1
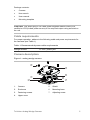
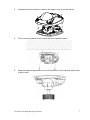
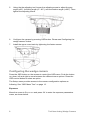
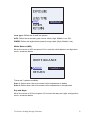
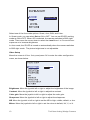
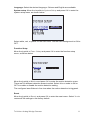
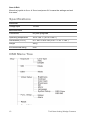
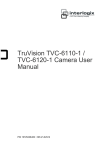
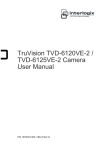
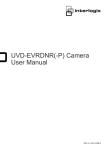
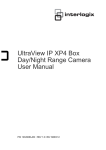
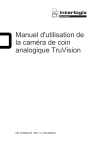
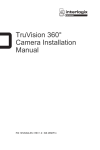
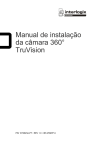
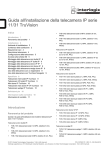
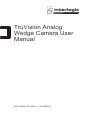
TruVision Analog Wedge Camera User Manual P/N 1072656A-EN • REV 1.0 • ISS 25SEP13 Copyright © 2013 UTC Fire & Security Americas Corporation, Inc. Interlogix is part of UTC Climate Controls & Security, a unit of United Technologies Corporation. All rights reserved. Trademarks and patents Manufacturer The TruVision name and logo are trademarks of United Technologies. Other trade names used in this document may be trademarks or registered trademarks of the manufacturers or vendors of the respective products. UTC Fire & Security Americas Corporation, Inc. 2955 Red Hill Avenue, Costa Mesa, CA 92626-5923, USA Authorized EU manufacturing representative: UTC Fire & Security B.V. Kelvinstraat 7, 6003 DH Weert, The Netherlands Certification FCC compliance N4131 Class B: This equipment has been tested and found to comply with the limits for a Class B digital device, pursuant to part 15 of the FCC Rules. These limits are designed to provide reasonable protection against harmful interference in a residential installation. This equipment generates, uses, and can radiate radio frequency energy and, if not installed and used in accordance with the instructions, may cause harmful interference to radio communications. There is no guarantee that interference will not occur in a particular installation. If this equipment does cause harmful interference to radio or television reception, which can be determined by turning the equipment off and on, the user is encouraged to try to correct the interference by one or more of the following measures: • ACMA compliance Canada Reorient or relocate the receiving antenna. • Increase the separation between the equipment and receiver. • Connect the equipment into an outlet on a circuit different from that to which the receiver is connected. • Consult the dealer or an experienced radio/TV technician for help. Notice! This is a Class A product. In a domestic environment this product may cause radio interference in which case the user may be required to take adequate measures. This Class A digital apparatus complies with Canadian ICES-003. Cet appareil numérique de la classe A est conforme à la norme NMB-0330 du Canada. European Union directives 12004/108/EC (EMC directive): Hereby, UTC Fire & Security declares that this device is in compliance with the essential requirements and other relevant provisions of Directive 2004/108/EC. 2002/96/EC (WEEE directive): Products marked with this symbol cannot be disposed of as unsorted municipal waste in the European Union. For proper recycling, return this product to your local supplier upon the purchase of equivalent new equipment, or dispose of it at designated collection points. For more information see: www.recyclethis.info. Contact information For contact information, see www.interlogix.com or www.utcfssecurityproducts.eu. Content Introduction 3 Product overview 3 Features 3 Installation 4 Installation environment 4 Package contents 4 Cable requirements 5 Camera description 5 Setting up the camera 6 Connecting the devices 6 Mounting the wedge camera 6 Configuring the wedge camera 8 Exposure 8 White Balance (WB) 9 Day and Night 9 Video Setup 10 Function Setup 11 Reset 11 Save & Exit 12 Specifications 12 OSD Menu Tree 12 Introduction Product overview This is the installation guide for TruVision analog wedge camera models: TVW-2101 TVW-4101 Features This section describes the camera features. Adopt high-performance sensor, 700TVL resolution, providing high definition and clear image IR cut filter realizes day/night surveillance TruVision Analog Wedge Camera 3 Auto-white balance with high color rendition Auto electronic shutter control to adapt to the different surveillance environments Auto gain control, adaptive brightness High SNR Environmental rating IP66 Installation This chapter provides information on how to install the cameras. Installation environment When installing your product, consider these factors: • Electrical: Install electrical wiring carefully. It should be done by qualified service personnel. Always use a 12 VDC UL listed Class 2 or CE certified power supply to power the camera, Do not overload the power cord or adapter. • Ventilation: Ensure that the location planned for the installation of the camera is well ventilated. • Temperature: Do not operate the camera beyond the specified temperature, humidity or power source ratings. The operating temperature of the camera is between -40 to +60°C. • Moisture: Do not expose the camera to rain or moisture, or try to operate it in wet areas. Turn the power off immediately if the camera is wet and ask a qualified service person for servicing. Moisture can damage the camera and also create the danger of electric shock. • Servicing: Do not attempt to service this camera yourself. Any attempt to dismantle or remove the covers from this product will invalidate the warranty and may also result in serious injury. Refer all servicing to qualified service personnel. • Cleaning: Do not touch the sensor modules with fingers. If cleaning is necessary, use a clean cloth with some ethanol and wipe the camera gently. If the camera will not be used for an extended period of time, put on the lens cap to protect the sensors from dirt. Package contents Check the package and contents for visible damage. If any components are damaged or missing, do not attempt to use the unit; contact the supplier immediately. If the unit is returned, it must be shipped back in its original packaging. 4 TruVision Analog Wedge Camera Package contents: Camera Hex wrench User manual Mounting template CAUTION: Use direct plug-in UL listed power supplies marked Class 2/CE certified or LPS (limited power source) of the required output rating as listed on the unit. Cable requirements For proper operation, adhere to the following cable and power requirements for the cameras (see Table 1). Table 1: Recommended power cable requirements Wedge camera: 12 VDC power jack Camera description Figure 1: analog wedge camera 3 4 1 2 1. 6 5 7 Camera 5. 2. Enclosure 6. Mounting base 3. Fastening screws 7. Adjusting screw 4. Upper cover TruVision Analog Wedge Camera Shield 5 Setting up the camera Note: If the light source where the camera is installed experiences rapid, widevariations in lighting, the camera may not operate as intended. To quickly put the dome camera into operation: 1. Prepare the mounting surface. 2. Connect the power cable and video cable to the camera. See “Connecting the devices” below. 3. Mount the camera to the ceiling using the appropriate fasteners. See “Mounting the wedge camera” below. 4. Set up the camera’s image parameters. See “Configuring the wedge camera” on page 8. Connecting the devices A qualified service person, complying with all applicable codes, should perform all required hardware installation. Figure 2: Connections on the base of the wedge cameras 2 1. Power supply Connect 12 VDC power supply. 2. 1 BNC port Connect to DVR or monitors. Mounting the wedge camera 1. 6 Use the supplied template to mark out the mounting area. Drill the screw holes on the ceiling. TruVision Analog Wedge Camera 2. Loosen the fasten screws to remove the upper cover from the device. 3. Fix the mounting base to the ceiling with the supplied screws. 4. Align the supplied adjusting tool to the small hole on the camera, and push it to get it fixed. TruVision Analog Wedge Camera 7 5. Using the the adjusting tool, loosen the adjusting screw to adjust the pan angle (±30°), the tilting angle (0°~ 85°), and the rotation angle (±180°). Then tighten the adjusting screw. 6. Configure the camera by pressing OSD button. Please see“Configuring the wedge camera” below. 7. Install the upper cover back by tightening the fasten screws. Configuring the wedge camera Press the OSD button on the camera to control the OSD menu. Push the button up, down, left and right to move between the different menu options. Press the OSD control button to select an option. The Setup menu provides access to the camera configuration options as following. See “OSD Menu Tree” on page 12. Exposure Move the cursor to Exposure and press OK to enter the exposure parameters menu, as shown below. 8 TruVision Analog Wedge Camera Lens type: Define the fix and iris options. AGC: Define the automatic gain control value (High, Middle, Low, Off). DWDR: Define the digital wide dynamic range value (High, Middle, Low). White Balance (WB) Move the cursor to WB and press OK to enter the white balance configuration menu, as shown below. WHITE BALANCE A UT O 1 MODE RETURN There are 2 options available: Auto 1: Select when the environment color temperature is stable. Auto 2: Select when the environment color temperature is complicated. Day and Night Move the cursor to D&N and press OK to enter the day and night configuration menu, as shown below. TruVision Analog Wedge Camera 9 Select one of the four mode options: Smart, Auto, B/W, and Color. In Smart mode, you can select Set as ON or OFF. You can set IR LED working mode as ON or OFF. When Off is selected, the camera switches to B/W night mode. Then move the cursor down to select the Level from 1 to 5 to avoid overexposure or to increase brightness. In Auto mode, the IR LED is turned on automatically when the camera switches to B/W night mode. The picture brightness is not adjustable. Video Setup Move the cursor to Video Setup and press OK to enter the video configuration menu, as shown below. Brightness: Move the joystick left or right to adjust the brightness of the image. Contrast: Move the joystick to left or right to adjust the contrast. Color gain: Move the joystick to left or right to adjust the color gain. Sharpness: Move the joystick to left or right to adjust the sharpness. NR: Move the joystick to left or right to set the NR to high, middle, default, or low. Mirror: Move the joystick to left or right to set the mirror to default, HV, V, or H. 10 TruVision Analog Wedge Camera Language: Select the desired language. Chinese and English are available. System setup: Move the Joystick to System Setup and press OK to enter the system setup menu, as shown below. Select white, red, or yellow for the OSD color. Set the OSD background to ON or OFF. Function Setup Move the joystick to Func. Setup and press OK to enter the function setup menu, as shown below. Move the joystick to Motion and press OK to enter the motion detection menu. There are five different detection areas to select. Select Alarm mode to ON or OFF to enable or disable the motion detection setting. The configured area flickers in live view when the motion detection is triggered. Reset Move the joystick to Reset, and press OK to enter the reset menu. Select Yes to restore all the settings to the factory default. TruVision Analog Wedge Camera 11 Save & Exit Move the joystick to Save & Reset and press OK to save the settings and exit the menu. Specifications Electrical Voltage input 12 VDC Miscellaneous Connectors DC jack flying lead Operating temperature -40 to +60 °C (-40 to +140°F) Dimensions (D × H) 97 × 46.6 × 99.5 mm (3.82” × 1.83” × 3.92”) Weight 300 g Environmental rating IP66 OSD Menu Tree 12 TruVision Analog Wedge Camera