1
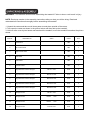
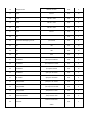
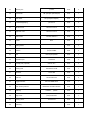
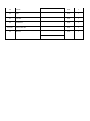
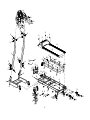
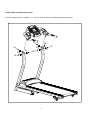
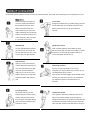
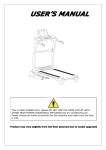
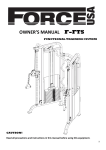
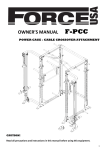
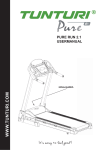
USER’S MANUAL
WARING:
If the supply cord is damaged, it must be replaced by the manufacturer, its service agent or similarly qualified
persons in order to avoid a bazard. This appliance is not intended for use by persons (including children) with
reduces physical, sensory or mental capabilities, or lack of experience and know ledge, unless they have been
given supervision or instruction concerning use of the appliance by a person responsible for their safety. children
should be supervised to ensure that they du not play with the appliance.
IMPORTANT: Read all instructions and warnings before using the treadmill
IMPORTANT VOLTAGE INFORMATION!
Before inserting the power cord into an electrical outlet, verify the voltage requirements for your area match the
voltage of the treadmill that you have received. The power requirements for this treadmill include a grounded
dedicated circuit, rated for one of the following: 115VAC +-%, 60Hz and 200amps; 208/220 VAC, 60Hz,15amps
or 230 VAC +-5%, 50Hz and 10amps. Check with your dealer for the exact voltage requirements of your treadmill.
Use of the wrong voltage will damage the treadmill.
WARNING! : Do not attempt to use the treadmill with a voltage adaptor.
Do not attempt to use the treadmill with an extension cord.
GROUNDING
INSTRUCTIONS
This treadmill must be grounded. If it should malfunction or break down, grounding provides a patch of least
resistance for electric current to reduce the risk of electric shock. This product is equipped with a cord having an
equipment-grounding conductor and a grounding plug. The plug must be put into an appropriate outlet that is
properly installed and grounded in accordance with all local codes and ordinances.
DANGER!
Improper connection of the equipment-grounding conductor can result in a risk of electric shock.
Check with a qualified electrician or service provider if you are in doubt as to whether the treadmill is
properly grounded.
CONSULT A DOCTOR IMMEDIATELY
Warning: before starting any exercise program consult your Doctor. This is especially important for
individuals over the age of 35 or persons with pre-existing health problems. Read all instructions before
using any fitness equipment. We take no responsibility for personal injury damage sustained by or through
the use of this treadmill.
1
IMPORTANT SAFETY INSTRUCTIONS
– Obtain a medical exam before beginning any exercise program.
– Keep children and pets away from the treadmill. Teenagers and disabled persons must be supervised while
using the treadmill.
– Stop exercising if you feel faint, dizzy, or experience pain at any time while exercising and consult your Doctor.
– Clip the SAFETY KEY onto your clothing and carefully test it prior to using the treadmill.
– Disconnect all power before servicing the treadmill.
– Connect the treadmill to a properly grounded outlet only.
– Do not operate electrically powered treadmill in damp or wet locations.
– Remove the SAFETY KEY when not in use.
– Inspect the treadmill for worn or loose components before each use.
– Do not operate the treadmill if:
– 1. The power cord is damaged.
– 2. The treadmill is not working properly
_
3. The treadmill has been dropped or damaged.
– Do not use the treadmill outdoors.
– Read and understand this owner's manual completely before using the treadmill.
– Read and understand all warnings posted on the treadmill and in this owner's manual.
– Do not wear loose or dangling clothing while using the treadmill.
– Always wear proper footwear on or around exercise equipment.
– Set up and operate the treadmill on a solid, level surface. Do not operate in recessed areas or on plush carpet.
– Provide the following clearances: 100cm at each side, 200cm at the back and enough room for safe access and
passage at the front of the treadmill.
– Do not modify the treadmill in any way.
TARGET HEART RATE ZONE
You do not want to workout at your maximum heart rate.
The recommended Heart Rate Zone is a percentage of
your maximum heart rate. It is between 60% and 75% of
your maximum heart rate.
Lower limit of Target Heart Rate Zone = Maximum Heart
Rate X 0.6
Upper limit of Target Heart Rate Zone
= Maximum Heart Rate X 0.75
(This is recommended by American Heart Association.
Before starting exercise program, please consult your
Doctor to understand your physical condition & situation)
2
Target Heart Rate Zone
220 - your age = Maximum Heart Zone
HOW OFTEN SHOULD YOU EXERCISE?
You should exercise three to four times a week to improve your cardiovascular and muscle fitness.
HOW AND HOW HARD SHOULD YOU EXERCISE?
Intensity of exercise is reflected in your heart rate. Exercise must be sufficiently rigorous to strengthen your
heart muscle and condition your cardiovascular system. Only your doctor can prescribe the target training
heart range for you. Before starting any exercise program consult your Doctor.
HOW LONG SHOULD YOU EXERCISE?
Sustained exercise conditions your heart, lungs and muscles. The longer you are able to sustain exercise
within your target heart range, the greater the aerobic benefits. To begin maintain 2~3 minutes of steady,
rhythmic exercise, then check your heart rate.
BEGINNER TREADMILL PROGRAM
EXERTION LEVEL
WEEK 1
WEEK 2
WEEK 3
WEEK 4
WEEK 5
WEEK 6
WEEK 7
Easy
Easy
Moderate
Moderate
Moderate
Slightly higher or slightly lower
Add interval training
DURATION
10~16 minutes
14~20 minutes
18~24 minutes
22~28 minutes
20 minutes
3 minutes at moderate exertion with
3 minutes at higher exertion for
24 minutes
WARNING! : Use extreme caution when assembling the treadmill. Failure to do so could result in injury
NOTE: Each step number in the assembly instructions tells you what you will be doing. Read and
understand all instructions thoroughly before assembling the treadmill.
1. Unpack the carton and take out all loose parts etc and place outside of the carton.
2. Tear open the carton as shown in the picture below and then fold up the treadmill.
3. Hold on roller cover by two hands and lean back the treadmill, move the treadmill forward as the picture
shows.
Item No.
DESCRIPION
SPEC
UNITS
QTY
1
Base Frame
SET
1
2
Left console mast
SET
1
3
Right console mast
SET
1
4
Main frame
SET
1
5
Motor frame
SET
1
6
Console Frame
SET
1
7
Large flat head screws Hexagon
PCS
6
8
Large flat head screws Hexagon
M8*30 15 UCP
PCS
3
9
Large flat head screws Hexagon
M8*42 28 UCP
PCS
1
10
Large flat head screws Hexagon
M8*50 20 UCP
PCS
2
11
Large flat head screws Hexagon
M8*60 20 UCP
PCS
4
12
Hexagon screw
PCS
1
13
Hexagon screw
M8*80
UCP
PCS
2
14
Hexagon screw
M8*20
UCP
PCS
1
15
Hexagon screw
PCS
4
M8*15
M8*65
UCP
UCP
M10*25 UCP
16
Hexagon screw
M10*65 20 UCP
PCS
2
17
screw
M4*12
PCS
10
18
screw
M6*25
UCP
PCS
2
19
screw
M6*40
UCP
PCS
2
20
screw
M6*45
UCP
PCS
4
21
screw
PCS
2
22
Bar
PCS
1
23
Cross head self-tapping screws
∮4*15 UCP
PCS
6
24
Nut
M8
PCS
10
25
Nut
M6
PCS
10
26
Nut
M10
PCS
4
27
Flat Washer
φ9.8*φ4.2*T0.8UCP
PCS
6
28
Flat Washer
φ12.5*φ6.6*T1.6UCP
PCS
8
29
Flat Washer
φ17*φ9*T1.6UCP
PCS
13
30
Flat Washer
φ21*φ11*T2.0UCP
PCS
4
31
Slip washer
φ15*φ8.4*T0.8UCP
PCS
9
32
Spring Washer
∮9.2*∮5.1*T1.3 UCP
PCS
6
33
Spring Washer
∮12.2*∮6.1*T1.5 UCP
PCS
8
34
Spring Washer
∮16*∮8.5*T1.5 UCP
PCS
2
35
Plastic Flat Washers
∮20*∮10*T2.0 UCP
PCS
4
PCS
1
M5*15
QDY22*10-650*28036
Air Shock
40KG
37
ball lock pins
∮10*50
PCS
2
38
Front Roller
HR φ96*φ46*φ39*490(535)
PCS
1
39
Rear Roller
HR φ46*φ39*450(520)
PCS
1
40
Socketheadpipeplug
∮28.6*T1.5
PCS
2
41
Left end cover
92*104*117*T3.0
PCS
1
42
Right end cover
92*104*117*T3.0
PCS
1
43
Motor Cover
110*340*568*T3.0
PCS
1
44
Buckle
6R-2
PCS
1
45
Moving wheel
PCS
2
46
Cushion
∮9*∮30*T20BK
PCS
4
47
Pad
M8*15*∮40*∮50 BK
PCS
4
48
Adjustable pad
145*65*38
PCS
2
49
Anti Slip pad(optional)
500*75*T1.4
PCS
2
50
Running belt
390*2500*T1.6 BK
PCS
1
51
Drive belt
190J*6 BK
PCS
1
52
Side rein
25*78*1085*T2.0
PCS
2
53
Toggle Switches
RF-1004-NBR4.W1A
PCS
1
54
Over current protector
RFMB-083-11C3N-R-D 220V
PCS
1
55
Safe Key
L800mm; ∮28mm
PCS
1
56
Ring Cores
∮28*∮18*H13mm
PCS
1
57
Running deck
1100*544*15
PCS
1
58
Side fixing
PCS
1
59
Console
PCS
1
60
Motor
PCS
1
61
Controller
PCS
1
62
ransforTmer
PCS
1
Connect wire Set
PCS
1
adhesive
PCS
1
63,64,65
66
48
9
59
23
10
31
18
10
31
18
18
31
10
31
36
60
36
60
50
23
10
59
57
37
18
10
46
3
46
2
10
10
49
10
10
10
58
31
31
10
13
21
31
50
51
31
10
18
10
32
27
16
54
15
47
19
5
44
21
19
21
21
18
32
27
53
18 18
21
29 31
20
55
56 18
19
18
20
33
28
19
32 27
8
19
62
19
29
61
16
41
24
42
40
1
4
45 52
7
24
24
40
26
30
17
26
30 11
29 25
34
24
24
24
12
17
24
25
29
35
43
6
12
35
38
6
29
29
43
39
31
22
31 29
14
14 22
50
10
10
31
10
10
10
31
10
31
50
51
10
ASSEMBLY INSTRUCTION
●STEP ONE: Assemble the posts
First, connect the cable (64) with (65) in the right post(3),
Second, lift the side posts and place them in correspondence to the pre-drilled holes on the base frame;
use the supplied screws(11) and washers (24) and (29) to fix the side post to the base frame.
7
●STEP TWO: Assemble the post bar
Use the supplied screw(8 washer(7)and nut 24 to fix the air shock(36) with the based frame
10
10
50
10
31
31
31
31
10
10
8
●STEP THREE: Assemble the console.
1. Connect the connecting cables (64) with console (63)
2. Use the supplied screw(7)and washer(31)to fix the console with the side posts.
ONE
FUNCTION INSTRUCTION
1.1 There are fifty built-in default automatic mode P1-P50 in computer, 30 minutes for every mode;
1.2 There are two user self-programming mode of computer, two minutes every section, it’s 30 minutes in total.
1.3 Set the countdown time, countdown distance, countdown calories mode;
1.4 Running speed: 1.0-12KM/H
1.5 Manual incline: 3 level
1.6 8 operation key ,there are 4 short cut key on the console;
1.7 Handle pulse function, the inspection range: 40—190;
TWO: BUTTON OPERATION INSTRUCTION
2.1 “SELECT”: select button at at the stopping state, select program mode
2.2 “START/STOP”: RUNNING, STOP button, at the readiness state, turn on the treadmill; at the running state,
suspend the treadmill, and preserve the data;
2.4 SPEED”+”: speed + button, at the running state, press it will be add 0.1KM/H every time ,press it for a long
time ,it will add the speed constantly ,at the stop state, select the work program ;
2.5 SPEED”-“: speed – button, at the running state, press it will decrease 0.1KM/H every time, press it for a long
time, it will decrease the speed constantly, at the stop state, select the work program ;.
9
2.6 “QUICK SPEED”:4 speed short cut button ,at the running state ,choose the corresponding speed 2,5,8,12.
THREE: SELF-SETTING MODE OPERATION
INSTRUCTION
3.1 when you select manual mode, you can set countdown time mode, countdown distance setting mode,
countdown calories. At the other mode,you can set countdown time mode,.
3.2 Countdown training choice way: at the stop state, press “SELECT” button, enter the countdown time
setting mode; then press “SELECT” button again ,enter the countdown distance setting mode ; last press
“SELECT “ the third time ,it will enter the countdown time mode again, in turn circularly
3.3 Countdown time training mode: at the stopping state ,press “SELECT” button ,enter setting state ,the time
window display flash, default display 30:00, press SPEED+,- button amend the setting value .The setting
range:10—99 minutes .Press “START” button and startup the treadmill. when the countdown time is
00:00 ,the treadmill stop running automatically .
3.4 Countdown distance training mode: at the stopping state ,press “SELECT” button ,enter setting state, the
distance window flash display , default display 5.0KM ,press SPEED+,-button and amend setting
value ,setting range: 1.0—99.0KM. Press “START” button to startup treadmill ,as the speed 0.8KM/H to
start to run, press SPEED+<- to adjust the speed .When countdown distance is 0.0 ,treadmill stop running
automatically.
3.5 Countdown calories training mode: at the stopping state , press “SELECT” button for three times ,enter the
setting state ,the calories window display flash ,default display 50CAL, press SPEED+,-button to amend
setting value ,setting range:10—990CAL. Press “START/STOP” button to startup treadmill ,as the speed
0.8KN/H to start to run, press the SPEED+,- to adjust speed. When Countdown calories is 0,treadmill will
stop running automatically.
BELT ADJUSTMENT
You may need to adjust the running belt during the first few weeks of use. All running belts are properly set
at the factory. It may stretch or be off-centre after use. Stretching is normal during the break-in period.
ADJUSTING THE BELT TENSION
If the running belt feels as though it is "slipping" or hesitating when you plant your foot during a run, the
tension on the running belt may have to be increased.
TO INCREASE THE RUNNING BELT TENSION:
A. Place 8MM wrench on the left belt tension bolt. Turn the wrench clockwise 1/4 turn to draw the rear roller
and increase the belt tension.
B. Repeat STEP A for the right belt tension bolt. You must be sure to turn both bolts the same number of
turns, so the rear roller will stay square relative to the frame.
C. Repeat STEP A and STEP B until the slipping is eliminated.
D. Be careful not to tighten the running belt tension too much as you can create excessive pressure on the
front and rear roller bearings. An excessively tightened running belt may damage the roller bearings that
would result in bearing noise from the front and rear rollers.
TO DECREASE THE TENSION ON THE RUNNING BELT, TURN BOTH BOLTS
COUNTER-CLOCKWISE THE SAME NUMBER OF TURNS.
CENTERING THE RUNNING BELT
10
When you run, you may push off harder with one foot than with another. The severity of the deflection
depends on the amount of force that one foot exerts in the relation to the other. This deflection can cause
the belt to move off-centre. This deflection is normal and the running belt will centre when no body is on the
running belt. If the running belt remains consistently off-centre, you will need to centre the running belt
manually.
A). Start the treadmill without anyone on the running belt, press (SPEED UP) bottom until speed reached
6kph.
B). Observe whether the running belt is toward the right or left side of the deck.
a. If toward the left side of the deck
Using wrench, turn the left adjustment bolt clockwise 1/4 turn and the right adjustment bolt counterclockwise
1/4.
b. If toward the right side of the deck
Using wrench, turn the right adjustment bolt clockwise 1/4 turn and the left adjustment bolt counterclockwise
1/4.
c. If the belt is still not at centre, repeat the above steps until the running belt is on centre.
C). After the belt is centered, increase the speed to 16kph (or highest speed) and verify that it is running
smoothly. Repeat the above steps if it is necessary.
If the above procedure is unsuccessful in resolving the off-centre, you may need to increase the belt
tension.
WARNING!: To prevent electrical shock, be certain the treadmill is turned off and unplugged before cleaning or routine
maintenance.
RUNNING BELT AND RUNNING DECK LUBRICATION
For maximum treadmill life, this treadmill needs a routine lubrication as part of a general maintenance for the machine. The routine
maintenance procedure will prevent premature wear of the running belt, running deck and drive motor system. The recommended
lubrication schedule as:
11
This schedule is the recommended application for a single user, up to 20~30 minutes per time. It should be 3~4 times per week. For
lubrication, you can contact your dealer.
CLEANING
Perspiration should be wiped from the console and treadmill surface after your workout.
You should wipe down your treadmill once a week with a water dampened, soft cloth. Be careful not get excessive moisture on the
display panel as this might cause an electrical hazard or electronics to fail.
STORAGE
Store your treadmill in a clean and dry environment. Ensure the master power switch is off and is un-unplugged from the electrical
wall outlet.
MOVING
This treadmill has been designed and equipped with wheels for easy mobility. Before moving, ensure the master power switch is in
the off position and the power cord is unplugged from the electrical outlet.
FOR CONSUMER/HOME USE ONLY!!
This treadmill is designed for home use only. Do not use for light institutional or commercial.
LUBRICATION
It is important to take good care of your treadmill deck (the walking surface underneath the belt).A good silicone lubrication will also
improve the performance of your treadmill.
NOTE: Use the silicone that is supplied with the treadmill. Additional silicone lubricant can be purchased from your retail store.
WARNING: STOP the treadmill and remove the safety key before lubricating the running deck.
HOW TO SPRAY SILICONE ON DECK?
A). Find the silicone bottle. It is located in the hardware kit package included with this treadmill.
B). Find a straw and put it onto the silicone bottle as the drawing shows.
C). Spray silicone evenly on treadmill deck as the drawing shows. (ATTENTION: The treadmill MUST
BE STOPPED before applying the silicone lubricant. This is to prevent injury, otherwise the edge of the running belt may cut you or
your fingers could be crushed by the rollers. )
Do not put too much silicone on the deck. Excessive lubricant may cause slippage of the belt on the rollers.
HOW TO SPRAY SILICONE ON DECK?
1. Speed error signal: “OVER SPEED”
Solution: 1). Adjust the position of speed sensor wire
2) Replace the speed sensor wire
2. The safety key is not connected: “SAFETY KEY OFF”
Solution: 1)Adjust the position of the safety key.
2) Replace the switching line of safety key.
12
A successful exercise program consists of a warm up, aerobic exercise, and a cool down. Warming up is an important part of your:
Head rolls
Rotate your head to the right for
Toe touches
one count, feeling the stretch up
Slowly bend forward from your waist, letting your back
the left side of your neck. Next
and shoulder relax as you stretch toward your toes.
rotate your head back for one
Reach down as far as you can and hold for 15
count, stretching your chin to the
seconds.
ceiling and letting your mouth open.
Rotate your head to the left for one
count, and finally, drop your head
to your chest for one count.
Shoulder lifts
Quadriceps stretch
Lift your right shoulder up toward
With one hand against a wall for balance, reach
your ear for one count. Then lift
behind you and pull your right foot up. Bring your heel
your left shoulder up for one count
as close to your buttocks as possible. Hold for 15
as you lower your right shoulder.
counts and repeat with left foot up.
Side stretches
Open your arms to the side and
continue lifting them until they are
Hamstring stretches
over your head. Reach your right
Sit with your right leg straight in front of you.
arm as far upward toward the
Straighten your leg out while trying to hold on to your
ceiling as you can for one count.
outstretched leg with your hand.
Feel the stretch up your right side.
Start up with your back straight. Slowly exhale and try
Repeat this action with your left
to bring your chest to the knee of your outstretched
arm.
leg. Hold, then repeat on the other side for 15
seconds.
Inner thigh stretch
Sit with the soles of your feet
Calf/achilles stretch
together with your knees pointing
Lean against a wall with your left leg in front of the
outward. Pull your feet as close
right and your arms forward. Keep your right leg
into your groin as possible. Gently
straight and the left foot on the floor; then bend the left
push your knees toward the floor.
leg and lean forward by moving your hips toward the
Hold for 15 counts.
wall. Hold, then repeat on the other side for 15 secon