1
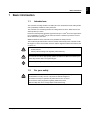
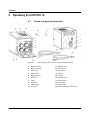
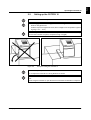
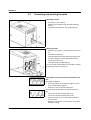
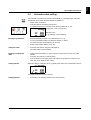
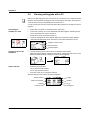
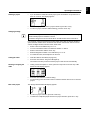
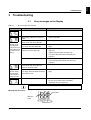
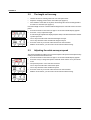
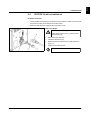
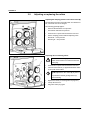
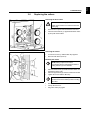
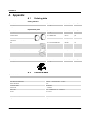
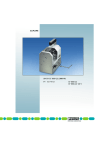
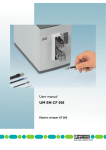
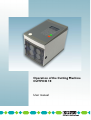
Operation of the Cutting Machine CUTFOX 10 User manual User manual Operation of the Cutting Machine CUTFOX 10 2013-04-22 Designation: UM EN CUTFOX 10 Revision: 01 Order No.: — This user manual is valid for: Designation From this Serial No. onwards Order No. CUTFOX 10 231000 1206829 PHOENIX CONTACT 102786_en_01 Please observe the following notes Please observe the following notes User group of this manual The use of products described in this manual is oriented exclusively to qualified electricians or persons instructed by them, who are familiar with applicable standards and other regulations regarding electrical engineering and, in particular, the relevant safety concepts. Explanation of symbols used and signal words This is the safety alert symbol. It is used to alert you to potential personal injury hazards. Obey all safety measures that follow this symbol to avoid possible injury or death. There are three different categories of personal injury that are indicated with a signal word. DANGER This indicates a hazardous situation which, if not avoided, will result in death or serious injury. WARNING This indicates a hazardous situation which, if not avoided, could result in death or serious injury. CAUTION This indicates a hazardous situation which, if not avoided, could result in minor or moderate injury. This symbol together with the signal word NOTE and the accompanying text alert the reader to a situation which may cause damage or malfunction to the device, hardware/software, or surrounding property. This symbol and the accompanying text provide the reader with additional information or refer to detailed sources of information. How to contact us Internet Up-to-date information on Phoenix Contact products and our Terms and Conditions can be found on the Internet at: www.phoenixcontact.com Make sure you always use the latest documentation. It can be downloaded at: www.phoenixcontact.net/products Subsidiaries If there are any problems that cannot be solved using the documentation, please contact your Phoenix Contact subsidiary. Subsidiary contact information is available at www.phoenixcontact.com. Published by PHOENIX CONTACT GmbH & Co. KG Flachsmarktstraße 8 32825 Blomberg GERMANY Should you have any suggestions or recommendations for improvement of the contents and layout of our manuals, please send your comments to: [email protected] PHOENIX CONTACT General terms and conditions of use for technical documentation Phoenix Contact reserves the right to alter, correct, and/or improve the technical documentation and the products described in the technical documentation at its own discretion and without giving prior notice, insofar as this is reasonable for the user. The same applies to any technical changes that serve the purpose of technical progress. The receipt of technical documentation (in particular user documentation) does not constitute any further duty on the part of Phoenix Contact to furnish information on modifications to products and/or technical documentation. You are responsible to verify the suitability and intended use of the products in your specific application, in particular with regard to observing the applicable standards and regulations. All information made available in the technical data is supplied without any accompanying guarantee, whether expressly mentioned, implied or tacitly assumed. In general, the provisions of the current standard Terms and Conditions of Phoenix Contact apply exclusively, in particular as concerns any warranty liability. This manual, including all illustrations contained herein, is copyright protected. Any changes to the contents or the publication of extracts of this document is prohibited. Phoenix Contact reserves the right to register its own intellectual property rights for the product identifications of Phoenix Contact products that are used here. Registration of such intellectual property rights by third parties is prohibited. Other product identifications may be afforded legal protection, even where they may not be indicated as such. PHOENIX CONTACT CUTFOX 10 Table of contents 1 2 3 A i Basic information ....................................................................................................................1-1 1.1 Intended use....................................................................................................... 1-1 1.2 For your safety.................................................................................................... 1-1 Operating the CUTFOX 10 ......................................................................................................2-1 2.1 Scope of supply and overview ............................................................................ 2-1 2.2 Setting up the CUTFOX 10 .............................................................................. 2-2 2.3 Connecting and inserting the cable .................................................................... 2-3 2.4 Automatic cable cutting ...................................................................................... 2-4 2.5 Planning cutting jobs with a PC........................................................................... 2-5 2.6 Manual cable cutting........................................................................................... 2-7 2.7 Exiting from cutting ............................................................................................. 2-7 Troubleshooting ......................................................................................................................3-1 3.1 Error messages on the Display........................................................................... 3-1 3.2 The length cut is wrong....................................................................................... 3-2 3.3 Adjusting the cable conveyor speed ................................................................... 3-2 3.4 CUTFOX 10 will not switch on ............................................................................ 3-3 3.5 Adjusting or replacing the rollers ........................................................................ 3-4 3.6 Replacing the cutters ......................................................................................... 3-5 Appendix ................................................................................................................................ A-1 PHOENIX CONTACT A1 Ordering data .................................................................................................... A-1 A2 Technical data ................................................................................................... A-1 A3 Declaration of conformity................................................................................... A-2 102786_en_01 1 Basic information 1.1 Intended use The CUTFOX 10 cutting machine cuts cables, litz wires, shrink sleeves and similar profiles and is particularly suitable for series production. The CUTFOX 10 is exclusively intended for cutting cables, litz wires, shrink sleeves and similar profiles up to 8 mm. Please note that only finely stranded copper litz wires up to 10 mm2 and solid copper cables up to a maximum of 2.5 mm2 may be used. Steel wires or similar may never be used, as these would destroy the cutter. Willful modifications to the CUTFOX 10 are prohibited for safety reasons. The required length and number of wires is entered either directly in the CUTFOX 10 with the keypad or can be documented on the PC with the supplied software and loaded to the CUTFOX 10. WARNING: The CUTFOX 10 may only be used – as intended and – when in perfect working order regarding safe functioning. WARNING: All persons responsible for commissioning, operating and maintenance of the CUTFOX 10 must be appropriately qualified and have read this user manual. In particular, they must be able to recognize dangers. NOTE: Only use original replacement parts from Phoenix Contact. 1.2 For your safety WARNING: The front door is installed for the safety of the operator. It is prohibited in all circumstances to modify, remove or by means of alterations bypass it. The CUTFOX 10 may be operated only when the front door is closed. Disconnect the mains plug before beginning maintenance work. Make sure that there are no foreign objects inside the housing. 102786_en_01 PHOENIX CONTACT 1-1 English Basic information CUTFOX 10 2 Operating the CUTFOX 10 2.1 Scope of supply and overview Figure 2-1 1 RS-232 interface 11 Metering roller 2 Mains connection 12 Insertion slot 3 Mains fuses 13 Door opener 4 Mains switch 14 Display 5 Adjusting screw 15 Key pad 6 Drive rolls 16 Allen key, size 3 7 Cutter 17 Removal hook 8 Outlet slot 18 Power cable 9 Cable routing 19 RS-232 cable 10 Front door 2-1 PHOENIX CONTACT Scope of delivery and overview of the operating components Not pictured: CD-ROM, user manual 102786_en_01 2.2 Setting up the CUTFOX 10 NOTE: The device must be set up on a level and horizontal surface. NOTE: During operation and storage, avoid the following: – humid or dusty places and – locations exposed to high levels of heat, direct sunlight or low temperatures (operating range: 15°C ... 35°C). NOTE: Set up the CUTFOX 10 so that it cannot slip from its work surface. Use a non-slip mat or fix the CUTFOX 10 in place, as depicted in Fig. 2-2 (right). Figure 2-2 Example for fixing the CUTFOX 10 NOTE: Do not spill liquids on the CUTFOX 10. Do not expose the CUTFOX 10 to strong vibrations or shocks. NOTE: If the machine is moved from a cold location to a warm location, condensation can form. Before using the CUTFOX 10, open the front door and allow condensation to evaporate. 102786_en_01 PHOENIX CONTACT 2-2 English Operating the CUTFOX 10 CUTFOX 10 2.3 Connecting and inserting the cable Connecting to mains • • Connect the power cable (2). Switch on the CUTFOX 10 with the mains switch (3) (press I). The display (4) and the red "stop" LED (5) light up. Inserting the cable • • • Press the door opener (1) and fold down the front door (2). The rollers are raised (3). Insert the cable between the rollers and pull it through the cable routing and out through the outlet slot (4). Fold up the front door (6). The rollers clamp the cable firmly (5). If you cut very soft or hard material, it is advisable to change the clamping pressure (see page 3-4). Adjusting the measuring unit between millimeter and inch The default is millimeter. • Press and hold the "mode" button for approx. six seconds, until this display appears. • Press the "4" key for mm/inch adjustment. The measuring unit currently in use is framed (here, it is mm). • The "2" key sets the measuring unit to mm. The "8" key sets the measuring unit to inch. • Press the "enter" key to save the value and return to mode selection. With the "mode" button, you can return to mode selection without saving. 2-3 PHOENIX CONTACT 102786_en_01 2.4 Automatic cable cutting The CUTFOX 10 cuts the amount entered automatically to a specified length. This is the default mode and is active when the machine is switched on. • Switch on the CUTFOX 10. • Insert the cable as described (see page 2-3). • To switch into this mode, press the "mode" button and then the "1" key. Length (mm or inch, see page 2-3) Number of cuts To go (Number of cuts remaining) Entering the parameters • • • • Enter the length and number of cuts with the keys "0" to "9". You can overwrite the values or delete them with the "C" button. For entries in inches, decimal places can be used. Switch to the next line with the "enter" key. Cutting the cable • Press the "start" button. The green LED lights up. The cable is then cut automatically. Pausing or stopping the cable • Cutting can be interrupted. To do this, press the "stop" button. The red "stop" LED flashes. Press the "start" button to continue cutting. If you would like to stop cutting, press and hold the "stop" button for at least two seconds. The To go display is set to "0000". • • Cutting finished When the cutting is completed, the To go display reads "0000" and a checkmark is shown. The length and number can be re-entered. Changing modes 102786_en_01 • Press the "mode" button to switch back to mode selection. PHOENIX CONTACT 2-4 English Operating the CUTFOX 10 CUTFOX 10 2.5 Planning cutting jobs with a PC Data records with cutting jobs can be created at a PC. The data records contain information about the desired number and length as well as a description of the cable. These data records are then processed sequentially from the CUTFOX 10. You can store and process up to 20 projects (lists) with a maximum of 100 data records (cutting jobs). Connecting the CUTFOX 10 to a PC • • • • • Switch off the CUTFOX 10 and the PC before connecting. Connect the CUTFOX 10 to a PC with the RS-232 cable supplied. The RS-232 interface is on the back side of the CUTFOX 10. Switch the CUTFOX 10 and the PC back on. Create the cutting jobs at the PC with the help of the CUTSOFT software supplied. Switch into the appropriate mode. Press the "mode" button and then the "2" key. Number of data records Project number Text description Loading a project to the CUTFOX 10 • Load the desired project to the CUTFOX 10 with help of the software. While the project is being loaded to the CUTFOX 10, a display appears on the screen. When it is finished loading, a display for project selection appears. Project selection • Select the project number. The "2" key lowers this number. The "8" key raises this number. Press the "enter" key to confirm the selection. • Then the settings for the selected project are displayed. Project number Data record number Number of data records 2-5 PHOENIX CONTACT Length Number To go Text description 102786_en_01 Deleting a project • If you would like to delete the current project, press and hold the "stop" button for at least two seconds. This display appears. • • To delete the project and return to project selection, press the "2" key. To return to project selection without deleting, press the "enter" key. Changing settings The values for length and number shown in project selection can be edited. The changes remain until the project is switched or closed. Permanent changes have to be made at the PC and then loaded to the CUTFOX 10. If, for example, a data record has been created where more cable is cut than actually required, then the number can be decreased here. But the next time this data record is accessed, the higher number, which is saved, will be used. • Select a data record with the keys "0" to "9". • You can overwrite the values or delete them with the "C" button. • Switch to the next line with the "enter" key. • Enter the length and number of cuts with the keys "0" to "9". • For entries in inches, decimal places can be used. Cutting the cable • • Insert the cable as described (see page 2-3). Press the "start" button. The green LED lights up. The CUTFOX 10 then processes all of the project's data records automatically. Pausing or stopping the cable • Cutting can be interrupted. To do this, press the "stop" button. The red "stop" LED flashes and this display appears. • • Press the "start" button to continue cutting. To stop cutting, press the "mode" button to switch to another data record or close the project. End of the project The cutting is finished when this display appears. • • 102786_en_01 To return to project selection, press the "enter" key. To delete the completed project and return to project selection, press the "C" key. PHOENIX CONTACT 2-6 English Operating the CUTFOX 10 CUTFOX 10 2.6 Manual cable cutting The cable can be moved and cut using button commands. • Insert the cable as described (see page 2-3). • Switch on the CUTFOX 10. • To switch into this mode, press the "mode" button and then the "3" key. Length moved (mm or inch, see page 2-3) Cutting Cutting cable • • Press and hold the "6" key until the cable has been moved the desired length. Press the "2" key to cut the cable. Deleting the length • Press the "C" key to delete the set length. Changing modes • Press the "mode" button to switch back to mode selection. 2.7 • • 2-7 PHOENIX CONTACT Exiting from cutting When no more cable is to be cut, switch off the mains switch (press 0). Open the front door and remove the cable. 102786_en_01 3 Troubleshooting 3.1 Table 3-1 Error messages on the Display Error messages and remedies Display The error is triggered when the motor receives current but the metering rollers are not turning. The error is triggered when the motor current increases too fast. Cause Remedy Front door is open. • Close front door. The metering roller does not detect a cable. • Insert a new cable. While conveying the cable, it jammed or made a knot. The drive rollers slip. • Check if there is a jam or knot. The force required to unwind the cable is too large. The drive rollers slip. • Check if the force required to unwind the cable is too large. The rollers do not convey the cable properly. The drive rollers slip. • Adjust the clamping pressure of the drive rollers (see page 3-4). Replace the drive rollers (see page 3-4). Use drive rollers that suited to the cable (see page A-1). • • The metering roller slips past the cable. • • Check if the metering roller is worn. Use a metering roller that suits the cable (see page A-1). While conveying the cable, it jammed or made a knot. The drive rollers are locked or are about to lock. • Check if there is a jam or knot. The force required to unwind the cable is too large. The drive rollers are locked or are about to lock. • Check if the force required to unwind the cable is too large. Maximum cutting force exceeded • Check if the cable cross section is too large or if the cable is for some other reason not suitable. Switch the cutter (see page 3-5). • Press the "enter" key to delete the error message. Metering and drive rollers Drive rollers Metering roller 102786_en_01 PHOENIX CONTACT 3-1 English Troubleshooting CUTFOX 10 3.2 • • • The length cut is wrong Check if the drive or metering rollers are worn and replace them. Adjust the clamping pressure of the drive rollers (see page 3-4). If the insulation of the cable is very hard, the metering roller can be exchanged with a PU roller or a steel roller (see page 3-4). If the actual length cut is not consistent with the length set, the CUTFOX 10 has to be readjusted. • Press and hold the "mode" button for approx. six seconds until this display appears. • Press the "1" key to adjust the length. A value for length adjustment is displayed (here: 5659). This value indicates the number of pulses per meter. • The "2" key lowers this value and with it the length conveyed. The "8" key raises this value and with it the length conveyed. • Press the "enter" key to save the value and return to mode selection. With the "mode" button, you can return to mode selection without saving. 3.3 Adjusting the cable conveyor speed The speed with which the cable is moved can be adjusted. This speed can be adjusted separately for automatic and manual modes. • Press and hold the "mode" button for approx. six seconds until this display appears. • Press the "2" key to change the speed in automatic mode and the "3" key for manual mode. • The speed is preset to 100% and can be lowered. The "2" key lowers this value and thus the speed. The "8" key raises this value and thus the speed. • Press the "enter" key to save the value and return to mode selection. With the "mode" button, you can return to mode selection without saving. 3-2 PHOENIX CONTACT 102786_en_01 3.4 CUTFOX 10 will not switch on No mains connection • • Check whether the mains plug is connected to the CUTFOX 10 mains connection and the shock-proof plug is connected to the mains socket. Make sure that the power supply at the mains socket is OK. Mains fuse blown WARNING: Risk of injury Switch off the CUTFOX 10 (1) and disconnect the mains plug (2). • • • • Remove the fuse holder (3). Check the mains fuses (4). Replace the blown mains fuse (for ordering data see page A-1). Push the fuse holder back in NOTE: The fuse holder should snap into place. 102786_en_01 PHOENIX CONTACT 3-3 English Troubleshooting CUTFOX 10 3.5 Adjusting or replacing the rollers Adjusting the clamping pressure of the drive rollers (B) The clamping pressure must suit the cable. For standard cable, it does not need to be changed. The following generally applies: – Hard and thick material: more pressure – Soft and thin material: less pressure B • • B Press the door opener and fold down the front door. Set the clamping pressure with the adjusting screw. Rotate left more pressure Rotate right less pressure Replacing drive or metering rollers WARNING: Risk of injury Switch off the CUTFOX 10 and disconnect the mains plug. B • • Press the door opener and fold down the front door. Insert the removal hook (1) supplied behind the rollers (2) and push off the rollers. A NOTE: Replace the drive rollers (B) in pairs only. Pay attention to the flat guiding surface (3) when mounting. B • • • 3-4 PHOENIX CONTACT Replace the rollers (for ordering data see page A-1). Fold up the front door. Plug in the mains plug again. 102786_en_01 3.6 Replacing the cutters Removing the drive rollers WARNING: Risk of injury Switch off the CUTFOX 10 and disconnect the mains plug. • • Press the door opener and fold down the front door. Insert the removal hook (1) supplied behind the rollers (2) and push off the rollers. Removing the cutters • • Loosen the screws (1) with the Allen key supplied. Remove both cutters (2 and 4). Mounting the cutters NOTE: Always replace both cutters. Pay attention when mounting that the slanted cutting surfaces (3) face outwards. • • • Place the lower blade (4) with the threaded insert onto the holder from the right. Place the upper blade (2) onto the holder from the left. Tighten the screws with the Allen key. NOTE: Pay attention to the position of the flat guide surfaces on the shafts (5) when mounting the rollers. • • • 102786_en_01 Remount the drive rollers. Fold up the front door. Plug in the mains plug again. PHOENIX CONTACT 3-5 English Troubleshooting CUTFOX 10 A Appendix A1 Ordering data Cutting machine Description Designation Order No. Pcs./Pkt. Cutting machine CUTFOX 10 1206829 1 Designation Order No. Pcs./Pkt. Standard rollers CF-10 WHEEL SET 1207271 1 pair Rollers with PU contact surface CF-10 WHEEL PU On request 1 Rollers with a hardened, finely knurled steel contact surface CF-10 WHEEL STEEL On request 1 Cutter CF-10 CUTTER KNIFE SET 1207284 1 set Mains fuse T 2A/250V (20 x 5 mm) – On request 1 pair Removal hook CF-10 ABZH 1207297 1 Description Designation Order No. Pcs./Pkt. Cable unwinder CUTFOX 10 C-UN 1208393 1 Replacement parts Description Drive / metering rollers Accessories A2 Technical data Technical data Mains connection 90 V ... 264 V / 47 Hz ... 63 Hz Power consumption 150 VA Cutting efficiency (flexible/solid) 0.08 mm2 ... 10 mm2/0.08 mm2 ... 2.5 mm2 Maximum throughput 8 mm Cross section setting Automatically Number of cuts 1 ... 9999 Pcs. Length of cuts 2 mm ... 999999 mm/0.1 in. ... 99999.9 in. Feed rate max. 0.5 m/s Interface RS-232 Dimensions (W x H x D) 194 mm x 228 mm x 301 mm Weight 10 kg A-1 PHOENIX CONTACT 102786_en_01 A3 Declaration of conformity PHOENIX CONTACT GmbH & Co. KG, Flachsmarktstraße 8, D-32825 Blomberg, Germany CUTFOX 10 1206829 CUTFOX 10 BASIC 1207543 The above-mentioned products are in conformity with essential requirements of the following directives and their amending directives. 2004/108/EC EMC Directive (Electromagnetic Compatibility) 2006/42/EC Machinery Directive The following applicable standards were consulted for evaluating the conformity: 102786_en_01 EN ISO 12100-1:2010 EN ISO 13857:2008 EN 349:1993/A1:2008 EN 60204-1:2006 EN 61000-6-2:2005 EN 61000-6-3:2007/A1:2011 PHOENIX CONTACT A-2 English Declaration of conformity CUTFOX 10 A-3 PHOENIX CONTACT 102786_en_01