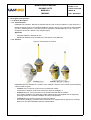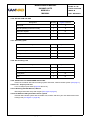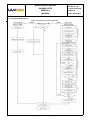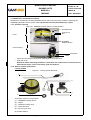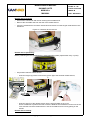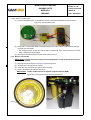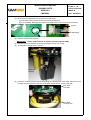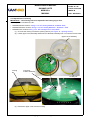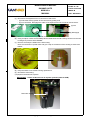
1
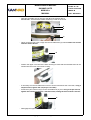
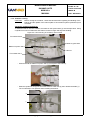
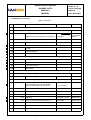
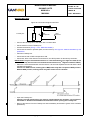
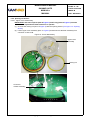
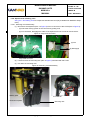
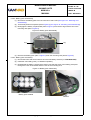
PAGE: 0 / 56
DATE: 08/04/2008
INDEX: B
REF.: DOC06097
KANNAD
Z.I. des Cinq Chemins BP23
56520 GUIDEL - FRANCE
Copyright © KANNAD. All rights reserved.
Telephone: +33 (0)2 97 02 49 49 Fax: +33 (0)2 97 65 00 20
Web : http://www.kannad.com - E-mail : [email protected]
KANNAD AUTO
MANUAL+
MANUAL
MAINTENANCE MANUAL
MAINTENANCE MANUAL
KANNAD AUTO
MANUAL+
MANUAL
PAGE: 1 / 56
DATE: 08/04/2008
INDEX: B
REF.: DOC06097
Users are kindly requested to notify KANNAD for any
discrepancy, omission or error found in this manual.
Please report to our customer support:
E-mail: [email protected]
Tel.: +33 (0)2 97 02 49 00
Copyright © KANNAD. All rights reserved.
MAINTENANCE MANUAL
KANNAD AUTO
MANUAL+
MANUAL
PAGE: 2 / 56
DATE: 08/04/2008
INDEX: B
REF.: DOC06097
CONTENTS
1
Description and operation .................................................................... 6
1-1
1-1-1
1-1-2
1-2
1-2-1
1-2-2
1-3
1-3-1
1-3-2
General description ........................................................................................6
Characteristics ...........................................................................................6
Versions ....................................................................................................6
Description of container and mounting bracket ..............................................7
Automatic container ...................................................................................7
Wall mounting bracket ...............................................................................8
Beacon description ........................................................................................9
Mechanical assembly ................................................................................9
Use ............................................................................................................11
1 - 3 - 2 - 1 Controls and commands ...........................................................................................11
1 - 3 - 2 - 2 Self-test .....................................................................................................................13
1 - 3 - 2 - 3 Manual activation ......................................................................................................14
1-4
1-5
1-6
2
Programming .................................................................................................15
Technical characteristics ................................................................................16
Working principle ...........................................................................................17
Material used for maintenance ............................................................. 19
2-1
2-1-1
2-1-2
2-1-3
2-1-4
2-1-5
2-2
2-3
2-4
2-4-1
2-4-2
2-4-3
2-4-4
2-4-5
2-4-6
2-4-7
2-4-8
2-4-9
2 - 4 - 10
2 - 4 - 11
2 - 4 - 12
3
3-1
3-1-1
3-1-2
3-1-3
3-2
3-2-1
3-2-2
Material used for programming and control ...................................................19
Programming and control equipment ........................................................19
Measurement equipment without opening the beacon ..............................20
Measurement equipment with beacon opening .........................................20
Battery test mock-up .................................................................................21
Test interface .............................................................................................21
Interconnections .............................................................................................21
Specific tool ....................................................................................................22
Maintenance kits ............................................................................................22
KIT upper cover all versions ......................................................................22
KIT housing MANUAL, MANUAL GPS ......................................................23
KIT housing MANUAL+, MANUAL+ GPS ...............................................23
KIT housing AUTO, AUTO GPS ................................................................23
KIT I521 PCB without GPS .......................................................................23
KIT I521 PCB with GPS ............................................................................24
KIT battery pack ........................................................................................24
KIT mounting rack .....................................................................................24
AUTO Float Free CONTAINER without H20 .............................................24
LOT tamper proof seal ............................................................................24
Mounting bracket Manual+, Manual ..........................................................24
Kit Hammar H20 hydrostatic release system ............................................24
Preventive maintenance ........................................................................ 25
Maintenance of automatic container ..............................................................26
Container opening .....................................................................................26
Release system replacement ....................................................................26
Container closing .......................................................................................29
Maintenance of beacon ..................................................................................32
Container ...................................................................................................34
Receiving Inspection .................................................................................34
3 - 2 - 2 - 1 Visual inspection .......................................................................................................34
3 - 2 - 2 - 2 Control of programming ............................................................................................34
3 - 2 - 2 - 3 Functional control out of Faraday box ......................................................................34
Copyright © KANNAD. All rights reserved.
MAINTENANCE MANUAL
KANNAD AUTO
MANUAL+
MANUAL
PAGE: 3 / 56
DATE: 08/04/2008
INDEX: B
REF.: DOC06097
CONTENTS (Foll.)
3 - 2 - 2 - 4 Functional control in Faraday box .............................................................................35
3-2-3
Opening the beacon ..................................................................................37
3 - 2 - 3 - 1 Upper cover disassembly .........................................................................................37
3-2-4
Control of frequencies on test bench .........................................................38
3-2-43-2-43-2-43-2-4-
1
2
3
4
3-2-5
3-2-6
Description of test interface ......................................................................................38
Connection of test interface ......................................................................................39
Control of 121.5 MHz ................................................................................................39
Control of 406.028 MHz ............................................................................................40
Re-activation of protection circuits ............................................................40
Replacement of battery pack .....................................................................41
3-2-63-2-63-2-63-2-6-
3-2-7
3-2-8
3-2-9
1
2
3
4
Mounting rack disassembly ......................................................................................41
Battery pack disassembly .........................................................................................42
Battery pack reassembly ..........................................................................................42
Check of battery pack ...............................................................................................43
Beacon reassembly ...................................................................................43
Check after closing ....................................................................................45
Control of watertightness, use of the bath .................................................45
3 - 2 - 9 - 1 Necessary equipment ...............................................................................................45
3 - 2 - 9 - 2 Procedure .................................................................................................................45
3 - 2 - 10
3 - 2 - 11
3 - 2 - 12
4
4-1
4-2
4-3
Counter reset. ............................................................................................45
Sealing the ON pushbutton .......................................................................45
Update .......................................................................................................45
Corrective Maintenance ........................................................................ 46
Replacement of upper cover assembly ..........................................................46
Replacement of housing ................................................................................49
Replacement of I521 PCB .............................................................................53
Copyright © KANNAD. All rights reserved.
MAINTENANCE MANUAL
KANNAD AUTO
MANUAL+
MANUAL
PAGE: 4 / 56
DATE: 08/04/2008
INDEX: B
REF.: DOC06097
LISTE OF MODIFICATIONS
Ind.
Date
Description of modifications
A
14/05/2007 First issue
B
07/04/2008 P.7 modification of IMPORTANT notice
P.9 & 10 removal of M/A switch reference
P.13 removal of «Test of Frequencies» title
P.15 add of programming protocols
P.6 modification of 121.5 MHz range
P.19 modification of control and programming equipment references
P.20 add of GPS transponder
P.21 modification of number of coaxial cables
P.22 add of mounting bracket as specific tool
P.25 modification of Fig.19
P.26 add of important notice
P.32 & 33 modification of check list
P.35 modification of visual inspection & programming control
P.36 modification of Fig. 24 and transmission chrono
P.38 modification of Note
P.39 add of Note section 3.2.4.2 § (1), add of NOTE section 3.2.4.3, removal of
consumption test, add of action on Test pushbutton
P.40 modification of 121.5 MHz range, add of action on Test pushbutton, removal
of consumption test, removal of section 3.2.5 Test before reassembly
P.41 add of unsticking action for keyboard cable
P.42 each battery pack replaced by each new battery pack
P.43 Connect the new battery pack to J6 connector of I521 PCB removed
P.44 add of Connect the new battery pack to J6 connector of I521 PCB + instruction if activation, add of action in case of activation, add of action to stick the keyboard cable, add of NOTE regarding the wire of flash, add of self-test after cover
reassembly
P.45 modification of check after closing, modification of equipment for watertightness test, removal of action when a mounting bracket is not available, modification
of Fig. 39, add of actions to check WSS and to reset counters
P.46 modification of IMPORTANT notice section 4.1
P.47 add of unsticking action for keyboard cable
P.48 add of action to stick the keyboard cable, add of NOTE regarding the wire of
flash, modification of check after closing
P.49 modification of first IMPORTANT notice, removal of second IMPORTANT
notice, add of locking lug picture on figure
P.50 add of unsticking action for keyboard cable, add of information to keep the
former traceability label, add of action to keep the tether
P.51 add of information to install the tether
P.52 add of action to stick the keyboard cable, add of NOTE regarding the wire of
flash
P.53 removal of IMPORTANT notice, add of action on ON/OFF Test pushbutton
P.54 add of action to unstick the keyboard cable
P55 add of instruction if activation when connecting battery, add of action in case
of activation, add of action to stick the keyboard cable, control of frequency
removed from § (12) to § (18) P. 56
P.56 Martec information replaced by KANNAD (including customer support).
Copyright © KANNAD. All rights reserved.
MAINTENANCE MANUAL
KANNAD AUTO
MANUAL+
MANUAL
PAGE INTENTIONALLY LEFT BLANK
Copyright © KANNAD. All rights reserved.
PAGE: 5 / 56
DATE: 08/04/2008
INDEX: B
REF.: DOC06097
MAINTENANCE MANUAL
KANNAD AUTO
MANUAL+
MANUAL
PAGE: 6 / 56
DATE: 08/04/2008
INDEX: B
REF.: DOC06097
1. Description and operation
1.1. General description
1.1.1. Characteristics
KANNAD Auto, Manual+, Manual are distress beacons with a TCXO oscillator, a super flash led, a
flexible monopole antenna, an intelligent PCB less greedy in energy. They transmit on 406.028 MHz
and 121.5 MHz frequencies. They are buoyant in operation and watertight up to 1 bar. They are
designed to be tied to a liferaft or any buoyant object.
Approvals
•
COSPAS-SARSAT certificate N°162.
•
Wheelmark BV0062 (Auto and Manual+) and R&TTE 0191 (Manual).
1.1.2. Versions
Figure 1: Presentation of versions
KANNAD Epirbs are available in 3 versions, Auto, Manual+, Manual, each version can be fitted with
a built-in GPS as option.
•
KANNAD Auto, Float Free version for the professional market:
An automatic container protects the Float Free versions (Category 1).
•
KANNAD Manual+, Survival version for the professional and leisure markets:
This version (Category 2) is fitted with a water switch sensor and supplied with an ergonomic
mounting bracket for on board installation and easy transportation.
•
KANNAD Manual, Survival version for the leisure market:
This version (Category 2) without water switch sensor is supplied with an ergonomic mounting
bracket for on board installation and easy transportation.
Copyright © KANNAD. All rights reserved.
MAINTENANCE MANUAL
KANNAD AUTO
MANUAL+
MANUAL
PAGE: 7 / 56
DATE: 08/04/2008
INDEX: B
REF.: DOC06097
1.2. Description of container and mounting bracket
1.2.1. Automatic container
The KANNAD Auto, Float Free version (Category 1), is supplied in an automatic container (1). This
container is designed to protect the beacon and to ensure its automatic release in the event of a ship
wreck thanks to the HAMMAR H20 release system (2). This container is also fitted with a locking
system (3) to open it manually.
It is mounted either in horizontal position on the wheel house or deck of the vessel, or in vertical
position against a bulkhead or any vertical flat surface and clear area.
Figure 2: KANNAD AUTO, description of automatic container
Note: a magnet located in the bottom of the container inhibits the water switch sensor of the
beacon avoiding any accidental activation due to moisture or water presence.
List of components
Automatic container (1): P/N 5104620
Hydrostatic release system including H20, axe and nut (2): P/N 5103555
Manual locking system and tether (3): P/N 5102004
Opening the container
Automatic opening
The release system uses the hydrostatic pressure effect. At a depth of 1.5 m to 4 m (4 to 12 ft.), the
release system operates and cuts the locking axis. The cover is released to enable the beacon to rise
to the surface. The beacon is automatically activated as soon as submerged in water and out of its
container.
Manual opening
It is possible to open the container manually by opening the manual locking system (A). Remove the
beacon from its container (B) and activate it (C) manually (ON pushbutton) or automatically (D) (throw
the beacon overboard).
Figure 3: Float Free EPIRB, manual opening and activation
Important: Clean salt and / or moisture as soon as the beacon is extracted from its container (risk of
activation).
Copyright © KANNAD. All rights reserved.
MAINTENANCE MANUAL
PAGE: 8 / 56
KANNAD AUTO
MANUAL+
MANUAL
DATE: 08/04/2008
INDEX: B
REF.: DOC06097
1.2.2. Wall mounting bracket
A wall mounting bracket is supplied with the KANNAD Manual and Manual+.
This mounting bracket is fitted with a strap used to avoid an inadvertent ejection of the beacon. It is
designed to be mounted vertically against a bulkhead or any vertical flat surface.
Figure 4: KANNAD 406 Manual+ & Manual, mounting bracket description
Bracket
Strap
Remove the beacon from the bracket (A), to activate beacon:
•
either manually by pressing ON pushbutton (B) for KANNAD Manual+ and Manual;
•
or automatically by throwing overboard (C) if fitted with a water switch sensor (KANNAD Manual+
only).
Figure 5: Manual+ and Manual beacons, removal and activation
Copyright © KANNAD. All rights reserved.
MAINTENANCE MANUAL
KANNAD AUTO
MANUAL+
MANUAL
PAGE: 9 / 56
DATE: 08/04/2008
INDEX: B
REF.: DOC06097
1.3. Beacon description
1.3.1. Mechanical assembly
Table 1: List of main components
Ref. Figure 6
Designation
Nomenclature
A
KANNAD AUTO GPS Assembly (including container)
1201245
B
KANNAD AUTO Assembly (including container)
1201244
C
KANNAD MANUAL+ GPS Assembly
1201164
D
KANNAD MANUAL+ Assembly
1201158
E
KANNAD MANUAL GPS Assembly
1201162
F
KANNAD MANUAL Assembly
1201156
1
Housing assembly fitted with (1-1 to 1-3):
1-1
Water switch sensor
1-2
Keyboard
1-3
Cover for On / Off pushbutton
2
Elastomer ring
3
Tether D = 2mm
4
Ballast
5
Mounting rack
6
Battery coupler board
7
Battery pack, 8x2 DL123
8
Desiccant capsule
9
I521 PCB
10
O-ring Sil 3 mm DI = 103.3 60SH
11
Upper cover assembly fitted with (11-1 to 11-7):
11-1
Upper cover
11-2
Antenna
11-3
Nut H M5 Inox A4
11-4
Flat washer M5 inox A4
11-5
O-ring Sil 1.5 mm DI = 7 60SH
11-6
Retroreflective tapes
11-7
Flash assembly
12
Locking nut (dome / housing)
13
Tamper proof seal
14
slotted grub screw with cone point M4x25
15
GPS µPatch module + antenna
Copyright © KANNAD. All rights reserved.
MAINTENANCE MANUAL
KANNAD AUTO
MANUAL+
MANUAL
PAGE: 10 / 56
DATE: 08/04/2008
INDEX: B
REF.: DOC06097
Figure 6: KANNAD AUTO, Manual+, Manual, mechanical assembly
11-5
11-2
12
11-7
11-6
11-1
15
8
11
9
14
A/B/C/D/E/F
5
6
7
4
10
1
11-7
View from above
1-1
1-1
11-4
11-3
1
1-2
13
2
3
1-3
Copyright © KANNAD. All rights reserved.
MAINTENANCE MANUAL
KANNAD AUTO
MANUAL+
MANUAL
PAGE: 11 / 56
DATE: 08/04/2008
INDEX: B
REF.: DOC06097
1.3.2. Use
1.3.2.1. Controls and commands
(1) Tamper proof seal:
-
to prove the beacon has been intentionally activated.
(2) Locking system:
-
to avoid unintentional activation of the beacon.
(3) TEST pushbutton:
-
to perform a self-test;
-
to stop the beacon transmission when required by authorities.
(4) ON button:
-
to activate manually beacon.
(5) Flash:
-
to improve or help visual localization of the beacon by the SAR operations.
(6) Beacon control lamp:
-
to check good operation when activating the beacon;
-
to check good operation when performing a self-test;
-
to program the beacon (by manufacturer or authorized programming stations).
(7) Water switch contact:
-
to activate automatically the beacon when submerged in water (Auto and Manual+ versions
only).
(8) Emergency deactivation device:
-
to stop transmission by fully disabling the beacon should beacon not switch off despite actions
on pushbutton (3)
(9) Tether line:
-
to secure beacon to a liferaft, life jacket, boat, etc.
(10) Retroreflective tape.
(11) 406 / 121.5 MHz antenna.
Copyright © KANNAD. All rights reserved.
MAINTENANCE MANUAL
KANNAD AUTO
MANUAL+
MANUAL
Figure 7: Controls and commands
Copyright © KANNAD. All rights reserved.
PAGE: 12 / 56
DATE: 08/04/2008
INDEX: B
REF.: DOC06097
MAINTENANCE MANUAL
KANNAD AUTO
MANUAL+
MANUAL
PAGE: 13 / 56
DATE: 08/04/2008
INDEX: B
REF.: DOC06097
1.3.2.2. Self-test
(1) Press TEST / READY push button.
(2) The buzzer transmits an audible signal every second.
(3) Check that control lamp blinks:
-
The test lasts 23 or 26 seconds according to version.
-
The test sequence starts as follows:
-
•
GPS Version
White flash / 1sec / Red led + White flash / 2 sec / White flash / 2sec / White flash / 6 sec /
Red led / Red led.
•
Non GPS Version
White flash / 1sec / Red led + White flash / 2 sec / White flash / 6 sec / Red led / Red led.
Then the test result is displayed as follows:
•
Red led, 1 blinking every 2 seconds indicates good operation.
•
Red led, 2 blinkings every 2 seconds indicates faulty operation.
Repeat 3 times to confirm failure before contacting agent.
Figure 8: Test instructions
Copyright © KANNAD. All rights reserved.
MAINTENANCE MANUAL
KANNAD AUTO
MANUAL+
MANUAL
PAGE: 14 / 56
DATE: 08/04/2008
INDEX: B
REF.: DOC06097
1.3.2.3. Manual activation
(1) Break the seal by sliding the locking system up.
(2) Press ON pushbutton during one second.
(3) When starting, the buzzer transmits a double audible signal (audio frequency 3 KHz), then the
audible signal is transmitted every second.
(4) The beacon starts with a test for 19 seconds (succession of white flash and red led blinking as
shown figure below).
(5) After the self-test, only the white flash blinks every 3 seconds. The buzzer continues to transmit
every second except during 406 MHz transmission.
STOP: press TEST pushbutton.
Figure 9: Manual activation by ON pushbutton
NOTE: For GPS versions, if the GPS receiver is not locked, the homing (121.5 MHz) will start only
10 seconds after the 6th real transmission.
Copyright © KANNAD. All rights reserved.
MAINTENANCE MANUAL
KANNAD AUTO
MANUAL+
MANUAL
PAGE: 15 / 56
DATE: 08/04/2008
INDEX: B
REF.: DOC06097
1.4. Programming
KANNAD AUTO, Manual+ and Manual beacons are programmed with a unique ID code (MMSI, radio call
sign or serial number).
KANNAD AUTO, Manual+ and Manual beacons are encoded with a PKR programming kit working under
Windows (WinProg software) without opening the beacon. The code is entered inside the beacon memory
with an optical pen placed over the beacon control lamp.
This programming kit has been specially designed by KANNAD for all the KANNAD 406 EPIRBs.
Refer to Winprog software for programming procedure.
Figure 10: Programming, optical pen
Copyright © KANNAD. All rights reserved.
MAINTENANCE MANUAL
KANNAD AUTO
MANUAL+
MANUAL
PAGE: 16 / 56
DATE: 08/04/2008
INDEX: B
REF.: DOC06097
1.5. Technical characteristics
Operating temperatures
: -20°C to +55°C.
Storage temperatures
: -30°C to +70°C.
Llithium manganese batteries
•
Expiration
: Non hazardous LiMnO2
: 6 years from date of production
Operating life
: 48 hours mini. at -20°C.
Housing made of polycarbonate with a high resistance to shocks.
Watertight at 1 bar
Housing dimensions: Ø 129.5 / 240 mm antenna folded
Weight
Without GPS
With GPS
Alone
1000 gr.
1015 gr.
With support
1170 gr.
1185 gr.
With container
2080 gr.
2095 gr.
406 MHz SATELLITE TRANSMISSION
Frequency
: 406.028 MHz ± 0.001 MHz
UHF output power
: 5W (37dBm ± 2 dB)
Phase modulation
: 16K0G1D, Biphase L± 1.1 ± 0.1 radians
Repetition period
: 50 sec. ± 5%
Transmission time
: 440 msec. (520 msec. with GPS) ± 1%
121.5 MHz HOMING TRANSMITTER
Frequency
: 121.5 MHz ± 0.006 MHz
Power
: 50 mW (17dBm ± 3dB)
Modulation
: AM audio sweep
Modulation format
: 3K20A3X
Transmission
: Continuous
STROBE LIGHT
Type
: Super LEDs
Intensity
: 0.75 Candela
Rate
: 20 flashes per minute
BATTERIES
Type
(Cospas-Sarsat Approved)
: 16LiMnO2 DL123 type cells (8 packs of 2
batteries in series connected in parallel)
Voltage / Intensity
: 9 V / 10.5 Ah
Replacement
: every 5 years (MSC 1039 Circ.)
Copyright © KANNAD. All rights reserved.
MAINTENANCE MANUAL
KANNAD AUTO
MANUAL+
MANUAL
1.6. Working principle
The beacon operates thanks to:
•
a I521PCB used as micro interface / RF interface;
•
a 2-frequency antenna;
•
a built-in GPS (module and GPS antenna are installed on GPS version only);
•
a water switch sensor (connected on Auto and Manual+ only);
•
a user interface;
•
a power supply (battery pack).
Figure 11: Block diagram of KANNAD Auto, Manual+, Manual
Copyright © KANNAD. All rights reserved.
PAGE: 17 / 56
DATE: 08/04/2008
INDEX: B
REF.: DOC06097
MAINTENANCE MANUAL
KANNAD AUTO
MANUAL+
MANUAL
Figure 12: I521 PCB, micro interface / RF interface
Copyright © KANNAD. All rights reserved.
PAGE: 18 / 56
DATE: 08/04/2008
INDEX: B
REF.: DOC06097
MAINTENANCE MANUAL
PAGE: 19 / 56
KANNAD AUTO
MANUAL+
MANUAL
DATE: 08/04/2008
INDEX: B
REF.: DOC06097
2. Material used for maintenance
2.1. Material used for programming and control
2.1.1. Programming and control equipment
Designation
KANNAD Reference
PKR4 programming kit: USB optical pen with KANNAD WINPROG
software.
0143264
BT100A Tester
0141296
Figure 13: PKR 4 programming kit
Figure 14: BT100A Tester
Copyright © KANNAD. All rights reserved.
MAINTENANCE MANUAL
PAGE: 20 / 56
KANNAD AUTO
MANUAL+
MANUAL
DATE: 08/04/2008
INDEX: B
REF.: DOC06097
2.1.2. Measurement equipment without opening the beacon
Designation
KANNAD reference
Faraday box
0137913
GPS transponder
0145082
Figure 15: Example of Faraday box and GPS transponder
Faraday box
GPS transponder
2.1.3. Measurement equipment with beacon opening
Designation
Reference
Wattmeter and frequencymeter:
•
BT100 tester;
•0141296 (KANNAD)
•
or spectrum analyzer;
•Commercially available
•
or radio test bench
•Commercially available
Multimeter
Commercially available
CAUTION: handling should be performed on an anti-static plan, the measurement equipment
should be grounded. Do not wear synthetical clothes.
Copyright © KANNAD. All rights reserved.
MAINTENANCE MANUAL
PAGE: 21 / 56
KANNAD AUTO
MANUAL+
MANUAL
DATE: 08/04/2008
INDEX: B
REF.: DOC06097
2.1.4. Battery test mock-up
Designation
Battery test mock-up
KANNAD reference
5104687
Figure 16: Battery test mock-up
2.1.5. Test interface
Designation
I555A PCB radio test interface
KANNAD reference
5104627
Figure 17: I555A PCB radio test interface
2.2. Interconnections
Designation
1 BNC / BNC 50-Ohm coaxial cable
Copyright © KANNAD. All rights reserved.
Reference
Commercially available
MAINTENANCE MANUAL
PAGE: 22 / 56
KANNAD AUTO
MANUAL+
MANUAL
DATE: 08/04/2008
INDEX: B
REF.: DOC06097
2.3. Specific tool
Designation
KANNAD reference
Opening device
0143033
Mounting bracket for Manual / Manual+
5104340
Figure 18: Opening device
2.4. Maintenance kits
Designation
References
Components
KIT upper cover all versions
5104612
See § 2.4.1. page 22
KIT housing MANUAL, MANUAL GPS
5104613
See § 2.4.2. page 23
KIT housing MANUAL+, MANUAL+ GPS
5104614
See § 2.4.3. page 23
KIT housing AUTO, AUTO GPS
5104615
See § 2.4.4. page 23
KIT PCB I521 without GPS
5104616
See § 2.4.5. page 23
KIT PCB I521 with GPS
5104617
See § 2.4.6. page 24
KIT battery pack
5104618
See § 2.4.7. page 24
KIT mounting rack
5104619
See § 2.4.8. page 24
AUTO Float Free CONTAINER without H20
5104620
See § 2.4.9. page 24
LOT tamper proof seal
5104621
See § 2.4.10. page 24
Mounting bracket Manual+, Manual
5104340
See § 2.4.11. page 24
KIT Hammar H20 hydrostatic release system
5103555
See § 2.4.12. page 24
2.4.1. KIT upper cover all versions
Designation
Quantity
Figure 6 Item N°
Upper cover
1
11
Desiccant capsule
1
8
O-ring 3mm
1
10
Seal
1
13
Copyright © KANNAD. All rights reserved.
MAINTENANCE MANUAL
PAGE: 23 / 56
KANNAD AUTO
MANUAL+
MANUAL
DATE: 08/04/2008
INDEX: B
REF.: DOC06097
2.4.2. KIT housing MANUAL, MANUAL GPS
Designation
Quantity
Figure 6 Item N°
Housing, MANUAL
1
1
Desiccant capsule
1
8
O-ring 3mm
1
10
Seal
1
13
GPS Sticker
1
-
Quantity
Figure 6 Item N°
Housing, MANUAL+
1
1
Desiccant capsule
1
8
O-ring 3mm
1
10
Seal
1
13
GPS Sticker
1
-
Quantity
Figure 6 Item N°
Housing, AUTO
1
1
Desiccant capsule
1
8
O-ring 3mm
1
10
Seal
1
13
GPS Sticker
1
-
Quantity
Figure 6 Item N°
I521 PCB
1
9
Desiccant capsule
1
8
O-ring 3mm
1
10
Seal
1
13
2.4.3. KIT housing MANUAL+, MANUAL+ GPS
Designation
2.4.4. KIT housing AUTO, AUTO GPS
Designation
2.4.5. KIT I521 PCB without GPS
Designation
Copyright © KANNAD. All rights reserved.
MAINTENANCE MANUAL
PAGE: 24 / 56
KANNAD AUTO
MANUAL+
MANUAL
DATE: 08/04/2008
INDEX: B
REF.: DOC06097
2.4.6. KIT I521 PCB with GPS
Designation
Quantity
Figure 6 Item N°
I521 PCB
1
9
GPS kit (already mounted on PCB)
1
8
Desiccant capsule
1
10
O-ring 3mm
1
13
Seal
1
-
Quantity
Figure 6 Item N°
Pack 2 batteries
8
7
Desiccant capsule
1
8
O-ring 3mm
1
10
Seal
1
13
Quantity
Figure 6 Item N°
Mounting rack
1
5
Desiccant capsule
1
8
O-ring 3mm
1
10
Seal
1
13
2.4.7. KIT battery pack
Designation
2.4.8. KIT mounting rack
Designation
2.4.9. AUTO Float Free CONTAINER without H20
Float Free container with manual locking system and tether, without release system (see page 7).
2.4.10. LOT tamper proof seal
Lot of 10 tamper proof seals (Figure 6 Item N°13).
2.4.11. Mounting bracket Manual+, Manual
Mounting bracket with strap and magnet (see Figure 4 page 8).
2.4.12. Kit Hammar H20 hydrostatic release system
Hammar H20 release system with severable axis, washer and two nylon nuts without tether and
locking hook (see Figure 21 page 26).
Copyright © KANNAD. All rights reserved.
MAINTENANCE MANUAL
KANNAD AUTO
MANUAL+
MANUAL
3. Preventive maintenance
Figure 19: Maintenance logical diagrams
Copyright © KANNAD. All rights reserved.
PAGE: 25 / 56
DATE: 08/04/2008
INDEX: B
REF.: DOC06097
MAINTENANCE MANUAL
PAGE: 26 / 56
KANNAD AUTO
MANUAL+
MANUAL
DATE: 08/04/2008
INDEX: B
REF.: DOC06097
3.1. Maintenance of automatic container
Maintenance of automatic container (KANNAD AUTO and AUTO GPS only) consists in replacing the
HAMMAR hydrostatic release system. This replacement must be performed every 2 years
3.1.1. Container opening
Figure 20 : HAMMAR release system in locked position
Severable axis
Counter nut
Nut
Cover
HAMMAR
Release device
Lower housing
Snap hook
Tether
•
Unlock and remove the locking hook, disengage the severable axis.
•
Open the cover.
Important: before extracting the beacon, check there are neither salt nor moisture on the
water switch sensor. Clean if necessary (risk of activation).
3.1.2. Release system replacement
Locking system
Figure 21 : Locking system elements
2
5
1
3
6
4
The locking system is composed of:
(1) a HAMMAR release device;
(2) a tether;
(3) a stainless locking hook;
(4) a severable axis;
(5) two HU8 nylon nuts;
(6) a rubber washer.
Copyright © KANNAD. All rights reserved.
MAINTENANCE MANUAL
KANNAD AUTO
MANUAL+
MANUAL
PAGE: 27 / 56
DATE: 08/04/2008
INDEX: B
REF.: DOC06097
Release device removal
•
Unscrew the counter nut and the nut securing the severable axis.
•
Remove the severable axis from the well of the release device.
•
Lift up the release device as shown hereunder and remove from the tongue inside which it was
inserted in.
Figure 22 : Release device removal
Release device positioning
Before positioning the new release device, mark replacement date (replacement every 2 years).
•
Pre-position Hammar release device:
-
insert the tongue (A) of the cover into the groove (B) of the Hammar release device;
C
B
A
D
-
insert the well (C) of the release device into the hole (D) fitted on the cover.
Use a screwdriver to perform this task: insert the blade of the screwdriver into the hole of the
cover and the well of the release device. Use the screwdriver as a lever by pulling on the
handle.
Release device locking
Copyright © KANNAD. All rights reserved.
MAINTENANCE MANUAL
PAGE: 28 / 56
KANNAD AUTO
MANUAL+
MANUAL
-
DATE: 08/04/2008
INDEX: B
REF.: DOC06097
Slide the severable axis (A) into the well (B) of the release device.
IMPORTANT: check that the rubber washer (C) is still on the screw.
A
B
C
-
Gently screw the first nylon nut (D) onto the severable axis (A) until it comes into contact
with the release device.
D
-
Position the upper cover above the lower housing to check that the severable axis can be
inserted into the notch of the lower housing.
-
If necessary turn the severable axis so that it can be inserted into the notch then, using a
torque wrench, tighten the nut (torque = 0.8 N/m).
-
Screw the nylon counter nut (E) on the severable axis (A), then using a torque wrench,
tighten the counter nut (torque = 0.8 N/m) while holding the first nut with a wrench.
E
-
Disengage the upper cover from the lower housing.
Copyright © KANNAD. All rights reserved.
MAINTENANCE MANUAL
PAGE: 29 / 56
KANNAD AUTO
MANUAL+
MANUAL
DATE: 08/04/2008
INDEX: B
REF.: DOC06097
3.1.3. Container closing
CAUTION:
Before closing the container, check that all information regarding the labelling of the
beacon and the update of the manual (date of next release system replacement) are
recorded.
Tip before installing the beacon
To install the beacon into the container, the blade on the ejection side (1) must be kept down. Using
a cylindrical rod of 7mm diameter and 150mm minimum length will help this handling.
Figure 23: Lower housing of container, internal view
Front water flow 2
3 Blade on guide side
Blade on ejection side 1
4 Groove
Front water flow 2
-
Press and hold the blade on ejection side (1) (front part of the beacon).
-
Slide the cylindrical rod (5) into the holes used for water flow (2) then release the blade (1).
The rod will keep it into position while installing the beacon.
5
1
Copyright © KANNAD. All rights reserved.
MAINTENANCE MANUAL
KANNAD AUTO
MANUAL+
MANUAL
-
PAGE: 30 / 56
DATE: 08/04/2008
INDEX: B
REF.: DOC06097
Use the guide (6) on the bottom of the beacon to place the beacon and the blade (3) as follows:
•
Insert the support blade (3) into the guide (6) on the bottom of the beacon.
3
6
•
Press down and place beacon into position. Carefully check that both sides of the blade (3)
inserted in the guide of the beacon are within the rear groove (4) of the container.
CAUTION: The blade must be positioned exactly in the middle of the groove and
must not be neither to the left nor to the right.
Position OK
Position not OK
4
-
Fold the antenna over the beacon and keep it pressed down.
-
Insert the lugs (7) of the lower housing into the notches (8) of the upper cover.
-
Close the upper cover while keeping the antenna folded on top of the beacon.
-
Release the antenna as soon it cannot unfold any more.
8
7
Copyright © KANNAD. All rights reserved.
MAINTENANCE MANUAL
KANNAD AUTO
MANUAL+
MANUAL
-
Slide the locking hook through the hole of the screw head.
-
Lock the locking hook by rotating the large hinged flap.
-
Remove the rod (if used) from the container.
Copyright © KANNAD. All rights reserved.
PAGE: 31 / 56
DATE: 08/04/2008
INDEX: B
REF.: DOC06097
MAINTENANCE MANUAL
PAGE: 32 / 56
KANNAD AUTO
MANUAL+
MANUAL
DATE: 08/04/2008
INDEX: B
REF.: DOC06097
3.2. Maintenance of beacon
Table 2 : Check list
Control
Result
Action
Inwards reception
1
Visual inspection: See § 3.2.2.1. page 34
- If GPS beacon, check amendment
If < D
- Aspect of lower and upper case, locking nut If damaged
2
Contact customer support
Replace
Control of programming: See § 3.2.2.2. page 34
Programming control
3
OK, If failed
Functional control out of Faraday box: See § 3.2.2.3. page 34
3-1
On / Off
3-2
TEST Pushbutton
3-3
WSS out of container + magnetic switch
4
Reprogram.
Functional control in Faraday box: See § 3.2.2.4. page 35
4-1
Self-test result
4-2
Flash
4-3
Code / transmission
4-4
Test of GPS
Beacon testing
5
Beacon opening: See § 3.2.3. page 37
Disassemble upper cover
6
Control of frequencies: See § 3.2.4. page 38
- Deactivate protection circuit against permanent transmission (except with BT100)
- Connect test interface to I521 PCB
6-1
ST3 I521 PCB
J5 connector
121.5 MHz: See § 3.2.4.3. page 39
6-1a Modulation rate
85% <<100%
Replace I521
6-1b Demodulation
Audio control
Replace I521
6-1c Frequency
121.5 MHz ± 6 KHz
Replace I521
6-1d Power (if measured with Radio Bench)
8 to 14 dBm
Replace I521
(if measured with BT100 or spectrum) 14 to 20 dBm
6-2
406,028 MHz: See § 3.2.4.4. page 40
Copyright © KANNAD. All rights reserved.
Replace I521
MAINTENANCE MANUAL
PAGE: 33 / 56
KANNAD AUTO
MANUAL+
MANUAL
DATE: 08/04/2008
INDEX: B
REF.: DOC06097
Control
7
Result
Action
6-2a 406.028 MHz frequency
406.028 MHz ±
1KHz
Replace I521
6-2b Power
35 to 39 dBm
Replace I521
6-2c 400 Hz biphase modulation
2 rd << 2.4 rd
Replace I521
Reactivation of protection circuits: See § 3.2.5. page 40
- Disconnect test interface from I521 PCB
- reactivate protection circuit against permanent transmissions
8
J5 connector
ST3 I521 PCB
Battery replacement: See § 3.2.6. page 41
- Unstick and disconnect the keyboard
- Disassemble mounting rack
- Disassemble battery pack
- Note batch number of each new element
- Install new battery pack
Check battery pack: See § 3.2.6.4. page 43
Voltage on 2.5 ohms load during 6 seconds
9
> 5.4 V / 6 sec.
Beacon closing: See § 3.2.7. page 43
- Replace O-ring
- Replace desiccant
- Reassemble mounting rack
- Connect and stick the keyboard
- Install the upper cover
- Perform self-test
- Lock the upper cover
9-1
9-2
9-3
9-4
9-5
9-6
9-7
Check
10
Functional control out of Faraday box: See § 3.2.2.3. page 34
10-1
On / Off
10-2
TEST pushbutton Flash / Led / Code / Transmission
11
Control of watertightness: See § 3.2.9. page 45
11-1
5 minutes at 55°C ±10°C
11-2
Water switch sensor out of container
12
Reset the counters
13
Seal the ON push button
14
Update of documents (Labelling and booklet)
15
Re-consignment (Administrative input)
No bubbles
Copyright © KANNAD. All rights reserved.
Check closing
MAINTENANCE MANUAL
KANNAD AUTO
MANUAL+
MANUAL
PAGE: 34 / 56
DATE: 08/04/2008
INDEX: B
REF.: DOC06097
3.2.1. Container
Open the container (for KANNAD 406 AUTO and AUTO GPS only), See § 3.1.1. Container opening.
Important: before extracting the beacon, check there are neither salt nor moisture on the
water switch sensor. Clean if necessary (risk of activation).
3.2.2. Receiving Inspection
3.2.2.1. Visual inspection
Ensure the housing, upper cover and locking nut are free from cracks or other visible damages.
Check of firmware: for a GPS beacon, on the traceability label located below the beacon check that
the amendment of the beacon is higher or equal to D. If lower than D, contact KANNAD customer
support ([email protected] or Tel. +33 (0)2 97 02 49 00).
3.2.2.2. Control of programming
Check the programming data of the beacon and print the coding sheet (KANNAD Winprog).
If necessary, re-program the beacon and update.
3.2.2.3. Functional control out of Faraday box
IMPORTANT: should these controls not be carried out in the Faraday box, they should not last
more than 40 seconds to avoid the transmission of a distress message towards
the satellites.
Control of ON / OFF pushbutton
(1) Activate the beacon by pressing 1 second the ON pushbutton:
-
During 20 seconds, check that the led and the flash flicker as described paragraph 1.3.2.3.
Manual activation.
(2) Stop the beacon by pressing the TEST / Ready pushbutton.
-
Check that the flickering stops immediately.
Control of TEST pushbutton
•
Press the TEST / Ready pushbutton:
-
Check that the led and the flash operate as described paragraph 1.3.2.2. Self-test.
Control of water switch sensor, beacon out of container (Auto and Manual+ versions only)
The purpose of the water switch sensor is to activate the beacon as soon as submerged and out of
container. Because of lapping or waves movement, the water switch sensor can sometimes be out
of water during a few seconds. When the beacon is activated by the water switch sensor, 10 seconds
lapse time is applied to avoid that the transmission stops as soon as it is out of the water.
The purpose of this test is to check:
•
activation by water switch sensor;
•
temporizing of water switch sensor.
IMPORTANT: do not press ON pushbutton.
•
Short circuit during 10 seconds the water switch sensor (about 10 buzzer’s beeps) then remove it:
Figure 24: Short-circuit of water switch sensor
Copyright © KANNAD. All rights reserved.
MAINTENANCE MANUAL
KANNAD AUTO
MANUAL+
MANUAL
PAGE: 35 / 56
DATE: 08/04/2008
INDEX: B
REF.: DOC06097
-
Led and flash start flickering, the buzzer «beeps» every seconds.
-
Remove the short circuit from the water switch sensor.
-
Check that transmission stops after ≈ 10 seconds.
3.2.2.4. Functional control in Faraday box
NOTE: this control is used to check the beacon in real transmission.
BEACON WITHOUT GPS
For operation of 406 MHz tester, refer to the applicable operation manual included with the test set.
Figure 25: Connection diagram without GPS
Faraday box
Beacon
406 Tester
•
Connect the Faraday box to the tester with a coaxial cable.
•
Put the beacon into the Faraday box.
•
Activate the beacon (See § 1.3.2.3. Manual activation).
•
Check that the beacon operates (flash, led and chrono): see Figure 9 : Manual activation by ON
pushbutton.
•
Close the Faraday box.
•
Check the code transmitted by the beacon and received by the tester.
IMPORTANT: Only the first 406 transmission is a test transmission (1st digits encoded FF FE
D0), the next ones are real distress transmissions (1stt digits encoded FF FE 2F).
•
Wait for the second transmission and check that ≈ 50 seconds separate the second and the third
406 MHz transmission, check the 121.5 MHz presence.
•
Open the Faraday box.
Caution: to avoid transmission of a distress signal towards the satellites, ensure that the
transmitter is between two 406 MHz transmissions before opening the Faraday box.
•
Remove the beacon from the Faraday box and immediately de-activate it (press TEST / READY
pushbutton).
Copyright © KANNAD. All rights reserved.
MAINTENANCE MANUAL
KANNAD AUTO
MANUAL+
MANUAL
PAGE: 36 / 56
DATE: 08/04/2008
INDEX: B
REF.: DOC06097
BEACON WITH GPS
Figure 26: Connection diagram with GPS
Faraday box
Beacon
406 Tester
GPS
transponder
GPS
antenna
•
Connect the Faraday box to the tester with a coaxial cable.
•
Put the beacon into the Faraday box.
•
Activate the beacon (See § 1.3.2.3. Manual activation).
•
Check that the beacon operates (flash, led and chrono): see Figure 9 : Manual activation by ON
pushbutton.
•
Close the Faraday box.
•
Check that the led of GPS transponder is ON.
•
Check that, after a few minutes of transmission, the GPS position is decoded by the tester.
IMPORTANT: Only the first 406 transmission is a test transmission (1st digits encoded FF FE
D0), the next ones are real distress transmissions (1stt digits encoded FF FE 2F).
•
Wait for the second transmission and check that ≈ 50 seconds separate the second and the third
406 MHz transmission.
Caution: for GPS versions, homing (121.5 MHz) starts only after reception of GPS position.
Without GPS position, homing starts only after a time-out of 5 minutes.
•
Open the Faraday box:
Caution: to avoid transmission of a distress signal towards the satellites, ensure that the
transmitter is between two 406 MHz transmissions before opening the Faraday box.
•
Remove the beacon from the Faraday box and immediately de-activate it (press TEST / READY
pushbutton).
Copyright © KANNAD. All rights reserved.
MAINTENANCE MANUAL
KANNAD AUTO
MANUAL+
MANUAL
PAGE: 37 / 56
DATE: 08/04/2008
INDEX: B
REF.: DOC06097
3.2.3. Opening the beacon
3.2.3.1. Upper cover disassembly
IMPORTANT: desiccant capsule (Item 8 Figure 6) and O-ring (Item 10 Figure 6) must be
replaced each time the beacon is opened.
(1) Unscrew the locking nut (Item 12 Figure 6) with the opening device (see Figure 18 : Opening
device).
(2) Lift the upper cover assembly (Item 11 Figure 6) and disconnect the flash assembly from
connector of I521 PCB.
Figure 27: Cover disassembly
Upper cover
assembly
Locking nut
Connector
of flash assembly
Copyright © KANNAD. All rights reserved.
MAINTENANCE MANUAL
KANNAD AUTO
MANUAL+
MANUAL
PAGE: 38 / 56
DATE: 08/04/2008
INDEX: B
REF.: DOC06097
3.2.4. Control of frequencies on test bench
The purpose of this test is to check and measure the 121.5 MHz and 406 MHz real transmissions.
This will be done using the KANNAD test interface and a radio bench.
This control must be perform for each PCB replacement.
NOTE:
When control of frequencies operations are carried out with a BT100 (See § 3.2.4.3.
page 39, and § 3.2.4.4. page 40, they can be performed by pressing test only once,
jumper in "Normal" position, test mock-up without connection ribbon.
3.2.4.1. Description of test interface
Figure 28: Test interface description
Jumper
14-pin connector
RF connector
Connection ribbon
The test interface is composed of:
•
A connection ribbon fitted with two connectors.
•
An electronic PCB mainly composed of:
-
a RF connector;
-
a 14-pin connector;
-
a jumper used to select the frequency to be tested.
Note: the jumper should be in «Norm» position when no test is performed or when the tests
are performed with BT100A.
Figure 29: Jumper in Norm position
Copyright © KANNAD. All rights reserved.
MAINTENANCE MANUAL
KANNAD AUTO
MANUAL+
MANUAL
PAGE: 39 / 56
DATE: 08/04/2008
INDEX: B
REF.: DOC06097
3.2.4.2. Connection of test interface
(1) On I521 PCB, de-activate ST3, protection circuit against permanent transmissions (Refer to
Figure 12 : I521 PCB, micro interface / RF interface).
Note: do not deactivate ST3 when using BT100.
(2) Connect I521 PCB to the radio bench as follows:
-
insert the test interface into the guide pins of I521 PCB;
-
connect the connection ribbon to the test interface and to J5 connector of I521 PCB;
-
connect the RF connector to the radio bench input.
Figure 30: Connection of test interface
Guide pins
Radio
bench
J5 Test
connector
I521 View from below
3.2.4.3. Control of 121.5 MHz
NOTE:
For use with BT100A, see note § 3.2.4.
(1) Modulated 121.5
-
On the test interface, set the jumper to «121.5 mod.» position as shown below.
-
Press ON pushbutton of beacon then check that:
•
modulation rate should be between 85% and 100%;
•
demodulation is present (audio control);
-
Press TEST to stop.
-
On the test interface, set the jumper to «Norm.» position
Copyright © KANNAD. All rights reserved.
MAINTENANCE MANUAL
KANNAD AUTO
MANUAL+
MANUAL
PAGE: 40 / 56
DATE: 08/04/2008
INDEX: B
REF.: DOC06097
(2) Non modulated 121.5:
-
On the test interface, set the jumper to «121.5 perm.» position as shown below.
-
Press ON pushbutton of beacon:
•
Frequency should be equal to 121.5 MHz ± 0.006 MHz.
•
Power should be between 25 mW and 100 mW (14 dBm and 20 dBm).
If the results are different of those indicated above, replace I521 PCB (See § 4.3.
Replacement of I521 PCB).
-
Press TEST to stop.
-
On the test interface, set the jumper to «Norm.» position.
3.2.4.4. Control of 406.028 MHz
NOTE:
For use with BT100A, see note § 3.2.4.
-
On the interface test, set the jumper to «406 7 sec» position as shown below.
-
Press ON pushbutton of beacon:
•
Frequency should be equal to 406.028 MHz ± 0.001 MHz.
•
Power should be between 3 W and 8 W (35 dBm and 39 dBm).
•
400 Hz bi-phase modulation should be between 2 and 2.4 rd.
If the results are different from those indicated above, replace I521 PCB (See § 4.3.
Replacement of I521 PCB).
-
Press TEST to stop.
-
On the test interface set the jumper to «Norm.» position.
3.2.5. Re-activation of protection circuits
•
Disconnect the RF connector from the test bench and from J1 of I521 PCB (see Figure 30 :
Connection of test interface).
•
On I521 PCB, re-activate ST3, protection circuit against permanent transmissions (see Figure 12
: I521 PCB, micro interface / RF interface).
Copyright © KANNAD. All rights reserved.
MAINTENANCE MANUAL
KANNAD AUTO
MANUAL+
MANUAL
PAGE: 41 / 56
DATE: 08/04/2008
INDEX: B
REF.: DOC06097
3.2.6. Replacement of battery pack
See § 2.4.7. KIT battery pack for components included in the kit (only available from MARTEC SerpeIesm).
3.2.6.1. Mounting rack disassembly
(1) Disconnect the keyboard (Item 1-2 Figure 6) from J4 connector of I521 PCB (Item 9 Figure 6):
-
(a) unlock the locking system of the connector by pulling it off;
-
(b) once unlocked, disengage the cable of the keyboard from its connector and unstick it.
Figure 31: Keyboard connection
(a) Pull
(b) Disengage
Keyboard connector
(2) Lift and remove the mounting rack (Item 5 Figure 6) still fitted with I521 PCB.
(3) Put down the mounting rack.
Figure 32: Mounting rack disassembly
Battery pack
J6 connector
Desiccant capsule
Mounting rack
Copyright © KANNAD. All rights reserved.
MAINTENANCE MANUAL
PAGE: 42 / 56
KANNAD AUTO
MANUAL+
MANUAL
DATE: 08/04/2008
INDEX: B
REF.: DOC06097
3.2.6.2. Battery pack disassembly
(1) Disconnect the battery pack from J6 connector of I521 PCB (see Figure 32 : Mounting rack
disassembly).
(2) Throw away desiccant capsule (Item 8 Figure 6) (see Figure 32 : Mounting rack disassembly).
(3) Disengage the battery coupler board (Item 6 Figure 6) from the two lugs used to fix it to the
mounting rack (Item 5 Figure 6).
Figure 33: Battery pack disassembly
Lug
Lug
(4) Remove the battery pack (Item 7 Figure 6) from the mounting rack (Item 5 Figure 6).
3.2.6.3. Battery pack reassembly
(1) Record the batch and serial numbers of each new battery element (ex: Fab:0628 1594).
(2) Install the new battery pack (+ of batteries upwards).
(3) Reassemble the battery coupler board, taking care that the wires of the battery pack pass
through the notch of the board and the notch of the mounting rack.
Figure 34: Battery pack reassembly
Battery pack installed
Notches
Copyright © KANNAD. All rights reserved.
MAINTENANCE MANUAL
KANNAD AUTO
MANUAL+
MANUAL
PAGE: 43 / 56
DATE: 08/04/2008
INDEX: B
REF.: DOC06097
3.2.6.4. Check of battery pack
(1) Connect the battery pack to the battery test mock-up and a multimeter as shown below.
Figure 35: Test of battery pack
(2) Press the 2.5 ohms load switch or simultaneously on the two 5 ohms load switches during 6
seconds and check that:
-
the voltage must be at least 5.4 volts on the 2.5 ohms load. If the value is less than 5.4 volts,
wait 1 minutes and check again.
(3) Disconnect the battery pack from the battery test mock-up.
3.2.7. Beacon reassembly
IMPORTANT: Replace desiccant capsule and watertightness O-ring each time the beacon is
opened.
(1) Remove the old O-ring (item 10 Figure 6) from its groove.
(2) Check that the O-ring groove is clean.
(3) Insert the new O-ring into the groove of the housing.
(4) Put the new desiccant capsule into place.
IMPORTANT: Install cardboard side of capsule upwards (towards PCB).
Figure 36: O-ring and desiccant capsule replacement
Desiccant
capsule
O-ring
Copyright © KANNAD. All rights reserved.
MAINTENANCE MANUAL
PAGE: 44 / 56
KANNAD AUTO
MANUAL+
MANUAL
DATE: 08/04/2008
INDEX: B
REF.: DOC06097
(5) Connect the new battery pack to J6 connector of I521 PCB. If the beacon is activated, stop by
holding the switch of emergency stop as long as possible.
(6) Insert the mounting rack into the housing taking care that the pins of the water switch sensor on
housing side are opposite to the pins of the water switch sensor on I521 PCB side.
Figure 37: Inserting mounting rack
Pins WSS
PCB side
Pins WSS
Housing side
(7) Connect the keyboard to I521PCB:
-
(a) fit the cable of the keyboard into its connector (J4 I521 PCB);
-
(b) lock the locking system of the connector by pushing it.
Figure 38: Connection of keyboard
(b) Push
(a) Fit
(8) If the beacon was activated when connecting the battery pack, press TEST/Ready to stop.
(9) Stick the keyboard cable.
(10) Place the upper cover above the housing.
(11) Connect the flash assembly to J7 connector of I521 PCB (see Figure 27 : Cover disassembly).
(12) Insert the upper cover into the housing:
NOTE:
-
Caution, the wire of the flash must be sufficiently distant from the antenna axis (stuck to the
cover).
insert the lug of the housing into the guide of the upper cover as shown below.
Figure 39: Upper cover assembly
Guide
Upper cover
Lug
Housing
(13) Screw the locking nut manually. Do not lock.
(14) Perform a self-test. If the self-test is not OK, check the wire of the flash.
(15) Lock the locking nut with the opening device.The locking nut must be tightened until an audible
click.
Copyright © KANNAD. All rights reserved.
MAINTENANCE MANUAL
KANNAD AUTO
MANUAL+
MANUAL
PAGE: 45 / 56
DATE: 08/04/2008
INDEX: B
REF.: DOC06097
3.2.8. Check after closing
Once the beacon is closed, perform ON / OFF and test pushbutton controls described § 3.2.2.4.
3.2.9. Control of watertightness, use of the bath
3.2.9.1. Necessary equipment
•
Bath or adequate equipment.
•
Fresh water.
•
Thermometer.
•
Mounting bracket for Manual / Manual+ mounted on a non-metallic pole.
3.2.9.2. Procedure
•
Bring the water to a temperature of + 55° C ±10° C.
WARNING:
•
If an electrical heating source is used, its power supply must be switched
off while handling the beacon in the bath.
Place the beacon into the mounting bracket
Figure 40: Magnet position and water level
Water Level
•
Immerse the beacon in the bath as shown here above.
•
Free the residual air trapped during immersion by moving slightly the beacon until total elimination
of the air.
•
Immerse during 5 minutes:
•
-
check that no bubble rises;
-
if bubbles rise, identify and suppress the reason of the leaking then carry out a new test;
-
remove the beacon from its bracket then immerse it again shortly to check the water switch
contact.
Dry the beacon with compressed air.
3.2.10. Counter reset.
•
Reset counters to zero (use PKR4).
3.2.11. Sealing the ON pushbutton
When all the controls are performed, stick a new tamper proof seal on the ON pushbutton.
3.2.12. Update
Write the new battery expiration date (fabrication date + 6 years) and next SBM date according to the
local regulation on the label of the housing and on the user manual.
Copyright © KANNAD. All rights reserved.
MAINTENANCE MANUAL
KANNAD AUTO
MANUAL+
MANUAL
PAGE: 46 / 56
DATE: 08/04/2008
INDEX: B
REF.: DOC06097
4. Corrective Maintenance
4.1. Replacement of upper cover assembly
See § 2.4.1. KIT upper cover all versions, for components included in the kit.
IMPORTANT : Desiccant capsule and O-ring should be replaced each time the beacon is opened.
However, if the beacon is open for less than 5 minutes, steps (4), (5), (6), (7), (9) and
(10) of this paragraph may be omitted.
(1) Unscrew the locking nut with the opening device (see Figure 18 : Opening device).
(2) Lift the upper cover assembly and disconnect the flash assembly from J7 connector of I521 PCB.
Upper cover
assembly
Locking nut
Connector
of flash assembly
(3) Extract the upper cover from the housing and discard it.
Copyright © KANNAD. All rights reserved.
MAINTENANCE MANUAL
PAGE: 47 / 56
KANNAD AUTO
MANUAL+
MANUAL
DATE: 08/04/2008
INDEX: B
REF.: DOC06097
(4) Disconnect the keyboard from J4 connector of I521 PCB.
-
(a) unlock the locking system of the connector by pulling it off;
-
(b) once unlocked, disengage the cable of the keyboard from its connector and unstick it.
(a) Pull
(b) Disengage
(5) Lift and remove the mounting rack connected with I521 PCB.
(6) Replace the desiccant capsule.
IMPORTANT: Install cardboard side of capsule upwards (towards PCB).
(7) Remove the old O-ring from its groove and replace it by a new O-ring.
(8) Check that the O-ring groove is clean.
Desiccant
capsule
(9) Insert the mounting rack into the housing taking care that the pins of the water switch sensor on
housing side are opposite to the pins of the water switch sensor on I521 PCB side.
Pins WSS
PCB side
Pins WSS
Housing side
Copyright © KANNAD. All rights reserved.
MAINTENANCE MANUAL
PAGE: 48 / 56
KANNAD AUTO
MANUAL+
MANUAL
DATE: 08/04/2008
INDEX: B
REF.: DOC06097
(10) Connect the keyboard to I521PCB.
-
(a) fit the cable of the keyboard into its connector;
-
(b) lock the locking system of the connector by pushing it in.
(b) Push
(a) Fit
(11) Stick the keyboard cable.
(12) Place the new upper cover above the housing.
(13) Connect the flash assembly to J7 connector of I521 PCB (see page 46).
(14) Insert the upper cover into the housing.
NOTE:
-
Caution, the wire of the flash must be sufficiently distant from the antenna axis (stuck to the
cover).
Insert the lug of the housing into the guide of the upper cover as shown below.
Guide
Upper cover
Lug
Housing
(15) Screw the locking nut manually. Do not lock.
(16) Perform a self-test. If the self-test is not OK, check the wire of the flash.
(17) Lock the locking nut with the opening device.The locking nut must be tightened until an audible
click.
(18) Once the beacon is closed perform the following tests:
-
ON / OFF and test button controls described § 3.2.2.4.
-
paragraph 3.2.9. Control of watertightness, use of the bath.
(19) Stick a new tamper proof seal on the ON pushbutton.
Copyright © KANNAD. All rights reserved.
MAINTENANCE MANUAL
PAGE: 49 / 56
KANNAD AUTO
MANUAL+
MANUAL
DATE: 08/04/2008
INDEX: B
REF.: DOC06097
4.2. Replacement of housing
IMPORTANT : The housing has to be replaced if the locking lug is worn.
For components included in the kit:
•
KANNAD Manual versions: See § 2.4.2. KIT housing MANUAL, MANUAL GPS.
•
KANNAD Manual+ versions: See § 2.4.3. KIT housing MANUAL+, MANUAL+ GPS.
•
KANNAD Auto versions: See § 2.4.4. KIT housing AUTO, AUTO GPS.
(1) Unscrew the locking nut with the opening device (see Figure 18 : Opening device).
(2) Lift the upper cover assembly and disconnect the flash assembly from J7 connector of I521 PCB.
Upper cover assembly
Locking
lug
Connector
of flash assembly
Locking nut
(3) Extract the upper cover from the housing.
Copyright © KANNAD. All rights reserved.
MAINTENANCE MANUAL
KANNAD AUTO
MANUAL+
MANUAL
PAGE: 50 / 56
DATE: 08/04/2008
INDEX: B
REF.: DOC06097
(4) Disconnect the keyboard from J4 connector of I521 PCB.
-
(a) unlock the locking system of the connector by pulling it off;
-
(b) once unlocked, disengage the cable of the keyboard from its connector and unstick it.
(a) Pull
(b) Disengage
(5) Lift and remove the mounting rack still connected to I521 PCB.
(6) Using a scalpel, unstick the traceability label located below the old housing. Stick it onto the new
housing then protect it with LEXAN®.
(7) Remove and keep the ballast of the old housing.
Note: turn the beacon upside down and give a tap on the bottom of the housing to extract the
ballast.
(8) Keep the tether to use it after housing replacement.
(9) Discard the old housing.
(10) Replace the desiccant capsule.
IMPORTANT: Install cardboard side of capsule upwards (towards PCB).
Desiccant capsule
Copyright © KANNAD. All rights reserved.
MAINTENANCE MANUAL
PAGE: 51 / 56
KANNAD AUTO
MANUAL+
MANUAL
DATE: 08/04/2008
INDEX: B
REF.: DOC06097
(11) Install the tether onto the new housing and tight it using the same knot as described figure below.
1
2
3
(12) Insert the new O-ring into the groove of the new housing and the ballast into the new housing.
Ballast
O-ring
(13) Insert the mounting rack into the new housing taking care that the pins of the water switch sensor
on housing side are opposite to the pins of the water switch sensor on I521 PCB side.
Pins WSS
PCB side
Pins WSS
Housing side
Copyright © KANNAD. All rights reserved.
MAINTENANCE MANUAL
PAGE: 52 / 56
KANNAD AUTO
MANUAL+
MANUAL
DATE: 08/04/2008
INDEX: B
REF.: DOC06097
(14) Connect the keyboard to I521PCB.
-
(a) fit the cable of the keyboard into its connector;
-
(b) lock the locking system of the connector by pushing it in.
(b) Push
(a) Fit
(15) Stick the keyboard cable.
(16) Place the upper cover above the housing.
(17) Connect the flash assembly to J7 connector of I521 PCB (see page 49).
(18) Insert the upper cover into the housing.
NOTE:
-
Caution, the wire of the flash must be sufficiently distant from the antenna axis (stuck to the
cover).
Insert the lug of the housing into the guide of the upper cover as shown below.
Guide
Upper cover
Housing
Lug
(19) Screw the locking nut manually. Do not lock.
(20) Perform a self-test. If the self-test is not OK, check the wire of the flash.
(21) Lock the locking nut with the opening device.The locking nut must be tightened until an audible
click.
(22) Once the beacon is closed perform the following tests:
-
ON / OFF and test button controls;
-
paragraph 3.2.9. Control of watertightness, use of the bath.
(23) Stick a new tamper proof seal on the ON pushbutton.
(24) If the beacon is a GPS version, stick a GPS sticker below the ON / Test pushbutton.
(25) Report the information of the old housing onto the label of the new housing.
Copyright © KANNAD. All rights reserved.
MAINTENANCE MANUAL
KANNAD AUTO
MANUAL+
MANUAL
PAGE: 53 / 56
DATE: 08/04/2008
INDEX: B
REF.: DOC06097
4.3. Replacement of I521 PCB
For components included in the kit:
•
Beacon with built-in GPS: See § 2.4.6. KIT I521 PCB with GPS.
•
Beacon without built-in GPS: See § 2.4.5. KIT I521 PCB without GPS.
(1) Unscrew the locking nut with the opening device (see Figure 18 : Opening device).
(2) Lift the upper cover assembly and disconnect the flash assembly from J7 connector of I521 PCB.
Upper cover
assembly
Locking nut
Connector
of flash assembly
(3) Extract the upper cover from the housing.
Copyright © KANNAD. All rights reserved.
MAINTENANCE MANUAL
KANNAD AUTO
MANUAL+
MANUAL
PAGE: 54 / 56
DATE: 08/04/2008
INDEX: B
REF.: DOC06097
(4) Disconnect the keyboard from J4 connector of I521 PCB.
-
(a) unlock the locking system of the connector by pulling it off;
-
(b) once unlocked, disengage the cable of the keyboard from its connector and unstick it.
(a) Pull
(b) Disengage
(5) Lift and remove the mounting rack still fitted with I521 PCB.
(6) Disconnect the battery pack from J6 connector of I521 PCB.
J6 connector
(7) Unclip I521 PCB from the four lugs used to fixed it to the mounting rack.
Lugs
Lugs
(8) Put down I521 PCB disassembly and discard it.
(9) Clip the new I521 PCB into the four lugs of mounting rack.
Note: Like the mounting rack which is fitted with four lugs, one being wider than the other, there
are four notches in the PCB, one being also wider than the other. Use these wide lug as indexing
slot.
(10) Replace the desiccant capsule.
Copyright © KANNAD. All rights reserved.
MAINTENANCE MANUAL
PAGE: 55 / 56
KANNAD AUTO
MANUAL+
MANUAL
DATE: 08/04/2008
INDEX: B
REF.: DOC06097
IMPORTANT: Install cardboard side of capsule upwards (towards PCB).
(11) Connect the battery pack to J6 connector of I521 PCB.If the beacon is activated, stop by holding
the switch of emergency stop as long as possible.
IMPORTANT:
(12) Remove the old O-ring from its groove and replace it by the new O-ring.
Desiccant
capsule
O-ring
(13) Insert the mounting rack into the housing taking care that the pins of the water switch sensor on
housing side are opposite to the pins of the water switch sensor on I521 PCB side.
Pins WSS
PCB side
Pins WSS
Housing side
(14) Connect the keyboard to I521PCB.
-
(a) fit the cable of the keyboard into its connector;
-
(b) lock the locking system of the connector by pushing it in.
(b) Push
(a) Fit
(15)If the beacon was activated when connecting the battery pack, press TEST/Ready to stop.
(16) Stick the keyboard cable.
(17) Perform a control of frequencies: See § 3.2.4. Control of frequencies on test bench.
(18) Place the upper cover above the housing.
Copyright © KANNAD. All rights reserved.
MAINTENANCE MANUAL
PAGE: 56 / 56
KANNAD AUTO
MANUAL+
MANUAL
DATE: 08/04/2008
INDEX: B
REF.: DOC06097
(19) Connect the flash assembly to J7 connector of I521 PCB (see page 53).
(20) Insert the upper cover into the housing.
-
Insert the lug of the housing into the guide of the upper cover as shown below.
Guide
Upper cover
Lug
Housing
(21) Screw the locking nut manually. Do not lock.
(22) Perform a self-test. If the self-test is not OK, check the wire of the flash.
(23) Lock the locking nut with the opening device.The locking nut must be tightened until an audible
click.
(24) Report the new CSN of the beacon onto the label of the housing and on the booklet.
(25) Once the beacon is closed perform:
-
-
Functional controls:
•
paragraph 3.2.2.4. Functional control in Faraday box,
•
paragraph 3.2.2.3. Functional control out of Faraday box.
Watertightness test:
•
paragraph 3.2.9. Control of watertightness, use of the bath.
(26) Stick a new tamper proof seal on the ON pushbutton.
(27) Inform KANNAD that the CSN number has been changed:
Send old CSN number, new CSN number and S/N to:
[email protected] or [email protected]
Copyright © KANNAD. All rights reserved.