1
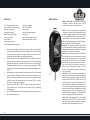
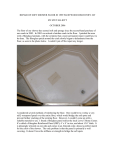
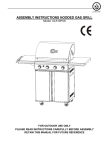
3 in 1 Smoker,
Charcoal Grill and Water Smoker
NAPOLEON APPLIANCE CORP.,
214 BAYVIEW DR.,
BARRIE, ONTARIO, CANADA L4N 4Y8
PHONE: (705)726-4278
FAX: (705)725-2564
[email protected]
www.napoleongrills.com
What’s Inside
Instructions - How to set up and use your water smoker
Hints and tips - How to get the best from your water smoker
Recipes - Step by step guide to great tasting smoked food
Retain this manual for future reference.
N415-0212 01/03/11
21.
Optional Accessories
Smoker Features
Marinade Injector
Use this oversize hypodermic-style needle to inject
basting mixtures, marinades, melted butter and
other liquid flavourings deep into the meat.
Product Code: 55007
Sturdy lid handle
Silicone BBQ Tongs
A welcome addition to your grilling accessories.
The silicone tips make lifting and rotating food
effortless. Also features a comfortable handle that
is extra-long to keep you at a safe distance.
Product Code: 55003
Lid contains a horizontal bar, which
is ideal for hanging fish, ribs or
sausages
Grid Lifter
No more struggling to lift the grid off a hot grill for
refueling or smoking. The sturdy construction lifts
heavy, hot grids keeping your hands away from the
heat.
Product Code: 62121
Pocket Thermometer
Provides the most accurate way of testing whether
or not your food is cooked to perfection.
Product code: 61007
ACCU-PROBE™ temperature gauge
Top air vent
Temperature probe eyelet at each
grill level
Each cooking chamber (stacker)
contains a 20” cooking grate
Hinged, tight fitting doors, all easy
access to the water pan and charcoal
basket
Folding handles enable ease of transport and storage
Latches lock each section together
3 air vents in the base are excellent
for temperature control
3 sturdy legs
Versatile
20.
1.
Safety Instructions
Please read and follow these instructions before using your smoker,
failure to do so may result in serious injury, death or a fire.
•
•
•
•
•
•
•
•
•
•
•
•
This unit is designed for outdoor use only. Do not operate indoors or in an
enclosed area
Only use this smoker on a hard, level and non-combustible surface
Do not leave the smoker unattended and keep children and pets away from
the unit at all times
Make sure there is at least 10’ clearance between the unit and any combustible
materials such as bushes, trees, wooden decks and buildings
Do not attempt to move the hot smoker
Use bbq/oven mitts at all times, as the surfaces will become hot
The use of abrasive cleaners or sharp objects will damage the coatings
Use extreme caution when adding charcoal or wood
Do not use instant lighting charcoal, or flammable liquids. We recommend
using a chimney starter with natural charcoal or charcoal briquettes
Extinguish coals and ash after use and before leaving the smoker unattended
Use common sense and caution when using this smoker
To clean the smoker, a mild solution of warm, soapy water is all that is
required
Warranty
For one year from date of purchase, Napoleon® warrants this charcoal smoker against
defects due to bad workmanship or faulty materials to the original purchaser. To
obtain repair or replacement under the terms of this warranty, please call Customer
Care at 1-866-820-8686 for complete details. Napoleon’s obligations under this
warranty are limited to the following guidelines.
The warranty does not cover smokers that have been altered or damaged due to:
normal wear, rust, abuse, improper maintenance, improper use, disassembly of
parts and/or attempted repair by anyone other than an authorized employee of
Napoleon®.
•
This warranty does not cover surface scratches or heat damage to the finish,
which is considered normal wear.
•
Napoleon® may elect to repair or replace damaged units covered by the terms
of this warranty.
•
The warranty extends to the original purchaser only and is not transferable or
assignable to subsequent purchasers.
Except as above stated, Napoleon® makes no other express warranty. The implied
warranties of merchantability and fitness for a particular purpose are limited in
duration to one year from the date of purchase.
2.
Mediterranean Chicken
Pesto (You may also use ready-made pesto)
3 cups fresh basil leaves (loosely packed)
3 tbsp. lightly toasted pine nuts
2 cloves roughly chopped garlic
½ cup freshly grated parmesan cheese
½ cup extra virgin olive oil
salt and pepper to taste
pop all the ingredients into a blender and blend until you have a paste.
Rub (Use Napoleon® Chicken & Rib spice if you want to skip this step).
1 tbsp. course sea salt
1½ tbsp. cracked pepper corns
1 tbsp. dried rosemary
1 tbsp. dried oregano
1 tbsp. ground coriander
If you like a bit of a “kick”, add some crushed chili. Mix all the ingredients by hand
in a mixing bowl.
Chicken
1 large, preferably free range chicken, refrigerated / if previously frozen, thaw in
refrigerator or under cold water.
Preparation - Loosen the skin of the chicken and using a spoon, insert the pesto
between the skin and flesh. Once you have a few spoonfuls in place, massage the
bird until the pesto is evenly distributed. Take a bit of the left over pesto and rub
it all over the outside, then sprinkle on your prepared rub (the pesto will help it
to stick).
Place the bird on the cooking grill of your smoker (the smoker has been set up
for water smoking and the charcoal has a light grey colour). Close the lid, open
the bottom door and throw on some wood for smoke flavour. With the smoker
running at between 200°F and 250°F the bird should be done in around 3½ hours.
Remember to use a probe thermometer to check if it’s done.
Tip – Let the chicken “rest” for at least 10 minutes before carving.
19.
Cold Smoked Fish
Basic brine for fish…
½ cup brown sugar
½ cup kosher or coarse sea salt
1 cup soy sauce
6 cups water
1 cup dry white wine
1 tsp. coarse ground pepper
1 finely chopped sprig of rosemary
You may need to increase the quantities proportionately dependent on how
much you need to cover your fish.
Thank you for purchasing the Apollo® 3 in 1 Smoker. We want you to be able
to use your new unit safely and effectively, while at the same time, producing
great tasting food for your family and friends to enjoy.
Tools required for assembly:
Phillips/Star Screwdriver
8mm - 5/16 Spanner/wrench
Remove all the components from the box,
and lay them out on a smooth flat surface.
1. Locate the base unit (dome shaped with
3 vents)
2. Lay the base unit open side down and
attach the 3 legs, using the six M5 x 10mm
nuts and bolts.
* NB – Please see inset diagram for correct
positioning of bolts, washers and nuts. Avoid
over tightening the bolts, as this can cause
damage to the finish.
3. Now turn the base unit over, so that it
stands on its legs and as assemble the rest
of the parts, in the order they appear on the
main diagram.
Method…
1.
Mix all the ingredients and stir thoroughly until the salt and sugar has
dissolved. Place the fish into a non-reactive container and pour the brine
mixture over, making sure that the fish is totally covered by the brine.
2.
Refrigerate overnight.
3.
Remove the fish from the brine (the brine has done its work, so should
now be disposed of), pat the fish dry and place back into the fridge for 2
hours.
4.
Set up your unit for cold smoking, as described previously, place the fish on
the cooking grills or you may want to use the fish hanger located in the lid,
pop the lid on and smoke.
Times will vary greatly depending on the size and weight of the fish. Mild woods
such as Alder, Apple, Beech or Maple are recommended for smoking fish.
Your Apollo® 3 in 1 BBQ Smoker is now ready
to use.”
Base
Unit
showing leg
attachment
18.
3.
Food smoking is easy!
Roxy’s Spicy Apple BBQ Sauce
When smoking food, you want to slow down the cooking process, avoiding the
temptation to “fiddle” with your food when smoking often results in better tasting
food. You will want to cook food at temperatures of between 200°F - 250°F (Hot
Smoking). You can smoke any type of food…..from vegetables to large cuts of meat,
even whole turkeys, and on a relatively small unit you can cook a load of food. The
Apollo® smoker incorporates many innovative features making them easy for you to
use. Some of the features and other food smoking terms:
Water Pan - A water pan positioned between the food & fire which acts as a buffer,
making it almost impossible to burn food. It also serves to stabilise the cooking
temperature and provides a moist cooking environment. Tip – Add beer, wine and/
or herbs to your water pan for extra flavour.
Rub – Dry or wet, a mixture of spices and herbs that is applied (rubbed) to the
outside of the food.
Wood – Wood for smoking comes in various forms, chunks, chips, dust and pellets,
it also comes in many varieties (flavours) from apple to walnut, each imparting
a different taste. Tip – Use only wood that you know has not been treated, or
better still buy from an outlet that can advise you correctly…. see your authorized
Napoleon® dealer.
Cooking Grill/ Rack – This is where you place the food on the cooker/smoker.
Charcoal – Like wood, it comes in an array of shapes and styles, lump or briquettes.
Charcoal provides the heat source and if used correctly should not impart any
flavour to your food… let it burn until the surface is covered with a layer of grey ash
(once you’ve become a seasoned BBQ’er, you can worry about using techniques
like the “minion” method to get longer burn times). Tip – Always use high quality
charcoal, remember some contain binders that may not be good for you.
Charcoal Chimney Starter – This is an excellent invention, it allows you to light
charcoal without the need for liquid starter, all it requires to get your charcoal going
quickly, safely and cleanly is some rolled up newspaper. It also allows you to top up
your charcoal basket easily. Tip – Wear closed shoes when handling hot charcoal.
Good quality BBQ mitts are also essential.
Probe Thermometer – An essential tool for determining when the food is cooked.
Insert a probe into the thickest part of the food (be sure to avoid hitting a bone
as this will give a false reading) you can then use the reading to see whether the
food has reached the desired temperature, a chart can be found further on in this
manual. Tip – The smoking process makes some meats turn pink, so don’t mistake
this for being raw.
3 baking apples, peeled, cored and diced
2 cloves garlic puree
1 tbsp. olive oil
1/2 cup water
1 1/2 cups ketchup
3/4 cup cider vinegar
1/4 cup molasses
1/2 cup turbinado sugar or brown sugar
1/2 cup cane syrup
1 tsp. salt
4.
1 tsp. cinnamon, ground
1 tsp. nutmeg
1/2 tsp. allspice
1/2 tsp. black pepper, fresh ground
1/2 tsp. cayenne pepper
1/4 tsp. clove, ground
1/4 cup cider vinegar, reserved
1 onion
In a sauce pan over medium heat, sauté apples, onions and garlic in olive oil for
5 minutes till onions become translucent. Add the water and reduce heat to low
and simmer till the apples have dissolved, 20 minutes or so. Add the remainder
of ingredients and simmer on low heat for 45 minutes until sauce is thickened.
Add remaining vinegar and incorporate. Place sauce in a blender and process till
smooth. Cool sauce and refrigerate up to 2 weeks.
Mack’s All purpose BBQ Rub
Use teaspoons, cups or whatever to measure out the ingredients (just make
sure you use the same size of container for all) depending on what quantity you
require. This rub works on ribs, steak or poultry.
1 measure ground fenugreek
3 measures coarse sea salt
4 measures demerara sugar
1 measure garlic powder
6 measures ground paprika
1 measure coarsely ground black pepper
3 measures ground coriander
1 measure yellow mustard powder
2 measures ground pimento
2 measures dried mixed herbs
Mix all the ingredients together and don’t worry if you have left over, as it’ll
last a couple of months.
17.
Stuffed and Rolled Brisket
Wood Types
All you require for this dish is a few ingredients, coarsely chopped garlic, salt,
pepper, coarse grain mustard, some natural string and plenty of time. Once you
get the brisket home, the first thing you need to do is cut the string and unroll
the brisket, if its already rolled, paying attention to how it all fits together, as
you will need to roll it up again. With the brisket laid out flat (fat side down)
slather it with mustard, put the chopped garlic on and season liberally with the
salt and pepper. At this point, you can slice some cheese on to it (optional) before
rolling it up again. Use a natural cotton string to tie it all together again. Slather
the outside with mustard and season with salt and pepper (herbs of your choice
can be sprinkled on too). Wrap the brisket in cling film and leave it in the fridge
overnight. Early the next morning (it will take 8 – 12 hours to cook, depending
on the size of the cut), set the unit up for water smoking and place the brisket on
the cooking grill and close the lid. Pop some wood on through the bottom door
for smoke flavour. This is where the time ingredient comes in, find something to
occupy your time as you wait for the low heat (200°F - 250°F) and smoke to work
its magic.
Wood Type Characteristics
Brisket takes time and practice, if you are monitoring the internal temperature of
the meat, you will probably notice that after about 5 hours the temperature will
sit at around 160°F for a while, don’t panic, as it will start to rise again. When it
has reaches 190°F, your brisket is cooked, but you will need to let the meat rest
for at least half an hour, before carving and serving.
16.
ALDER
Very delicate with a hint of sweetness. Good with fish, pork, poultry,
and light-meat game birds.
ALMOND
A sweet smoke flavour, light ash. Good with all meats.
APPLE
Very mild with a subtle fruity flavour, slightly sweet. Good with poultry
(turns skin dark brown) and pork.
ASH
Fast burner, light but distinctive flavour. Good with fish and red meats.
BIRCH
Medium hardwood with a flavour similar to maple. Good with pork and
poultry.
CHERRY
Good with poultry, pork and beef. Some say that cherry wood is the
best wood for smoking.
GRAPEVINES
Tart. Provides a lot of smoke, rich and fruity. Good with poultry, red
meats, game and lamb.
HICKORY
The King of smoking woods. Sweet to strong, heavy bacon flavour.
Good with pork, ham and beef.
LILAC
Very light, subtle with a hint of floral. Good with seafood and lamb.
MAPLE
Smoky, mellow and slightly sweet. Good with pork, poultry, cheese, and
small game birds.
MESQUITE
Strong earthy flavour. Good with beef, fish, chicken, and game. One of
the hottest burning woods.
MULBERRY
The smell is sweet and reminds one of apple.
OAK
The Queen of smoking wood. RED OAK is good on ribs. Good with red
meat, pork, fish and heavy game.
ORANGE
Produces a nice mild smoky flavour. Excellent with beef, pork, fish and
poultry.
PEAR
A nice subtle smoke flavour. Much like apple. Excellent with chicken
and pork.
PECAN
Sweet and mild with a flavour similar to hickory. Tasty with a subtle
character. Good with poultry, beef, pork and cheese
PLUM
Great on most white or pink meats, including chicken, turkey, pork and
fish.
WALNUT
Very heavy smoke, usually mixed with lighter woods like almond, pear
or apple. Can be bitter if used alone. Good with red meats and game.
5.
Quick Reference Cooking Chart
Delicious Duck
The chart below shows estimated cooking times, based on the smoker running at
230°F. Outside factors such as wind and ambient temperature will have an effect on
the actual time it takes to cook food. Internal temps are taken at the thickest part of
the meat, using a good quality probe thermometer. We strongly recommend the use
of a probe thermometer to check for doneness.
1 duck (fresh not frozen)
1 cup freshly squeezed orange juice
½ cup soy sauce
¼ cup dry sherry
2 cloves of garlic (finely chopped)
1 tsp mustard powder
4 thin slices of orange
salt and pepper to taste
Food
Cut
Time
Internal Temp
Sirloin
Roast
3 -4 Hrs
Rare 50°C (125°F )
Med 60°C (145°F)
Well 70°C (160°F)
Brisket
Roast
6+ Hrs
85°C (190°F)
Ribeye
Steak
5 – 15 Minutes
Rare 50°C (125°F )
Med 60°C (145°F)
Well 70°C (160°F)
Chicken
Whole
3½ - 4 Hrs
75°C (165°F)
Chicken
Breast
25-35 Mins
75°C (165°F)
Chicken
Thigh
25-35 Mins
75°C (165°F)
Turkey
Whole
6 – 8 Hrs
75°C (165°F)
Salmon
Whole
2 – 3 Hrs
60°C (140°F)
Salmon
Fillet
30 – 40 Mins
60°C (140°F)
Prawns
Whole
10 – 15 Mins
Cook until pink
Shoulder
Whole
12+ Hrs
85°C (190°F)
Loin
Roast
4 – 5 Hrs
65°C (150°F)
Ribs
Rack
5 – 6 Hrs
65°C (150°F)
Beef
Poultry
Combine the orange juice, soy sauce, sherry, garlic and mustard powder in a glass
bowl and mix thoroughly.
Place the duck in the bowl and gently massage the mixture onto the bird. Cover
and refrigerate overnight or at least a few hours. Remove the duck from the
mixture and pierce the skin in several places (this will allow the fat to drain off
while cooking). Lift the skin carefully and place the orange slices underneath on
the breast (2 on each side). Allow the duck to come up to room temperature.
Once the smoker is ready, water pan in and filled about ¾ of the way, place the
duck on the cooking grill. Put the lid on (remember to open the lid vent fully) and
add the wood of your choice to the charcoal, using the bottom access door. Cook
for about 4 hours at 220°F, or until the internal temperature of the meat reaches
75°C (165°F).
Fish
Pork
6.
15.
Pulled Pork
1 2½ - 4 kg pork shoulder roast,
bone-in (aka pork or Boston butt).
Napoleon’s bbq sauce
1 jar english mustard.
Mack’s All Purpose Bbq Rub
1 tbsp. chili powder
2 tbsp. paprika
1 tbsp. cayenne pepper
1 tbsp. fresh ground black pepper
1. 2. 3. 4. 5. 14.
Whole Chicken
1 tbsp. garlic powder
1 tsp. onion powder
2 tbsp. sea salt
1 tbsp. dried rubbed oregano
1 tbsp. cumin
1 tsp. coriander seeds, crushed
1 tbsp. mustard seeds, crushed
Score the skin and apply the mustard, ensuring that the roast is completely
covered (the mustard flavour will not be prevalent at the end of the cooking
process). Generously apply the rub, again making sure to cover the roast
completely. Wrap in cling film and refrigerate overnight.
Remove the roast from the fridge about half an hour before you want to
cook, this will ensure that it is at room temperature. Get the charcoal going
and place the water pan in position. Place the roast on the cooking grill.
The cook should take about 9 hours, so make sure you are using a full load
of good quality charcoal and keep the smoker temperature between 200250°F.
Add wood chips or chunks through the bottom door on to the fire to create
smoke, Hickory or Mesquite wood work well with pork. You will need to
monitor the internal temperature of the meat, you will probably notice
that after a while, the temperature will sit at around 160°F for a while,
don’t panic, as it will start to rise again.
When it has reached 195°F – 200°F, your butt is cooked, but you will need
to let the meat rest for at least half an hour, before “pulling” (shredding/
breaking apart).
Serve on fluffy white bread rolls with Coleslaw and let your guests pour on
as much sauce as they like.
What you will need: Charcoal, BBQ/ oven mitts,
newspaper, charcoal chimney starter, lighter/
matches, clean water, herbs, spices, food.
The Fire – Fill your charcoal starter with a good quality
charcoal, place a sheet of rolled up newspaper into the
cavity at the bottom, make sure the starter is standing
on a non-combustible surface (you can stand it in the
charcoal basket of your smoker), light the newspaper.
The charcoal should be ready to use in about 20 minutes.
Pour the charcoal into the charcoal basket.
Water Pan – Fill the water pan about ¾ with hot water
(by using hot water your smoker will get up to the correct
cooking temperature quicker) and place it in the bottom
stacker. Put the stacker on to the base unit.
The Food – Once you have prepared the food and taken
it out of the fridge, you can now place it on the cooking
grill just above the water pan. If you are cooking more
using another stacker (or two) you can now prepare
these and put them onto the bottom stacker. We advise
you not to use more than 3 stackers at a time, as the
higher you go, the unit becomes unstable. Tip – As the
food is the most important ingredient, make sure you
buy the best quality.
The Smoke – Put the lid on to the top stacker, open the
bottom access door and place the wood chips or chunks
directly on to the charcoal, be careful… it’s HOT! Close
the door. MAKE SURE THAT THE VENT ON THE LID IS
OPEN if you close this vent it will shut down the fire. If
you need to adjust the temperature use the vents on the
base unit. Open it to get more heat, close it to bring the
temperature down. Wood can be added for more smoke
during the cook, but if it’s your first time, just add a
handful of chips at the beginning…. If you find the food’s
not smoky enough, add more on your next cook.
The Best Bit – After approximately 3.5 hours (cooking
temperature of 200°F -250°F) the chickens should be
done. Check using a probe thermometer… the internal
temperature of the meat should be at least 165°F.
7.
Quick Tips
Low and Slow Spare Ribs
•
The important thing to remember when buying ribs (or any meat) is to ensure
you get the best quality available..... You're going to spend about 5 hours cooking
them, so you don't want to start off with meat that will not turn out right, no
matter how you prepare and cook it.
•
•
•
•
•
•
•
•
•
Use hot water in the water pan at the start, this will allow the unit to come up
to the desired temperature a lot quicker.
Make sure that the air vent in the lid is kept fully open during use, failure to do
so will disrupt the airflow and may result in the fire going out.
If you’re looking, the food’s not cooking. Every time the lid is lifted to inspect
the food, it will take up to 30 minutes for the smoker to come back up to the
required temperature. Familiarity and the use of probe thermometers will
reduce the need to inspect the food visually.
Start with a small amount of wood to create smoke on your first few attempts,
as it is very easy to “over smoke” food and remember, to get a smoke flavour
all that is required is a wisp of smoke, smoke billowing out of the unit is not
desired and will often leave a sooty deposit on the food which doesn’t taste
good.
Use a good quality lumpwood charcoal or charcoal briquettes. Some brands of
fuel have unsavory fillers and may impart an unpleasant flavour to the food.
Buy good quality ingredients, as this makes all the difference.
Allow the food to come up to room temperature by taking it out of the
refrigerator at least 30 minutes before you intend to cook it. Meat at room
temperature allows smoke to penetrate more.
Use only tried and tested non-resinous woods, see chart in manual.
Try to source wood that has no bark on it, as the bark can contain bugs and
other nasties that may be poisonous.
Most importantly... experiment! Try different woods, rubs and sauces until
you come up with the combination that suits your taste buds. We’ve included
a few recipes in this booklet, but feel free to add your own twist to them.
1. 2. 3. 4. 5. 6. 7. 8. 8.
Prepare ribs by removing the membrane from the underside of the ribs.
Trim off any loose fat or meat.
Pat the ribs dry using a paper towel, apply a rub, making sure to cover the
ribs completely. You can use an “off the shelf” rub or make your own, just
blend a few dried spices and herbs together. Wrap the ribs in Clingfilm or
use a "foodsaver" bag (one that seals) to place the ribs in, and refrigerate
overnight.
Remove the ribs from the fridge about half an hour before you want to
cook them, this will ensure that they are at room temperature. Baste the
ribs with Napoleon’s bbq sauce or make your own by using cola, tomato
sauce/ ketchup, honey and whatever herbs and spices you like.
Get the charcoal going and place the water pan in position and place the
ribs on the cooking grill/rib rack. The cooking time should take 5 – 6 hours,
so make sure you are using a full load of good quality charcoal and keep
the smoker temperature between 200-250°F.
Add wood chips or chunks through the bottom door on to the fire to create
smoke, this should be done for the first 3 hours. You will need to baste the
ribs every hour during this period.
After 3 hours, remove the ribs from the smoker and place them on some
heavy duty tin foil, baste heavily with the sauce, wrap the tinfoil around
them, making sure there are no holes in the foil. Put the parcel back on
the smoker for another 2 hours, keeping the temperature at between
200-250°F (there’s no point putting any wood for smoke on the fire at this
stage).
Remove the foil from the ribs and place them back in the BBQ.
After 6 hours total cooking time, baste for a final time, drop one of the
grills onto the fire bowl brackets and quickly sear the ribs on either side for
30 seconds, caramelising the sauce.
13.
Salmon Steaks
Cold Smoking
6 salmon steaks (1- 1.5 inches thick)
2 cups cold water
2 tbsp. sea salt
1-1/2 tsp. white wine vinegar
1 tsp. dried mixed herbs
1/4 cup extra virgin olive oil
Cold smoking is used to cure, rather than, cook the food. Foods that are usually
prepared in this method include fish, ham, bacon and cheese. It must be said,
that “cold” smoking is a little harder to master than “hot” smoking, and we would
suggest buying a book that deals specifically with the methods used. Home
Smoking and Curing by Keith Erlandson is a good place to start. Cold smoking is
done, as the name suggests, at low temperatures, below 30 °C (85 °F). For this
reason, not all days are ideal for cold smoking, so colder periods of the year are
best. For some meats, such as fish or seafood, a brine is used before the food is
smoked. A brine is usually a water, salt and sugar solution.
Combine the water, salt, vinegar and mixed herbs. Stir until salt dissolves.
Place the fish steaks into a non-reactive dish (glass) and pour the mixture over.
Cover and refrigerate for 30 minutes, use this time to set up your smoker.
Once the smoker is ready, water pan in and filled about 1/2 way, place the steaks
on the cooking grill. Put the lid on (remember to open the lid vent fully) and add
the wood of your choice to the charcoal, using the bottom access door.
We recommend a mild wood such as Alder for fish. Cook for about 2 hours at
220ºF, or until the fish flakes easily.
Cold smoking on your Apollo® Smoker
1.
Get 4 or 5 charcoal briquettes going in a chimney starter, once they have a
grey appearance, place them in the fire bowl (you won’t need the charcoal
basket for this type of smoking).
2.
Cover the briquettes with wood dust (a cupful should do it), this will allow
the wood to smolder, plus reduce the heat given off by the briquettes. Like
this, it should produce smoke for about 1 hour.
3.
Place the water pan in its usual position, just above the fire and either fill
with water or leave dry, this will depend on the ambient temperature, as
you may need cold water to help keep the temperature inside the unit
down below 30 °C (85 °F).
4.
Place the food on the cooking racks and put the lid on (do not close the lid
vent, it must remain fully open).
With cold smoking, it is important to monitor the temperature inside the unit at
all times, we suggest using a digital thermometer for this.
Cooking times will vary greatly depending on what food you are cold smoking,
for instance, cheese will only take an hour or 2, whereas a side of salmon may
take 10 – 12 hours. Meat such as ham will take several days.
12.
9.
Brines
Smoked Cheese
Brines are generally used on white meats such as fish or poultry and are used to
produce a juicier and more flavourful end product. The brining process will enhance
food that is to be either “Hot” or “Cold” smoked. Before you start brining, there are
a couple of basic rules to follow.
Smoked cheese is easy to do on you Apollo® Smoker and the end result is far
superior to the smoked cheese you buy from your supermarket.
1.
2.
3.
4.
Containers - as a brine is basically a salt solution, the containers need to be
clean and made from a non reactive material. Plastic tubs or stainless steel
or glass containers are fine.
Before putting your meat into the brine, the temperature of the brine
must be about 3-4ºC (38-40ºF) this temperature needs to be maintained
throughout the process. The best way to achieve these temperatures is to
either refrigerate, or by adding ice cubes to the brine mixture. A good quality
digital thermometer will help with monitoring this.
Make sure the meat is fully covered by the brine.
Brines can NOT be reused.
Set up your smoker for cold smoking, as described on previous pages, put the
cheese on the cooking grills, pop the lid on and away you go.. simple.
Cheese absorbs smoke quickly and is generally smoked for between 1 and 2
hours. Start at the lower end of the time scale for your first attempt. The cheese
won’t change colour much, this is a good thing, store bought cheeses are usually
darker, due to not being naturally smoked, but rather having had some “liquid
smoke” sprayed on. Mild woods are good for cheese, use apple, maple or alder.
Basic Brine Recipe
1/4 Cup of Kosher salt
1/4 Cup of brown sugar
4 Cups of water
In a medium bowl, combine the salt, sugar and water. Stir vigorously until all the
salt and sugar has dissolved. Then pour this mixture over the meat, poultry, or
fish that you are preparing. Soak for several hours, or overnight. You may need to
increase the quantities in order to ensure that the meat is fully submerged.
* You may wish to add some herbs or spices to the basic recipe.
10.
11.