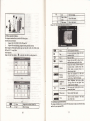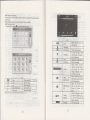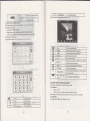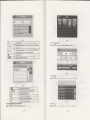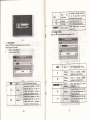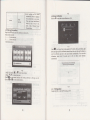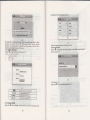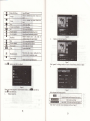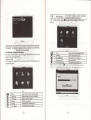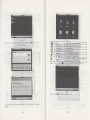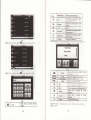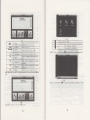
1
User Manual
User's
Mtihriil
Welcometoqs_e.ourGP$navigatol
"';
..,
.
:
.we rcswe the fitral dplatration right o this lis-rr's Muual.
.Specifi@tios@subj€dtooheryevitboulmtige;Sory;fo1oyinconvoiEce
caued!
.Plee
@Le
a qopy
of rhe
i4ortmf
data we
NW
no re€poGibiliry
f6
:.
. .
the dab
loss.
oThis
@ud bs bm@tu[yontrtE4.Plse,@et.qu striogc€orqryhe!$J
q,pingdistakeisfNd-
.., ,':.,,1r
-
.i.
-.," . ., !:jr.'
: '!
@d the opemting.ilEt[[email protected] ed ry $a accwie cldy'provftled .
by tlrc original fetory io avoirl aay up.:rpecr{,{am4ge. No wa@ty wil be
ex@uted if yo! e aot folryiry 6e i$lrwtim 6 i@wtingvithrhe itrodnpctibte
.Plee
&6&des,
we
6slre
no rcsponsDility
.The el@mic Mvigsti@3qt! Egy
b€
f6 ey
loss md damge @Ned bereby.
lhe aptul tra$pofitrg
@titrc@fomity ryith
to the traffic coGtrrctiotr develop@t. Plw be sw to corply vilh the
@ditiotr md fouow the traffc ruler. Opsating md viryiry the GPS '
'
r ':
duing driviag my eue s€@ hfra ecid@t. Ou compatry will not be
ecidml.
by
tte
uexpsle-d
my
166
@u8ed
resposible for
rUsas ru update ad upgmde sftw ftom website at his/hd optiotr. , ' ' '
oAnydircrcpancybetwathepicturcswithrcal prcdutshftiMftd, thele4l @e -',i
.r : ,' ,l '
prcmils.
@ks dE
real r@d
a
1
t
I
-
Chapter
1. 1
One
aHi-Fi sEr@ earphotre md builLin Hi-Fi
aButun md touch-screm opdation:
Product introduction
Intrcduction
mhly wed for navigating md also has
the optional function of video playing, audio playing, Bluetooth hmds ftee, FM,
Welcome to use the GPS mvigator, which is
Bluebotb. pboto viewing. md E-Book eh.
tlHigh perfomce, low-power consmption MediaTek MT335l CPU:
acomfofrable uer interface: simple, @sy to opdate;
aPower r]legmmi: keep the pmduct to wdk loago md morc stadily;
aDab l]mmiting: comuicate with computo thrcugh USB cable;
a Excellenl in receiving signal: accMt positioD fixing prcvidd you the satisfied
navigating serice;
acorgatibte with Bluel@th-mobile: the navigator cm also be used for making md
mswering call with hand+fte (Optional);
aEntataimetr MP3 md MP4 fiuctioo cm relieve you fatigue;
You ce use it wheD &ivitrg, walking, riding, or ivaiting for a meeting; the ped@t
"GPS + mt€rtaimenf' firnction cm make you life md work morc spleodid.
L2 Package
The p&kitrg box contais the following accessories, please cmfim:
GPS navigatm
Tmvel Chilger <optional>
Cd chargo
MINI USB cable <optio@l>
User's lrmual
Protecting covd
Cd b@ket
For the item listed above, plese coDfim the actul produch. If my dmge,
Please conhct with the distibuto or the agmt as soon ro possible.
Instructiotr
Ple6e rcad this Ner's l]mul crefully to be fmilia with all the opqation details
ed to make the GPS mvigator pdom well:
(ReMkI;
IRelative
The inshuction re1ates to the themer
The extending infomtionrelates to the theme;
The not€s md wamings ielate to the theme. Ple6e value
notes, otheMise it will possibly britrg d@ge to you md othen.
This wer mul only adapts to ou GPS navigator products.
ChapterT\wo
2.1 Main
Featur€sandspecilications
ferturo
aopflating
s)Btem:
Miqosofl Windows CE 5.0r
ed
volme adjNbbler
.
aMINI USB port:
aBuilt-in rechargable Li-battery which ce be pow@d by tEvel @d @ charger
2.2
CPII
Me.lieTek MT335{
EMS
54 MBvtes
ITSRalimf ,O MNTITSR
SD
SD
/ MMC slot,
a.rd <,mlsd.d
the
ruimm
GPS
Brftew
Built-in rcchtrs€able
Aurllo
Brttery
capacity
of SD
oq whm
charge
rPq.hFc r^ IGR
A: Built-in high fidolity speakn
B: Hiph fidelito stereo emhorc
Cold ffi. <42s
Hot stafr : <3s(in the open dea)
Li-bah
DC 5V pofr
Aa Chr
lm/2?OV
.Lrod 5V / I 5A
Car Charser
StstB of
the
IrCD lisht
Operatitrg
Nwig.don
Softwrre
Wha
charging, tlrc red light is
6aishe-d the blue
lishl is o.
Misosoft Windows
CE
5.0
SD card
ASFA/IWMV3GPMP4 FIV.
infomtionl:
[Notel:
speaker,
aBuilt-itr seDsitive GPS mtm:
aThe navigating softwde could u the SD cdd dir€dy;
aVideo fomt supported: ASF,AVI,WMV3GBMP4,FLV;
aPhoto fo]mt suppo.ted: BMP, JPG, PNGr
aE-book fomat supporEd : fiT:
follow these
Phdo viwer
F3.i0k \
E-AIbuh- JPG GlF. BMP. PNG
Slstem setting
setl
TXT
IFM Transmitted [Sqeen adiustment] [Default
[volme] tPiNul tBacklightl [Time md Date]
[ .--,.-.r
R-" r;Hr
T.m..r h,r.
Working
Storage
Atmospheric
-?Of 1^6Of
45% to 80%RH
30% to 90%RH
86KPa to I 06KPa
This chaptfr will give e inftoduction ofthe appdeDt componmb and basic functiotr
ofthe GPS Nayigator and it will help you to be fmilitr with the basic opemtion
quickly.
2.3 Product appearance
Chapter
Three
Manual Instruction
3.1 Power supply atrd charge
If this navigator is frst used, p1e6e use AV adaptot to fully chdge it.
3.1.1 Powersupply
There tre thrce t ?es of supplying power: baftery, adaptor, USB cab1e.
CPS mvigator uses the Li-baftery lo supply powfr whm it is nol comecred
wirh adapror.
fGE; oo Lh. up ;gtt oIinterface indicare tbe curent
The;k
electric
rolme.
GPS mvigator uses the extemal powtr whetr it is comected with the adaptol
GPS navigator uses the USB cable to supply power whetr tle CPS comects
to tbe PC.
(Remtrkl This mchine adopt built-in, mchmgeable Lithium battery At no]ml
condition (ifthe back light is not so bright), the actual supply hou can be different
becaBe ofthe dlfferent way using the mvigator Some function (audio playing video
playing, bright back light) will coNme a ltrge powel which will rcduce the using
hou.
(Notel lrhis l@hine
avoid fue
ad bming,
adopts built-iq mchmgeable Lithium ba&ry ln order to
pl@se do trot poke, bump or take it apd or tbrow it ilto fue
3.1.2 Use the trrvel chsger to supply poter
Wlen the GPS @vigator is fNt wEq plpase Be the AC adaptor to cbage it.
Comect the DC pad of the adaptor with the powa hterfee at the 19ft sidg
of the eit (The power interfee i6 6ue
USB itrtfifapr );
2. The other part comect to the power socket, it supplies powq while ch{ging.
l.
I
Red LED indicates it's beiag chagpd. Pl€rc wait wtil it is fully chrged
don't pull out lhe adaptd while chargiag. Wh.tr il is tutly-chaged, tLe LED will
to BlE. If low battery or tro b4ttery pl€aie gh4rge it i@diately.
3. I .2 Uce 3he crr ch$ger to .upply power
'1.
Comect the DC par, of lhs adaptor with the powgr iildacer
2. The othd pd corect b thc powq sooket, il supplies powa while obagiag.
IReMkl
ed
hm
I
Please insefr lhe car aalaptor after running th€ car so as not to damage the
I Note
machine by electicity collision.
3.2 Power otr/off
Power on/olT is controlleal
3.2,1 Poser on:
Please checkr The batery is enough, or it is comected to extemal power souce;
Pl€ase press the bufton on the top ofthe unit to boot.
(Notel Ifhing the wit fom one place to ilothet plee, please boot until it adapts
to the enviroment- Big hmidity fluctution will roke $e mainfme shofr
circuited.
3,2.2 Power
off
Press the bufton on the top ofthe unit to tum off, the uoit will enter the power
saving mode and mainbin the last operation status whm boot next time3.3 Reset system
Ifthe system cantrot work, you cm res€t the system by the following wayi
Click lhe resel key on rhe flght pafl o[ rhe machrne lo resel lhe s]ilem b] ustng lhe
stylus.
(relative
l.
2.
infomationl' it cm be no response in the following condition:
The shift between pictues is delayed or stopped.
The
progm
select function camot work nomally, such as long time to
carry out or cannot be activated.
The power bufion can not work
(Note)The msaved dab will be lost as you reset the system when the system has no
response. Please copy the data every other time.
3.4 Use bracket to fix navigator
Wlen use GPS in the cd, you should fix the device to th€ pd ofwindow besides the
pmel by using the bracket.
3.
Comect rhe MINI end [I]
of USB cable with the USB pon on the iefi
pd of CPS device md the nomal end tfl
wift the Ho.t pon on
computet
(Note) Wlen use the breke! please take care ofthe position. Plede don't fix the
navigator to the position where the driver's sight is being influenced. Please do not
Iay it aside fteely; do not fix it to the air bag, do not lay it on the expand range ofthe
air bag.
3.5 Stylus
The stylus is the tool for you to 6e you navigator Please keep it careldly-
1.
Singleclick
2.
Doubleclick:
.
3.
Please pull out the MINI USB cable afteryou fmished you opemtion, the
GPS navigator will rem to the pre-operatim interface.
[Notel Data secuity: Please copy the data to the outer stomge device every time
before you update your system dah. Ou compey hkes no respoNibiliry to dy loss
of daa.
Singly click the screen with the srylus point.
(Rmarkl
Double click the screen with the sryl6 point.
3, Dmwing:
Click one point and hold to move on the screen.
(Notel Any broken stylus, ball pen or anj, acute dd hesh object will desfoy the
LCD if you use it to opfrate ihe device.
3.6 SDA{MC card
The attrched SDA{MC cild contains the navigation softwde, map data and
media file. Please insert the ctrd coEectly when we il.
(Note) Please do not ake out the SDMMC cdd when the system is mvigating or
playing.
The GPS
mvigatorwill stopthe operation when it is comected with
computer
(Note)
cormmicatiot the following operations will break offthe
comection with corputer, the unfDished data will be lost.
In the prmess of
1.
2.
3.
PullouttheMINIUSBcable:
Powerofl
Reset the system by
sing
reset button
o
elecfic switch
Chapt€rFour Primaryfunction
4.1 The main lnterface atrd the
4.1.1. Main menu
function
INoteI
l. Don't shess or cuile the SDMMC cad avoid
2. Avoid high tempemtue or high humidity when
the cdd directly to su light, let the cdd ftr away
3. Please pay afteilion to the heading when insefr
ctrd improperly, you will damage the cad.
loss
od
bulge.
md store the ced, don't expos
ftom liquid and conosive @terial.
lhe SDA{MC cdd. Ifyou ilsefr the
use
3.7 Connect with computer
The device cm be com@ted with the conputs thrcugh the MIM USB on its
left part. You can copy the docment betuefl navigator md computer or copy the
dab ftom GPS navigator to computq so as to recover the daa in GPS when you tre
in n@d of them.
L
Please
confm
the GPS Mvigator is
powoon;
4-t
Click the top left mmer of the interface X Deskbp display the date , show itr
Figue4-2
7
Bluetooth
Video
Photo
E-book
Double-click the date icoa
!
etrer the date sefting
hbrface,
show in
ry6r&
Click the top left com$
of
Audio
player
Figue 4-3
Seting
This device catr mswff md make phone
after
.^nne.fino with m.hile nhone via Bluetooth
md FLV fomat.
S!'nn^i nr m..<,dnr<f nrise md fiil] screen Dlav
Support JPG, BMP md PNG fomat. Suppofr photo
Suppo( ASF,
AVl, WMV,
3GP, MP4
rohte. eDltrse/shritrk pictues. automatic Dlay and
Iext fomal ffi.
so on
SuDDofr Dase selection
Audio playing
fomtr
WMA, MP3.
Suppofr mdom playing, sequential playing, rcpeat
nlavino nailse nrevious/next- volume
Brighhess, Volume, Leguages, Power, Time, System,
Default- GPS Info. NaviDath.
This chapter will intoduce the Mvigation functiotr and notes.
4.2 Navigation functions and features
According to you choice ofMvigation system, the GPS navigator cm make
position by GPS satellite signal receiver md display on the mvigation mp. The
system can calculate a best route after seting the ddtiMtion, which ce help Nes to
43
the interface
arive the destination safely atrd Epidly.
The system cm let you enjoy the individul chm atd mjoy you tip by r1my
diflercnt ways such as vision map, vivid animation, voice indication, and words
f
chmge the desktop display
background. sho\ in Figue 4-4
indication.
The
softwre.
speific navigation fiuctions de depended on you choice ofmvigating
Please refer to the
Nayigation Softwtre Instruction.
Notes
i.
4
Click tbe left buftoo I quick rccess to uvigatiou mp
Click rhe le{ibufrotr I opm aurlio player quick
Click the left button I rapid deplolment desktop applications
4.1.2 Function lntrcduction
Mnp infomation
h is probably that the eletronic navigation data is not consistent with the 16l tmffic
instuctions becaue of the tamc cotstructiotr development. Please do comply with
the highway condition and the actual haffic nrles.
2.
Navigation
The navigator offds the route for the reference; detemine the rcute by youself,
the driver my be more fmitid with the route thm GPS mvigabr
Receivingsigml
3.
Mey factos sch as high, deme buildings (in the mel, betueen the hiSh
buildirg, mderyrowd pekitrg, mder the tesle), vrioN weathq condition, atrd
closue of the satellite will affect the ability to leceive signal so as to result itr
inaccMte positioq inefficiency of navigation opffitim dd system furctiotr.
a
next
Video folder
nme
vid@ nme
4.3 Video operation lnterface
This chapter hhoduced how to use the GPS video player
4.3.lFuctions md feahres
1.
Suppofr ASF, AVl, WMV, 3cP, MP4 ed FLV
2.
Suppoil full-screen playing, progres choosing md file selection;
Before using the \4deo playet pl6e copy you video flle (ASF, AVl, WMV, 3cp,
MP4 and FLV) to my folder
4.3.2 Operation!
Single click the Video butbn q to mter the video file list 6 the pictue 4-5:
E
Close
tl
PIay
l))'
Next
B
Iry
File list
Volume
B
Playing
ry
Brighhess
progress
adjut
tr:}
)i
i
,f-
r-
I
-
E@
IL
@
Sinele click to close
Iast
Show last Dage
cment fiie.
Video folder name
Show video name
Click to close the video list:
It shows stop playitrg. Si4le click
will
Single click md shift to video file list,
,nd then .ioose vour favorite videoSingle click volme. It shows volme is
decreased whetr it shift toward left.
wlile volume is indease when it is
shifted toward dsht.
by slide the
bd; go left for
Adjust the pro$ess
progress-displaying
h""h-*r.
on ;ahf f^r f^ru,rdc'
Adjust brighhess with stylus while
moving towdd left and ilght. Tm
ialf
meqn< fr1m hiohlet
Play inttrface
Full screen play. Double click to retw
nomal Dlav shtus.
Video name
Show
Time
Show the time consmed
time ofthe video
I
+6
rI
a
,lI
Show next DaSe
cMent Video name
4.4 Audio player operation iDterfrce
This chapter inhoduces how to use the CPS video player to play
and let itbe you ptrsoml MP3.
tl
/
The total
you favodte
music,
4.4.1 Functions and leatures
The audio player supports MP3 md
as you
WAV forui, you could
set the
playing sequence
wish.
Before using the audio playet please copy the files to my folder.
4.4.2 ODention method,
Srngle rhck rhe bunon
ro enter Vusic rile h5l as 4-8:
L
I
!$n
til
,t-lJ
Single click to close
Close
Homepage
ETI
ffi:x***;*.;;;
E
e
U
EIf,'
Piay the
To play and pause, single
Play/pause
click to pause, click again to
Dlav continuouslv:
Stop
Srnele click to ston nlavins,
Ne
Play the nexl
Adiust voiume-
re
Volume
Sethg
4-9
t3
Close
Close
the
playing mode
cMeni file
Show last Dase
Show next page
Music folcler name
Music nanle
Choose the song 10 enter the playing inteface
Music folder
Mhe
ET
the
audio nlaver'
Open the pla)
list
lt
shows
volume is dccreased shen it
shift toward left While
volume is increase when it
is shifted toward risht.
Suppoft sequencial playing,
loop playing, repeat playing
and random nlavino
Single click io display ihe
play list, and choose your
favorite as picture
4-22
Shotr mDsic nrme
as 4-10
AdJust the progress by slide
E.=
Playing
progess
tsEIgII
Sons
iitle
the progless-displaying bar;
go lefl for backwards, go
right fbr foNards:
Show the sonq title
EE
I ime
I Show ue ltme progre\'
lcoosmpiron lstow Lte lolal rimc ror
Chmse the pictue to enter play interface
as 4-1
3:
Total time
4.5 Photo vieser operation itrterface
This chapter infoduces how to use the photo viewer to browse pictues
4.5.1 Function featwes:
1.
Suppofrs
JPG. BMPandPNG
2.
Suppoilpicturerotate, pictue enlarge/shrinkatrd automatic play.
Before using the photo vieweq please copy you photos to dy folder
4.5.2 Operation method:
Single click the button hl to open the photo list as pictue 4- I 1 ,
Single click and shift to video file list, and then
4-1
t
Play all the pictues
circulrly on full
Show the photo name and
screen
fomat
4.6 E-book reader interface and operation
This chapter introduces how to
4.6.11Function
l.
2.
use GPS to read e-book.
Suppofr TXT
Suppod tuming ove.page, page browse, and file choosing.
Before using e-book function, please copy your TXT flle and save it to any folder
4.6.2 Operation:
single click bufton
}ll
to enter Ebook list as 4-1 4:
liom
tl
L/
E
rtril
Close
Single click and close e-book reader
Last Dase
Next page
Read last nase
Read next Dape
File
Single click to enter Ebook list to choose
favorite hook
Font set
As 4-17
EA!
As 4-18
AJ
Add book nark
B
Open book
It needs ooen e-book and choose TXT
IMk
As 4-19
list
sfl
v
Close
Last page
Cli.k ro.lose cnftnt file
Show ti€ last nase:
Show the next Dase:
F-hook folder name
File
Disolav e-book folder:
Show the filename
Choose file name to enter e-bookreada as 4-16:
4-t'7
Set
font
as
Set font as
hold
nomal
!t
Decrmse font size
Z2
Font size indicator
0
lnclease tont sze
17
4-t
I
4-20
4.8 UnitConversion
Set.olor RGB
Choose background
Single
click
B
into Unit conuersion interface
as
shom
4-2 I
:
backgroud color, font color or set b&kgound
color with reverse order or sequential order
&&
Choose
x
Color
g
colol font color or sei backgound
r
Rem
to e
4-2t
4.9
Calculator
Singleclick * into the calculator inrerface as shown4-22
4.7 Game interface and operation
single click B o choose different games as4-20r
18
4. 10 f,ince
Singleclick
I into th"
computer inrerface as shown4-23:
l9
Click
fo6
the
sdeeo tone
g
g
4. 12 Backlight
Siryle click
*l
to set the
on/off key tone,with
loud.sft.md offthe three states;
nrtr
on/ off screm click tone:
Tum riEht
Tm
on/
hesmt volMe
Yellow blanks shows the
volme level;
TM
riltrlY
By clicking the leff/right shift button
leff
offthe screm click tone;
Presetrt
setting
to entu brcklight settiag interface as 4-25
!
+23
1l Volume adiust
Srngle clclr il irto the vlme adjul irlerface
4.
as
shom4-24:
"Volume adjushent" itrcludes:
l.
2.
Speaker
volMe adjBtumt
"Screen click tone" setting
tg
Single click
to d*r€se the volme
m l0
mnks for
volme ftom mute to
maximum.
gmduafly; there
's
I
Close
Click to
decrease backlight
{t
Brighhess
decte6e
{,
Briglhess
Click to
increase
gradually to tho highest ievel
P16ent
Red blank shows the
Brighhds
brighbesa
ufDUrrtffi
.it
6
gadMlly to the lowest level;
inctease backlight
single click md
it wil
shift len
and it will show last
di$law ic in .imle
Shift rieht
@d it vill shov last
ilisnlav is in circle.
will defreae one mnk.
Silgle click to increase the volume
gmdually there ae 10 Bnks for
volme ftom mute to ]]Himum.
click will inu€se one mL
Exit "backlight sefting" inhrfacei
Silgle click
Presenl
shift left,
co1m. This
dd it will
shift right
collm.
This
I
I
I
I _.
I ;-,":,,
I
I
I
I
Sysrem backJighr urll be ctosed
aJrorolically wben no opqalion
for a period lime to sa\e pouer
th... *. several ilme inrenal
choice for youi never, 3 min,
2min, lmin, 3osecond
421
4.14 Screen
Click the X
CalibEtion
b
enter the screen calibmtion as 4-28"
later,
losecond later
and time setting
Single cllck Il inlo the dale time hkrface
4.13 Date
Date
as
shoM4-26,
ed time include:
1.............. System time set;
2...............System date ser;
3 ytem time zone set.
428
E
it will move flom itr the sequence ofthe center, left up, left doM, right
and right up till the calibration succeed, theD click any where on the sqeetr to
save the calibration and exit to the main intedace automatically. If not save tle
infomation, please wait 30 seconds md it will exit fiom cMetrt in&rface
C[ck
dom
automaticallv
kd***eqbs&edtuw
i&*&@!wde*e
4_26
buton X or V to set time md date.
*or& to choosetime area.
Ctck GI_to *it cwent inrerface after sefrng, and then it
Choose X&r 8E ro exitcmetrtinterface..
L
Single click
2.
Single
F
will
show as 4-43
4-29
4.15
FM
Srngle
click
TEnsmitter
E
lo enler lhe FM seuing
as
4-10
23
including:Syetem ptompl languS€ selection.
atd
:etdit
+30
FM TmNminer will seod out the audio sigtal lo tbe radio devices. Take 76.OMHZ
hequeDcy Jbr exmple, both the CPS raosmifting frequency md rhe recei\ed
ftequmcy of the mdio should be 76.0MH2, then all the somds of the GpS will be
input through lhe @plitrd system ofthe radio"
4. 16 Svstem infomation
Click rhi E to enbr the Systm inforolion as4-l
System information includes:
l.
2.
3.
4-32'
Single click lmguge colum b do leguge choos€.
4.18 Naviggtioo prth
set the inrerface i oto navigation palh . sel the default
C ick the
I
H
shoM in Frgue 4-33:
I :
Firmrile version:
APP version;
Svstem ID.
tffiiil
nSll5
+33
ffi
ffi
Single
r
click I
to
mtu
tho defaultiettihg-as
434:
4-31
Exit system information
Show ROM version
tra. a
-
4. 19 Default- set
Shou
Show
tie APP veFi^n
the svstem TD
4.17 Language aettirg
Single click I ioto the l*gu"g" seftings interface
4
shom4-32,Lmguge sefting
25
na \
igati on palhs as
Click the buton "
4_34
Single
click
I
to restore the default
seftings, single click
@
sce"
to enter
Figue 2
the.scmitrg chMels intedace
as
figue
3
to exit 0rc default
setings"
4.20
GPS
Tnforution
ingle click the bunon
g ild
mter CPS infomatioo irrerface m 4-35:
Figue 3
ents the broadcast iderface
Select the TV chamel you sealch for to
Figure 1
Click "Cotrtinue" to entq the TV chmels broadcdt interface. thtu
clicl&
buton
r
Opm the file list
E
Seftlf,g
as
figue 4
Click to switch to the folder intnface, selecl
wnrt favnrite nroram
Cli.l
f6 ser ISDBT
5
Disnl.v FSC Menn
-
Click to increase the system volume
Volume +
E
Click to
I
Mute
Vohrtre size
&
inshrri6r
ofi
SnaDshot
Dicfu€
E
B
Play/Pause
g
f,
lndicate ptogam pause
/
play, click to
Time
Cllck to Dlav trext channel
Svsrem cument fime
Broadcdt pichne
I
level
click to open Mute
9 levels altoqeihq
Click to tum off TSDRT
Smpshot cwent broadcastins Dictu€
Record cwent broadcastinp Drotram
Previous channel
Y
Signal sftength
one
the system volume one
continue to Dlav click asain to nause
Click to ston hla;nq nroqzh
Clicl to nl*nrednr<
chqn""l
Stop
r
decrease
Full-screen play mode, double-click the
screen b rehrm to nomel
DisDlay
sipal
shensth
nhw mode
infomtion
Figure 7
Click "general" on Sefiings interface to enttr the General Sefiings interface
8
Figre
Selecrg,u favorile progrm lo enlfr
click
1.
I
to enttr ESG menu
Display chamel list
5
broadcasl ilterface.
clicltrro
exrt file lrsl,
Firue
8
Set the lansaqe and screen DroDortion
lffi
JaDanese and
Audio
,
Click "about" to enter the version
Sub
infomtion
Audio md Dual thrce
interf'ace as
fisre
9
as
figue
Fisre
9
Note: please be sure to pull out the whip antenna ofbody then using the digital
TV function ! This futrction is optional, atrd some models hav€ no such function.
Pleas€ refer to the real subject!
4.22 Bluetooth setting and lnstructions:
This chapter inkoduces how to use this navigator's Bluetooth to connect with cell
phone for call making and answering .
Onemtion method:
in main menu to open lhe Blueloolh intcrlace
4.22., Srngle (lick lhe bunon
S
the following picturer
&
I
L
T
Ciose
Phone bool(
Messas(
ao
click botton H you wiLl get the following two pictures
in searching and the next one is the searching result.
te
4-1(,
Sinple
cli.k to close the ctrnent interface
DisDlav cwent call history
Phone numbtr dialinB
DoMl6,n SMS 6f n,ired nhone
Domload files of paired phone
138
. r:la, I k .,
4-39
4F\ ,p r'uu ddrr ro.onnD t a
follosing pictures:
d.li-. |lllo ..
la
*r
Single click to close
Phone book
DisDlav conhct list ofnaired cell hh6ne
T
Dial md
DisDlav call histow
Dial phone nmber
X
File
DoMload SMS of pailed phone
Dowdoad files ofpaired phone
s
Settitrg
ht
22.
Cell phone sedching, profile
441
Dicture:
and connecting,
it will
show the
management,
Bluetooth switched on md disconrcct
phone book interface as
Sjngle click a*bnd enter phone book as 4
After successful pairing
cment interface
Close
r
44
4
+3
Number display
Display
It
key
cMert number input
nade up
of
Single click
Backspace
10 numbers from
will
0
delete the last
i*
.&
Single click to select phone nMber
fr.m hh^nF h^nL
Phone book
Smgle click
Phone rccord
Dial phone
4-44
4.22.5 Sinsle click the button
E
toop"n call history as 4
to
select phone number
insle click to make call
will
I
45
be in dialins as 1-,17
fl@bni lOlSoAt
erflRt-.
4-45
4.22.6 Sinele click the button
E to
op"n
dial
pad as 1-16
&I
Retm
NArna
ru*De
,;I;
I ctor"
I
smcle drck
b
c
cment
(eep call stare and return to nain
the nanle vou' ro dial ins
the numher vorr' ra aiAl inr
curr,.nt call sLate
lnc I uding extension, sound shiIt. ca1 I
shift, conl'erencc call and so on.
Mute the micronhone while keenino rhe .,ll
Single click to decrease the volume
ShoN
Numbfr disDla!
Callinp
n
Dial
T
r
Mute
ll&
Volume +
,{*
Hans un
Volume -
Show
Show
Single click to increase the volume
Single click and hanq uD
4.22.8 If there is an incoming ca]1, it will
number as 4 48
show
the caller Tjl and iLs
rft
xtrc
r{m!er
,!D
Caller ID
Number
Volme -
dglt
Shov
ma
Volume +
Dial exiension nlrmher
Sinple click to shift the voice to cell
currently
nhone
the incoming call nunbcr
Mute the microphone while keepmg
Mute
&
caii state and return to
interface
Shov caller ID
Keep
Retm
t]1e
Single click to decrease the volme
Single click to hrease the volume
Sinsle click to reiect the.all
click
4.22,
md
will display connected. You can alk with each other
449
!Mt5l#{rt
X
I
4-49
4.22.
10
Single click the buttorL&s 4
50
Single click the button
ffi
4-51
to enter the folloving interface
as 4 52
Without soud
4. 22.
12
to
click "|i
files from
Single
domload
on the main Bluetooth interface
paired cell phone as 4 53
1e Manager"
4:53
Chapter
Five
nomlly
38
3
mitrutes to receive the
protected by right methods. Please follow the inshctioN below to eNue your GPS
run smoothly for a long time.
Protect screen: Don't press the sffeen with shength or you will destoy it. Please
use the stylus to operate ihe navigator and spray a liftle glass clemer on the soft cloth
to clean the screen, don't spmy on the soeen directly.
(Note) Be sue to tum oflthe GPS mvigator before cleming.
Drop or rrike uillcause dmge to high-precisioD components.
( Note ) Accidental damge is beyond ou respoNibilities-
/
'
J
Simple Problem shooting and maintenance
IF yow GPS navigator cannot work
need more than
please check
it
as follows.
If
you
Don't use it under such mviroment: Temperatue change abroptly (high
tempetature above 60' , low tempemtue uder-lo'), high volhge, dusty,
elecftostatic interfererce, avoid my corosive liquid ed dip into my liquid.
J Avoid mdiated itrterference: The radiated itrterference ftom other elecbonic
products will affect the display and it will be nomal after suppressing the
iDterftretrce souce.
[NoteI Ifyou carry Ore uit by air, please put the cPS together with you luggage to
pass &e X-my detection system. Avoid scaming by the mgnetic head detector (at
the passage used for pdsing) or the mgrctic bd (held by the securitj, checker), or it
will deshoy the system date in the uait. We will hke no responsibility for it.
Avoid direct, intense light: Don't use the cPS mvigator in high light and ulhaviolet
radiatiotr in order to increase the wing life.
39