1
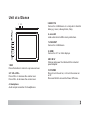
USER’S
MANUAL
www.primux.es
Features
Browse the Web.
Visit your favorite websites
Check your e-mail
Keep in touch with friends and family
Watch YouTube™ videos
Browse the world’s most popular videosharing community
Read your favorite books
Download thousands of books with the
included E-book reader *
Discover thousands of apps for Android™
Games, applications, and more with
marketplace(need for customer installed)
Connect to the Internet wirelessly
High-speed W i-Fi 802.11 b/g/n networking
HDMI™ output to your T V ™
Enjoy in the comfort of your living room
Enjoy your media library anywhere
2
Portable powerhouse plays popular music,
video,and photo formats
microSD memory card reader
Increase your storage capacity (up to 16 GB
supported)
Built-in camera
Convenient front-facing camera
Automatic orientation detection
Read any wa y you want; the display adjusts
automatically!
Reading books in the ePub format requires
the included E-book reader application.
Requires optional HDMI cable
(Type A-to-Type C). 1080p HD video playback
requires a video file encoded at 1080p.
Streaming video quality will be affected by the
source, and the quality and condition of your
network connection.
Unit at a Glance
1
2 3
5.USB OTG
Connect to a USB device or a computer to transfer
data (e.g. music, videos,photos, files).
6. microSD
Load external microSD memory cards here.
4
5
6
7
8
9
7.USB HOST
Connect to a USB device
8. HDMI
Connect to a TV or other displays.
10
1.ESC
Press this button to return to a previous screen.
2/3. VOL+/VOLPress VOL+ to increase the volume level.
Press VOL- to decrease the volume level.
9.DC IN 5V
Change and power the tablet with the included
power adapter.
10. POWER
Press to turn the unit on, or to turn the screen on
or off.
Press and hold to access the Power Off menu.
4. Headphone
Audio output connection for headphones.
3
Getting Started
Turning the Tablet on or off
To turn the tablet on:
Press and hold the Power key until the LCD
screen turns on. Wait until the Hom e screen
appears; the tablet is now ready for use.
To turn the tablet off:
1.Press and hold the Power key until the
Device Options menu appears.
Turning the Screen On or off
(Standby)
W hen the tablet is on, you can turn off the
screen to conserve battery power. Simply press
the Power key once to turn the screen
off. Press the Power key again to turn the
screen back on.
To conserve battery power, the screen
can be set to turn off automatically when
the tablet is not in use (between
1 minute and 30 minutes).
This Screen timeout option can be found
in the Display menu.
2. Touch ok the screen to turn off the tablet.
4
Getting Started
About Applications
Unlocking the Screen
To open an application, touch the application
icon on the home screen or in the Launcher
where you can tap the icon right up on the
home screen to get in..
W hen the screen turns off, you will have to
unlock the screen
when you turn it back on.
To unlock the screen, drag the lock icon across
the screen towards the lock icon.
Launcher screen:
.
The screen shown above is for illustrative
purposes only. Reserves the right to modify
and improve the final list of applications
available on the tablet.
5
About Applications
Preinstalled Applications
Preinstalled Applications
Installing Applications
Some applications have been installed on your
tablet for your convenience.
These applications include:
Browse the web.
Perform simple mathematical operations.
Take pictures or videos with the
frontfacing camera.
Check your e-mail.
Play music.
Access the Settings menu to adjust the
tablet’s options.
6
You can also download an install additional
applications from the device’s applications
marketplace, the web browser, or other
sources.
The tablet must be set to allow installation of
applications from non-Market sources. T he
Unknown sources option can be set in the
Application settings menu.
Connect to a Wi-Fi network
The Notification bar displays icons that indicate
your tablet’s W i-Fi status.
Notification that an open W i-Fi network is
in range.
Connected to a W i-Fi network (waves
indicate connection strength).
[no icon] T here are no W i-Fi networks in
range, or the W i-Fi radio is off.
1. Turn on the W i-Fi radio if it is not already
on. To turn on W i-Fi:
a.Go to the Hom e screen: Press the Hom e
key.
b.Open the Settings menu: tap the icon right
up on the home screen to get into the
launcher, then touch Settings icon.
c.Open the W ireless & networks menu: Slide
the icon to ON status.
W hen W i-Fi is on, the tablet will look for and
display a list of available W i-Fi networks.
If a network that yo u have connected to
previously is found, the tablet will
connect to it.If you don’t see your
network in the list, you can force the
tablet to re-scan. To scan for networks,
tap the Menu key, and then touch Scan.
7
Connect to a Wi-Fi network
2. Select an available Wi-Fi network to connect
to:
In the same Wi-Fi settings menu above,touch a
network in the list.
If the network is open,the tablet will prompt you to
confirm connection to the network. Touch Connect
to confirm.
If the network is secured (as indicated by a Lock
icon),the tablet will prompt you to enter a
password or other credentials.Touch the Wireless
password box to show the on-screen keyboard
and then use it to enter the password. Touch
Connect to confirm.
8
When you have successfully connected to a
Wi-Fi network, the Notifications bar at the the low
of the screen will show a Wi-Fi signal indicator.
To learn about how to add a Wi-Fi network
when it is not in range or when the router
is set to obscure the network name (SSID);
or to configure advanced Wi-Fi options,
please refer to the manual.
Optional Connections
Connecting to a Computer
Connect the tablet to a computer to transfer files.
1.Connect your tablet to the computer.
With the included USB cable: Plug the small end
of the cable into the USB 2.0 high speed
connector of the tablet. Plug the large end of the
cable into an available USB 2.0 high speed port
on the computer.
2.When your tablet is connected,slide up the
USB icon right down on the screen and then
touch icon USB connected.
To connect the tablet to the TV:
1. Plug the small end of the HDMI cable into the
mini HDMI connector on the tablet.
2. Plug the large end of the HDMI cable into the
HDMI port on the TV.
3. Turn on the TV, and set its display mode to the
HDMI port that the tablet is connected to.
If you need help setting the display mode
of the TV, please refer to the documentation
provided by the TV manufacturer. If there
is no sound from the tablet on your TV, you
may need to set the HDMI switch sound
settings.
3.Mount the storage.
Touch button Turn on USB storage to mount the
tablet’s built-in storage. W hen it is mounted, you
can copy files to or from your tablet.
9
Specifications
Processor
RAM
BOXCHIP A10 1GHz(Cortex A8)
1G DDR3
Storage
4/8GB(option) flash built-in; micro
SD card slot (max.32GB supported)
Display
9.7” TFT LCD(1024x768)IPS, Capcitive touchscreen
Wi-Fi Networking
IEEE 802.11 b/g/n
Video Output
Mini HDMI,type C(1080p and 720p supported)
Audio Output
3.5mm headphone
PC Interface
USB 2.0 high speed
Built-in microphone
Additional Features Front facing camera(0.3MP)
2X1W speaker
Operating System
Power
Playback Time
(hours)
10
Androi d™ 4.0
Rechargeable Li-poly battery power
Adapter(DC 5V,2A)
Up to 8 hours music,
6 hours video,
6 hours web browsing
Music was tested with a 128 kbps MP3 file; video
was tested with a 1920x1080 MPEG-4/AVC file;
browsing was tested with the screen brightness
set to default. Actual playback results may var y.