1
1 . I n t ro d u c t i o n t o t h e C o n t ro l l e r
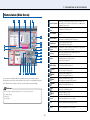
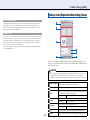
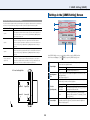
Nomenclature (Main Screen)
3
6
2
7
1
25
24
23
22
21
20
19
16
4
5
8
9
10 12 14 15 13 11 17 18
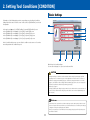
You can select a tool condition suitable for the plotted media or run a test cutting or cutting by
specifying the position of the tool and the orientation of the media. You can also display the help and
version information of the controller or open the screen for advanced and optional settings.
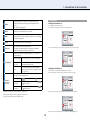
Reference
Some of the buttons are assigned keyboard shortcuts. The shortcut keys are as follows:
−[Use Keyboard]→[F6]
−[Origin]→[F5]
−[Cut Test]→[F8]
1
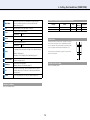
User1/2: User Name
Indicates the mode to which the plotter is set: User1 or User2. The
name that is set in [User Name] on the [Option] screen (Æpage 32) is
displayed as the user name.
2
Settings Display
Area
Displays the settings (tool, force, speed, accel, and offset) for the tool
condition that is currently selected.
3
Tool Condition
Lists tool conditions from Condition No. 1 through 8. Click a condition to
select it.
4
Edit Conditions
Opens the [Edit Conditions] screen.
Æ2. Setting Tool Conditions [CONDITION] (page 11)
5
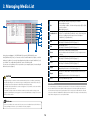
Edit Media List
Opens the [Edit Media List] screen.
Æ3. Managing Media List (page 16)
6
Upload Setting to
plotter
Overwrites the condition settings (tool conditions) in the plotter by the
settings (tool conditions) in the controller.
7
Cut Test
Runs a test cutting under the tool condition that you set.
ÆTest Cutting Patterns (page 15)
8
Rotate
Sets the plotting direction against the media or the direction to set the
media printed by the printer in the plotter.
ÆSelecting Rotation (page 10)
9
Registration
Marks Setting
Used for a cutting where the registration mark is scanned.
Æ7. ARMS Setting [ARMS] (page 24)
10
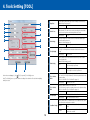
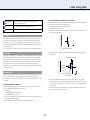
(TOOL)
Opens the [Tools Setting] screen.
Æ4. Tools Setting [TOOL] (page 18)
11
(ARMS)
Opens the [ARMS Setting] screen.
Æ7. ARMS Setting [ARMS] (page 24)
12
(AREA)
Opens the [Area Parameters] screen.
Æ5. Setting Area Parameters [AREA] (page 21)
13
(MEDIA)
Opens the [Media Setting] screen.
Æ8. Media Setting [MEDIA] (page 28)
14
(I/F)
Opens the [Interface] screen.
Æ6. Interface Setting [I/F] (page 23)
15
(ADV.)
Opens the [Advance] screen.
Æ9. Advance [ADV.] (page 30)
16
Cancel*1
Cancels the setting and closes the controller.
17
Cut*1
Cuts the media based on the settings you made.
18
Close*2
Cancels the setting and closes the controller.