1
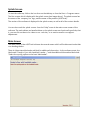
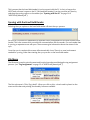
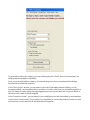
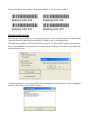
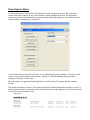
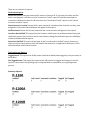
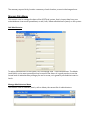
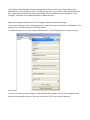
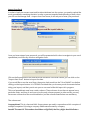
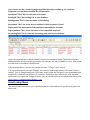
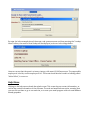
ASSETtraK™ Software User Manual, Version 1.0.0
www.rftags.co.za
Splash Screen
To start the software, click on the icon from on the desktop or from the Start → Programs menu.
The first screen which is displayed is the splash screen (see image above). The splash screen has
the name of the company, our logo, and the name of the product (ASSETtraK).
The version of the software is displayed in the splash screen, as well as all of the contact details.
You can also reach the splash screen from the “Help” menu in the main screen screen of the
software. The web address and email address on the splash screen are functional hyper links, that
is, you can click on them to be taken to our web site, or to send an email to our support
department.
Main Screen
The main screen of the ASSETtraK software has several menus which will be discussed under their
own headings below.
There is a blue status label and a red label for additional information. As the software starts, the
label reads “Ready to Sync with hand held reader....” and the additional information label reads
“Select the syncing option on the hand held reader”.
This is means that the hand held reader(s) can be synced with the PC. In fact, as long as the
ASSETtraK software is open on the PC, the hand held reader(s) can be synced at any time by
selecting the syncing option on the reader (see “Syncing with the PC” on page 16 of
“ASSETtraK_Manual.pdf”).
Syncing with the Hand Held Reader
Selecting the sync option on the hand held reader will start the sync process.
As soon as a connection is established, a separate screen, independent of the main screen will be
loaded. This is the screen which controls the communication with the reader. For each reader that
is syncing, a separate screen will open. These screens give information about the status of the
sync.
Once the sync is complete this screen will automatically close. There is no user involvement
needed for syncing, other than starting the sync process on the hand held reader.
File Menu
The file menu is used to print the asset and location barcodes used during the tag assignment
process (see “Tag Assignment” on page 12 of “ASSETtraK_Manual.pdf”).
The first sub menu is “Print Tag Labels”. When you click on this, a check mark is placed on the
menu and the barcode printing functionality becomes available.
To print labels, select the company you are working with (see “Excel” below for information on
loading data and multiple companies).
Once you have selected the company, the second drop down box is populated with buildings
found within the selected company.
In the “Print Scope” section, you can select to print all of the labels within a building, or only
incomplete labels. An incomplete label is an asset or location which has not yet been assigned to a
tag. This makes it easier during the tag assignment process to print labels for only those assets or
locations which need to still be assigned.
In the “Asset Sort Order”, you can select if you would like to sort the asset labels by asset number,
or by location (room name). This is useful if you would like to sort the barcodes by location so that
you can enter a room and have all the labels printed together.
To print the labels, click on either “Print Asset Labels” or “Print Location Labels”.
Changing the printer
There are two ways in which you can change the printer to use for printing asset or location labels.
From the file menu, select the second option, “Printer to use” (see image above).
The other way is when you click on the “Print Locations” or “Print Assets” buttons, the software
asks if you would like to continue with the current printer. Clicking on the “NO” button opens the
printer selection form.
To select the printer to use, either double click on the printer name in the list, or click to highlight it
and then click on the “Save and Exit” button.
Show Reports Menu
To access the reports, click on the “Show Reports” menu on the main screen. This will open a
screen with various reports to run. Not all reports will be available at all time. The verification
reports only become available after you have used the hand held readers to do a verification and
you have done a complete sync with the PC.
You can draw reports using all of the data, ie, not adjusting the report settings on the right of the
screen, or you can draw reports based on a company or a specific building using the report
settings on the right of the screen.
All of the reports are generated and displayed in a web browser. The report all have a similar
format.
The assets are listed by location. The location label itself will be printed either in blue or in red. If a
label is printed in blue, it means that the location already has a tag assigned to it, and if it is printed
in red the location still needs a tag.
There are two classes of reports:
Verification Reports
Assets Not Found: These are assets which were not found at all. If you enter a location and the
asset is not present, it will show on the “Assets Not Found” report. Should the asset later be
scanned in a different location it will move from the “Assets Not Found” report to the “Assets
Incorrect Location” report.
Assets Incorrect Location: Assets which were scanned in a location other than the one they were
assigned to in the main client database will appear in this report.
Verified Assets: Assets which were scanned in the correct location will appear in this report.
Locations Not Verified: This report lists the locations which have not yet been entered during the
verification report. Only locations which were entered during the verification process will display
results in the above three reports.
Assets Not Verified: This report is the same as the “Locations Not Verified” report. However, it
does not only list the locations which still need to be entered to complete the verification, it lists
individual assets within these location.
Tag Assignment Reports
Tagged Assets: This report lists all the assets which have already been tagged, ie, they are ready to
be verified.
Not Tagged Assets: This report lists assets which still need to be tagged and assigned. Use this
report in conjunction with printing only incomplete labels to streamline your tag assignment
process.
Summary Reports:
The summary reports list by location a summary of each location, as seen in the image above.
Manage Data Menu
This menu is used to manage the data of the ASSETtraK system, that is, import data from your
main database via an excel spreadsheet, or add / edit / delete administrators (users) on the system
Add Administrator
To add an administrator to the system, click on Manage Data → Add Administrator. The Admin
Level field is not in use at present but may be used in the future. It is good practice to use the
lowest level of administrative privilege you can for a user, so in general you should set users to
level 1.
Manage Administrators Menu
This menu is used to maintain, that is, edit or delete, the current list of administrators.
From the list of administrators (in the example above there is only one), double click on the
administrator you would like to edit. This will open up a box very similar to the add administrator
box, except that the details will be pre-populated, and that the button text changes to “Save
Changes”, and there is an additional button to delete the user.
Make your changes and press the “Save Changes” button to save the changes.
If you want to keep this user's existing password, then simply leave the password fields blank. The
password is not displayed here for security reasons.
To delete this user, click on the “Delete Administrator”. This will prompt you to make sure you
have not pressed this button by mistake.
If you do not want to make changes to this administrator, simply close this form using the close
button in the top right corner of the form, or press the “Esc” key on your keyboard.
Import from Excel
In order to load your current asset and locations database into the system, you need to upload the
excel spreadsheet containing the data. In order to prevent unauthorised uploading of data, when
you click on the Manage Data → Import from Excel menu, it will ask you to enter your password.
Once you have entered your password, you will be presented with a box to navigate to your excel
spreadsheet, much like any windows navigation form.
Click on the Browse button and find the excel document. Once that is done, you can click on the
“Import from Excel” button to import the data.
If you would like to see the excel form, then put a check mark into the “Excel Visible” box before
clicking on the import button. It is STRONGLY advised that you close any excel documents before
doing your import, and that you do not open or use excel while this import is in progress.
This excel spreadsheet must have certain columns. These columns do not have to appear in any
particular order, and they do not have to be the only columns present, in other words, you may
have more columns than the ones listed below, but the columns listed below are mandatory.
The columns are:
CompanyName: This is a free text field. Some systems are used in corporations which comprise of
multiple companies. By having a company field assets allocated by company.
AssetID: The asset ID. This number should be a 12 digit field, the first 3 digits should indicate a
class of asset and the 9 remaining digits should be the unique number, eg, for ComPuter
Equipment, you may have a number like CPE000000001
AssetName: This is the free text name of the asset
BuildingID: This is the building's ID on your database
BuildingName: This is a free text name of the building.
RoomName: This is the room name or number in which the asset is found
EmployeeID: The employee ID of the employee responsible for this asset
EmployeeName: This is a free text name of the responsible employee
AccountingCode: This is a free text accounting code used in your database.
Note in the example above that the fields in red are the mandatory fields. The fields in blue are
additional fields which are simply ignored by the software, but may be useful to a user. Also notice
that the order of the fields is unimportant.
In the example above, we have two companies data, “RFTags”, and “Axicon”.
If at some future point your data changes, for instance, in the image above, if the asset “Lenovo
Laptop” (line 1) changes employee, or location, simply make the changes in your spreadsheet and
reimport it to make the corrections. Of course you would then also need to sync with the hand
held reader's to import the changes to them. You can download the excel spreadsheet above from
www.rftags.co.za/assettrak/exceldemo_1.xls.
Asset Lookup Menu
The asset lookup menu allows you to quickly lookup the information of a specific asset, given the
asset code.
By enter (as in the example above) the asset code cpm000000001 and then pressing the “Lookup
Asset” button, the result of that lookup will be displayed, as shown in the image below.
Here we can see that the asset is a Lenovo Laptop, with asset ID CMP000000001. The responsible
employee is John Mc, and his employee ID is 1. This asset should also be found in a building called
“Main Office”, in room 101.
Help Menu
Clicking on the help menu reloads the splash screen. This screen has our contact information, as
well as the version information of the software. The web and email links are active, meaning that
you can click on them to go to our web site, or to start your email program with our email address
already populate.