1
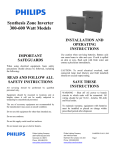
User Manual
Document Part No: SNSDOC-026
01/16/12
PRIMEX WIRELESS, INC. LICENSE AGREEMENT
IMPORTANT NOTICE--PLEASE READ PRIOR TO USING THIS SOFTWARE.
This License Agreement ("Agreement") is a legal agreement between you (either an individual
or an entity) and Primex Wireless, Inc. ("Primex Wireless") for the use of the Primex Wireless
software set forth in Section 1 below (such software, together with the underlying
documentation if made available to you, the "Software"). By installing the Software or by
otherwise using the Software, you agree to be bound by the terms of this License Agreement.
IF YOU DO NOT AGREE TO THE TERMS OF THIS LICENSE AGREEMENT, DO NOT INSTALL OR
OTHERWISE USE THE SOFTWARE. YOU AGREE THAT YOUR USE OF THE SOFTWARE
ACKNOWLEDGES THAT YOU HAVE READ THIS LICENSE, UNDERSTAND IT, AND AGREE TO BE
BOUND BY ITS PROVISIONS. PRIMEX WIRELESS IS NOT RESPONSIBLE FOR ANY THIRD PARTY
SOFTWARE, PROPRIETARY OR OTHERWISE, UTILIZED IN CONNECTION WITH THE SOFTWARE,
AND PRIMEX WIRELESS SHALL HAVE NO LIABILITY FOR YOUR USE OF SUCH THIRD PARTY
SOFTWARE.
1. DEFINITIONS: The Software consists of one or more software applications which are used
with the Primex Wireless SNSTM Applications Management Platform.
2. GRANT OF LICENSE. Primex Wireless hereby grants to you a non-exclusive, non-transferable,
non-sublicensable license to use the Software in accordance with the terms of this Agreement.
3. LICENSE RESTRICTIONS.
3.1 You may not: (i) modify, translate, reverse engineer, decompile, disassemble (except to the
extent that this restriction is expressly prohibited by law) or create derivative works based upon
the Software; (ii) resell, rent, lease or make any similar commercial use of the Software; (iii)
utilize the Software for any purpose other than that indicated in its underlying documentation;
or (iv) remove any proprietary notices or labels on the Software. Any such forbidden use shall
immediately terminate your license to the Software. Additional license restrictions are set forth
in Sections 7 and 8 hereof.
3.2 You agree that you shall only use the Software in a manner that complies with all applicable
laws and regulations in the jurisdictions (U.S. and non-U.S.) in which you use the Software,
including, but not limited to, applicable laws and regulations concerning copyright and other
intellectual property rights.
3.3 You may not use the Software in an attempt to, or in conjunction with, any device, program
or service designed to circumvent technological measures employed to control access to, or the
rights in, a content file or other work protected by the copyright laws of any jurisdiction.
SNS Compliance Manager™ User Manual ©2007-2012 Copyright Primex Wireless, Inc. All Rights Reserved
Page 2
4. TITLE. Title, ownership, rights, and intellectual property rights in and to the Software shall
remain in Primex Wireless. The Software is protected by the copyright laws of the United
States and international copyright treaties.
5. NO WARRANTIES. YOU UNDERSTAND AND AGREE THAT THE SOFTWARE IS PROVIDED "AS IS"
AND PRIMEX WIRELESS, ITS AFFILIATES, SUPPLIERS AND RESELLERS EXPRESSLY DISCLAIM ALL
WARRANTIES OF ANY KIND, EXPRESS OR IMPLIED, INCLUDING WITHOUT LIMITATION ANY
WARRANTY OF MERCHANTABILITY, FITNESS FOR A PARTICULAR PURPOSE OR NONINFRINGEMENT. PRIMEX WIRELESS, ITS AFFILIATES, SUPPLIERS AND RESELLERS MAKE NO
WARRANTY OR REPRESENTATION, REGARDING THE RESULTS THAT MAY BE OBTAINED FROM
THE USE OF THE SOFTWARE REGARDING THE ACCURACY OR RELIABILITY OF ANY INFORMATION
OBTAINED THROUGH USE OF THE SOFTWARE, OR THAT THE SOFTWARE WILL MEET ANY USER'S
REQUIREMENTS. USE OF THE SOFTWARE IS AT YOUR SOLE RISK. YOU WILL BE SOLELY
RESPONSIBLE FOR ANY DAMAGE TO YOU RESULTING FROM THE USE OF THE SOFTWARE.
6. LIMITATION OF LIABILITY. TO THE MAXIMUM EXTENT PERMITTED BY APPLICABLE LAW, IN
NO EVENT WILL PRIMEX WIRELESS OR ITS AFFILIATES, SUPPLIERS OR RESELLERS BE LIABLE FOR
ANY SPECIAL, INCIDENTAL, INDIRECT, EXEMPLARY OR CONSEQUENTIAL DAMAGES
WHATSOEVER (INCLUDING, WITHOUT LIMITATION, DAMAGES FOR LOSS OF BUSINESS PROFITS,
BUSINESS INTERRUPTION, LOSS OF BUSINESS INFORMATION, OR ANY OTHER PECUNIARY LOSS
OR DAMAGE) ARISING OUT OF THE USE OF OR INABILITY TO USE THE SOFTWARE OR THE
PROVISION OF OR FAILURE TO PROVIDE TECHNICAL OR OTHER SUPPORT SERVICES, WHETHER
ARISING IN TORT (INCLUDING NEGLIGENCE), CONTRACT OR ANY OTHER LEGAL THEORY, EVEN
IF PRIMEX WIRELESS, ITS AFFILIATES, SUPPLIERS OR RESELLERS HAVE BEEN ADVISED OF THE
POSSIBILITY OF SUCH DAMAGES. IN ANY CASE, PRIMEX WIRELESS'S, ITS AFFILIATES', SUPPLIERS'
AND RESELLERS' MAXIMUM CUMULATIVE LIABILITY AND YOUR EXCLUSIVE REMEDY FOR ANY
CLAIMS ARISING OUT OF OR RELATED TO THIS AGREEMENT WILL BE LIMITED TO THE AMOUNT
ACTUALLY PAID BY YOU FOR THE SOFTWARE (IF ANY). Because some states and jurisdictions do
not allow the exclusion or limitation of liability, the above limitation may not apply to you.
7. DFARS RESTRICTIONS. The Software, including the portion thereof constituting the
documentation, is provided with Restricted Rights, in accordance with DFARS section 227 and
its subparagraphs. You acknowledge that if you are using the Software as a representative,
employee or agent of the Department of Defense or other governmental entity of any country
or state, that the Software or portion thereof is classified, in accordance with 252.227-7014, as
"Commercial Computer Software" and any documentation included in or with the Software, is
classified as "Commercial Computer Software Documentation," both of which were "Developed
exclusively at private expense" by Primex Wireless, Inc., 965 Wells Street, Lake Geneva, WI
53147, and may only be used accordingly. You receive no rights in, or rights to modify or
reproduce, the Software including the portion thereof constituting documentation.
8. EXPORT RESTRICTIONS. You acknowledge that the Software or portion(s) thereof may be
subject to the export control laws of the United States. You will not export, re-export, divert,
SNS Compliance Manager™ User Manual ©2007-2012 Copyright Primex Wireless, Inc. All Rights Reserved
Page 3
transfer or disclose any portion of the Software or any related technical information or
materials, directly or indirectly, in violation of any applicable export law or regulation.
9. INDEMNIFICATION. You agree to indemnify, defend and hold harmless Primex Wireless, its
affiliates, officers, directors, employees, consultants, agents, suppliers and resellers from any
and all third party claims, liability, damages and/or costs (including, but not limited to,
attorney’s fees) arising from (i) your use of the Software, (ii) your violation of this Agreement,
(iii) the infringement or violation by you of any intellectual property or other right of any person
or entity, or (iv) if the Software is imported from the United States, import and export duties or
other claims arising from such importation.
10. TERMINATION. This License Agreement will automatically terminate if and when you fail to
comply with any term hereof. No notice shall be required from Primex Wireless to effect the
termination specified in the preceding sentence. You may also terminate this License
Agreement at any time by notifying Primex Wireless in writing of termination. Upon any
termination of this License Agreement, your license shall immediately terminate and you shall
discontinue use of the Software. Upon any termination of this Agreement, you must cease any
further use of the Software and delete/destroy any copies of Software (including all elements
thereof such as documentation) within your possession and control. All sections, except
Section 2, shall survive termination of this Agreement.
11. ASSIGNMENT. This Agreement may not be assigned without Primex Wireless's express
written consent. This Agreement shall be binding upon any party who uses the Software
and/or any party to whom you transfer the Software. You agree that you are responsible for
informing all users and transferees of the Software of the binding application of this
Agreement, and all provisions contained herein, to such user(s) and transferee(s). Primex
Wireless may assign this Agreement without your approval in the event there is a
reorganization, consolidation, merger or acquisition of substantially all of the stock or assets of
Primex Wireless.
SNS Compliance Manager™ User Manual ©2007-2012 Copyright Primex Wireless, Inc. All Rights Reserved
Page 4
Contents
PRIMEX WIRELESS, INC. LICENSE AGREEMENT ............................................................................2
1. Introduction ............................................................................................................................6
1.1
Application Access and Overview ..................................................................................6
1.2 Filtering and Sorting ........................................................................................................10
2. Setup and Administration ......................................................................................................16
2.1 Organization Administration ............................................................................................16
2.2 Building Administration ...................................................................................................21
2.3 User Administration ........................................................................................................24
3. Main Program .......................................................................................................................28
3.1 Electronic BBI ..................................................................................................................28
3.2 Assessment .....................................................................................................................35
3.3 Deficiency Summary ........................................................................................................51
3.4 Deficiency Edit .................................................................................................................57
3.5 Reports ............................................................................................................................61
3.6 eSOC Export.....................................................................................................................67
SNS Compliance Manager™ User Manual ©2007-2012 Copyright Primex Wireless, Inc. All Rights Reserved
Page 5
1. Introduction
Primex Wireless, Inc. has designed "SNS Compliance Manager™”, a web-based software
program, to assist healthcare facility, security and life safety managers with their Joint
Commission™ (TJC™) Statement of Conditions™ (SOC™) monitoring and reporting process.
This product includes features for creating Electronic Basic Building Information (eBBI), and
Deficiencies based on the 2009 Life Safety Chapter of the Hospital Accreditation Standards
(HAS). In addition, there are numerous reports for managing and presenting your information
and a means to export that information for import into your Joint Commission Connect site.
1.1 Application Access and Overview
1) SNS Compliance Manager™ is a web-based hosted application which can be accessed
through a secure login and password authentication at
https://secure.snscompliancemanager.com. Please note the "s" in https://. This must
be typed into the address line because Internet Explorer defaults to non-secure (http://)
sites.
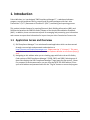
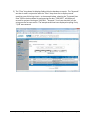
2) Navigating to this address takes you to a landing page with links to three Life Safety
Code versions of SNS Compliance Manager™ (2000, 2003, and 2009). Selecting one of
these links displays the SNS Compliance Manager™ logon page for that version. (Note:
For purposes of this documentation, we are using the NFPA 101-2000 edition.) Enter
your email address and password and click the "Log On" button to access the program.
SNS Compliance Manager™ User Manual ©2007-2012 Copyright Primex Wireless, Inc. All Rights Reserved
Page 6
If you are uncertain of your login and password, please contact your Primex Wireless
consultant or call our technical support hotline at 1-800-404-8112, Option 4. Support
Hours: Monday through Friday 8:00 am – 5:00 pm CST.
SNS Compliance Manager™ User Manual ©2007-2012 Copyright Primex Wireless, Inc. All Rights Reserved
Page 7
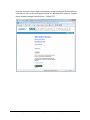
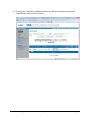
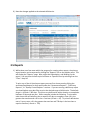
3) When first opened, SNS Compliance Manager™ defaults to the Deficiency Summary
page. All program navigation is done from the sidebar menu which is divided into two
sections: Compliance and System Admin. Each link under the two sections will display
different pages. The sidebar menu is visible at all times.
SNS Compliance Manager™ User Manual ©2007-2012 Copyright Primex Wireless, Inc. All Rights Reserved
Page 8
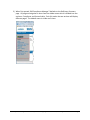
4) At login, SNS Compliance Manager™ typically defaults to the "Deficiency Summary"
page with no organization or building selected. After an organization and building are
selected, the software will default to that organization and building until another
organization or building are selected or for the remainder of the login session if no
changes occur.
SNS Compliance Manager™ User Manual ©2007-2012 Copyright Primex Wireless, Inc. All Rights Reserved
Page 9
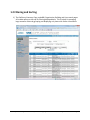
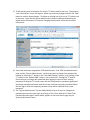
1.2 Filtering and Sorting
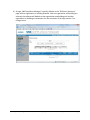
1) The Deficiency Summary Page, and eBBI, Organization, Building and User search pages
all include options at the top for filtering displayed data. This is helpful in managing
large amounts of data by grouping and displaying only items with similar information.
SNS Compliance Manager™ User Manual ©2007-2012 Copyright Primex Wireless, Inc. All Rights Reserved
Page 10
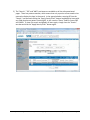
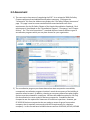
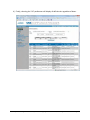
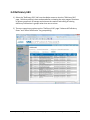
2) The "Search:", "OR" and "AND" text boxes are available on all the aforementioned
pages. These are pattern searches, which means that only a portion of text needs to be
entered to display the item in the search. In the example below, entering B5 into the
"Search:" text box and clicking the "Apply Search/Filter" button would display items with
any fields that have a pattern matching B5, in this case the "Room" field for rooms 2B5
and 2AB54. To clear this search and display all items again, simply clear the "Search:"
text box and click the "Apply Search/Filter" button again.
SNS Compliance Manager™ User Manual ©2007-2012 Copyright Primex Wireless, Inc. All Rights Reserved
Page 11
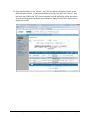
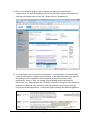
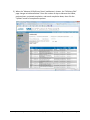
3) Entering information in the "Search:" and "OR" text boxes will display a union of two
different types of data. In the example below, entering room B5 in the "Search:" text
box and room 2100 in the "OR" text box displays records with either of the two values.
As before clearing both text boxes and clicking the "Apply Search/Filter" button will redisplay all records.
SNS Compliance Manager™ User Manual ©2007-2012 Copyright Primex Wireless, Inc. All Rights Reserved
Page 12
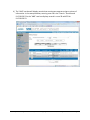
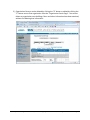
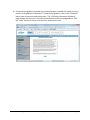
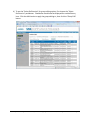
4) The "AND" text box will display records that contain two separate strings or pieces of
information. In the example below, entering room 2B in the "Search:" text box and
LS.02.01.30-23 in the "AND" text box displays records in room 2B with EP No.
LS.02.01.30-23.
SNS Compliance Manager™ User Manual ©2007-2012 Copyright Primex Wireless, Inc. All Rights Reserved
Page 13
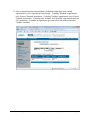
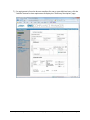
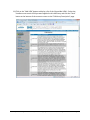
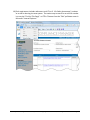
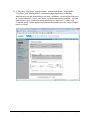
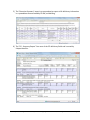
5) The "Filter" drop down list displays fields within the database to search. The "Keyword:"
text box is used in conjunction with the "Filter" drop down list to display records
matching exact full-string criteria. In the example below, selecting the "Projected Start
Date" field in the drop down list and entering the date "2/18/2011", will display all
records for projects starting on 2/18/2011. "Keyword:" is not case sensitive, but the
string must be an exact match. The example would not have displayed anything if only
"2/18" were entered.
SNS Compliance Manager™ User Manual ©2007-2012 Copyright Primex Wireless, Inc. All Rights Reserved
Page 14
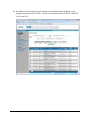
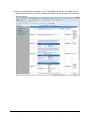
6) Any column can be sorted by simply clicking on the desired column heading. In this
example, we clicked on the "EP No." column to sort which displays EP No's. LS.02.01.103, 10-4, and 10-9.
SNS Compliance Manager™ User Manual ©2007-2012 Copyright Primex Wireless, Inc. All Rights Reserved
Page 15
2. Setup and Administration
2.1 Organization Administration
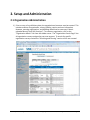
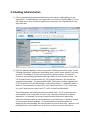
1) Prior to entry of any deficiency data, the organizational structure must be created. This
includes creation of organization, survey, building, section and user information.
However, entering organizations, and buildings would not be necessary if data is
uploaded directly from SNS Surveyor™. To create an organization, click on the
"Organization Admin" link from the sidebar menu. The "Organization Search Page" lists
all organization-surveys assigned to your user account. To search for specific
organization-surveys review the "Searching and Filtering" section of this user manual.
SNS Compliance Manager™ User Manual ©2007-2012 Copyright Primex Wireless, Inc. All Rights Reserved
Page 16
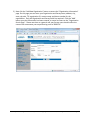
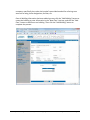
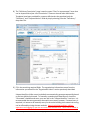
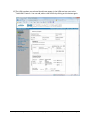
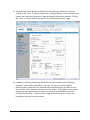
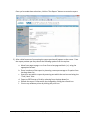
2) Next click the "Add New Organization" button to access the "Organization Information"
page. On this page you can enter your Organization and Survey name, address, city,
state, zip code, TJC organization ID, contact name and phone number for the
organization. Only the Organization and Survey fields are required. Click the "Add"
button once the information has been entered, or cancel to return to the "Organization
Search Page". Please note that as a general rule your Survey name should reflect the
name of the assessment you are performing such as 2009 SOC.
SNS Compliance Manager™ User Manual ©2007-2012 Copyright Primex Wireless, Inc. All Rights Reserved
Page 17
3) Organization-Surveys can be deleted by clicking the "D" button or edited by clicking the
"E" button next to that organization from the "Organization Search Page". You cannot
delete an organization once buildings, floors and other information have been attached,
without first deleting that information.
SNS Compliance Manager™ User Manual ©2007-2012 Copyright Primex Wireless, Inc. All Rights Reserved
Page 18
4) Organizations can also be disabled from the "Organization Information" page by SNS
administrators and the System administrator only. This feature is used primarily to
enforce hosting contracts. To disable an organization click the "E" button to edit that
organization, click on the "Disable Organization" check box, and click the "Update"
button to confirm the change.
SNS Compliance Manager™ User Manual ©2007-2012 Copyright Primex Wireless, Inc. All Rights Reserved
Page 19
5) Once an organization has been disabled it is displayed separately from enabled
organizations on the "Organization Search Page". To display "Disabled" organizations
only, click the "Disabled" pushbutton. To display "Enabled" organizations only, click the
"Enabled" pushbutton. To display both "Enabled" and "Disabled" organizations click the
"All" pushbutton. To enable an organization go to the edit screen and un-check the
"Disable" checkbox.
SNS Compliance Manager™ User Manual ©2007-2012 Copyright Primex Wireless, Inc. All Rights Reserved
Page 20
2.2 Building Administration
1) Once an organization has been established, the next step is to add buildings to that
organization. To add buildings to an organization first click the "Building Admin" link on
the sidebar menu, then choose an organization-survey from the "Organization-Survey"
drop down box.
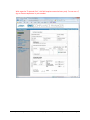
2) Click the "Add New Building" button to access the "Building Information" page. On the
"Building Information" page enter the building name, section name, address, city, state,
zip code, TJC building ID, contact name and contact phone number. You may also
choose an automatically generated numbering scheme for your deficiency items. The
"PFI UniqueID Prefix" combined with the "PFI UniqueID Separator" will precede any
autogenerated number. For example,MHH-1000. Clicking the checkbox "Append Year
to PFI UniqueID Prefix" will add the year to the prefix structure, i.e. MHH2007-1000. In
addition, if you would like to export PFI's to the Joint Commission™ (TJC™) eSOC web
site, you'll need to enter values from TJC™ eSOC for SiteID and BuildingID.
The building name and building section are required fields. Per TJC requirements on
each hospital's Joint Commission Connect™ site, a building is defined by occupancy
separations. For example, if a primary hospital building contains an appropriate
separation between health care and ambulatory care occupancies, it should be treated
as two separate, distinct buildings. To accommodate this separation while still
identifying the actual building, we have included this section name field. However, since
building section is not linked to any of the forms, it does not have to describe an
SNS Compliance Manager™ User Manual ©2007-2012 Copyright Primex Wireless, Inc. All Rights Reserved
Page 21
occupancy specifically, but rather the hospital's prescribed method for referring to an
area such as wing, letter designation, function, etc.
Once all building information has been added you may click the "Add Building" button to
create the building or enter information in the "New Floor" text box, and click the "Add
Floor" button to add floors to a building. Then click the "Add Building" button to
complete the process.
SNS Compliance Manager™ User Manual ©2007-2012 Copyright Primex Wireless, Inc. All Rights Reserved
Page 22
3) Building-sections can be deleted by clicking the "D" button or edited by clicking the "E"
button next to that building from the "Building Search Page". You cannot delete a
building once floors and other information have been attached, without first deleting
that information.
SNS Compliance Manager™ User Manual ©2007-2012 Copyright Primex Wireless, Inc. All Rights Reserved
Page 23
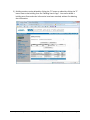
2.3 User Administration
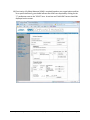
1) The final step in program setup is to create users. First click on the "User Admin" link on
the sidebar menu to display the "User Search Page". The user search page displays all
users including their full name, phone, email and their assigned organizations. Since the
system administrator and users who have been assigned the SNS Admin role have
access to all organizations, their role is displayed in the "Assigned Organization(s)"
column.
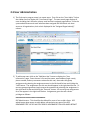
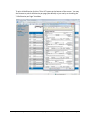
2) To add a new users click on the "Add New User" button to display the "User
Information" page. Enter the user's first and last name, email address (login name),
phone number, and any comments to describe this user, then select the group
assignments by selecting the assignment name in the left-hand list box and clicking the
"Add" button. The assignments for this user should appear in the right-hand list box. To
remove group assignments simply reverse the procedure by selecting the assignment in
the right-hand list box and clicking the "Remove" button. All current group assignments
for a user appear in the right-hand list box. Assignments grant the user certain
privileges as follows:
ORGANIZATION SPECIFIC GROUP ASSIGNMENTS
SOC Administrator: This should be the default for most of our smaller clients. SOC
administrator gives access to add, delete, edit and print any part of the SOC.
REMEMBER THAT USE OF MULTIPLE GROUP ASSIGNMENTS CAN ADD AND SUBTRACT
SNS Compliance Manager™ User Manual ©2007-2012 Copyright Primex Wireless, Inc. All Rights Reserved
Page 24
PRIVELEGES. IF YOU WANT SOMEONE TO HAVE FULL ACCESS DO NOT ASSIGN MULTIPLE
GROUP ASSIGNMENTS SUCH AS SOC Administrator combined with SOC User.
SOC User Administrators: This group assignment grants access to the user admin
section of the program so users can be added, edited or deleted from the users’
assigned organizations. This group assignment can be added to any of the other roles.
SOC BBI Admin: This group assignment has the ability to add, edit or delete eBBI
information, can view deficiencies without editing and run reports. This group
assignment has no access to administrative functions or the eSOC export.
SOC PFI Admin: This group assignment has the ability to add, edit or delete deficiency
information, can view eBBI information without editing and run reports. This group
assignment has no access to administrative functions or the eSOC export.
SOC Users: This group assignment can view both eBBI and deficiency information and
run reports. They have no other access rights.
After selecting group assignments for a user, specific organizations must be assigned.
Unless a user is assigned to at least one organization, they will not be able to view or
edit any information regardless of the group assignments they have been given. To
assign an organization to a user, select the organization in the left-hand list box under
"Organizations:" and click the "Add" button. The organization should appear in the
right-hand list box. To remove organization assignments simply reverse the procedure
by selecting the organization in the right-hand list box and clicking the "Remove"
button. All current organization assignments for a user appear in the right-hand list box.
SNS ADMINISTRATOR and PASSWORDS
The system administrator has special privileges as follows:
· The SNS Administrator checkbox is a unique role that should only be given to SNS
employees. It grants full access to all SOC information for all organizations and
can only be assigned by the system administrator.
· A temporary default system password is automatically assigned for new users
created by individuals with the SNS admin or SOC User admin roles. The first
time the new user logs in, they must change this password. Only the system
administrator has the option to create a specific password for a user.
· In the event an existing user forgets their password, users with the SNS Admin
and SOC User Administrator roles may reset this user to the temporary default
password, so that they may log in and reset their password. The system
administrator may trigger a password change for one or more users. This will
require these users to change their current password the next time they log in.
Once all user information has been completed, click the "Add" button at the bottom of
the screen to create the new user. When a new user is created, the system
automatically sends an email to the user's email address. The email contains the user's
logon information and a randomly generated temporary password. The user will log on
SNS Compliance Manager™ User Manual ©2007-2012 Copyright Primex Wireless, Inc. All Rights Reserved
Page 25
as described in Application Access and Overview. They will then be required to create a
new password.
SNS Compliance Manager™ User Manual ©2007-2012 Copyright Primex Wireless, Inc. All Rights Reserved
Page 26
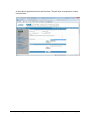
3) To edit existing user information click on the "E" button next to that user. The previous
"User Information" screen will appear. Make any necessary changes and click the "Add"
button to confirm these changes. To delete an existing user click on the "D" button next
to that user. Note that the System Administrator cannot be deleted, and editing the
administrator information is limited to changing the password, and minimal contact
information.
4) Users who have been assigned the "SNS Administrator", and "SOC User Administrator"
roles and the "System Administrator" can force any user to change their password by
clicking on either the "C" button in the "User PWD Change" column, or by clicking on the
"P" button in the "Default PWD" column, next to that user. Clicking the "C" button
forces the user to change their password upon logging in next with their existing
password. Clicking the "P" button resets the user's password to a randomly generated
temporary password and sends email to the user with the temporary password. When
the user logs in with the temporary password, they will be required to set a new
password.
5) The "System Administrator" has the added ability to force all users to change their
password the next time they log in by clicking on the "Force All Users To Reset Their
Password On Next Logon" button which appears on the User Search page only for
System Administrator users.
SNS Compliance Manager™ User Manual ©2007-2012 Copyright Primex Wireless, Inc. All Rights Reserved
Page 27
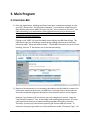
3. Main Program
3.1 Electronic BBI
1) Once the organizations, buildings and floors have been created you can begin to enter
your SOC™ information. SNS Compliance Manager™ can be used to create electronic
Basic Building Information (eBBI) for entry into your "Joint Commission Connect™" site.
eBBI information is not required here (and unlike deficiencies) cannot be exported
directly to your TJC site, so you can choose NOT to maintain this information in our
software to eliminate redundancy.
Clicking on the "eBBI" link from the sidebar menu displays the eBBI Search Page. The
eBBI Search Page lists all buildings created during building administration described
previously under "Setup and Administration". To add eBBI information for each of these
buildings, click the "E" edit button next to the desired building.
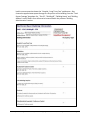
2) Because of inconsistencies in the occupancy descriptions and the inability to export this
information mentioned previously, the eBBI form is no longer tied to the occupancies
and new accreditation programs described in the assessment portion of the program.
However if you choose to fill out the form you must complete all sections. Note the
"Help: Mixed Occupancy?" link. As described under building administration, TJC treats
each separate occupancy as a separate building regardless of building continuity.
Therefore, you may only choose one occupancy type for each eBBI you create. To
choose an occupancy type select one of the pushbutton's under "Occupancy Type". For
SNS Compliance Manager™ User Manual ©2007-2012 Copyright Primex Wireless, Inc. All Rights Reserved
Page 28
health care occupancies choose the "Hospital / Long Term Care" pushbutton. Also
choose the approximate square footage for this portion of the building from the "Total
Square Footage" dropdown list. "Site ID", "BuildingID", "Building Name" and "Building
Address" are all filled in from information entered under the previous "Building
Administration" section.
SNS Compliance Manager™ User Manual ©2007-2012 Copyright Primex Wireless, Inc. All Rights Reserved
Page 29
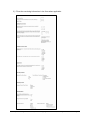
3) Fill out the remaining information in the form where applicable.
SNS Compliance Manager™ User Manual ©2007-2012 Copyright Primex Wireless, Inc. All Rights Reserved
Page 30
4) One advantage to completing your eBBI information here before transferring to your
TJC site is that certain fields have been added to our form in order to provide guidance
for information that TJC requires in the catch-all "Additional Comments and Notes"
memo box at the bottom of their form. Information regarding the consultant who
completed the information, and a description of the mixed occupancy for the buildingsection in question where applicable are actually required and hospitals have been cited
for not providing this information. We also provide suggested language for some of this
information in the "Additional comments and notes" memo box. When the form is
printed this information is all combined into the "Additional comments and notes"
memo box so that it closely resembles what you need to enter on your TJC site.
SNS Compliance Manager™ User Manual ©2007-2012 Copyright Primex Wireless, Inc. All Rights Reserved
Page 31
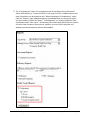
5) One other recent addition is the question regarding government suspension. Where
mandated by state or federal agencies, a hospital may be required to suspend testing
such as those requiring an excessive use of water during a drought period. When the
pushbutton is selected for this, information describing the nature of the suspension
must be provided in the memo box below.
6) To provide a method for storing and centralizing information associated with a building,
we recommend posting drawings and other attachments to AutoCAD WS.
7) To print the eBBI form click on the "Print Friendly" button at the top of the form.
SNS Compliance Manager™ User Manual ©2007-2012 Copyright Primex Wireless, Inc. All Rights Reserved
Page 32
8) A dialog box checking to make sure you've saved changes to the form will appear. If you
have saved the form you may click the "OK" but to continue to the print friendly view or
the "Cancel" button to go back and save your changes first.
9) If all required fields have been completed a "Print Friendly" view will pop up in a
separate window.
SNS Compliance Manager™ User Manual ©2007-2012 Copyright Primex Wireless, Inc. All Rights Reserved
Page 33
10) This print friendly view can be used to complete the form on your Joint Commission™
Connect site. Note the "Additional Comments and Notes" contains a collection of
information entered into the SNS Compliance Manager™ eBBI form.
SNS Compliance Manager™ User Manual ©2007-2012 Copyright Primex Wireless, Inc. All Rights Reserved
Page 34
3.2 Assessment
1) The next step in the process of completing the SOC™ is to review the 2009 Life Safety
Chapter requirements and add deficiencies where necessary. Clicking on the
"Assessment" link from the sidebar menu displays the "Life Safety Chapter Assessment"
page. This page is used to create new deficiencies associated with each of the
requirements for the Life Safety Chapter of the Hospital Accreditation Standards. Each
requirement is listed based on the "Accreditation Program", "Occupancy" and "Chapter
Section". Per "The Joint Commission™" standards there are several different types of
accreditation programs which you may have chosen for your organization.
2) The accreditation program you choose determines what occupancies are available,
consequently accreditation programs that don't match the occupancy of the building in
question cannot be used. In addition, choosing an occupancy determines what chapter
sections must be reviewed for compliance. We have also added an option for LSA Only
(No Accreditation) to cover review of Business occupancies. Standalone Business
occupancies are not required for Statement of Conditions inspections. However, per
EC.02.03.01 Business occupancies that are used as a means of egress from another
occupancy that is required, must comply with NFPA requirements for a business
occupancy. In this case we have included relevant sections of NFPA10, NFPA13, NFPA80
SNS Compliance Manager™ User Manual ©2007-2012 Copyright Primex Wireless, Inc. All Rights Reserved
Page 35
and NFPA101 as chapter sections for review. Note that while other occupancies are not
currently available under this section, they will be added in the future to cover the new
Det Norske Veritas (DNV) National Integrated Accreditation for Healthcare
Organizations (NIAHO) requirements and other authorities having jurisdiction.
3) WARNING!!! Once you begin to add deficiencies to requirements, any changes to
accreditation program or occupancy will DELETE those deficiencies. If you attempt to
make this change the following prompt will appear. To keep the current settings and
prevent deletion of deficiencies select the "Cancel" button.
SNS Compliance Manager™ User Manual ©2007-2012 Copyright Primex Wireless, Inc. All Rights Reserved
Page 36
4) Once an accreditation program and occupancy are chosen you should review
compliance for the selected building on each of the life safety chapter requirements by
selecting each chapter section from the "Chapter Section" dropdown list.
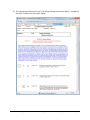
5) For each chapter section review the requirements. If the building is in compliance with
a specific requirement, nothing needs to be done. If the requirement does not apply to
the building click the checkbox in the not applicable (N/A) column next to that
requirement. Items in "Blue" are chapter section headings and are provided for
information only. Requirements with "Guidance" buttons to the right contain additional
guidance for reference. You can quickly view this guidance information by hovering
over the associated requirement. A tooltip will appear showing the additional guidance.
SNS Compliance Manager™ User Manual ©2007-2012 Copyright Primex Wireless, Inc. All Rights Reserved
Page 37
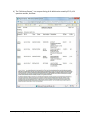
6) Sometimes the guidance provided may exceed the space available in a tooltip, so only a
portion of the guidance is displayed. To view the full guidance, click on the "Guidance"
button next to the associated requirement. The "Life Safety Assessment Guidance"
page displays the full test of the selected requirement and associated guidance. Click
the "Close" button to return to the previous assessment screen.
SNS Compliance Manager™ User Manual ©2007-2012 Copyright Primex Wireless, Inc. All Rights Reserved
Page 38
7) If a requirement is found to be non-compliant for one or more deficient items, click the
"Add Def" button for that requirement to display the "Deficiency Description" page.
SNS Compliance Manager™ User Manual ©2007-2012 Copyright Primex Wireless, Inc. All Rights Reserved
Page 39
8) The "Deficiency Description" page is used to create "Plan For Improvement" items that
can be imported into your Joint Commission™ Connect site and other deficiencies.
Templates have been provided for common deficiencies that populate both the
"Deficiency" and "Proposed Action" fields by simply selecting from the "Deficiency:"
drop down list.
9) Fill in the remaining required fields. The organization information comes from the
information you entered in the "Organization Admin" section previously described.
Unique Identifiers (uid)s are set by default to automatically generate sequentially based
on the last deficiency entered. To manually created unique identifiers un-check the
"Generated" checkbox and enter your own uid in the "Unique Identifier:" text box. It is
recommended that auto-generation be used in most cases, however, if manual entry is
required, it is better to do manually entry for the entire building since numerical sorting
can be affected by mixing the two methods. Keep in mind that prefixes, suffixes,
separators and tagging by year do not need to be entered here. These can be added at
SNS Compliance Manager™ User Manual ©2007-2012 Copyright Primex Wireless, Inc. All Rights Reserved
Page 40
any time by modifying this information in the "Building Admin" section for a particular
building, so the use of manual uid entry is not necessary in most cases.
Project Start and Projected Completion Dates can be challenging to enter since most
people think in terms of man hours or days to complete a task and then have to
calculate the date manually. The problem becomes more challenging because The Joint
Commission™ (TJC) requires deficiencies not repaired within 45 days to be added to a
hospital's Joint Commission™ Connect site as Plan For Improvement items. Any items
that can be fixed within that timeframe do not need to be reported to TJC and can be
repaired through a hospitals work order process. The ID "+" button takes some of the
work out of this calculation process. For example, if you know that it takes 15 days to
order and replace a missing escutcheon from a sprinkler head and you can do this as
part of your internal work order process, subtract 15 from 45 days. Enter 30 days in the
"Projected Start Date" and 45 days in the "Projected Completion Date" and click the "+"
button to automatically calculate these dates.
SNS Compliance Manager™ User Manual ©2007-2012 Copyright Primex Wireless, Inc. All Rights Reserved
Page 41
With regard to "Projected Cost", this field requires numerical entry only. Do not use a $
sign or comma separators in your number.
SNS Compliance Manager™ User Manual ©2007-2012 Copyright Primex Wireless, Inc. All Rights Reserved
Page 42
10) If an Interim Life Safety Measure (ILSM) is required based on your organizations policies
for a specific deficiency, you should indicate that ILSM's are required by clicking on the
"Y" pushbutton next to the "ILSM?" item. A text box and "Add ILSM" button should be
displayed on the screen.
SNS Compliance Manager™ User Manual ©2007-2012 Copyright Primex Wireless, Inc. All Rights Reserved
Page 43
11) Click on the "Add ILSM" button to display a list of the 14 possible ILSM's. Select the
checkbox next to each ILSM you want applied to this deficiency and click the "Save"
button at the bottom of the screen to return to the "Deficiency Description" page.
SNS Compliance Manager™ User Manual ©2007-2012 Copyright Primex Wireless, Inc. All Rights Reserved
Page 44
12) The ILSM numbers you selected should now appear in the ILSM text box next to the
"Add ILSM's" button. You can add, edit or clear ILSM's by clicking on this button again.
SNS Compliance Manager™ User Manual ©2007-2012 Copyright Primex Wireless, Inc. All Rights Reserved
Page 45
13) Click the "Save" button to add the deficiency item to the requirement you originally
selected. Any deficiency item can be copied, edited or deleted by clicking on the "C",
"D" or "E" buttons next to that deficiency.
SNS Compliance Manager™ User Manual ©2007-2012 Copyright Primex Wireless, Inc. All Rights Reserved
Page 46
14) Comments can also be added to requirements by clicking the "Comments" button next
to the requirement. Enter your comment in the memo box on the "Life Safety
Assessment Comment" page and click the "Save" button to return to the assessment
page.
SNS Compliance Manager™ User Manual ©2007-2012 Copyright Primex Wireless, Inc. All Rights Reserved
Page 47
15) The comment will now be displayed below the requirement. To delete or edit the
comment click the "Delete Comment" or "Edit Comment" buttons.
SNS Compliance Manager™ User Manual ©2007-2012 Copyright Primex Wireless, Inc. All Rights Reserved
Page 48
16) Each requirement includes references to old "Part 3: Life Safety Assessment" numbers
as an aid for learning the new system. The easiest way to search for an old LSA number
is to use the "Find (on This Page)" or CTRL+F feature from the "Edit" pull down menu in
Microsoft® Internet Explorer.
SNS Compliance Manager™ User Manual ©2007-2012 Copyright Primex Wireless, Inc. All Rights Reserved
Page 49
17) Enter the old LSA question number in the "Find" dialog and click the "Find Next" button.
Repeated clicking of the "Find Next" button will display any requirements that reference
this old number.
SNS Compliance Manager™ User Manual ©2007-2012 Copyright Primex Wireless, Inc. All Rights Reserved
Page 50
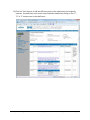
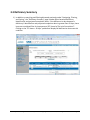
3.3 Deficiency Summary
1) In addition to searching and filtering discussed previously under "Navigating, Filtering,
and Sorting", the "Deficiency Summary" page includes filters based on deficiency
identification and projected completion dates. If the difference in days between a
deficiency’s identification and projected completion dates is greater than 45 days, these
items are considered Plan for Improvement (PFI) items by The Joint Commission™.
Clicking on the "PFI Items > 45 days" pushbutton displays all deficiencies that meet this
condition.
SNS Compliance Manager™ User Manual ©2007-2012 Copyright Primex Wireless, Inc. All Rights Reserved
Page 51
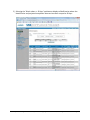
2) Selecting the "Work orders <= 45 days" pushbutton displays all deficiencies where the
identification and projected completion dates are less than or equal to 45 days.
SNS Compliance Manager™ User Manual ©2007-2012 Copyright Primex Wireless, Inc. All Rights Reserved
Page 52
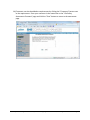
3) Choosing the "Undated" pushbutton displays any deficiencies where the projected
completion date has not been entered.
SNS Compliance Manager™ User Manual ©2007-2012 Copyright Primex Wireless, Inc. All Rights Reserved
Page 53
4) Finally, choosing the "All" pushbutton will display all deficiencies regardless of dates.
SNS Compliance Manager™ User Manual ©2007-2012 Copyright Primex Wireless, Inc. All Rights Reserved
Page 54
5) Any deficiency can be deleted or edited from the "Deficiency Summary" screen by
clicking on the "D" or "E" buttons respectively. Editing a deficiency in this manner is the
same as the "Deficiency Description" page described in the previous example. Clicking
the "Save" or "Cancel" button will return to the "Deficiency Summary" page.
6) In addition to filtering and editing, deficiencies can be printed from the "Deficiency
Summary" screen either separately or in groups. To print one or more specific
deficiency items, select the print checkbox next to the deficiencies you'd like to print
then click the "Print" button at the bottom of the column. In the Report server popup
window you can choose to print or export the report to several different formats
including PDF and Excel. To print an entire page of deficiencies you can select the
checkbox at the top of the print column.
SNS Compliance Manager™ User Manual ©2007-2012 Copyright Primex Wireless, Inc. All Rights Reserved
Page 55
To print all deficiencies click the "Print All" button at the bottom of the screen. You may
also choose to print 4 deficiencies per page (the default) or just one by un-checking the
"4 Deficiencies per Page" checkbox.
SNS Compliance Manager™ User Manual ©2007-2012 Copyright Primex Wireless, Inc. All Rights Reserved
Page 56
3.4 Deficiency Edit
1) Select the "Deficiency Edit" link from the sidebar menu to view the "Deficiency Edit"
page. Deficiency editing is best understood after reviewing the main program functions.
Its primary purpose is to manage and enhance the creation and editing of existing
deficiency information in groups rather than one at a time.
2) There are two primary options on the "Deficiency Edit" page: "Advance All Deficiency
Dates" and "Select Deficiencies" for group editing.
SNS Compliance Manager™ User Manual ©2007-2012 Copyright Primex Wireless, Inc. All Rights Reserved
Page 57
3) When the "Advance All Deficiency Dates" pushbutton is chosen, the "Deficiency Edit"
page changes as indicated below. Enter the number of days to advance the id date,
projected start, projected completion, and actual completion dates, then click the
"Update" button to complete the process.
SNS Compliance Manager™ User Manual ©2007-2012 Copyright Primex Wireless, Inc. All Rights Reserved
Page 58
4) To use the "Select Deficiencies" for group editing option, first choose the "Select
Deficiencies" pushbutton. Checkboxes should now be displayed for each deficiency
item. Click the deficiencies to apply the group editing to, then click the "Group Edit"
button.
SNS Compliance Manager™ User Manual ©2007-2012 Copyright Primex Wireless, Inc. All Rights Reserved
Page 59
5) A "Deficiency Description" page will appear. Shared fields such as "Organization",
"City/State", and "Building Name" are edited through Organization or Building
Administration and are unavailable for edit here. In addition, certain unique fields such
as "Unique Identifier", "Floor", and "Room" are locked and cannot be edited. All these
fields appear in gray. Fields that can be edited such as "Deficiency", "ILSM?", and
"Proposed Action" will be applied to all selected deficiencies when the "Apply Changes"
button is clicked.
SNS Compliance Manager™ User Manual ©2007-2012 Copyright Primex Wireless, Inc. All Rights Reserved
Page 60
6) Note the changes applied to the selected deficiencies.
3.5 Reports
1) While there are a few areas within the program for creating other reports, the primary
report location can be accessed by clicking the "Reports" link on the sidebar menu. This
will display the "Reports" page. Next, select the Organization, and Building for the
report. You may then choose to print all floors or a specific floor by selecting from the
"Floor:" drop list.
To print any of the six listed report types you must first choose one by clicking the
associated pushbutton for that report under the "Assessment Reports:", "Deficiency
Reports:", or "Quality Control Reports:" sections. If you are running a deficiency report
you should adjust your date filter to print the desired range of deficiencies. The default
range is > 45 and <= 365 days. This prints any deficiencies with a duration to completion
between 45 days and one year. Other examples include the following: To print work
order items that will take less than or equal to 45 days to complete, enter a 0 in the
greater than text box and a 45 in the <= text box (>0 and <= 45). To print all deficiencies
out to 2 years, enter a 0 in the greater than text box and 730 days in the less than or
equal to text box (> 0 and <= 730).
SNS Compliance Manager™ User Manual ©2007-2012 Copyright Primex Wireless, Inc. All Rights Reserved
Page 61
Once you've made these selections, click the "Run Report" button to create the report.
2) After a brief moment of processing the report preview will appear on the screen. From
the report preview you may choose the following options from the top bar:
a. Move from page to page <> or from first to last page and back |<>| using the
appropriate arrows.
b. Zoom in and out of the report by choosing a zoom percentage or fit option from
the drop-down list.
c. Search for text within a report by entering text within the text box and using the
"Find | Next" links.
d. Export to PDF format or Excel by selecting from the drop down list.
e. Refresh the report if information has changed by clicking the refresh icon.
f. Print to any windows printer by clicking the print icon.
SNS Compliance Manager™ User Manual ©2007-2012 Copyright Primex Wireless, Inc. All Rights Reserved
Page 62
3) The sample report below is for the "Life Safety Chapter Assessment Report". Samples of
the other 5 reports are also shown below.
SNS Compliance Manager™ User Manual ©2007-2012 Copyright Primex Wireless, Inc. All Rights Reserved
Page 63
4) The "Deficiency Report" is a compact listing of all deficiencies sorted by EP ID, LSA
question number, and floor.
SNS Compliance Manager™ User Manual ©2007-2012 Copyright Primex Wireless, Inc. All Rights Reserved
Page 64
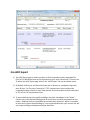
5) The "Executive Summary" report is a comprehensive report of all deficiency information
in a spreadsheet format sorted by EP ID#, and building.
6) The "PFI - Summary Report" lists most of the PFI deficiency fields and is sorted by
Unique Identifier.
SNS Compliance Manager™ User Manual ©2007-2012 Copyright Primex Wireless, Inc. All Rights Reserved
Page 65
7) The "Completeness" report is a management tool for tracking missing information
within each deficiency. In many cases this is the project start or completion dates, but
other information can be missed as well. When choosing the "Completeness" report
from the "Reports" page, additional options are available prior to running the report.
You may choose to select the "Room", "ILSM Required", or "Actual Completion Date"
check boxes under "Also check:" As indicated, this would check deficiencies to see that
all rooms have numbers or descriptions, whether or not an ILSM is required, and
whether an actual completion date has been added.
SNS Compliance Manager™ User Manual ©2007-2012 Copyright Primex Wireless, Inc. All Rights Reserved
Page 66
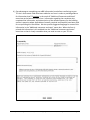
3.6 eSOC Export
1) The eSOC Export page is used to produce an Excel compatible comma separated file
(CSV) of PFI deficiencies that can be imported into your Joint Commission™ Connect site.
To access the eSOC Export page click on the "eSOC Export" link on the sidebar menu.
2) By default, deficiencies are filtered by those with a duration to completion of greater
than 45 days. Per The Joint Commission™ (TJC) requirements, these could not be
completed through a facility's work order process and must be electronically submitted
to TJC as Plan For Improvement items.
3) To export deficiencies for a specific buildings, check the checkboxes in the "Select"
column next to the desired buildings and un-check those you wish to exclude from the
export. Buildings listed as unavailable have already been exported. While it is possible
to reset and re-export these buildings it is not recommended since your connect site will
not except buildings with duplicate unique identifiers.
SNS Compliance Manager™ User Manual ©2007-2012 Copyright Primex Wireless, Inc. All Rights Reserved
Page 67
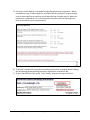
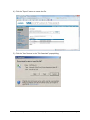
4) Click the "Export" button to create the file.
5) Click the "Save" button in the "File Download" popup dialog.
SNS Compliance Manager™ User Manual ©2007-2012 Copyright Primex Wireless, Inc. All Rights Reserved
Page 68
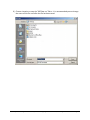
6) Choose a location to save the "SOCData.csv" file to. It is recommended you not change
the name of this file until after the file has been saved.
SNS Compliance Manager™ User Manual ©2007-2012 Copyright Primex Wireless, Inc. All Rights Reserved
Page 69
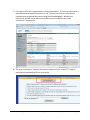
7) If the export fails this is typically due to missing information. This missing information is
reported below the export information in red. Some of the most common failures
include missing projected dates and missing SiteID and BuildingID. Without this
information you will not be able to successfully import the file into your Joint
Commission™ Connect site.
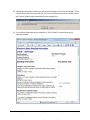
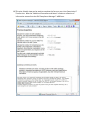
8) The Joint Commission™ Connect site contains a button on the "Import PFI" page for
retrieving site and building ID's for your facility.
SNS Compliance Manager™ User Manual ©2007-2012 Copyright Primex Wireless, Inc. All Rights Reserved
Page 70
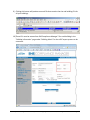
9) Clicking this button will produce an excel file that contains the site and building ID's for
all your buildings.
10) These ID's must be entered into SNS Compliance Manager™ for each building in the
"Building Information" page under "Building Admin" for the eSOC export process to be
successful.
SNS Compliance Manager™ User Manual ©2007-2012 Copyright Primex Wireless, Inc. All Rights Reserved
Page 71