1
Wycom Corporation
ELITE-PLUS USER MANUAL
Date:
09/15/03 2:57 PM
Revision:
1.8
File Format:
MS-Word 97
File Status:
Release
File Location:
H:\Data\DOC\eliteplus-usermanual.doc
ELITE-PLUS USER MANUAL
9/15/2003 12:06 PM
TABLE OF CONTENTS
1.
INTRODUCTION .............................................................................................................................................. 4
2.
HARDWARE/ELECTRONICS ........................................................................................................................ 4
3.
ELITE-PLUS USER INTERFACE................................................................................................................... 5
4.
CUSTOMER INSTALLATION INSTRUCTIONS ........................................................................................ 5
4.1
ELITE-PLUS HARDWARE INSTALLATION ........................................................................................................ 5
4.2
WINDOWS 95/98 INSTALLATION .................................................................................................................... 5
4.2.1
Gather Networking Information............................................................................................................ 5
4.2.1.1
4.2.1.2
4.2.1.3
Get the Workgroup ............................................................................................................................................ 5
Get the IP Type.................................................................................................................................................. 5
Get the IP address .............................................................................................................................................. 6
4.2.2
Configure Elite-Plus networking .......................................................................................................... 6
4.2.3
Test the connection from Elite-Plus to the printer ................................................................................ 7
4.2.4
Add a New Windows Network Printer (SMB/Lan Manager) ................................................................ 8
4.3
WINDOWS 2000 INSTALLATION ..................................................................................................................... 9
4.3.1
Gather Networking Information............................................................................................................ 9
4.3.1.1
4.3.1.2
4.3.1.3
4.3.2
4.3.3
4.3.4
4.3.4.1
4.3.4.2
4.3.4.3
Get the Workgroup ............................................................................................................................................ 9
Get the IP Type.................................................................................................................................................. 9
Get the IP address .............................................................................................................................................. 9
Configure Elite-Plus networking ........................................................................................................ 10
Test the connection from Elite-Plus to the printer .............................................................................. 11
Add a New Windows Printer............................................................................................................... 11
Add a New Windows Network Printer (SMB/Lan Manager) .......................................................................... 12
Add a New Windows Network Printer (RAW 9100 / JetDirect) ..................................................................... 12
Add a New Windows Network Printer (LPR) ................................................................................................. 13
4.4
WINDOWS: MAPPING THE ELITE PLUS TO AN LPT PORT.............................................................................. 14
4.5
AS400 INSTALLATION ................................................................................................................................. 15
4.5.1
Gather Networking Information.......................................................................................................... 15
4.5.2
Configure Elite-Plus networking ........................................................................................................ 15
4.5.3
Test the connection from Elite-Plus to the printer .............................................................................. 16
4.5.4
Add a AS400 Print Queue ................................................................................................................... 16
4.5.4.1
4.5.4.2
Add a AS400 Print Queue using IP port 9100 ................................................................................................. 17
Add a AS400 LPR Remote Print Queue.......................................................................................................... 18
4.6
HP/UX INSTALLATION ................................................................................................................................ 19
4.6.1
Gather Networking Information.......................................................................................................... 19
4.6.2
Configure Elite-Plus networking ........................................................................................................ 19
4.6.3
Test the connection from Elite-Plus to the printer .............................................................................. 20
4.6.4
Add the Elite Plus hostname to your HP/UX system........................................................................... 20
4.6.5
Add a HP/UX Print Queue.................................................................................................................. 20
4.6.5.1
Add a Remote Printer/Plotter” in HP/UX using “sam”.................................................................................... 21
4.6.5.2
Add a Remote Printer/Plotter” in HP/UX using the command line programs ................................................. 21
4.6.5.2.1
Note on using the “lpadmin” command: ................................................................................................... 21
4.6.5.3
Test the new remote printer ............................................................................................................................. 22
4.7
ELITE PLUS FILE CAPTURE .......................................................................................................................... 23
4.7.1
Enable Capture on the Elite Plus........................................................................................................ 23
4.7.2
Disable Capture on the Elite Plus....................................................................................................... 23
4.7.3
Capture User Interface ....................................................................................................................... 23
4.7.4
Capturing files with a ELITE PLUS ................................................................................................... 26
4.7.5
Transferring Captured Files from the ELITE PLUS........................................................................... 27
H:\Manuals\CM-3000\Elite Plus User Manual.doc
2
ELITE-PLUS USER MANUAL
4.7.5.1
4.7.5.2
4.7.5.3
9/15/2003 12:06 PM
Using FTP defaults to transfer captured data files ........................................................................................... 27
Using FTP configuration to transfer captured data files .................................................................................. 27
Accessing captured files using SMB (Windows Networking)......................................................................... 28
H:\Manuals\CM-3000\Elite Plus User Manual.doc
3
ELITE-PLUS USER MANUAL
9/15/2003 12:06 PM
1. Introduction
The ELITE-PLUS is an external peripheral designed to operate as an integrated print server, check signer, form
generator, MICR generator and data transformation engine. This document describes the ELITE-PLUS user
interface.
2. Hardware/Electronics
The ELITE-PLUS utilizes a 300MHz 32-bit CPU, and is approximately 16 times faster than the 40MHz 16-bit
ELITE PLUS. This section describes external connectors and sockets.
Chassis specification (front):
•
LCD screen
•
2 LEDs
•
1 Executive key switch
•
1 Setup key switch
Chassis specification (back):
•
1 Power connector
•
1 PS2 style keyboard port
•
1 RJ45 10/100 Ethernet connector
•
1 IEEE-1284 bi-directional parallel output port
•
1 IEEE-1284 bi-directional parallel input port
•
2 serial ports I/O ports
Chassis specification (access panel):
•
1 CompactFlash socket
H:\Manuals\CM-3000\Elite Plus User Manual.doc
4
ELITE-PLUS USER MANUAL
9/15/2003 12:06 PM
3. ELITE-PLUS User Interface
The ELITE-PLUS user interface is identical to the CM2000 with the following exceptions:
1.
The DIP switch dump screen does not exist since the ELITE-PLUS does not have any DIP switches.
2.
PROGRAM/7 is a serial number dump screen [a new feature for both the ELITE-PLUS and the CM-2000]
3.
PROGRAM/4 is the network configuration screen
4. Customer Installation Instructions
4.1 Elite-Plus Hardware Installation
1.
Connect the parallel printer port to the parallel port of a HP PCL compatible printer
2.
Connect the 10/100baseT RJ45 connector to an active network connection.
3.
Connect the power cord
4.
Connect a PS/2 compatible keyboard
5.
Turn on the power
4.2 Windows 95/98 Installation
4.2.1 Gather Networking Information
You will need to determine the following information:
1.
The name of your windows workgroup
2.
The type of IP addressing (static or dynamic)
3.
If you have static IP addressing, you must obtain IP numbers from your system administrator.
4.2.1.1 Get the Workgroup
This section will describe how to obtain the workgroup under Microsoft Windows 95/98.
Click the “Start” button
1.
Click Settings->Control Panel
2.
Click the Network icon. The network dialog box will appear.
3.
Click the “Identification” tab. The Identification dialog box will appear.
4.
Write down the name of the Workgroup listed in this dialog box. This is the name that will be configured in
the Elite Plus.
4.2.1.2 Get the IP Type
This section will describe how to obtain the IP Type Microsoft Windows 95/98.
1.
Click the “Start” button
2.
Click Settings->Control Panel
3.
Click the Network icon. The network dialog box will appear.
H:\Manuals\CM-3000\Elite Plus User Manual.doc
5
ELITE-PLUS USER MANUAL
9/15/2003 12:06 PM
4.
Click on the “Configuration” tab. The configuration dialog box will appear.
5.
Ignore any line with “Dial Up Adapter”, and page down in the network components list until you see
something similar to “TCP/IP->[some name]”. Double-Click on this component. The TCP/IP Properties
dialog will appear.
6.
If “Obtain IP Address Automatically” is selected, you have a DYNAMIC IP address. If “Specify an IP
Addresses” is selected, your machine has a pre-defined IP address, and the Elite-Plus must also be assigned an
IP address. See the section “Get the IP address” for the information needed.
4.2.1.3 Get the IP address
If your network does not allow you to “obtain IP address automatically”, you must request an IP and related
numbers from your network administrator. The numbers required are:
•
IP Address
•
Netmask
4.2.2 Configure Elite-Plus networking
You should have followed the procedures listed in the section “Gather Information”. You must have the following
information:
•
Workgroup
•
IP addressing type (static or dynamic)
•
If the IP addressing is static, you must also have:
•
IP Address
•
Netmask
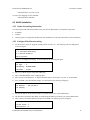
1) Set the executive switch to “program” and the position switch to “4”. The following network configuration
screen will appear.
NETWORK CONFIGURATION
C = Configure Networking
D = Restore Defaults
Enter Options:
2) Select ‘C’ to configure networking. The following screen will appear.
NETWORK CONFIG
IP Type
: D
Workgroup : NOTSPECIFIED
Hostname
: wycom1
3) Enter the IP Type. If you have a dynamic IP address, then enter “D”. If you have a static IP address, enter “S”.
4) Enter the workgroup name
5) Enter an arbitrary name for the Elite-Plus. The default of wycom1 is recommended.
6) Press <ENTER> after the hostname prompt.
7) For Dynamic IP configuration:
H:\Manuals\CM-3000\Elite Plus User Manual.doc
6
ELITE-PLUS USER MANUAL
a)
9/15/2003 12:06 PM
If you have selected “D” as the “IP Type”, then the following screen will appear. You will not be
prompted to enter IP addresses.
Dis. SpoolSS: Y
Client Drive: Y
Show Wizard : N
Diagnostics : N
b) Press <ENTER> four times to accept the defaults, and the following screen will appear.
This will write the new configuration
and will destroy existing settings.
Continue (y/n)?
c)
Choose “y” to write the configuration. Choose “n” to not write the configuration. You can discard all
changes by simply changing a key switch on the unit.
8) For Static IP configuration:
a)
If you selected “S” as the “IP Type”, then the following screen will appear.
IP Address
: 192.168.0.199
IP Netmask
: 255.255.255.0
b) Enter the IP address and IP Netmask address you gathered from your system administrator.
c)
Once you have entered the addresses and pressed <ENTER>, the following screen will appear.
Dis. SpoolSS: Y
Client Drive: Y
Show Wizard : N
Diagnostics : N
d) Press <ENTER> four times to accept the defaults, and the following screen will appear.
This will write the new configuration
and will destroy existing settings.
Continue (y/n)?
e)
Choose “y” to write the configuration. Choose “n” to not write the configuration. You can discard all
changes by simply changing a key switch on the unit.
4.2.3 Test the connection from Elite-Plus to the printer
This test will exercise the Elite Plus Parallel Output Port. You should have previously followed the instructions in
the section “Elite-Plus Hardware Installation”.
1.
Turn the switches to ONLINE/TEST.
2.
Turn the unit on.
3.
Wait approximately 20-40 seconds for the unit to boot.
4.
The screen will display the message “Self-test mode. Self-test will begin in 2-5 seconds.”
H:\Manuals\CM-3000\Elite Plus User Manual.doc
7
ELITE-PLUS USER MANUAL
9/15/2003 12:06 PM
5.
Wait for the Self-test to complete with the message: “Self-test printout… Self-test completed.”
6.
Examine the self-test form. If it printed clearly, then the connection from the Elite-Plus to the printer is
working.
4.2.4 Add a New Windows Network Printer (SMB/Lan Manager)
The ELITE-PLUS supports LAN Manager windows-based network printing (i.e. Network Neighborhood). Most
installations will use this technique to add a new Windows printer. Once the ELITE-PLUS has been configured to
operate with the in-house windows network (The workgroup name must match), you must “Add a New Printer” in
Windows. Once this printer has been created, you can simply print to the ELITE-PLUS just like any other networkconnected printer.
1.
Click the “START” button
2.
Select Settings->Printers
3.
Click on the “Add Printer” icon. The Add Printer Wizard dialog will appear.
4.
Click Next
5.
Click the Network Printer radio button.
6.
Click Next. The Browse for Printers dialog will appear.
7.
Click Browse.
8.
Scroll down in the list until you see “Wycom1”. [Note: If you named your Elite-Plus something other than
wycom1, then you should search for that name. I.e. if you named the Elite-Plus “wycom2”, then search for
Wycom2.
9.
Double-Click on Wycom1. Two printers will be listed: “lp” and “wycom”.
10. Click on the “wycom” printer.
11. Click OK. “\\WYCOM1\wycom” will be listed as the “Network Path or Queue Name”.
12. If you are going to print from MS-DOS programs, select the “Yes” radio button. If you are not going to print
from MS-DOS programs, select the “No” radio button.
13. Click Next. The printer driver browse dialog will appear.
14. Select your printer from the list.
15. Click Next. [If the keep existing driver dialog appears, then select “keep existing driver”, then click Next.]
The Printer Name dialog will appear.
16. Enter “wycom1” into the text box. If you named your Elite-Plus “wycom2”, then enter “wycom2”.
17. If you want to send all default print jobs to the Elite-Plus, click Yes. If you do not want to send all print jobs
to the Elite-Plus, click No. Typically, this will be set to “No”. You can change the default printer in the future
if desired.
18. Click Next. The Print Test Page dialog will appear.
19. Click No.
20. Click Finish.
H:\Manuals\CM-3000\Elite Plus User Manual.doc
8
ELITE-PLUS USER MANUAL
9/15/2003 12:06 PM
4.3 Windows 2000 Installation
4.3.1 Gather Networking Information
You will need to determine the following information:
1.
The name of your windows workgroup
2.
The type of IP addressing (static or dynamic)
3.
If you have static IP addressing, you must obtain IP numbers from your system administrator.
4.3.1.1 Get the Workgroup
This section will describe how to obtain the workgroup under Microsoft Windows 2000.
1.
Click the “Start” button
2.
Click Settings->Control Panel
3.
Click the System icon. The “System Properties” dialog box will appear.
4.
Click on the “Network Identification” tab. The Network Identification dialog will appear.
5.
Write down the name to the right of “Workgroup”. . This is the name that will be configured in the Elite Plus.
6.
Click the Cancel button.
4.3.1.2 Get the IP Type
This section will describe how to obtain the IP Type under Microsoft Windows 2000.
1.
Click the “Start” button
2.
Click Settings->Network and Dial-Up Connections
3.
The Network and Dial-Up Connections box will appear.
4.
Right-click on the “Local Area Connection” icon.
5.
Select “Properties”. The Local Area Connection Properties dialog box will appear.
6.
Click on Internet Protocol in the list box.
7.
Click on the Properties button.
8.
If “Obtain IP Address Automatically” is selected, you have a DYNAMIC IP address. If “Specify an IP
Addresses” is selected, your machine has a pre-defined IP address, and the Elite-Plus must also be assigned an
IP address. See the section “Get the IP address” for the information needed.
4.3.1.3 Get the IP address
If your network does not allow you to “obtain IP address automatically”, you must request an IP and related
numbers from your network administrator. The numbers required are:
•
IP Address
•
Netmask
H:\Manuals\CM-3000\Elite Plus User Manual.doc
9
ELITE-PLUS USER MANUAL
9/15/2003 12:06 PM
4.3.2 Configure Elite-Plus networking
You should have followed the procedures listed in the section “Gather Information”. You must have the following
information:
•
Workgroup
•
IP addressing type (static or dynamic)
•
If the IP addressing is static, you must also have:
•
IP Address
•
Netmask
1) Set the executive switch to “program” and the position switch to “4”. The following network configuration
screen will appear.
NETWORK CONFIGURATION
C = Configure Networking
D = Restore Defaults
Enter Options:
2) Select ‘C’ to configure networking. The following screen will appear.
NETWORK CONFIG
IP Type
: D
Workgroup : NOTSPECIFIED
Hostname
: wycom1
3) Enter the IP Type. If you have a dynamic IP address, then enter “D”. If you have a static IP address, enter “S”.
4) Enter the workgroup name
5) Enter an arbitrary name for the Elite-Plus. The default of wycom1 is recommended.
6) Press <ENTER> after the hostname prompt.
7) For Dynamic IP configuration:
a)
If you have selected “D” as the “IP Type”, then the following screen will appear. You will not be
prompted to enter IP addresses.
Dis. SpoolSS: Y
Client Drive: Y
Show Wizard : N
Diagnostics : N
b) Press <ENTER> four times to accept the defaults, and the following screen will appear.
This will write the new configuration
and will destroy existing settings.
Continue (y/n)?
c)
Choose “y” to write the configuration. Choose “n” to not write the configuration. You can discard all
changes by simply changing a key switch on the unit.
H:\Manuals\CM-3000\Elite Plus User Manual.doc
10
ELITE-PLUS USER MANUAL
9/15/2003 12:06 PM
8) For Static IP configuration:
a)
If you selected “S” as the “IP Type”, then the following screen will appear.
IP Address
: 192.168.0.199
IP Netmask
: 255.255.255.0
b) Enter the IP address and IP Netmask address you gathered from your system administrator.
c)
Once you have entered the addresses and pressed <ENTER>, the following screen will appear.
Dis. SpoolSS: Y
Client Drive: Y
Show Wizard : N
Diagnostics : N
d) Press <ENTER> four times to accept the defaults, and the following screen will appear.
This will write the new configuration
and will destroy existing settings.
Continue (y/n)?
e)
Choose “y” to write the configuration. Choose “n” to not write the configuration. You can discard all
changes by simply changing a key switch on the unit.
4.3.3 Test the connection from Elite-Plus to the printer
This test will exercise the Elite Plus Parallel Output Port. You should have previously followed the instructions in
the section “Elite-Plus Hardware Installation”.
1.
Turn the switches to ONLINE/TEST.
2.
Turn the unit on.
3.
Wait approximately 20-40 seconds for the unit to boot.
4.
The screen will display the message “Self-test mode. Self-test will begin in 2-5 seconds.”
5.
Wait for the Self-test to complete with the message: “Self-test printout… Self-test completed.”
6.
Examine the self-test form. If it printed clearly, then the connection from the Elite-Plus to the printer is
working.
4.3.4 Add a New Windows Printer
Windows 2000 natively supports a variety of network printing protocols including SMB/Lan Manager, Raw (HP
JetDirect) and LPR (typically used with Unix systems). Most Windows users should follow the SMB/Lan Manager
procedure which connects the ELITE-PLUS through the “Network Neighborhood”. Alternatively, you can choose
to connect the ELITE-PLUS using either Raw or LPR protocols.
4.3.4.1 Add a New Windows Network Printer (SMB/Lan Manager)
The ELITE-PLUS supports LAN Manager windows-based network printing (i.e. Network Neighborhood). ). Most
installations will use this technique to add a new Windows printer. Once the ELITE-PLUS has been configured to
operate with the in-house windows network (The workgroup name must match), you must “Add a New Printer” in
H:\Manuals\CM-3000\Elite Plus User Manual.doc
11
ELITE-PLUS USER MANUAL
9/15/2003 12:06 PM
Windows. Once this printer has been created, you can simply print to the ELITE-PLUS just like any other networkconnected printer.
1.
Click the “START” button
2.
Select Settings->Printers
3.
Click on the “Add Printer” icon. The Add Printer Wizard dialog will appear.
4.
Click Next
5.
Click the Network Printer radio button.
6.
Click Next.
7.
Click the radio button next to “Type the printer name…”.
8.
Do NOT enter anything into the Name text box.
9.
Click Next. The Browse for Printers dialog will appear.
10. Scroll down in the list until you see “WYCOM1”. [Note: If you named your Elite-Plus something other than
wycom1, then you should search for that name. I.e. if you named the Elite-Plus “wycom2”, then search for
WYCOM2.
11. Double-Click on WYCOM1. Two printers will be listed: “lp” and “wycom”.
12. Click on the “wycom” printer. A warning dialog will appear “The server on which the printer resides does not
have the correct printer driver installed. If you want to install the driver on your local computer, click OK.”
13. Click OK. The printer driver browse dialog will appear.
14. Select your printer from the list.
15. Click OK. The “copying files” dialog will briefly appear, then the “default printer” dialog will appear.
16. If you want to send all default print jobs to the Elite-Plus, click Yes. If you do not want to send all print jobs
to the Elite-Plus, click No. Typically, this will be set to “No”. You can change the default printer in the future
if desired.
17. Click Next. The Finish dialog will appear.
18. Click Finish.
4.3.4.2 Add a New Windows Network Printer (RAW 9100 / JetDirect)
The ELITE-PLUS supports HP JetDirect “raw”printing protocols. You can print to ports 9100. You must “Add a
New Printer” in order to create a printer. Once this printer has been created, you can simply print to the ELITEPLUS just like any other network-connected printer.
1.
Click the “START” button
2.
Select Settings->Printers
3.
Click on the “Add Printer” icon. The Add Printer Wizard dialog will appear.
4.
Click Next
5.
Click the Local Printer radio button.
6.
Click Next.
7.
Click the “Create a new port” radio button.
8.
Select “Standard TCP/IP port” from the “Type” pull-down box.
9.
Click Next. The Add Standard TCP/IP Port Wizard dialog will appear.
H:\Manuals\CM-3000\Elite Plus User Manual.doc
12
ELITE-PLUS USER MANUAL
9/15/2003 12:06 PM
10. Click Next.
11. Enter the ELITE-PLUS IP address in the “Printer Name or IP Address” box. Example: “192.168.0.199”.
Alternatively, you can enter the ELITE-PLUS hostname. Example: “wycom1”. Using the IP address is the
preferred method.
12. Use the default Port Name generated by Windows 2000.
13. Click Next. The wizard will delay for several seconds, then the “Additional Port Information Required” dialog
box will appear.
14. Click the “Custom” radio button.
15. Click “Settings…” button.
16. Click the “Raw” radio button
17. Enter “9100” as the Raw settings port number.
18. Click OK.
19. Click Next.
20. Click Finish. This will complete the “Add Standard TCP/IP Port” Wizard, and take you back to the Add
Printer Wizard.
21. Select your printer from the list.
22. Click OK. The “use existing driver” or “copying files” dialog will briefly appear, then the “default printer”
dialog will appear. If the “use existing driver” dialog appears, select “keep existing driver”, and click Next.
23. If you want to send all default print jobs to the Elite-Plus, click Yes. If you do not want to send all print jobs
to the Elite-Plus, click No. Typically, this will be set to “No”. You can change the default printer in the future
if desired.
24. Click Next. The Finish dialog will appear.
25. Click Finish.
4.3.4.3 Add a New Windows Network Printer (LPR)
The ELITE-PLUS supports LPR printing protocols. You must “Add a New Printer” in order to create a printer.
Once this printer has been created, you can simply print to the ELITE-PLUS just like any other network-connected
printer.
26. Click the “START” button
27. Select Settings->Printers
28. Click on the “Add Printer” icon. The Add Printer Wizard dialog will appear.
29. Click Next
30. Click the Local Printer radio button.
31. Click Next.
32. Click the “Create a new port” radio button.
33. Select “Standard TCP/IP port” from the “Type” pull-down box.
34. Click Next. The Add Standard TCP/IP Port Wizard dialog will appear.
35. Click Next.
H:\Manuals\CM-3000\Elite Plus User Manual.doc
13
ELITE-PLUS USER MANUAL
9/15/2003 12:06 PM
36. Enter the ELITE-PLUS name or IP address in the “Printer Name or IP Address” box. Example: “wycom1” or
“192.168.0.199”.
37. Use the default port name. Alternatively, you may enter your own name as the Port Name. Wycom
recommends [eliteplus name]_[port]. I.e. wycom1_9100, wycom1_9101, or wycom1_9102.
38. Click Next. The wizard will delay for several seconds, then the “Additional Port Information Required” dialog
box will appear.
39. Click the “Custom” radio button.
40. Click “Settings…” button.
41. Click the “LPR” radio button
42. Enter “wycom” in the Queue Name text box
43. Check “LPR Byte Counting Enabled”.
44. Click OK.
45. Click Next.
46. Click Finish. This will complete the “Add Standard TCP/IP Port” Wizard, and take you back to the Add
Printer Wizard.
47. Select your printer from the list.
48. Click OK. The “use existing driver” or “copying files” dialog will briefly appear, then the “default printer”
dialog will appear. If the “use existing driver” dialog appears, select “keep existing driver”, and click Next.
49. If you want to send all default print jobs to the Elite-Plus, click Yes. If you do not want to send all print jobs
to the Elite-Plus, click No. Typically, this will be set to “No”. You can change the default printer in the future
if desired.
50. Click Next. The Finish dialog will appear.
51. Click Finish.
52. Right click on the printer you just created.
53. Select properties
54. Click on the “Ports” tab.
55. If “Enable bidirectional support” is checked, click on the “Enable bidirectional support” check box. This box
should NOT be checked.
56. Click Apply.
57. Click OK.
Note: The key features when creating this driver were: 1) Selecting LPR, 2) setting “wycom” as the Queue
Name, 3) Enabling LPR Byte Counting, 4) Disabling bidirectional support.
4.4 Windows: Mapping the Elite Plus to an LPT port
Some DOS-based applications may require an explicit mapping from an LPT port to a network printer name. This
section describes how to achieve this mapping with the “net use” command.
You can map the Elite Plus to a parallel port using the command:
NET USE LPTx: <Elite Plus Name>
For Example, if the name of the Elite Plus is “wycom1”, and you want to map to LPT6, then the following
command should be used.
H:\Manuals\CM-3000\Elite Plus User Manual.doc
14
ELITE-PLUS USER MANUAL
9/15/2003 12:06 PM
NET USE LPT6: \\wycom1\wycom
To remove this mapping, use the command:
NET USE LPT6: /DELETE
4.5 AS400 Installation
4.5.1 Gather Networking Information
You must request an IP and related numbers from your network administrator. The numbers required are:
•
IP Address
•
Netmask
•
Gateway (This is not required if the Elite Plus will communicate on the same local subnet as the workstations).
4.5.2 Configure Elite-Plus networking
1) Set the executive switch to “program” and the position switch to “4”. The following network configuration
screen will appear.
NETWORK CONFIGURATION
C = Configure Networking
D = Restore Defaults
Enter Options:
2) Select ‘C’ to configure networking. A screen similar to the following will appear.
NETWORK CONFIG
IP Type
: S
Workgroup : NOTSPECIFIED
Hostname
: wycom1
3) Enter “S” as the IP Type to select static addressing.
4) Enter “NOTSPECIFIED” as the workgroup name
5) Enter wycom1 as the Hostname. A different hostname may be selected, but “wycom1” is recommended.
6) Press <ENTER> after the hostname prompt. A screen similar to the following will appear.
IP Address
: 192.168.0.199
IP Netmask
: 255.255.255.0
IP Gateway
:
7) Enter the IP address and IP Netmask address you gathered from your system administrator.
8) The IP Gateway should be either blank, or should be the IP address provided by your system administrator.
9) Once you have entered the addresses and pressed <ENTER>, the following screen will appear.
Dis. SpoolSS: Y
Client Drive: Y
Show Wizard : N
H:\Manuals\CM-3000\Elite Plus User Manual.doc
15
ELITE-PLUS USER MANUAL
9/15/2003 12:06 PM
Diagnostics : N
10) Press <ENTER> four times to accept the defaults, and the following screen will appear.
This will write the new configuration
and will destroy existing settings.
Continue (y/n)?
11) Choose “y” to write the configuration. Choose “n” to not write the configuration. You can discard all changes
by simply changing a key switch on the unit.
4.5.3 Test the connection from Elite-Plus to the printer
This test will exercise the Elite Plus Parallel Output Port. You should have previously followed the instructions in
the section “Elite-Plus Hardware Installation”.
1.
Turn the switches to ONLINE/TEST.
2.
Turn the unit on.
3.
Wait approximately 20-40 seconds for the unit to boot.
4.
The screen will display the message “Self-test mode. Self-test will begin in 2-5 seconds.”
5.
Wait for the Self-test to complete with the message: “Self-test printout… Self-test completed.”
6.
Examine the self-test form. If it printed clearly, then the connection from the Elite-Plus to the printer is
working.
4.5.4 Add a AS400 Print Queue
The AS400 natively supports printing to an IP port and typically support remote printing using UNIX-style Line
Printer Requester (LPR). IP Port printing is usually preferable to LPR when printing to laser printers. IP Port
printing is superior to LPR by providing page range support and better spool management. The following sections
describe how to configure both IP Port and LPR queues.
H:\Manuals\CM-3000\Elite Plus User Manual.doc
16
ELITE-PLUS USER MANUAL
9/15/2003 12:06 PM
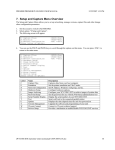
4.5.4.1 Add a AS400 Print Queue using IP port 9100
A configuration similar to the following should be used to add an AS400 local print queue:
Device description . . . . . . . DEVD
Port number . . . . . . . . . . PORT
Online at IPL . . . . . . . . . ONLINE
Font:
FONT
Identifier . . . . . . . . . .
Point size . . . . . . . . . .
Form feed . . . . . . . . . . . FORMFEED
Separator drawer . . . . . . . . SEPDRAWER
Separator program . . . . . . . SEPPGM
Library . . . . . . . . . . .
Printer error message . . . . . PRTERRMSG
Message queue . . . . . . . . . MSGQ
Library . . . . . . . . . . .
Activation timer . . . . . . . . ACTTMR
Inactivity timer . . . . . . . . INACTTMR
Line speed . . . . . . . . . . . LINESPEED
Word length . . . . . . . . . . WORDLEN
Type of parity . . . . . . . . . PARITY
Stop bits . . . . . . . . . . . STOPBITS
Host print transform . . . . . . TRANSFORM
Manufacturer type and model . . MFRTYPMDL
Paper source 1 . . . . . . . . . PPRSRC1
Paper source 2 . . . . . . . . . PPRSRC2
Envelope source . . . . . . . . ENVELOPE
ASCII code page 899 support . . ASCII899
Image configuration . . . . . . IMGCFG
Character identifier:
CHRID
Graphic character set . . . .
Code page . . . . . . . . . .
Remote location:
RMTLOCNAME
Name or address . . . . . . .
User-defined options . . . . . . USRDFNOPT
+ for more values
User-defined object:
USRDFNOBJ
Object . . . . . . . . . . . .
Library . . . . . . . . . .
Object type . . . . . . . . .
Data transform program . . . . . USRDTATFM
Library . . . . . . . . . . .
System driver program . . . . . SYSDRVPGM
Publishing information:
PUBLISHINF
Support duplex . . . . . . . .
Support color . . . . . . . .
Pages per minute black . . . .
Pages per minute color . . . .
Location . . . . . . . . . . .
Text 'description' . . . . . . . TEXT
> P00102
9100
*YES
11
*NONE
*AUTOCUT
*FILE
*NONE
*INQ
*CTLD
170
*SEC15
19200
8
*NONE
1
*YES
*HP4000
*LETTER
*LETTER
*NUMBER10
*NO
*NONE
*SYSVAL
'<ELITE PLUS IP ADDRESS>'
*SAME
*NONE
*NONE
*HPPJLDRV
*UNKNOWN
*UNKNOWN
*UNKNOWN
*UNKNOWN
*BLANK
'<YOUR DESCRIPTION HERE>'
Note that the <ELITE PLUS IP ADDRESS> MUST be the same as the IP address configured into the Elite Plus.
The “Port Number” MUST be 9100. The “System Driver Program” MUST be *HPPJLDRV. The text description
can be any arbitrary text. You should set the “Manufacturer type and model” based on your laser printer model.
This definition assumes that the printer supports HP’s Printer Job Language protocol for returning status
information. If the printer does not support PJL, then each print job will require a hold/release in order to print.
Note: nearly all HP-compatible printers support PJL.
H:\Manuals\CM-3000\Elite Plus User Manual.doc
17
ELITE-PLUS USER MANUAL
9/15/2003 12:06 PM
4.5.4.2 Add a AS400 LPR Remote Print Queue
The AS400 can use the UNIX Line Printer Requester (LPR) protocol to transfer print jobs to the Elite Plus. The
AS400 uses LPR when using the Send TCP/IP Spooled File (SNDTCPSPLF) or when a Remote Output Queue
(RMTOUTQ) has been configure with the Connection Type (CNNTYPE) set to *IP.
The AS400 does not allow for page range support when using LPR, so you should not use LPR if you want to print
page ranges. In addition, due to the AS400/LPR spooling mechanism, stopping printing, holding a spooled file, or
deleting a spooled file may not be successful. This printing mechanism works well when you will always send and
always want to print an entire job. For more information on capabilities and restrictions, search for “Capabilities
and Limitations of TCP/IP Remote Output Queues” at www.ibm.com.
The following settings will create a Remote Print Queue:
CRTOUTQ OUTQ(QUSRSYS/PRTS5)
RMTSYS(*INTNETADR)
Must be *INETADR
RPTPRTQ(wycom)
Must be wycom
AUTOSTRWTR(1)
Recommended value
CNNTYPE(*IP)
Must be *IP
DESTTYPE(*OTHER)
Must be *OTHER
MFRTYPMDL(*HP4000)
Choose based on your printer
INTNETADR('<YOUR IP ADDRESS>')
The IP Address of the Elite Plus
DESTOPT(XAUTOQ)
Recommended
SEPPAGE(*NO)
TEXT('<YOUR TEXT DESCRIPTION>')
Arbitrary text
AUTCHK(*DTAAUT)
Note: See the following URL for detailed configuration instructions from IBM:
http://www-1.ibm.com/support/docview.wss?rs=0&uid=nas19f4b1d4d23c582f1862565c2007d4471&loc=en_US
H:\Manuals\CM-3000\Elite Plus User Manual.doc
18
ELITE-PLUS USER MANUAL
9/15/2003 12:06 PM
4.6 HP/UX Installation
The following instructions detail how to print to install an Elite Plus to operate with an HP/UX based system.
4.6.1 Gather Networking Information
You must request an IP and related numbers from your network administrator. The numbers required are:
•
IP Address
•
Netmask
•
Gateway (This is not required if the Elite Plus will communicate on the same local subnet as the workstations).
4.6.2 Configure Elite-Plus networking
12) Set the executive switch to “program” and the position switch to “4”. The following network configuration
screen will appear.
NETWORK CONFIGURATION
C = Configure Networking
D = Restore Defaults
Enter Options:
13) Select ‘C’ to configure networking. A screen similar to the following will appear.
NETWORK CONFIG
IP Type
: S
Workgroup : NOTSPECIFIED
Hostname
: wycom1
14) Enter “S” as the IP Type to select static addressing.
15) Enter “NOTSPECIFIED” as the workgroup name
16) Enter wycom1 as the Hostname. A different hostname may be selected, but “wycom1” is recommended.
17) Press <ENTER> after the hostname prompt. A screen similar to the following will appear.
IP Address
: 192.168.0.199
IP Netmask
: 255.255.255.0
IP Gateway
:
18) Enter the IP address and IP Netmask address you gathered from your system administrator.
19) The IP Gateway should be either blank, or should be the IP address provided by your system administrator.
H:\Manuals\CM-3000\Elite Plus User Manual.doc
19
ELITE-PLUS USER MANUAL
9/15/2003 12:06 PM
20) Once you have entered the addresses and pressed <ENTER>, the following screen will appear.
Dis. SpoolSS: Y
Client Drive: Y
Show Wizard : N
Diagnostics : N
21) Press <ENTER> four times to accept the defaults, and the following screen will appear.
This will write the new configuration
and will destroy existing settings.
Continue (y/n)?
22) Choose “y” to write the configuration. Choose “n” to not write the configuration. You can discard all changes
by simply changing a key switch on the unit.
4.6.3 Test the connection from Elite-Plus to the printer
This test will exercise the Elite Plus Parallel Output Port. You should have previously followed the instructions in
the section “Elite-Plus Hardware Installation”.
7.
Turn the switches to ONLINE/TEST.
8.
Turn the unit on.
9.
Wait approximately 20-40 seconds for the unit to boot.
10. The screen will display the message “Self-test mode. Self-test will begin in 2-5 seconds.”
11. Wait for the Self-test to complete with the message: “Self-test printout… Self-test completed.”
12. Examine the self-test form. If it printed clearly, then the connection from the Elite-Plus to the printer is
working.
4.6.4 Add the Elite Plus hostname to your HP/UX system
Speak with your system administrator regarding how to add a hostname to your system. Typically, you must edit
the file /etc/hosts and add a line similar to:
10.28.50.3 wycom1
Where 10.28.50.3 would be replaced with the actual static IP address of the Elite Plus.
4.6.5 Add a HP/UX Print Queue
HP/UX supports BSD-style Line Printer Requester (LPR) printing, and provides both a graphical and command line
interface to add print queues. The graphical program is called “sam”. You must use either “sam” or the command
line to add a printer queue. Typically, you will utilize only one of these methods. Note that these instructions may
vary depending on the version of HP/UX.
H:\Manuals\CM-3000\Elite Plus User Manual.doc
20
ELITE-PLUS USER MANUAL
9/15/2003 12:06 PM
4.6.5.1 Add a Remote Printer/Plotter” in HP/UX using “sam”
1. At the command prompt, start sam: hpux# sam
2. Select "printers and plotters"
3. Select "printers/plotters"
4. From the "Actions" menu, select "Add Remote Printer/Plotter". The "Add Remote Printer/Plotter"
dialog will be displayed. Enter the following:
4.1. Printer Name: wycom1
4.2. Remote system name: wycom1 [“wycom1” should be in your /etc/hosts file]
4.3. Remote Printer Name: wycom
4.4. Click on the box: “Remote Printer is on a BSD System”. Ensure that this option is selected.
4.5. Remote Cancel Model: rcmodel
4.6. Remote Status Model: rsmodel
4.7. Default Request Priority: <use the default>
4.8. Allow anyone to cancel a request: <use the default>
4.9. Make the printer the default destination: do not select
4.10. Click on OK. This will create the remote printer.
4.6.5.2 Add a Remote Printer/Plotter” in HP/UX using the command line programs
The following steps show how to use the command line to create a remote printer. If you have already defined the
printer using “sam”, then this step is not necessary. Note that the lpadmin command parameters (step #2) may be
adjusted.
1) Log in as root
2) hpux# lpshut
3) hpux# lpadmin -pwycom1 -ormwycom1 –orpwycom -v/dev/null -mrmodel –ocmrcmodel –osmrsmodel -ob3
4) hpux# accept wycom1
5) hpux# enable wycom1
6) hpux# lpsched
4.6.5.2.1 Note on using the “lpadmin” command:
Use the “lpadmin” command to create a local queue and attach the local queue to a queue on a remote machine.
The following command is recommended:
hpux# lpadmin -pwycom1 -ormwycom1 –orpwycom -v/dev/null -mrmodel –ocmrcmodel –osmrsmodel -ob3
However, both the –p[local queue name] and –orm[remote machine] can be adjusted if necessary. The following is
a brief description of the commands and parameters used. This is a subset of the command available to lpadmin.
Refer to the HP/UX man page for more information.
lpadmin –p[local queue name] –orm[remote machine] –orp[remote queue] -v/dev/null -mrmodel \
-ocmrcmodel -osmrsmodel –ob3
H:\Manuals\CM-3000\Elite Plus User Manual.doc
21
ELITE-PLUS USER MANUAL
9/15/2003 12:06 PM
-pwycom1
“wycom1” is the name of the local printer queue. This can be changed to a user-preferred name.
For example, if you want the queue to be named “checkprinter”, then specify –pcheckprinter. The
default of “wycom1” is recommended.
-ormwycom1
“wycom1” is the hostname of the Elite Plus. This must be the same name entered into your
/etc/hosts file.
–orpwycom
“wycom” is the remote printer queue. The Elite Plus has two printer queues: “wycom” and “lp”.
Use the queue “wycom” for check printing. You can optionally use the “lp” queue, but this is
strictly for pass-through operation. Note that only “lp” and “wycom” printer queues are available.
Other printer queue names will not work.
-v/dev/null
can not be changed: associates printer to /dev/null since the printer is remote
-mrmodel
can not be changed: model interface program
-ocmrcmodel
can not be changed: the method used to cancel remote requests
-osmrsmodel
can not be changed: the method used for displaying remote status
-ob3
can not be changed: specifies BSD-style queue with 3-digit numbering
4.6.5.3 Test the new remote printer
Once you have configured the printer with either the command line or with “sam”, then test the printer by sending
some data to the printer using a command similar to the following:
hpux# lp -dwycom1 /etc/hosts
This will print /etc/hosts to the printer. If /etc/hosts is a short file, the printer may not eject the page. You may need
to press the "go" button on the printer to have the page ejected. If the page prints, then the printer "wycom1" is now
operational.
H:\Manuals\CM-3000\Elite Plus User Manual.doc
22
ELITE-PLUS USER MANUAL
9/15/2003 12:06 PM
4.7 Elite Plus File Capture
When capture is enabled, the PROGRAM positions can be used to capture .prn files from a host computer. This
section describes the ELITE PLUS capture interface.
4.7.1 Enable Capture on the Elite Plus
This section will describe how to enable file capture on the Elite Plus. Please note: YOU MUST CONFIGURE
NETWORKING PRIOR TO ENABLING CAPTURE. When capture is enabled, the network configuration screen
will be unavailable since PROGRAM/4 will be used as a capture position. In order to access the network
configuration screen, you must disable capture (see the next section). Please note that you should specify a gateway
address if you intend to send captured files directly from the Elite Plus to Wycom.
1.
Turn the key switches to MANUAL\TEST. A configuration menu will appear.
2.
Type 1<ENTER> to select option 1.
3.
Hit <ENTER> twice to move the cursor to the “Capture” option.
4.
Type Y<ENTER>.
5.
When prompted to save changes, enter Y.
4.7.2 Disable Capture on the Elite Plus
When Capture is enabled, the PROGRAM positions are utilized to capture data. Functions normally associated
with these switch positions will be inaccessible. Once you have completed your data capture, please remember to
disable capture using the following procedure:
1.
Turn the key switches to MANUAL\TEST. A configuration menu will appear.
2.
Type 1<ENTER> to select option 1.
3.
Hit <ENTER> twice to move the cursor to the “Capture” option.
4.
Type N<ENTER>.
5.
When prompted to save changes, enter Y.
4.7.3 Capture User Interface
All positions ( PROGRAM/0 – PROGRAM/Test) will display an initialization screen if this is the first capture
after a format.. This screen is illustrated below. Enter a dealer name (enter “wycom” if no dealer). Enter the
customer name, and a valid date. After capture has been initialized, positions PROGRAM/1-PROGRAM/8 can be
used to capture data.
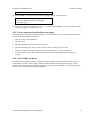
Volume Init Needed
Dealer Name
: John Dealer
Customer Name: My Customer
Enter Date
: 06/22/2000
PROGRAM/1 – PROGRAM/8 are capture positions. Once initialized, you can begin to capture data by setting
the switches in positions PROGRAM/1 – PROGRAM/8. The ELITE PLUS will automatically open a flash file to
H:\Manuals\CM-3000\Elite Plus User Manual.doc
23
ELITE-PLUS USER MANUAL
9/15/2003 12:06 PM
save data. As data is received, the ELITE PLUS will save data to the flash file system, then send the data to the
output port. When the switches are changed, the file is closed.
“EMPTY” PROGRAM/1 – PROGRAM/8. Only one file may be captured per position. Once a file has been
captured to a position, the dealer should change the keyswitch. A sample screen for and empty PROGRAM/1 –
PROGRAM/8 is illustrated below. “Total Files” will not change. “Byte Count” will increment as data is received.
Capture Pos# : 1
Total Files
: 0
Byte Count
: 0
Note: turn keyswitch after capture
“FULL” PROGRAM/1 – PROGRAM/8. Once a file has been captured on a position, and the keyswitch is
changed, that position is closed for any additional capture. When the dealer turns the keyswitch back to the
position, the ELITE PLUS will perform a compatibility check against the data in the captured file. The only way to
capture additional data on the position is to re-format the card.
The following screens may appear if the file was captured with v6.41 or greater.
Results: Compatible
count:xxxxxx
Results: Need Digits
count:xxxxxx
Likely compatible.
Send 1 or more checks
With digits 0-9, comma and decimal point
In the amount field and check no. field.
Results: Postscript
Not compatible.
count:xxxxxx
Select a compatible
Printer driver and resend the check on
A different key switch position.
Results: PCL6
Not compatible.
count:xxxxxx
Select a compatible
Printer driver and resend the check on
A different key switch position.
H:\Manuals\CM-3000\Elite Plus User Manual.doc
24
ELITE-PLUS USER MANUAL
Results: Graphic File
9/15/2003 12:06 PM
count:xxxxxx
Compatible, but the protected amount and
Signature suppression options are not
available.
Edit settings and try again.
H:\Manuals\CM-3000\Elite Plus User Manual.doc
25
ELITE-PLUS USER MANUAL
9/15/2003 12:06 PM
This screen may be displayed if a compatibility check was performed over cards captured with versions before 6.23.
If the data was captured with a version above v6.23, this screen will never appear.
Results: PCL6 or Postscript count:xxxxxx
PROGRAM/TEST is a summary of all captured data. Positions 1-8 are listed. If a compatibility check has been
performed, the results of the check will be sumarized. If a check has not been performed, a dash will be displayed.
Note: the compatibility check must be performed –before- switching to this position. This position displays the
results, but it will not perform the compatibility check.
1: Need Digits
5: PostScript
2: Compatible
6: Post/pcl6
3: PCL6
7: graphic/v ascii
4: Limited Sign
8:
PROGRAM/0 provides a mechanism to clear the flash. At the prompt, the user must enter “clear” or “format” in
either upper or lower-case letters, and the flash memory will be cleared. In addition, once the files have been
captured, the ELITE PLUS is able to transfer the files to Wycom via the Internet with the command, “send”.
Dealer
: Joe Dealer
Customer: My Customer
Date
: 06/22/2000
Commmand: <enter “format” here>
4.7.4 Capturing files with a ELITE PLUS
This section describes how to capture files with the ELITE PLUS.
Clear the capture memory.
1.
Follow the instructions in section 4.7.1 to enable capture.
2.
Turn the switches to PROGRAM/0. If the screen prompts for initialization information by displaying the
message “Volume Init Needed”, then a format is not necessary, so skip step 3-6.
3.
At the command prompt, type “format<ENTER>”. The ELITE PLUS will prompt “Are you sure? Y/N:”.
Enter “Y<ENTER>”. The ELITE PLUS will clear the capture memory, then prompt for the initialization
information.
4.
Enter the dealer name at the prompt.
5.
Enter the customer name at the prompt.
H:\Manuals\CM-3000\Elite Plus User Manual.doc
26
ELITE-PLUS USER MANUAL
6.
9/15/2003 12:06 PM
Enter the date at the prompt. When the date is entered, the initialization will be complete, and you may now
capture data to the ELITE PLUS.
To capture data to the ELITE PLUS
1.
Turn on the ELITE PLUS.
2.
Set the executive switch to PROGRAM.
3.
Set the setup switch to the desired position to capture from 1-8. For example, if the customer wants an account
payable check on position #1, set the setup switch to 1. The current capture statistics for this account will
appear.
4.
Send at least three checks of data to the ELITE PLUS.
5.
When you have completed sending the data, you must turn either the executive or setup key to commit the data.
Do NOT turn off the ELITE PLUS prior to changing the executive switch.
6.
Repeat steps 3-6 for all accounts to be captured.
To view statistics
1.
Turn the switches to PROGRAM/0 to view all accounts
2.
Turn the switches to PROGRAM/1-8 to view individual accounts..
4.7.5 Transferring Captured Files from the ELITE PLUS
The ELITE PLUS support two mechanisms to transfer captured files: export of a (Windows) SMB share, and FTP.
4.7.5.1 Using FTP defaults to transfer captured data files
The Elite Plus is able to send captured data files to a destination computer using File Transfer Protocol (FTP).
Please note: The gateway address must have been correctly specified (PROGRAM/4) in order for this feature to
work.
1.
Turn the switches to PROGRAM/0
2.
At the command prompt, type “send”. The ELITE PLUS will display “…please wait”. When the transfer
attempt is complete, the ELITE PLUS will clear the command.
3.
Call Wycom Customer Support to confirm receipt of the transfer.
4.7.5.2 Using FTP configuration to transfer captured data files
By default, the ELITE PLUS will send captured data files directly to Wycom. You can modify the FTP settings to
transfer the files to a different FTP server.
1.
Turn the switches to MANUAL\TEST
2.
Type 2<ENTER> for FTP configuration
3.
Enter the destination IP address.
4.
Enter the target directory (if any)
5.
Enter the user name
6.
Enter the user’s password
7.
When prompted to save the changes, type “Y”.
8.
Now, follow the instructions in the previous section to send the files to the IP address specified.
H:\Manuals\CM-3000\Elite Plus User Manual.doc
27
ELITE-PLUS USER MANUAL
9/15/2003 12:06 PM
4.7.5.3 Accessing captured files using SMB (Windows Networking)
Captured data files are place in a windows share called capture. If you set the hostname of the ELITE PLUS to
“wycom1”, then this share will be called \\wycom1\capture. You can browse using the network neighborhood to
“wycom1”, then click on “capture” to see the captured files.
H:\Manuals\CM-3000\Elite Plus User Manual.doc
28