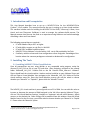
1
NovTech Evaluation Board NOVPEK™CVLite Document Name: User Manual Document Number: 0011200407 Rev. 0.1 10/2014 Property of NovTech, Inc. © 2014. All Rights Reserved Page 0 of 38 Contact Information: Home Page: Company: www.novtech.com Modules: www.novsom.com E-mail: [email protected] USA/Europe or Locations Not Listed: 7401 Wiles Road, Suite 229 Coral Springs, FL 33067 United States +1(954) 3413320 [email protected] Europe, Middle East, and Africa: 30 HaShahar St. Ra'anana, 43565 Israel +972 (0)528308870 [email protected] Information in this document is provided solely to enable system and software implementers to use NovTech products. There are no express or implied copyright licenses granted hereunder to design or fabricate any circuits or circuits based on the information in this document. NovTech reserves the right to make changes without further notice to any products herein. NovTech makes no warranty, representation or guarantee regarding the suitability of its products for any particular purpose, nor does NovTech assume any liability arising out of the application or use of any product or circuit, and specifically disclaims any and all liability, including without limitation consequential or incidental damages. “Typical” parameters that may be provided in NovTech data sheets and/or specifications can and do vary in different applications and actual performance may vary over time. All operating parameters, including “Typicals”, must be validated for each customer application by customer’s technical experts. NovTech does not convey any license under its patent rights nor the rights of others. NovTech products are not designed, intended, or authorized for use as components in systems intended for surgical implant into the body, or other applications intended to support or sustain life, or for any other application in which the failure of the NovTech product could create a situation where personal injury or death may occur. Should Buyer purchase or use NovTech products for any such unintended or unauthorized application, Buyer shall indemnify and hold NovTech and its officers, employees, subsidiaries, affiliates, and distributors harmless against all claims, costs, damages, and expenses, and reasonable attorney fees arising out of, directly or indirectly, any claim of personal injury or death associated with such unintended or unauthorized use, even if such claim alleges that NovTech was negligent regarding the design or manufacture of the part. Learn More: For more information about NovTech products, please visit www.novtech.com. NovTech™ and the NovTech logo are trademarks of NovTech, Inc. All other product or service names are the property of their respective owners. © NovTech, Inc. 2014. All rights reserved. Property of NovTech, Inc. © 2014. All Rights Reserved Page 1 of 38 TableofContents Revision History ..........................................................................................................................3 Table of Figures ...........................................................................................................................4 List of Tables ...............................................................................................................................5 1. Introduction and Prerequisites ...............................................................................................6 2. Installing The Tools .................................................................................................................6 2.1 Installing NOVPEK™CVLite Virtual Machine .....................................................................6 3. Updating Hardware/Software files in Virtual Machine ............................................................9 3.1 Setting up Network Share Folder ..........................................................................................9 3.2 SVN Sharing ........................................................................................................................10 3.3 Hardware File Update .........................................................................................................10 3.4 Software U‐Boot Source Files Update .................................................................................11 3.5 Software Linux Source Files Update ....................................................................................11 4. Building NOVPEK™CVLite GHRD using Preinstalled Quartus Tools .........................................12 4.1 Procedure ...........................................................................................................................12 4.2 Build Project Using Command Line (NovTech Recommended) .......................................12 4.3 Open Quartus Project .........................................................................................................14 4.3 Generate System in Qsys ................................................................................................16 4.5 Compile the Design in Quartus ...........................................................................................19 4.6 Generated Files ..................................................................................................................23 4.7 Converting .sof to .rbf .........................................................................................................24 5.0 Build Preloader ‐ U‐Boot spl................................................................................................25 5.1 Generating the Preloader ...................................................................................................25 5.2 Compiling the Preloader from handoff files ........................................................................29 6. Build U‐Boot and Preloader with Buildroot ...........................................................................30 7. Building Linux Kernel and Root Filesystem ............................................................................31 8. Creating a micro SD image ....................................................................................................32 8.1 Installing image to micro SD ...............................................................................................33 8.2 Creating SD Card Image Using Provided Script ....................................................................33 8.3 Updating Individual Elements on the SD card manually ......................................................35 9. Booting NOVEPK™CVLite ......................................................................................................36 Property of NovTech, Inc. © 2014. All Rights Reserved Page 2 of 38 RevisionHistory Revision Date Number 1.0 09/2014 Changes Notes Initial Release Table 1- Provides a revision history for this application note. Property of NovTech, Inc. © 2014. All Rights Reserved Page 3 of 38 TableofFigures Figure 1 – VMware® Player Open Virtual Machine ......................................................................7 Figure 2 – VMware® Player Edit Virtual Machine .........................................................................7 Figure 3 – NOVPEK™CVLite Virtual Machine Desktop Screen .......................................................8 Figure 4 ‐ Shared Network Folder ................................................................................................9 Figure 5 ‐ Hardware SVN Update ...............................................................................................10 Figure 6 ‐ Hardware SVN Update Done ......................................................................................11 Figure 7 ‐ GHRD Project Folder ..................................................................................................13 Figure 8 ‐ Open Quartus Project ................................................................................................14 Figure 9 ‐ Select Quartus Project ...............................................................................................15 Figure 10 ‐ Quartus Loaded Project ...........................................................................................15 Figure 11 ‐ Start QSYS ................................................................................................................16 Figure 12 ‐ Open QSYS Project ...................................................................................................16 Figure 13 ‐ Loaded QSYS Project ................................................................................................17 Figure 14 ‐ Generate QSYS Project.............................................................................................17 Figure 15 ‐ Generating QSYS Project ..........................................................................................18 Figure 16 ‐ QSYS Project Complete ............................................................................................18 Figure 17 ‐ Exit QSYS .................................................................................................................19 Figure 18 ‐ Compilation .............................................................................................................19 Figure 19 ‐ Analysis & Synthesis Start ........................................................................................20 Figure 20 ‐ Analysis & Synthesis Output ....................................................................................20 Figure 21 ‐ Analysis & Synthesis Output ........................................ Error! Bookmark not defined. Figure 22 ‐ TCL Script .................................................................................................................21 Figure 23 ‐ Locate TCL Script......................................................................................................21 Figure 24 ‐ Run TCL Script ..........................................................................................................22 Figure 25 – Assembler ...............................................................................................................22 Figure 26 ‐ Assembly Output .....................................................................................................23 Figure 27 ‐ Convert SOF File ......................................................................................................24 Figure 28‐ BSP Editor .................................................................................................................25 Figure 29‐ Create New BSP ........................................................................................................26 Figure 30‐ Open Handoff Folder ................................................................................................26 Figure 31‐ New BSP Loaded .......................................................................................................27 Figure 32‐ BSP Editor .................................................................................................................27 Figure 33‐ BSP Compile Complete .............................................................................................28 Figure 34‐ MK_SD Output..........................................................................................................32 Figure 35‐ NOVPEKCV Lite Board ...............................................................................................36 Figure 36‐ NOVPEK™CVLite Terminal Output ............................................................................37 Property of NovTech, Inc. © 2014. All Rights Reserved Page 4 of 38 ListofTables Table 1‐ Provides a revision history for this application note. ......................................................3 Table 2 – Project Folder.............................................................................................................12 Table 3‐ Generated Output Files................................................................................................23 Table 4‐ Preloader Output Files .................................................................................................28 Table 5‐ Preloader Output Files .................................................................................................29 Table 6‐ Buildroot U‐Boot Output File .......................................................................................30 Table 7‐ Buildroot Linux Kernel and RFS Output File ..................................................................31 Table 8‐ SD card Storage Files....................................................................................................33 Table 9‐ SD Output Files ............................................................................................................34 Table 10‐ SD Individual Files for update .....................................................................................35 Property of NovTech, Inc. © 2014. All Rights Reserved Page 5 of 38 1. IntroductionandPrerequisites This User Manual describes how to set up a NOVPEK™CVLite for the NOVSOM™CVLite Cyclone™ V SoC module. This manual will assist the user in setting up a Linux virtual machine. This machine includes tools for building the NOVPEK™CVLite GHRD, U‐Boot‐spl, U‐Boot, Linux Kernel and root Filesystem. Buildroot is used to manage the software build process. The Manual assumes that the user has little to no experience using Buildroot and some knowledge of building u‐boot and Linux Kernel. The following prerequisites are required 1: • PC with VMware Player 6.0.1 or higher � PC with ability to open .rar zip files, ie. WinRAR • PC with 50G+ available hard drive space. • NOVPEK™CVLite VMware® virtual machine, 14G .rar zip file provided by NovTech • Familiarity with the u‐boot and Linux configuration screen navigation. Knowledge of the location where the common packages are selected or deselected for configuration. 2. InstallingTheTools 2.1 InstallingNOVPEK™CVLiteVirtualMachine Once all prerequisites are met, using WinRar or any acceptable unzip program, unzip the Ubuntu 64_14.0_CVL.rar file to your PC hard drive. After unzipping, navigate to the created folder ‘Ubuntu64_14.0_CVL’. Double Click on the file ‘Ubuntu 64‐bit_new.vmx’. VMware® Player should load the virtual machine. Another method could be to open VMware Player and click on ‘Open a Virtual Machine’ then navigate to the ‘Ubuntu64_14.0_CVL’ folder to find the virtual machine setup file. Once the Virtual Machine startup you may be asked to choose whether you “Moved it” or “Copied it”, please click the “Moved it” button. NOTE The NOVPEK_CVL virtual machine is preconfigured to use 2G of RAM. You can edit this value to increase or decrease the amount of RAM assigned to the VM. After opening VMware® Player, click on ‘Edit Virtual Machine Settings’, Navigate to ‘Hardware’ tab and select Memory. Adjust memory to the desired size. Other settings can be modified from this window. Once the Virtual Machine starts for the first time, you will be asked to choose whether you ‘Moved it’ or ‘Copied it’. Please select the ‘Moved it’ option. 1 Software tools and drivers are included in the USB drive provided with the kit. Property of NovTech, Inc. © 2014. All Rights Reserved Page 6 of 38 Figure 1 – VMware® Player Open Virtual Machine Figure 2 – VMware® Player Edit Virtual Machine To log into the virtual machine please use these credentials, username ‘novtech’ password ‘novtech’ all lower case. These credentials will log you into the virtual machine and allow you to start developing and editing hardware and software settings for the NOVPEK™CVLite. All shortcuts to programs needed are located on desktop and right‐hand Dash bar. Property of NovTech, Inc. © 2014. All Rights Reserved Page 7 of 38 A pop‐up window may ask you to update the VMware® Linux Tools. It is not necessary to do so, but if you wish to stop seeing the annoying message tab on the bottom of the VM, click “Install” button when asked. VMware® will then mount a CD drive and open the mounted folder with the install files contained in that folder. Copy all the files in that folder and paste them in your home folder. Open a Terminal window and you should be placed in your home where you placed the files. Run these two commands: ‘sudo chmod 777 auto*.sh’, enter the ‘novtech’ password when prompted, then ‘sudo ./autorun.sh’ to install the tools. After installation is completed you can delete the files from the home folder and eject the CD drive that VMware® auto mounted. This should remove the tab on the bottom of the VM, notifying you about the VMware Linux Tools install. Figure 3 – NOVPEK™CVLite Virtual Machine Desktop Screen Two windows will pop‐up during the VM boot asking for password, which is ‘novtech’, to perform administrative tasks. Property of NovTech, Inc. © 2014. All Rights Reserved Page 8 of 38 3. UpdatingHardware/SoftwarefilesinVirtualMachine 3.1SettingupNetworkShareFolder NovTech recommends you check and verify that your custom hardware/software project files are up to date. This is done with NovTech’s SVN server. There is a shared Project folder under /home/novtech/ in the Linux VM in which Windows can have access to as a network shared folder. To access the shared folder, open a Linux terminal in the VM and run the command “ifconfig” to get the IP address of the VM. In windows, open a file browser window and in the address tab type ‘\\’ followed by the IP address of the VM. Windows will display a Project shared network folder (See Figure 6). Double click on the folder and when prompted enter the same user and password used to enter the VM. (user: ‘novtech’, passward: ‘novtech’). Using these credentials gives you full read/write access to the shared folder of the VM. Figure 4 - Shared Network Folder Property of NovTech, Inc. © 2014. All Rights Reserved Page 9 of 38 3.2SVNSharing SVN® is NovTech’s subversion repository of choice. TortoiseSVN is the application NovTech has chosen for version control. Users are free to use any version control application they choose but will not be supported by NovTech. The installation files are included with the USB drive under /Tools/SVN. (32bit and 64bit versions). Please refer to http://tortoisesvn.net/ for any installation issues. The installation process should be simple and straight forward. After installation of ToroiseSVN please follow the steps below to update the hardware/software files. 3.3HardwareFileUpdate 1) 2) 3) 4) 5) 6) 7) In Windows shared folder (opened in previous section) navigate to Projects/ folder. Right Click on the novsomcvlite_ghrd_dramx16_5CSEBA2 folder. Select “SVN Update” (see Figure 5). Enter User name: ‘novpekcvl’. Enter Password: ‘novpekCVL’. Update window will pop‐up displaying any files that needs updating. Click ‘OK’ to finish (see Figure 6). Figure 5 - Hardware SVN Update Property of NovTech, Inc. © 2014. All Rights Reserved Page 10 of 38 Figure 6 - Hardware SVN Update Done 3.4SoftwareUBootSourceFilesUpdate 1) 2) 3) 4) 5) 6) In Windows shared folder navigate to Projects/ folder. Navigate to ‘Buildroot‐2014.08/output/build’ folder. Right Click on the uboot‐custom folder. Select ‘SVN Update’. Update window will pop‐up displaying any files that needs updating. Click ‘OK’ to finish. 3.5SoftwareLinuxSourceFilesUpdate 1) 2) 3) 4) 5) 6) In Windows shared folder navigate to Projects/ folder. Navigate to ‘Buildroot‐2014.08/output/build’ folder. Right Click on the linux‐custom folder. Select ‘SVN Update’. Update window will pop‐up displaying any files that needs updating. Click ‘OK’ to finish. Property of NovTech, Inc. © 2014. All Rights Reserved Page 11 of 38 4. BuildingNOVPEK™CVLiteGHRDusingPreinstalledQuartusTools 4.1Procedure The following procedure uses the NOVPEK™CVL Cyclone V SoC GHRD. File GHRD Archive Quartus Project Qsys File Cyclone V SoC novsomcvlite_ghrd_dramx16_5CSEBA2.tar.gz novsomcvlite_ghrd_dramx16_5CSEBA2/soc_system.qpf novsomcvlite_ghrd_dramx16_5CSEBA2/soc_system.qsys Table 2 – Project Folder 4.2 BuildProjectUsingCommandLine(NovTechRecommended) A user can skip the entire GUI process below and compile and build the GHRD project in a terminal. This method is recommended because it’s fast and when there are no changes needed to be made to the hardware configuration in QSYS or Quartus. Follow the steps below to build GHRD from command line. (Do not type the single quotation marks. A compilation is necessary only if a change was applied to the design). 1) In VM, open a terminal. 2) In terminal cd to ‘~/Projects/novsomcvlite_ghrd_dramx16_5CSEBA2’ folder. 3) Enter into Altera Embedded Environment by running this shell script: a. Enter ‘~/altera/14.0/embedded/embedded_command_shell.sh’, password is ‘novtech’. b. To build everything all at once, enter ‘make all’ c. To build preloader, ‘make preloader’ d. To build uboot, ‘make uboot’ e. To build ‘soc_system.rbf’, ‘make rbf’ f. To generate the device tree blob, ‘make dtb’ g. To generate the device tree, ‘make dts’ h. To build quartus sof, ‘make program_fpga’ i. To build flash program preloader, ‘make program_qspi’ j. To restore design to its barebones state, ‘make scrub_clean’ k. To Create a tarball with the UBoot script, dtb and rbf files, ‘make sdfat’ l. For Qsys generate & Quartus compile this design, ‘make sof’ m. To create a tarball with the barebones source files that comprise this design, ‘make tgz’ Property of NovTech, Inc. © 2014. All Rights Reserved Page 12 of 38 Once completed, all output files will be located under: � novsomcvlite_ghrd_dramx16_5CSEBA2, � novsomcvlite_ghrd_dramx16_5CSEBA2/Output, � novsomcvlite_ghrd_dramx16_5CSEBA2/software/preloader/ folders. These files can either be used to update an existing SD image or create a new SD image for the NOVPEK™CVLite. Figure 7 GHRD Project Folder Programming file: novsomcvlite_ghrd_dramx16_5CSEBA2/output_files/soc_system.sof Property of NovTech, Inc. © 2014. All Rights Reserved Page 13 of 38 4.3OpenQuartusProject 1. Start Quartus tool by double clicking the icon on the desktop, or by running it from the command line: $ ~/altera/14.0/quartus/bin/quartus 64bit 2. In Quartus, go to File > Open Project ..., browse to the file cv_soc_devkit_ghrd/soc_system.qpf and click Open. Figure 8 - Open Quartus Project Property of NovTech, Inc. © 2014. All Rights Reserved Page 14 of 38 Figure 9 - Select Quartus Project 3. Quartus will load the project. Figure 10 - Quartus Loaded Project Property of NovTech, Inc. © 2014. All Rights Reserved Page 15 of 38 4.3 GenerateSysteminQsys 1. In Quartus, go to Tools > Qsys to start the Qsys tool Figure 11 Start QSYS 2. Qsys tool will start and ask you to open a Qsys file. Select cv_soc_devkit_ghrd/soc_system.qsys and click Open. Figure 12 - Open QSYS Project Property of NovTech, Inc. © 2014. All Rights Reserved Page 16 of 38 3. Qsys will load the file Figure 13 - Loaded QSYS Project 4. In Qsys, select Generate Generate HDL this will open the Generate dialogue box. Figure 14 - Generate QSYS Project Property of NovTech, Inc. © 2014. All Rights Reserved Page 17 of 38 5. In the Generate dialogue box, click the Generate button. Figure 15 - Generating QSYS Project 6. A message will be displayed when the generation is complete (may take a few minutes depending on host machine speed) Figure 16 - QSYS Project Complete Property of NovTech, Inc. © 2014. All Rights Reserved Page 18 of 38 7. Click Close button in the Generation window to close it. 8. In Qsys, go to File > Exit to close Qsys. Figure 17 - Exit QSYS 4.5CompiletheDesigninQuartus RunningAnalysis&Synthesis 1. In Quartus, in the Tasks panel change the flow from RTL Simulation to Compilation. Figure 18 - Compilation Property of NovTech, Inc. © 2014. All Rights Reserved Page 19 of 38 2. In the Tasks panel, right click Analysis and Synthesis and select Start. Figure 19 - Analysis & Synthesis Start 3. After a few minutes (depending on host machine speed) the Analysis & Synthesis will finish and a message will be displayed. Figure 20 - Analysis & Synthesis Output Property of NovTech, Inc. © 2014. All Rights Reserved Page 20 of 38 RunningSDRAMPinAssignmentTCLScript 4. In Quartus, go to Tools > Tcl Scripts Figure 21 - TCL Script 5. In the TCL Scripts window, select the hps_sdram_p0_pin_asignments.tcl file and click Run. Figure 22 - Locate TCL Script Property of NovTech, Inc. © 2014. All Rights Reserved Page 21 of 38 6. A notification window will appear when the script is completed. Figure 23 - Run TCL Script RunningtheAssembler 7. In the Tasks panel, select Assembler, right click it and select Start. Figure 24 – Assembler Property of NovTech, Inc. © 2014. All Rights Reserved Page 22 of 38 8. After the assembly phase is completed, a notification message will be displayed. Figure 25 - Assembly Output 4.6GeneratedFiles This section presents the name and location of the files resulted from compiling the hardware design. File ~/Projects/novsomcvlite_ghrd_dramx16_5CSEBA2/output_files/so c_system.sof ~/Projects/novsomcvlite_ghrd_dramx16_5CSEBA2/soc_system.so pcinfo ~/Projects/novsomcvlite_ghrd_dramx16_5CSEBA2/soc_system/sy nthesis/soc_system_hps_0_hps Description SRAM Object File for programming FPGA SOPC Info File - Used by Device Tree Generator System View File - Used by ARM DS-5 AE Table 3- Generated Output Files Property of NovTech, Inc. © 2014. All Rights Reserved Page 23 of 38 4.7Converting.softo.rbf SOF (SRAM Object File) is used to program the FPGA from the Quartus Programmer tool. For the purpose of programming the FPGA from software, the SOF file needs to be converted to RBF (Raw Binary File). Several different options are available for converting the file: A. Using the command line tools from Quartus Programmer (installed by default with the SoC EDS or installed standalone) or from Quartus. $ ~/altera/14.0/embedded/embedded_command_shell.sh $ ~/altera/14.0/quartus/bin/quartus_cpf -c \ Projects/novsomcvlite_ghrd_dramx16_5CSEBA2/output_files/soc_system.sof \ Projects/novsomcvlite_ghrd_dramx16_5CSEBA2/output_files/soc_system.rbf $ ~/altera/14.0/qprogrammer/bin/quartus_cpf -c \ Projects/novsomcvlite_ghrd_dramx16_5CSEBA2/output_files/soc_system.sof \ Projects/novsomcvlite_ghrd_dramx16_5CSEBA2/output_files/soc_system.rbf B. Use the GUI converter, callable from either Quartus Programmer or Quartus, by selecting the menu File > Convert Programming Files. 1. Select the Programming File Type to be Raw Binary File (.rbf) 2. Select the Mode to be Fast Passive Parallel X8 or 16 3. Click on the SOF Data then click Add File and browse to the soc_system.sof file 4. Edit the desired name of the output file to be soc_system.rbf 5. Click the Generate button Figure 26 - Convert SOF File Property of NovTech, Inc. © 2014. All Rights Reserved Page 24 of 38 5.0BuildPreloaderUBootspl This section describes how to build and compile the preloader for the NOVPEK™CVLite from the handoff files generated by Quartus Project. (These instructions are mainly copied from the RocketBoards.org website instructions.) http://www.rocketboards.org/foswiki/Documentation/GSRDPreloader The procedure shown below uses the Cyclone V SoC GHRD as an example. 5.1GeneratingthePreloader 1. Compile the GHRD. 2. Start an Embedded Command Shell and go to GHRD folder (assumed here to be saved in the home folder): $ ~/altera/14.0/embedded/embedded_command_shell.sh $ cd ~/Projects/novsomcvlite_ghrd_dramx16_5CSEBA2/ 3. Start the Preloader Generator aka the BSP Editor $ bsp-editor& 4. In the BSP Editor, select File > New BSP ... Figure 27- BSP Editor Property of NovTech, Inc. © 2014. All Rights Reserved Page 25 of 38 5. In the New BSP window, click the ... browse button to browse to the handoff folder Figure 28- Create New BSP 6. Select the ~/Projects/ novsomcvlite_ghrd_dramx16_5CSEBA2/hps_isw_handoff/soc_system_hps_0 folder and Click Open. Figure 29- Open Handoff Folder Property of NovTech, Inc. © 2014. All Rights Reserved Page 26 of 38 7. The New BSP window will have all the settings populated, based on the handoff folder. Accept the default settings and click OK. This will close the window. Figure 30- New BSP Loaded 8. In the BSP Editor window, edit any settings if necessary, and then click Generate. Figure 31- BSP Editor Property of NovTech, Inc. © 2014. All Rights Reserved Page 27 of 38 9. The message panel on the bottom will indicate the status of the generation. Click Exit to close the BSP Editor. Figure 32- BSP Compile Complete The following items are generated in the ~/Projects/ novsomcvlite_ghrd_dramx16_5CSEBA2/software/spl_bsp/ folder File/Folder generated Description Folder containing source code that was generated based on the information from the handoff folder settings.bsp Preloader settings file, that contains the settings from the Preloader Generator Makefile used to build the Preloader Makefile preloader.ds ARM DS-5 AE that can be used to load the Preloader Table 4- Preloader Output Files Property of NovTech, Inc. © 2014. All Rights Reserved Page 28 of 38 5.2CompilingthePreloaderfromhandofffiles 1. Start an Embedded Command Shell and go to the generated Preloader folder: $ ~/altera/14.0/embedded/embedded_command_shell.sh $ cd ~/Projects/novsomcvlite_ghrd_dramx16_5CSEBA2/software/spl_bsp 2. Run make command to build the Preloader image $ make The Makefile (also created by the Preloader Generator) performs the following steps: 1. Extract the fixed part of the Preloader source code 2. Build the Preloader executable using the fixed and the generated parts of the Preloader source code 3. Convert the executable to binary, then add the bootROM required header on top of it The following files are built in the ~/Projects/novsomcvlite_ghrd_dramx16_5CSEBA2/software/{spl_bsp or preloader}/ folder File ubootsocfpga/spl/ubootspl ubootsocfpga/spl/ubootspl.bin preloader-mkpimage.bin Description Preloader ELF file Preloader binary file Preloader image with the BootROM required header Table 5- Preloader Output Files Property of NovTech, Inc. © 2014. All Rights Reserved Page 29 of 38 6. BuildUBootandPreloaderwithBuildroot Buildroot is a tool used to make complete embedded Linux systems. NovTech’s Buildroot project is setup to build the preloader and UBoot. Please refer to the Buildroot user manual for any assistance with Buildroot, http://Buildroot.uclibc.org/downloads/manual/manual.pdf. All Buildroot Source code for UBoot is located in the ‘~/Projects/Buildroot2014.08/output/build/ubootcustom’ folder. Edit and modify source code from this UBoot folder to make any changes to the UBoot and preloader image. NOTE Do not run ‘make clean’ command unless you have backed up the output folder. The command will delete all packages and image files locate in output folder resulting in two to three hours of recompile time, depending on the speed of your machine. 1. Start a Command Shell and go to the Buildroot folder: $ cd ~/Projects/Buildroot-2014.08.1 2. Run make commands to build the uboot and preloader image $ make uboot-rebuild $ make all File ~/Projects/Buildroot2014.08/output/build/uboot custom/spl/ubootspl ~/Projects/Buildroot2014.08/output/build/uboot custom/spl/ubootspl.bin Description Preloader ELF file ~/Projects/Buildroot2014.08/output/images/ubootspl.bin Preloader binary file in images folder Preloader binary file Table 6- Buildroot U-Boot Output File NOTE To clean the UBoot build, NovTech provided a scrip called ‘mk_uboot.sh’. This script can run with the option clean to clean the UBoot project, ‘mk_uboot.sh novpekCVL clean’. Other options are available in the script, please open it and review. Property of NovTech, Inc. © 2014. All Rights Reserved Page 30 of 38 7. BuildingLinuxKernelandRootFilesystem Buildroot is a tool used to make complete embedded Linux systems. NovTech’s Buildroot project is setup to build the Linux kernel, and root file system. Please refer to the Buildroot user manual for any assistance with Buildroot, http://Buildroot.uclibc.org/downloads/manual/manual.pdf. All Buildroot Source code for the Linux Kernel is located in the ‘~/Projects/Buildroot2014.08/output/build/linuxcustom’ folder. Edit and modify source code from that Linux folder to make any changes to the kernel. 1. Start a Command Shell and go to the Buildroot folder: $ cd ~/Projects/Buildroot-2014.08.1 2. Run Linux menu config to make any changes to kernel: $ make linux-menuconfig 3. Run make commands to build the kernel and root $ make linux-rebuild $ make all File ~/Projects/Buildroot2014.08/output/images/zImage ~/Projects/Buildroot2014.08/output/images/rootfs.ext2 ~/Projects/Buildroot2014.08/output/images/rootfs.tar Description Linux Kernel zImage Linux EXT2 root file system Linux root file system in tar ball ~/Projects/Buildroot 2014.08/output/images/soc_novpekCV_Lite.dtb NOVPEKCV device tree file Table 7- Buildroot Linux Kernel and RFS Output File NOTE To clean the linux kernel, cd to ‘~/Projects/Buildroot2014.08/output/build/linuxcustom’ folder and run the command ‘make clean’. Property of NovTech, Inc. © 2014. All Rights Reserved Page 31 of 38 8. CreatingamicroSDimage All files needed to create the micro SD image are located in the ‘~/Projects/Buildroot/2014.08/output/images/’ folder. NovTech provided script, ‘~/Projects/Buildroot/2014.08/mk_sd.sh’ will automatically build an SD image. 1. Start a Command Shell and go to the Buildroot folder: $ cd ~/Projects/Buildroot-2014.08.1 2. Run the mk_sd.sh script: $ ./mk_sd.sh Figure 33- MK_SD Output NOTE Always answer yes to remove the existing sd_image file if it already exists. Property of NovTech, Inc. © 2014. All Rights Reserved Page 32 of 38 8.1InstallingimagetomicroSD All files needed to program the image to the SD are located in the ‘~/Projects/Buildroot 2014.08/output/images/’ folder. (Instructions are copied from the RocketBoard website: http://www.rocketboards.org/foswiki/Documentation/GSRDSdCard. The following table summarizes the information that is stored on the SD card: Location Partion 1 Partion 2 Partition 3 File Name socfpga.dtb soc_system.rbf uboot.scr zImage various n/a n/a Description Device Tree Blob file FPGA configuration file UBoot script for configuring FPGA Compressed Linux kernel image file Linux root filesystem Preloader image UBoot image Table 8- SD card Storage Files The MBR (Master Boot Record) contains descriptions of the partitions on the card, including their type, location and length. Partition 3 is a custom partition with type = 0xA2. It is required by the BootROM, which will identify it from the MBR and load the Preloader from the beginning of this partition. NOTE The MBR describes the partitions; the order of partitions and their locations is not actually relevant. You could have a different order and/or gaps between them and the boot will still be successful. 8.2CreatingSDCardImageUsingProvidedScript This section presents details on how to create the GSRD bootable SD card image, similar with the SD card image that is provided as part of the precompiled binaries package. Property of NovTech, Inc. © 2014. All Rights Reserved Page 33 of 38 The following items are required in order to be able to create the SD card image. They are all delivered as part of the precompiled binaries package but can also be rebuilt. Item preloader mkpimage_cyclone5.bin Description Preloader image How to build Generated and compiled with SoCEDS based on Quartus handoff information soc_system.rbf Compressed FPGA configuration file Device Tree Blob From GHRD delivered with GSRD, Device Tree Blob UBoot script for configuring the FPGA UBoot image From GHRD delivered with GSRD Compressed Linux kernel image Root filesystem as compressed tarball Compiled by Buildroot soc_system.dtb novpekCVL.dtb u-boot.scr u-boot.img zImage rootfs.tar located in ~/novsomcvlite_ghrd_dramx16_5CSEBA2/ouput_files folder Build From Buildroot when Linux is build From GHRD delivered with GSRD, located in ~/novsomcvlite_ghrd_dramx16_5CSEBA2/ folder Compiled by Buildroot Table 9- SD Output Files A script, ‘mk_cv_sd.sh’ that can copy a complete image or individual files to SD card was created by NovTech. Below is the usage text for the script: Usage: ./mk_cv_sd [hnpuir] /dev/sd# where /dev/sd# is a valid devnode for the SD card. h Help. (This information.) n Do nothing. Just echo intended actions. p Place Preloade on the SD card. u Place UBoot on the SD card. i Place SD Image on the SD card, Entire Image, PreLoader, UBoot, Kernel, Filesystem. r Place Root Filesystem on the SD card. The script should only be run from the ~/Projects/Buildroot2014.08/ folder. Property of NovTech, Inc. © 2014. All Rights Reserved Page 34 of 38 8.3UpdatingIndividualElementsontheSDcardmanually It is time consuming to write the whole SD image to the card each time a modification is made. Therefore it is often preferable to create the SD card and write to the card once, then update different elements individually. The following table presents how each item can be updated individually: File Update Procedure zImage soc_system.rbf soc_system.dtb uboot.scr Mount DOS SD card partition 1 and replace file with new one: $ sudo mkdir sdcard $ sudo mount /dev/sdx1 sdcard/ $ sudo cp <file_name> sdcard/ $ sudo umount sdcard preloader_image.bin uboot.img $ sudo dd if=preloader_image.bin of=/dev/sdx3 bs=64k seek=0 $ sudo dd if=uboot.img of=/dev/sdx3 bs=64k seek=4 $ sudo dd if=rootfs.ext2 of=/dev/sdx2 root filesystem Table 10- SD Individual Files for update NOTE Replace in the above command "sdx" with the device name of the SD card on your host system. You can find out the device name by running ‘$ cat /proc/partitions’ before and after plugging in the card reader into the host. Property of NovTech, Inc. © 2014. All Rights Reserved Page 35 of 38 9. BootingNOVEPK™CVLite To setup the NOVPEK™CVLite, follow these steps: 1. Plug in the supplied USB cable to the HPS UART port on the board and connect to PC. Assure the USB serial driver is found, (FTDI USB Serial Convertor driver). 2. Insert the SD card into the HPS SD slot, not the SD slot on module. They share the same electrical interface. For development purposes it is easier to work with the full size SD slot. 3. Assure all switches correspond to Figure 31 below. 4. Open a Serial Terminal, HyperTerminal or UConn, with settings of 115200, 8, N, 1. 5. Connect 5V power supply to 5V input connector. 6. Monitor Serial Terminal, you can stop at uboot or boot all the way to Linux prompt. Figure 34- NOVPEKCV Lite Board Property of NovTech, Inc. © 2014. All Rights Reserved Page 36 of 38 Figure 35- NOVPEK™CVLite Terminal Output Property of NovTech, Inc. © 2014. All Rights Reserved Page 37 of 38