1
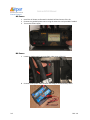
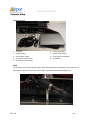
Grab and GO Kit Manual Rev. 1.0 9/11/2008 This page has been intentionally left blank Purpose The purpose of this document is to provide you with the basic materials that you will require to properly operate and maintain the Grab and Go kits. We have included a Trouble Shooting Section that covers all of the known problems, and their respective solutions, that we have encountered to date. Your assistance in identifying further problems and solutions will be greatly appreciated, and will assist in the future development of this project. Acknowledgements The Grab and Go Kits have been made possible through the cooperation and support of the Surrey Emergency Program and the Surrey Fire Services. Acceptance of Amateur Radio as an integral part of the Surrey Emergency Program has been the fundamental strength of all the volunteers who contributed to this communications kit project. The Surrey Emergency Program Amateur Radio (SEPAR) is a roster of amateur radio volunteers who are registered with the Provincial Emergency Program and who maintain an active role in practicing their communications skills. In February of 2007 under the leadership of Bill Gipps, VE7ISV, a group of SEPAR members met for the first time to apply their knowledge and training in the design of the portable Grab and Go Kits. After several meetings the design and objectives were clearly spelled out and the next step was to communicate our recommendations to the Surrey Emergency Program through the Surrey Fire Services. Bill Gipps carried on in his leadership role and developed a Power Point presentation. This presentation was given to Chief Len Garis, Dan Barnscher and Jocelyne Colbert at the Emergency operations Centre located in Surrey Fire Hall # 1. After approval by the Surrey Emergency Program sourcing and assembly of the kits began and fell under the direction of John Brodie, VE7JBB. John led the SEPAR team through the mock up, prototype and finally with the completion of 3 professionally assembled amateur communications kits. Along the way John was greatly assisted by Drew Elvins, VA7DRW, Mike Plant, VE7AT, Bill Gipps, VE7ISV and Fred Orsetti, VE7IO. Finally thanks to all SEPAR members who have provided support and volunteered their time in testing and demonstrating our amateur radio skills. This is one of the characteristic that makes our volunteer group stand out. Fred Orsetti, VE7IO SEPAR Coordinator Grab and GO Kit Manual Table of Contents Inventory Radio Box ............................................................................................................................................... 1‐1 Antenna and Accessory Box .................................................................................................................. 1‐2 HF Antenna Bag ...................................................................................................................................... 1‐2 Deployment Location Considerations ......................................................................................................................... 2‐1 Unpack and setup Radio’s Proper removal technique ................................................................................................................. 2‐2 Removing radio heads ....................................................................................................................... 2‐2 Antennas VHF/UHF Antenna Setup ................................................................................................................... 2‐3 HF Antenna Setup .............................................................................................................................. 2‐4 Connecting the HF antenna to the Deno meter ........................................................................... 2‐7 Power Sources AC Power ............................................................................................................................................ 2‐8 DC Power ........................................................................................................................................... 2‐8 Attaching Optional Accessories Headphones ....................................................................................................................................... 2‐9 Dino Meter relocation ..................................................................................................................... 2‐10 CW Keyer .......................................................................................................................................... 2‐10 Computer Setup Inventory .......................................................................................................................................... 2‐11 Connecting power ............................................................................................................................ 2‐11 Connecting to Pactor Modem .......................................................................................................... 2‐12 Starting the Computer ..................................................................................................................... 2‐12 REV. 1.0 ~ i ~ Grab and GO Kit Manual Operation Deployment Plans Non Digital Voice only ............................................................................................................................ 3‐1 Digital Airmail and CW ........................................................................................................................... 3‐1 Standalone (No EOC) ............................................................................................................................. 3‐1 Basic operating instructions VHF/UHF Radios ..................................................................................................................................... 4‐1 HF Radio ................................................................................................................................................. 4‐1 Dstar ....................................................................................................................................................... 4‐3 Airmail .................................................................................................................................................... 4‐4 Qforms ................................................................................................................................................... 4‐6 Withdrawing instructions VHF/UHF Antennas ................................................................................................................................ 5‐1 HF Antenna ............................................................................................................................................ 5‐1 Disconnecting the power ....................................................................................................................... 5‐1 Disconnecting the radio ......................................................................................................................... 5‐1 Computer Shutdown .............................................................................................................................. 5‐1 Repacking the radio heads ..................................................................................................................... 5‐2 Other items ............................................................................................................................................ 5‐2 Maintenance Quarterly Maintenance .......................................................................................................................... 6‐1 Annual Maintenance .............................................................................................................................. 6‐2 Troubleshooting ........................................................................................................................................ 7‐1 Serialized Inventory................................................................................................................................... 8‐1 Appendix A – XT‐4 CW Memory Keyer Manual Specifications ......................................................................................................................................... A‐1 On/Off/Speed Control ............................................................................................................................ A‐1 REC and MESSAGE 1‐4 Buttons .............................................................................................................. A‐1 Beacon Mode ......................................................................................................................................... A‐2 Appendix B – Radio frequency Memories ................................................................................................ B‐1 ~ ii ~ REV. 1.0 Grab and GO Kit Manual Inventory Radio Box The following are mounted to the rack Antenna connectors 1. Kenwood TS480SAT H VHF/UHF 1 2. Icom IC2820 H 3. Icom IC2820 H F 4. Icom 91-AD handheld radio VHF/UHF 2 5. Icom 91-AD Rapid Charger 6. Alinco DM 330MV power supply Top shelf (Radio Heads) 7. PG 40 PWRGate 8. Rigrunner 9. SCS PTCIIpro Modem 10. Lenovo Laptop 11. Dino SWR/Power Meter 10 12. Dummy Loads 9 The following are not mounted to the rack (Detailed inventory sheets attached to packaging) • Manuals • 3x Heil headset • 2 x Sony dual headsets • Lenovo power cord AC & DC Middle shelf • CW Keyer • CW Paddle 8 11 7 2, 3 5 12 1 6 Back 4 Bottom shelf REV. 1.0 1‐1 Grab and GO Kit Manual Antenna and Accessory Box • • • • • • • • • • VHF/UHF Antenna Kit 2x Tripods 2x VHF/UHF Base antennas Battery jumper cables 50’ contractors extension cord Tool Kit Screws 2x pole supports 3 lb hammer LMR 400 Ultra flex coax cables o 1x 150’ o 1x 100’ o 1x 50’ o 1x 33’ HF Antenna Bag • • • • • 12x 4 foot fiberglass poles sections Guy ropes Metal tripod Tent pegs Guy rings & links 1‐2 REV. 1.0 Grab and GO Kit Manual Deployment Location Considerations • Work with the site supervisor 9 Obtain PEP task number 9 Select an appropriate location for operating position 9 Antenna Placement ¾ Check for overhead power lines and other wires ¾ Survey and observe the area before erecting any antennas ¾ Consider buildings and trees when erecting VHF/UHF antennas ¾ Unroll the Coax Cable by walking and playing it out as you walk, Be careful not to kink the Coax as the LMR 400 Ultraflex is very easily kinked ¾ Feed lines (Coax cables) must be neatly placed on the ground to ensure they are not a safety hazard and are free from any vehicular traffic ¾ Use Duct Tape to hold cables in place if there is any kind of foot traffic crossing the cables ¾ Any excess cables should neatly rolled and placed under the operating tables REV. 1.0 2‐1 Grab aand GO Kit M Manual Unpack k and setup p Radio’s Proper remo P oval technique The re emoval of the Grab and Go o kit from its ccase requiress 2 people. Removing ra R adio heads 1. Proper way to rremove radio o heads is to ggently rock th he head to loo osen it from tthe Ve elcro. Brace hand ds so that the control head d does not sud ddenly come lloose. 2‐2 2. On nce the head is loose careffully lift the h head unit out being careful not to hit th he fraame REV. 1.0 Grab and GO Kit Manual Antennas VHF/UHF Antenna Setup Inventory of Antenna parts 9 2x Tripods 9 2x Antennas mounted upside down on Tripods 9 8x Antenna radials stored in white tube 9 1x Screwdriver mounted to top of white tube 9 1x Antenna bag Unpack and assemble instructions • • • • • • • Unscrew and invert the antenna on the tripod Remove 4 radials from the white tub Insert and secure each radial into the base using the screwdriver attached to the top of the white tube • Move the antenna to its operational position and extend the base until the lower support arms are parallel to the ground Attach the coax to the base of the antenna Rise the tripod to its operational height (try to maintain 2 feet vertical separation between antennas Run the coax under one of the legs of the tripod to prevent the tripod from being pulled over Carefully unwind the coax taking extreme care not to kink the cable or leave any loops that may kink when the cable is rolled out to the radio Connecting VHF antennas 1. Remove ONL Y the Dummy Load connector for the antenna you want to connect 2. Securely connect the VHF/UHF antenna coax to corresponding connector REV. 1.0 2‐3 Grab aand GO Kit M Manual HF Anten nna Setup (Requiress 4‐5 people) • One leg of the antenna is 45 ft. long and O d the other is 90 ft. (135 ft.. overall). Thee antenna is ffed beetween the tw wo legs with a SO 239 con nnector locateed at the basee of the balun n. The conneector iss recessed and d, if care is no ot taken, it is easy to crosss thread the ccable connecttor while instaalling th he coax. • Th he antenna se ets up as an inverted V w with the legs b being ideally aat a 120° angle to o each other. This antennaa performs m much like a sta andard dipolee and operatees in n free space. • Th he feed pointt of the anten nna must be aat least 30 ft. off the groun nd which is acccomplished u using th he set of fiberrglass poles, ttripod, end su upports and rropes provideed in the greeen canvas bagg. • Th he antenna m must be clear of surroundin ng objects forr optimum peerformance h however if ideeal co onditions are not availablee the radio’s iinternal tunerr will compen nsate for any moderately h high SW WR condition ns (up to 4:1).. BE AW WARE OF ANY Y OVERHEAD POWER LINEES Invento ory of partts 1. 2 x Mast head poles witthout pulley (Rope Hub b) 2. Tripod 3. 6 x pegs 4. 9 x Straigh ht fiberglass p poles d pole with pu ulley 5. Mast head 6. Guy Ring 7. 3 x Guy lines 8. Antenna halyard 9. Off-Centerr-Fed (OCF) dipole d 0. Coax 10 2‐4 3. 2. 1. 4. 5. 6 6. 1. REV. 1.0 Grab and GO Kit Manual Assembling the Antenna • The antenna center mast is made up of 4ft sections of fiberglass poles. Note the aluminum guy ring, the metal tripod, the top antenna support and the two rope hubs Rope hub • Unroll the antenna legs and lay them along the ground in opposite directions. • Attach the LMR 400 Ultraflex cable to the balun taking care not to cross thread the connector. • Carefully unwind the coax taking extreme care not to kink the cable or leave any loops that may kink when the cable is rolled out to the radio. • Locate the spot where the metal tripod will be placed and using three (3) tent pegs secure the tripod using the loops at the bottom of each leg. • Slide the first marked 4 foot section of fiberglass mast into the tripod. This is the one marked with yellow tape. • Lay out and connect 6 lengths of the fiberglass pole sections • At the top end of the sixth section install the aluminum ring used for the guy ropes and attach the three (3) guy ropes • Connect the 7th mast section above the aluminum ring. • On top of the 7th section install the pulley support, feed through the 60 REV. 1.0 2‐5 Grab aand GO Kit M Manual fo oot length of rope and tie tthe ends togeether • Have one persson on each o of the two guyy ropes and th hree 3) people raissing the pole ttaking care to o keep the tw wo (3 gu uy ropes tightt while the m mast is being rraised. Care musst be taken w when erectingg the HF antenna ssupport not to apply too m much stress w while standin ng up o the main center pole aas the joints aare subject to bre eakage. • • • Once the maast is vertical one person ttake a positio on on the third guy rope and the two rem maining peop ple will lift thee mast up and d place it onto o the mast section (#8) already installed d in the tripod. The guy ropes should be located even nly around thee 360° circle o or at 120° to each h other and kkeeping the gu uy lines out o of the path of the antenna halyard allowingg the antennaa ends to be ffreely moved over the guy ropees. Adjust the gguy ropes so tthat the mastt is straight an nd vertical, th hen secure the gguy ropes usin ng the tent peegs or affix th he ropes to trrees or other suittable objects. mportant for p public safety that the endss of the anten nna wires aree 8 ft. or moree It is also im ab bove ground to eliminate the risk of co ontact with higgh RF voltagees at the endss of the wire. This iss accomplishe ed by: 2‐6 • Use one of the e orange polee supports to install two (2) sections of ffiberglass maast with the ro ope upport hub on the top. su • Attach a short length of ligh ht rope to eacch leg of the aantenna and feed the ropee through thee ope support h hub. ro • Drawing the ro ope tight ensu ure the anten nna leg is not drooping and d is not touch hing the rope hub • pe using a ten nt peg behind the fiberglasss support. Seecure the rop • Th he antenna iss now in posittion and the ccoax should b be carefully unwound and routed to thee raadio rack. REV. 1.0 Grab aand GO Kit M Manual Connecting C g HF anten nna 1. Lo ocate the HF A Antenna conn nector mountted on the Din no meter at the back of th he maain unit. 2. Se ecurely conneect the HF anttenna coax to o the elbow on the Dino meter. Conne ect the HF anttenna coax caable to the elb bow on the D Dino meter. REV. 1.0 DO NOT usee the HF1 or HF2 connecto ors 2‐7 Grab and GO Kit Manual Power Sources AC Power 1. Uncoil the AC Power cord located in the back left hand corner of the kit 2. Connect to a good AC power source using the extension cord provided if needed 3. Turn on the Power supply DC Power 1. Locate the PWRgate BAT connector(Back right corner of the kit) 2. Connect the DC power cable between the PWRgate and the battery tether 2‐8 REV. 1.0 Grab and GO Kit Manual Attaching Optional Accessories Headphones 1. Connect the headset audio to one of the two headphone jacks (The upper jack allows audio to be toggled between the headset and Speaker but the bottom jack is always on) 2. Disconnect the microphone from the Jack on the side of the remote head unit and plug‐ in the headphone and microphone 3. You will need to reduce the audio gain on the radio when using the headset mic (Refer to the radio manual for instructions) REV. 1.0 2‐9 Grab and GO Kit Manual Dino Meter relocation This meter for HF SWR/Power can be relocated from the main rack and relocated to the remote head for convenience of operating. You will have to power it using the 12 v power cable and stereo cable that are hanging at the back of the TS 480 control head. CW Keyer 1. Connect the CW Keyer to the CW Paddle connector on the remote head unit. 2. Connect the CW paddle to CW Keyer 3. Additional information on using CW can be found on page 41 of the TS‐480 manual and Appendix A of this manual. VOX must be on to transmit on CW. 2‐10 REV. 1.0 Grab and GO Kit Manual Computer Setup Inventory of parts 9. 8. 7. 1. 4. 3. 6. 5. 2. 1. Computer 6. Power supply bag 2. Computer Bag 7. USB to Serial adapter 3. AC/DC power supply 8. Serial cable from Modem 4. AC cord for power supply 9. SCS Modem 5. DC cord for power supply Power The computer has an AC/DC power supply. Select the appropriate cord based on your power source. If using the DC power cord connect it to the Cigar type socket attached to the Rigrunner REV. 1.0 2‐11 Grab and GO Kit Manual Connecting the computer to the Modem 1. Attach the modem cable to the USB dongle 2. Connect the USB dongle to the port marked SCS on the left hand side of the computer 3. Power on the Modem, the switch is located on the back right corner of the modem Starting the Computer 1. Open the lid on the computer 2. Press the power button located on the top center of the keyboard 3. Log on using the SEPAR ID and the assigned password 4. Launch Airmail (See digital modes – Airmail for more information) 2‐12 REV. 1.0 Grab and GO Kit Manual Operation Deployment Plans Non digital voice communications only • Captains and Co‐Captains will determine which voice communications modes are used. ¾ Simplex VHF/UHF. ¾ Repeater It is recommended that all VHF repeater use start on VE7RPT 146.94‐ (no tone required) and then move to a suitable local repeater. ¾ HF communications may be required to contact distant stations (such as the Kamloops PREOC). HF should only be used if VHF/UHF simplex communication is not useable. Digital Airmail and CW • Captains and Co‐Captains will provide email addresses and contact information. ¾ Airmail requires an address for the recipient or relay station. ¾ CW requires a operators who are proficient at CW. ¾ RTTY and other digital modes cannot be used without special computer software so these modes will not be used. Standalone (No EOC) In this mode all communications are directed at a site other than the EOC radio room. This may require the use of Airmail to send and receive information to and from specific individuals via email. There may be communications from a portable site (go kit) and a reception center. In this case only VHF voice will be used as all reception centers have VHF only. CAPTAINS AND CO‐CAPTAINS WILL ‐ • Determine what communications methods are to be used and only use what is necessary to establish effective communications. • Determine which frequencies will be used • Determine the type of communications ¾ Formal messages ¾ Tactical messages ¾ Airmail (email addresses are required) REV. 1.0 3‐1 Grab and GO Kit Manual This page has been intentionally left blank 1‐2 REV. 1.0 Grab and GO Kit Manual Basic Operating instructions VHF/UHF Radios Basic operating instructions • Both Icom 2820 radios are setup to operate in both voice and packet. One radio is set to UHF 9600 Baud and the other is set to VHF 1200 Baud. Because the packet board in the modem is selectable from 1200 to 9600 baud only one can be used at any one time. To use UHF 9600 baud the cable from the 9600 baud radio must be moved to port 1 on the modem if 9600 baud packet is to be used. This is caused by the fact that the cables for 9600 baud and 1200 baud are different. (NOTE) we plan to add a second board to the modem which eliminate the need to move any cables however at this time it is recommended that only 1200 baud packet be used. • All memories in both Icom 2820 radios have been programmed with both voice and packet frequencies which apply to the South West Region. Use the memory channels for selecting frequencies as CTCSS tones have been preprogrammed to eliminate confusion. • The same frequency list has been programmed into the Icom 91AD as well as the D‐Star frequencies. Use only the preprogrammed frequencies to avoid any confusion. • A complete list of the programmed frequencies has been placed on the laptop computer as well as a printing list in Appendix B of this manual. • Operation of all VHF/UHF/D‐STAR radios must be in accordance with the operating manuals provided in the documents folder. Should there be a need to make changes other than the memory channel changes refer to the manuals provided. HF Radio Basic operating instructions • The HF radio is provided to ensure communications outside the range of VHF/UHF coverage. When operating the HF radio in CW, SSB use the standard modes. The modem can operate in PACTOR III mode and should be used in that mode only unless PACTOR III is not available. Use the preprogrammed frequencies listed in Appendix B • When operating CW you must use the external keyer (Appendix A). Local CW emergency traffic net (BCEN) can be found on 3.652 mHz at 0200Z and should be the primary link to RN7 National Traffic System. If you operate CW please remember to keep the speed down to 15 WPM. • When operating SSB the most common nets can be found on 3.716mHz (BC/YUKON Traffic Net), 3.729mHz (BC Public Service Net) and 3.735mHz(Official PEP net). Use these nets to move formal traffic and remember the PEP net is for official government traffic only so wait to be invited to pass your traffic on this net. • The HF radio is operated in the standard SSB modes for all amateur bands i.e. LSB for 40 and 80 meters. REV. 1.0 4‐1 • • • Grab and GO Kit Manual When operating PACTOR use only USB on all bands. Ensure your dial frequency is set to match the frequency of the PMBO or other station. Information on this can be found in the Airmail operating section of this manual or in the help section on the laptop. Radio frequency memories have been programmed with Airmail and standard net frequencies) and a list of memory channels is provided in the document pouch as well as in Appendix B. Refer to Kenwood TS 480SAT operating manual if needed Noise Cancelling Speaker: If the external noise canceling speaker is not functioning at all, it probably means that the external speaker cable at the front of the Kenwood radio is not plugged in. If the controls on the noise cancelling speaker do not function, momentarily turn off, and then turn on, its power using the toggle switch on the left of the control head labeled “NC Speaker”. You can then control width of filter and level of noise cancelling with the buttons on the top of the speaker. CW Keyer: Many operators do not like the internal CW keyer with the TS‐480 and prefer to use an external keyer or bug. If an external key, electronic keyer or bug is used, the “Key/Paddle” plug at the front of the Kenwood radio must plugged into the “key” position. If you find the dot and dash are reversed, follow the procedure on page 41 of the TS‐480 manual. The dot‐dash can also be reversed at the keyer (see Appendix). VOX must be on to transmit on CW. SSB Operation: The mic audio gain on the radio is set to the default of 50 which is about right when using the Kenwood mic. You should adjust it for your voice level anyhow, using the procedure on page 9 of the manual. If you are using the boom mic with the Heil headset, the gain is definitely too high and should be decreased to around 10 (subject to your voice). Internal Antenna Tuner: You should always be on Ant. 1. Ant. 2 is not used. If you are moving around the band, make sure that you adjust the tuner when changing frequency. The SWR as measured at the Dino meter should ideally not exceed 1.5 after tuning. Procedure is on page 9 of the TS480 manual. The OCF antenna is designed to work on the following bands, 75/80, 40, 20, 17, 12, 10, & 6 meters. Note that it does not resonate on the 15 m band. Dino Meter relocation This meter for HF SWR/Power measurements can be relocated from the main rack to the remote head for convenience of operating. You will have to power it using the 12 v power cable and stereo cable that are hanging at the back of the TS 480 control head. See page 2‐10 for instructions on how to relocate the display 4‐2 REV. 1.0 Grab and GO Kit Manual DSTAR • • • • • REV. 1.0 The only D‐Star radio currently available with the go kit is an Icom 91AD handheld. The D‐ Star radio has been preprogrammed with the local area repeaters. A complete list of repeaters can be found in Appendix C The 91AD has two bands the “A” band and the “B” band. D‐Star can only be used on the “B” band while all FM voice is found on the “A” band. The 91AD is fully programmed to operate as an additional VHF/UHF FM voice radio and contains the same memory frequencies as the Icom 2820 radios. The “A” band contains the South West frequencies in the “0” to “100” bank . The “100” to “200” bank contains frequencies used for cross border contacts into Washington State. There are two call frequencies assigned to “C0” and “C1”. “C0” is the Surrey VHF repeater and “C1” is the Surrey UHF repeater frequency. The “B” band has the D‐Star repeater frequencies for Surrey and Vancouver plus Calgary and San Francisco. Use of the gateway for contacts outside the South West Region should only be used when requested by the coordinator. 4‐3 Grab and GO Kit Manual Airmail Start AirMail from the Start menu or from the desktop icon and select Allow when prompted. This is the main AirMail screen with the most used features highlighted. Composing a new message 1. Select the new message icon 2. Select an address from the address book or new to add an address or select cancel if you don’t want to add the address to the address book 3. Compose you message like you would using any other E‐Mail program 4. When you are finished composing your message press the Post Message button Compose and post as many messages as you would like following the above instructions. 5. You will need to connect to one of the following connections to send and receive your messages 1. Internet Connection via Telnet Client 2. VHF/UHF Connection via Packet Client 3. HF Connection via Terminal window 4‐4 REV. 1.0 Grab and GO Kit Manual How to connect to a Mail Server (open one of the following connections) Method 1 – Internet Connection (Telnet Client) Method 2 – VHF/UHF Connection (Packet Client) 1. Select a nearby Telnet station and tune the radio to its frequency (See AirMail Station list) 2. Listen and select the green connect button when the frequency is clear Method 3 – HF Connection (Terminal Window) 1. Select a Station from the list. F8 will bring up a propagation table to help you chose (VE7SCC & VE7VIS are preferred) *** the radio should change to the stations frequencies/band when selected if not see the trouble shooting guide*** 2. Listen and select the green connect button when the frequency is clear REV. 1.0 4‐5 Grab and GO Kit Manual Qforms • • • • Standard ARRL message forms will be provided for all messages Qforms will be used with Airmail if available Airmail standard email text format messages are acceptable and must contain the preamble, addressee, date and time, signature of the originator and any special handling instructions. Before Opening Qforms start Airmail and start the Mail Server Module. • Open Qforms from the desktop shortcut or from the start menu • When Qforms starts you will be presented with the following screen. • Please note whether or not the software is in Exercise Message mode. To change the mode go into the options menu and add or remove the tick from beside Exercise Mode to put the software in the required mode. • We will mostly be using Radiogram mode so select the Radiogram tab. Fill out the Radiogram following standard messaging practices. • As you are filling out the form you will see instructions as to what is required in the field you are currently filling out. By pressing the ... beside a field will auto‐fill that field with the current information. Auto‐fill the Check last. 4‐6 REV. 1.0 • Grab and GO Kit Manual To send the message, goto Options and select send to mail server. When prompted select yes to save the message. Name the file after the message number ie. RGM005.XML. REV. 1.0 4‐7 • Grab and GO Kit Manual You will now be prompted to fill out the email information. Please note that when sending messages between Winlink accounts you do not have to include the @winlink.org. For all non Winlink accounts you will have to enter the full email address. • NOTE:You must attach the Style Sheet when sending this message to people that are not running Qforms • You should get the following message if the message was successfully passed off to Airmail. • Now you will have to goto Airmail and select the Transit tab. You will see your message with a question mark beside it. Now double click on your message 4‐8 REV. 1.0 Grab and GO Kit Manual • and post it • Repeat for each message you have in Transit with the ? beside it. • The next time you connect to a message server these messages will be sent. This is what the sent message looks like in a browser. REV. 1.0 4‐9 Grab and GO Kit Manual This page has been intentionally left blank 4‐10 REV. 1.0 Grab and GO Kit Manual Shutdown VHF/UHF ANTENNAS • Lower the tripods • Remove the base radials by loosening the setscrews • Tighten the setscrews to ensure they do not get lost • Remove the antenna from the mount and reverse it so it points down then retighten the wing nut • Adjust the tripod so it fits into the black bag • Insert the base radials into the 1” white plastic sleeve and install the cap with the screwdriver attached • Make sure both antennas are properly stored in the black bag • Fold the bag and secure with the Velcro straps HF ANTENNA • Lower the center of the antenna from the main support by using the rope • Disconnect the Coax cable • Disconnect the center balun from the rope • Lower the ends of the antenna and remove the ground support pipes from the ground • Remove and store all pegs • Roll each leg of the antenna starting at the center and working towards the ends • Tape the first loop at 12” and roll each leg into a 12” roll and secure with tape • Roll the Coax cable by taping the first loop at 20” and roll into a 20” circumference MAKING SURE NOT TO KINK THE COAX CABLE and secure with tape DISCONNECTING THE POWER • Disconnect power source first • Disconnect the battery from the Power Gate • Roll the power cords and store in the radio rack DISCONNECTING THE RADIOS • Disconnect Coax cables from the VHF/UHF radios • Connect each VHF/UHF radio to the corresponding connection on the dummy loads COMPUTER SHUT DOWN • Disconnect the USB cable from the computer and serial cable • Roll the serial cable and store in the radio rack • Shut down the computer using the standard shutdown procedure • Close the computer and store in the black and red sleeve • Store the USB/SERIAL adapter in the black and red sleeve REV. 1.0 5‐1 Grab and GO Kit Manual REPACKING THE RADIO HEADS • Place the microphones on the head mount • Place the head mounts on the main frame making sure they are positioned clear of any other metal. • Carefully roll the umbilical cords and secure with the attached Velcro straps OTHER ITEMS • Store the headsets and all other loose items in the zippered black storage bag LIST MUST BE DATED AND SIGNED AND RETURNED TO THE ZIPPERED STORAGE BAG USING THE CHECK LIST PROVIDED CHECK THE PELICAN STORAGE BOXES FOR MISSING ITEMS. THE CHECK NOTE ANY REQUIRED REPAIRS AND IF YOU ARE MISSING ANY ITEMS CHECK THE SITE CLOSELY IF THEY STILL CANNOT BE FOUND NOTIFY FRED ORSETTI AT [email protected] IMMEDIATELY. CHECK THE SITE FOR CLEANLINESS AND MAKE SURE ALL ITEMS ARE READY FOR TRANSPORT. Antenna connectors Calibrate following are mounted to the rack 1. Kenwood TS480SAT 2. Icom IC2820 H 3. Icom IC2820 H 4. Icom 91-AD handheld radio 5. Icom 91-AD Rapid Charger 6. Alinco DM 330MV power supply 7. PG 40 PWRGate 8. Rigrunner 9. SCS PTCIIpro Modem 10. Lenovo Laptop 11. Dino SWR/Power Meter 12. Dummy Loads The following are not mounted to the rack (Detailed inventory sheets attached to packaging) • Manuals • 3x Heil headset • 2 x Sony dual headsets • Lenovo power cord AC & DC • CW Keyer • CW Paddle H VHF/UHF 1 F VHF/UHF 2 Top shelf (Radio Heads) 10 9 Middle shelf 8 7 2, 3 5 11 1 12 6 4 Bottom shelf 5‐2 REV. 1.0 Grab and GO Kit Manual Back of Rack Antenna and Accessory Box • • • • • • • • VHF/UHF Antenna Kit 2x Tripods 2x VHF/UHF Base antennas Battery jumper cables 50’ contractors extension cord Tool Kit Screws LMR 400 Ultra flex coax cables o 1x 150’ o 1x 100’ o 1x 50’ o 1x 33’ HF Antenna Bag • • • • • • • 12x 4 foot fiberglass poles sections Guy ropes Metal tripod 2x pole supports Tent pegs Guy rings & links 3 lb hammer REV. 1.0 5‐3 Grab and GO Kit Manual This page has been intentionally left blank 5‐4 REV. 1.0 Grab and GO Kit Manual Maintenance Quarterly Maintenance • Battery service ¾ Batteries are sealed and maintenance free ¾ Check battery connection cables ¾ Check fuses located at each battery ¾ Each kit battery has a battery tender unit for keeping the battery fully charged while not in use. It should be hooked up at the time of kit storage and left on continuously. ¾ Batteries should be put on a load tester and if the battery checks out then it should be placed back on the battery tender. If the battery does not check out on the load tester it must be replaced. ¾ Batteries must be kept in dry storage and protected from freezing • CW Keyer ¾ The CW keyer unit has a 9V battery that must be replaced periodically • Computers ¾ The laptops must be plugged in so that the batteries are kept charged ¾ Windows updates should be applied ¾ Anti‐Virus software need to be updated ¾ Documentation and software updates applied from supplied media • Radios ¾ All radios must be turned on and memories checked ¾ All power and data cables checked for damage or missing ¾ Check all radio panel lights are in working order • Black Utility Bag (containing headphones etc.) ¾ Check the contents against the inventory list included in the bag and confirm all items present. Report missing items. REV. 1.0 6‐1 • Grab and GO Kit Manual Document Pouch (containing equipment manuals) ¾ Check the contents against the inventory list included in the pouch and confirm all items present. Report missing items. • Pelican Case #2 and HF Antenna Bag ¾ Check the contents against the inventory list in this manual and confirm all items present. Report missing items. 6‐2 REV. 1.0 Grab and GO Kit Manual ANNUAL MAINTENANCE • Antennas ¾ Assemble HF antenna and test with the MFJ analyzer ¾ coax cables checked for damage ¾ mounting poles, ropes and hardware checked ¾ VHF/UHF antenna tripods checked ¾ Confirm all VHF/UHF antenna radials are in the storage tube ¾ Assemble VHF/UHF antennas (2) and test with analyzer • Pelican cases ¾ Check that seals are on each case ¾ Remove seal and check contents against the check list provided ¾ Check each case for physical damage and complete damage report • Computers ¾ Remove any non approved software ¾ Backup and delete all user documents. Reload with standard supplied documents. ¾ Disk Cleanup needs to be run ¾ Disk Defragmenter ¾ Install Windows updates ¾ Renew and update Anti‐Virus software REV. 1.0 6‐3 Grab and GO Kit Manual This page has been intentionally left blank 6‐4 REV. 1.0 Grab and GO Kit Manual Troubleshooting ¾ Radios will not power up when power supply is plugged in 9 Check power supply ON/OFF switch is in the ON position 9 Confirm the Anderson power pole connector is firmly inserted into the Power Gate and the Power Gate is connected to the distribution panel (Rigrunner) and that the green light on the panel is ON 9 If just one radio will not power up check the in line fuse for that radio and that the Anderson power pole connection is firmly in its socket. ¾ Computer will not boot 9 Check computer is plugged into either the 12 Volt power supply or 120 volt mains and that the battery is fully charged ¾ HF Antenna SWR is too high (i.e. over 2.0) when checked with the Dino Meter under power, and after activating the internal auto‐tuner. 9 Ensure you are on one of the following bands when using the Off-Center-Fed(OCF) Dipole, 75/80, 40, 20, 17, 12, 10, & 6 meters 9 Ensure that the tuner has engaged and that Ant. 1 is selected 9 Make sure the coax cable is properly connected to the antenna 9 Make sure the HF antenna is not located too close to a metal building or structure 9 The HF legs are at the correct angle of 120⁰ at the center pole ¾ VHF/UHF antenna SWR is too high when checked with the MFJ analyzer 9 Make sure the ground plane radials are securely in place 9 Make sure the coax cable is firmly connected 9 Antennas should be located in the clear and the tripods raised as high as practicable and a vertical separation space of no less than 2 feet exists between the two antennas ¾ Airmail is not able to contact the modem 9 Check all the connections and ensure everything is plugged in properly 9 Shutdown Airmail and cycle the power on the modem 9 Reboot the computer and cycle the power on the modem before starting Airmail REV. 1.0 7‐1 Grab and GO Kit Manual ¾ Airmail is not able to control the HF 9 Check all the connections and ensure everything is plugged in properly 9 Turn off the HF radio and modem then power up the radio before the modem 9 Shutdown Airmail and cycle the power on the modem and radio. Ensure that the radio is powered on before the modem 9 Reboot the computer and cycle the power on the modem and radio before starting Airmail. Ensure that the radio is powered on before the modem 7‐2 REV. 1.0 Grab and GO Kit Manual Grab & Go Kits - Box #1 Number 1 1640 1 1 1 1 1 1 1 1 1 TS-480SAT MC-58DM PG4Z DM-330MV IC-2820H IC-2820H IC-91AD BC-139 PTCIIpro 1 1 1 1 1 1 Lenovo 4012 PG40 2 1 1 2 1 Custom Custom Traveller Single Side HSTA-IM HSTA-KM Sony HM-75A 1 XT-4 1 REV. 1.0 Pelican Case Kenwood HF transceiver External mic for Kenwood cable kit for Kenwood Alinco power supply Icom VHF/UHF transceiver Icom VHF/UHF tranceiver Icom handheld VHF/UHF transceiver Icom charger for handheld radio SCS Modem Laptop computer West Mountain Rigrunner West Mountain Powergate SGS Noise cancelling speaker Dino Meter & pickup Dummy Loads Heil headset with boom mic in cloth case Icom adaptor cable for Heil headset Kenwood adaptor cable for Heil headset Headsets Icom speaker mic for IC 91A Unified Microsystems CW Memory Keyer Lenovo AC/DC Combo Adaptor Manuals for above in document folder no serial # 90400026 no serial # no serial # 11449 502886 502831 503052 202688 OP22070100000 E84D3B8A8 L3A3907 no serial # no serial # no serial # no serial # no serial # no serial # 90400025 no serial # no serial # 11450 502887 502888 503294 202366 OP46070100000 AE309DCDC L3A3906 no serial # no serial # no serial # no serial # no serial # no serial # 90500024 no serial # no serial # 11461 502889 502890 503053 202367 OP47070100000 FF52A78EE L3A5635 no serial # no serial # no serial # no serial # no serial # no serial # no serial # no serial # no serial # no serial # no serial # no serial # no serial # no serial # no serial # no serial # no serial # no serial # no serial # no serial # no serial # 11S41R0139ZVJ2VZ 066732 no serial # 11S41R0139ZVJ2VZ 076246 no serial # 11S41R0139ZVJ2VZ 066662 8‐1 Grab and GO Kit Manual Grab & Go Kits - Box #2 1 2 2 2 1 1 1780 NMO 2/70 NMO 2/70 base 90 amp hr CM1A 7 band OCF Dipole Pelican Case Larsen dual band antenna Base mounting kit for Larsens Cameron tripods in case AGM sealed battery Schauer Chargemaster (trickle charger) Buckmaster More to come n n n n n n n Grab & Go Kits - HF Antenna Bag 12 pcs 1 3 pcs 48 ft. LMR 400 ultraflex Collapsible fibreglass pole kit Tripod for above Coax Rope, stakes, anchor rings More to come 8‐2 REV. 1.0 Grab and GO Kit Manual Appendix A UM unified Microsystems XT4 CW Memory Keyer User’s Manual Revision 1.06 Specifications Battery: 9 volt alkaline CW speed: Approximately 5‐45 WPM Memories: 4, approximately 110 Morse characters each Output keying: Positive Keying only, RCA phono jack output Paddle input: 1/8’ (3.5mm) stereo jack input ON/OFF/Speed Control The speed control knob is a combined ON/OFF switch and speed control. Turn the knob fully counter‐ clockwise to turn the unit off when not in use. This will preserve battery life. Turning the knob clockwise will increase the CW sending speed. The speed ranges from about 5 WPM to 45 WPM. The XT‐4 has a special power save mode to conserve battery power if you forget to turn the power off. After about 30 minutes of inactivity. The XT‐4 goes into power save. The LED will briefly flash every 6 seconds to remind you to turn it off. Pressing any button or the paddle will bring the XT‐4 back to normal operation. REC and MESSAGE 1-4 Buttons Pressing Message Buttons 1‐4 will play back the corresponding pre‐recorded message. The message will be played until it is complete. Pressing either the DIT or DAH key paddles will cancel the rest of the recorded message. To record a message: 1) 2) Press the REC button. The LED will blink rapidly. Press the MESSAGE Button (1, 2. 3, or 4) that you wish to record. The LED will come on without blinking. 3) 4) Start sending the message you wish to record with the paddle. The XT‐4 will not begin recording until the first dit or dah is sent. Press the REC Button to stop recording. The LED will go out. Press the REC board as soon as possible after you finish sending the message. This will minimize recording dead time at the end of your message. REV. 1.0 A‐1 Grab and GO Kit Manual Message Recording Notes: 1) 2) 3) The message will be presented even if you turn off the power. If you accidentally press the REC button and don’t want to record a message, tap the DIT or DAH paddles before pressing a MESSAGE BUTTON. This will cancel the record, and the LED will go out. Each message buffer will hold approximately 100‐110 Morse characters. You can combine messages 1‐2 or 3‐4 together. Simply start re‐cording message 1 or 3 and it will continue into the next message buffer if it is too long to fit in the first buffer. Paddle Reverse You should wire up your paddle so that the dit and dah keys operate the way you are used to. You can temporarily reverse the paddle keys for other operators with the following procedure. 1) Turn off the power. 2) Press and hold down the message 1 key. 3) Turn the power back on. 4) The paddle keys will be reversed as long as power is applied. Beacon Mode 1) 2) 3) You can put message 1 in auto‐repeat or beacon mode by: Turn off the power. Press and hold down the message 2 key. Turn the power back on and then release the message 2 key. Once the message 1 key is pressed, message 1 will continuously repeat until a paddle key is touched. At that point it will operate as a normal keyer. Messages 2‐4 operate normally. Pressing the message 1 key will return it to Beacon Mode. Tune You can place the XT‐4 in a key down state for tuning with the following procedure: 1) Press and hold the REC button. 2) Press the 2 button. The keyer will now be in the tune mode. 3) Touch either paddle key to exit tune mode. A‐2 REV. 1.0