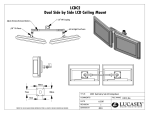
1
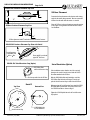
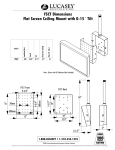
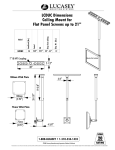
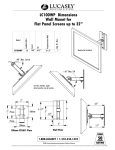
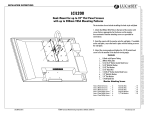
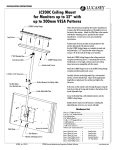
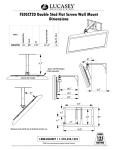
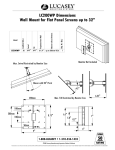
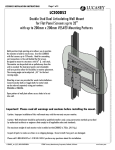
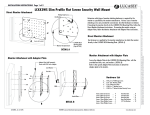
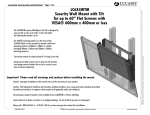
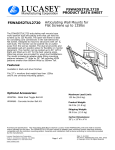
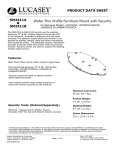
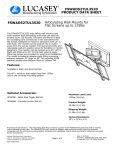
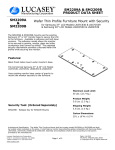
SLELCLG-7DC INSTALLATION INSTRUCTIONS Page 1 of 6
SLELCLG-7DC
Designed to work with LG Models: 26LC7DC, 32LX7DC, 32LX7DCS & 32LC7DC
SECURITY LOCKING MECHANISM
Traps the monitor attaching hardware and prevents access to the hardware
attaching to the furniture. Preventing easy removal of the monitor without
the appropriate tool.
CONVERT OLD CRT TUBE TVS TO LCD FLAT SCREENS
The mounting base used for the SLELCLG-5DC is the same base used in other SLE
type products from Lucasey Manufacturing for CRT Tube TVs. The
interchangeable base can be used to convert from existing SLE CRT TV
mounts to Flat Screens using the SLELCLG-5DC.
SECURITY RELEASE TOOL
The patented security mechanism used for the SLELCLG-5DC ensures that the
flat screen can not be easily removed from its mounted location without the
appropriate security removal tool.
PROTECT EXPENSIVE COUNTERTOPS
When mounting on furniture that has marble, granite or Corian® surfaces,
where the countertop can not be screwed into, Lucasey has an optional
adhesive accessory that can be used. The APSLEADS furniture mounting
accessory, sold separately, uses an adhesive pad to connect with the
countertop, screws into the back of the furniture and attaches to the SLE
Base. This maintains the security for the monitor while preventing damage
to expensive countertops.
Monitor Not Included
FAST INSTALLATION
Once the proper mounting location is determined, the SLE Base can
be installed very quickly onto the furniture. The SLELCLG-5DC mounting
plate can be attached to the monitor and assembled in a few minutes.
For large installations, many rooms can be finished in a short time.
EASY CARE AND MAINTENANCE
The decorative plastic cover allows for easy cleaning under and
around the monitor. Clean with a soft dust cloth and do not use
any cleaners that may damage the plastic or metal surfaces.
Important! Please read all warnings
and cautions before installing the mount.
Caution: Improper installation of this mount may void the warranty on your monitor.
Caution: Installation should be performed by qualified installers only, using construction methods prescribed
by authorized architects or engineers that comply to all applicable codes and standards.
The maximum weight of monitor to be installed on the SLELCG-7DC is 50 Lbs. (22.7 Kg.)
Inspect all parts to make sure there is no shipping damage. Do not install if any parts are missing or damaged.
Please call 1-800-LUCASEY or 1-510-534-1435 if you have any questions about this installation.
SLELCLG-7DC_Ins (11/2007)
©2007 Lucasey Manufacturing Corporation, Oakland, California
www.lucasey.com
Protected under one or more of these U.S. Patent numbers: 3,291,432 3,559,942 3,724,798 DES.270,689 4,613,109 4,878,645 4,852,842 DES.309,5624,973,023 5,169,114 5,255,884 5,310,152 5,522,576 5,621,614 Re.35,677 DES.398,834 5,826,384 5,941,492 5,964,068 6,060,661 6,102,398 6,158,704 6,454,116B1 6,761,276B2 6,806,425B1
STEALTH LOCKING FURNITURE MOUNT
SLELCLG-7DC INSTALLATION INSTRUCTIONS
Page 2 of 6
SLE Base
SLELCD Rivet Plate
A
The SLE Base ships attached to the SLELCD Rivet Plate, as shown above, to ensure the quality
of the primary mount mechanism. In order to separate the SLE Base from the SLELCD Rivet
Plate, the SLEKEY Release Rod is required. The SLEKEY Release Rod does not ship in the same
package with the SLELCD. The SLEKEY Release Rods are packaged separately to keep control
over who has the unlocking tool to remove the screen from the security mount.
Spring
DETAIL A
1
1
1
1
1
...
...
...
...
...
6
4
6
12
18
1
1
1
1
...
...
...
...
...
...
...
...
...
SLE Base attached to SLELCD Rivet Plate
SLELCLG-7DC Mounting Plate
SLELCLG-7DC Back Cover
SLELCD Plastic Dress Cover
SLELCLG5-DC Installation Instruction
Hardware Kit Containing:
#10-24 x 1/2" Countersunk Screws
#10 Wood Tapping Screws
4mm x 25mm Setscrews
4mm Hex Nuts
5mm Flat Washers
#10-24 Nylock Nut
#10 Flat Washer
SLE Stop Plate
1" Plastic Edge Protector
The Spring inside the SLE Base splits the hole. The SLEKEY Release Rod goes under the
spring pushing it upwards (towards the bottom of the SLE Base) to release the SLELCD
Rivet Plate.
Slide SLE Base back while
rotating the SLEKEY Release Rod.
Rotate release rod
counterclockwise.
Keep SLELCD Rivet Plate in a fixed position.
B
SLEKEY Release Rod
(Packed Separately from SLELCD)
To separate the SLE Base from the SLELCD Rivet Plate; orient the parts as shown in the
illustration above, Insert the SLEKEY Release Rod into the hole on the side of the SLE Base
until 1.2" of the rod remains outside the hole (See DETAIL B). Rotate the SLE Release Rod
counterclockwise while putting pressure on the SLE Base to slide it back and holding
the SLELCD Rivet Plate in place.
DETAIL B
Use edge of rivet plate
for leverage to rotate
release rod.
Insert release rod until
1.2" remains outside hole.
SLELCLG-7DC_Ins (11/2007)
©2007 Lucasey Manufacturing Corporation, Oakland, California
www.lucasey.com
Protected under one or more of these U.S. Patent numbers: 3,291,432 3,559,942 3,724,798 DES.270,689 4,613,109 4,878,645 4,852,842 DES.309,5624,973,023 5,169,114 5,255,884 5,310,152 5,522,576 5,621,614 Re.35,677 DES.398,834 5,826,384 5,941,492 5,964,068 6,060,661 6,102,398 6,158,704 6,454,116B1 6,761,276B2 6,806,425B1
Unpack all of the components from the box and
check against the component list below.
SLELCLG-7DC INSTALLATION INSTRUCTIONS
Page 3 of 6
SLELCLG-5DC Furniture Placement Top View
6.0"
22"
72"
Example placement with 6" from back of monitor to back of furniture.
Determine the best placement on the furniture and viewing
angle for the monitor being mounted. Take into account the
distance from the wall when the monitor is swiveled.
Place the SLE Base in the exact location to mount the monitor
in the proper viewing location and mark the base location
for installation.
SLE Base Furniture Placement Top View
6.0"
12.0"
SLE Base placement with 6" from back of monitor to back of furniture.
SLELCLG-5DC Furniture Placement Top View with Swivel
32"
Swivel Restriction
is adjustable from
10 to 40 .
30°
Shown with 30 swivel and
typical 32" flat screen.
SLELCLG-5DC Swivel Restrictor Stop (Option)
Swivel Restriction (Option)
SLELCD Rivet Plate
with Swivel Restrictor Stop
C
Push in stop until it hits the SLE Base.
Detail C
Top View
Bottom View
If the installation requires that the swivel be restricted,
determine the extent of swivel desired with the SLELCD
Rivet Plate attached to the SLE Base.
With the #10-24 Nylock Nut only hand tight, swivel the
SLELCD Rivet Plate to the desired degree of swivel and
push the Swivel Restrictor Stop in until it hits the SLE Base.
Without moving the Swivel Restrictor Stop,swivel the SLELCD
Rivet Plate back to neutral and release the SLE Base from
the SLELCD Rivet Plate as shown on Page 2.
Tighten the #10-24 Nylock Nut to fix the Swivel Restrictor
Stop in place.
Swivel Restrictor Stop
SLELCLG-7DC_Ins (11/2007)
#10-24 Nylock Nut
& #10 Flat Washer
©2007 Lucasey Manufacturing Corporation, Oakland, California
www.lucasey.com
Protected under one or more of these U.S. Patent numbers: 3,291,432 3,559,942 3,724,798 DES.270,689 4,613,109 4,878,645 4,852,842 DES.309,5624,973,023 5,169,114 5,255,884 5,310,152 5,522,576 5,621,614 Re.35,677 DES.398,834 5,826,384 5,941,492 5,964,068 6,060,661 6,102,398 6,158,704 6,454,116B1 6,761,276B2 6,806,425B1
SLE Base Placement
Page 4 of 6
SLELCLG-7DC INSTALLATION INSTRUCTIONS
Base Installation Using Wood Tapping Screws
SLE Base Installation
Using the base location determined with the instructions
on page 2, drill pilot holes 3/4" deep with a 1/16" bit for
each of the tapping screw locations.
SLE Base
attach the SLE Base to the countertop using the provided
#10 Wood Tapping Screws.
Base Installation Using Optional APSLEADS Adhesive Adaptor
(Optional APSLEADS Sold Separately)
12" - 16" Adjustable
If the countertop can not be drilled, there is an optional
adhesive adapter, APSLEADS, which can be used to screw
into the back of the furniture and adhere to the surface
of the furniture. This adapter can be adjusted from 12"
to the front of the SLE Base to 18" to the front of the
SLE Base.
Follow the installation instructions for the APSLEADS to
mount the SLELCD Base in the appropriate location.
Use optional APSLEADS for Marble, Granite,
Corian ®or other surfaces that can not be drilled.
SLELCLG-7DC Mounting Plate
Mounting Plate Assembly
Assemble the SLELCLG-7DC Mounting Plate with the SLELCD
Plastic Cover and SLELCD Rivet Plate as shown. Care should
be taken not to scratch the SLELCD Plastic Cover when it is
placed between the two metal parts.
Align the three pieces and screw together with four of the
six provided #10-24 Countersunk Screws.
SLELCD Rivet Plate
SLELCD Plastic Cover
Countersunk Screws
Attach monitor
cords and route
through the cord
hole.
Leave the two holes at the back of the SLELCD Rivet Plate
empty until after the monitor is attached.
Routing Monitor Cords
The monitor cords can be routed through the 2" center
hole with a plastic snap ring or can be routed to the
monitor without going through this hole depending upon
the type of monitor and individual preference.
Before attaching the monitor to the SLELCD Mounting Plate,
connect the monitor cords as instructed in the monitor's
user manual.
2" Cord Hole with
Plastic Snap Ring
SLELCLG-7DC_Ins (11/2007)
©2007 Lucasey Manufacturing Corporation, Oakland, California
www.lucasey.com
Protected under one or more of these U.S. Patent numbers: 3,291,432 3,559,942 3,724,798 DES.270,689 4,613,109 4,878,645 4,852,842 DES.309,5624,973,023 5,169,114 5,255,884 5,310,152 5,522,576 5,621,614 Re.35,677 DES.398,834 5,826,384 5,941,492 5,964,068 6,060,661 6,102,398 6,158,704 6,454,116B1 6,761,276B2 6,806,425B1
#10 x 3/4" Wood Tapping Screws
SLELCLG-7DC INSTALLATION INSTRUCTIONS
Page 5 of 6
SLELCLG Spacer
4mm x 40mm Setscrews
Monitor Attachment
Screw the 4mm x 40mm Setscrews into the threaded
inserts on back of the monitor.
Place the SLELCLG-7DC spacer onto the Setscrews
Attach the SLELCLG-7DC Mounting Plate to the monitor
with the 4mm Hex Nuts and 5mm Washers.
Tighten the 4mm Hex Nuts until the monitor is securely
fastened to the SLELCLG-7DC Mounting Plate.
SLELCLG-7DC Back Cover
Back Cover Attachment
Check to make sure the monitor is securely attached to the
SLELCLG-7DC Mounting Plate
Slide the 1"Plastic Edge Protector onto the center of the
top edge of the SLELCLG-7DC Back Cover to dampen any noise
from the metal parts that slide together.
Screw the SLELLG-7DC Back Cover to the SLELCD Rivet
Plate using the remaining two Countersunk Screws.
SLELCLG-7DC_Ins (11/2007)
©2007 Lucasey Manufacturing Corporation, Oakland, California
www.lucasey.com
Protected under one or more of these U.S. Patent numbers: 3,291,432 3,559,942 3,724,798 DES.270,689 4,613,109 4,878,645 4,852,842 DES.309,5624,973,023 5,169,114 5,255,884 5,310,152 5,522,576 5,621,614 Re.35,677 DES.398,834 5,826,384 5,941,492 5,964,068 6,060,661 6,102,398 6,158,704 6,454,116B1 6,761,276B2 6,806,425B1
1" Plastic
Edge Protector
SLELCLG-7DC INSTALLATION INSTRUCTIONS
Page 6 of 6
With the monitor mounted to the Top Assembly, align the rivet
on the SLELCD Rivet Plate with the Triangular Slot on the SLE
Base. Slide the top half assembly back until there is an audible
click and the top half is locked into the SLE Base. Pull forward
on the monitor to ensure that the rivet has engaged the SLE
Base and the monitor is secure.
Warning: Check to ensure the monitor is locked in place and
can not be disengaged from the SLE Base. Leaving the Monitor
& Top Assembly loose can result in equipment damage or injury.
Top Assembly
SLE Base
Triangular Slot on SLE Base
Monitor Removal
Insert the SLEKEY Release Rod into hole on side of base until
1.2" remains outside the hole
Rotate the SLEKEY Release Rod counterclockwise until the
spring inside the base has been depressed and the monitor
can easily slide forward on the base.
Slide the monitor forward and carefully raise the top half
assembly with the monitor attached to the SLELCD Rivet
Plate.
SLEKEY Release Rod
(Packed Separately from SLELCD)
DETAIL E
E
LIMITED WARRANTY
LUCASEY MANUFACTURING CORPORATION MAKES NO WARRANTY OF ANY KIND, EXPRESS OR IMPLIED except that the goods sold under this agreement
shall be free of defects in materials and workmanship for a period of one year from the user's date of purchase. User assumes all risk and liability
resulting from the use of the goods, whether used singly or in combination with other goods. Lucasey Manufacturing Corporation neither assumes
nor authorizes any person to assume for it any other liability in connection with the sale or use of the goods sold and there are no oral agreements
or warranties collateral to or affecting this limited warranty. Lucasey Manufacturing Corporation will repair or replace defective parts or equipment
within one year of the date of purchase, at its option, provided the part or equipment is returned pre-paid to Lucasey Manufacturing Corporation's
plant. The repaired or replaced part shall be shipped to the user, FOB Lucasey Manufacturing Corporation's plant. NO allowance for outside labor
charges are implied within the terms of this limited warranty. Under no circumstances will Lucasey Manufacturing Corporation be responsible for
special, indirect or consequential damages. The remedies set forth in this Limited Warranty are exclusive and the liability of Lucasey Manufacturing
Corporation with respect to any contract of sale or anything done in connection therewith, whether in contract, in tort, under any warranty or
otherwise shall not, except as expressly provided herein, exceed the price of the equipment or part on which such liability is based. Any damage
caused by the improper use, operation beyond capacity, substitution of parts or equipment not approved by Lucasey Manufacturing Corporation,
improper packaging, failure to observe installation or other instructions, transit, or repair by one other than Lucasey Manufacturing Corporation,
will not be covered by and shall void this Limited Warranty.
SLELCLG-7DC_Ins (11/2007)
©2007 Lucasey Manufacturing Corporation, Oakland, California
www.lucasey.com
Protected under one or more of these U.S. Patent numbers: 3,291,432 3,559,942 3,724,798 DES.270,689 4,613,109 4,878,645 4,852,842 DES.309,5624,973,023 5,169,114 5,255,884 5,310,152 5,522,576 5,621,614 Re.35,677 DES.398,834 5,826,384 5,941,492 5,964,068 6,060,661 6,102,398 6,158,704 6,454,116B1 6,761,276B2 6,806,425B1
Monitor to SLE Base Attachment