1
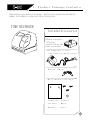
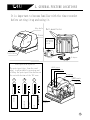
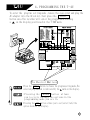
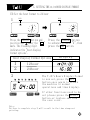
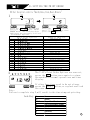
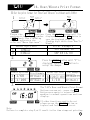
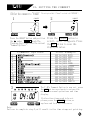
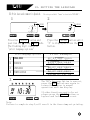
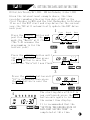
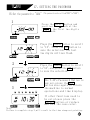
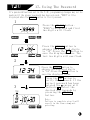
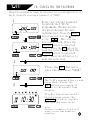
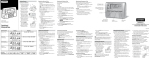
T4U
CONTENTS
1、Product Package Contents
2、General Feature Locations
3、Quick Install
4、Programming the T-4U
5、Setting the T ime
6、Setting the D ate
7、Setting the 12/24 H our D isplay F orma t
8、Setting the P rint O rder
9、Print 2 or 4 Digit Year
10、H our/ M in ute Print Format
11、Day (Date) Print Format
12、Setting the C omment
13、Setting the L anguage
14、Setting the P rint M ethod
15、Setting the D aylight S aving T ime
16、Setting the P assword
17、Using the P assword
18、Canceling the P ass word
19、Resettin g the T-4U
20、W all M ounting
21、Replacing the R ibbon C assette
22、Error C od es
23、Other I nformation
2
3
4
5
6
7
8
9
10
11
12
13
14
15
16
18
19
20
21
22
23
25
26
T4U
1. Product Package Contents
Congratualtions on your purchase of this product. Now that you have opened the box and found this
document, the User Manual, you should also find the following items:
TIME RECORDER
Included Accessories
Ribbon cassette
( Factory
installed on the
time recorder)
A C a d a p t e r:1 p c s
(A C p o w e r f e m a l e p l u g)
K e y s:2 p c s
Wall-mount fittings:
Template: 1sheet
Screws:
3p c s
Washer:
1pcs
23
T4U
2、GENERAL FEATURE LOCATIONS
It is important to become familiar with the time recorder
b efore setting it up and using it.
Key hole
Wall-mount holes
Cover
Power supply
110V-220VAC
50/60Hz
Push bar
Print Site Indicator
AC adapter
Print position adjuster
SELECT buttons
CHANGE buttons
SET buttons
The print position , from the card
edge , is adjustable by pre s sing and
sliding the print position button on
the outside bottom of the T4U case .
A
B
Display
RIBBON cassette
C
Print head
30mm
SEP 2
15mm
SEP 2 AM 8:00
SEP 2 AM 8:00
Carrier
Ass embl y
3
T4U
3、Q U I C K I N S T A L L
1
2
Unlock the key and remove
the top case.
Remove the PROTECTION PAD.
Remove the PROTECTION PAD
! before inserting AC power
Protection pad
CA
UT
IO
N
CA
UT
IO
N
3
Plug the T r a n s f o r m e r
into an a v a i l a b l e A C
Outlet. P l u g t h e
opposite e n d o f t h e
wire fro m t h e
transfro m e r
into the T - 4 U .
A time sh o u l d
now be di s p l a y e d .
If t h e t i m e o r d a t e i s
not c o r r e c t , p l e a s e
revi e w t h e t i m e
sett i n g i n s t r u c t i o n s
star t i n g o n p a g e s 5 , 6
and 7 .
4
Replace the cover and lock.
Insert a card.
2003AUG23 AM 12:00
(Print example)
43
T4U
4、PROGRAMMING THE T - 4U
To enter the program setting mode , remove the case cover and plu g the
AC adapter into the AC outlet. Ne x t press the SELECT
button once . T he recorder will enter the program mode showing
a
on the display positioned at the "TIME"mark.
PRINT STYLE
PRINT ORDER
1.M.D.H.Min
2.D.M.H.Min
3.M.D.Y.H.Min
4.D.M.Y.H.Min
5.Y.M.D.H.Min
6.Y.M.D.H.Min.S
7.D.H.Min
8.DOW.D.H.Min
9.Y.M.D
10.M.D
11.DOW.D.M.Y
12.C.M.D.Y
13.C.D.M.Y
14.C.Y.M.D
15.M.D.Y.C
16.D.M.Y.C
17.Y.M.D.C
18.C.D.H.Min
Y=Year
1.2Digits :Hour
M=Month
1.12hour
D=Date
DOW=Day of the week 2.4Digits 2.24hour
H=Hour
Min=Minute
S=Second
C=Comment
:Minute
1.1/60
2.1/100
3.1/20
4.1/10
1.ZERO Disabled
2.ZERO
DISPLAY
:Sec
:Hour
:Year 1.12hour
:Month 2.24hour
:Min
:Date
1.RCVD
2.SENT
3.IN
4.OUT
5.CFMD
6.FILED
7.PAID
8.USED
9.FAXED
10.VOID
11.ORIGN
12.APR'D
13.CMPL'D
Enabled
PRINT YEAR HOUR LEADING
TIME DATE HOUR ORDER DIGIT MIN. ZERO COMMENT
LANGUAGE
SA
TU W E TH
MO
FR
SU
1.ENGLISH
2.FRENCH
3.SPANISH
4.PORTUGUESE
RESET
:Print
Direction
1.Right 2.Left
:Print Activation
PASSWORD
:Year D.S.T.
:Month END
D.S.T. PRINT DIRECTION
START PRINT ACTIVATION
:Date
CHANGE
SELECT
DAYLIGHT SAVING TIME
1.Automatic
2.Semiautomatic
3.Manual
SET
PRINT METHOD
T he C ontrol B uttons
SELECT
:Press the SELECT button to choose the program setting mode.The
selec te d program mode is indicated by the mark on the display .
CHANGE : Pressing the CHANGE button allows
you to cycle through the options in the
programming mode you are in.
SET
:Pressing the SET button allows you to set (enter/lock) the
option shown on the display.
53
T4U
5、S E T T I N G T H E T I M E
EX: To s et the T-4U to 09:30 AM from some other arbitrary time.
Press the SELECT button and position
the under the T I M E mark. T he "hour"
digits will begin flas hing .
(The flashing means that the num b er can be changed.)
1
TIME
Second
Hour
CHANGE
SELECT
Press the CHANGE button to
2 TIME
advance the hour to "09". P ress
the SET button to accept the
displayed value . T he "Minute"
digits will now flash ,
SELECT
indicating they may now be
adjusted.
3 TIME
CHANGE
Press the CHANGE button to advance
the minutes to "30". P ress the SET
button to accept the displayed
value . T he "Second" value will
SELECT
start counting from "00" automaticlly .
The T-4U ’ s time is now set,
press the S ET button once
again to return the machine
to normal operations and time
display.
4
MO
Minute
SET
SET
CHANGE
TU
WE
TH
If other functions need to be S E L E C T
set please press the SELECT
button ,o r replace and lock the case cover.
FR
SA
CHANGE
SET
SU
SET
Note:
Failure to complete step 4, will result in the time stamp not print ing .
63
T4U
6、S E T T I N G T H E D A T E
EX: Set the T-4U ’s date to September 2 of 2003
1
DATE Y e a r
Month
Press the CHANGE button
until " 09 " is displayed ,then
press the SET button. The
Date
"Da y " should now flash .
4
CHANGE
SELECT
SET
Press the SELECT button,
the under
a nd position
DATE
the "
". T he "YEAR" will
flash .
2
DATE
DATE
5
MO
SELECT
SELECT
CHANGE
SET
Press the CHANGE button
until "03" is displayed ,
then press the SET
button. The "Month" should
now flash .
3
CHANGE
SELECT
TU
WE
TH
FR
SA
CHANGE
SET
SU
SET
Press the CHANGE button
until " 02 " is displayed ,then
press the SET button. The
T-4U ’ s date is now set,press
the S ET button once again to
return the machine to normal
operations and time display.
DATE
SELECT
If other functions need to be
set please press the SELECT
button ,o r replace and lock the
case cover.
CHANGE
SET
Note:
Failure to complete step 5 , will
result in the time stamp not
print ing.
73
L
ko
Ti
4U
7、SETTING THE 12/24 HOUR DISPLAY FORMAT
EX:Set the hour format to 24 hour
1
HOUR
HOUR
CHANGE
SELECT
SET
SELECT
Press the SELECT button a nd
position the under the " HOUR "
mark. T he flashing digit
indicates the "hour display
format options".
SELECT
Display
Ex:PM 4:00
12hour
24hour
2
MO
SET
Press the CHANGE button
to advance to mode "2" , then
press the SET button.
Hour Display Format Options
1
2
CHANGE
TU
WE
TH
FR SA
CHANGE
SU
SET
The T-4U ’ s Hours Display Format
is now set,press the SET
button once again to return
the machine to normal
operations and time display.
If other functions need to be
set please press the SELECT
button ,o r replace and lock
the case cover.
Note:
Failure to complete step 2 , will result in the time stamp not
print ing.
83
T4U
8、SETTING THE PRINT O R DER
EX:Set the print order to "Month,Date,Year,Hour,Minute"
1
PRINT
ORDER
PRINT
ORDER
CHANGE
SELECT
SET
SELECT
Press the
SELECT
button and
position the
under the "PRINT
O R D E R " m a r k . Th e f l a s h i n g d i g i t
indicates the currently selected
"Print Order Options".
Print Order Options
1
2
3
4
5
6
7
8
9
10
11
12
13
14
15
16
17
18
2
MO
SELECT
M、D、H、M i n
D、M、H、M i n
M、D、Y、H、M i n
D、M、Y、H、M i n
Y、M、D、H、M i n
Y、M、D、H、M i n、S
D、H、M i n
D O W、D、H、M i n
Y、M、D
M、D
D O W、D、M、Y
C、M、D、Y
C、D、M、Y
C、Y、M、D
M、D、Y、C
D、M、Y、C
Y、M、D、C
C、D、H、M i n
TU
WE
TH
FR SA
SET
Press the
CHANGE
button
until"5" is displayed, then
press the SET button.
Sample Imprint
SEP 08 13:49
08 SEP 13:49
S E P 0 8 ,2 0 0 3 1 3 : 4 9
0 8 S E P ,2 0 0 3 1 3 : 4 9
,2 0 0 3 S E P 0 8 1 3 : 4 9
,2 0 0 3 S E P 0 8 1 3 : 4 9 : 3 0
08 13:49
MO 08 13:49
,2 0 0 3 S E P 0 8
SEP 08
,
M O ,0 8 S E P 2 0 0 3
R C V D S E P 0 8 ,2 0 0 3
R C V D 0 8 S E P ,2 0 0 3
R C V D ,2 0 0 3 S E P 0 8
S E P 0 8 ,2 0 0 3 R C V D
0 8 S E P ,2 0 0 3 R C V D
,2 0 0 3 S E P 0 8 R C V D
RCVD 08 13:49
The T-4U ’ s Print Order Options are now set,
press the SET button once again to return
the machine to normal operations and time
display .
SU
CHANGE
CHANGE
SET
If other functions need to be set please
press the SELECT button ,o r replace and lock
the case cover.
Note:
Failure to complete step 2 , will result in the time stamp not print ing.
Code Key:
Y
M
DOW
D
H
Min
S
C
Year
Month
Day of the Week
Day of the Month (Date)
Hours
Minutes
Seconds
Comment
9
L
ko
Ti
4U
9、PRINT 2 OR 4 DIGIT YEAR
EX:Set the T-4U to imprint a 4 digit year
1
YEAR
DIGIT
YEAR
DIGIT
CHANGE
SELECT
SET
Press the SELECT button
a n d p oYs
ition the
under
EAR
t h e " DIGIT " m a r k , t h e f l a s h i n g
digit indicates the currently
selected"Year Digit Options"
Year Digit Options
1
2
2 Digit
4 Digit
2
MO
SELECT
TU
WE
TH
FR SA
CHANGE
SU
SET
CHANGE
SELECT
SET
P r e s s t h e C H A N G E button
to step through each
selection. When "2" is
displayed, p r e s s t he
SET button.
Print Example
,
08 SEP 03 14:50
08 SEP,2003 14:50
The T-4U ’ s Print Order Options are
now set, press the SET button once
again to return the machine to normal
operations and time display .
If other functions need to be set
please press the SELECT button ,o r
replace and lock the case cover.
Note:
Failure to complete step 2 , will result in the time stamp not print ing.
23
10
T4U
1 0、H our/ M in ute Print Format
EX:Set the print format for "Hour"and "Minute"to 24 hour and 1/ 10 0hr
1
HOUR
MIN
Type of
an hour
CHANGE
SELECT
HOUR
MIN
Type of
Minute
SELECT
SET
Press the SELECT button
and position the
under
HOUR
M
I
N
"
"mark.The flashing
digit indicates the
selected "Hour Options".
Hour Options
1
2
SET
Press the CHANGE button until 2 is
displayed . P ress the SET button to
save the displayed value.T he
flashing digit shifts from "Hour"to"
Minute".
Print Example
SEP 08 PM 04:00
SEP 08 16:00
12Hour
24Hour
2
CHANGE
HOUR
MIN
Press the CHANGE button until "2 ”is
displayed. P ress the SET button to
accept the changes .
CHANGE
SELECT
SET
Order Options Print Example
Order Options Print Example
1 1/ 6 0
2 1/ 1 0 0
3 1/20(5/100) SEP 08 AM 12.15
SEP 08 AM 12.1
4 1/10
SEP 08 AM 12:10
SEP 08 AM 12.17
3
MO
SELECT
TU
WE
TH
FR
SA
CHANGE
The T-4U ’ s Hour and Minute Print Format
Options are now set, press the SET
button once again to return the
machine to normal operations and time
display .
SU
SET
If other functions need to be set
please press the SELECT button ,o r
replace and lock the case cover.
Note:
Failure to complete step 2 , will result in the time stamp not print ing.
11
23
T4U
1 1、Day (Date) Print Format
EX:Disable the leading “0” in the Day of the Month (Date)
1
LEADING
ZERO
LEADING
ZERO
CHANGE
SELECT
CHANGE
SELECT
SET
SET
Press the CHANGE button
Press the SELECT button and position
u
the under "
"mark. T he flashing n t i l " 1 " i s d i s p l a y e d .
digit indicates “ Leading Z ero Options" P r e s s t h e S E T b u t t o n t o
LEADING
ZERO
save the displayed value.
Leading Zero Options
1
2
Print Example
ZERO Disabled
SEP 8
ZERO Enabled
SEP 08
PM
4:00
PM
0 4:00
2
MO
SELECT
TU
WE
TH
FR SA
CHANGE
SU
SET
The T-4U ’ s Day Of The Month Print Format
Option is now set, press the SET
button once again to return the
machine to normal operations and time
display .
If other functions need to be set
please press the SELECT button ,o r
replace and lock the case cover.
Note:
Failure to complete step 2 , will result in the time stamp not print ing.
12
823
T4U
1 2、S E T T I N G T H E C O M M E N T
EX:Set the comment to "FAXED"
1
(This setting is available if "Comment" is selected in the "PRINT ORDER".)
2
COMMENT
CHANGE
SELECT
SELECT
SET
Press the SELECT button and position
the
under " COMMENT "mark. T he
flashing digit indicates the current
" C omment Options" .
Comment Options
RCVD(Received)
SENT
1
2
3
4
5
6
7
8
9
10
11
12
13
3
IN
OUT
C F M D(C o n f i r m e d)
FILED
PAID
USED
FAXED
VOID
O R I G N(O r i g i n a l)
A P R ' D(A p p r o v e d)
CMPL'D(Completed)
MO
SELECT
TU
WE
TH
FR SA
CHANGE
COMMENT
CHANGE
SET
Press the CHANGE button to
scroll, until "9" appears . P ress
the SET button to save the
displayed value .
Print Example
,
SEP 06 ,2003 RCVD
SEP 06 ,2003 SENT
SEP 06 2003 IN
,
SEP 06 ,2003 OUT
SEP 06 ,2003 CFMD
SEP 06 ,2003 FILED
SEP 06 2003 PAID
,
SEP 06 ,2003 USED
SEP 06 2003 FAXED
,
SEP 06 2003 VOID
,
SEP 06 ,2003 ORIGN
,
SEP 06 ,2003 APR D,
SEP 06 2003 CMPL D
The T-4U ’ s Comment Option is now set, press
the SET button once again to return the
machine to normal operations and time
display .
SU
SET
If other functions need to be set
please press the SELECT button ,o r
replace and lock the case cover.
Note:
Failure to complete step 3 , will result in the time stamp not print ing.
1313
T4U
1 3、S E T T I N G T H E L A N G U A G E
EX: Print date and comment in Spanish .
(This setting is available if "Comment" is selected in the "PRINT ORDER".)
1
2
LANGUAGE
CHANGE
SELECT
SELECT
SET
Press the SELECT button and
position the along LANGUAGE mark.
T he flashing digit indicates
"print language options"
Print Language Options
1 ENGLISH
2 FRENCH
3 SPANISH
4 PORTUGUESE
3
MO
TU
SELECT
WE
TH
FR SA
CHANGE
SET
Press the CHANGE button until
"3" is displayed . P ress the SET
button.
Print Example
S U,0 7 S E P,2 0 0 3
O U T 0 7 1 0:3 0
D I,0 7 S E P ,2 0 0 3
S O R T 0 7 1 0:3 0
D O ,0 7 S E P ,2 0 0 3
S A L 0 7 1 0:3 0
D O ,0 7 S E P ,2 0 0 3
S A I D A 0 7 1 0:3 0
The T4U ’ s Language Option is now set,
press the SET button once again to
return the machine to normal
operations and time display .
SU
CHANGE
LANGUAGE
SET
If other functions need to be set
please press the SELECT button ,o r
replace and lock the case cover.
Note:
Failure to complete step 3 , will result in the time stamp not print ing.
14
823
T4U
1 4、SETTING THE PRINT ING METHOD S
EX:Change the print direction to "Left" and the print activation to "Automatic".
2
1
PRINT DIRECTION
PRINT ACTIVATION
CHANGE
SELECT
PRINT DIRECTION
PRINT ACTIVATION
SET
CHANGE
SELECT
Press the SELECT button and position
DIRECTION
the above the PRINT
PRINT ACTIVATION mark.
T he flashing digit indicates
"Print Direction Options".(See the table 1)
SET
Press the CHANGE button until "2" is
displayed and then press the SET
button to save the selection .
The flashing digit indicates the
"PRINT ACTIVATION" method(s). Press
the SET button, if "1" is displayed.
(See the table 2)
Print Direction
(Table 1)
1
Right
2
Left
(Table 2) Print Activation
1
2
3
3 MO
TU
SELECT
Explaination
T he c l o c k w i l l p r i n t w h e n a c a r d
Automatic
or f o r m i s i n s e r t e d a n d s e n s e d b y
the t r i g g e r
T he c l o c k w i l l p r i n t w h e n a c a r d o r
Semiautomatic form i s i n s e r t e d a n d s e n s e d b y t h e
trig g e r a n d t h e P u s h B a r i s a l s o
pres s e d
T he c l o c k w i l l p r i n t w h e n a c a r d o r
Manual
form i s i n s e r t e d a n d t h e P u s h B a r i s
pres s e d
WE
TH
FR SA
CHANGE
SU
The T-4U ’ s Print Method
Option is now set,press the
SET button once again to
return the machine to
normal operations and time
display .
SET
If other functions need to
be set please press the
SELECT button ,o r replace
and lock the case cover.
Push bar
Note:
Failure to complete step 3 , will result in the time stamp not print ing.
1315
T4U
1 5、SETTING THE DAYLIGHT SAVING TIME
EX:Start,date Thursday,MAY 1,2003.
END date Wednesday October 1,2003
G iven the internation a l e x a m p l e a b o v e , t h e t i m e
recorder remembers the s t a r t i n g d a t e o f D S T a s t h e
first Thrsday in MAY a n d t h e l a s t W e d n e s d a y i n O c t o b e r .
If we set the DST star t a n d s t o p d a t e s f o r t h e c u r r e n t
year,the T4U will auto m a t i c a l l y u p d a t e t h e D S T d a t e s
each year.
1
Press the SELECT bu t t o n a n d
position the under t h e
mark,the "Month" wil l f l a s h .
(The T - 4U assumes the
programming is for th e
current year)
Year
Month
Date
DST
START
DST
END
DST
START
CHANGE
SELECT
SET
2
Press the CHANGE bu t t o n u n t i l
"0 5 " is displayed ,th e n p r e s s
the SET button to sa v e t h e
selection ."Date" wil l n o w f l a s h .
DST
END
DST
START
CHANGE
SELECT
SET
3
Press the CHANGE b u t t o n u n t i l
"0 1 " is displayed ,th e n p r e s s
the SET button to s a v e t h e
selection .
SELECT
4
MO
SELECT
TU
WE
TH
FR SA
CHANGE
SU
SET
DST
END
DST
START
CHANGE
SET
The starting date of D.S.T is
now configured,press the SET
button once again to return to
the normal time display.
It is recommended that the
"SETTING THE ENDING DATE OF
DAYLIGHT SAVING TIME" is
completed at this time.
16
823
T4U
1 5、SETTING THE DAYLIGHT SAVING TIME (2)
EX -(continued) :Daylight saving time ends on Wednesday October 1,2003
1
Year
Month
DATE
Press the SELECT button and
position the
under the
"
"mark the "Month" will
flash.
DST
END
DST
END
CHANGE
SELECT
SET
2
Press the CHANGE button until
"10"is displayed. Press
the SET button to save the
selection."Date" will begin
to flash.
DST
END
CHANGE
SELECT
SET
3
Press the CHANGE button until
"01" is displayed.Press
the SET button to save the
selection.
DST
END
CHANGE
SELECT
4 MO
TU
WE
TH
FR SA
SET
T h e T - 4 U ’s D a y l i g h t S a v i n g s M o d e
Option is now set,press the
SET button once again to
return the machine to
normal operations and time
display.
SU
If other functions need to
be set please press the
SELECT button,or replace
and lock the case cover.
SELECT
CHANGE
SET
Note:
Failure to complete step 4 , will result
in the time stamp not print ing.
To clear either the Month or Date field
select “--”. Setting both the Month and
Date fields as “--” will disable the
Daylight Savings function. Please
remember to set both DST Start and
DST End Modes appropriately.
17
823
T4U
17、SETTING THE PASSWORD
EX:Set the password to "1234"
1
( The password can be set from"0000" to"9999" )
Press the SELECT button and
position the
mark at the
" PASSWORD " , t h e f i r s t t w o d i g i t s
will flash.
PASSWORD
CHANGE
SELECT
SET
Press the CHANGE button to scroll
to "12" . P r e ss the SET button to
save the selection. The last
two digits will now flash .
PASSWORD
CHANGE
SELECT
SET
2
Press the CHANGE button to s croll
t o "34",and pr e ss the SET button
to save the selection.
PASSWORD
CHANGE
SELECT
SET
3
MO
SELECT
TU
WE
TH
FR
SA
CHANGE
SU
SET
The T-4U ’ s Password Option is
now set,press the SET
button once again to return
the machine to normal
operations and time display .
If other functions need to
be set please press the
SELECT button ,o r replace
and lock the case cover.
Note:
Failure to complete step 3 , will result in the time stamp not print ing.
1318
T4U
1 7、Using The Password
If a password has been set in the T-4U, programming changes may not be
made until the proper password has been entered. "9999" will be
displayed when the SELECT button is first pressed.
1
Press the SELECT button .
"9999"is displayed and first
two digits will flash.
SELECT
SELECT
CHANGE
CHANGE
SET
SET
Press the CHANGE button to
advance the displayed digits
to "12". P ress the SET button to
save the displayed value . The
last two digits will now flash .
2
Press the CHANGE button to
advance the displayed digits
to " 34 ". P ress the SET button to
save the displayed value .
SELECT
CHANGE
SET
3
TIME
SELECT
CHANGE
SET
Press the SET button to
verify the password. If the
correct password has been
entered the
cursor will
TIME
indicate
.Select the
desired setting mode by
pressing the SELECT
button.
Note:
Failure to complete step 3 , will
result in the time stamp not
print ing.
19
823
T4U
1 8、CANCELING THE PASSWORD
Should the password no longer be necessary for a given application it
may be cleared by entering a 'password' of "0000".
1
PASSWORD
CHANGE
SELECT
SET
PASSWORD
CHANGE
SELECT
SET
2
Enter your current password
to unlock the T-4U for
programming (Please review
the previous page for more
information). P ress the SELECT
button and position the cursor
at the " P A S S W O R D " . The first two
digits will flash. Press the
CHANGE button to selected
“00”. Press the SET button to
save the selection. Press the
CHANGE button to selected
“00”. Press the SET button to
save the selection.
Press the SET button to
save the new value“0000” .
PASSWORD
CHANGE
SELECT
SET
T h e T - 4 U ’ s p a s s w o r d h as is n o w
cancelled. Press the
SET button once again to
return to the normal time
display.
3
MO
TU
WE
TH
FR SA
SU
If other functions need to
be set please press the
SELECT button ,o r replace
and lock the case cover.
SELECT
CHANGE
SET
Note:
Failure to complete step 3 , will
result in the time stamp not
print ing.
2310
T4U
19、RESETTING THE T-4U
The T-4U may be re-initialized to its factory settings
by pressing the recessed Reset Switch. After the
Reset Switch is pressed theT-4U may need to be
re-programmed for a given job assignment.
Please note: All functions and settings including
passwords will be cleared when the Reset Switch is
pressed.
Reset switch
21
823
T4U
2 0、W A L L M O U N T I N G
1 1, Select a suitable location to mount the T-4U that is reasonably close to an
AC wall outlet (within 6ft/2m of wire cord length), a wooden installation
(backing) board should be used to mount the T-4U to the surface of the wall.
2, The T-4U should be mounted 48 inch es (122 CM) above the floor.
M ark screw
locations on
the installation board using
the provided template
AC P ower
Wall Outlet
Shoring Platform
WALL
2
Be sure to keep about
1/4"( 6mm ) of the screw
hea d away from the wall.
48"
Installation board
3
Using the u nlock key ,r emove the
case cover. Place the T-4U on the
screws to h ang it on the wall. Use
the third screw and the washer to
secure the machine to the
installation board.
4
The c as e cover may now be replaced and lock ed .
The T-4U is now ready for usage .
2312
T4U
2 1、REPLACING THE RIBBON CASSETTE
1
Unlock the key remove the cover.
3
2
Hold the ribbon cassette by
its tab and pull straight out
to remove it.
4
T u r n t h e k n o b o f t h e new
cassette in the directi o n
o f t h e a r r o w t o t i g h t en
the ribbon.
Place the cassette inside the
time recorder as shown in the
figure.Push the ribbon until
it snaps into position. T urning
the knob on the ribbon cassette
may make installation easier.
23
823
T4U
2 1、REPLACING THE RIBBON CASSETTE
5
Turn the knob of the cassette
in the direction of the arrow
to tighten the ribbon.
6
Replace the cover and lock.
The T-4U may now be used to imprint documents.
2314
T4U
Code
P—01
P—02
P—03
P—04
P—05
2 2、ERROR CODES
Problem
CPU error
The lithium battery back-up used for
memory is expiring .
The card is not inserted in the
clock properly.
Cannot print.The print head motor
or home position sen s or is not being
sensed correctly.
Cannot print.The print head motor or
the sensor is not functioning
properly.
Solution
Call the servicing dealer from
whom you purchased your T - 4U or
Call Widmer at ( 800 ) 424-4459.
Correctly insert the card .
Make sure that the ribbon cassette
is correctly inserted in place.
Press the push bar.
P—06
Incorrect password.
Enter the correct password.
P—07
D aylight Savings Time setting
mistake .
Verify the correct staring and
ending date of dayling saving time
and re- enter again.
Date entered is invalid.
Refer to your owner , s manual on the
page related to the item.
P—08
Other Trouble Issues
1、T h e T - 4 U d o e s n o t o p e r a t e Ensure the AC adapter is properly
plugged into the AC outlet and the T4U.
Verify AC Power is available in the outlet.
2、T h e T - 4 U d o e s n o t p r i n t Ensure the ribbon is installed
correctly and the proper print
method is set.
3、T h e d o c u m e n t i s j a m m e d Press the push bar and try to pull
out the document at the same time.
25
T4U
OTHER INFORMATION
Techni cal infor m ation
T-4U Physic al
- Depth :
- W idth:
- Height:
Dimensions :
6.75 inches (171.45 mm)
6.45 inches (163.83 mm)
5.7 inches (144.78 mm)
T-4U Shipping Information:
- Shipping W eight:
8 lbs (3.63 Kg)
- Shipping Box Depth: 8.5 inches (215 mm)
- Shipping Box Width: 8 .75 inches (214.63 mm)
- Shipping Box Height: 10 .5 inches (266.7 mm)
Power Requirements:
110 VAC 60Hz or optionally 110VAC 50HZ,
220VAC 60Hz and 220VAC 50HZ
Saf ety information :
! To avoid fire or electric shock,
please do not expose this machine
to rain or excessive condensed
moisture
NOTE: The T-4U is designed for use in normal commercial and office environments.
This product should not be subjected to excessive heat, sunlight, dampness,
cold or be subjected to electrical spikes. The product may be used on a desk
or wall mounted with-in six (6) foot of a standard wall outlet.
26
Widmer Time Recorder Co., Inc.
maintains its world headquarters at:
228 Park Street
Hackensack, N.J. 07601
201-489-3810
Fax 201-489-3478
Email: [email protected]
For product support please contact the Widmer Dealer that sold this product or contact
Widmer Time Recorder Co., Inc. at (800)424-4459. We also maintain a web site at
http://www.widmertime.com