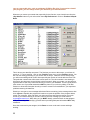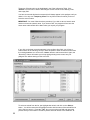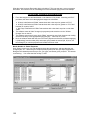
1
Welcome to HorseTrak Software 2003 Users Manual Thank you for choosing HorseTrak Software as your equine management solution. Every effort has been made to make both your program and this manual as user friendly as possible. We feel that we have provided adequate instructions in this manual and have appended these instructions with online help on our FAQ web page. We have also installed a free forums group on our website for our customers to share information and assist each other with the daily use of our programs. We would love to be available 24/7 to help you with any areas of your program that you don’t understand and we certainly want to know if there’s a problem with the operation of your program itself so we can fix it. However, we ask that you read the instructions contained in this manual, check http://www.horsetrak.com/faq.html to see if your questions are addressed there and finally, join our free forums group to ask your fellow users for their seasoned advice before contacting us. We have learned a lot over the years from our veteran users. You can too! Contacting us via email for assistance is always free and there is no expiration for this method of tech support. However, if you must call, we offer telephone tech support free of charge for 30 days following your date of purchase. Once the 30 days have expired, we will charge the credit card we have on file, a support fee of $10.00 per call. 0 TABLE OF CONTENTS ………………… Section 1 ……. License Agreement - Copyright information and refund policies OVERVIEW - Your program, its features, and getting started Section 2 ……. INSTALLATION & ACTIVATING YOUR PROGRAM Section 3 ……. STARTING YOUR HORSETRAK DELUXE PROGRAM (If you purchased any other level, skip to Section - 4) Section 4 …… Customizing Your Program – Setting up letterhead, invoice preferences, past due messages, currencies, etc. Section 5 …… Backing up and Restoring Old Data from Gold 1.5 Customers who have been using our software prior to the release of HT2002r11 (released November 2001), will need Gold 1.5 installed on their computer. All HT 2002 and new users, skip to Section 6. Section 6 …… Creating your Client Database Section 7…… Animal Information Section 8…… Health Information Section 9…… Scheduled Services Section 10…… Pedigree Section 11…… Section 12…… Section 13…… Breeding Menu Resources – Address Book, Journal, Calendar, Travel Log Business & Forms – An Overview General Accounting, Accounts Receivables, Invoices, P&L, Checking Accounts, etc. Section 14…… Section 15…… Lessons & Competitions (Business Plus, Gold, Deluxe) Forms & Contracts - HT Forms (stand alone) or Business Plus, Gold, Deluxe) Section 16…… Section 17…… Section 18…… Backing up and Restoring within HT2002 & HT2003 Troubleshooting Billing Tutorial 1 SOFTWARE LICENSE AGREEMENT Please read this agreement carefully (1). By accepting receipt of this software program, you agree to adhere to all terms herein. (2). Random returns will not be accepted. Refunds will not be issued without prior approval of the return. (3). It is an industry standard that most software programs are not refunded. For this purpose, we provide a demo version of our software for previewing before purchase. We feel the demo version offers enough features and capabilities for the potential buyer to determine if it will suit his/her needs. All software shipped to the consumer or downloaded from our website, arrives in demo version and will be converted to full version only upon payment in full. For this reason, we will not refund returned packages nor downloaded programs, once activation codes have been provided. (4). We take great care in the handling of CD’s and test each individual one before mailing. If your CD arrives damaged, or in the unlikely chance, your CD is faulty, we will replace it. If such damage or flaw is not reported within 10 days from the date of shipping, we will assume the software arrived in tact and functions as expected. We will not replace materials under these conditions beyond 10 days of purchase. (5). We do not replace outdated versions with current versions. We do not sell outdated versions for any reason. We are not responsible for replacing outdated software purchased from a retailer. We notify our dealers when upgrades become available. Therefore, keeping current versions of our software stocked in any establishment is the responsibility of the dealer. (6). We do not program any so-called “bug” or expiration features in our software that would cause it to malfunction or stop running after a predetermined time. If any version of our software, no matter how old, reverts to demonstration mode, it will have happened due to a change in the user’s operating system, a power surge, or the software being reinstalled. Upon proof of purchase, we will ALWAYS provide a conversion code to get your program out of demo. If you begin to experience problems with a previous version after having used it without problems for an appropriate amount of time, it cannot be replaced. We offer discounted upgrades to replace versions that are no longer compatible with your operating system. If the program you purchased does not offer as many features as you hoped (or you ordered the wrong version in error), we will gladly upgrade your program to a higher version with full credit for the original program within 6 months of purchase. After 6 months, we will offer appropriate discounts towards the purchase of a larger version. (7). We retain the copyright protection for this product. This software is specially coded with your name, a program specific serial number and activation code. Under copyright laws, you agree not to make copies of the software or any of the related material for anyone. It is against the law to make illegal copies. We will uphold and enforce our legal rights with regards to copyright infringements. (You may make a backup copy for yourself for safekeeping.) (8). We are not responsible for the loss of data files or system failures. Nor are we responsible for any tort, indirect, special or consequential damages such as loss of profits, goodwill, etc. Some states don't allow these limitations, in such cases, our liabilities shall be limited to a refund of the list or purchase price (whichever is less). 2 Section 1 – OVERVIEW OF OUR SERVICES & YOUR PROGRAM THIS SECTION CONTAINS AN IMPORTANT OVERVIEW OF OUR SERVICES, YOUR PROGRAM AND ITS INSTALLATION, OPERATION AND SYSTEM REQUIREMENTS. PLEASE READ IT THOROUGHLY. Hardware / Software Requirements Every effort has been made to make your HorseTrak Management Software a user friendly program. Please read the installation procedure before you begin. The basic requirements to run this software program are: • • • • • At least 32 MB RAM Windows 98 at no less than 64 MB Ram 128 MB Ram for Windows 2000, ME and XP systems A mouse pointing device CD-ROM Drive Your software may or may not run on Windows 95 systems. We recommend users upgrade their system to at least Windows 98 and we assert that it has successfully tested on Windows 2000, ME and XP systems. Windows 95 and MAC users should install at their own risk. Note: If you are installing an upgrade from an older version of any Horsetrak program, you should do a backup of your data before you proceed. Also, items in this manual shown in quotes are for easier identification or clarification, and the quotes and parenthesis should not be typed in when entering data. Information that needs to be typed in and the buttons you will need to click on will often be in BOLD text throughout this manual. The screen shots (pictures) throughout the manual may not be identical to your screen due to programming changes and enhancements. The ONLINE HELP Button: is just that! You must be connected to the internet to use it. This button contains the hyperlink to our website where we answer our customer’s most frequently asked questions. REGISTERED USERS: For your convenience, if you purchased a retail package, we included a form in your packaging to jot down the name you used when you purchased your program, your pass code and the program version you are using. You must include this information when contacting tech support. If you downloaded your software, please print out this information contained on your receipt and keep it in a handy place so you can include it EVERY TIME you contact us. IMPORTANT NOTE ON TECH ASSISTANCE: We cannot overemphasize enough how important it is to completely identify yourself when contacting tech support. It is difficult to respond effectively to a question without knowing your level of experience with our software or the version of our program you are using. We can look up your file quickly to learn all this when you provide the full name and/or business you registered under when you first purchased your program. We have no way of knowing if you got married or moved since you first purchased your software unless you tell us. Please take this into consideration when you contact us. Please try to use the same email address when ongoing communication is underway. It helps us look up your original question, as well as our responses to see how far we are in the support. While brevity is appreciated, cryptic one liners slows down assistance, not only to you, but to others while we try to figure out who you are and what you need. You must include your registration information on all tech assistance email. Not identifying yourself in every email message to us can cause long delays in response time. Please go to http://www.horsetrak.com/DoDont.html for our tech support policies 3 Anti-Virus Software Please note: This software contains copy protection components. Some active anti virus software may interfere with the installation of these components. If you experience difficulty during or after installation, disable your anti virus software and reinstall your Horsetrak program. Once installation has successfully completed, enable your anti virus software. If the problem still persists call technical support for assistance at 570-823-1157. For faster and FREE assistance send us an email at [email protected] 4 Section 2 – INSTALLATION & ACTIVATING YOUR PROGRAM: IMPORTANT!!! It is recommended that you accept the defaults of the install program whenever possible. If you attempt to customize the location or rename your program, operation can be hampered and technical support cannot be guaranteed. Installing from the CD-ROM Once you insert the CD-ROM, the program should automatically install with an activated auto run function built into your computer system. If you do not have this function or if your program does not automatically install, do the following: • • • • • Insert your CD Rom Click on MY COMPUTER on your Windows Screen Double click on the CD Rom Drive Double click on the file that appears The Installation Wizard should now appear and the remaining installation process will begin Internet Download Installation: Once you have downloaded the HT program from the Internet, you will see a file that will read “HT2003.exe” Double click on it and the final installation will complete. Again, follow all instructions and recommendations as they appear on your screen. Once completed, you should see a new icon on your desktop. If not there, click on <START> from your Windows screen, then on <Programs>. Right click on the HorseTrak 2003 program and then click on SEND TO, then on DESKTOP (Create a shortcut) Double click on the icon. You are now ready to set your program. 5 ACTIVATING YOUR PROGRAM All programs, whether through Internet download or installed from the CD will install in DELUXE DEMO version. You must activate your program in order to use it to full capacity. Until activated, you will be brought to the following screen when you click on the HT icon. Click on <Activate> 6 Program Level list: Click on the program you purchased and fill in your personal information. The information you type into this area is your choice, but be aware, it will appear on your default letterhead. After activating, when you first open your screen, your business name and your email address (if you choose to insert an email address) will appear on your opening screen beneath the horse’s picture. Now click <Activate> The Activation field will be blank. When you receive your software, either through electronic or retail package delivery, you will need to insert your Activation code. If you did not receive one with your program, whether you purchased the program directly from us or through one of our dealers, you will receive a pass code on a label affixed behind your CD. Insert that pass code into the subject of an email to us. In the body, you must include your full name and the program you purchased. Click <send> to [email protected]. You should immediately receive your activation code in reply. If you do not receive one automatically, (sometimes our connection will get disconnected after hours when no one is here to reconnect it) just send us a regular email requesting one. We will respond with your code as soon as possible during business hours. Be certain you include your purchase information with your request. 7 Once you click the <Activate> button, you will be taken here. Type in your activation code and click <ok>. Close your program and open. Your program will now be in full version for the program level you purchased. 8 Section 3 - STARTING YOUR HORSETRAK DELUXE PROGRAM (If you purchased any other level, skip to Section - 4) You are now in full version and ready to use your software. If you purchased HorseTrak Deluxe, whenever you open your program, you will need to log in. This is a multi-level security accessed program. As each user opens the program, they will insert their name and password. Certain features will appear or disappear according to the level you have assigned each user. As the owner or System Administrator, you will be the first person to log in. The first time you log in, type <SYSADMIN> as the <Login Name>. Your temporary password is also <Sys Adm>. 9 Now click on the <SysAdm> tab on your toolbar then <User Access Rights> to set up your new login name and the access level for each user of your program. 10 Create a new login name and password for yourself and your employees. If you want to keep your login name as <SYSADM> we recommend you create a new and unique password so no one else can get into the features you want to remain confidential. Once you create a new password, click on <reset password>. Note the Login/Logout dates. Do nothing in these fields, as they will automatically record as each user logs in and out of the system. If a user fails to log out of the program, others will experience problems and the system will shut down. As system administrator, you will log in and clear out the errors to allow users to continue working. For this reason, we recommend you delegate someone in authority at your facility, the ability to access this area should you not be available to do so yourself. From the <Sys Adm> tab on the opening screen, click <Browse Users> and begin inserting the names and passwords of users for your program. Begin by clicking <insert>. Add the names, the passwords, then be sure to click <active>. Note the active users in the above screen. Should one of these employees be terminated from your employ, you would highlight their name, click <change> and uncheck the <active> button. Their name will disappear from the list. 11 From the <Sys Admin> button on your main screen, choose <User Access Rights> and be brought back to this screen. <Select> the user to assign their level of access to your program. 12 As I was the last user I browsed in the previous screen, when I open <User Access Rights>, mine is the first user I will edit for security level access. Note <M> in <Access Level>. Where all items are marked with that <M> I am given complete access to add, insert, change, delete and view all other users and all areas of the program. Now click on the <Users> button to set the access level for your employees. 13 Select an individual user to set up your multi-level security access options Let’s say that “Joe” is the stable manager. He would not have access to your financial data, however, you would want him to be able to access information in your horse health and services, employee maintenance (if you wish him to see pay rates), inventory, etc. So, we tagged the financial modules, then clicked the <Tags to No Access> to remove these items from view when he logs in. If you want him to be able to “Manage” these accessible records on any level, to include deleting information, leave his access level at <M>. If you want him to be able to add information, but not delete it, tag any modules as appropriate and click on the <Tag to Edit Access> for <E> level. If he is an employee that is not allowed to change anything in the system and only browse areas for gathering inventory or health service information, leave the financials at <N> for “None”, tag your preferred modules and change access to <Tag to Browse Access> for <B> level, which is for browsing only. <B> access can only view items. Not change them. You are now ready to use your HorseTrak Deluxe Program. From this point, any references or screenshots that refer to Gold will also apply to you. 14 Section 4 - Customizing Your Program You are almost ready to begin using your program, but first, you need to decide some specifics and preferences for how you want your invoices and program to look and how you will want invoices to print. First of all, you can change the picture on your opening screen. This is optional. To do so, click on the <Change Picture> button on your opening screen. Scroll to the folder where you keep your picture files and <select>. That’s all there is to it! You can leave ours there, or insert a picture of your favorite horse or clip art. You can insert a family picture or favorite kid picture! If you own a scanner, scan your favorite picture and save to a jpeg, bmp or gif format. (Please consult your manufacturer’s user manual for scanning pictures.) Your Customized Letterhead: Click on the <Sys Admin> tab on your opening screen. Now click <My Preferences>. In the past, we have offered two options. Option 1 was using the information you will have typed into the <My Preferences> form. When your invoices print, the fonts and appearance in your letterhead will be exactly as the rest of the invoice. Option 2, was allowing you to click on <no>, that you didn’t want to use the program letterhead. Meaning, if you already had stationary (and it would fit into an approximate two inch top margin, you could print your invoices onto it). 15 Now, you have more options. You can click <yes> that you want the information in <My Preferences> and your invoices will look like this: If you want the default set up + your own logo: Click on <yes>, then click on <Look up Logo File> and select your company logo from your picture files. Your invoices will now look like this: 16 If you want to use your own letterhead, choose <no> where the program asks if <… you want to use this information>. Then click on <Letterhead File>, select your file, and see the following sample letterhead: How to Create your own letterhead: To create this letterhead, we went into MS Word. (Using Win ME) and opened a blank document. We then clicked on <insert> and chose our file picture for our logo. In Word Art, we created the HorseTrak Software business name. Then inserted a text frame beneath it, inserted our city, state, phone #, etc. Then from our keyboard, we clicked on the <Prt Scr Sys Rq> key. We use “ADOBE PHOTO DELUXE BUSINESS EDITION” (Nearly every operating system has some sort of graphics program. Locate and review your user’s manual to learn how to use yours). Open your graphics program, open a new file, click your mouse on it and <paste>. Resize or crop as necessary. Then <save as …> a jpeg, gif or bmp, graphic into the HorseTrak file folder, then <close>. Then we came back to our HorseTrak program, went back into <My Preferences> and clicked on <Letterhead File>, choosing the picture file we saved. 17 My Invoices (Formerly Business Defaults): Click the <My Invoices> to set up the rest of your program. Once you’ve begun using your program, you may set up services you have to do or have done on your animals. (Scheduled Services will be addressed later in this manual) If you wish to be reminded of services you have scheduled, click on the <Yes> button. Each time you sign onto your program, a pop up screen will appear, reminding you of this. You may disable this feature at any time by returning to this area and clicking on the <No> tab. Print Credit Invoice/Zero Invoice? If you want to send your customers an invoice showing their zero balances and/or an overpayment via a credit balance, click on the <YES> buttons. If you prefer to only send out debit invoices, check <NO>. When you print out your invoices, only those customers with a debit balance will print. Sort Bill by Animal? This is another optional default that you can set up according to your own preference. If you mark <YES> your billing will show each client’s charges by animal in alphabetic order with a subtotal for each animal. If you mark <NO>, the charges on the invoices will appear by ascending date with no break in category. Once you’ve begun to insert your data, this will become more clear. If you don’t like the way your clients/horses are sorted, you can always come back here and change it. 18 Normal Billing Message / Overdue Billing Message: Whatever message you type here will appear on the bottom of your invoices. Printing: When you install your program, it should automatically recognize your default printer. If you purchase a new printer after your software has been installed, you may need to go into this area of the program and change the default printer. Should you ever experience printing problems when using your HorseTrak program, check this area first to see if your default printer is selected. Repair/Restore Old Data: This tab will be discussed a little later. Right now, we know you want to get to the part where you restore your data so you can begin using your program. If you have been using HT 2002 or are new to HorseTrak Software, skip to: Section 6 – Creating Your Client Database 19 Section 5 - Backing up and Restoring Old Data from Gold 1.5 If you have upgraded from an HT 2002 program, or if you are starting out new with HT 2003, you may skip this section and go on to Section 6 - Back up & Restore Data Files All Users with Programs older than HT 2002 must read these instructions to learn how to restore data to your upgrade! If you need to import your data to HT 2002 or HT 2003 from another HorseTrak program, regardless of the version or program level (except for HT 2002 users), you need to restore the data first to HT Gold 1.5. If you have not done so yet, go to our download page on the HorseTrak website and click on the Program to Restore Older Data. Download Gold 1.5 before going any further. If you purchased your HT 2003 program on CD, this file will be contained in a folder on the CD named “Program to Restore Older Data.” You must install it to restore your data to your HT 2003 program !!!!!!!!!!!CAUTION!!!!!!!!!!!!!!!!!! This program is our old Gold 1.5 program. If you were using Gold 1.0, 1.01 or 1.2, prior to upgrading to HT 2002 or HT 2003, this program will OVER WRITE YOUR DATA!!!!! CHECK THE TABLE OF CONTENTS IN THIS MANUAL FOR THE SECTION CALLED “RESTORING DATA FROM GOLD 1.5” 20 Now go to your previous version of HorseTrak (the program you were using prior to upgrading to HT 2002 or 2003) and back up your data to a 3 ½floppy as you always have. There have been so many versions of the software, it would be entirely too tedious for all concerned to provide instruction on each version for each program level. You will need to refer to your old manuals for the specific instructions on backing up and restoring your data in your older version program. Once done, you should have a file that either looks like this: a:\1.bkp or one that looks something like this: a:\ ~001.back. Remove the data disk (label it and put away for safekeeping until you feel comfortable that all data has been backed up properly). You can always start over by restoring the data back in and trying the process over again. Now go into the Gold 1.5. Click on <Utilities> from the main menu. Depending on your previous program, choose the correct “Restore” item that best describes the program you were using. You will be brought to a screen that looks like this: Once you’ve found the correct restore engine, you will now be brought to a screen that looks like the following sample shot. Click on <Copy OLD HorseTrak Files>. Your screen will now generate activity. Do not interrupt the process. Once completed, you can close out the screen. Check the Client and Horse databases to see if your data successfully restored. 21 Once you are sure your data has been restored properly to the HT Gold 1.5 program, close the Gold program down and go into your HT 2003 upgrade. Click on <SysAdmin>, then <My Preferences>, Click on the <Import data from HT Gold 1.5> tab. You will now see the warning in red letters, telling you to back up your existing data before continuing. It is always a good idea to do this before installing or performing any major function with your software. Always remember, if your program goes down, we can always get it running again. If you lose your data, there’s nothing anyone can do to save it, once it’s written over. 22 Click on <Select HTG 1.50 Program Folder> and be brought to the next screen. Double click on the “C:\” and scroll down until you find the HT Gold program. Once you’ve located the HT Gold program, you will notice when you click on it, the folder appears empty. It isn’t. Click on the <OK> button closest to the folder (not the one on the farthest right of this screenshot). 23 You will now be brought back to the Import Data from HT Gold 1.5 screen. Note the C:\HTGold\ file now present beneath the warning. Click <OK> and your screen will once again become active as it restores your data into the HT 2003 program. When the activity ceases, check your Client and Animal tabs from the main screen. If you’ve followed all the directions, you’ll see your databases. You are now ready to begin working. You may now delete the HT Gold 1.5 Program to Restore Older Data from your hard drive. You will not need it again. Until you feel comfortable that all your old data has been restored and your new program is operating properly, you should safely store your original data disk. Once your old data has been restored properly, you may delete the HTG 1.5 off your hard drive to recover memory space. You will never need to use this feature in the HT 2002 or HT 2003 versions again. Backing up and restoring data for your HT 2003 will be addressed in a later chapter. NOTE: Computer crashes, power surges, and file corruptions can happen to anyone at any time. Such occurrences can completely wipe out or disable your program. The good news is, you can always reinstall or replace a current program. The bad news is, once data files are wiped out, they cannot be recovered. Therefore, we STRONGLY recommend that after your data files have been saved to your <Back Up Data> program folder, make a back up 24 copy to a removable drive, such as a diskette, CD-RW or Zip drive. If you need to reinstall your program, you can always restore your data from your removable drive. Whenever you restore your saved data, especially for the first time, come into this area from the <Sys Admin> button on your main screen then <My Preferences>. Click on <Freshen & Repair Data> This is where your data files are stored. The first time you come to this screen, you will see all zeroes or “?” next to each file. Click on the <Tag All> button, then on the <Freshen> button. You will now see activity generating on your screen. Do not stop it. When the screen activity stops, you will see something similar to this. Note especially the number of records after the Horse File. This particular customer has 199 horses in their horse file. The client number is not showing in this picture, but there were several clients in this file as well. When you restore, you should have a general idea of how many clients and horses you have in your database. This is a good place to quick scan to see if your data restored but NOT the place for you to do any editing. It will also assist us to know this information should you need to contact us for assistance if you experience problems restoring old data files. Should you ever get an error message while these files are restoring, jot the message down, then click <ignore>. Hopefully the program will continue to repair the problem. If the program aborts, reboot your computer, open and check your client and horse data from the tabs on your main screen. If your data is missing or incorrect, send us the error message you wrote down to [email protected]. When doing so, you MUST identify yourself and tell us what program level you are using. Not identifying yourself and not providing adequate information WILL delay assistance. Once the screen activity has stopped, click <Done> to return to the main screen and begin working. 25 Congratulations! You have now customized your program and restored any data from a previous program. You are now ready to begin working with your new program! Section 6- Creating your Client Database Client Information The client (or customer) database is one of the primary databases. Each horse record must refer to a client record. If you don't have any clients, insert your own name so that all of your horse records have something to point to. Let’s enter a client. To do this, select the <Clients> tab from the main menu and then <Client List> to be brought to the screen below. If this is your first client, you will select <Insert> to create a new client record. Note the <Show Active Customers> Yes & No buttons. If you have inactive client records that you need to draw information from, you would click on the <Yes> button to see both active and inactive clients in your database. The default for this option is <No> so that you will not have to scroll through several inactive names to find the record you want to look up. 26 Insert taxes before or after finance charges? Type VAT Tax or GST Begin typing in your client (or your own) information as shown above. Most of the fields are selfexplanatory. Notice the <Active> button. Should this client ever become inactive for a period of time, you might want to remove them from your active base, but won’t want to delete the activity and billing associated with them. Simply select them from your client list, click on <change>, then be brought to this screen to uncheck the <Active> box. If you are an International user, you will insert your VAT or GST. At this writing, the tab label reads ‘VAT.” But it’s what you type into the field itself that determines the type of tax or tariff you will use for your individual country or Province. Before typing in your country’s tax system, type any letter into the empty field in the highlighted field in the above screen, then hit <enter> on your keyboard. You will be brought to the screen below: 27 Now click <Insert> and be brought to the following screen: In the <Label> field, you will type VAT (for European), GST (for Canadian) or State Tax (for US). In the <Percentage> field, type your local percentage VAT, GST or State TAX rate. Once you click on the <OK> button you will be brought back to the Client Information page where you will see the <Label> only. You will not see the percentage you typed into the field above. However, your invoices will now pick up both the <Label> and <Percentage> for your Invoices. Note: The rate will be attached to the TOTAL invoice after finance charges and late fees if you check <Tax Finance Charges>. If you leave that option unchecked, the tax will calculate to the sub total of your products or services, before any late fees or finance charges you choose to apply to your billing. Please check your State or Country’s requirements for this option. In the <Currency> field on your Client Info area, you may choose to insert your currency symbol. If you insert your currency symbol, every monetary reference on your invoices and in other areas of the program will show the currency symbol. Therefore, if you do not like the way the invoice looks with the symbol shown, you can come back to this area and remove it. Adding/Removing the currency symbol is optional. Its presence or absence WILL NOT affect appropriate calculation. Notice the <Monthly Finance Charge> and <Late Charge> buttons. These are optional features that you would use if you chose to add penalties for late payments from your customers. Typical (USA) finance charge rates are on a monthly basis and are from 1.5% to 2.0%, corresponding to an 18% and 24% annual interest rate respectively. A late charge can be added in addition to or instead of finance charges. Or you can simply leave these fields blank. Click on: <Comments>. You will see a blank form where you can add information about a client, such as an additional address, birthday or payment habits, etc., or anything else you might want to refer to. The information you add here will not appear in your invoicing, but will, however, show up on your personal report when you click on <Print>. Type a line or two now, then click <OK>. You will be brought back to the Browse the Client Information Table. Tag the client, then click on <Print>. You can now see a preview of this client’s information. Once you’ve added several more names in your client list, you can choose to view one client at a time, or <Tag All> and see all your client information displayed on one (or more) pages. Click on the red X on the <Print Preview> Screen if you do not want to print the information out at this time. 28 Note the little numbers to the far right of this preview screen in each clients record. Whenever you add a new horse to a client in the animal list, the program will automatically add the number of horses owned by that client into the client database. Therefore, this Client Information Report is quite complete, should you print it out for quick reference. At a glance, you will see their name, address, phone and cell #’s, your comments and how many horses they own. 29 Multi-Ownership of Animals (Syndicate Owners) HT Basic and HT Forms users can skip this section. (NOTE: All new users should skip to Animal Information in the next section and come back to this section after you have entered some horse data.) Setting up Syndicated Animals Your HorseTrak program supports multiple owners for a single animal. You can intercept any billing-related information that you enter for an animal, check if that animal has multiple owners, and the program will automatically split by assigned percentage, any billing charges to each owner of a particular horse. Once you have entered all horses in the Animal List database, come back to the <Client List> and select the <Syndicate/Multi Owner> button. There, you will see a list of all animals and their associated owner. Shown here is a representation for illustration, but you should see actual names and animal names. This screen will look a little different, depending on the version you are using, but the feature itself works the same. Highlight the animal that you wish to set up multiple ownership to, then <select>. In our case, it will be Horse 2. 30 Shown here is the present status, in that Client 2 holds 100% of Horse #2. For this example, assume that Client #2 now only owns 75% of Horse #2, and that Client #3 owns 25%. First, highlight Client 2 and click <Change>. Next, change the 100% to 75% and press the <OK> button. 31 You will now see the previous table with an error at the bottom, warning that 75% does not total up to 100%. Now, lets add Client 3, by pressing <Insert>, and selecting <Client 3>. Type in 25% for the percentage. After pressing the <OK> button above, you should see the following screen, with the 100% total. 32 This animal is now set up for multiple ownership. Press the <Close> button to return. Note that each time you select this animal (or any animal that has been set up under syndicate ownership), you will see “SYN” in the browse window. This indicates that the animal has multi ownership. You can also select any one of the owners of that horse to add a transaction. The bill will be automatically divided by the owner percentage. 33 Section 7 - Animal Information After entering the client information, you can then proceed to enter information on each animal. From the tool bar menu, select <Animals>. Select <Animal List>. At the bottom of the screen, click on <Insert>. You will first be asked to select the client. If you will not be working with other people’s horses, simply select yourself by either pressing the <Select> button or double-clicking on the highlighted record of interest. After pressing the <Select> button, you’ll see the following screen: Click the <Insert> button to add an animal and you will be brought to a blank version of the screen above. Notice that there are four tabs, labeled “General”, “Appearance”, “Registration”, and “Feed Management”. After filling in the “General” information, press the “Appearance” tab at the top. 34 Most of the appearance information is self-explanatory. All program levels in the in the HorseTrak 2002 and HorseTrak 2003 versions have the ability to insert scanned images. Most common image formats are acceptable, such as GIF, JPG, BMP, or ICO. For best results use a good quality, close up photo of your horse. Click on the gray box next to the <Picture File> blank to select your horse’s picture. NOTE: It is not necessary to insert a horse picture to complete your animal information file. If you don’t have a picture of your own horse, or if your skills around a computer are minimal, you might like to insert a breed image that resembles your horse. We recommend the Mark J. Barrett Screen-A-Day CD. We used his work in some of our samples in this book. You can get his CD on our website at http://www.horsetrak.com/markbarrett.html Scanned Photographs – More Details: The option to insert photographs requires the user to have a general working knowledge of Windows and File/Folders. Once you have scanned your photo, name the file and save to the HorseTrak file folder. Technical support for scanning your photos and working with non-HorseTrak programs is not available through us. Please refer to your manufacturer’s manual for detailed instructions on creating and working with photos. 35 After filling in the appearance information, press the <Registration> tab. On the registration sheet there is room for 3 registration numbers for your horse and the names of the organizations that the horse is registered with. This sheet also provides a convenient place to record purchase and sales information for the horse. Next fill in the <Feed Management> information. Record your horse’s eating habits, quantity, etc. Note the comments section for additional reference or instructions. Press the <OK> button to save this information about your horse. Notice that your horse’s name and other information now appears in the browse animal table. If you need to change this information, select the horse from the list and click the <Change> button, or double-click on the animal of interest. You can either close this area out, or click on an item from the toolbar to insert more optional, detailed information. 36 Transfer Ownership of an Animal You may have the need to transfer ownership of an animal from one client to another. This can be done easily in the Animal Information section. Select the original or existing owner of the animal you wish to transfer. Just click on the <Xfer Owner> button and the following warning will be displayed. Click <OK> Clicking the <OK> button will allow you to select the animal you are transferring and then selection of the new owner. Once the new owner has been selected, you will see the following screen with one last chance to abort the transfer. 37 Choose “Yes” and then click on the <Continue> button. The ownership of the specified animal along with any information you have entered about the animal, will be transferred to the new owner. Or you can click on the <NO> and the entire transaction will be cancelled. You can always go back and reverse the transfer if you need to. Printing your Animal’s Information First of all, make sure that your printer is set up to your satisfaction. Under the <SysAdmin> tab on the main menu, select <My Prefences> then <Printing>. This window allows you to customize and change your printer, and change paper sizes, etc. When you press the <Options...>, you are entering into your specific printer driver’s software, so consult your Windows manual and/or your printer’s manual for further instructions here, since its not part of this program. 38 Print Animal Information Once you’ve secured your print preferences, click <OK> then <OK> and you will be brought back to the main menu. Click on <Animals>, then <Animal List>. Make your selection from the animal list, then click on the <Print Animal Information> located at the bottom of the screen. Press <Continue> to preview the report. A progress bar will appear briefly, until the report is ready for viewing. 39 The animal information is then displayed in a preview screen for your review before it is sent to the printer. You can use the preview screen menu to zoom in and out. When you are ready to send the report to the printer select “File”, then “Print” from the pull down menu or click on the <Printer> icon on the upper left. You may also cancel the print by clicking on the Printer icon with the big red “X” through it. Or simply exit to cancel the print job. 40 Print Animal’s Picture If you simply want to print the animal’s picture without the data file information, do so as follows: From the Browse the Animal File screen click the <View/Print Animal Picture> button on the bottom of the screen. As you can see above, the picture of your horse will be displayed on the screen if there is a picture available. From here you can check your printer setup and then print the picture. If you have a color image on your screen and your printer has color capabilities the printout will be in color. 41 Section 8 - Health Information To enter health information for an animal, select the <Animal> tab from the toolbar, then <Health> Next, you will be prompted to select a Client, and then the Client’s animal. Select the animal for which you want create a health record. When you are at the “Browse the Health File”, press the <Insert> button to add a health record entry or select an existing record with the mouse and press the <Change> button to view or edit the record you have highlighted. If the need arises to delete a record you would select the record to be deleted and then press the <Delete> button. If you have the same procedure done to several horses at the same time you can enter the procedure for one horse and then use the <Copy Highlighted Health Record to Multiple Animal’s and Billing…> button to place a copy of the record in the database for each horse that had the procedure done. The table can be sorted by date or service by selecting the appropriate tab at the top of the list. There are also <Pick Client> and <Pick Animal> buttons available to make it easy for you to enter several health record items for different animals without leaving this screen. There is also a <Help> button on the bottom of the screen If you are connected to the internet while working, you will be brought to pages that will offer further assistance. We will continually upgrade the online help according to customers most frequently asked questions. To create a new health record, click <Insert>. You will be brought to a page that looks like this: Click on <Insert> at the bottom of the page to be brought to the “Record will be added” screen 42 Click the <Lookup Health Service> button and pick the service from the list in the pop up window that appears. All of the Health Items in this list will begin with a zero in the Amount column: If you are creating health records for yourself, you will be generating both a health record as well as keeping track of health expenses for a particular horse. If you leave the amount at “zero” an expense record will not be created. Also, if you run a boarding / breeding facility, you may want to keep track of health services you perform or have performed for your client’s horses. By installing 43 an optional monetary value in the health record, we have made your record keeping easier by allowing you to create two corresponding records at a time. When the health/expense record is created, you will have the option to copy this expense into the clients billing without having to type it twice. Select the health service you desire and the service will place itself on the Health Information form. Note that you can add, change, and delete items in this list of health services. (The <Close> button will close the window without transferring the selected item to the Health Information form.) After selecting the service, you will go back to the previous screen where you may enter a description of the service and/or comments about the service. You also have an option to click on the Charges tab if you wish to add a monetary value to the transaction for the customer’s billing. Clicking on the Charges tab will bring up the following screen. Type in a dollar amount and click in the “Add to Clients Billing” box. Click on the <OK> button to return to the “Browse the Health File” screen with the information you added displayed in the window. 44 You have now created a new health record with optional charges. If you wish to copy this information to multiple animals, click on the <Copy Health Information (and charge if any) to Multiple Animals> button and you will see the following screens. In the next screen, you will see all horses in your active database. You can <Tag All>, tag only this horse, or select several others. Only the horses tagged in that horse list will receive this health service and this charge to their billing. Printing Health Records While in the “Health Information Table”, press the <Print> button. You will see the following: 45 Select either Print by Date or by Service, and the printout will be sorted accordingly. During the print process you will be asked to tag the clients that have horses you want to print health data on. You will then be presented with a list of horses that belong to the tagged clients and be asked to tag the horses that you want to print health records on. You will also be presented with another screen that allows you to select specific health services that you want included in the report. Once the tagging process is complete you will have defined the report that will be generated. The report will then be displayed on the screen. If the report meets your requirements you can send it to the printer or cancel it with the press of a button. A sample of a Health Information report. In time, this report can contain several filled pages, depending on how much you use this feature. 46 Section 9 - Scheduled Services This area of the program is for creating and tracking recurring services. You have options to set up the frequency of the service by changing the count and units sections on the “Schedule Services Form”. You will have the ability to print out a list of scheduled services (to give to the vet, farm hand, or whatever) of any services that will come due in a date range that is determined by the user. Once scheduled services have been done, a click of a button from the main screen archives the services, transfers any associated charges to accounting and re-schedules service for the next cycle. Choose your client and horse, then click <Insert> 47 After clicking on the insert button from the previous screen, you will be brought to the one above where all fields will be blank except for the horse you are recording the service for. Click on the gray box to the right of the <service> field and choose the service list. If the service you want to schedule is not contained in the list, click the <insert> button and add to, delete or edit any of the services already there. Once the service has been selected, add a dollar amount if appropriate. If this is a recurring service, schedule the units of recurrence by day, week, month, quarter, or year. Set the <Count>, being aware that if you choose <month> as the unit, the count will be set to <1> so the service will be recalculated once per month. You may add a person’s name in the <Done by> field. This is optional. You can add it as a one time occurrence or retrieve the name from your address book (which we will get into later in further detail> You may add additional information or a special note to the description field. Once you have added the date to the <Last Done> field, then <Next Due> date will calculate. If this were a health service that needed to be performed on a recurring basis, you would want to check <yes> to the <Add to Health> option. The animal’s health record will be automatically updated every time the service has been completed. Now click <ok> to be brought back to your horse’s services record. 48 Note: <Show Done, Not Done, or All>. Should you wish to refer to an archived record, you can click on the <Done> or <All> buttons. The default for this screen is <Not Done>. Click <close> and then view the next item below to see how to complete your scheduled service task. 49 Section 10 - Pedigree The <Pedigree> function in HT Pedigree, Business Plus, Gold and Deluxe allows you to build unlimited generation pedigrees that may be saved, printed or integrated in future pedigrees you may build. HT Business and Basic will allow for 5 generations. From the toolbar, click on <Animals>,the <Pedigree> button, then <Pedigree List>. You will be brought right to the Pedigree Form. Your program has a “Smart Key” function; meaning, if a horse is already in your database, just by typing a letter or two of the horses name will automatically bring it into the form. To add an animal to the pedigree, you can either start typing the animal’s name or click on the down arrow beside the field you are working in and select a horse from your database. Start by typing the name of your source horse (the animal you are doing the pedigree report on) in the farthest left/centered field on the document above. 50 If you are adding a horse not already contained in your database, you will get a message box similar to the one below indicating the animal is not in your database. You now have 3 Options. Clicking on the <YES> brings you to the "Client Information Table." You may now insert a new client name for your new horse. If you do not know the name of the owner, or it is not important for you to insert their name, do the following: Click <INSERT>. You will now be in the "Record will be added" screen. Enter a phrase, such as; "Temporary Client" in the "Last Name Field" and click <OK>. 51 Temporary Client should now be highlighted in the Client Information Table. Click <Select>. You will now be back to the Pedigree screen with the cursor flashing in the next empty field. You have now saved this horse's name and it will always appear in this pedigree until you delete it. You may use "Temporary Client" for any future entries for which you do not know the owner's name. IMPORTANT: You must follow the above procedure if you wish to save a horse's name and do not know the owner's name. If you choose "NO", the program will not save the horse name and that field will be blank when you reopen your program. If you click on the down arrow that appears in the pedigree form field, you will see a screen similar to the following. Here you have the option to either choose an animal from the existing database or to click on the <Insert> button to add a new animal. Again, the “Smart Key” feature will enable you to keep typing existing horse names into your pedigree form without having to refer to this list. To select an animal from the list, just highlight that animal, and click on the <Select> button. You will be returned to the pedigree window with the name of that animal filled in on the field you were in. Press the “Tab” key to move to the next field and repeat the process until you are finished. The above picture shows all horses in the database. As 52 you can see, the horse “Erikson” has information associated with him, showing he was a pre-existing, active horse in your database. Those horses assigned to the “Temporary Client” while generating a pedigree file will not have specific information, unless you physically select on each horse and edit in any additional information you may have. Helpful Hint: Before beginning your Pedigree, set up the “Temporary Client” in your Client List. Then go to the Animal List and begin inserting all the horses and related information that you expect to include and save in your pedigree reports. You need not insert them in any particular order, you only need to associate them to the “Temporary Client” base. When you’re ready to create your pedigree records, you will not have the interruption from the program asking if you want to save the horse to the Temporary Client or not. The “Smart Key” feature will kick in as you begin to key in the horse’s names in the pedigree form and you’ll be done in no time! Saving the Pedigree After you are finished with the pedigree, click on the <Save> button to save your information. This is very important. Otherwise your work will not be saved and you will need to re-enter it again. Printing a Pedigree After saving, you may now print a pedigree. Click on the <Print> button. You will see the following window. As you can see, you have many options available to you to allow you to customize the pedigree printout. First, you can elect to add: • One registration number, or • An accomplishment, or • A portion of the Comments field, or • None 53 Depending upon the number of generations (from 3 up to 6) these fields may not be available on the printout. For example, the new six-generation pedigree fills the page and there is no room for any other information other than the animal’s names. To insert a field to be printed out on the pedigree, just click on the triangle at the right of the field for the available fields, highlight the one you desire by clicking on it, and it will be inserted and you will return to the “Caption” window. Also, you will note that the number of generations may change (to the largest allowable with the field you have elected to include) depending upon the original setting. Again, you have the option for the number of included generations. Notice that as you increase the number of generations, the “Field to include:” box will change to “None” if you elect to do six generations. Your next option is to select either “Portrait” or “Landscape” for your layout. The portrait setting is the default and this will give you a pedigree printout in the vertical format. The maximum number of generations is five if you select this layout. You have the option to include a picture of your animal (if you have assigned one) or have the pedigree framed in one of several borders, which we have included in the software package. If you elect not to put in a picture, then your animal’s complete information will be printed in the location where the picture would be placed. Note the difference in choices. 54 If you choose the “Landscape” layout, you can print up to six generations and have the option to include one of our included borders, or, insert your horse’s picture in the background. The horse information will not be included in the landscape option. If you choose to place your horse’s picture in the background for the landscape layout, choose “Borders” rather than “Include Picture. Play around with the different numbers and layouts to find the most suitable option for what you want to include on your report. All features cannot fit into all options. So, you need to decide which one(s) are most important to you. 55 If you check the “Include Picture” box, a picture will be added to the portrait only printout, replacing the detailed information about the selected animal. If you do not have a picture attached to the animal, the “Include Picture” text will be light gray and you will not have the option to select the box. You must actually have a picture in the Animal Information section in your program. This is not the place to add a picture to a horse, or change the picture you have on file. If you elect to include the horse’s picture in your pedigree document, the picture field will be grayed out. This doesn’t mean the program can’t find your picture, it only means it DOES recognize you have picture in the horse’s file, but it cannot be changed in the Pedigree area. Checking the “Include Border” box will activate the “Border File:” allowing you to click on the box (with the three dots) to pick out one of the many available borders for your pedigree printout. You may choose from one of the eleven we include with the software, or any of the approved file formats that you may have on your computer. After you have decided on the border and have clicked on the <OK> button from the “Choose a File” window, you will be returned to the “Caption” window with the selected border in the field box. You also have the option to change the fonts on your pedigree report. To do this, click on the “Fonts” tab at the top of the following window. Immediately after selecting the fonts tab, you will get the following warning. 56 Clicking on the <OK> button will bring up the following screen. Here you have the options to change the font (to any font on your system), the pitch (size), and the color of the font. When you are finished with the fonts section, click on the <Print> button to print the pedigree with the selected options. Click on the <Done> or <Cancel> button to return to the “Pedigree” window. Warning: If you change the font name or size, there is a possibility that the font will not completely printout on your pedigree. It may be too large and half will be missing, or you may run out of room and the name may be cut off. To quickly clear up this situation, clicking on the <Defaults> button will return the original fonts, colors, etc, to the printouts. Also, any changes you make to this section cannot be saved, so if you find a combination you like, be sure to remember the changes you made. When you enter the software again, the defaults will be restored. Also, the option to change fonts is applicable only on the printouts relating to the pedigree section, and will not affect any other printouts. New for HT 2003 versions – In HT Pedigree 2003, as well as the other program levels, you will notice the <Ancestor List> when clicking on the <Animals>, <Pedigree> tabs: 57 This section was created as a place to store your Pedigree ancestors (aka Temporary Client). When you go into your <Animals> list, you will see you have an option to show or hide the horses in your animal database. When you click on the option to hide the inactive horses, only those horses you choose to “hide” will disappear from the screen. This will allow you to scroll and work with only those live horses you own or are in your care for billing without scrolling through hundreds or thousands of ancestors in your pedigree file. You can view your entire animal database in the <Animal List> area if you turn the option off. Or you can turn it on and view your ancestor database in the <ancestor> area. Progeny If you would like a listing of all the descendents from a specific animal, you may click on the <Progeny> button, which will bring up the following screen. Here you have options on the number of generations you wish to include, from 1 through 30, which can either be typed in or use the up and down buttons in the upper right corner. After you have determined the number of generations (which defaults to 10), you may either start typing in the animal’s name and the database will perform an incremental search. (When you see the animal you were searching for, you can click the <Find> 58 button to activate the process) or you can use the <down arrow)> button to browse your database and select the animal via this method. Once you have the animal you wish in the “Parent Horse” field, click on the <Find> button; which will search the entire database for any animals within the generation depth selected that are descendents of the parent animal. Here you have the option to either <Print> or <Close> the window. If you elect to print, you will see a print preview with options to either: zoom, print, or cancel the print. Either the print or cancel print options will return you to the above screen. Clicking on the <Close> button will return you to the “Progeny” screen. Clicking on either the <Done> or <Cancel> button will return you to the main menu. Blood Crosses The <Blood Crosses> button is used to determine the percentage of bloodline between two animals. To use this feature, click on the <Blood/Crosses> button, and you will be presented with this screen. Here you have the option to determine the number of generations (from 1 to 30 with the default value being 10) you wish to search through. After determining the number of generations you wish to search, you would insert the “Test Horse” and the “Ancestor” in the respective boxes, and click on the <Find> button. You would then see a screen indicating if your horse falls within the bloodline and if so, where, in a 10 generation check. There are no print capabilities in this function. Clicking on the <Done> or <Cancel> button will return you to the main menu. NOTE: The formula for determining the amount of blood in the test horse is calculated from the percentages in each animal in the lineage for the number of generations you have chosen. The resulting percentages from the Sire and the Dam side of the “Ancestor” are then added together. The formula for determining the number of crosses is merely the number of times that the “Test Horse” appears in the lineage for the “Ancestor” within the number of generations specified. 59 Section 11- Breeding Menu The breeding function helps you organize information associated with breeding operations of your business. Edit Breeding Information After selecting the <Edit Breeding Information> button, you will be prompted for the client, then the animal. After selecting the animal, you will see a screen similar to the following. The Breeding & Teasing Form is divided down the middle. To the left is the Breeding Season information. For each line item to the left, there is a corresponding group of details to the right. To add a Breeding Season record, simply press the left-most <Insert> button, which will bring up a screen similar to the one below. 60 This is the Breeding Season Form, which contains heading information for the breeding attempt. After you have entered the information on this form, click the <OK> button to return to the previous window. To add details to the breeding season, first make sure that the appropriate breeding season is selected. Next, press the rightmost <Insert> key. To take advantage of the breeding chart, you can use the Lookup feature that will get the 2-letter code, which will appear, in the breeding chart. You also have the flexibility to add your own codes and description, or to change or delete any of the entries. Clicking on the <OK> button will return you to the breeding & teasing record. You also have the capability to print any or all of the breeding season(s) by tagging the desired seasons and clicking on the <Print tagged> button. A breeding chart may also be printed by highlighting the season of your choice and clicking on the <Print Breeding Chart for Highlighted Season> button. Should you desire to enter breeding information for a different animal and/or customer, buttons are provided on this window for you to change and select the required information without leaving this section of the program. 61 Print Breeding Information By clicking on the <Print Breeding Information> button and first tagging a client then an animal, you will see a screen similar to the one below. Tag the records you wish to print and then click on the <Continue> button and a report will be generated. 62 Edit Breeding Chart Codes There is also a button for you to edit the breeding chart codes (the same as in the “Edit Breeding Information” section). Clicking on this button will bring up the breeding codes screen below. Record of Produce Clicking on the <Record of Produce> button, and then selecting the customer and animal you wish to work with will bring up the following screen. Clicking on the <Insert> button will bring up this screen; 63 Here you have fields to enter information for your record of produce. Clicking on the ”General” tab will switch you to another window with more fields for more information. After you have added all the information and clicked the <OK> button, you will return to the previous screen with the option to print the information. 64 Stallion Report Clicking on the <Stallion Report> button and selecting a customer then animal will bring you to a window where you can insert a new record, or change or delete and existing record, or print a record. You should see a form similar to the one below. Clicking on the <Insert> button will bring up the following screen for you to enter information. Clicking the <OK> button will bring you back to the previous screen with the information you entered now available for print, or change or delete. Click on the <Close> button to return to the Breeding Menu. 65 Section 12 – Resources Names & Addresses Names and Addresses of friends, employees, and riders can be kept and printed. The names held in this list will also appear in the <Done By> list previously discussed in the Health Section. There are buttons at the bottom of the screen for Insert, Change, Delete, Print and Close. When the <Insert> button is clicked or an existing record is selected and the <Change> button is clicked the following screen is displayed. After you have finished filling in all of the data fields press the <Ok> button to save your information or press the <Cancel> button to close the window without saving. 66 Printing from the Names and Addresses Menu When the <Print> button on the Names & Address browse list is pressed the following menu screen is displayed. As you can see you can either print a list of just names and phone numbers or you can print out full details for each person on the list. When you print either list it is first displayed on the screen for you to review and then you can decide to send it to the printer or cancel printing. 67 Journal The Journal keeps text records of anything you want. This function can be used as a log for daily or weekly activities. The Journal screen is a universal browsing screen. You can insert new journal records or change or delete existing records from this screen. You can also Tag items and print them from this screen. When you insert or change a record you will be presented the following data entry screen: Press the <OK> button to save your entry. You also have the option to print one or several of your entries from this screen. 68 Calendar The calendar function is very versatile. You can enter appointments in 15-minute intervals and print your daily, weekly, or monthly schedule. The circled numbers indicate that you have appointments for that day. The white box shows the system date of the computer, when this picture was first created. Every once in a while, you may want to delete older calendar entries to save space. Select the <Maintenance> button to accomplish this automatically. Set a date value and click the <Erase Older Appointments Now> button to erase all appointments that occurred before the date you set. You can control the size of the printout that is generated when you print the calendar events by selecting the scope of the printout. Choose your printout from the 3 options available; by the Day, Week or Month. 69 Section 13 - Business & Forms – An Overview As a reminder, some screen shots and certain features included in this section were taken from the HT Business program level. These instructions also apply to HT Business Plus users. If you own Basic or Pedigree, you will not have all these features. If you get to a feature that doesn’t apply to your version, just skip over it to the features that do apply. There is a separate manual for the Gold and Deluxe versions, contained on your CD or on the website. We have also included a short billing tutorial at the end of this manual. The portion called “The Billing Tutorial” will help you further understand the billing process in your program. The billing tutorial was designed several years ago by the original designers of HorseTrak. While it is not necessarily a reflection of your program, it is a very useful explanation of maintaining accurate records and proper billing methods. You will note it is quite dated. It was written so well, we decided to just carry it through in our user’s manuals as additional instruction. For user’s of our Gold and Deluxe programs, a comprehensive instruction on using the specific accounting features in your program are detailed in a separate manual on your CD and/or on our website. The Business Menu consists of the following items: 70 How the Billing Works (Also, see the billing tutorial in back of manual) IMPORTANT: Most errors occur in the Business Menu due to a lack of understanding of the importance of proceeding step by step through the billing process. Please take the time to read and review the instructions to avoid confusion and frustration. We always recommend having the manual in front of you as you learn the business functions. Proceeding step by step will ensure your success. The billing works very similar to a revolving credit card. Charges are added to a client’s account in one of four ways: Manually, during a special Health Copy feature, and two ways with Scheduled Services. Each Client has an individual transactions database. Think of this database as a journal, where you record each charge to a client. All account activity for each Client is recorded here. This includes charges, for things such as Vet Reimbursements, food, special handling, boarding, etc. Also, payments from your Clients are recorded here. These Transaction journal entries are either considered “New”, which means that they haven’t been billed yet, or “Billed”, which means that they’ve been mailed to a client. When you print bills, only the transactions marked “New” are printed. The ones marked “Billed” will not be printed. “Billed” records are only used to calculate previous balances. Warning: Please copy and post this very important notice. Once you’ve mailed or given a client a bill, NEVER go in and modify a “Billed” Transaction entry. This is the worst mistake that someone can make with billing. The reason is that your new bill will never match the client’s old bill again. Treat any “Billed” item that has already been mailed or given to the client as permanent history. Remember, your credit card company would never go back and change a transaction that has already been billed. They’ll fix it on the next bill. If you send out a bill that has a mistake, issue a credit or make an adjustment manually that will correct the problem on the next bill. If you’ve printed the bill, but haven’t mailed or given it to the customer yet, and it has a mistake, THIS can be more easily corrected, as explained in detail later. Before we start in on a more detailed explanation of each section of the business section, let’s first get a brief overview of each section. We will now break down the various menu options. Add/Edit Clients Accounts Receivable This area is used for non-recurring items that the client is responsible for. Examples of these are vet visits for an injury to an animal (though you may want to add this via the health menu), hay charges, lessons that you give on an unscheduled basis, or training fees. This feature is where invoicing is generated and payments recorded .It works the same as your credit card accounts. You get a bill in April. You send in a payment for that billing, and in May you get a statement showing new charges and payments received for the previous billing cycle. If you do not use this section to record payments received, the amount owed will continue to climb and never go down and late charges (if applicable to the specific client) will be added every billing cycle. 71 Prorating charges- Another valuable feature of this window is the ability to pro-rate charges over a portion of the month. For example, if you normally charge $ 300 per th month to board an animal, and the client brings the animal in on the 10 of the month, you would bring up a transaction record for that animal, put in a service of boarding with your normal $ 300 charge. You would then click on the box next to the “Pro Rate Amount Based on Day Out of Month”. This would bring up fields for start date and end date. By using the up and down arrows on the right side of the date fields, change the dates to correspond with the dates you would be charging the customer. The program will calculate the number of days, the charge per day, and the amount the client would be charged (Adjusted Amount) automatically. When you click on the OK button, the client would be charged $ 212.90 for the period (22) days that you actually boarded his animal. You can also enter daily charges by leaving the charges and credits blank, and click on the Pro Rate, then enter the daily charge. As you use the up and down arrows on the right side of the start and stop date fields, the adjusted amount changes accordingly. When you have the correct start and stop dates, clicking on the <OK> button will transfer those charges to the customer’s account. 72 Print Bills – Used to print customers bills. After printing, you are asked if the bills printed OK. You can and should view each statement to insure it is complete and correct by viewing it in the print preview prior to printing and/or by looking at it after the bill is printed. If the bills printed properly, select <Yes> and all the billed transactions will have a status change from “New” to “Billed”. This will prevent you from billing a customer more than once for the same service. If you need more than one copy of the bill, or if there is a problem, select <No> and the status will not change for the transaction(s). Once you have selected Yes and the status has changed, you should not alter that transaction. If you discover an error in the billing, make a transaction to show an adjustment to the clients billing and include that adjustment in the next billing cycle to show the client what you did. Any payments due that are not received and added to the clients account would incur late charges, if applicable. You have the option to select, in the client information section, whether or not you wish to charge a specific client a late charge or a finance charge, or both. Print Transaction History Prints a listing of all transactions for a user specified date range for user specified clients. Display Accounts Receivable Aging – Gives user the option to select client(s) and print out an aging report that shows the totals for current charges, and charges over 1, 2, 3, and 4 months along with a balance due. Checking Account Menu – Capability to insert new accounts and to input checks written by the user, transfer via software all payments received (not done in this section. Payments are input via the “Add/Edit Clients…..” above and will be added to the account you specified when you complete the credit transaction.), print specified accounts for user selectable date ranges, and to edit names of existing account should the need arise. Print Profit/Loss Report – This will print out all you user tagged account transactions that are marked with either “Income” or “Expense”. Transactions marked “Other” will not print out in this report. Manager’s Log – A journal for personal use. Notice in the fields, there is an area for hours worked, mares served, etc. Employee hours and activities can be recorded here for the purpose of assisting you in generating a payroll record or employee performance. There’s also a section for dates animals arrived and departed, as well as, a generic comments section for additional information. A report can be printed out, however, this area should not be counted on for calculating important data for billing or taxes, as it does not retrieve from or send to any other parts of the program. Equipment List – A section for you to keep a listing of items around the barn, or whatever. You may list tack items, shovels, or whatever you wish to track. This is a good place to refer to for equipment depreciation records for your accountant. Travel Log – A section for you to keep track of places and mileage for any and/or all trips. Another handy report if your accountant counts travel expenses in your tax deductions. 73 Animals “For Sale” – A section for you to input any animals you have for sale. It will print out a nice listing of specified animals. Close – Returns you to the Business Menu 74 Add/Edit Clients Accounts Receivable You can enter charges in a variety of ways. The simplest is the Manual Entry. Simply select <Add/Edit Client’s Accounts Receivable> button under the <Business> menu and you can add, modify, and delete charges and payments. You must enter payments manually. After selecting a client on the selected client window that appears you will be presented this the transaction table for the selected client (similar to the one below. The Browse The Transaction File screen provides several services related to billing. The currently selected client is displayed in a box near the top of the screen and there is a <Pick Client> button that makes it easy to select a new client’s records while entering transactions. The transaction table contains all the billing information for the specified client. You can view the “New” transactions (transactions that have not been billed yet), the “Billed” transactions ( transactions which have been sent to the customer on a statement and you indicated that the bill printed OK), or all transactions for the client by clicking on the appropriate tab. WARNING: NEVER change a “Billed” item that has already been sent to a client if you should discover an error in the billing. Instead, make a new transaction to adjust the error for the next billing cycle. 75 The <Add/Edit Client’s Accounts Receivable> button would be used to enter non-recurring billing information (that does not occur in regular cycles - here you would normally use the <Scheduled Services> button) into the client’s account. This would include such charges as emergency Vet calls, partial boarding charges, special feeding supplements (supplied by you) that are for a temporary period of time, and any non-scheduled service. You would also want to enter payments made by your clients using this screen, and adding them to the appropriate account as part of the process. To manually enter a transaction for this client, press the <Insert> button to open the transaction form. You will see a screen similar to the one below. Note that the computer assigns the Transaction number and the date is present to the system date (normally the current date) on the computer. You should never change the transaction number, but you may want to change the transaction date, depending upon the date the action you are entering actually occurred. Although you can type the name of an animal into the animal block, it is easier to avoid errors by pressing the <Select Animal> button and selecting the appropriate animal from the list presented. It is also recommended that you use the <Select Service> button to fill in the Service block. NOTE: In both the Health Service List and Schedule Service List: We STRONGLY recommend that the service is physically selected from the list. Typing the service into the blanks will not guarantee that the item will show up in printed documents. Some customers report these items missing from billing statements when they’ve TYPED the item, rather than SELECTING it. Therefore, always add your customized services to the Health and Scheduled Services list. When adding new transactions in both areas, always 76 CLICK on the gray box next to that field in the Adding New Record screens and physically <Select> the item from the list. The <Select Service> button will open a list of services that you can select from. You may edit, delete, or add to any of these items by highlighting the item and clicking on <Change> or <Insert>. Recording Payment Received Remember – never change an existing transaction in your system. To add a payment received, you must Add A New Transaction. Here are the steps: 1. 2. 3. 4. 5. 6. 7. 8. Click on the <Animal> button and highlight the correct horse. Click the <Select> Service Button and the following screen will appear. Click on <Insert> button to create a new service entitled “Payment Received” Click on <OK> button and your Adding a Transaction Record will Reappear. In the service window, you should now see payment received. In the CREDIT window, enter the amount of payment received. Click <OK> button. You have now recorded a payment received from your client. Repeat steps 4 to 6 to make additional records of payments received. If the service you need is not there or the billing amount is not correct you can add or change the animal service from this window. This standard pricing will automatically appear in your form. You can change this price in your form if needed. After selecting a service, continue with the transaction record by: 1. 2. 3. 4. 77 Filling in the “Done By” field (if desired), Verify the charges are correct and change if necessary, Insert an amount in the Credits field if this record is for a payment, Verify and correct date of transaction, if necessary, 5. Pro-rate the charges, (if necessary) based on the number of days (for example, if th someone brings in an animal to be boarded on the 12 of the month, then you can calculate the charges based on the number of days boarded)(Paragraph below explains in more detail the Pro Rate Process}, 6. Verify the status is marked “New” so it will appear on the customer’s next billing cycle, 7. Click on the <OK> button to save the record. While at the Browse the Transaction File screen, you also can change any record by highlighting the record and clicking on the <Change> button, or you may delete a record by highlighting the record and clicking on the <Delete> button. Again, you should never change or delete any transaction marked “Billed” that has been sent to a client. Make another record to correct any billing errors that may have occurred. Pressing the <Close> button will bring you back to the Business Menu Screen. Health Transaction Entries (for transfer of charges to Billing) Another way that charges can be added to a client’s transaction database is during the time that you are adding health records. While at the “Browse the Health File” window, press the <Copy Highlighted Health Record to Multiple Animal’s & Billing> button. If you wish to add charges to each animal, check the box next to the “Check Here to Add Charges to Client(s) Billing” and an amount box will appear for you to enter the amount you wish to charge for the service on each animal. Then you would click on the <Copy health Information (and charge if any) to multiple animals…> button. You will then tag the client(s) for each animal and press the <Close> button, then tag each animal the service was performed on and then press the <Close> button on that screen. You will be returned to the main menu, and each client will now have a transaction created billing him or her for this service. Scheduled Service Entries The Scheduled Services feature is explained in detail in the next section. 78 There are two types of scheduled services. The first type of Scheduled Service item is called a “To-Do” item. A good example is a particular type of shot. Let’s say that the animal needs a particular shot every 16 weeks. First, you enter that shot into that animal’s Scheduled Services table. You will be asked the item (shot), when it was done last, and how much time between shots. The Scheduled Services function will print a weekly (or for any time period) list of “Thingsto-Do”, based upon the date that each item was done last. When the item is completed, the cost associated with that item will be transferred to the Client’s Transactions database. The charges are entered into the Client’s transactions database when you select “Transfer "Done" Items to Billing and Recalculate Due Dates” under the Scheduled Services menu. The second type of Scheduled Service is a regular monthly activity, such as boarding. These activities are entered just like the “To-Do” items, except that you enter a “0” for the number of weeks between each activity. This tells the billing program that this is a regular “Monthly” item, and should be transferred monthly. The charges are entered into the Client’s transactions database when you select “Transfer Monthly Items (Boarding, etc...) to Billing” under the Scheduled Services menu. The Scheduled Services Process: 1. 2. 3. 4. 5. 6. First build a customized schedule for each horse. Next, you print a daily or weekly (or any length) "Things-To-Do" list. Third, you do the items on the list (or have someone else do them). Then you check off all items that you completed. You then transfer all "Done" items to the client's billing account. Also, only once per month, you must transfer all monthly items (i.e. Board) to billing. 79 Add/Edit Animal’s Scheduled Services - By Animal To build a customized schedule for each horse, press the <Add/Edit Scheduled Services - By Animal> button and you will see a screen similar to the following. Highlight a client, and press the <Select> button. You will then see a screen like the following one. Select an animal from the list and press the <Select> button. This will bring up a window similar to the one below. 80 In this example, there were no scheduled services for the selected animal, so the <Change> and <Delete> button are not highlighted. If there were services in this window, they would be in bold and you would have options to change or delete an existing service. If our case, we will click on the <Insert> button to insert a new (our first in this case) service. After pressing the <Insert> button, below is the next screen you will see. Both the “Service” and the “Done by” fields have buttons on the right side that will bring up a selection window. You may choose from one of these or enter your own unique information. Blocks are provided for you to enter a description of the service( should you desire to) and to select the frequency of the service. 81 The count refers to the number of days, weeks, months, etc. If you make this count equal to “0”, then the item is treated special. You only do this with a regular monthly charge, such as boarding. First, items with a zero count will be added to the client's bill every time the bill is printed (usually monthly). You can build a custom service schedule for each animal. Edit Animal’s Scheduled Services - All If you select the <Edit Animal’s Scheduled Services-All> button, you will see a screen which will show all scheduled services for all animals. From this window, you can change a service, or delete a service or close and return to the Schedule Services Menu. This window will show all clients and animals for whom you have generated a scheduled service. Print "To Do" Schedule Work Orders When you select the "To Do" menu item, you will be asked to enter the Upper Date. The default is that it will print out items that are due 7 days into the future. Pressing <Done> will cause the “To Do” report to print. 82 83 Check off "To Do" items as "Done" When items have been completed from the "To-Do" list, select the <Check-Off “To-Do” items as “Done”> button, which will bring up a screen similar to the following. All scheduled services that are due before the Upper Cut-Off Date on the window will appear on the screen. If you do not see the service you are looking for, raise the upper cut-off date by clicking on the up arrow or by going to the field and entering a future date. As a scheduled service is performed, you would highlight the service and change it to “Done” To accomplish this, highlight the item that was completed, and press the <Change Highlighted “To Do” items as “Done”> button. You will see a screen similar to the following. 84 Make sure that you check the “Yes” button under the “Done?” box, and also fill in the date that the task was actually done. Press the <OK> button to return to the previous screen. After changing this and any other service(s) that has(have) been performed, press the <Final Step: Process “Done” items and Recalculate Due Dates> button. This procedure is used to transfer any amounts to the respective clients accounts receivable section and to the health section(if applicable) and to recalculate the scheduled services next due date. You will see the following screen. Clicking on the <OK> button will continue with the transfer process, giving you one last chance to abort the process. Normally you would select Yes to the following screen. When you do this, the program will calculate the next due date for each service you have marked as “Done”. 85 Selecting “Yes” from the window below will add the charges to the proper client(s). Transfer Monthly Items (Boarding Etc...) to Billing Every month, you must select this item. This procedure transfers all non-scheduled items, such as boarding. Non-scheduled items are indicated by a zero entered for the count in the Scheduled Services Form. This should only be done once per month. Otherwise, there will be duplicate charges in the client’s billing. Print Bills Prior to printing bills, you may want to review each client’s account to make sure that there are no errors. Only the “New” items will be printed on the bill. When you print bills, you will first be asked to select the client(s) to include in the billing. 86 Next, the bills will print. After the bills have printed, review them carefully. You will have a few more warnings before the “New” items are turned into “Billed” items. If you discover an error, disregard the printout, and answer “No” to the prompt. You can go to the Accounts Receivable section, and correct the errors. 87 If You Made A Mistake After Answering Yes If you discover a mistake after you print the bill, after answering “Yes” to everything, and before you mailed it or gave it to your client, you can correct the process in the Accounts Receivable selection, as follows: 1. Have the bill in front of you. 2. Go to the Accounts Receivable section, and select the “Billed” button for this client. 3. Locate each transaction number on the screen that matches the bill, and press the <Change> button. Change the status from “Billed” to “New”. 4. Delete any “New” finance or late charge. These will be recalculated after another printing. 5. Select the “New” button in the “Accounts Receivable Table”. 6. Correct the errors. Print Transaction History A listing of selected transactions for client(s) can be generated by selecting the <Print Transactions History> button on the Business Menu screen. The first screen (below) allows you to select a date range for the report. After selecting the date range and clicking on the <Done> button, you will see the following screen asking you which client(s) you wish to generate a report for. Tag the client(s) and press the <Continue> button. You will then get a print preview of the report ( similar to below) where you can zoom in or out, go to other pages of the report (if applicable) and either Print or Cancel the report. 88 Display Accounts Receivable Aging You can view and print a report that shows each customer’s accounts receivable aging. Clicking on the <Display Accounts Receivable Aging> button on the business menu will present you with a screen to select the client(s) you wish to include in the report. After tagging the client(s) and pressing the <Continue> button, you will see a report on the screen similar to the one below. For each client you tagged, you will see a status of their account, broken down by current charges, over 1,2,3, and 4 months, and a current balance. The aging is calculated first by summing all charges to the appropriate time slot, then by applying the total payments starting with the oldest invoice. You can print this report if desired. 89 Checking Account Menu The checking account is relatively self contained in operation. The checking account has four menu selections, as follows: • • • • 90 Checking Account Print Checking Account Information Edit Names of Accounts Close Before you add checks to your checking account, you must define the name of your account or accounts. Select <Edit Names of Account>. For example, you might call your business checking account "BUSINESS CHECKING". You may wish to add "CASH", "PERSONAL CHECKING", "VISA", "MASTERCARD", or however many you choose. Many people like to keep expenses separated by year. To accomplish this, you may setup account names as follows: CHECKING 1991 CHECKING 1992 CHECKING 1993 (etc...) Checking Account When you select this menu choice, you must select the account name that you previously defined in the previous section. Here, the "BUSINESS CHECKING" account was selected. If you choose to type in all of your old checks since you opened your account, you do not have to do anything special. Otherwise, you have to start off the account with a "Previous Balance" deposit. This allows the checkbook to balance, without having to have every last check. Your deposits and checks are then entered as normal. When your bank statement arrives, you simply highlight the transaction and change the ‘Open/Closed?’ field from "Open" to "Closed". 91 After pressing the <Checking Account> button, you will see a screen similar to this that will show all the accounts you have in entered in your program. Highlight the account you wish to work with, and press the <Select> button. In the example below we have selected the BUSINESS CHECKING account, and we currently have no entries in this account. Because there are no entries in the account at present, the <Change> button and the <Delete> button are deactivated (as there is nothing to either change or delete) and the only options available are <Insert> and <Close> buttons. By clicking on the <Insert> button, you will see the following screen where you would normally enter a starting balance for this account. 92 Your Checks written are then entered as normal. Payments received from clients will be entered in the “Add/Edit Clients Accounts Receivable” section of the business menu, and will be transferred into the appropriate account when you process the credit via that route. They will show up in the account and automatically update the current balance. The rest of the entries on the Checking Account Form are self-explanatory. The Account Name defaults to the name of the account you selected on the previous screen. The Open/Closed section is used to identify the status of the transaction. It will default to the “Open” status. When you receive a bank statement for this account, you simply change the “Open/Closed?” field from “Open” to “Closed”. They will now disappear from the new items tab and move to the cleared tab. The “All” tab shows both open and closed items. The procedure to reconcile your account balance when you receive your bank statement is as follows; Open the appropriate checking account. Select the cleared items tab. Verify that the balance on the screen matches the starting balance on your statement. Select the New Items tab. Mark all the items that appear on your statement as closed. (Be sure to add an item for each additional transaction such as service charges or interest received, and clear them also). 6. Select the Cleared Items tab. 7. Verify that the closing balance on the screen matches the closing balance on your statement. 8. The Date field defaults to the system date from your computer, and may be changed as required. The Check number and Payee are self-explanatory. The Classify section is used to show a classification (or split classifications) for this entry. Clicking on the <Lookup> button will bring up a listing of available classifications. You may select one from the list presented, or you may insert one of your own choosing. The following is what the classification lookup table will look like. 1. 2. 3. 4. 5. Click on the <Select> button after you have highlighted the classification you wish, or click on the <Insert> button to add one of your own if you do not see what you are looking for. The insert button will bring up a window where you can type your particular classification and indicating whether it is an income, expense, or other category. 93 If you wish to split the amount of this transaction over more than one classification, you have the option to do this by clicking on the <Split Classification> button on the Checking Account Form. This will bring up a screen similar to the following. 94 In this example, we have a transaction for $250.00 that we have chosen to spread over more than one classification. The Split Total block will automatically update depending upon the amounts you put in for the classifications. For example, let’s say the $ 250.00 is to be split between three different classifications, as in the example that follows. After inputting the classifications and amounts and the Split Total matches the Amount from Checking Entry, you would click on the <Close> button to return to the Checking Account Form which would now show the classifications are split and a message that “*** Split Classifications Exist ***”. If the split totals did not match the amount of the transactions, you would see the message “***Error:Split Totals Do Not Match Amount***” below the <Split Classifications> button. 95 Click on <Look up> at the <Classify> area to determine whether this transaction is an expense, income, or other. Expense and Income are included in the Profit and Loss Reports, while any transaction with a type of “Other” would not be included in the calculations for those reports. “Other” would be a good place to enter a personal deposit that you would not want calculated in your Profit & Loss Statement as “Income”. After entering any desired information in the “For What” field, you would click the <OK> button to return to the checkbook window. In Summary: The Classification entries determine the accuracy of your Profit & Loss Statement. Print Checking Account Information After selecting this button, you must select the date range of interest. Next, tag the accounts that you wish to include in the printout. 96 Edit Names of Accounts Clicking on the <Edit Names of Accounts> button will bring up the following screen. The program comes with two generic accounts, shown above. It is at this window where you can change, delete, or insert new accounts. If you click on the <Insert> button, for example, you would see the following screen. Here you would type in an account name, a brief description of this account, and the account type. Clicking on the <OK> button would then add this new account to your account listings. For instance, if you use one “Visa” card for both business and personal purchases, you might record your business transactions only into this account so it will be included in your P&L report. 97 Print Profit/Loss Report Select this item to generate a Business "Profit and Loss" report based upon your entries into the checking account. You will first see this screen; Click the <OK> button, and select the date range of interest. Click on the <Done> button when you have the proper date range you wish to view. Next, tag the accounts that you wish to include in the P&L report. Click the <Continue> button after tagging, and the report will be generated. 98 Manager's Log This menu selection allows you to store and print information on your daily activities. Additionally, the program will store and total the number of hours that you participate in the business. Clicking on the <Manager’s Log> button will bring up a screen similar to the following. Click on the <Insert> button to insert a record. 99 Equipment List This menu selection allows you to store and print information on your equipment, such as trailers, etc. You may also track the date purchased and sold, price, and type of equipment. The form below is an example of an equipment list record. Travel Log This menu selection allows you to store and print information on your travel activities, such as trip name, start and end dates, the mileage at the beginning and end of your trip, along with a comments block for additional comments. 100 Animals “For Sale” The animals for sale menu is used to generate a listing of any and all animals you have for sale. Clicking on the <Animals “For Sale”> button of the business menu will bring up the following screen where you have options to insert a new animal, or to change or delete an existing animal. You also have the capability to print the for sale information after you have entered the animal(s) you wish to include. After adding an animal, your screen would be similar to the following. 101 Section 14 – Lessons & Competitions (This feature is available in HT Plus, HT Gold and HT Deluxe) The Competition and Lessons section of the program gives you a location to track information about your animal in these two areas. In the competition section, fields are provided for you to enter a rider, the date of the competition, a compete field, event field, place field, Judge and Points and Money. The lessons portion has fields for you to enter a date, activity, rider, miles and points. Competition Click on the <Animal> button on the main and then <Performance> to select either Competition or Lessons for the following screens If you would like to enter competition information, click on the <Competition> button. You will be asked for the client and animal for which you wish to enter information. After selecting an animal, you will see a screen similar to the following. In the example above, the animal, My Genuine Risk, has no entries for the dates specified. You have the option to change the date range for the screen. Some of the entries on these pages are obviously outdated, but the current years would appear on the screen as you enter them. You also have options to change clients (by clicking on the <Lookup> button beside the Client field and/or to change animal (by clicking on the <Lookup> button beside the Animal field). There are tabs at the top to sort by either date or event by clicking on the desired tab. 102 To add a new record, click on the <Insert> button, and you will see a screen similar to the following. Fill out the information and click on the <OK> button when you are finished. You will be returned to the previous screen with the record you added on that screen. You now have the options to either print or to print a summary of any and all information that is on the form. Lessons Click on the <Lessons> button. You will be asked for the client and animal for which you wish to enter information. After selecting an animal, you will see a screen similar to the following. 103 In the example above, the animal has no entries for the dates specified. You have the options to change the date range for the screen. As you lower the lower date, if you have any entries for 1996, they would appear on the screen as the date entered was passed on the Lower Date field. You also have options to change clients (by clicking on the <Lookup> button beside the Client field and/or to change animal (by clicking on the <Lookup> button beside the Animal field). There are tabs at the top to sort by horse, date, activity or horse, rider, date or date, activity, horses(all). As we currently have no entries on this record, both the <Change> and <Delete> buttons are inactive. After you have entered a record, both buttons will be in bold type, and you will be able to click on either of them. To add a new record, click on the <Insert> button, and you will see a screen similar to the following. Enter the desired information and click the <OK> button to return to the previous screen with the new information displayed in the browse mode on that screen. You now have options to insert a new record, delete or change an existing record, to print records ( you tag the client(s) and animal(s) you wish to print), or to close the window and return to the Competition and Lessons Menu. When you are finished with this section, click the <Close> button on the Competition and Lessons menu and you will be returned to the main menu. NOTE: The <Help> button on this screen is currently inactive. It will become functional as we update our product and add on-line help screens. The <Help> button on the main menu, is however, functional when you are signed onto the internet. 104 Section 15 - Forms/Contracts This section contains forms, contracts and agreements. All may be viewed and printed blank. In addition, if you are using this program through HT Business Plus, Gold or Deluxe, you may fill in the blanks using your database of Clients and Horses prior to printing. After selecting the <Forms/Contracts> button, you will advance to the <Browse Forms> screen. Click <insert> Samples and Print Only Forms This folder allows you to view and print all forms and contracts with the blanks empty. By clicking on the <insert> tab, you may select any of the forms to preview and print without inserting specific data into the fields. Now Lets Get Started……….. To Create a New Contract/Form In its “stand alone” form, HT Forms 2003 will not have a database to work from. You can click on <Resources> and build an address book where you will be able select individuals to insert into your contracts and forms. Any horse names you will require for your contract will need to be typed into the <Enter Data into Blanks …> fields on a contract by contract basis. If you are using HT Forms 2003 from within the HT Business Plus, HT Gold or HT Deluxe programs, you will be able to click on tabs from the screen below to select from your client and horse databases. 105 Note: There are 2 fields and tabs for horses. The first tab <Pick horse 1 > would be the main horse referenced in your contract. For most contracts, that will be the only horse you will need. However, the <Pick Horse 2> tab is present for the purpose of naming a second horse for a contract such as a breeding contract. In the case of the <Breeding Contract>, Horse 1 will be the mare. When you click on the <Pick Horse 2>, the second horse will be appropriately designated as the <stallion> in the contract. Owner and Horse may be filled in using your database or you may simply type in a name. 106 If choosing from your data base in HT Business Plus, Gold or Deluxe, you will choose the client/horse from your databases by clicking on <Select Names & Addresses>. If you are using HT Forms 2003 alone. Click <Enter User Data …> tab or the <Select Names & Addresses> to get into your address book. If you don’t have anything inserted in your address book, this action will bring you to a blank database screen. Depending on the above selections, you are now brought to the screen above to customize your form/contract. Now click on the tab: <Enter Data into Blanks…> tab Fill-in-Blank Fields Each form presents a template for you to fill in the blanks. Once you fill in the blanks, the program will compile the data and present it to you on the form for print preview/printing. You may move from field to field by either clicking on a field with your mouse, tab down or utilizing your arrow keys. We recommend filling in all of the blanks whenever appropriate. If you do not complete all fields, you may still print the incomplete form. If you do not have all of the data at this time, complete as much as possible and save the document. You may choose that document at any time in the future to make changes and/or fill in the remaining blanks. Once you have completed the document, click <OK> and you will now be in the Browse Forms/Contracts Window with your completed document highlighted. To view and/or print click on the <Print/Preview Document>. You may zoom the document, print or cancel. 107 Dates and Description Enter the date of the contract. If you do not enter a date, it will default to the date on your computer system. You may want to change the date to reflect the actual date your contract has gone into effect. Enter your description. The more detailed the description, the easier it will be for you to locate this document in the future. You may enter up to 50 characters for this description. Your completed document is saved until you choose to delete it from your program. To exit this section of the program, click <Close>. 108 Section 16 – Backing up and Restoring within HT2002 & HT2003 Backing up: We can never overemphasize the importance of backing up your data on a regular basis. It’s nothing to reinstall a program, but once your data is wiped off your hard drive it’s gone. Backing up and restoring your data has never been easier. Not only easier, but more conveniently as a simple click of your mouse will back it up to any removable drive, such as; CDR, CD-RW, diskette or Zip drive. Let’s get started: Decide which vehicle you will use to store your data and insert the diskette or CD in your hard drive. You can also save the data to your hard drive, although we recommend you copy that back file to a 3 ½floppy or CD. Now click on the <File> tab on your main menu: 109 Click on the <Backup> feature and you will be brought to this screen. The <Name of backup file(no extension): will be empty. We inserted a name for our file. Note, the program tells you not to add an extension to your file. That’s because HT 2002 will automatically save and recognize your data in a zip file. So, our data, in this case, will be end up being called: <htfiles.zip> Click <OK> and your screen will become active as your data is quickly gathered and safely saved. And that’s it! Restoring: To restore data either to another computer where you have installed your HT 2002/2003 program or for those restoring from HT 2002 to the HT 2003 upgrade, do the following: From the main menu, click <File> then click <Restore Saved Data Files>, then be brought to this screen. Click on <Select Backup file set to restore>. 110 For users of HT 2002 or those who upgraded from HT2002 to HT2003, look for your saved data in the HTTrak folder. This folder is located in the HT 2002 version. If you saved your data to a 3 ½ floppy or CD-R, or anywhere else outside of the HorseTrak program, you need to locate your file. We saved our data from HT2002 to the program’s Backup folder. Look for the <Backup Data Directory> in the following list: New Users, who will have been using HorseTrak 2003 only, will look for saved data in C:\Program File\HorseTrak 2003\BackupData folder. Double click on the <Backup Data> directory and your zip file will pop up. Double click on your file, the data will restore to your program and you’re ready to go! This process works for both HorseTrak 2002 users and HorseTrak 2003 users. Importing your 2002 data to 2003 is just as simple. 111 Section 17 - INSTALLATION PROBLEMS The CD will not install Insert the CD, click on <My Computer> from the Windows screen. Allow your computer a moment to locate the CD drive (some systems run slower than others and clicking on the CD Rom drive too quickly, could prompt the computer to tell you the drive is empty. Be patient J. After a moment, double click on the CD Rom drive, then double click on the HT 2002/HT2003 installation file. You purchased a full product, and your software is in Demonstration Version To avoid software piracy, many software programs are delivered in Demo Version. A registration process opens up the first time you install your software. Send us an email or fax us with your purchase information, EXACTLY as you want to be registered in our system. Be certain to indicate whether you purchased from us or through one of our dealers. Our fax number is 570287-5717. Or email to [email protected] If you ordered through our shopping cart, you will receive an email receipt from Americart/Authorizenet. On the very bottom of the receipt, you will see an <ITEM REF> number. Type that number into the subject line of an email with NOTHING else. In the body, type your registration information. If you’ve followed directions, you will automatically receive your Activation Code. If you do not follow this process exactly you will have to wait for a personal response if we receive your message after hours, on weekends or holidays, as no one will be available until the next business morning. At this writing, our office is not staffed 24/7. When you purchased your HT 2002 program, you received your serial number and activation code, but when you type them in, you keep getting a message that they are incorrect If you purchased HT 2002 between November 2001 and February 1, 2002, the program will require a Serial Number and 16 digit Activation Code. We installed a corrected version on the website: Version number 2002r11. If you have not upgraded to HT 2003, and are still using the HT 2002 release, you need to be using the HT2002r11 version for all your features to be functioning properly. If you do not update your HT 2002 to the current version, we will not be responsible for any loss of data or malfunctioning of your program. Please back up any data you presently have in your HT 2002 program, according to previous instructions. Go to http://www.horsetrak.com and download the current HT 2002 program. You will notice in the Activation area that only an Activation Code is required this was one of the items changed in the HT 2002r11 release. You can receive this code automatically by typing in the original serial number we gave between November 2001 and February 2002. Or if you type in the ITEM REFERENCE number from your receipt, you will also receive your code automatically. The number you will be typing is a 5-7 digit code. IT IS NOT THE 16 DIGIT CODE you received when you first purchased the program back in November 2001! You had to reinstall your program and the numbers that worked before, won’t work now. Activation Codes expire every 30 days. THIS DOES NOT MEAN YOUR PROGRAM WILL EXPIRE. If your program is running in full version, it will stay that way, unless you reformat your hard drive or reinstall the HorseTrak Program. If the Activation Code we gave you no longer converts your program to full version, type THAT number or the ITEM REFERENCE number from your receipt into THE SUBJECT line of an email. IDENTIFY YOURSELF in the body of the message. You will automatically receive your current Activation Code. If you are a registered user, we will ALWAYS generate new codes for you to get your software running again. 112 You installed a new version, and your old data is missing or will not import You imported your HT2002 data files to you HT2003 upgrade and some of the clients or horses are missing: Click on <System Admn>, then <My Preferences>, then <Repair/Restore Old Data> Click on the <Freshen & Repair Data> button. <Tag All> then <Freshen>. Once the screen activity has stopped, click <Done>, <OK> and return to the main screen to examine your files again. If this has not corrected the problem, email us at [email protected] and we will walk you through the “fix.” If your problem occurs from importing data from an version prior to the HT 2002 version, review Section 5 titled “Backing up and Restoring Old Data to Gold 1.5” The instructions from that section assumes that you inserted and saved your old data properly in your previous version. If you didn’t, your data will not import properly to Gold 1.5. If you have followed all instructions for importing your data to the HT 2002-2003 versions and you continue to experience importing problems, you will need to go back to your old user manual to see if you missed something in the operation and back up of that particular version. ERRORS/DATA PROBLEMS If you receive any type of “Bind/Data Errors” messages, write the message down exactly as it appears on your screen. Then close the program and reboot your system. Often this will correct the problem. If it doesn’t, send us an email with the error message, exactly as it appeared on your screen. To save time, include your data file as an attachment to your email. Also include the name you registered your program under. If you provide the correct name, we can save you some time if it becomes necessary to replace your program. If you do not know how to send a file attachment, consult your email server for instructions. You MUST identify yourself in the email. Due to various computer viruses, we WILL NOT open a file attachment without the sender’s registered name and an explanation as to why you are sending us a file attachment. Once we’ve received your message and file attachment, we will restore it to our system, try to correct the problem and email the corrected data file back to you. DO NOT SEND YOUR DATA files via regular mail WITHOUT notifying us. Due to current health risks since 9/11/01, we will not open unsolicited mail. DO NOT send original data disks. Always make a copy of your files and send the copy. We DO NOT return data disks, nor will we be responsible for data disks lost in the mail! Software will not print Verify that the printer is turned on and is connected to the computer. Verify that the proper port is selected. If the software was printing earlier, there is a possibility that the Windows software has lost contact with the printer. To fix this, close out all windows programs, and exit windows. If this is the case you will normally get a warning that there are still items to print. Cancel and then go back into Windows and everything should print. Breeding Section will not print You need to have data in both the breeding season sections and the breeding activity sections. Billing Statements will not print 113 This can be caused by several things. First, verify that there are transactions with a “New” status for the respective customer. Then verify that the customer(s) who will not print either have a positive balance due for the billing period or you have selected to print zero balances and/or credit balances in the system defaults area of the Utility Menu. Scheduled Services will not transfer to billing and/or health To transfer scheduled services, the transaction needs to have the “Done” field marked “Yes” and then you need to click on the <Final Step: Process “Done” Items & Recalculate Due Dates> button under the <Check-Off “To-Do” Items As Done> portion of the Scheduled Services menu. Program behaves erratically, frequently locks up with just the hourglass showing, must reboot computer to get out of program. One of the most common causes of this is that the working directory is set up differently from the sub-directory where the program is stored. It is important that both of these are the same. The path for HT 2002 should read C:\HTTrak. The HT 2003 path should read C:\Program Files\HorseTrak Software\HT2003 114 Section 18 – The Billing Tutorial This Section was created several years ago, so it is a bit dated. We decided not to spend time updating screen shots because it is meant as a tutorial to assist you in understanding how successful financial records are generated and not necessarily, an accurate depiction of current program versions. Some screen shots or instructions to click on certain tabs may not reflect the appearance of current programs. This tutorial is not a guide to the Accounting System contained in our HT Gold 2003 or HT Deluxe 2003 versions. Please refer to the <HorseTrak Accounting Manual> on our website or contained on your CD Over the years, we’ve received numerous calls about how our billing works. As a result, we’ve created this tutorial of how the billing portion of our software works. It is important to understand the billing feature for three very important reasons. First, your clients expect accurate and timely billings. Second, and most importantly, you may have to explain the billing in great detail to your client when he or she asks, “Why do I owe this?” Finally, if you call about billing questions, we will use this document and these examples as a point of reference. Billing Background and Overview There are several approaches that people (and computer programs) take to perform the billing function. Some of these approaches can be very complex and confusing. For example, there are companies that still have systems that try to match payments to invoices. In practice, these systems are awkward at best, and they can’t easily accommodate “exceptions to the rule”, such as partial payments. Our approach is much simpler. We’ve tried to model our billing process after the credit card companies. Charges and payments are simply accumulated throughout the billing cycle, and once a month, on about the same day, the bills are printed. If you choose to impose finance and/or late charges, at the time of billing, they are added automatically. We’ve added a little more detail to our bills than the credit card folks. We show the 30, 60, and 90+ day aging, which are calculated at the time the bill is printed. Setting Up the Client As practice, you may want to create a fictitious client (Susan Smith) and enter all of the data as we go along. Lets go through an example of how you might perform the billing function for your make-believe client Susan Smith. From the main menu, select <Client Information>, and then press the <Insert>button. 115 When you first set up Susan Smith as a client, you had to make a choice whether or not to charge her interest and/or a late fee if she was ever late. You can do this on a client-by-client basis. You decided ahead of time to charge Susan a 1% per month (which is about 12% annually if you ignore compound interest, the time value of money, and all of that stuff), and no late fee. Press the “OK” button to continue. The Client’s Accounts Receivable Table Now, go to the main menu and select the “Business Menu” button. Select the <Add/Edit Client’s Account Receivable> button. Highlight Susan Smith’s name, and press the <Select> button. This is Susan Smith’s Transaction Table. You will fill out this table shortly to match the example above. This transaction table is divided into columns. Each row represents a single entry into the journal. The minimal amount of information that you’d want to collect would be Date, Service, Horse, and Amount. The transaction number is generated automatically, and is a unique number. 116 There are regular entries that you probably make on a monthly basis, such as board, and there are random entries that you make, such as extra feed. Although we will be entering all charges and payments manually for this example, keep in mind for the future that we have a feature called Scheduled Services which can automatically add recurring entries, such as Boarding. Let us assume for our example that Susan Smith is a new client who brought her horse to your farm on 1/1/97. You charge $125 per month board, and over the month, she’s accumulated several charges. To add the charges as shown above, press the <Insert> key and fill out the transaction form. Note that you can select from a list of Susan’s horses by pressing the <Select Animal> button, and a list of services from the <Select Services> button, or you can simply type the entries. The Billing Cycle Example On a regular basis, and on or close to the same day every month, you can print the billing statements based on the transactions that have accumulated. Let’s say that on February 6, you finally had a chance to sit down and do the billing for the month. From the main menu, select the <Business Menu> and then the <Print Bills> button. Next, you need to “Tag” the clients. For this example, highlight Susan Smith’s name, and press the “Tag” button. An “X” to the left of the name indicates that the name has been successfully selected. As an alternative, you can press the space bar to tag an entry. Now, press the “Continue” button. After a few moments, you can preview the bills on the screen prior to printing. Press the Printer Icon in the upper-left of the screen to print, or the red “X” to cancel. 117 If the bill printed correctly, then select “Yes” and the <Continue> button. This will change the status of each transaction from “New” to “Billed”. Billing Statement Susan Smith Date Printed: 02/07/97 1234 Fifth Street Anytown, US 12345 Date Service Horse Balance Forward… 01/01/97 01/05/97 01/28/97 02/05/97 Board Trigger Xtra Feed Wash Trigger Lessons Trigger 125.00 Trigger Charges Payments Balance 0.00 0.00 125.00 35.00 0.00 160.00 10.00 0.00 170.00 20.00 0.00 190.00 Thank you for your prompt payment. ------------------------------------From To 12/07/96 11/07/96 10/07/96 Current 12/06/96 And Older ------------------------------------New Charges Billed 30 Days Billed Billed 60 Days 90 Days+ Guidelines for Billing 1. Create a client record, and determine if you will be charging interest and/or lay fees. 2. Record new charges and payments by client throughout the billing cycle in the Client’s Accounts Receivable. 3. Print and mail the bills on or close to the same day every month. Month Number 2 Well, you’ve been really busy with your horses, and those of your boarders. You periodically add items to your clients’ Transaction List. Again, some charges are regular, and others are random. nd You’ve received Susan’s payment for $190, and before the 2 billing, here’s what Susan’s Client’s Accounts Receivable looks like. Make sure you press the <Show ALL> tab to see both billed and new items. 118 Its time again to do the billing, so here it goes. This time, you finally get a chance to sit down and do the billing on March 4. You follow all of the “Steps of the Billing Cycle”. Note: Notice that you don’t necessarily have to print bills on the same day every month. Billing Statement Date Printed: 03/04/97 Susan Smith 1234 Fifth Street Anytown, US 12345 Date Standard Message Service Horse Balance Forward… 02/08/97 02/15/97 02/20/97 03/02/97 Board Feb Shoes Trigger Payment Xtra Feed Charges Payments Balance 190.00 Trigger 65.00 0.00 Trigger 125.00 0.00 315.00 0.00 380.00 190.00 190.00 35.00 0.00 225.00 Balance from last month’s New Items Thank you for your prompt payment. ------------------------------------From To Amount Due 1/07/97 12/07/96 11/07/96 Current 11/06/96 And Older ------------------------------------New Charges $225.00 Billed 30 Days 0.00 Billed Billed 60 Days 90 Days+ 0.00 0.00 Please Pay: $225.00 Includes only “New” charges less payments. Note that payments are credited to the oldest charges first. 90+ first, then , 60, 30, then “New Current”. 119 Accounts Receivable Aging Section. Includes only the “Billed” charges less payments. Shows exactly how “Balance Forward” is broken out. Remember, payments are applied to the oldest charges (i.e. 90+) first. Month Number 3 - - Late Payments The real challenge to a billing system is dealing with partial payments. Even if your policy is not to “Carry” accounts, you do in fact “Carry” accounts if someone doesn’t pay you. As a matter of fact, all accounts are really open, revolving accounts. Even with the American Express card, where you are supposed to pay the entire bill every month, their computer must be able to deal with partial payments. Susan Smith 1234 Fifth Street Anytown, US 12345 Date Notice that the standard message changed. Service Horse Balance Forward… Billing Statement Date Printed: 04/07/97 Charges Payments Balance 225.00 03/04/97 Board Mar Trigger 125.00 0.00 03/06/97 Lessons Trigger 20.00 0.00 370.00 03/22/97 Wash Trigger 10.00 0.00 380.00 04/05/97 Lessons Trigger 20.00 0.00 400.00 04/07/97 Finance Charge 2.25 0.00 402.25 Your account is past due. ------------------------------------From 2/07/97 1/07/97 12/07/96 To Current 12/06/96 And Older ------------------------------------Billed Billed Billed 60 Days 90 Days+ New Charges 30 Days $177.25 225.00 0.00 0.00 Please Pay: $402.25 350.00 This exercise brings up two procedures that we haven’t discussed in detail; the interest calculation, and the Accounts Receivable Aging calculation. First, the interest charges. 120 {Balance Forward minus the Sum of all new payments}, all multiplied by the monthly interest rate equals… Interest and Late Charges You should keep in mind about Interest and Late Charges: 1. They are only added at the time of billing 2. They are only added if you specify them in the Client’s setup form. 3. They are only added if any new payments don’t cover the “Balance Forward” amount. HOW THE INTEREST AND LATE CHARGES ARE CALCULATED 1. 2. 3. 4. 5. Start with the Balance Forward amount. Subtract any “New” payments or credits from this amount. If there is still a positive balance after subtracting these two amounts, then this means that the client did not pay their entire bill. Multiply this difference by the monthly interest rate, and add the resulting interest charge to the bill, and to the Accounts Receivable Table, if applicable for this client. Add the fixed late charge to the bill and to the Accounts Receivable Table, if applicable for this client. Here’s how Susan is charged a $2.25 finance charge. First, take the Balance Forward amount of $225.00. Next, subtract any payments or credits, of $0.00 in this case. Now, multiply this by the monthly interest rate for Susan, which is 1%, to yield $2.25. After printing the bill and answering “Yes” to the question “Did the bills print correctly” then the “New” charges change to “Billed”. 121 What about the Accounts Receivable Aging calculation? This one was easy, since no payment was made. We’ll list the rules for calculating Accounts Receivable Aging for the next example. CALCULATING ACCOUNTS RECEIVABLE AGING 1. First, date ranges are calculated based on the date the bill is printed. Assuming a 4/07/97 print date, then here is how the aging date ranges are calculated: a. 30 days is defined as all “Billed” transactions with a date equal or greater to 2/7/97. b. 60 days is defined as all “Billed” transactions with a date equal or greater to 1/7/97 and less than or equal to 2/6/97. c. 90+ Days is defined as all “Billed” transactions with a date that’s equal to or older than 1/6/97. 2. The software scans all “New” charges (no payments) and sums them to the “All New Charges” box on the bill. 3. The software goes through every single “Billed” transaction entry (both charges and credits), and sums the entry to the appropriate aging category… either 30, 60, or 90+. 4. Now, the software starts with the sum of all “New” payments and credits, and starts applying it (subtracting) from the oldest (90+) and keeps going toward the newest (60, 30, then “All New Charges”) or until the payments and credits have been used. Month Number 4 - Partial Payments Well, Susan comes up to you and apologizes about the late payment, and says that she just changed jobs, etc… and would you accept a partial payment until she gets her first paycheck? Being the kind-hearted person that you are, you agree, and Susan gives you $100. The interest is still ticking… You create the bills on May 5, 1997. 122 Billing Statement Date Printed: 05/05/97 Susan Smith 1234 Fifth Street Anytown, US 12345 Date Service Horse Balance Forward… 04/08/97 04/15/97 04/29/97 05/02/97 05/05/97 Board Apr Payment Wash Trigger Xtra Feed Finance Charge Charges Payments Balance 402.25 Trigger 125.00 0.00 527.25 0.00 100.00 427.25 10.00 0.00 437.25 Trigger 35.00 0.00 472.25 3.02 0.00 475.27 Your account is past due. ------------------------------------From To 3/05/97 Current 2/05/97 1/04/97 1/05/97 And Older ------------------------------------New Charges $173.02 Billed 30 Days 177.25 Billed Billed 60 Days 90 Days+ 125.00 0.00 Please Pay: $475.27 The “Please Pay” amount should be equal to the sum of the aging amounts, as well as the last balance value. With the May 5, 1997 bill, interest is calculated by taking the previous balance (Balance Forward) of $402.25 less any new payments and credits ($100), and multiplying the resulting $302.25 by the monthly interest rate (1%) to yield $3.02. See the section “Calculating Interest and Late Charges”. Next the accounts receivable is calculated as described in the “Calculating Accounts Receivable Aging” procedure above. Month Number 5 - Fixing Errors This is a very important section. It is vitally important that errors are corrected properly. There are four types of errors that you can make. Type 1 Error: The first type of error is when you find the error PRIOR to answering “Yes” to the question “Did the Bills Print Correctly?” This one is very easy to fix. You simply go into the Client’s Transaction File and correct the error. Type 2 Error: This is an error that is discovered AFTER you answer “Yes” to the question “Did the Bills Print Correctly?”, and BEFORE you mail the bills to your clients. This one is moderately easy to fix. To fix this error, go to the Client’s Transaction File and locate the transaction numbers on the bill. Change these items from “Billed” to “New”. Then, delete any finance charge and/or late charge entry in the Client’s Transaction File corresponding to the billing date. Type 3 Errors: This is an error that’s discovered AFTER you mail the bill to your client. Here, you should always add a new credit to correct the error. You should never change or delete an erroneous “Billed” transaction entry after a bill is mailed. To correct this error, you should always add a new entry to counteract the bad one. For example, if you accidentally charged your client $40 and sent the bill, simply add a “New” entry for $40 credit, and in the “Service” field, type “Adjustment for Error”. Remember to also credit the client for any interest (in this example, assuming 1% interest, then $0.04). 123 Type 4 Errors: This is an error that occurs if you don’t follow the guidelines of the Type 3 Errors. It is guaranteed to totally mess up your billing, and is difficult to correct. Remember, NEVER change or delete an erroneous “Billed” transaction entry after the bill is mailed. To correct a Type 4 Error, you will need to recreate the client’s transaction file, and make it match the billing. Assemble a copy of every bill that you’ve ever sent the client. Then, change the Transaction file to exactly match the billing, including any errors on the bills. Then proceed to correct the error as described in Type 3 Error. Example of Fixing an Error For this example, we’re going to say that there were two errors made. The first one was dated 05/15/97, and was caught prior to sending the bills, which means it’s a Type 1 Error. Here, you would simply delete the entry. The second one was dated 05/29/97, and was NOT caught prior to sending out the bill, which means its a Type 3 error. The item dated 5/29/97 was an accidental entry, and the full amount must be credited, including interest. Error found After Billing 124 Error Caught Before Billing Billing Statement Susan Smith Date Printed: 06/02/97 1234 Fifth Street Anytown, US 12345 Date Service Horse Balance Forward… 05/07/97 05/15/97 05/29/97 05/30/97 06/02/97 Board May Xtra Feed Wash Trigger Payment Trigger Finance Charge Charges Payments Balance 475.27 Trigger 125.00 0.00 600.27 Trigger 35.00 0.00 635.27 40.00 0.00 675.27 0.00 -300.00 375.27 1.75 0.00 377.02 This $40 error wasn’t caught until after the bill was mailed. Your account is past due. ------------------------------------From To 3/02/96 Current 3/02/97 2/01/97 2/05/97 And Older ------------------------------------New Charges $201.75 Billed 30 Days 175.27 Billed Billed 60 Days 90 Days+ 0.00 0.00 Please Pay: $377.02 The interest of $1.75 again is calculated by the previous balance of $475.27 less the payment of $300.00, which is $175.27 times the monthly interest rate (1%) or $1.75. Again, the aging is calculated by applying the current payments $300 to the oldest balances. See the section on “Calculating Accounts Receivable Aging”. To fix the $40 error, simply credit the amount, and add a separate entry to undo the interest charge also. Inform your client Susan Smith to subtract $40.04 from her “Please Pay” amount, and the credit should appear on her next bill. This should fix the error on the next billing cycle. 125 Billing Statement - One Page Summary Billing Statement Date Printed: 05/05/97 Susan Smith 1234 Fifth Street Anytown, US 12345 Date Service Horse Balance Forward… 04/08/97 04/15/97 04/29/97 05/02/97 05/05/97 Board Apr Payment Wash Trigger Xtra Feed Finance Charge Charges Payments Balance 402.25 Trigger 125.00 0.00 527.25 0.00 100.00 427.25 10.00 0.00 437.25 Trigger 35.00 0.00 472.25 3.02 0.00 475.27 Your account is past due. ------------------------------------From To 3/05/97 Current 2/05/97 1/04/97 1/05/97 And Older Last Balance Entry is Amount Due. ------------------------------------New Charges $173.02 Billed 30 Days 177.25 Billed Billed 60 Days 90 Days+ 125.00 0.00 Please Pay: $475.27 Aging, all sums to Amount Due. 1. 2. 3. 4. 5. 6. 7. 8. Bills should be printed on or about the same day every month. If applicable, interest and late charges are added when bills are printed. The Aging dates (30, 60, 90+) are calculated at the date of printing. If applicable, interest is calculated by subtracting Balance Forward from sum of Payments (and Credits), and multiplying by the monthly finance charge rate. If applicable, a fixed late charge is added if the sum of payments (and credits) is less than the Balance Forward amount. Payments are applied to the oldest charges first (90+), then the newer charges next (60, 30, then “New Charges). The “New Charges” include all charges listed on this bill (regardless of the date), less the payments applied as described in #4. The 30, 60, and 90+ amounts are from the “Balance Forward” amount only, less the payments applied as described in #4. 126