1
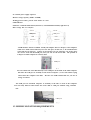
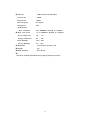
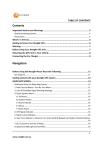
USB PORTABLE DATA
STORAGE DISK
USER’S MANUAL
TABLE
CONTENTS
I. PACKING LIST - - - - - - - - - - - - - - - -- - - 2
II. INTRODUCTION - - - - - - - - - - - ------------ - - - 2
III. PRODUCT FEATURES - - - - - - - - - - - - - - - - - 3
IV. MINIMUM SYSTEM REQUIREMENTS - - - - - - - - - - - -- 3
V. INSTALLATION GUIDE - - - - - - - - - - - - - - - - - 4
VI. SOFTWARE - - - - - - - - - - - ---------------------4
VII. HOW TO USE THE GREAT DISK
---- - - - - - - - - - - 5
VIII.SPECIFICATIONS- - - - - - - - - - - - - - - - - - - - 6
1.1
PACKING LIST
WEIYE GREAT DISC SERIES
package contains the following:
USB portable data storage disk
User’s Manual
Installation CD
Warranty Card
USB extension cable
If you found anything missing after you bought this product, pls. Contact our distributor or agent
immediately.
1.2
INTRODUCTION
Thank you for purchasing WEIYE GREAT DISC SERIES.
WEIYE GREAT DISC SERIES, as the smallest, lightest, slimmest USB portable hard disk drive
available in the world, downsized to a piece of cigarette in height, and running without any external
power supply, is an innovative product.
As the Great Disc fits in your pocket, you can take it anywhere conveniently.
Because USB cable
delivers power to the GREAT DISC, there is no need of external power source such as A/C adapter.
Plug & Play, Hot Plug-out features make WEIYE GREAT DISC SERIES convenient and easy to
use. With a transfer rate of up to 1000MB/S in reading and 920KB/S in writing and disk space up to
16MB ~512MB, WEIYE GREAT DISC SERIES also delivers powerful performance. As WEIYE G
REAT DISC SERIES is compatible with windows, Macintosh, Linux for both laptops and desktops,
you can take all your files with you wherever you go!
It is an absolutely portable USB Hard Disk
ever.
1.2.1. WEIYE GREAT DISC SERIES FEATURES
World Smallest, Lightest & Slimmest in its category.
Hi-Speed reading ability up to 1000KB/s.
Hi-Speed writing ability up to 920KB/s.
USB boot from BIOS Support Driverless for Windows Me, 2000,
Driver support Win98
Comply with USB Ver 1.1
2
No external power supply required.
Massive storage capacity (16MB ~ 512MB)
Writing protect switch, prevent from misuse & virus
LED Indicator
Small size: 77mmx26.5mmx13mm (left chart 1) 77mmx26.5mmx12.5mm( right chart 1)
Date storage life over 10years
Cover
Cover
USB por t
USB por t
LED
LED
Sw i t c h
Sw i t c h
(
)
A USB interface must be available. Usually all computer have a USB port, some computers
which were made before 1998 may have not this port, in this case, a PCI-USB interface
converted card is necessary. If there is no USB port on your computer, you need to have
one convert card with PCI-USB port, then you can use the Great disk. The position of
USB port on table computer is as below chart.
USB por t
You can connect the Great disk directly to the USB port on the back of the table computer.
But since the USB port is normally on the back of computer , it’s not convenient to plug
and connect the computer each time.
We have one USB extention line for you free of
charge to connect.
The USB port for notebook computer is normally at the side or back of the computer.
You can easily find out and connect the Great disk to USB port without using extention
line.
USB por t
1.3 MINIMUM SYSTEM REQUIREMENTS
3
Microsoft Windows® 98,
Windows Me,
Windows 2000,
Windows XP,
Mac OS 9.0 or Over +
Linux Kernel 2.4 or Over
2. INSTALLATION GUIDE
Installation for Windows®
a. Windows® Me/2000/XP, Mac OS 9.X/Mac OS X and Linux2.4.x: Auto installation (No
Driver required)
If auto installation is not successful, please refer to the trouble shooting tips in section
b. Windows® 98: Please take following steps.
1. Insert installation CD
2. Connect the Great Disk to available USB port
3. Turn switch to on position
4. “Add New Hardware Wizard” will appear. Then, click “next”
5. Click “next” and select CD-Rom for driver
6. Click “next”, then click “finish”
4
3. SOFTWARE
Don’t cut off the power when the Great Disk is using, which will cause to lose the data and
you must format the Great Disk. Attached mini CD with software for your convenience, please take
the following steps:
(Notes: Please make a copy before installation and don’t use the disc avoiding conflict.)
3.1Format the Great Disk
Open the CD
double click “Manager – exe”
select “completed format”
click “format”
double click “ Manager”
3.2 Making USB Boot Disk
Please note that this function is only for Win 98, and please cancel the password before
computer booting.
Select “ Manager.exe”
select “ making Boot Disk”
click “ format”
Reboot computer
setup “ Boot Device” to “ USB-ZIP”
3.3 Setup password
1.
2.
Insert the formatted disk to USB port and enter “ Manager.exe”
select “ user password”, click “ exit”. take out the disk from USB, and re -insert to
computer.
3.
Go to “my computer”, and enter into “removable”, see the picture.
4.
Enter “ PassMan.exe”, empty “inside password”, click “apply” to access, and press
“ EXIT” to quit
5
5. After accessing, passman window will be closed in 1second automatically.
Now, you will be ready to use the Great Disk.
3.4 Change Password
Please don’t forget your password, as user must re-format the disk when forget password,
and this will cause to lose all the data.
4.HOW TO USE THE GREAT DISK
1.
2.
Available USB port for computer
Check on USB, go to “control panel”
“system”
“device manager”
Scroll down to check the “ Universal Serial Bus Controllers”
4.1 Windows 98/Me/2000/XP
1.
Make sure the connection between USB port and Great Disk is properly done. (In
this case, the LED indicator of Great Disk will be shine once)
2.
Go to “My Computer”, “Removable” drive letter (eg: G: ) (see the picture3.2) or
“Local” driver letter (see the picture 3.3 for Windows Me/2000/XP) will appear on
the screen, named Great Disk Letter
3.2
3.3
3.4
.
Notes: when using the Great Disk the first time, it must take some time for system to
6
find the driver.
3.
Now, you are ready to use the Great Disk, like copying, modifying or deleting. The
LED indicator will flash quickly when using the Great Disk, and the indicator will
not flash if the reading-writing data is finished.
Removing the Great Disc after use
Do not remove or disconnect the Great Disk from your computer while reading /writing
files, this may cause damage for HDD or loss of data stored in Great Disc.
Please take the following steps:
1.
Windows 98: You may simply take out the Great Disk when the LED indicator is off,
and the driver letter will disappear automatically.
2.
Windows Me/2000/XP: Click on the “Stop USB Storage Device – (G:)” icon on the
right corner, “USB Storage Device can be removed from the system” will appear on
the screen. Click “OK” to close the window, and your can take out the Great Disk
3.5
3.6
4.1.2Mac os 9.x/Mac OS X
. 1. Reboot your Macintosh computer
2.Make sure the connection between USB port and Great Disk is properly done.
“UNTITLED” drive letter (see the picture3.7) will appear on the screen, named Great
Disk Letter.
3. When you want to take out the Great Disc, please dray the disc letter into the trash
can first, otherwise, it may loss all of the data stored in the disk.
3.7
VI. SPECIFICATION
ITEM
DESCRIPTION
Computer required
BIOS
System required
Power supply
Disk capacity
IBM PC with USB available, other compatible computer
USB HDD or USB ZIP support (system boot required)
Windows 98/Me/2000/XP, Mac os 9.x/Mac OS X, Linux 2.4.x
USB cable
16MB/32MB/64MB/96MB/128MB/256MB/384MB/512MB
7
Interface
USB 2.0 (Universal Serial Bus)
work current
<80Ma
Sleep current
<500uA
Date storage life
over 10years
Writing lock
YES
Built-in LED
Date read Speed
Date write speed
Up to 1000KB/sec (decided by computer)
Up to 920KB/sec (decided by computer)
Work temperature
-40
~ +70
Storage temperature
-50
~ +80
Work Humidity
Storage Humidity
10% ~90%
5% ~ 95%
Dimension
77(L) X 25(W) X 13(H) – mm
Weight
15g
EMC standard
FCC (B), CE
The above mentioned specification may change without prior notice.
8