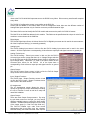
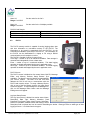
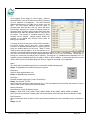
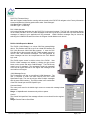
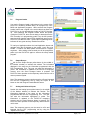
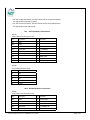
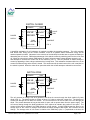
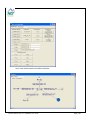
1
DVC Family
System and
Programming User
Guide
The information in this publication is intended as a guide only, and HCT take NO
responsibility for usage and implementation in any user written application code
structure.
HCT strongly suggests that the user attends one of the product training courses
to ensure correct and full understanding of this information and to learn further
optimized methods of control techniques.
Please contact HCT customer service to book one of the scheduled training
dates or to discuss arranging a course specific to your company needs.
Thank you for using High Country Tek Inc. Products.
P/N: 021-00154, Rev. A.6 - updated for V4.7 Tools
Page | 1
About Us
HCT was founded in 1983 as an electronics contract manufacturing company, based upon the founder’s
extensive background in high-tech manufacturing, including senior manufacturing positions at several Silicon
Valley companies. Early in its history, HCT began a systematic migration towards proprietary products. The
Company anticipated the need for Electronic Controls for Mobile Equipment and invested more than $2M to
develop the DVC™ family of products, which began shipments in 2001.
HCT’s proprietary products have been designed specifically for the Mobile Equipment Market, taking into
consideration customers’ broad functionality needs, demands of the severe operating environments, and other
customer requirements unique to this market. The groundbreaking modular architecture of the DVC system
allows customers to add functionality, reliability and precision where and when they need it, while preserving all
of their investment in prior application development. Industry-standard communication protocols (e.g. CAN bus)
and HCT’s unique graphical, PC based, programming tool allows our customers to easily implement and
maintain Electronic Control Systems via this fully configurable, modular solution.
The patented Intella™ Software System is the heart of the company’s DVC product line. It was designed to
enable customers and channel partners who are relatively unfamiliar with sophisticated electronic control
systems to customize our products in the field with minimal training and/or support. Intella™ Software is a
comprehensive development environment for the design, development, testing, modification and support of DVC
system applications. Intella™ Application Libraries can be used as templates for application development. All of
this functionality is in a system that allows the application designer, application programmer and maintenance
programmer to operate within a single application development environment.
The DVC master controller module, with its flexible hardware and software, can run many applications as a
single stand-alone module. Combinations of DVC™ modules (10 modules to date, with different functionalities)
enable HCT to support a wide range of machine control applications. All DVC™ modules are packaged in small,
ruggedized enclosures. Each module is encapsulated to withstand extreme conditions in harsh operating
environments. The “hardened” enclosure allows customers to locate the DVC™ modules near the sensors,
valves, etc. they will control. This can significantly reduce the amount of cabling in a system and,
correspondingly, the cost.
We pride ourselves on producing cost effective devices that are rugged, abuse resistant, and easy to setup and
diagnose. We are able to respond quickly to customer requirements due to our in-house engineering and
assembly departments. We also provide turnkey manufacturing services for customers that do not require
engineering services. Our standard product line includes environmentally hardened hydraulic proportional valve
drivers, digital closed and open loop controllers, and user programmable CAN bus controller systems for mobile
off-highway applications.
In addition to our standard products, we develop custom products per customer requirements. Full product
specification from the customer is welcome, but not required. We often work with the customer to determine the
specifications for the product required to solve their problem. Our experience in the industrial and mobile control
markets speeds up the product design time and greatly reduces the occurrence of unanticipated problems.
Customer support after the sale is one of our strong points.
When you need SOLUTIONS for electronic control of mobile and industrial
devices think………. HIGH COUNTRY TEK
P/N: 021-00154, Rev. A.6 - updated for V4.7 Tools
Page | 2
New Release 4.7 Features and Enhancements Summary
Each new release of the Programming Tool and Program Loader Monitor contains new and enhanced features
plus normal bug fixes. Release 4.7 succeeds Release 4.2 and contains the following new features and
extensions.
Application and BIOS Compatibility
Applications compiled using the 4.0 or 4.2 Programming Tool will work with the 4.7 BIOS. Programming Tool
4.7 generated applications will run with the previously released 4.22 BIOS as well as the new 4.7 BIOS. The
only restriction is that the new variables supported in the 4.7 Programming Tool (and enumerated below) will be
set to zero when the application runs with the 4.22 BIOS.
Note: With this release the Programming Tool is now available in a demonstration form for new
customers to use. Contact HCT sales for information on how to obtain the tools.
New Features
Variable Always Code/Logic Sequence Bubble run time (1ms to 20ms) or so called system heartbeat versus the
previous 10ms. The default value is still 10ms.
o
Variable Always Code/Logic Sequence Bubble run time (1ms to 20ms) or so called system heartbeat
versus the previous 10ms. The default value is still 10ms.
o
DVC5 and DVC7 Auto ranging supports the entire 0 - 3.3 ampere coil current range
o
System Enable support in DVC5/7/10
o
Analog and Universal Inputs configurable as Digital inputs
o
DVC7 Support with Digital Inputs having Pulse capability
o
Digital Signal Processing support for BiQuad filters
o
New Program Loader Monitor Display fields
o
Application variables to access High current and Low current coil gains for each output group to enable
dynamic setting of the maximum and minimum coil currents
o
BIOS based 40% DVC Application Performance Improvement for all applications compiled using the
4.0, 4.2 or 4.7 Programming Tool versions.
o
DVC_Temperature variable added for DVC5 and DVC7 internal module temperature sensing
o
DVC21, DVC22 and DVC41 variables can now be referenced as DVC21.name or name etc.
o
Textual Replace All for Always and Bubble code
o
DVC62 Hand Held Programming Pendant (4 X 20 Character Display with Keypad)
o
D206 Touch Screen, Color Graphical Display
o
NMEA0183 RS232 Protocol Support for Maritime applications
o
J1939 message enable/disable and message specific source address
P/N: 021-00154, Rev. A.6 - updated for V4.7 Tools
Page | 3
o
Variable Output Group PWM frequency (0-100 hertz) and duty cycle control.
o
DP04 Pendant Logging feature
o
Variable PWM frequency (0-100 hertz) and duty cycle control.
o
Vista Business & Ultimate drive updates.
o
New Application variables:
HC_Coil_Gain_OG1
HC_Coil_Gain_OG2
HC_Coil_Gain_OG3
LC_Coil_Gain_OG1
LC_Coil_Gain_OG2
LC_Coil_Gain_OG3
FreeRunningTimer
MACID
P/N: 021-00154, Rev. A.6 - updated for V4.7 Tools
DVC_Temperature
J1939msgname.srcaddr
J1939msgname.disable
Page | 4
Manual Index:
About Us ......................................................................................................................2
New Release 4.7 Features and Enhancements Summary........................................3
Application and BIOS Compatibility.................................................................................................... 3
New Features ..................................................................................................................................... 3
1
DVC System and Software ...................................................................................9
1.1
1.2
1.3
1.4
1.5
Introduction.............................................................................................................................. 9
The DVC System Overview..................................................................................................... 9
DVC7 Introduction ................................................................................................................. 10
DVC10 Introduction ............................................................................................................... 10
System Configurations ..........................................................................................................11
1.6
1.7
1.8
1.9
1.10
1.11
1.12
13
How the System Works .........................................................................................................14
Closed Loop Control Principles .............................................................................................15
Programming and Debugging the DVC5/7/10.......................................................................16
Expansion Modules ............................................................................................................... 17
Menus.................................................................................................................................... 19
Projects.................................................................................................................................. 19
Input Output Configuring .......................................................................................................20
1
P/N: 021-00154, Rev. A.6 - updated for V4.7 Tools
Page | 5
1.13
1.14
1.15
1.16
2
2.1
2.2
2.3
3
3.1
3.3
3.4
3.5
3.6
3.7
3.9
3.10
3.11
3.12
3.13
3.14
3.15
3.16
4
4.1
4.2
4.3
4.4
4.5
4.7
5
5.1
5.2
5.3
5.4
5.5
5.6
5.7
5.8
6
6.1
6.2
6.3
6.4
6.5
6.6
6.7
6.8
6.9
6.10
6.11
6.12
Input Output Variables and Programming.............................................................................20
Programming Example .......................................................................................................... 20
Hints & Tips for code writing..................................................................................................21
Circuit Protection ................................................................................................................... 22
Software Installation ...........................................................................................23
System Requirements ...........................................................................................................23
Installation ............................................................................................................................. 23
Software Overview ................................................................................................................ 23
Programming the DVC Family............................................................................25
Compiling Your Program to Create the Output Files.............................................................25
Saving DVC Files .................................................................................................................. 26
Restoring DVC Files .............................................................................................................. 26
Loading PGM and MEM files.................................................................................................26
Selecting or Changing Your Project Type .............................................................................26
Programming the DVC5/7/10 ................................................................................................27
DVC Program Loader Monitor Password Implementation ....................................................28
Digital Inputs and Programmable LEDs ................................................................................28
Analog Inputs......................................................................................................................... 32
Universal Inputs..................................................................................................................... 36
Output Groups ....................................................................................................................... 38
Input Output Functions .......................................................................................................... 45
Controlling LEDs.................................................................................................................... 46
Program Variables ................................................................................................................. 49
Bubble Logic .......................................................................................................55
Always Code.......................................................................................................................... 56
Logic Sequences ................................................................................................................... 57
How Logic Sequences are executed by the DVC5/7/10 .......................................................58
Program Statements .............................................................................................................58
EE Memory............................................................................................................................ 59
Long Unsigned Integer Math .................................................................................................60
Programming Examples .....................................................................................61
DVC variable types................................................................................................................ 61
Hello Program........................................................................................................................ 61
Binary Counter Example for the DVC5 or DVC10 Controllers ..............................................62
Process PI Closed Loop Control Example (PSI to Valve Current)........................................67
Simple Control Example........................................................................................................68
Compactor Program Example ...............................................................................................73
More Complex Control Program Example ............................................................................75
Send receive bit / byte information ........................................................................................78
DVC Expansion Modules....................................................................................80
Introduction............................................................................................................................ 80
DVC21 ................................................................................................................................... 80
DVC22 ................................................................................................................................... 82
DVC41 ................................................................................................................................... 84
DVC50 ................................................................................................................................... 85
DVC61 ................................................................................................................................... 89
DVC62 ................................................................................................................................... 91
DVC65 ................................................................................................................................... 94
DVC70 ................................................................................................................................... 95
J1939/DVC80 ......................................................................................................................100
Add Device Net Module.......................................................................................................104
DVC5/7/10 to DVC5/7/10 ....................................................................................................105
P/N: 021-00154, Rev. A.6 - updated for V4.7 Tools
Page | 6
6.13
6.14
6.16
7
Virtual Display......................................................................................................................107
Application Simulator...........................................................................................................108
DP04 Pendant .....................................................................................................................116
Program Loader Monitor .................................................................................118
7.1
7.2
7.3
7.4
7.5
7.6
7.7
7.8
7.9
7.10
7.11
7.12
7.13
7.14
7.15
7.16
7.17
8
Introduction..........................................................................................................................118
Connecting to the DVC5/7/10..............................................................................................118
Starting the Program Loader Monitor ..................................................................................118
Main Program Loader Monitor Screen ................................................................................119
Program Loader...................................................................................................................121
Output Groups .....................................................................................................................121
Analog and Universal Inputs ...............................................................................................121
Input / Output Functions ......................................................................................................122
Factory Information..............................................................................................................122
EE memory..........................................................................................................................122
DVC21 (Sinking and Sourcing Digital Inputs) and the Loader Monitor ...............................123
DVC22 (Sinking Digital Inputs) and the Loader Monitor .....................................................123
DVC41 (High-Side Outputs) and the Loader Monitor..........................................................124
DVC50 (Multiple Output Types Module) and the Loader Monitor .......................................124
DVC61 (Display Module) and the Loader Monitor ..............................................................126
DVC70 (Logging Module) and the Loader Monitor .............................................................127
DVC80 (J1939 to CAN Bus Module) and the Loader Monitor ............................................129
Programming Notes.........................................................................................132
8.1
8.2
8.3
8.4
8.5
9
Examples of Program Statements and Logical Operators.................................................132
Variable Display Types........................................................................................................132
Variable initialization............................................................................................................133
Program Debugging and Variable tracing ...........................................................................134
J1939 Only Mode on the DVC5/7/10...................................................................................134
Application Notes..............................................................................................135
9.1
9.2
9.3
9.4
CAN Bus Configuring ..........................................................................................................135
CAN Bus Termination Options ............................................................................................135
DVC5/7/10 Powering...........................................................................................................135
Driving Alarms from outputs ................................................................................................135
10 Hardware Installation .........................................................................................136
10.1
10.2
10.3
10.4
10.5
10.6
10.7
10.8
10.9
10.10
DVC5 Hardware Connections .............................................................................................136
DVC7 Hardware Connections .............................................................................................137
DVC10 Hardware Connections ...........................................................................................137
DVC21 Hardware Connections ...........................................................................................138
DVC22 Hardware Connections ...........................................................................................139
DVC41 Hardware Connections ...........................................................................................140
DVC50 Hardware Connections ...........................................................................................141
DVC61 Hardware Connections ...........................................................................................142
DVC70 Hardware Connections ...........................................................................................143
DVC80 Hardware Connections ..........................................................................................143
11
Safety is Everyone’s Responsibility.............................................................145
11.1
11.2
11.3
Safety in building the hardware connections.......................................................................145
Safety in mounting the DVC units .......................................................................................145
Safety in programming the controllers.................................................................................145
Appendix A
Appendix B
Appendix C
Compiler Keywords........................................................................146
Programming Statement Examples ..............................................147
Troubleshooting Systems .............................................................149
Basic Electronics Theory and DVC System Troubleshooting ........................................................149
Basic Electronics Introduction.........................................................................................................149
P/N: 021-00154, Rev. A.6 - updated for V4.7 Tools
Page | 7
Protection with Fuses and Special switches...................................................................................150
Get the entire valve shift you need .................................................................................................150
Trouble shooting the electronics in your system ............................................................................150
Troubleshooting the CAN Bus Communication network ................................................................152
Good grounding practices...............................................................................................................152
Appendix D Current Regulation using PID techniques ...................................153
Appendix E Pulse Width Modulation (PWM) and Dither ..................................155
Appendix F Flowchart (Sequence of Operations) example .............................160
Appendix G HCT Terminology and Definitions.................................................163
Appendix H Sensor Manufacture recommendations .......................................164
Appendix I Frequently Asked Questions...........................................................165
Introduction .............................................................................................................166
BIOS / PLM Version 4.0 ...........................................................................................166
BIOS / PLM Version 4.2 and Higher .......................................................................168
P/N: 021-00154, Rev. A.6 - updated for V4.7 Tools
Page | 8
1
DVC System and Software
1.1
Introduction
The DVC module family is user programmable with combinations of modules able to support a wide range of
hydraulic control applications. The DVC5, DVC7 and DVC10 are the master controllers and their flexible hardware
and software allow them to run many hydraulic control applications as a single module. This user guide illustrates
the techniques to create and maintain user applications that run on the DVC5/7/10 and the DVC family of expansion
modules. Instructions on how to use the DVC programming tools are provided along with definitions, programming
steps and examples. The DVC5/7/10 is programmable using the Programming Tools described in this manual. You
simply select the project type you are designing for via a main menu item. Programs written for the DVC5 are
compatible with the DVC10 whereas a DVC10 program may not be backward compatible with the DVC5 since the
DVC5 supports fewer components. The DVC7 has new features that when used by an application may require some
programming changes to port the application to the DVC5/10.
1.2
The DVC System Overview
The DVC5/7/10 modules are the main control modules for all other DVC series modules. You program them using
the graphical Programming Tool on your Windows PC. The provided PC based Program Loader Monitor software is
used for debugging and monitoring your executing program.
Your program defines the logic that controls your system while graphical displays are used to configure all of the
system input and output parameters. The DVC5/7/10 BIOS software provides high-level data to your program
regarding the state of each of your system inputs while the actual input/output electrical interfacing to sensors,
joysticks, potentiometers and valves is automatically handled for you.
The DVC5/7/10 and all DVC expansion modules are packaged in small rugged enclosures. All connectors are sealed
and each module is encapsulated to withstand extreme conditions in harsh operating environments. The hardened
enclosures allow you to locate the DVC modules near the sensors, valves, etc. they will control. This can greatly
minimize the amount of cabling in your system and significantly lower your costs.
P/N: 021-00154, Rev. A.6 - updated for V4.7 Tools
Page | 9
1.3
DVC7 Introduction
The DVC7 Programmable Valve Controller is the latest addition to the DVC family of modules. The DVC7 is
designed to be a low cost subsystem controller. The low cost DVC7 has enough processing power and input
output functionality to support a wide range of hydraulic applications. Should more capability be needed than
provided by a single DVC7, multiple interconnected DVC7s or the DVC5/10 and the DVC expansion modules
can be used.
The DVC7 comes in one version. It supports the RS232 connected D206 Graphical Display or DVC61 text
display or a handheld DP04 Pendant. The RS232 port on the DVC7 is used for loading and monitoring your
application program. Four light emitting diodes (LEDs) mounted around the connector on the DVC7 module
also are useful for monitoring your system’s execution.
The DVC7 has 3 Universal inputs (programmable to accept the most common sensor inputs), 2 analog inputs
(programmable for joysticks and potentiometers) and 3 digital/pulse inputs with digital input 1 able to be
configured as an SYSTEM ENABLE input.
New with the DVC7 and unlike the DVC5 and DVC10 the DVC7 has a single +5 volt regulated reference output
and ground. This reference can supply up to a total of 500ma of current. Multiple devices with varying current
requirements can be connected to this reference. Only the total load current of 500ma needs to be adhered
too.
In addition, the DVC7 has 6 High-Side (voltage and current sourcing) outputs and 2 PWM (pulse width
modulation) outputs for proportional and bang-bang valve control. The High-Side outputs provide +POWER
(system power typically 12-24 volts) when enabled by your program to the coils used to open or close your
valves. The PWM outputs serve two functions for proportional valve coil current closed loop control. First, they
provide the current return path from the negative side of the coil. This current is measured and compared to the
desired coil current. Given the difference between the desired and actual current the PWM pulse output duty
cycle (i.e. the percent of time current is allowed to flow through the coil) is adjusted to eliminate this error or
difference. The internal DVC7 circuitry and BIOS automatically adjust this PWM duty cycle and therefore the
effective voltage (and current) seen by the coil. This regulated valve coil current provides a constant valve
output (i.e. spool position), which is unchanged by coil resistance, connection length or power supply
fluctuations. The High-Side and PWM outputs can be used stand-alone or in conjunction with one another to
support the wide combination of valve types you may have in your system. From 2 to 8 valves depending on
the valve types can be controlled by a single DVC7. The DVC50 expansion module allows you to control more
valves if needed.
The DVC7 has four programmable LEDs two of which are located on each side of the connector. These LEDs
can be programmed in various ways depending on your application and module orientation in your system. For
instance the Module Status and Network Status LEDs can be programmed to be on either side of the connector
insuring their visibility in spite of the DVC7 orientation.
Also the DVC7 can connect to the CAN Bus via Device Net or J1939.
1.4
DVC10 Introduction
A single DVC10 module has a large number of inputs and outputs that allow it to work as a stand-alone unit or
be the main module for a large CAN Bus system with up to 14 DVC expansion modules. If your system is very
complex, additional DVC10s each controlling up to 14 expansion modules can share the CAN Bus and
communicate with other DVC10s. The RS232 port on the DVC10 is used for loading and monitoring your
application program. Light emitting diodes (LEDs) mounted on the DVC10 module and CAN Bus or RS232
connected DVC display modules can be used to monitor your system’s execution.
The DVC10 has 3 Universal inputs (programmable to accept the most common sensor inputs), 3 analog inputs
(programmable for joysticks and potentiometers) and 8 digital inputs (programmable for on/off switches).
Note: All universal and analog inputs have a corresponding Pot Reference output pin for ease of connecting or
switches.
P/N: 021-00154, Rev. A.6 - updated for V4.7 Tools
Page | 10
In addition, the DVC10 has 6 High-Side (voltage and current sourcing) outputs and 3 PWM (pulse width
modulation) outputs for proportional and bang-bang valve control. The High-Side outputs provide +POWER
(system power typically 12-24 volts) when enabled by your program to the coils used to open or close your
valves. The PWM outputs serve two functions for proportional valve coil current closed loop control. First, they
provide the current return path from the negative side of the coil. This current is measured and compared to the
desired coil current. Given the difference between the desired and actual current the PWM pulse output duty
cycle (i.e. the percent of time current is allowed to flow through the coil) is adjusted to eliminate this error or
difference. The internal DVC10 circuitry and BIOS automatically adjust this PWM duty cycle and therefore the
effective voltage (and current) seen by the coil. This regulated valve coil current provides a constant valve
output (i.e. spool position), which is unchanged by coil resistance, connection length or power supply
fluctuations. The High-Side and PWM outputs can be used stand-alone or in conjunction with one another to
support the wide combination of valve types you may have in your system. From 3 to 9 valves depending on
the valve types can be controlled by a single DVC10. The DVC50 expansion module allows you to control more
valves if needed.
Comparing the three DVC controllers
Below is a chart comparing the main features of the new DVC7 along with that of the DVC5 and DVC10.
Valves
High Side Outputs
PWM Outputs
Digital Inputs
Analog Inputs
Universal Inputs
Pulse Inputs
RS232
CAN DeviceNet/J1939
500ma Reference Output
5V->1kohm Reference Outputs
1.5
DVC7
4 to 8
6
2
3
2
3
6
Yes
Yes
Yes
No
DVC10
3 to 9
6
3
8
3
3
3
Yes
Yes
No
Yes
System Configurations
The DVC family is designed to control the simplest to most complex machines. Four different configurations are
supported namely:
DVC5/7/10 standalone with optional Graphical Display, DVC61 Display or DVC62 Display keypad
DVC5/7/10 directly connected to J1939 Engine Control systems over a CAN Bus/Device Net cable
DVC5/7/10 multiple sub system control with CAN Bus synchronization
DVC10 with multiple CAN Bus connected DVC Input / Output expansion and Display modules
These system configurations are illustrated below and on the next page:
P/N: 021-00154, Rev. A.6 - updated for V4.7 Tools
Page | 11
P/N: 021-00154, Rev. A.6 - updated for V4.7 Tools
Page | 12
P/N: 021-00154, Rev. A.6 - updated for V4.7 Tools
Page | 13
1.6
How the System Works
Here we will give you an overview of the operation of the DVC5, DVC7 and the DVC10 with the DVC expansion
modules they can control. While not being an exhaustive discussion of the DVC design and operation,
hopefully, this overview will allow you to better understand the Programming Tool and Program Loader Monitor
to see how your system operation is programmed and controlled.
There are 5 fundamental concepts we wish to introduce to you.
1. Each DVC module has a control program or BIOS providing services.
2. All of the expansion modules communicate to the DVC10 master controller and vice versa continuously.
3. Inter module communication and DVC5/7/10 application processing are performed in parallel.
4. The DVC5/7/10 common BIOS executes a defined sequence of operations every 10ms. This cycle time can
be set for anytime between 1 - 20ms and defaults to 10ms.
5. The BIOS provides many services that make application development much easier.
P/N: 021-00154, Rev. A.6 - updated for V4.7 Tools
Page | 14
First, every DVC module be it a DVC5/7/10 or DVC expansion module has an internal program or BIOS to
control the module’s operation and its communications over the CAN Bus. All of the modules operate
asynchronously with their own internal clock. The BIOS sets module internal circuits to correspond to the
input/output configurations you specify using the Programming Tool. The BIOS of a DVC expansion module
gets the input output configurations the user configured using the Programming Tool from the master
DVC5/7/10 through a series of CAN Bus messages. Once this profile is loaded into the module’s memory, the
module will setup, read and write to the inputs and outputs based on their individual type, configuration settings
and the application program.
Second, as your system operates, the DVC5/7/10 and each of the DVC expansion modules continuously
exchange messages between each other over the CAN Bus. Each expansion module sends messages
detailing the state of each of its hardware supported inputs and outputs. These messages include whether a
digital input is closed or open, an analog input’s voltage as a percentage of the user specified (i.e. configured)
voltage range and error flags such as a short being detected on a reference output pin. These messages are
received by the DVC5/7/10 and stored into its I/O memory. After receipt, the DVC controller has a complete
status of each of the expansion module’s input and output states. Similarly, the DVC5/7/10 records in I/O
Memory the state of its inputs and outputs. The application program references I/O Memory using predefined
variable names to decide what to do to control the system.
Third, in parallel with messages being transmitted between the DVC5/7/10 and other modules, the user’s
application program is being processed. As your application executes it can look at the current state of any of
the system input and output settings stored in the I/O memory. Usually it is looking for some specific input to
change (i.e. a digital input is closed or a new analog input value from a joystick movement) and as a result it will
transition to another state or bubble in the application where it will control an output in a certain way or look for
another input change.
Fourth, the DVC5/7/10 executes their resident user application and BIOS in a defined sequence, over and over,
typically in 10ms intervals. During each interval, any CAN Bus messages to be sent or that have been received
are processed. Next, it updates the input and output status for its own I/Os. Next, it analyses the Bubble logic
transition conditions for the application program. For instance, if your application is waiting on a digital input
from an expansion module to be closed to advance from its current state or bubble to the code in another
bubble that is done at this time. Finally, the Always code is executed for your application and then the active
bubble or new bubble’s code (after a transition) for the current logic sequence.
Finally, one other point worth noting for system operation is that the status of input and output pins is
communicated back and forth between modules often as a percentage of a user defined voltage or current
range. Thus a potentiometer setting can directly control a proportional value where the percentage of
movement of the potentiometer directly relates to the position of the valve. Also a nonlinear response can be
defined by using an IO Function curve to translate a potentiometer position percentage to the valve current
percentage. All of this behind the scenes BIOS processing and CAN Bus messaging makes application
development much easier than would otherwise be possible.
1.7
Closed Loop Control Principles
Closed loop control is a means whereby a feedback signal to the DVC is measured against a desired level or
set point. If the values differ then a corrective action is taken. The corrective action is generally a new valve
current setting that is obtained by adjusting up or down the PWM duty cycle. This adjustment is a continuous
process during operation and compensates for environmental factors such as high resistance wires or off spec
valves. In a PID system like that used by the DVC family the adjustment amount is a function of the error (set
point - feedback) and P and I terms. The P term scales the current adjustment proportional to the error and the
I-term scales the correction as a function of the error over time. These corrections are summed. The D term is
not used. Generally the higher the values of the P and I terms the faster the error will be corrected. Correcting
P/N: 021-00154, Rev. A.6 - updated for V4.7 Tools
Page | 15
to fast can cause over correction (i.e. overshoot) depending on the latency experienced by the feedback signal
changing given the adjustment. Most systems require the P and I terms to be tuned based on how your system
behaves.
It should be noted that when you desire a valve’s current to be set to 1 ampere for instance from 0 amperes the
PID system works as if the error at time zero is 1 ampere and the adjustment mechanism then sets the actual
PWM% to begin to correct the error. By plotting a particular PWM variable using the Program Loader Monitor’s
graph facility you can see how the correction is accomplished as a function of time for tuning purposes.
The DVC5/7/10 controllers provide for 3 distinct and different closed loop control mechanisms. They are:
1. Automatic proportional valve current regulation
2. Software controlled closed loop proportional valve current based on a sensor’s feedback signal indicating
pressure, position, temperature or RPM.
3. Software only closed loop control used typically for long latency systems.
In the first case, the PID technique is employed by the DVC hardware and BIOS to set and maintain the valve
coil current to the desired value.
In the second case, your application software calculates the feedback value and the set point and the DVC
hardware and BIOS adjusts the valve current (PWM %) based on the difference between the
setpoint (or target) and the calculated feedback.
In the third case, you control the PWM % setting through a repeatedly executed piece of software that reads
sensor input and does its own form of a PID adjustment.
1.8
Programming and Debugging the DVC5/7/10
The Windows PC based DVC5/7/10 Programming Tool gives
you the ability to program the DVC modules to work in a
variety of applications without large development costs.
Some knowledge of Windows, computer programming
and electro-hydraulics is beneficial.
The Programming Tool's main screen shown here is called
the Project screen. Every project consists of components. A
component can be a physical DVC5/7/10 module and a
number of DVC expansion modules. Additionally, software
components such as the Always code icon wherein you
program critical system functions and several logic sequence
icons wherein you program the normal operations of your
system. At a minimum, a DVC5/7/10 (Master) module and an
“Always” bubble icon must be defined. As your system grows
you add additional physical and programming components by right clicking your mouse on the Project screen
and selecting the component type you wish to add. Once selected from the pop menu, the component will be
added to the project as another icon. As a result, the Project screen contains all of the components, in the form
of movable icons, for the creation of your system application. Double clicking a component icon will allow you to
program or configure it. The next section lists the component types.
Note: If you wish to have another DVC5/7/10 module be the master controller of a portion of your system them
another Project needs to be created wherein that DVC5/7/10 and the components it controls are programmed.
Adding a DVC5/7/10 to DVC5/7/10 module to each project and configuring the messages to be sent back and
forth can enable communication between multiple DVC5/7/10 projects.
P/N: 021-00154, Rev. A.6 - updated for V4.7 Tools
Page | 16
Debugging your application is generally done with the assistance of the PC based DVC Program Loader
Monitor. This software supports a Virtual Display allowing your application to display variable values and where
the code is executing as well as showing you the status of the various inputs and outputs of your system.
The screens here show examples of the main debug windows.
1.9
Expansion Modules
As your system control needs grow, the DVC family is
designed to meet your needs easily and cost effectively.
The DVC family offers a wide range of expansion modules
that allow you to control your machine operation.
All of the following icons are accessible by right clicking on the Project screen. Double click the icons on the
Project screen to open up the component specific programming menus. Right mouse click an icon to delete it.
DVC5/7/10 to DVC5/7/10 – Enables communication between multiple DVC5/7/10s.
P/N: 021-00154, Rev. A.6 - updated for V4.7 Tools
Page | 17
DVC-21 – 40 additional digital inputs (sinking and sourcing) are provided.
DVC-22 – 40 additional Digital Inputs (Sinking only) are provided.
DVC-41 – 12 additional High-Side outputs are provided.
DVC-50 – Additional Digital /Analog /Universal Inputs, Output Groups are provided.
DVC-61 – Display and 5 Single Pole Double Throw Digital Inputs are provided.
DVC62 Pendant – A 4x20 character display and keypad data entry is provided.
DVC-65(RS232) – A serial text display is provided.
DVC-70 – Provide the ability to log data during run time for later retrieval.
.
DVC-80 Provides the J1939 to CAN Bus interface.
P/N: 021-00154, Rev. A.6 - updated for V4.7 Tools
Page | 18
D206 – Color Touch Screen Graphical Display.
Logic Sequence – Where system operation code is created using state machine like bubbles
Virtual Display - Where the Program Loader Monitor Virtual Display screens are defined.
DNET1
Device Net Module - Defines DVC10 communication to Device Net devices
1.10
Menus
The Programming tool features a menu across the upper portion of the project screen. The following is a
description of the items that compose the menu:
Menu Item
File
Submenu Item
New
Open
Restore BAK File
Save
Save as
Load Mem File
Print
Exit
Find / Replace All
Edit
Project
Compile
Help
1.11
DVC5
DVC5 / J1939
DVC10
Make
About
Description
Create a New Project
Open a DVC Project for modification
Restore the Previous saved/compiled project
Save changes to the DVC Project
Save a DVC Project to a new file
Load a Program Loader Monitor Modified Mem
File
Select and Print the DVC Project Code, Bubble
Logic diagrams, Module diagrams and Module
Data.
Shut-down the DVC Programming Tool
Search the Bubble code for a string and replace
the string
Set project type to DVC5
Set project type to DVC5 with J1939
Set project type to DVC10
Create the DVC User Application output files
Shows the Programming Tool’s Part number
and Version
Projects
A Project contains all of the information about your system in a form that allows you to specify and change your
system’s hardware and software components over time. The Programming Tool menus allow you to save your
P/N: 021-00154, Rev. A.6 - updated for V4.7 Tools
Page | 19
project (“projectname.dvc”) into a directory of your choosing and to reopen a previously saved project. When
your project is compiled (or make is run) five files are created for a project. These files have .dvc, .bak, .inf,
.mem and .pgm file extensions.
.dvc
.bak
.inf
.mem
.pgm
is the project file that contains the program text and input/output configuration data
is the project backup file
is the DVC70 configuration file used when downloading data from the DVC70 to the PC
is the memory image describing the system inputs and outputs configurations
is the DVC5/7/10 program file in a loadable format
1.12
Input Output Configuring
The DVC5/7/10 and the DVC expansion modules are all configurable using the Programming Tool’s graphical
displays. Each module’s input and output pin’s characteristics (sensor voltage range, valve coil currents, etc.)
as well as display and logging module fields can be specified. Once the values are specified, the DVC5/7/10
BIOS will read or write to the inputs and outputs or modules as specified.
1.13
Input Output Variables and Programming
The DVC5/7/10 execution environments allocate a memory area for each Input/Output of every module in the
system. This includes the expansion modules if they are used. The expansion modules send messages to the
DVC5/7/10 containing the values to be stored in their memory area on a periodic basis. This area is where
values
such as the input voltage, the percent of the range and error flags such as an open or short circuit has been
detected are recorded. The memory is allocated irrespective of whether or not a specific I/O is used in the
system or referenced in the application code. The memory area for each I/O is continually updated by the BIOS
and can be written to by the application code itself in some cases. Particular sections (typically a 2 byte word or
a single bit) of a I/Os memory area are identified by a variable name such as Dig_1 or Ana_1. For instance to
check if a switch has been closed you would write “If (Dig_1 = True)”. To check to see if that input has noted an
error you
would write “if (Dig_1.open = True or Dig_1.short = True) “. Each memory area has a predefined set of variable
names that are associated with specific sections (values) in the memory area.
1.14
Programming Example
The following example illustrates the general constructs used and the screen displays for configuring Inputs and
Outputs. The example is a relatively simple steering application that has been implemented using a DVC5
control module. The code consists of 4 parts namely:
Open loop test code for each I/O
The virtual display code for monitoring program execution and variables
Error checking for the status of the wiring connections in the
Always code
The unit LED updates
The actual steering control code
P/N: 021-00154, Rev. A.6 - updated for V4.7 Tools
Page | 20
1.15
Hints & Tips for code writing
The Intella programming environment allows the programmer to be creative in their programming style. Here
are some suggestions as how a program may be structured.
Create machine function flowchart (a.k.a. Sequence of Operations)
This idea forces the development team to understand what the function of the machine will be before the
program is written. Using flowchart notation, the development team documents each function of the machine.
In the case of a hydraulic log splitter, maybe the first function would be to assure the engine is running,
providing pressure for the pump. It is advised that the first flowchart of a project contain very simple steps in the
functionality. Later revisions can combine simple functions into more complex functions. Insert as much
information in this flowchart as possible. For instance, if there is a pressure relief valve in the machine, set at
1500psi, list that in the flowchart. Once the flowchart is finished, everyone should agree on the machine
functionality. This step will help to minimize changes to the program at a later date. This step could take
considerable time, but will make the program much sampler to write. Refer to appendix F for an example.
Separate different functions into different logic bubbles.
It is not incorrect to place all of the program logic in the always code, but it can slow down the program and
make it more difficult to troubleshoot. Time critical logic should be contained in the ‘always’ code. Different
functions should be contained in individual bubbles. For example, a pump control’s logic can be contained in a
bubble by itself. The logic to control the track drive of a bulldozer can be contained in a bubble by itself. These
functions may not be as critical as something such as looking for a high pressure situation.
P/N: 021-00154, Rev. A.6 - updated for V4.7 Tools
Page | 21
Use meaningful variable names.
The limit on variable size is 32 characters. A variable that isn’t an input or output device is called an internal
variable. An internal variable that is for Valve1 minimum current setting for the program loader monitor could be
labeled Valve1MinCurA_PLM_IV. This naming convention could be used throughout the program. An EEmem
variable for a valve’s minimum current setting could be named Valve1MinCurB_eem. Below are some other
examples.
Valve1ctl_AI2 – analog input#2. Variable names in capitol letters designate an abbreviation.
Cross_valve_UI2 – universal input #2.
Output_shaft_RPM_PI1 – rpm pulse input#1.
Pump#2_milling_pwm_OG1 – output group #1, pwm controlled motor.
OK_to_begin_led_OG3 – output group #3, discrete(bang bang) output to control LED.
Engine_rpm_lo_J1939 – The low byte of the engine rpm from the j1939 network.
Engine_temp_J1939 – The engine temperature from the j1939 network.
Network_status_eem - EEmem variable.
Mast_into_position1_IV – internal variable.
EEmem_spare_128 – eemem variable that doesn’t have a specific name because unused. Makes programmer
aware of spare EEmem addresses.
Declare all variables in one location
Have one area of one bubble that is executed once to declare all variable names. This area would include
unsigned integers (Uint), EEmemory variables (EEmem), Timers (timer), constants (const) and others. Declare
all 128 EEmem variables. Variables that aren’t used could be name EEmem_spare_89, or such. An exception
would be a variable that is decared private, this would have to be declared in the bubble used. Declaring all the
variables in one location could make it easier to add another variable at a later time, and provides for a cleaner,
more structured program.
Comment important information into the program
Information such as Programmer’s name, date of program creation, revision history, and any description of
something that is difficult to understand is appreciated by anyone offering assistance in troubleshooting the
program. Explaining a complex math equation can be beneficial at a later date to refresh the programmers
memory of why a function was built the way it was and to assist in troubleshooting. Comment as much or little
as necessary. Comments do not contribute to the compiled program (.pgm) file size. Remember to add a colon
(‘) before starting comments. The Intella software interprets the (‘) that the information to the right is not to be
compiled.
‘Programmer’s Name: Paul Programmer
‘Program creation date: 5/28/2007
‘Revision history: 5/28/07 – initial release
‘
6/12/07 – modified Always code to add temperature sensor to engine coolant
‘
2/25/08 – modified ‘Tank level’ bubble to add logic and hydraulic fluid level sensor
‘Program description: This program will…
‘
The math function for the tank level takes into consideration the ….
1.16
Circuit Protection
Each of the modules require adequate circuit protection. Use AGC type fuse. Each module requires 150mA for
internal circuitry. These modules also include the dvc61. If the module is capable of driving an output, then the
current required for that output is added to the 150mA. For instance, if a dvc7 is driving a 2 independent
cylinders, and the valves for the cylinders require 1.7A, then the total current for the dvc7 module would be
Dvc7 requirements
150mA
P/N: 021-00154, Rev. A.6 - updated for V4.7 Tools
Page | 22
(2) valves, 1.7A each 3.4A
Total current
3.55A
Of course, a AGC fuse of 3.55A is not available, use a fuse size near this calculated value.
2
Software Installation
2.1
System Requirements
Windows XP Professional
Windows Vista Business or Ultimate
40 megabytes of disk space to support a complete system install
PC with Serial Port - RS232 or USB port
For USB ports you need a USB to RS232 converter (i.e. Dongle)
DVC5/7/10 controller module
DVC10 serial cable
2.2
Installation
When you install the DVC development software following the steps outlined here you will have one
Programming Tool and one Program Loader Monitor that supports both the DVC5 and the DVC10.
To install the DVC development software, close all program applications. Insert the DVC Software CD in the
CD-ROM drive, and wait for the installer program to execute. The installer will guide you through the installation
procedure.
2.3
Software Overview
The DVC software package includes two applications named "Programming Tool" and "Program Loader
Monitor". These applications provide the means to configure, design, create, load, and monitor the user
application. The Programming tool is
configure the inputs and outputs and
program the control logic for an
application. The Program Loader
is used to download the user
application program files to the
DVC5/7/10. It also performs real time
monitoring of your system
inputs/outputs. Also, you can modify
input/output configuration settings (i.e.
analog ramp rates). Another feature
Program Loader Monitor is it allows
see and change EEmem variable
settings. For example, this is a
convenient way to have the user
with the system to change a
maximum pressure setting or input a
customer job number as the system is
running.
used to
Monitor
some
like
of the
you to
interact
Programming Tool
P/N: 021-00154, Rev. A.6 - updated for V4.7 Tools
Page | 23
Program Loader Monitor
P/N: 021-00154, Rev. A.6 - updated for V4.7 Tools
Page | 24
3
Programming the DVC Family
The "Programming Tool" is used to create your application for the DVC5/7/10. The "Program Loader Monitor" is
used to load the user application into the DVC5/7/10 module and monitor the inputs and outputs in real-time
mode as your application executes. Both programs are located in the Windows Start Menu under the
c:\Program Files\HCT Products. In order to create a user application, the following steps generally should be
followed:
a) Architect your system. In the design process compile a total list of digital inputs, pulse inputs, pwm outputs
etc. A total I/O count is needed to assure the correct amount of DVC inputs / outputs are specified in
external modules, if needed. Also, remember to allow room for expansion with spare I/O.
b) Define your system components and their interactions. HCT does have experience with a wide variety of
sensor manufactures. Request a sensor recommendation sheet of sensors known to work with the HCT
system.
c) Start the Intella Programming Tool. Create a new project by saving the file, i.e. hydraulic log splitter. Select
your Project type to be a DVC5, DVC5/J1939, DVC7 or DVC10 project.
d) Configure the DVC5/7/10 and DVC expansion module’s inputs and outputs that drive or sense your
components. With the mouse on the screen, right click to choose the expansion module. Insert the
expansion module, set the modules unique name and Mac ID#. Assign names to the real world I/O, refer to
section 1.16 for further guidance on I/O names.
e) Create a flow diagram of machine function (a.k.a Sequence of Operations) refer to section 1.16 and
Appendix F for additional information. Once the Sequence of Operations (SoO) is complete, this needs to
be converted into a program. The ‘always’ code as well as bubble logic sequences will be used during this
step. Refer to section 5 for programming examples. Refer to Appendix A for compiler keywords. Program
the control logic as to how the outputs respond to the inputs.
f) Compile the program. Refer to section 3.1.
g) Load the compiled program files into the DVC5/7/10. Refer to section 3.5.
h) Run your system and debug your application.
Graphical windows allow you to specify the system components you will need and the electrical characteristics
of your inputs and outputs. Text screens are provided to enter the program control logic (using a subset of the
Basic language) for both your time critical and normal operations.
3.1
Compiling Your Program to Create the Output Files
After configuring the DVC5/7/10 inputs and outputs and creating the program code, click the Compile menu item
in the Project window and select Make to create the output files. If there are no errors, the Programming Tool
will create two or three files. The two primary files needed for the next step are projectname.pgm and
projectname.mem. These are the two files that will be loaded into the DVC5/7/10. A third file projectname.inf is
generated if a DVC70 is in the project. A fourth file projectname.dvc is the project file where all of the
programming tool information is contained.
Note: If the compiler detects an error during compilation, an error display will pop up and the line in your
program with the error will be highlighted.
3.2
Loading DVC Filesll projectname.dvc files contain information enabling the system to open previously
saved project files. Once open you can make modifications to the Input / Outputs, control code and system
configuration. To open a project, click on the File menu item in the Project window and select Open. Finally,
select the appropriate “projectname.dvc” file.
P/N: 021-00154, Rev. A.6 - updated for V4.7 Tools
Page | 25
3.3
Saving DVC Files
To save your project click on the File menu item in the Programming Tool project window and then select the
Save menu item. This saves the project file under the current filename. To save your project with a different
name click on File and select “Save as” on the menu selection. Type a new filename and save your new .dvc
project file.
Note: If you select an existing project name, the existing file will be deleted and replaced with the new DVC
project file. Also, if the open project has changed and you choose to exit the Programming Tool, you will be
prompted to save your project.
3.4
Restoring DVC Files
Every time the Programming Tool saves a projectname.dvc project file, a backup file is made of the previous
projectname.dvc file. The Programming Tool does this by changing the projectname.dvc file extension to
projectname.bak before creating a new projectname.dvc file. When Restore BAK file is selected from the File
menu, the Programming Tool automatically loads the last backup made, if one exists, for the current open
project. The restore feature allows users one level of undoing changes.
3.5
Loading PGM and MEM files
After a DVC project has been successfully compiled, it is ready to be loaded into the DVC master control
module.
During compilation the Programming Tool creates two files named projectname.pgm and
projectname.mem. One additional file named projectname.inf is created if a DVC70 module is included in your
DVC project and used when you extract data from the DVC70 module. The .pgm and .mem files contain the
users’ application code in an executable format. The .pgm file contains the compiled application code and is
referenced by the Program Loader Monitor when you load the application into the DVC5/7/10. The .mem file
contains the memory information that specifies the configuration for all of the system inputs and outputs and is
loaded along with the .pgm file by the Program Loader Monitor
Note: .mem files contain all of the DVC physical information. If changes are made to the DVC configuration
with the Program Loader Monitor, you can update the DVC program with the new configuration data by doing
the following. Using the Program Loader Monitor, save a new .mem file by clicking on "Export to File". Using
the Programming Tool, open your project and click "File" and select "Load Mem File". Select the .mem file and
click Open. The program will automatically update all of the DVC physical information.
3.6
Selecting or Changing Your Project Type
Using the Project Menu of the Project window you can select from amongst four project types. These are:
DVC5
DVC5/J1939
DVC7
DVC10
When you first execute the Programming Tool a DVC10 empty project is assumed. When you change any
project from a DVC10 to a DVC5, DVC5/J1939 or DVC7 type, the Programming Tool will warn you about any
incompatibilities. Remember, the DVC5 does not support expansion modules whereas the DVC7 and DVC10
do.
When you open an existing project file, the system will know what type of Project the file represents from data
stored in the .dvc file. Converting a DVC5 project file to a DVC10 is as simple as opening the DVC5 project and
selecting the Project Menu -> DVC10 item. Any code or I/O configurations you specified for the DVC5 will work
unchanged on the DVC10. Converting a DVC10 project to a DVC5 type is done the same way but the system
will warn you if expansion modules in your original DVC10 project are not supported. Converting a DVC7
P/N: 021-00154, Rev. A.6 - updated for V4.7 Tools
Page | 26
project to a DVC5/7/10 is more involved because of the new features added to the DVC7 such as configurable
LEDs and digital inputs with pulse capability.
3.7
Programming the DVC5/7/10
The DVC hardware is very flexible and
supports many input and output configurations. For quick reference
the inputs and outputs have been
grouped into the following: Digital Inputs, Analog Inputs, Universal Inputs,
Output Groups and Input/Output Functions. To configure the hardware,
access each of the groups by clicking on the associated buttons. The
buttons are are aligned vertically underneath each group name. Click on a
button to access the configuration options for that input or output.
The following subsections give the definitions
of each of the fields accessible in the DVC5/7/10
configuration window.
3.8
Program Name and Passwords
Program Name:
When the application executes, the Program Loader Monitor will display the program name.
Range: 16 Characters.
Send Password: (1)
Level 1 Password to limit access to certain screens in the Loader Monitor.
Range: 16 Characters.
App Password: (2)
Level 2 Password to limit access to certain screens in the Loader Monitor
Range: 16 Characters.
Bios Password: (3)
Level 3 Password to limit access to certain screens in the Loader Monitor
Range: 16 Characters.
P/N: 021-00154, Rev. A.6 - updated for V4.7 Tools
Page | 27
3.9
DVC Program Loader Monitor Password Implementation
The password scheme is implemented to protect customers from software vandalism or unskilled users. First,
the passwords are defined using the Programming Tool and are downloaded into the DVC5/7/10 when the
project files are loaded. Next, the Program Loader Monitor asks you to enter a password for the level of access
you wish to have to the run time environment. The Program Loader Monitor has 3 levels of password protection.
The level of the password entered in the Program Loader Monitor determines your access and ability to issue
commands. The three levels are 1: Send Changes, 2: Load Applications, 3: Load BIOS. Higher numeric levels
include all of the abilities of the lower levels. If no password is entered when the Program Loader Monitor is run
then default access is given to the user to view the status of the DVC5/7/10, factory information, EE memory
(non-volatile memory where program variables can be stored in the event of power failure) and DVC expansion
modules. However, if all password fields are left blank in the Programming Tool, level 3 accesses is given by
the Program Loader Monitor.
Level 1: Send Changes
This level allows the user to view/send changes to the Output Groups, Analog Inputs, and I/O Functions. The
user can also export memory to a file and send changes to the EE memory.
Level 2: Load Application
This level allows the user to download a new application to the DVC.
Note: DVC software tools do not allow reading back programs stored in the DVC, so additional read back
protection is not required.
Level 3: Load BIOS
This level allows the user to make changes to the Factory Information settings. These settings include MAC ID,
CAN Bus type and CAN Bus baud rate. These settings will be explained later.
This level allows the user to download a BIOS file to the DVC5/7/10. The BIOS (i.e. kernel) is the HCT supplied
code that controls the execution of the DVC application and provides services to the application. It executes the
.pgm file code, monitors and controls the entire user configured input/outputs and schedules the execution of
the Always and logic sequence code.
3.10
Digital Inputs and Programmable LEDs
Eight digital inputs are provided in the DVC10 controller and three and four for the DVC7 and DVC5
respectively. You use the Program Loader Monitor to interrogate the digital inputs on the DVC7. On the
DVC5/10 modules each input has an associated LED. In addition the DVC5 has four programmable LEDs. To
illuminate these DVC5 LEDs in a specific pattern to indicate an error condition for instance you use the
keywords DVCLED_1, DVCLED_2, DVCLED_3 and DVCLED_4 to turn an LED on or off. DVCLED_4 = true
will illuminate the fourth LED on the DVC5 module.
All of the controllers have a programmable red status LED for indicating error conditions your application
detects.
Digital inputs are set by the opening or closing of a switch during system operation. The activation of a switch
presents a voltage waveform to a DVC5/7/10 digital input pin. The DVC hardware and software interpret the
waveform and convert it to a true or false value for the application program. The true or false value (> 0 or 0
numeric value respectively) is passed to the application program via a program variable with the name of the
input. Your application program control logic then determines what to do given this input state.
P/N: 021-00154, Rev. A.6 - updated for V4.7 Tools
Page | 28
A typical digital input waveform as seen at the DVC digital input pin looks like the following:
+PWR
De-bounce Time
Time
The DVC5/7/10 support two electrical configurations called Sinking and Sourcing. In the Sinking case, the
switch is powered externally and the digital input pin detects the switch being open or closed and supplies a
connection to ground through a resistor for the current when the switch is closed. In the Sourcing case, the
DVC supplies the power (i.e. +5vdc reference voltage through a 1k ohm resistor via a second DVC reference
pin connected to the digital input) for the switch as well as the digital input pin where the switch being open or
closed is received. The DVC5 and DVC10 have 4 and 6 reference pins respectively. The DVC7 has a single
+5vdc regulated Reference output capable of driving up to 500ma of current. If you use a reference output for
a switch on the DVC5/10 controllers and you wish to check the Reference pins voltage (to detect miswiring or
other abnormal conditions) you can do this using the Analog input or Universal input configuration name for the
particular reference pin you intend to use. To use a Digital Input in sourcing mode on a DVC7, an external
series resistor must be used to limit the current sourced from the internal reference voltage regulator to
prevent shorting the reference voltage to ground through the inputs switch. A 1K ohm 1 Watt resistor will
protect the reference voltage regulator from shorts to ground and shorts to power in.
The two configurations of digital inputs supported by the DVC hardware are:
Sinking (Externally Powered Switch)
Sourcing (DVC Ref Voltage Supplied)
to DVC POT REF Pin
(1K-ohm resistor connected to +5v
or DVC7 500ma regulated
reference)
+ PWR
( +3Vdc to +32Vdc)
to DVC DIGITAL IN
Pin (10k ohm resistor
to PWR COM)
to DVC DIGITAL IN Pin
(10k ohm resistor to PWR COM)
PWR COM
Note: the DVC circuitry senses the voltage change at the edge of the
waveform and if the transition state is the same after the de-bounce time
interval then the new state is deemed valid and communicated to your
application via the input’s variable name True or False setting.
To configure a digital input, click one of the Digital Input buttons on the DVC
screen. The Name field’s value is the way this input will be referenced in your
user application.
The De-bounce Time setting is used to avoid recording momentary spikes
on the input as valid state changes. The polarity determines what voltage
level is interpreted as a true or false or which edge causes a change in the
state of the input. An explanation of how the DVC interprets inputs. In No Toggle, the state of the input flag
will change to True any time the Active Polarity Input condition is met including debounce time and back to
P/N: 021-00154, Rev. A.6 - updated for V4.7 Tools
Page | 29
False if it is not met. In Toggle mode, the input state is set to True on the first occurrence of the Active Polarity
instance and remains true until the second instance of the Active Polarity, always observing debounce time.
Software toggle changes the state of the program variable when a rising edge or falling edge is detected on the
input. For an input in Toggle mode the application program can also set the input state at any time. Digital
input 1 can be configured to be a System Enable (Emergency Stop) type. When this Software Toggle mode is
selected and the digital input is true the BIOS will automatically turn off all of the current paths to the valves and
require a power cycle to resume operation.
Note: Regardless of what type of digital input switch configuration is used, the DVC will react the same
according to the voltage seen at the input. See the hardware manual for instructions on hooking up a switch in
order to provide the desired voltage levels.
The following subsections give the definition as well as an overview of each of the fields in the Digital Input
screen:Name
Name used in the bubble logic code to access this digital inputs state and its associated properties.
Range: 16 Characters with no spaces. Valid characters are A-Z, a-z, 0-9, and "_".
Rules:
The first character cannot be a number.
Compiler Keywords or other Names already in use are not valid. A valid example is "Boom_Extend".
De-bounce Time
The number of milliseconds the system will wait after a change in voltage at the input before accepting a change
in input state.
Range: 0 to 9990ms in 10ms Increments
Polarity
Polarity High is considered true, active, on when > 2.5 Volts is sensed at the input pin.
Polarity Active Low s considered true, active, on when < 2.5 Volts is sensed at the input pin.
Range: Active High, and Active Low
Software Toggle
In Toggle Mode, the rising or falling of the digital input (with respect to debounce and polarity Active High or
Low) will reverse the state of the variable. Software Toggle gives the programmer the ability to Latch an input
variable.
Range: Toggle, No Toggle
Polarity
Active High
Active Low
Software Toggle
Toggle
Variable changes states when
input goes from Ground to >
2.5 Volts
Variable changes states when
input goes from > 2.5 Volts to
Ground
P/N: 021-00154, Rev. A.6 - updated for V4.7 Tools
No Toggle
Variable is true when input is >
2.5 Volts
Variable is true when input is
ground
Page | 30
Digital Input Code Example
Code
If (Dig_1 = True) Then
HS_1 = Dig_1
PWM_1.Dir = Dig_1
Dig_1 = False
DVCLED_1 = True
Comments
if logic test True or False based on the state of
the input
Sets an output to the state of the Input
Set direction of a dual coil based on the state
of the input
Set the state of an Input to False (Toggle mode
Only)
Turns on the programmable LED of a DVC5
DVC7 Digital Pulse Inputs
The DVC7’s digital inputs can be configured to be pulse inputs with RPM and counter modes. You configure the
digital inputs using the following two windows. The modes operate very much like the Pulse input capability of
the Universal Inputs.
You access the Pulse capability using the variables
Dig_1.RealRPM
Dig_1.PulsesperRev
Dig_1.Pulsetimeout
Dig_1.counter
Dig_1.LOS
Input Impedance
The input impedance for all inputs, other than current inputs is 10k ohms. The input impedance for current
inputs is 120 ohms.
P/N: 021-00154, Rev. A.6 - updated for V4.7 Tools
Page | 31
3.11
Analog Inputs
Voltage conditioning for Analog Inputs
All inputs on the DVCs are rated for a Maximum of +/-32 Volts. The working voltage on the universal and analog
inputs for the dvc7/10/710 is 0 to +5 Volts (optional +/- 1, 0 to +10 volts for the DVC10/710). The signal will
need to be clamped positive or negative that exceeds 32 Volts. Suggest clamping to 28 Volts.
Analog inputs are 0-5V level reading inputs. There are 2 such inputs on the DVC5 and DVC7. The DVC10 has
3 Analog inputs. Analog inputs return the value of the voltage at an input pin to the application as a percentage
of the calibrated voltage range represented by a ten-bit value (0 (0%) ->1023 (100%) decimal). The resolution is
to the nearest tenth of a percent.
New with the 4.7 release each Analog input can be configured as a digital input by selecting the Active High or
Active Low button in the lower right hand corner of the configuration window. When one of these is selected the
Ana_1 name will be set to true when the voltage input exceeds 2.5 volts for Active High and false for Active
Low. NOTE: Analog Inputs are internally pulled High through a 1M Ohm resistor. Therefore, if selected to be
used as an Active High Digital Input, the input may not be allowed to float when not in use. An external 2K
resistor between the input pin and ground may be used to Pull down the input pin.
On the DVC5/10 controllers each Analog input has a corresponding reference output to make the wiring of
potentiometers easier. Each Analog input can be configured to only sense the input voltage or to supply power
to the circuit using the reference output pin and sense the input. The DVC7 has one common reference output
that can be used by several Analog input circuits as long as the total current load of 500ma is not exceeded.
DVC POT REF Pin
(1K ohm resistor connected to
+5v
Or +5V regulated 500ma
output)
Potentiometer -10k ohm
to DVC5/10 Analog In Pin
0 to ~4.55 volts
To DVC7 Analog In Pin 0 to 5volts
P/N: 021-00154, Rev. A.6 - updated for V4.7 Tools
Page | 32
PWR COM
Analog inputs can be noisy or have abrupt voltage swings (i.e. joysticks). To help the application developer with
these problems the DVC5/7/10 support smoothing functions or ramps and noise filtering. Noise filtering is
effectively accomplished by the 10ms input sampling period of the DVC hardware and the deadband facility
provided. Ramps allow successive 10ms voltage measurements to be damped. For example, rather than
returning the percentage of the min/max range the raw voltage represents, the returned percentage value will be
determined by the ramp up/down rate over the min to max voltage range.
The purpose of ramps is to slow (damp) the voltage transitions as seen by the application program. Ramps are
especially useful for joystick control. If the joystick is moved abruptly in one direction or another the ramp
mechanism will effectively slow down the movement and enable the system to respond more gracefully.
Another joystick control filter is the deadband specification. When the analog voltage read from the joystick is in
the range of Center Volts – deadband to Center Volts + deadband the returned percentage value is 0. So if the
joystick moves slightly from the center it will have no effect on the system until it exceeds the deadband range.
Note: The ramp up or ramp down time used depends on the difference between the last two input voltage
samples within the min to max range. Ramp time between any change in input voltage is the product of the
User Selected Ramp Time and the difference between 0% to 100% of the User Selected Calibrated Voltage.
For example a 5 second ramp entered for an input calibrated to .1 to 4.5 Volts would return a 2.5 second ramp
with an instantiations voltage change between 1 Volt and 3.2 Volts.
The setting of the analog input characteristics is done using the DVC5/7/10 Programming Tool: Analog Input
window on the previous page. The configuration input fields are divided into logical sections. Some input fields
may be disabled depending on the boxes checked (i.e. Enable Center and Enable Ramps). First, give the input
a name that allows you to reference the specific input and its properties in your application. If the input has a
center, put a check in that box, and enter the direction names. When Enable Center is checked you must use
the Min Volts to Center Volts and Center Volts to Max Volts names in your application. If the analog input needs
voltage ramps, check that box. Calibrate the input with a voltage meter or the Program Loader Monitor and fill in
the Voltage Calibration Min, Max, and Center. Enter the Voltage limits and Reference limits. These values are
used to detect an open or short circuit condition or excessive voltage on the input. To set the voltage limits click
on the Auto Set Voltage Limits button. The Invert Output selection will make the program variable value equal
to 100% at MIN Volts and 0% at MAX Volts.
The following subsections give the definition as well as an overview of each of the fields in the Analog Input
screen:
Name
Variable name used in the application program to access this input’s value as a percentage of the voltage range
or true/false for a digital input and it’s associated properties.
Range: 16 Characters with no spaces. Valid characters are A-Z, a-z, 0-9, and "_".
Rules:
The first character cannot be a number.
Compiler keywords or other names already in use are not valid. A valid example is "Steering".
Min volts to Center volts
Name: Access word for the % of Center + Deadband to Min value
Range: 16 Characters with no spaces. Usable characters are A-Z, a-z, 0-9, and "_".
Rules:
The first character cannot be a number.
Compiler Keywords or other Names already in use are not valid. A valid example is "Steer_Left".
Ramp Down:
P/N: 021-00154, Rev. A.6 - updated for V4.7 Tools
Page | 33
When Enable Center is not checked, Ramp Down is the ramp time from Max to Min Volts. Checking Enable
Ramps allows you to specify the Min to Max and Max to Min ramp times.
Otherwise, Ramp Down is the ramp from Center - Deadband Volts to Min.
The Ramp time is the amount of time to ramp from 100% to 0%.
Range: 0.0 to 65.00 s
Ramp Up:
When Enable Center is not checked, Ramp up is the Ramp from Min to Max Volts.
Otherwise, Ramp Up is the ramp from Center + Deadband to Max Volts.
The Ramp time is the amount of time to ramp from 0% to 100%.
Range: 0.0 to 65.00 s
Center volts to Max volts
Name: Access word for the % of Center + Deadband to Max
Range: 16 Characters with no spaces. Valid characters are A-Z, a-z, 0-9, and "_".
Rules:
The first character cannot be a number.
Compiler Keywords or other names already in use are not valid. A valid example is "Steer_Right".
Ramp Down:
Ramp Down is the ramp from Max to (Center + Deadband) Volts.
The Ramp time is the amount of time to ramp from 100% to 0%.
Range: 0.0 to 65.00 s
Ramp Up:
Ramp Up is the ramp from (Center + Deadband) to Max Volts.
The Ramp time is the amount of time to ramp from 0% to 100%.
Range: 0.0 to 65.00 s
Voltage Calibration
Calibrate the input with a voltage meter or the PLM and fill in the Voltage Calibration Min, Max, and Center
voltages.
The min, max and center values allow you to redefine the 0 to 100% voltage values.
Min: The minimum voltage.
Range: 0 to 4.99v
Center: The center voltage.
Range: .01 to 4.99v
Max: The maximum voltage.
Range: .01 to 5.00v
Voltage Limits
These values are used by the system to sense an out of bounds voltage condition at the input. The Voltage
Limits may be used to detect an open or shorted input wire or overdrive condition. These conditions are
P/N: 021-00154, Rev. A.6 - updated for V4.7 Tools
Page | 34
normally due to faulty wiring. The condition is communicated to the program using the Name.MinF and
Name.MaxF variable names where Name is the name you gave to the input like Ana_1.
Min: If the input voltage is less than this set point, Then “Name.MinF” is set to true.
Range: 0 to 4.99v
Note: If the voltage goes out of range, the user must reset Name.MinF manually to false.
Max: If the input voltage is more than this set point, Then “Name.MaxF” is set to true.
Range: .01 to 5.00v
Note: If the voltage goes out of range, the user must reset Name.MinF manually to false.
Reference Limits
These values are used by the DVC5/10 system to sense an out of bounds voltage condition at the Reference
output pin when it is connected. The Reference limits can detect an open or shorted reference wire. The
normal way this happens is when the system is wired incorrectly. A normal value for this pin is approximately
4.5 volts. Values above 4.75 and below 4.25 volts are probably indicative of an error. The condition is
communicated to the program using the Name.MinRF and Name.MaxRF variable names where Name is the
name you gave to the input like Ana_1.
Min: If the Reference Voltage is less than this set point, “Name.MinRF” is set to true.
Range: 0 to 4.99v
Max: If the Reference Voltage is less than this set point, “Name.MaxRF” is set to true.
Range: 0.01 to 5.00v AND always > Ref Min Limit Volts by .01
Invert Output
When Invert Output is checked, the returned percentage values of the voltage range will be 0 for MAX Volts and
100% for MIN Volts.
Range: Checked/Unchecked
Enable Ramps
Turns on the ability to set the Ramp Times
Range: Checked/Unchecked
Enable Center
When unchecked the percentage value returned to your program via the variable “Name” would be directly
proportional to Max - Min with Min equal to 0 and Max equal to 100%. When checked, the center is 0% and the
min and max volts will be 100% with respect to Invert Output.
Range: Checked/Unchecked
Deadband %
The deadband percentage specifies the range of voltage above and below the center point that is effectively
center. In the deadband voltage range the returned percentage value for this analog input is 0%.
Auto Set Voltage Limits
The Auto Set Voltage Limits will set the Voltage Limits based on the Voltage Calibration Settings. The voltage
limits will be set to one-half of the difference between the Reference and Voltage Calibration values for both the
min and max values.
Gain / Offset Calculator
When analog input voltage values are to be displayed by the Program Load Monitor
this facility will automatically scale the value displayed according to a linear equation of
P/N: 021-00154, Rev. A.6 - updated for V4.7 Tools
Page | 35
the form y = gain * x + offset where x is the analog input’s value and y is the scaled value. This is convenient to
c
Code
Comments
o
If
(Ana_1
>
5%)
Then
If
Input % is greater than 5%
n
PWM_1
=
Ana_1
Sets
an PWM% output to the Analog Input %
v
PWM_1.Dir
=
Ana_1.Dir
Set
direction
of a dual coil based on input (if centered enabled)
e
If
(Ana_1.MaxF)
then
Test
if
Maximum
Volts threshold reached
rt
If
(Ana_1.MaxRF)
then
Test
if
Reference
Maximum volts threshold reached
a
Ana_1.MaxRF = 0
Clear /Reset condition or flag (retry)
s
ensor voltage to actual units like PSI.
The Gain / Offset Calculator was designed in order to help the application developer calculate values for Gain
and Offset.
Calculations:
LowBits = (Low End Value / Scaling Factor)
HighBits = (High End Value / Scaling Factor)
Note: The Scaling Factor is dependent on the Input chosen
Gain = (High End Engineering Units - Low End Engineering Units) / (HighBits - LowBits)
Offset = (High End Engineering Units - Low End Engineering Units) - (HighBits * Gain)
Analog Input Sample Code
3.12
Universal Inputs
There are two Universal Inputs available on
the DVC5 and three Universal Inputs on the
DVC7/10, consult your hardware manual for
features available on individual modules.
These inputs are programmable to accept
the most common sensor outputs. On the
DVC5/10 each Universal input also has a
Reference output pin that can supply a
voltage to a circuit like a potentiometer. The
DVC7 provides a single common regulated
reference output for all Analog and
Universal input circuits with a 500ma current load limit.
New with the 4.7 release each Universal input can be configured as a digital input by selecting the Active High
or Active Low button in the lower right hand corner of the configuration window. When one of these is selected
the Uni_1 name will be set to true when the voltage input exceeds 2.5 volts for Active High and false for Active
Low.
Three types of inputs are supported and are selectable for each of the inputs. They are Analog input (Voltage) /
Current, RPM Pulse Input and Counter Mode input types. A fourth type of input is Quadrature and using this
requires two Universal inputs to be used. On the DVC7/10 these are inputs 2 and 3 and on the DVC5 these are
inputs 1 and 2. Quadrature is a method of determining speed direction using two pulse inputs.
On the DVC10 each universal input can have one of four ranges namely: –1 to +1volts, 0 to +5volts, 0 to
+10volts or 0ma to 22ma. On the DVC7 each universal input can have one of two ranges namely: 0 to +5volts or
P/N: 021-00154, Rev. A.6 - updated for V4.7 Tools
Page | 36
0ma to 22ma. On the DVC5 only 0 to +5volts is supported. Note that on the DVC5/7 0 to +10volts requires an
external voltage divider to be connected.
To identify a Universal Input to your application program, fill out the name field or use the default. Each
universal input needs at a minimum its input type and input range to be selected.
Note: The Universal Input configuration window will display certain fields while deactivating others based on the
Input Type selected.
Input Fields
For Universal Inputs, the setup process is similar to the Analog Input setup. Refer to the previous Analog Input
section of this manual for a complete description of the analog input configuration options. The main difference
between Universal and Analog inputs is the input ranges supported. Analog inputs only support 0 to +5 volt
operation.
RPM Pulse Inputs
For RPM pulse inputs, specify the RPM Limits (min and max), and the RPM Calibration parameters (min and
max). RPM Calibration values set the 0 and 100% variable return values. The RPM Limits set error variables
when these values are met or exceeded. Because 0 RPM can never be counted, the Pulse Time Out field is the
number of seconds the system will wait until the RPM variable is set to 0 by the BIOS and set the pulse time
out flag "name.LOS". Pulses per Rev is the number of teeth on the pulse pickup device. The DVC5/7/10 can
count pulses to a total limit of 24khz or 8khz per input on average.
Counter Mode Inputs
For Counter Mode pulse inputs, setup the min and max counts under Count Limits. The output value will be a
percent of the min to max difference. The counter value may be read or set by the application. The counter is
incremented on every falling edge of the pulse input. When the count reaches the max value it remains at that
value until set to a new value by the application program.
Quadrature Inputs
Quadrature is a method of determining Speed, Direction or Position using two pulse inputs.
For a Quadrature pulse input, setup the min and max count under Count Limits. On the DVC7/10 Quadrature
mode can only be selected with Universal input #2 and will also use Universal input #3 for the second pulse
train. The DVC5 uses inputs #1 and #2. The output will be the percentage of the min to max count. The counter
value may be read or set by the application. The counter will be incremented or decremented on every rising
and falling edge of both pulse trains based upon the phase of the two inputs. Direction is determined by the
pulse count going up or down while speed is determined by the absolute value of the pulse count change as a
function of time.
The following gives the definition as well as an overview of each of the fields in the Universal Input screen not
covered in the Analog Inputs section.
Name
The name used in the bubble logic screen to access this variable and it’s associated properties.
Range: 16 Characters with no spaces. Usable characters are A-Z, a-z, 0-9, and "_".
Rules:
The first character cannot be a number.
Compiler Keywords or other names already in use are not valid names. A valid example is "Conveyor_Speed".
Input Type
Contains all the configuration selections for the universal input
Range: Analog Input, RPM Pulse Input, Counter Mode, and Quadrature Mode
Input Range
Select the range of the input voltage or current for Analog and Pulse Inputs
Range: 0 volts to 5 volts, Volts to 10 Volts, -1 volt to 1 Volt, and 0 milliamps to 20 milliamps
Pulses Per Rev
The amount of pulses the processor will detect in one revolution
Range: 1 to 9999
P/N: 021-00154, Rev. A.6 - updated for V4.7 Tools
Page | 37
Pulse Time Out
The amount of time elapsing without detecting a pulse before turning RPM to 0
Range: 0 to 2.0 seconds
Count Limits
Min:
0 to 65535
Max: 0 to 65535
Universal Input Code Sample
Code
If (Uni_1 > 5%) Then
PWM_1 = Uni_1
PWM_1.Dir = Uni_1.Dir
If( Uni_1.MaxF) then
If (Uni_1.MaxRF) then
Uni_1.MaxRF = 0
If (Uni_1.RealRPM > 500) then
Uni_1.MaxVolt = Uni_1.RawVolts
If (Uni_1.LOS) then
Uni_1.Counter = 512
3.13
Comments
Test to see If Input % is greater then 5%
Sets an PWM% output to the Analog Input %
Set direction of a dual coil based Input (if center enabled)
Test Maximum Volts threshold reached ever
Test Reference Maximum volts threshold reached ever
Clear /Reset condition-flag (to retry)
Test Actual RPM > 500 RPM
Set voltage max to volts seen (Calibration Example)
Test loss of signal (pulse input only)
Set counter to value (counter or Quadrature type only)
Output Groups
The three DVC5/7/10 Output Groups are used to
configure and control valves.
Each group has 2
programmable voltage source output pins (High-Side)
and one output (2 Low-Side current sensing and sinking)
pin. The DVC5 and 7 have only two low-side pins. This
pin is thought of as an output even though it receives
current and measures it. This is because the Low-side
pin using circuits internal to the DVC module also
controls the amount of time (duty cycle) the current
sinking mode is active by the application setting the
output PWM% (Pulse Width Modulated) variable. The
PWM% represents the effective High Side coil voltage.
This voltage will equal the PWM% times the system
voltage. The switch control shown in the diagram below
is the output PWM circuit.
The DVC5/7/10 controllers can control two kinds of
valves. The first type is Bang-bang valves or quick
opening valves that are fully on or off. The second type
is Proportional valves (PWM% controlled) that are
controlled by continuously measuring the received coil
current and comparing the value to a desired value and adjusting the PWM% up or down to correct the error.
The output groups are designed to give the user a great deal of flexibility. The software gives the user the ability
to control the voltage (High-Side) to the positive side of the coil and control the PWM current sinking capability
(PWM OUT) from the negative side of the coil.
Refer to the Appendices for a more in depth discussion of PWM, Dither and the PID technique used to regulate
coil current.
HIGH-SIDE OUTPUTS (HS OUT) – Qty (6 for DVC5/7/10)
P/N: 021-00154, Rev. A.6 - updated for V4.7 Tools
Page | 38
These outputs are designed to source (supply) power supply voltage when enabled. Each output is short circuit
protected and has open circuit detection. The maximum current per output capability is 3.3 Amps.
PWM OUTPUTS (PWM OUT) – Qty (2 for DVC5/7 or 3 for DVC10)
These outputs are designed to sink current to ground at the PWM frequency (19 khz). Each output can be
configured for a specified current range for maximum current sensing resolution. All outputs are short circuit
protected and most current ranges have both open circuit and short circuit detection (see Current Range Details
for more information).
Current Range Details
Each DVC10 PWM output can be configured to a current range, which will produce the maximum current
sensing resolution.
3.3amp, 1.67amp, 1 amp, 500 ma, 250 ma, 125 ma and 63 ma valves plus 90 ma or less EDC valves are
supported.
The DVC5 support a high current (0 to 3.3amps) range and low current (0 to 90ma) range.
The DVC7 support a high current (0 to 3.3amps) range.
The basic proportional valve control circuit looks like the following:
DVC5/7/10 programmable
High-Side
Voltage source
+V
Valve Positioning Coil and Spool
Switch
Low-Side Input
Programmable
Switch (PWM)
Current Measuring Device
GND
A Bang-Bang valve circuit looks like the following:
DVC5/7/10 programmable
High-Side
Voltage source
+V
Valve On Off Coil
GND
Each Output group can control from 2 to 3 coils representing 1 to 3 valves depending on the valve types. The
DVC5/7 can control from 2-8 valves and the DVC10 3-9 valves.
The four supported valve control configurations are namely:
Dual Coil High Side
Single Coil High Side
Single Coil Low Side
High-Side Only
P/N: 021-00154, Rev. A.6 - updated for V4.7 Tools
Page | 39
OUTPUT GROUP CONFIGURATIONS
SINGLE COIL HIGH-SIDE
DUAL COIL HIGH-SIDE
To HS OUT
To HS OUT
PWM
PWM
PWM
BANG
BANG
To PWM OUT
To PWM OUT
To +POWER IN
To HS OUT
To HS OUT
BANG
BANG
PWM
To PWR COM
HIGH-SIDE ONLY
SINGLE COIL LOW-SIDE
To PWR COM
To HS OUT
To HS OUT
To HS OUT
To HS OUT
BANG
BANG
BANG
BANG
To PWR COM
To PWM OUT
BANG
BANG
To PWR COM
FIGURE 4
The following gives the definition as well as an overview of each
of the fields in the Output Groups screen:
Low Side Name
The name used in your application code to access this PWM
output and it’s associated properties.
Range: 16 Characters with no spaces.
Usable characters are A-Z, a-z, 0-9, and "_".
Rules:
The first character cannot be a number.
Compiler Keywords or other Names already in use are not valid.
A valid example is "Boom_Fwd".
Current P
P/N: 021-00154, Rev. A.6 - updated for V4.7 Tools
Page | 40
For the DVC hardware PI Loop regulating current, this is the P value
Range: 0 to 655.00
Current I
For the DVC hardware PI Loop regulating current, this is the I value
Range: 0 to 655.00
Dither Amp
How much current above and below set point to dither
Range: 0 to 100%
Dither Hz
The frequency setting of the dither
Range: 1Hz to 500Hz
High Side # Name
This will be the access word for the High Side Output. Set this ON or OFF in your application.
Range: 16 Characters with no spaces. Valid characters are A-Z, a-z, 0-9, and "_".
Rules:
The first character cannot be a number
Compiler Keywords or other Names already in use are not valid.
Min Cur
The Min Coil current setting for Coil A in Single and Dual Coil selections corresponding to 0% PWM
Range: 0 to 3 A
Note the text on how to set this value in your application described in the Max Cur section below.
Max Cur
The Max Coil current setting for Coil A in Single and Dual Coil selections corresponding to 100% PWM
Range: 0 to 3 A
With release 4.7 of the BIOS, Programming Tool and Program Loader Monitor, the Coil Current Gain constants
are available to allow you to set the Max Cur or Min Cur in your application. Coil current gains are the factors
the BIOS uses to calculate the actual current through a coil given all of the variances in the current sense
circuits internal to the DVC controller. The Coil current gain constants are loaded into the individual DVC
controller’s flash memory when the unit is tested at HCT’s manufacturing facility. For each output group there is
one coil gain for current ranges 0-3amps and another one for low current ranges or 0-90ma. The variable
names are HC_Coil_Gain_OG1 and LC_Coil_Gain_OG1, HC_Coil_Gain_OG2 and LC_Coil_Gain_OG2 and
HC_Coil_Gain_OG3 and LC_Coil_Gain_OG3 for output groups 1,2 and 3 respectively.
Setting the Max Cur and Min Cur in your application is done with statements like:
OutputGroupName.maxcura = (Current_in_milliamps * 100) / HC_Coil_Gain_OG1
OutputGroupName.mincura = (Current_in_milliamps * 100) / HC_Coil_Gain_OG1
For Dual Coils the second coils current setting is accomplished with statements like:
OutputGroupName.maxcurb = (Current_in_milliamps * 100) / HC_Coil_Gain_OG1
OutputGroupName.mincurb = (Current_in_milliamps * 100) / HC_Coil_Gain_OG1
Ramp Down
When the Enable Current Ramps is selected, Ramp Down is the ramp from Max to Min Current.
Ramps are applied for all current / PWM% changes.
Range: 0.0 to 65.00 s
Ramp Up
When ramps are checked, Ramp Up is the Ramp from Min to Max Current.
Ramps are applied for all current / PWM% changes.
Range: 0.0 to 65.00 s
Output Selection
This is where the user configures the output type
Range: Dual Coil High Side
P/N: 021-00154, Rev. A.6 - updated for V4.7 Tools
Page | 41
Single Coil High Side
Single Coil Low Side
High-Side Only
Process P
Setting the P in the Process PI Loop
Range: 0 to 655.00
Process I
Setting the I in the Process PI Loop
Range: 0 to 655.00
Process I Time
The time in between updates to the Integral portion of the output correction for the Process PI Loop
Range: 0.10 to 10.000
Process Selection
Range: Current Regulation, Enable Process PI, Enable Current Ramps and PWM Duty Cycle Control.
Each selection will activate the appropriate selection boxes.
Current Regulation
Current Regulation provides for automatic hardware and BIOS based adjustments to maintain the coil current at
the application code’s PWM% setting.
The Low-Side variable name sets the desired coil current. Example: Min 0 amp, Max 1 amp. Low-Side Name =
50% will cause the DVC hardware and BIOS to regulate the current to 500 ma or 50% of the current range.
This regulation will compensate for coil resistance variations typically caused by manufacturing tolerances,
increases in operating temperature and any other wiring resistances to and from the terminals of the coil.
Enable Process PI
Enable Process PI provides a facility where the application program sets a desired setpoint value and then
continually determines a feedback variable. The hardware and BIOS then adjusts the coil current to close the
error between the feedback and the setpoint. The feedback value is usually derived from a sensor that reflects
pressure or RPM and the setpoint represents the target value.
The current to the Low-Side output is increased or decreased under BIOS control to make the Feedback and
the Setpoint equal. In addition, the High Side activation is automatically switched for a Dual Coil configuration.
High Side 1 will be activated when the setpoint is greater than the feedback and High Side 2 activated when the
setpoint is less than the feedback. The Low-Side access variables are Low-Side Name.SetPoint and Low-Side
Name.FeedBack. Both SetPoint and FeedBack are variables from 0 to 100% or integer values from 0 to 1023.
This capability is generally used when the feedback signal to be regulated to is not the coil current but rather a
RPM or PSI reading from a sensor. The application program will convert the feedback sensors value to the
Low-Side Name.Feedback value. The current through the coil will increase to its maximum as long as the
feedback is less than the setpoint and decrease to zero if the feedback is greater than the setpoint. In a normal
case you should update the feedback value in your the Always code and when the feedback equals the setpoint
the coil current will remain fixed. Note that when you use the simulator and do not drive an actual coil the PWM
command will never exceed the setpoint %.
For example: if you system is capable of generating 0 to 3000 psi and you wish to generate 1500 psi you would
set the setpoint value to 50% or 512. Then typically in the Always code (since it updates every 10ms) you would
read the pressure sensors voltage to determine the current pressure and set the feedback value as a percent of
the 0-3000 psi range.
Enable Current Ramps
The output current will be ramped up or down based on the ramp times to the Low-Side Name setpoint. As the
current setpoint is ramped to in steps, the DVC hardware and BIOS change the current to the set point using the
P/N: 021-00154, Rev. A.6 - updated for V4.7 Tools
Page | 42
P and I setting to correct any error and after the setpoint is reached it continues to regulate / maintain the
current at the setpoint.
P/N: 021-00154, Rev. A.6 - updated for V4.7 Tools
Page | 43
PWM Duty Cycle Control
The Low-Side Name allows direct PWM control. This mode is equivalent to Open Loop PWM, and is required
for voltage (i.e. PWM) controlled valves, or variable LED outputs.
PWM Frequency (New with release 4.76)
Using the variables Low_Side Name.frequency and Low_Side Name.dutycycle or Low_Side Name the PWM
frequency and PWM dutycycle and be controlled between the ranges 0 to 100 hertz (in tenth hertz increments)
and 0 to 100% (in tenth % increments) respectively. The accuracy of the frequency and dutycycle is very
precise. This can apply to single coil or dual coil configurations.
Enable Dither
Click this option if the user wants current regulated dither
Range: True, False
Output Group Code Sample
Code
PWM_1. Enable = True
PWM_1 = Uni_1
PWM_1 = 50%
PWM_1.Dir = HS1
PWM_1.Dir = Uni_1.Dir
If (PWM_1.Short) then
If (HS1.Short) then
HS1.Short = False
HS1.RampUp = 100
Comments
Enable PWM to drive
Sets an PWM% output to the Analog Input %
Set PWM or current to 50% of output range
Set direction of HS1 output (Dual coil only)
Set direction based on position of input (verses center)
Test for shorted coil
Test for shorted coil
Reset shorted coil flag (retry logic)
HS1 Ramp Up from min to max = 1 second (.01 per)
Programming the Different Output Group Valve Configurations
Controlling valves has a few subtleties depending on the valve configuration. Some of the control of the valve’s
operation is done for you by the DVC5/7/10 BIOS. This level of BIOS control has two purposes. First, to ease
some of the application programming that would otherwise be required. Second and most important, is to insure
safe valve operation in the event of miswiring or valve control failure. You can think of this BIOS control as
implementing hidden code automatically for you.
Note: Should you inadvertently use a variable that is not defined for a particular valve configuration you will get a
compile error when you compile your application.
The basic output group default variable names that control valves in Output Group 1 are:
HS_1
HS_2
PWM_1
PWM_1.Enable
PWM_1.Dir
For each of the four configurations a subset of these variables is used as enumerated below.
Dual Coil High Side
PWM_1.Enable Set it to TRUE (>0) to activate the valve controls
PWM_1
Set it to 0 to1023 or 0 to 100% to cause current to flow in a coil equal
to the percentage of the current range
PWM_1.Dir
Set it to False to activate the HS_1 powering of the coil and True to
activate the HS_2 powering of the coil
Hidden Code
HS_1 = PWM_1.Enable and not PWM_1.Dir
HS_2 = PWM_1.Enable and PWM_1.Dir
Single Coil High Side
P/N: 021-00154, Rev. A.6 - updated for V4.7 Tools
Page | 44
PWM_1.Enable
Set it to TRUE (>0) to activate the valve controls for
the High Side 1 connected valve.
PWM_1
Set it to 0-1023 or 0 to 100% to cause current to flow in HS_1’s coil
HS_2
Set it to TRUE to activate the Bang-Bang valve.
Hidden Code
HS_1 = PWM_1.Enable
Single Coil Low Side
PWM_1.Enable
Set it to TRUE (>0) to activate the low side valve controls.
PWM_1
Set it to 0-1023 or 0 to 100% to cause current to flow in the coil.
HS_1
Set it to TRUE to activate the Bang-Bang valve.
HS_2
Set it to TRUE to activate the Bang-Bang valve.
No Hidden Code
High-Side Only
HS_1
Set it to TRUE to activate the Bang-Bang valve
HS_2
Set it to TRUE to activate the Bang-Bang valve
No Hidden Code
PWM Frequency
PWM_1.Dir
Set to coil direction for Dual coil configuration
PWM_1.Enable
Set it to TRUE (>0) to activate the low side valve controls
PWM_1.Frequency Set it to values 0 to 1000 representing 0 to100 hertz in tenth hertz
Increments
PWM_1.dutycycle Set it to values 0 to 1023 representing 0 to 100% duty cycle
PWM_1.freqerror 1 means frequency = 0 or > 1000 and 2 means dutycycle > 1023.
Open Detection
When using a PWM output to drive a ‘bang bang’ valve, be sure to set the max current in the output group to the
max current for the valve. The current feedback from the PWM output looks at the current. If the output is set to
2A, but the valve only uses 1.2A, then the controller sets the ‘open’ indicator and stops driving current.
3.14
Input Output Functions
Input Output functions change the response of inputs
that are based on 0 to 100%. This function is a one
to one function, meaning that every input has exactly
one output. Input Output functions are useful in
applications where the output is not linear to the input.
These functions can be used to ramp motors with
acceleration and deceleration if the function is shaped
as a parabola. They are also useful if the output
levels are not known. The user can use the "Program
Loader Monitor" to adjust the output levels to control
the system correctly.
The DVC’s BIOS calculates the output value for a
given input value. This takes one execution cycle
typically 10ms to complete. The result of this is that
the actual output value is delayed one execution cycle
from setting the input. In other words, once you set an input value the output value will be unchanged until the
code setting the input is executed again or the next logic sequence is executed.
Note: The DVC5/7/10 BIOS software does linear interpolation between consecutive output values for a specific
input value.
P/N: 021-00154, Rev. A.6 - updated for V4.7 Tools
Page | 45
The following subsections give the definition as well as an overview of each of the fields in the Input/Output
functions window:
Name
This is the access word for the function’s associated properties.
Range: 16 Characters with no spaces. Valid characters are A-Z, a-z, 0-9, and "_".
Rules:
The first character cannot be a number.
Compiler Keywords or other Names already in use are not valid.
Input
The 8 movable points on the x-axis with each input be of ascending values
Range: 0 to 100 %
Output
The 8 movable points on the y-axis, one for each input or x-axis value
Range: 0 to 100 %
Input Output Function Sample
Code
Knee1.In = Ana_1
PWM_1 = Knee1.Out
Knee1.X0 = EESAVX0
EESAVY0 = Knee1.Y0
EESAVY7 = Knee1.Y7
3.15
Comments
Input to IO Function Knee1 set to analog input %
Set PWM Output to Output% from IO Function
Set X0 Input % to % value from EE memory
Set EE memory location to the Y0 output%
Set EE memory location to the Y7 output%
Controlling LEDs
High Side outputs on the DVC5/7/10, DVC41 and DVC50 can be used to illuminate an external LED. After
connecting the High Side output to the LED, power will be supplied when the HS variable is True.
The DVC7 and DVC5/10 have different ways of controlling their respective LEDs illumination due to the reduced
number on the DVC7. First we will describe the DVC5/10 control methods and second the DVC7 control
methods.
DVC5/10 LED Control
The DVC5/10 master controllers provide three types of LED control. First you can control the Status LED on the
module. Second you can turn on or off the LEDs for digital inputs and finally you can control power being
supplied to external LEDs. Each type is explained in more detail below.
Status LED
The red status LED is next to the power LED on the DVC5/10 modules. You can blink the status LED a given
number of times by setting the blink count into the system variable blinkcode.
Blinkcode = 10
blinks the status LED 10 times then must be reset to continue the blinking.
When coupled with using the unused digital inputs you can indicate an error with the status light and display an
error code using the digital input LEDs.
P/N: 021-00154, Rev. A.6 - updated for V4.7 Tools
Page | 46
Digital Input LEDs
Unused DVC5/10 digital inputs and the four extra LED provided for in the DVC5 can have their LED turned on or
off by doing two things. First, define the digital input as being a toggle type using the digital inputs configuration
screen. Finally by executing the statement Dig_1 = True or Dig_1 = False the LED will be turned on or off and
remain so until the Dig_1 variable is set again.
The four extra LED provided for in the DVC5 can have their LEDs turned on or off by simply setting the
DVCLED_1, DVCLED_2, .… DVCLED_4 variable to true or false respectively.
DVC7 LED Control
The DCV7 has four Red/Green LEDs. Two are positioned on each side. The application can switch the
meaning of the LEDs using the Programming Tool DVC7 IO configuration screen. Note the Power On period
time can be changed as well. This is provided so that depending on how your controller is oriented in your
vehicle the appropriate LEDs for your application can be seen.
LED1
LED2
LED4
LED3
The default meaning of the LEDs is as follows:
LED1 = Network Status
LED3 = Module Status
LED2 = PWM %
LED4 = status/error code/blinkcode
Operation
When a BIOS or application is being downloaded to the controller, LED1 and LED3 will alternate flashing green
just like the Module Status (MS) and Network Status (NS) LEDs on the DVC5 and DVC10.
The normal operation consists of a Power On period followed by normal operation.
Power On Period
Length: Default 30 seconds
Summary: LED3 and LED4 act like the Module Status LED on the DVC5/10. LED1 and LED2 act like the
Network Status LED on the DVC5/10
NOTE: The application can change the length of the “Power ON” sequence. The programmer may wish to give
more or less time for period.
LED3 and LED4: Module Status
P/N: 021-00154, Rev. A.6 - updated for V4.7 Tools
Page | 47
LED STATE
Off
On GREEN
Flashing GREEN
On RED
Flashing RED
Flashing RED/Green
MEANING
There is no power applied to the module.
The module is operating in a normal condition.
Device is in standby state. May need servicing.
Module has an unrecoverable fault.
Recoverable fault.
This DVC7 was loaded with an application that was
compiled for a DCV10 or DVC5. The DVC7 is not
operational in this condition. Recompile the application
as a DVC7 type and load that application.
LED1 and LED2: Network Status
LED STATE
Off
On GREEN
Flashing GREEN
On RED
Flashing RED
MEANING
There is no J1939 device (or other DVCs) in the
project.
J1939/CAN Bus communication has been established.
J1939/CAN Bus device in project but communication
has not been established. Flash 2 times in 2 seconds.
The device has detected an error that has rendered it
incapable of communicating on the network.
The J1939 communication is in a timed-out state.
Flash 2 times in 2 seconds.
Normal Operation
Length: Until the next power cycle
Summary:
LED1 shows Network status
LED2 shows max PWM
LED3 error, System Enable or module ready
LED4 is the error code if any set by the blinkcode or open/short detection
LED1: Network Status (Same as Power On)
LED STATE
Off
On GREEN
Flashing GREEN
On RED
Flashing RED
MEANING
There is no J1939 device (or other DVCs) in the
project.
J1939/CAN Bus communication has been established.
J1939/CAN Bus device in project but communication
has not been established. Flash 2 times in 2 seconds.
The device has detected an error that has rendered it
incapable of communicating on the network.
The J1939 communication is in a timed-out state.
Flash 2 times in 2 seconds.
LED2: PWM Status
P/N: 021-00154, Rev. A.6 - updated for V4.7 Tools
Page | 48
LED STATE
Off
RED >> GREEN
Flashing GREEN
Flashing RED
MEANING
No PWMs are active.
The greatest PWM %
0 -> 100%
PWM or High Side output Open circuit detected
PWM or High Side output Short circuit detected
LED3: Error / System Enable / Module Ready
LED STATE
On RED
On Yellow
On GREEN
Flashing RED
MEANING
Unrecoverable error
System Enable active (Power cycle required to reset)
Module Ready
Low voltage (<8.5vdc) into DVC7
LED4: Error Code
LED STATE
Off
On RED
On GREEN
Flashing Yellow
Flashing RED
MEANING
No errors
PWM1 Open or Short detected
PWM2 Open or Short detected
High Side Open or Short detected
Application defined blink codes
variable > 0.
when
blinkcode
Using the input fields on the right side of the
window shown you can reverse the LED’s
display side and set the Power On period for the
DVC7.
3.16
Program Variables
Program variables are identifiers that are used
by your application program to refer to specific input values and to control the operation of a specific output.
This section is divided into various subsections according to Input/Output category. The following gives the
definition of all the program variables:
P/N: 021-00154, Rev. A.6 - updated for V4.7 Tools
Page | 49
Digital Input
Name
Name1
Name.RealRPM
Name.PulseTimeout
Name.PulsesPerRev
Name.Counter
Name.LOS
Description
Set/Get the state of the switch
The Unsigned Integer Value of the RPM. For Pulse
inputs Only
Get/Set Pulse Timeout for Loss of Signal
Get/Set Pulses Per Revolution
Get/Set Unsigned Integer Value of the Counter.
Pulse inputs Only
Loss of Signal flag set after time out. For Pulse
inputs Only
Range
False or Off, True or
On
0 to 9999
0 to 65535
0 to 9999
0 to 65535
False (Pulses ok),
True (No Pulse Input)
Universal and Analog Input
Name
Name1
(Min Volts to Center
Volts)
NameLo1
(Center Volts to Max
Volts)
NameHi1
Name.Dir
Name.RawVolts
Name.RefVolts
Name.RampVolts
Name.MinVolts
Name.MaxVolts
Name.MinLimit
Name.MaxLimit
Name.RefMinLimit
Name.RefMaxLimit
Name.CenterVolts
Name.Deadbandv
NameX.RampUp
NameX.RampDown
NameX
Name.MinF
Name.MaxF
Name.MinRF
Name.MaxRF
Description
Get 0 to 100% regardless of direction
Get 0 to 100% of Min to (Center - Deadband)
only if Center is enabled
Range
0% to 100%
0% to 100%
Get 0 to 100% of (Center + Deadband) to Max
only if Center is enabled
0% to 100%
Get the Upper or Lower Side of the Analog
Input only if Center is enabled.
Lower Side voltage is lower than the Upper
Side
Volts or mAmps (ma = universal input ma
select)
Reference Volts = RefVolts * .00489
Ramped Volts = RampVolts * Scale Factor
When Name = 0% (i.e. Center not enabled)
When Name = 100%
Threshold for Name.MinF
Threshold for Name.MaxF
Threshold for Name.MinRF
Threshold for Name.MaxRF
Where Center Volts
Plus and minus volts about CenterVolts
RampUp * .01 = Time Min to Max (Seconds)
RampDown * .01 = Time Max to Min (Seconds)
Where NameX = NameLo, NameHi if Center is
enabled NameX = Name if Center is not
enabled
Status Flag set if Voltage is less than Min Limit
False (Lower
(Upper Side)
Status Flag set if Voltage is greater than Max
Limit
Status Flag set if Voltage is less than
Reference Min Limit
Status Flag set if Voltage is greater than
Reference Max Limit
P/N: 021-00154, Rev. A.6 - updated for V4.7 Tools
Side),
True
0 to 1023 * Scale2
0 to 1023
0 to 1023 * Scale2
0 to 1023 * Scale2
0 to 1023 * Scale2
0 to 1023 * Scale2
0 to 1023 * Scale2
0 to 1023 * Scale2
0 to 1023 * Scale2
0 to 1023 * Scale2
0 to 1023 * Scale2
0.0 to 65.00 s
0.0 to 65.00 s
False (ok), True (Outside
Limit)
Range: False (ok), True
(Outside Limit)
False (ok), True (Outside
Limit)
False (ok), True (Outside
Limit)
Page | 50
Name.LOS
Name.RealRPM
Name.Counter
Name.PulsesPerRev
Loss of Signal flag set after time out. For
Universal Pulse inputs Only
The Unsigned Integer Value of the RPM. For
Universal Pulse inputs Only
Get/Set Unsigned Integer Value of the Counter.
Universal Pulse inputs Only
Get/Set Pulses Per Revolution
False (Pulses ok), True (No
Pulse Input)
0 to 9999
0 to 65535
0 to 9999
1
Name is the actual name entered in the Input/Output configuration window.
Scale depends on Input Range (0 to 5 =.00489, 0 to 10 = .00977, 0 to 25ma = 0.02158 )
2
Output Group Selected as Dual Coil High-Side
Name
Description
(Low-Side/PWM) Name
Set the state Current Target or
Process in percentage of min to max
current
Name.Dir
Set the coil to be PWM’d, *(use High
Side names to set the direction)
Name.Enable
Set the PWM to 0 or enable the PWM
Name.Short
Name.Open
HSEven#Name.Rampup
HSEven#Name.Rampdown
HSEven#Name.Short
HSEven#Name.Open
HSOdd#Name.Rampdown
HSOdd#Name.Short
HSOdd#Name.Open
Name.Cur
Name.RampCur
Name.CurErr
Name.CurSumErr
Name.CurP
Name.CurI
Name.MinCurA
Name.MaxCurA
Name.MinCurB
Name.MaxCurB
Name.Config
Get the Coil Flag for Short Status
Get the Coil Flag for Open Status
Set the ramp up rate (time to travel
from 0% to 100%)
Set the ramp down rate (time to travel
from 100% to 0%)
Get the Coil Flag for Short Status
Get the Coil Flag for Open Status
Set the ramp down rate (time to travel
from 100% to 0%)
Get the Coil Flag for Short Status
Get the Coil Flag for Open Status
Current actual * CurGain = amps
Ramped Current*CurGain= amps
Current Error = RampCur – Cur
Current Error accumulated over time
Current Proportional Term Constant
“P”
Current Proportional Term Constant
“I”
Minimum Current Coil A *.001 = amps
Maximum Current Coil A *.001 =
amps
Minimum Current Coil B *.001 = amps
Maximum Current Coil B *.001 =
amps
Configuration
Word
–Output,
Process, Coil
P/N: 021-00154, Rev. A.6 - updated for V4.7 Tools
Range
0% to 100%
High-Side Odd # Name / High
Side Even # Name
True [PWM Enabled], False
[PWM = 0]
Off [Coil Ok], On [Coil Short]
Off [Coil Ok], On [Coil Open]
0.0 to 65.00 s
0.0 to 65.00 s
Off [Coil Ok], On [Coil Short]
Off [Coil Ok], On [Coil Open]
0.0 to 65.00 s
Off [Coil Ok], On [Coil Short]
Off [Coil Ok], On [Coil Open]
0 – 3.5 amps
0 – 3.5 amps
16 bit signed integer
0 – 65535
0 – 255
0 – 255
0 – 3.5 amps
0 – 3.5 amps
0 – 3.5 amps
0 – 3.5 amps
Page | 51
Output Group Selected as Single Coil High-Side
Name
Description
Name
Set the state Current Target or
Process in percentage of min to max
current
0 = 0 Current, .1% = Min Current,
and 100% = Max Current
Name.Enable
Set the PWM to 0 or enable the
PWM
Name.Short
Get the Coil Flag for Short Status
Name.Open
Get the Coil Flag for Open Status
Name.Rampup
Set the ramp up rate (time to travel
from 0% to 100%)
Name.Rampdown
Set the ramp down rate (time to
travel from 100% to 0%)
HSEvenName
Set the Bang-bang Coil to On or Off
HSEven#Name.Short
Get the Coil Flag for Short Status
HSEven#Name.Open
Get the Coil Flag for Open Status
HSOdd#Name.OpenDisable
Set the Disable Coil Open Detection
HSOdd#Name.Short
Get the Coil Flag for Short Status
HSOdd#Name.Open
Get/Set the Coil Flag for Open
Status
Name.Cur
Current actual * CurGain = amps
Name.RampCur
Current ramped Currend*CurGain=
amps
Name.CurErr
Current Error = RampCur – Cur
Name.CurSumErr
Current Error accumulated over time
Name.CurP
Current Proportional Term Constant
“P”
Name.CurI
Current Proportional Term Constant
“I”
Name.MinCurA
Minimum Current Coil A *.001 =
amps
Name.MaxCurA
Maximum Current Coil A *.001 =
amps
Name.Config
Configuration
Word
–Output,
Process, Coil
Range
0% to 100%
True [PWM Enabled], False
[PWM = 0]
Off [Coil Ok], On [Coil Short]
Off [Coil Ok], On [Coil Open]
0.0 to 65.00 s
0.0 to 65.00 s
Off, On
Off [Coil Ok], On [Coil Short]
Off [Coil Ok], On [Coil Open]
0 [Enabled], 1 [Disabled]
Off [Coil Ok], On [Coil Short]
Off [Coil Ok], On [Coil Open]
0 – 3.5 amps
0 – 3.5 amps
16 Signed Integer
0 – 65535
0 – 255
0 – 255
0 – 3.5 amps
0 – 3.5 amps
Output Group Selected as Single Coil Low-Side
Name
Description
Name
Set the state Current Target or Process in
percentage of min to max current
0 = 0 Current, .1% = Min Current, and
100% = Max Current
Name.Enable
Set the PWM to 0 or enable the PWM
Name.Short
Get the Coil Flag for Short Status
Name.Open
Get the Coil Flag for Open Status
Name.Rampup
Set the ramp up rate (time to travel from
0% to 100%)
Set the ramp down rate (time to travel
Name.Rampdown
P/N: 021-00154, Rev. A.6 - updated for V4.7 Tools
Range
0% to 100%
True [PWM Enabled],
False [PWM = 0]
Off [Coil Ok], On [Coil
Short]
Off [Coil Ok], On [Coil
Open]
0.0 to 65.00 s
0.0 to 65.00 s
Page | 52
HSEvenName
HSEven#Name.Short
from 100% to 0%)
Set PWM frequency
Ser PWM dutycycle
Returns error 1 = Frequency error,
2 means duty cycle error
Set the Bang-bang Coil to On or Off
Get the Coil Flag for Short Status
HSEven#Name.Open
Get the Coil Flag for Open Status
HSOddName
HSOdd#Name.OpenDisable
HSOdd#Name.Short
Set the Bang-bang Coil to On or Off
Set the Disable Coil Open Detection
Get the Coil Flag for Short Status
HSOdd#Name.Open
Get/Set the Coil Flag for Open Status
Name.Cur
Name.RampCur
Name.CurErr
Name.CurSumErr
Name.CurP
Name.CurI
Name.MinCurA
Name.MaxCurA
Name.Config
Current actual * CurGain = amps
Current ramped Currend*CurGain= amps
Current Error = RampCur – Cur
Current Error accumulated over time
Current Proportional Term Constant “P”
Current Proportional Term Constant “I”
Minimum Current Coil A *.001 = amps
Maximum Current Coil A *.001 = amps
Configuration Word – Output, Process,
Coil
Name.Frequency
Name.Dutycycle
Name.Freqerror
Output Group Selected as PWM Disabled
Name
Description
Set the Bang-bang Coil to On or Off
HSEvenName
HSEven#Name.OpenDisabl Set the Disable Coil Open Detection
e
HSEven#Name.Short
Get the Coil Flag for Short Status
HSEven#Name.Open
Get the Coil Flag for Open Status
HSOddName
HSOdd#Name.OpenDisabl
e
HSOdd#Name.Short
Set the Bang-bang Coil to On or Off
Set the Disable Coil Open Detection
HSOdd#Name.Open
Get/Set the Coil Flag for Open Status
Get the Coil Flag for Short Status
0 to 1000 for 0 to 100hz
0 to 1023 for 0 to 100%
Off, On
Off [Coil Ok], On [Coil
Short]
Off [Coil Ok], On [Coil
Open]
Off, On
0 [Enabled], 1 [Disabled]
Off [Coil Ok], On [Coil
Short]
Off [Coil Ok], On [Coil
Open]
0 – 3.5 amps
0 – 3.5 amps
16 Signed Integer
0 – 65535
0 – 255
0 – 255
0 – 3.5 amps
0 – 3.5 amps
Range
Off, On
0 [Enabled], 1 [Disabled]
Off [Coil Ok], On [Coil
Short]
Off [Coil Ok], On [Coil
Open]
Off, On
0 [Enabled], 1 [Disabled]
Off [Coil Ok], On [Coil
Short]
Off [Coil Ok], On [Coil
Open]
Enable Process PI Variables
The Name field is the Low-Side name. The default variable name is replaced with the specified name.
Name
Description
Range
The desired % set point position for the 0 to 100%
Name.Setpoint
output
Name.Feedback
The % feedback position for the output
0 to 100%
Name.ProErr
Error = Set point – Feedback
16 bit signed integer
Name.ProSumErr
Error accumulated over time
0 – 65535
Name.ProP
Process Proportional Term Constant “P”
0 – 255
P/N: 021-00154, Rev. A.6 - updated for V4.7 Tools
Page | 53
Name.ProI
Name.ProItime
Name.Cur
Name.RampCur
Name.CurErr
Name.CurSumErr
Name.CurP
Name.CurI
Name.MinCurA
Name.MaxCurA
Name.MinCurB
Name.MaxCurB
Name.Config
Status LED
Name
BlinkCode
Process Proportional Term Constant “I”
Update / Integration Time
Current actual * CurGain = amps
Current ramped Currend*CurGain= amps
Current Error = RampCur – Cur
Current Error accumulated over time
Current Proportional Term Constant “P”
Current Proportional Term Constant “I”
Minimum Current Coil A *.001 = amps
Maximum Current Coil A *.001 = amps
Minimum Current Coil B *.001 = amps
Maximum Current Coil B *.001 = amps
Configuration Word – Output, Process,
Coil
0 – 255
0.0 to 650.00 s
0 – 3.5 amps
0 – 3.5 amps
16 bit signed integer
0 – 65535
0 – 255
0 – 255
0 – 3.5 amps
0 – 3.5 amps
0 – 3.5 amps
0 – 3.5 amps
Description
The Status LED blinks the amount of times equal to the number
written to this location. When the blinking is done, the value for this
location will be 0.
Input/Output Functions
Name
Description
Changing this variable will update the "Name.Out"
Name.In
variable by the BIOS after a delay of 10ms
Name.Out
The Output of the Transfer Function
Name.X0
The X0 of the input/output function
Name.X1
The X1 of the input/output function
Name.X2
The X2 of the input/output function
Name.X3
The X3 of the input/output function
Name.X4
The X4 of the input/output function
Name.X5
The X5 of the input/output function
Name.X6
The X6 of the input/output function
Name.X7
The X7 of the input/output function
Name.Y0
The Y0 of the input/output function
Name.Y1
The Y1 of the input/output function
Name.Y2
The Y2 of the input/output function
Name.Y3
The Y3 of the input/output function
Name.Y4
The Y4 of the input/output function
Name.Y5
The Y5 of the input/output function
Name.Y6
The Y6 of the input/output function
Name.Y7
The Y7 of the input/output function
Range
0 to 65535
Range
0% to 100%
0% to 100%
0% to 100%
0% to 100%
0% to 100%
0% to 100%
0% to 100%
0% to 100%
0% to 100%
0% to 100%
0% to 100%
0% to 100%
0% to 100%
0% to 100%
0% to 100%
0% to 100%
0% to 100%
0% to 100%
Power Supply
Name
Description
Supply
The Power Supply voltage. The value returned is in units of supply volts (sv)
Temperature
Name
DVC_Temperature
Description
Internal DVC5/7 controller temperature. The value returned is in units of
degrees C + 40. Therefore, –40 C is returned as 0.
Continuous Counter
P/N: 021-00154, Rev. A.6 - updated for V4.7 Tools
Page | 54
Name
FreeRunningTimer
DVC Macid
Name
MACID
Description
16 bit counter that continually increments every 100 micro second. Counts
from 0 to 65535 (6.5 seconds) then begins again. Could be used to show
timing between two events, as long as these events were within 6.5 seconds.
Description
This variable returns the MACID of the DVC controller.
Coil Gains
Name
HC_Coil_Gain_OG1 to OG3
LC_Coil_Gain_OG1 to OG3
4
Description
These variables return the coil gain constant used by the BIOS to
determine actual coil current from analog to digital values derived by
the controller’s processor. You use these values if you wish to
dynamically change maximum and minimum current setting in your
application.
Max_cur = (current_in_ma * 100)/HC_Coil_Gain_OG1
Bubble Logic
DVC5/7/10 application programs consist of one or more
code sections. The first section is called the Always
code and the second and additional sections are called
logic sequences. An icon in the main project window
identifies each of the sections. These icons represent
where the programmer actually writes the application
code. Each application has an Always section and
optionally any number of logic sequence sections. By
clicking the right mouse button in the project window, a
menu will appear that will allow the addition of logic
sequence icons.
A logic sequence is composed of bubbles that
contain application code. Code expressions specifying
under what circumstances execution will transition to
another bubble are also present as the diagram
illustrates. Typical transition conditions are a timer
expiring or digital input being true.
Logic sequences, Bubble transitions and the Always
code have a defined way in which they are executed.
The Always code is executed followed by the code for
the active bubble in a logic sequence and finally the outbound transitions defined for the active bubble are
evaluated. If one of the transition expressions is true the bubble pointed to by that transition will be the new
active bubble the next time the logic sequence is executed. Upon completing this cycle, the Always code is
executed again and the active bubble for a different logic sequence and its transitions are executed and
evaluated respectively if more than one logic sequence is defined. After the last logic sequence is executed the
first one will be executed during the next cycle. This Always code - logic sequence – transition evaluation cycle
is repeated every 10ms or longer if the code is complex. In between these cycles, the DVC5/7/10 BIOS
executes and records system input/output value changes and sends and receives CAN Bus messages. Given
the frequent execution of the Always code it should contain your system critical code such as code to sound an
alarm control critical valves. Note that the timing between executing each logic sequence is a minimum of 10ms
P/N: 021-00154, Rev. A.6 - updated for V4.7 Tools
Page | 55
times the number of logic sequences. Logic sequence code is usually where your normal system operation
sequences and display code are programmed (i.e. open this valve when this digital input is switched on).
Note that with release 4.7, the above cycle sometimes referred to as the system heartbeat can be set from 1ms
to 20ms with the default being 10ms.
To further help you control the operation of your application from a timing perspective Logic sequences can be
grouped to provide you a way of tuning the performance of your system while maintaining the logic sequence
coding paradigm for different aspects of your
system. Right clicking on a logic sequence will give
you the ability to add the logic sequence to 1 of 9
groups. The grouped logic sequences are shown
graphically connected by the black line. Generally,
the non-critical performance parts of your
application should be grouped together.
Virtual Display updates, DVC61 Display updates,
Open Loop Test, EEmemory change validation and
LED updates are examples of non critical parts of
most applications.
Within each group only the active bubble of one of
the logic sequences will be executed during a
cycle. In other words, in the window above the
Always code will be executed every 10ms as normal. The Logic0 and Logic1 sequences will be executed every
30ms and each of the other two grouped sequences will be executed every 60ms. Without grouping the Logic
0, Logic1 sequence would have been executed every 40ms. Other than right clicking on a sequence icon to add
it to a group no other changes to your program are required. Right clicking also allows you to remove a
sequence from a group.
You can also copy and paste a whole logic sequence from one project to another or within the same project by
right clicking on the appropriate sequence to copy it and right clicking in the project window to add it into the
project.
To access the Always code or a particular logic sequence’s code, double click the icon. This will cause a
window to appear for editing the Always code and the bubble diagram for the logic sequence selected. Double
clicking a bubble will bring up an edit window for its code. To delete a logic sequence or bubble, click the right
mouse button on the icon and select Delete.
4.1
Always Code
In this section program all of the logic statements for the
system variables that need to be checked or updated most
frequently as the code will execute every 10ms
independent of the logic sequence to be executed.
Generally closed loop software process control should be
implemented in the Always code. You may also want to use
this screen to define your program variables. In this way
you can easily find variable definitions. Note that all DVC
defined program variables are global (i.e. able to be
referenced or changed in any logic bubble) unless they are
specifically declared as Private. Another recommended
use of the Always code is to sum all of the system
P/N: 021-00154, Rev. A.6 - updated for V4.7 Tools
Page | 56
input/output status variables and then check for a non-zero sum that indicates an error condition was detected.
Given an error then examine each of the status variables to determine the problem and corrective action.
4.2
Logic Sequences
The logic sequence window uses bubbles (the circles) and transitions (the lines connecting the circles) to create
a logical program flow for part of the user application. Bubbles are containers for the program code while
transitions are specify bubble transition conditional logic. Each
Bubble represents a state in which the program will repeat the
same set of programmed logic until a transition logic expression is
evaluated to be true. When a transition is true like a digital switch
being closed, the program will change states to the bubble pointed
to by the transition line. Any bubble can have multiple transition
conditions pointing to different bubbles.
Also note that each logic sequence has one starting point bubble
noted by the (S) above the bubble. This is the bubble that will be
executed after power up of the controller when the logic sequence
is first executed. The starting point bubble has to be specified but
it can be changed to any bubble in the logic sequence.
Adding and Editing Bubbles
To add a bubble to a logic sequence, click the right
mouse button and select Add Bubble. To relocate a
bubble click and hold the left mouse button on top of the
bubble and move the mouse to relocate the bubble. The
transitions if any will follow the bubble. Releasing the
mouse button completes the bubble move.
To edit bubble code, double click the left mouse button
on the bubble. This displays a window with four text entry
fields and 1 check box. The Caption field identifies the
bubble in the logic sequence window and is merely a
comment. This value is also used in the Transition
Display for quick reference to the transition logic flow on
the bubble screen. The Description field will be displayed
as a comment in the logic sequence window above the bubble icon if the visible check box is checked. Use the
Entry Code box for program code that is executed when the bubble is transitioned to from another bubble. Use
the Repeat Code box for the program code that will be executed each time the DVC processor visits the bubble
before a transition to another bubble is taken. When a bubble is transitioned to or the Start bubble is executed
the Entry Code and Repeat Code are both executed. After that only the Repeat Code is executed until a
transition condition is true.
Adding and Editing Bubble Transitions
To add a bubble transition, click the right mouse button on a
bubble and select Add Bubble Transition. Next, click on the
Bubble to which you want the transition to point. Now double
click on the transition line to bring up a window with three text
fields and three check boxes. The box titled "Description" is for
placing comments about the transition. The next two fields are for the transition logic expression. A transition
logic expression is of the same form as that used in the If (…) conditional execution expression without the “if (“
and closing “)”. Conditions can be combined using the “and” and “or” logic operators. The visible check boxes
P/N: 021-00154, Rev. A.6 - updated for V4.7 Tools
Page | 57
cause the transition code to be displayed in the Logic Sequence window. Transitions expressions are
supported for going from bubble n to bubble m and vice versa. An empty expression signals no transition
defined between the bubbles whereas entering “1” or “Always” indicates a transition from one bubble to another
always.
Examples of transition expressions would be “dig_1 = true” or “joystick_left > 50% and reset_timer < 1s”.
4.3
How Logic Sequences are executed by the DVC5/7/10
A logic sequence is executed at a typical or default rate of 100 times per second or once every 10ms. The
maximum rate is 1000 times a second. Within each execution cycle, the processor updates the system
input/output values and communicates with other modules over the CAN Bus then the Always code is executed
followed by the active logic bubble in a logic sequence and its out bound transition expressions. Note that this
implies that an individual logic sequence will be executed typically every 10ms * the number of logic sequences.
For example, an application with three sequences would execute a particular logic sequence once every 30ms.
Grouping of logic sequences can be used to change the frequency of execution of a particular logic sequence.
For instance, assigning 2 logic sequences out of a total of 3 to a group would mean that logic sequence 3
executes every 20ms while logic sequences 1 and 2 execute every 30ms. Multiple groups of logic sequences
can be defined. Logic sequences not assigned to a group can be considered to be in their own group for
purposes of this discussion. Only one bubble within a logic sequence of a group will be executed each 10ms.
After one pass through all of the groups then the process is repeated with a new logic sequence in each group
being executed. If no more logic sequences are defined in a particular group then the first logic sequence in the
group is executed. This execution pattern can be thought of as a main loop with mini loops in each group.
Each time the active bubble of a logic sequence is executed the execution starts at the top of the repeat bubble
code and proceeds to the end of the code after which time the DVC5/7/10 BIOS checks the transition conditions
and executes any true transition conditions. A true transition condition for a bubble causes the pointed to
bubble’s entry code to be executed during the next execution cycle followed by the repeat code.
DVC Application Code Processing
0ms
11ms
0ms
Always
Always
Always
Always
Entry
Entry
Entry
Entry
Repeat
Repeat
Repeat
Repeat
Transition
Transition
Transition
Transition
10ms
Logic Sequence #0
4.4
21ms
20ms
Logic Sequence #1
30ms
Logic Sequence #2
10ms
Logic Sequence #0
Program Statements
The programming tool supports the following basic-like statements:
Refer to Appendix B for examples of how to use program statements and logical operators.
Programming statements including keywords are all case insensitive.
P/N: 021-00154, Rev. A.6 - updated for V4.7 Tools
Page | 58
Code
Dim VarName as Uint
Dim VarName as Timer
Dim VarName as EEmem
Private VarName as Uint/Timer/String
Comments
Declares a 0 to 65,535 value variable
All variables are Global
Declares a Uint variable that once set will decrement at 10ms
intervals until it reaches zero.
Create a Uint location in memory that can be stored in
permanent non-volatile memory. Up to 128 EEmem resident
variables can be declared.
ElseIf (Logic Statement) Then
Private variables are only referenceable within the logic
sequence in which they are defined. Code reuse is the
primary reason for using Private variables.
Declares a constant named VarName
If Statement Logical Operators are AND, OR, XOR, NOT, <,
>, =, <>, >=, and <=
The else if condition
Else
The else condition
End If
The end of an If Statement
Const VarName = Value
If (Logic Statement) Then
' Comment
Algebra Statements can include +, -, *, and /
On and True are equivalent to the value 65535
Off and False are equivalent to the value 0
Comments are started by using a " ' "
0xFFFF
Hex Notation
Var = Algebraic Statement
Some statements unique to the Bubble Language are:
Code
Comments
The % after a number will scale the value between 0 and 1023.
A = 100%
Percentage numbers can include a decimal e.g. PWM_1 = 75.3%
The ms after a number scales the value to units of 10ms. ms
TimerA = 100ms
numbers can include a decimal e.g. Timer0 = 250.5ms
The s after a number scales the value to units of 10 milliseconds.
TimerA = 1s
s numbers can include a decimal e.g. Timer1 = 5.8s
The sv after a number will scale the value to units of supply
Supply > 20sv
voltage. Supply is the voltage powering the unit. sv numbers
can include a decimal, e.g. Var = 13.8sv
4.5
EE Memory
Electronically erasable memory (EE Memory) is memory that is maintained (non volatile) when there is no
power to the DVC5/7/10. The DVC5/7/10 has 128 EE memory locations. EEmemory locations can be used to
interface to the compiled, running DVC program. For instance, if, during troubleshooting, the user wanted to
change between different virtual display screens, the programmer may create a EEmem variable
‘virtual_screen’. By programming the DVC, the contents of the variable ‘virtual_screen’ could be monitored to
determine which virtual display is active. EE memory locations are all unsigned 16-bit values that can store any
number from 0 to 65535. EE memory names can be 32 characters in length. The actual EE memory is not
used while the program is running. A mirror copy in DVC5/7/10’s program memory is used to prevent over
usage of the EE memory. There is a special command to save the mirror copy to the EE memory and another
one to copy the EE memory to the program memory location. The EE memory has an approximate 1 million
writes guarantee. If a new value where to be stored every minute, the DVC5/7/10 is guaranteed to run for 1.9
Years.
P/N: 021-00154, Rev. A.6 - updated for V4.7 Tools
Page | 59
To save all of the EE memory, execute this line of code in your application: EECommand = EEWrite. In between
writes you will need to reset the EEcommand to 0. Also, note that the EE memory will only be written to if one
or more of the EE memory variables has changed. So if you insert the EEcommand = EEwrite in your always
bubble or some other frequently executed logic bubble you are very unlikely to exceed the 1 million writes limit
of the memory chips. A typical sequence of code to update EE memory would look like the following:
Dim eememory_update_timer as timer
EEcommand = 0
If (eememory_update_timer = 0s) then
eememory_update_timer = 2s ‘ timer set to > 10ms needed to insure at least one EEcommand = 0
‘ executed between EEcommand = EEwrite commands
EEcommand = EEwrite
End if
To declare an EE memory variable use this line of code: Dim VarName as EEmem
To save all of the EE memory use this command: EECommand = EEWrite
To restore actual EEmemory values to program memory use this line of code: EECommand = EERead
EERead (is rarely used but) would be used if you had changed an EE memory variable in your application but
had not saved it to permanent memory and wished to reset the variable to the permanent EE memory value.
Note: When the DVC5/7/10 powers up the program memory copy of EE memory is automatically initialized to
the values stored in permanent EE memory. Therefore, you do not need to start your program with an EEread
command.
4.7
Long Unsigned Integer Math
All numeric calculations in your application code are executed with 32 bit resolution. Intermediate values are
stored as 32 bit unsigned integers. However, only the lower 16 bits of the numeric result are stored into the
result variable’s memory. This allows for intermediate values to temporally grow larger than 65k to about 4
billion. However, your final result will be restricted to be less than or equal to 65535.
The DVC does only integer math calculations with division resulting in truncation. When you perform division in
a calculation the result will be an integer value with no fractional part or remainder saved. For instance 1 / 2 will
equal 0 rather than 0.5 for any subsequent calculation. Also note that calculations in parentheses will be
performed first. For instance the expression 100*2*(1/2) will equal zero while 100*2*1/2 will equal 100.
Since the DVC does only unsigned math negative numbers are not explicitly saved. So when you wish to
calculate a difference in two variables you will need to write code like:
If (a < b) then
Diff = b-a
Else
Diff = a-b
End if
P/N: 021-00154, Rev. A.6 - updated for V4.7 Tools
Page | 60
5
Programming Examples
This section illustrates how the DVC5, DVC7 and DVC10 are programmed. The first example is a traditional
Hello program. Hello introduces you to the basic steps in writing a DVC application. The second example is a
two speed binary counter that introduces you to logic sequences. For both of these examples you only need to
have a DVC5/7/10 and the DVC Programming Tool / Program Loader Monitor software installed. The third
example is most illustrative of a hydraulic control application and is shown in step-by-step detail. The other
examples are explained and can be provided. They are not shown in step-by-step detail, but the key points are
highlighted and explained.
5.1
‘
‘
DVC variable types
The physical I/O for the DVC module uses 10 bit architecture, the decimal values for the variables can be 01023. Internal variables are 16 bit, or decimal values 0-65535. It is recommended to write the program logic
using decimal values, but some may find it easier using logic statements such as true / false, on/off. As a
reminder, using decimal values and logic statements, care must be used that the programmer knows the
decimal value of a logic statement
true’ and ‘on’ have a decimal value of 65535
false’ and ‘off’ have a decimal value of 0.
Other constants can be defined such as the statement below
Const yes = 52
This variable ‘yes’ has been given a value of 52.
Always remember to try a variable using the virtual display to fully understand the decimal value of the variable
when turned on and off.
5.2
Hello Program
This is an example program to introduce you to most of the DVC programming concepts.
It is designed to operate with only a DVC5/7/10 connected to your Windows PC computer using the DVC RS232
cable and a +12volt dc 1.0 amp power source. The DVC RS232 serial cable is used to load your application
into the DVC controller’s memory from your Windows PC.
Program Description
The Hello program will flash the Status LED on the DVC5/7/10 10 times every 10 seconds.
Process
No IOs will need to be configured for this example.
Enter the Hello code in the Always
bubble, Compile/Make the program and
load the “.pgm” file into the DVC5/7/10.
On the next pages are the steps you
should follow and the resultant screen
displays you should see.
First, the
Programming Tool screens are shown
followed by the Program Load Monitor
screens.
Programming Steps
Execute the Programming Tool by
double clicking on the Programming Tool
icon on the desktop or in the C:\Program
Files\HCT Products folder.
P/N: 021-00154, Rev. A.6 - updated for V4.7 Tools
Page | 61
Click the Project menu item and select the controller type you have.
Double click on the DVC5/7/10 Master icon to open the DVC configuration window.
Enter Hello in the Program Name field.
Next, enter the Always bubble code.
Double click the Always icon in the Project window. Enter the code as shown into the empty edit window.
Select the Make item from the Compile menu in the Project window. When prompted save your project in
c:\Program Files\HCT Products\myproject.dvc. This completes the code generation, compilation and project
saving.
Next, load and execute the compiled Hello program.
Execute the Program Loader Monitor program by double clicking on the Program Loader Monitor icon in the
c:\Program Files\HCT Products folder.
Now execute the following steps.
The first time the Loader Monitor program executes you
may be asked to specify the COMM port your RS232
cable is attached too. Select the appropriate check box.
Double click on the DVC5/7/10 Master (yellow) button.
Double click the Program Load button (shows as Please
Wait on the shown display) in the DVC5/7/10 window.
Turn the power to the DVC5/7/10 off and on to cause the
DVC to initiate the download process.
Select the blue Load Application button.
Using the file locator window navigate to the project
program download file myproject.pgm in
c:\Program Files\HCT Products\myproject.pgm and open
it.
After a few seconds and when prompted turn the
DVC5/7/10 power off and on.
This will cause the
application program to execute.
Your DVC should now have a slowly flashing red status LED.
You have successfully completed your first DVC application program.
5.3
Binary Counter Example for the DVC5 or DVC10 Controllers
The DVC7 has fewer LEDs and as such will not execute this example. The programming techniques illustrated
are supported on the DVC7.
This example is designed to operate with only a DVC5/10 connected to your computer using the DVC RS232
cable and a +12 volt dc 1.0 amp power source. The DVC RS232 serial cable is used to load your application
into the DVC controller’s memory from your Windows
XP PC and read data from the DVC for the Virtual
Display.
This example builds on the Hello example and
introduces you to 5 other concepts namely:
Always Bubble programming
Logic sequences consisting of Bubbles and
Transitions
Variable Initialization
P/N: 021-00154, Rev. A.6 - updated for V4.7 Tools
Page | 62
Virtual Display configuring and use in debugging
String Utilization
The Binary Counter program is designed to have the Dig_1, Dig_2 and Dig_3 DVC5/10 LEDs count in binary
from 0 to 7 (all LEDs on). The counter increments once every 2 seconds in slow mode and once every 200ms
in fast mode. The mode changes from slow to fast or fast to slow when the count reaches 7.
The Virtual Display is a Program Loader Monitor facility of the DVC5/10 and enables you to display program
variables as your program executes to aid program debugging.
Now you will be guided through the programming of the DVC to achieve the desired behavior. Load the
Programming Tool and proceed.
The first thing to do is to add a Virtual Display and Logic Sequence icon to your project. Right mouse click in the
project window and select the two items one at a time.
Next configure the Virtual Display by double clicking on the Virtual
Display icon in the project window. The window shown appears
without the Screen1 icon. Right click in the Virtual Display window
and select “Add Screen”. Now double click on the Screen1 icon to
open the Virtual Display setup window.
Enter the data displayed into the Virtual Display
Setup window fields including renaming the
screen from Screen1 to Display. These fields are
used to format the screen display’s output. Note
the Test Display on the right. It displays what
your actual Virtual Display window will look like
when your application executes.
Next configure the 3 digital inputs that comprise the counter.
Double click the DVC5/10 icon in the project window and select the
Dig_ 1-3 input buttons one at a time and set the Software Toggle
field to Toggle as shown for Dig_1. Setting a digital input to toggle
mode allows us to set its state (on or off) programmatically.
Next, double click on the Logic0 icon in the project window. This
will bring up a blank window where we will add bubbles and
specify the bubble transition conditions. First change the Name
P/N: 021-00154, Rev. A.6 - updated for V4.7 Tools
Page | 63
field to Logic1. Next, right click in the Logic1 window and select “Add Bubble”. Repeat this again to get a
second bubble displayed. Now, right click on bubble 1, select “Add Transition”, move the mouse to bubble 2
and click. A line connecting the two bubbles will be displayed.
Next, double click on the line and a Transition dialog
box will appear. Enter “always” in the “Transition to 2
when” text box. Entering “always” will cause a transition
to bubble 2 every time the bubble 1 code completes.
We will use bubble 1 to initialize the variables we will be
using such as timer interval, etc. After it executes we
want to go unconditionally to bubble 2 where the actual
counting code begins. Note the transition code is
shown. “2:” is the target bubble and “1” the condition.
Now we will program the Always code and logic
sequence bubbles and transitions.
After we
complete the task your Logic1 window should look
like this.
First, double click the Always icon in the project
window and enter the code below. Note that it
is generally convenient to declare all of your
program variables (Timer_Interval, Slow etc.) in
the Always bubble. You can use any of these
global variables in a Logic Sequence bubble
without declaring them again. Also remember
that all variables are set to 0 when the
DVC5/7/10 powers up.
Therefore, the “if
(Change_Interval = N)” statements will all be
false when the Always bubble executes for the
first time.
P/N: 021-00154, Rev. A.6 - updated for V4.7 Tools
Page | 64
Next, double click on bubble 1 and enter
the variable initialization code shown
below.
Now, we will enter the code for bubble 2 and
the other bubbles in the logic sequence.
Double click on the bubble and enter the
program text and the optional Description field.
Next double click on the transition line connecting bubbles 2 and 3. Enter the transition conditions as shown.
Repeat this for the other transition lines. Enter the transition conditions shown in the “Logic1” logic sequence
window.
Note: Transition to 2 from 3 is whenever
the timer (Timer_0) counts down to 0
seconds.
Every bubble returns to
bubble 2 in this manner to begin the
next counter incrementing sequence.
The transition to 3 is when the carry out
P/N: 021-00154, Rev. A.6 - updated for V4.7 Tools
Page | 65
condition is met signaled by Toggle_2 being set to TRUE.
Next is the Bubble 3 code.
Here is the Bubble 4 code.
Now select the Make option from the
project window’s Compile menu. Correct
any typing errors and repeat the Make
operation.
Now load the application into the DVC
controller as you did in the Hello example.
Once it is loaded click the yellow Virtual
Display status button in the Program
P/N: 021-00154, Rev. A.6 - updated for V4.7 Tools
Page | 66
Loader/Monitor window and the following screens should be visible. Note also the changing Dig_1 to Dig_3
LEDs on the DVC5/10 module.
You have completed Example 2 and now we will introduce you to more sophisticated control applications.
5.4
Process PI Closed Loop Control Example (PSI to Valve Current)
Process PI is a capability of the DVC that makes it
easy to control a valve’s current as a function of
another sensors input. The example demonstrated
here is a valve that controls the flow through a
hydraulic pump that in turn generates pressure in a
line. A pressure sensor provides the feedback that is
used to adjust the valve current and therefore the
flow to the pump to achieve a desired pressure or
setpoint.
The screens shown demonstrate how easy this is to
achieve with the DVC. In this example the Setpoint
or desired pressure is inputted to the DVC5 controller
by the voltage reading from an analog signal or
potentiometer. The 0 to 5v signal represents a
pressure range of 0 to 5000 psi. The feedback signal or pressure achieved by the pump is inputted to the DVC5
via a second analog signal of 0-5 volts with 5 volts representing a maximum of 5000 psi.
The first 5 lines of the Always code do all of the work.
' *** Control Code ***
Valve_1.enable = SetPoint_PSI
Valve_1.Setpoint = SetPoint_PSI
Valve_1.Feedback = FeedBack_PSI
P/N: 021-00154, Rev. A.6 - updated for V4.7 Tools
Page | 67
First, by being in the Always bubble this code will execute every 10ms so the system will be very responsive to
any change in the setpoint or any variation in the performance of the pump as indicated by a change in the
pressure sensor or feedback.
Second, the valve will only be activated or enabled when a nonzero setpoint (True) is read from the analog input
Setpoint_PSI.
Third, when a valve is configured for Process PI, the
DVC5/7/10 BIOS automatically adjusts the valve
current over its defined range so that the feedback
and the setpoint will be equal. If the setpoint is
greater than the feedback then the current is
increased and decreased if the setpoint is less than
the feedback. The DVC BIOS’s current correction
uses PID techniques and PWM to effectively
increase the voltage seen by the valve’s coil.
Increased voltage increases the current through the
coil and moves the spool.
Fourth, the rest of the code is to manage the Virtual
Display so that an operator would see what is going
on in human readable terms.
5.5
Simple Control Example
This simple control example program will perform the following steps:
1. Wait for a Pulse Input on the Digital Input #1,
which is named "Start"
2. Ramp up the PWM #1 output, which is named
"TurnMotor", to 1 amp in 5 seconds
3. Wait 2 Seconds
4. Ramp down the output "TurnMotor" to 0 amps in
5 seconds
5. Turn on High-Side #1, which is named "EndPulse
6. Wait 1 Second
7. Turn off "EndPulse"
Setup the DVC5/7/10
Double click on the DVC10 Master Icon in the project window.
P/N: 021-00154, Rev. A.6 - updated for V4.7 Tools
Page | 68
Press the Button Labeled "Dig_1".
In the Digital Input 1 window, enter the following information:
Name: Start
De-bounce Time: 20ms
Polarity: Active High
Toggle: No Toggle
Press the Button Labeled "PWM_1" in the Output Groups.
Set up the following Fields:
Output Selection:
Single Coil Low Side
Process Selection:
Enable Current Ramps
Low Side A Name:
TurnMotor
Current P: 10
Current I: 10
Min Cur: 0 A
Max Cur: 1 A
Ramp Down: 5s
Ramp Up: 5s
High Side 1 Name:
EndPulse
Close the PWM_1 and DVC10 windows and return to the
project screen.
Setup the Bubble Logic
Click the right mouse button in the project window and add a
logic sequence.
Double click on the Logic Icon.
Add 5 bubbles to the logic window. To add bubbles, click the right mouse
button and select "Add Bubble". To move a bubble, click the left mouse
button on it and move the mouse. To delete a bubble, click on it and press
the Delete key.
Add transitions to look like the picture. Transitions are the
paths between bubbles. To add transitions, click the right
mouse button on a bubble and select "Add Transition". Next,
click the left mouse button on the bubble you want the
transition to point to.
P/N: 021-00154, Rev. A.6 - updated for V4.7 Tools
Page | 69
2-25
Double click on bubble "1". In the entry window enter this information:
Caption: 1
Description: Start
Visible: Checked
Entry Code: (empty)
Always Code: TurnMotor = 0%
EndPulse = Off
Double click on bubble "2" and enter this information:
Caption: 2
Description: Ramp Motor Up
Visible: Checked
Entry Code: Dim Wait as Timer
Wait = 5s
Always Code: TurnMotor = 100%
Double click on bubble "3" and enter this information:
Caption: 3
Description: Hold Motor
Visible: Checked
Entry Code: Wait = 2s
Always Code: (empty)
Double click on bubble "4" and enter this information:
Caption: 4
Description: Ramp Motor Down
Visible: Checked
Entry Code: Wait = 5s
Always Code: TurnMotor = 0%
Double click on bubble "5" and enter this information:
Caption: 5
Description: Pulse EndPulse
Visible: Checked
Entry Code: Wait = 2s
Always Code: EndPulse = On
Double click on the transition between bubble 1 and 2. In this entry screen enter the following:
Description: (empty)
Visible: not checked
Transition to 1 when: (empty)
Visible: checked
Transition to 2 when: Start = On
Visible: checked
P/N: 021-00154, Rev. A.6 - updated for V4.7 Tools
Page | 70
Double click on the transition between bubble 2 and 3. In this entry screen setup the following:
Description: (empty)
Visible: not checked
Transition to 2 when: (empty)
Visible: checked
Transition to 3 when: Wait = 0s
Visible: checked
Double click on the transition between bubble 3 and 4. In this entry screen setup the following:
Description: (empty)
Visible: not checked
Transition to 3 when: (empty)
Visible: checked
Transition to 4 when: Wait = 0s
Visible: checked
Double click on the transition between bubble 4 and 5. In this entry screen setup the following:
Description: (empty)
Visible: not checked
Transition to 4 when: (empty)
Visible: checked
Transition to 5 when: Wait = 0s
Visible: checked
Double click on the transition between bubble 5
and 1. In this entry screen setup the following:
Description: (empty)
Visible: not checked
Transition to 5 when: (empty)
Visible: checked
Transition to 1 when: Wait = 0s
Visible: checked
Your bubble Screen should look like this:
Close the bubble logic screen.
Generate the application output files by pressing, "Compile" and then selecting "Make". Note this operation
prompts you to save your project.
Execute the Program Loader Monitor program by double clicking on the Program Loader Monitor icon in the
c:\Program Files\HCT Products folder.
Click on the "Program Load" button.
Power cycle the DVC5/7/10 (Off and On) and click the blue Load Application button.
Open the file created (.pgm extension) using the Programming Tool.
P/N: 021-00154, Rev. A.6 - updated for V4.7 Tools
Page | 71
After a few seconds, power cycle the DVC5/7/10 again to execute the application.
P/N: 021-00154, Rev. A.6 - updated for V4.7 Tools
Page | 72
5.6
Compactor Program Example
The compactor demo is a good example showing how bubble logic works. This program will run a garbage
compacting routine that has manual and auto compacting modes. Also, while in the Auto Cycle mode, the
manual inputs will override the auto mode. Holding the Auto button will halt the machine and reset the auto
cycle.
DVC Setup
Name
Auto
Extend
Retract
ExtLimit
RetLimit
ExtSol
RetSol
Function
Starts the Auto Cycle
Manual Cylinder Extend
Manual Cylinder Retract
True when the Cylinder is fully extended
True when the Cylinder is fully retracted
Bang-Bang valve that extends the Cylinder
Bang-Bang valve that retracts the Cylinder
P/N: 021-00154, Rev. A.6 - updated for V4.7 Tools
Type
Digital Input
Digital Input
Digital Input
Digital Input
Digital Input
Digital Output
Digital Output
Page | 73
The Bubble Logic
The Bubble Logic on the following page contains circles with captions. Above the circles is a description. The
starting point's description always starts with a "(s)". In this example the starting point is the bubble with the
caption "M". Transitions are the lines that connect two bubbles. If the Transition goes in only one direction,
there will be only one arrowhead. If there are two arrowheads, it is necessary to know how to read the transition
information. If a transition condition is listed as "M: Retract = False", it is read as "Go to M When Retract =
False". That way you will know in which direction the transition goes. The following is a list of all the bubbles
and the respective transition information.
Bubble Name
Manual Mode
Caption
M
Function
Turn off Solenoids
Go to Ext when Extend is true
Go to Ret when Retract is true
Go to A when Auto is true
Manual Extend Ext
Turn on the Extend Solenoid
Go to M when Extend is False
Manual Retract Ret
Turn on the Retract Solenoid
Go to M when Extend is False
Auto Start
A
Auto Extend
Ex
Go to A when Auto is true
Go to M when Retract is true
Go to Ext when Extend is true
Go to Re when ExtLimit is true
_
Turn off Solenoids
Go to Ex when Auto is False
Turn on Extend Solenoid
Auto Retract
Re
Turn on the Retract Solenoid
Turn off the Extend Solenoid
Go to A when Auto is true
Go to M when RetLimit is true or Extend is true
Go to Ret when Retract is true
P/N: 021-00154, Rev. A.6 - updated for V4.7 Tools
Page | 74
5.7
More Complex Control Program Example
This example program illustrates how to program various types of processes on the DVC. The point of this
example is to show the kind of code written to make a given process work.
Processes
Valve Driver:
Drive a Dual Coil High-Side valve setup with a joystick.
AntiStall:
If the Engine RPM starts to drop, the Hydraulic load is reduced.
Bang-Bang:
Drive two Bang-bang valves with two digital switches.
Flash LED:
Pulse a High-Side output to drive an LED.
Pulse Regulation:
PID a PWM output to regulate a Pulse input to a Pot input
Valve Driver
Three lines of code are required to drive a Dual Coil High-Side Valve with a joystick. In the setup, there is an
output group set up as a Dual Coil High-Side and an analog Joystick with the Center Enabled.
PWM_1 = Joystick
This line of code sets the desired current percentage. The PWM_1 variable accepts a
number from 0 to 1023 or 0% to 100% to set the current PID setpoint. The Joystick variable changes with the
joystick position and is set to a value of 0 to 1023 or 0% to 100%.
PWM_1.dir = JoyStick.dir
This command allows dual High-Side valves to switch directions. The direction
can be set to the name of the High-Side valve. In this example it would be Fwd_Coil or Rev_Coil. On this
command, the PWM_1.dir is set to the Joystick's Direction. Because the joystick was setup with a center point,
the direction of the joystick can be determined. The joystick’s direction can be tested to the names given in the
setup, rather than testing if it is true or false.
P/N: 021-00154, Rev. A.6 - updated for V4.7 Tools
Page | 75
PWM_1.Enable = True This command enables the output for PWM current regulation. If the enable is set to
False, the output will be 0% PWM, or 0 current. It will not go to Min current. To get min current, the output
should be enabled and the variable set to 0%.
Anti-stall
Two lines of code are required to run an Anti-stall algorithm. The key to the Anti-stall routine is in the set-up.
The load on the Engine is controlled with a Single Coil PWM Valve. In this example it is assumed that if this
valve is at min current, the load on the engine will be at its maximum and if the valve is at max current, the load
on the engine will be at minimum. The easiest way to achieve this is by inverting the Speed input. When the
Speed input is not inverted 0% = Min Speed and 100% = Max Speed. By inverting the output, the Min Speed is
100% and the Max Speed is 0%.
PWM_2 = Speed
This command sets the current regulation for the valve. Be sure the Speed setpoints
are correct in the setup and that the speed input is inverted if at min speed the output needs to be 100%.
PWM_2.Enable = True This command simply enables the output for PWM current regulation. If this is set to
False, the output would be 0% PWM, or 0 current. It will not go to Min current. To get min current, the output
should be enabled and the variable set to 0%
Bang-Bang Valves
One line of code is all that is required to command a bang-bang valve. In this example, two digital switches
control two bang-bang valves. Bang-bang valves are best controlled with High-Side outputs, which are either on
or off. To setup the DVC to run bang-bang valves, set the output group to any setting except "Dual Coil HighSide". In "Single Coil High-Side" mode, the output group can control only one bang-bang valve, but in "Single
Coil Low-Side" and "High-Side Only" mode, the output group can control two bang-bang valves.
HP_Limit = Dig_HP_Limit This line of code sets the bang-bang valve named "HP_Limit" to the value of the
Digital input labeled "Dig_HP_Limit". This can be used to turn on a valve that would limit the Horsepower in the
system. "HP_Limit" can also be set to "True" to turn the valve on and "False" to turn the valve off.
Relief = Dig_Relief
This line of code sets the bang-bang valve named "Relief" to the value of the digital
input labeled "Dig_Relief". This can be used to turn on a relief valve. "Relief" can also be set to "True" to turn
the valve on and "False" to turn the valve off
Flash LED
The Flash LED example illustrates the use of "Entry Code" in conjunction with Timers. This routine uses one
variable called "Wait" and it is defined as a "Timer". This logic sequence uses two bubbles. One bubble turns
on the LED output and the other one turns off the LED output. When a bubble is first executed, the "Entry
Code" sets the "Wait" variable to 50ms. The program will then wait until the timer becomes 0 before it
transitions to the other bubble. The cycle will turn the LED off and on repeatedly.
Dim Wait as Timer
this variable.
This code statement flags the Programming Tool to reserve some space in memory for
Wait = 50ms Sets the Wait timer to 50ms. Because this line of code is in the "Entry Code", the Wait Variable
will not continue to be reset to 50ms. The bios will decrement this time to 0 in 50ms.
BlinkLED = True
Turns on the High-Side output.
BlinkLED = False
Turns off the High-Side output.
Pulse Regulation
P/N: 021-00154, Rev. A.6 - updated for V4.7 Tools
Page | 76
This example makes use of the Process PI selection. The Process PI selection will adjust the current output up
or down in an attempt to make the Set point and the Feedback equal. This kind of regulation requires three
lines of code.
PWM_3.Setpoint = EngineSetpoint
0% to 100%.
Update the set point variable. The variable is a value from 0 to 1023 or
PWM_3.Feedback = EngineRPM
or 0% to 100%.
Update the feedback variable. The variable is a value from 0 to 1023
PWM_3.enable = true
Enable the current output.
Fan Control Example
Below is the actual code for this example
' Fan control to maintain fan speed at 2750 rpm with a pot to control
' varying the speed between ~3000 and 2400 rpm
' 3 inputs are defined and 1 PWM output for a 24 volt Sauer Dan-Foss valve
' Input 1 - Dig start switch
' Input 2 - Univ - proximity switch 10 teeth per revolution
' Input 3 - Analog - potentiometer to control varying the rpms
' Output 1 - PWM Sauer Dan-Foss valve type to control Fan rpm
' Implementation Process P/I loop for PWM/RPM control
' 24 volt controlled valve
' Desensitize the pot movement control
Dim Actual_Sp as Uint
'Trim the Setpoint, from 0 to 100% range to 10 to 90% Range
Actual_Sp = ((Setpoint * 80%) / 100%) + 10%
Dim SError as Uint
Dim Sum as Uint
Dim I_Timer as Timer
Dim EE_I as EEmem
Dim EE_I_Time as EEmem
Dim EE_Error_Max as EEmem
Output.Enable = enable
If (I_Timer = 0s) Then
I_Timer = EE_I_Time
If (Feedback > Actual_SP ) Then
SError = (Feedback - Actual_Sp) * EE_I / 100
If (SError > EE_Error_Max) Then
SError = EE_Error_Max
End If
If (Sum < SError) then
Sum = 0%
Else
Sum = Sum - SError
P/N: 021-00154, Rev. A.6 - updated for V4.7 Tools
Page | 77
End If
ElseIf (Feedback < Actual_SP) Then
SError = (Actual_SP - Feedback) * EE_I / 100
If (SError > EE_Error_Max) Then
SError = EE_Error_Max
End If
If (Sum + SError > 100%) then
Sum = 100%
Else
Sum = Sum + SError
End If
End If
End If
5.8
Send receive bit / byte information
The DVC controllers are capable of both sending and receiving J1939 messages. This example will explain
how to contruct / deconstruct bytes of information from both single bit and 10 bit configurations. More
information can be found in the document ‘DVC7 as J1939 expansion module’, also refer to the online tool,
‘J1939 message creation’.
Digital values, using one bit:
Using the ‘J1939 message creation’ worksheet will show how to set / reset bits in a word.
8
7
6
5
4
3
2
1
bit#
128
64
32
16
8
4
2
1
value
0x80
0x40
0x20
0x10
0x08
0x04
0x02
0x01
set value (hex)
0x7f
0xbf
0xdf
0xef
0xf7
0xfb
0xfd
0xfe
reset value (hex)
0x128
0x64
0x32
0x16
0x08
0x04
0x02
0x01
compare value (hex)
dec
value
0
0
0
0
0
0
0
0
0
For instance, if the programmer needed to set the fourth bit to ‘true’, the word would be ‘or ed’ with 0x08h.
if ((Valvecoil2.short = 1) or (Valvecoil2.open = 1)) then
data_to_dvc7a.output_status = ((data_to_dvc7a.output_status) or (0x08))
else
data_to_dvc7a.output_status = ((data_to_dvc7a.output_status) and (0xf7))
end if
If the bit needs reset, ‘and’ with 0xf7.
is the active word.
The word ‘data_to_dvc7a.output_status’
Another example, if it is needed to see if bit ‘2’ is on, then use 0x02, see
below.
if ((data_from_dvc7.a_OG1_OG2_enable and 0x02) = 2) then
Valvecoil2.Enable = 1
P/N: 021-00154, Rev. A.6 - updated for V4.7 Tools
'comparing 2nd bit
Page | 78
else
Valvecoil2.Enable = 0
end if
If the value is true, or ‘2’ in this example, then an internal bit can be set or
reset.
Analog values, using more than one bit:
Using a value that is other than on/off will need to be transferred also. The DVC
controllers use a 10 bit number. The information transmitted in 1 byte is 8 bits
in length. For this reason, and to transmit / receive the highest resolution, 2
words will need to be used, see the code below on format.
data_to_dvc7a.a_ana_in1_low = (Analog_In1 and 0xff)
data_to_dvc7a.a_ana_in1_high = (Analog_In1 / 256)
The value of ‘analog_In1’ is moved into a 8 bit word, data_to_dvc7a.a_ana_in1_low.
Analog_In1 is then divided by 256, this will move the upper 8 bits into the lower
8 bits. That value is then moved into a 8 bit word, data_to_dvc7a.a_ana_in1_high.
To reverse the process, follow this format
Valvecoil1 = ((data_from_dvc7.a_OG1_PWM_low)+(data_from_dvc7.a_OG1_PWM_high *
256))
The 8 bit word, data_from_dvc7.a_OG1_PWM_high is multiplied by 256, this moved the
information from the lower 8 bits to the upper 8 bits. This value is added to the
8 bit word, data_from_dvc7.a_OG1_PWM_low, to give a 16 bit variable, Valvecoil1.
P/N: 021-00154, Rev. A.6 - updated for V4.7 Tools
Page | 79
6 DVC Expansion Modules
6.1
Introduction
The DVC5, DVC7 and DVC10 are programmable controllers. Each has a fixed number of Inputs and Outputs
for standalone operation. If your system requires more inputs or outputs than the DVC5/7/10 provide you have
two expansion options. Additional DVC5, DVC7 and DVC10s can be configured each as master controllers for
a portion of your application. Each DVC5, DVC7 and DVC10 will have their own application program and can
communicate with each other using an application specific CAN Bus message we will describe. In addition the
DVC7 and DVC10 (not the DVC5) can talk to other DVC expansion modules over the CAN Bus to expand your
specific input and output capabilities. It is important to note that if the system requires multiple modules of the
same model, specific module names and Mac ID# must be unique. For instance, if the system uses (2) DVC50
modules, one could be named dvc50_1 with a Mac ID of 50. The other could be named dvc50_2 with a Mac ID
of 51. At this time the DVC7 and DVC10 can talk to the following units:
DVC21
40 Sinking and Sourcing Digital Inputs
DVC22
40 Sinking Digital Inputs
DVC41
12 High Side Outputs for Bang-Bang Valves or LEDs
DVC50
3 Output Groups, 8 Digital, 3 Analog and 3 Universal I/Os similar to the DVC10
DVC61
4x20 character screen display with 12 display variables and 5 single
pole double throw digital inputs
DVC62
RS232 connected handheld 4X20 character display with a 20 button keypad for data
entry.
DVC65
2x20 Character Screen Output
DVC70
Memory module for Data Logging and Tracing
DVC80
J1939 CAN Bus Support
DVC5/7/10 to 5/7/10
D206
The ability multiple DVC5, DVC7 and DVC10s to talk to each other
RS232 connected Touch Screen Color Graphical Display
The following sections describe each of these modules.
6.2
DVC21
P/N: 021-00154, Rev. A.6 - updated for V4.7 Tools
Page | 80
The DVC21 screen is broken up into three areas: Name, MAC ID, and
Individual Input Configuration. The Name is used to uniquely identify a
particular DVC expansion module. The MAC ID tells the DVC10 how to
address the Input Module when communicating over the CAN Bus. You
configure the inputs by pressing the numbered buttons.
Digital Inputs
Digital inputs are Boolean inputs that are either true or false. The input is
enabled when the Name field is specified. The De-bounce Time setting is used
to filter momentary spikes on the input. The Input Polarity determines what
voltage level is interpreted as a true or false or which edge causes a software
toggle. Software toggle changes the state of the program variable when a
rising edge or falling edge is detected on the input.
Note: Regardless of what type of switch is used, the DVC10 will react according
to the voltage seen at the input (above 2.5 volts is a high level and below a low
level). Instructions for hooking up a switch to provide the desired voltage levels can be found in the hardware
manual.
Name:
The name used in the bubble logic screen to access this variable and properties.
Range: 16 Characters with no spaces. Usable characters are A-Z, a-z, 0-9, and "_".
Rules:
The first character cannot be a number.
Compiler Keywords or other Names already in use are not valid.
Debounce Time:
The amount of milliseconds to wait before accepting a change in input states
Range: 0 to 9990ms in 10ms Increments
Polarity:
Polarity has two types of control depending on the state of the software toggle.
When No Toggle and Active High are set, the variable is true when the input is + Voltage.
When No Toggle and Active Low are set, the variable is true when the input is Ground.
When Toggle and Active High are set, the variable changes states on a rising edge.
When Toggle and Active Low are set, the variable changes states on a falling edge.
Range: Active High, and Active Low
Software Toggle:
Toggle reverses the True/False state of a variable. The digital inputs level does not directly set the variables
value; rather, the rising or falling of the digital input will reverse the state of the variable. Software Toggle gives
the programmer more options for controlling an input variable.
When No Toggle and Active High are set, the variable is true when the input is + Voltage.
When No Toggle and Active Low are set, the variable is true when the input is Ground.
When Toggle and Active High are set, the variable changes states on a rising edge.
When Toggle and Active Low are set, the variable changes states on a falling edge.
Range: Toggle, No Toggle
P/N: 021-00154, Rev. A.6 - updated for V4.7 Tools
Page | 81
Software
Polarity
Active
High
Active
Low
Toggle
Input changes states when Voltage
goes from Gnd to > 2.5 Volts
Input changes states when Voltage
goes from > 2.5 Volts to Gnd
Toggle
No Toggle
Input is True when voltage is > 2.5
volts
Input is True when voltage is Gnd
DVC21 Program Variables
DVC21.Status
Get the state of the flag.
Range: 0 = Module is Online
2 = Module is Offline
DVC21.Name or Name Get the state of the switch.
Range: False or Off, True or On
Digital Input Code Sample
Code
If (Dvc21.I40 = True) Then
Dvc41.A1 = Dvc21.I1
Comments
If logic test True or False based on the state of the input
Sets an output to the state of the Input
Note: The input state cannot be set or reset by the application. The input must be set or reset by the physical
input. For example if an input is set to toggle mode and the input is toggled on with a pulse on the input during
operation, a second voltage input is required on the input to reset the input flag from its present state. The
application code cannot reset the input.
6.3
DVC22
The DVC22 screen is broken up into three
areas: Name, MAC ID, and Individual Input
Configuration. The Name is used to uniquely
identify a particular DVC expansion module.
The MAC ID tells the DVC10 how to address
the Input Module when communicating over
the CAN Bus and must be specified and be
unique. You configure the inputs by pressing
the numbered buttons.
Digital Inputs
Digital Inputs are Boolean inputs that are either
true or false. An input is enabled when its
Name field is specified. The De-bounce Time
setting is used to filter momentary spikes on
the input. The Input Polarity determines what voltage level is interpreted as a true
or false, or which edge causes a software toggle. Software toggle changes the
state of the program variable when a rising edge or falling edge is detected on the
input.
P/N: 021-00154, Rev. A.6 - updated for V4.7 Tools
Page | 82
Note: Regardless of what type of switch is used, the DVC22 will react according to the voltage seen at the input
(above 2.5 volts is a high level and below a low level). Instructions for hooking up a switch to provide the
desired voltage levels can be found in the hardware manual.
Name:
The name used in the bubble logic screen to access this variable and properties.
Range: 16 Characters with no spaces. Usable characters are A-Z, a-z, 0-9, and "_".
Rules:
The first character cannot be a number.
Compiler Keywords or other Names already in use are not valid.
De-bounce Time:
The amount of milliseconds to wait before accepting a change in input states
Range: 0 to 9990ms in 10ms Increments
Polarity:
Polarity has two types of control depending on the state of the software toggle.
When No Toggle and Active High are set, the variable is true when the input is + Voltage.
When No Toggle and Active Low are set, the variable is true when the input is Ground.
When Toggle and Active High are set, the variable changes states on a rising edge.
When Toggle and Active Low are set, the variable changes states on a falling edge.
Range: Active High, and Active Low
Software Toggle:
Toggle reverses the True/False state of a variable. The digital inputs level does not directly set the variables
value; rather, the rising or falling of the digital input will reverse the state of the variable. Software Toggle gives
the programmer more options for controlling an input variable.
When No Toggle and Active High are set, the variable is true when the input is + Voltage.
When No Toggle and Active Low are set, the variable is true when the input is Ground.
When Toggle and Active High are set, the variable changes states on a rising edge.
When Toggle and Active Low are set, the variable changes states on a falling edge.
Range: Toggle, No Toggle
Polarity
Active
High
Active
Low
Software
Toggle
Input changes states when Voltage
goes from Gnd to > 2.5 Volts
Input changes states when Voltage
goes from > 2.5 Volts to Gnd
Toggle
No Toggle
Input is True when voltage is > 2.5
volts
Input is True when voltage is Gnd
DVC22 Program Variables
DVC22.Status
Get the state of the flag.
Range: 0 = Module is Online
2 = Module is Offline
DVC22.Name or Name Get the state of the switch.
Range: False or Off, True or On
P/N: 021-00154, Rev. A.6 - updated for V4.7 Tools
Page | 83
Digital Input Code Sample
Code
If (Dvc22.I40 = True) Then
Dvc41.A1 = Dvc22.I1
Comments
If logic test True or False based on the state of the input
Sets an output to the state of the Input
Note: The input state cannot be set or reset by the application. The input must be set or reset by the physical
input. For example if an input is set to toggle mode and the input is toggled on with a pulse on the input during
operation, a second voltage input is required on the input to reset the input flag from its present state. The
application code cannot reset the input.
6.4
DVC41
The DVC41 screen is broken up into
three areas: Name, MAC ID, and
Individual Output Configuration. The
Name is used to uniquely identify a
particular DVC expansion module. The
MAC ID tells the DVC10 how to address
the
DVC41
Module
when
communicating over the CAN Bus and
must be specified and be unique. To
configure the DVC41 outputs, give the output a Name and check the LED
box if that output is driving an LED. 12 High Side Outputs for Bang-Bang
valves or LEDs are provided.
High-Side Output
High-Side Outputs are sourcing outputs that are either true or
false (on or off). The Output is enabled when a name is
typed in to the Name textbox for that output's subgroup.
Name:
The name used in the bubble logic screen to access this variable and properties.
Range: 16 Alpha/Numeric characters only with no spaces.
LED Output:
If this Output is controlling an LED, check this box. This selection will configure the DVC41 internal resistor to
be in series with the output, so the output can directly control an LED.
Range: Checked or Unchecked
DVC41 Program Variables
DVC41.Status
Get the state of the flag.
Range: 0 = Module is Online
2 = Module is Offline
DVC41.Name or Name Set/Get the state of the switch.
Range: False or Off, True or On
P/N: 021-00154, Rev. A.6 - updated for V4.7 Tools
Page | 84
Digital Output Code Sample
Code
Dvc41.A12 = On
Dvc41.A1 = Dvc21.I1
6.5
Comments
Turn Output On
Sets an output to the state of the Input
DVC50
The DVC50 Universal I/O Module is an expansion module designed
to operate in conjunction with a DVC7/10 Master Module. Its large
number of inputs and outputs make it ideal for applications that may
need to control more proportional valves than a DVC7/10 supports.
Four analog (0 to +5Vdc) and two analog/pulse (0 to +5Vdc) inputs
can interface to a number of different types of sensors including
joysticks, potentiometers and pulse sensors. Eight digital inputs are
provided for a multiple of switch input types. The output groups are
the same as the DVC10 Master module providing 6 High Side and 3
PWM outputs in three output groups. In addition six +5vdc reference
voltage pins are provided to supply power to external sensors or
potentiometers. These reference outputs are true +5vdc outputs and
not +5vdc through a 1Kohm resistor like the DVC5/10 reference
outputs. In the DVC5/10, the 1Kohm resistor serves to limit the
maximum short circuit current to 5ma per reference output. Over
current protection in the DVC50 is provided by a 120ma fuse
incorporated into the module. The 120ma current limit applies to
the sum of all the currents from the six reference outputs. Each
individual output may supply up to 120ma. The DVC50’s RS232 port
is used for setting its MAC ID, CAN Bus baud rate and for device
monitoring.
The DVC50 communicates to the DVC7/10 Master over the CAN Bus. DVC7/10 Bubble logic code reads and
sets the input/output variables that are transferred between the modules.
Two different CAN Bus communication mechanisms are used between
the DVC10 and DVC50. They are high-speed mail in and mail out
interfaces and direct memory transfer of data. The mail out interface from
the DVC50 to the DVC10 is limited to 8 bytes or 4 variables and is
accomplished in a single CAN Bus message. The mail in interface from
the DVC10 to the DVC50 is limited to 16 bytes or 8 variables and is
accomplished in a two CAN Bus messages. The direct memory transfer
mechanism requires multiple 4 CAN messages to transfer DVC50 I/O
status to and from the DVC10 and is reserved for slower types of I/O.
Note: The PWM command for an output group is restricted to the mail in
communication because of its higher speed requirement.
The DVC50 high speed interface to the DVC10 is via 4 mail outputs. The
high speed DVC50 interface from the DVC10 is via 8 mail inputs. The names of the Mail inputs and outputs are
mapped to DVC50 IO variable names. The DVC10 and DVC50 BIOS send and receive the mail data as Device
Net communication messages.
Mail output names (DVC50 to DVC10 data) are used to transfer Analog Pulse counts, Analog RPM values, etc
to the DVC10 for processing. Mail input names are used to control coil PWM percentages while the lower
speed direct memory transfer is used to enable a valve and set current direction. Mail outputs are sent every
P/N: 021-00154, Rev. A.6 - updated for V4.7 Tools
Page | 85
10ms to the DVC10 while Mail Inputs are sent to the DVC50 every 20ms. Direct memory transfers will complete
every 40ms.
The DVC50 I/O configuration screen is very similar to the DVC10’s
screen with the addition of the Name, MAC ID and IO Assignment fields. Also note the different number of
Analog/Pulse Inputs and that only six function curves are provided instead of eight.
The Name field is used to identify this DVC50 module and serves as the prefix for DVC50 IO names.
The MAC ID is the CAN Bus address for this module. This field must be specified and be unique in order for the
modules to communicate via the CAN Bus.
Digital Inputs
The DVC50 Digital Input Screen is laid out like the DVC10 Digital Input screen and is used in the same manner.
All of the 8 inputs are sinking (i.e. externally powered).
Analog Inputs
The DVC50 Analog Input screen is laid out like the DVC10 Analog Input screen and is used in the same
manner. All of the inputs have a corresponding +5vdc reference output pin and signal common or ground pin.
Analog / Pulse Inputs
The DVC50 Analog / Pulse input screen is laid out like the DVC10
Universal Input screen except that there is no Voltage Range selection
for the DVC50 (see the DVC50 Hardware Users Guide for information on
input voltage limits). Otherwise, it is used in the same manner as the
Universal Input screen for the DVC10. All of the inputs have a
corresponding +5vdc reference output pin and signal common or ground
pin.
Output Groups
The DVC50 Output Group screen is laid out like the DVC10 Output
Group screen and is used in the same manner.
Input / Output Functions
The DVC50 Input / Output Functions screen is laid
out like the DVC10 Input / Output Functions screen
and is used in the same manner.
IO Assignments
The IO Assignments screen allows the user to
quickly set up Input to Output relationships including
the use of Function Curves as well as to map and
name Mail variables.
Output Groups
There are three Output Groups screens. By using
the pull down menus on the right, you may assign
different available inputs to control the listed output
variables. Available selections depend on the setup
of the output group (i.e. Dual Coil High Side etc.).
The DVC7/10 Bubble logic code must control
assignments that do not have their box checked.
Note that setting the PWM command value requires
P/N: 021-00154, Rev. A.6 - updated for V4.7 Tools
Page | 86
that you use a mail input. Refer to the code samples at the end of this section for an example.
IO Functions
The IO Functions screen allows the user to assign various
inputs as the input to an IO Function curve. Use the pull
down menus on the right side of the screen to assign an input
to the associated Function Curve.
Mail Names
The Mail Names screen is used to assign variable names to
the Mail_Inputs1,…8 and Mail_Outputs1,...4 of the DVC50.
You use these names in your DVC7/10 application code.
Mail_Inputs are inputs to the DVC50 from the DVC10 while
Mail_Outputs are inputs to the DVC10 from the DVC50.
Mail Inputs can be used in DVC50 IO Assignment screens to
control the input to a Function Curve or set a PWM command
percentage. There are eight available Mail Inputs.
Mail Outputs are used to send selected DVC50 I/O status
information out on the CAN Bus to the DVC10. There are
four available Mail Outputs.
Range: 16 Characters with no spaces. Usable characters are
A-Z, a-z, 0-9, and "_".
Rules:
The first character cannot be a number.
Compiler Keywords or other Names already in use are not
valid.
User Defined
The User Defined screen is used to assign DVC50 I/O
information to each of the four Mail Outputs. Use the pull
down menus to assign available variables to the Mail
Outputs.
Using the DVC50 in Bubble Logic
The IO Assignment screens may be ignored all together
and application code can be written in the DVC7/10 Bubble
logic as with any other system module. The user may also
use IO Assignments in conjunction with Bubble Logic.
Note the fact that any relationship selection opted for in the
P/N: 021-00154, Rev. A.6 - updated for V4.7 Tools
Page | 87
IO Assignments screens may not be contradicted in the Bubble Logic.
DVC50 Program Variables
The Input and Output Group variables are the same as with the DVC10.
Note: Output Group PWM is the lone exception and is controlled via the Mail In variables as previously
explained.
To access these variables in the Bubble logic, use the format “Name.Var-Prefix.Var-Suffix”, where Name is the
name of the module (DVC50, DVC51, Frank etc), Var-Prefix is the I/O variable name (.Dig_1, .Ana_1 etc) and
Var-Suffix (if needed) is the variable attribute (.Dir, .Short, .Enable, .Dir etc). For example the proper variable
name for Analog/Pulse Input two’s Real RPM on a DVC50 named Tina would be ”Tina.Ana_Pulse_2.RealRPM”.
Additional variables are as follows;
Name.STATUS
Get the state of the DVC50.
Range: 0 = Module is Online
2 = Module is Offline
Name.ClrMinMax
Reset the Max/Min flags on the Analog Inputs
Range: True = Reset flags
False = Do not reset flags
Name.ClrShorts
Reset the Short flags on the High and Low Side Outputs
Range: True = Reset flags
False = Do not reset flags
Name.ClrOpens
Reset the Open flags on the High and Low Side Outputs
Range: True = Reset flags
False = Do not reset flags
Name.Mail_Output1…4
This is name or the name assigned to this mail output is the name for the Mail Outputs from the DVC50 to the
DVC10.
Range: 16 Characters with no spaces. Usable characters are A-Z, a-z, 0-9, and "_".
Rules:
The first character cannot be a number.
Compiler Keywords or other Names already in use are not valid.
Name.Mail_Input1…8
This is name or the name assigned to this mail input is the name for the Mail Inputs to the DVC50 from the
DVC10.
Range: 16 Characters with no spaces. Usable characters are A-Z, a-z, 0-9, and "_".
Rules:
The first character cannot be a number.
Compiler Keywords or other Names already in use are not valid
Code Sample
Code
Comments
DVC50.PWM_1.Dir = Ana_1.Dir
Sets the direction for PWM_1 output on the DVC50 to
follow the direction of Ana_1 on the DVC10
DVC50.PWM_1.Feedback = DVC50.Ana_2
Sets the feedback for PWM_1 to Ana_2 on the DVC50
DVC50.ClrShorts = DVC50.Dig_2
Clears any short flags on the DVC50 when DVC50.Dig_2
is active
Bubble logic code
‘ Dual coil High Side Valve named pump
If (set_valve) then
DVC50.pump.enable = true
' activates pwm
DVC50.pump.dir = True
' activates High Side 1
DVC50.mail_input1 = pwmpercentage ' sets pwm%, IO assignment maps PWM for the valve to
P/N: 021-00154, Rev. A.6 - updated for V4.7 Tools
Page | 88
‘ mail_input1
Else
DVC50.pump.enable = false
End if
6.6
' turns off current to the valve
DVC61
The DVC61 display module is a
very configurable display device
with an additional 5 Single Pole
Double Throw digital inputs. A
single DVC61 can be connected
to the RS232 port of a
DVC5/7/10 or one of more
DVC61s can be connected to
the CAN Bus. In addition to
supporting
multiple
DVC61
display devices, multiple screen
images per device are also
supported. Each screen image
consists of text and variables
that you define and position on
the display.
Each DVC61
device and display screen image has a name. To switch between screens for a particular device you simply
specify in your application a statement of the form:
Device_Name.Screen = Screen_Name
To set a variable display field’s value you program a statement of the form:
Device_Name.v1 = Ana_1
When configuring a DVC61 module, you use the
Programming Tool’s DVC61 screen shown. This
screen is broken up into five areas: Name, MAC ID,
Connection Type, Input Setup and an area to add
individual screen image icons for this device. The
Name field (Device_Name above) is used to identify
this DVC61 module. The MAC ID is the CAN Bus
address of this DVC61 module. It must a unique CAN
Bus address and is used by the DVC7/10 and DVC61
modules to communicate. Connection Type is used to
select between CAN Bus communication and RS232
communication. Five digital inputs that can be wired
directly to the DVC61 connector are also supported.
Use the Input Setup button to open the Input Setup
screen. Each of the five tabs when selected presents a screen for configuring the 2 inputs. You can specify the
name for the input (Device_Name.input_name is how the input is referred to in your application). Each input
can be enabled or disabled, have its debounce time set and be set for toggle or no toggle mode.
Screens images for a particular DVC61 device are added by right clicking in the DVC61 device window shown
above and selecting "Add Screen". Screen images can de deleted by right clicking the mouse on their icon and
selecting Delete. Double clicking on a screen image icon will display the screen image configuration screen
described later.
P/N: 021-00154, Rev. A.6 - updated for V4.7 Tools
Page | 89
DVC61 Digital Input Setup
The DVC61 Input Setup screen allows the user to configure the 5
Single Pole Double Throw (SPDT) digital inputs of the DVC61. The
user may select the tabs at the top of the screen to switch between the
five input groups. The diagrams displayed show possible hardware
configurations for the inputs.
Input 1A check box
Enable the input for use in the project by checking the box.
Name:
The name used in the bubble logic screen to access this variable and properties.
Range: 16 Characters with no spaces. Usable characters are A-Z, a-z,
0-9, and "_".
Rules: The first character cannot be a number, compiler keyword or another names already being used.
Debounce Time:
The amount of milliseconds to wait before accepting a change in input states
Range: 0 to 9990ms in 10ms Increments
Toggle / No Toggle:
When the input is set to Toggle, The input will be set by the appropriate voltage level input edge and will remain
set until the next appropriate voltage level input edge (If set by a positive voltage pulse, it will remain set after
the voltage is not present on the input until the next positive pulse.
When Set to No Toggle, The input is set only as long as the proper voltage is present and reset when removes.
Range: Toggle, No Toggle
INPUT A
(Name)
INPUT B
(Name)
Toggle
No Toggle
Active Input changes states when Voltage Input is True when voltage is > 2.5 volts
High
goes from < 2.5 Volts or OPEN
(floating) to > 2.5 Volts
Active Input changes states when Voltage Input is True when voltage is < 2.5 Volts
Low
goes from > 2.5 Volts or OPEN
(floating) to > 2.5 Volts
Screen Images
Each DVC61 device can support multiple screen images to
display information in various forms.
Each device has up to 12 display variables. At run time each
variable can be assigned the value of an input or output
program variable or another variable.
Every screen image has fields to specify its Name, define
which of the 12 display variables will be displayed, the X, Y
location for the variable and in what format. You may also
enter fixed textual information for the image. A shaded area
to allow the user to preview the finished screen image with
sample variable values is provided.
Name:
The name used in the bubble logic to access this screen and its properties.
P/N: 021-00154, Rev. A.6 - updated for V4.7 Tools
Page | 90
Range: 16 alpha/numeric characters only with no spaces.
V1, … ,V12:
Scroll down list of display types/formats
Refer to Section 8.2 for an explanation of Display Types.
X&Y
These are the X and Y numeric text character position and line coordinates for the Display
variables. The Upper left corner is X = 1 and Y = 1.
Test Value
This is the value displayed on the test screen to allow the user to preview the finished
screen while in the programming tool.
DVC61 Program Variables
Note: DVC61 below is the default device name but could be another name of your choosing.
DVC61.Screen
Identifies the screen image to be displayed
DVC61.V1
Get/Set the value for the V1.
Range: 0 to 65535
Get/Set the value for the V2.
Range: 0 to 65535
Get/Set the value for the V3.
Range: 0 to 65535
DVC61.V2
DVC61.V3
******
DVC61.V12
DVC61.Backlight
Get/Set the value for the V12
Range: 0 to 65535
Get/Set The value of the Backlight.
Range: 0 to 1023
Get/Set The value of the Contrast Level.
DVC61.Contrast
Range: 0 to 1023
DVC61.Status
Get the state of the flag.
Range: 0 = Module is Online
2 = Module is Offline
DVC61.Input_Name
Get the state of the digital input
Range: False or Off, True or On
DVC61 Code Sample
Code
DVC61.Screen = Screen_Name
DVC61.V1 = ana_1
6.7
Comments
Point to DVC61 Screen image to display
First Variable is set to analog input 1’s value
DVC62
Release 4.7 the DVC tools provides support for the DVC62 input/output device
commonly referred to as a pendant. This device provides a 4 line 20 characters per line
text display plus a 20 key keypad for inputting data to your application. The DVC62
connects to the DVC5/7/10 controller using the RS232 interface. Typical usage of the
DVC62 is for system configuring where your application writes messages to the display
and accepts user input from key depressions and in so doing sets parameters probably
saved into EE memory that determine the operation of the system. The device is
approximately 3” wide by 5” high and easily held in your hand, comes with pendant
P/N: 021-00154, Rev. A.6 - updated for V4.7 Tools
Page | 91
batteries and a moisture and oil proof keypad. Backlighting provides for easy reading of the display.
Programming the DVC62
Below is an example of how to program the DVC62. More complete
examples can be obtained from High Country Tek Tek upon request.
You basically program the display in four steps:
First add the DVC62 icon to your project.
Second construct the various display images you will want the user
to access (scroll through). The images are specified much like the DVC61 screens.
Third construct a logic sequence for the pendant code like
that shown. A bubble for each screen and a common key
input processing bubble is one way of organizing the
processing.
Finally, write the navigation and key entry code.
Programming the Key Keypad Entries
P/N: 021-00154, Rev. A.6 - updated for V4.7 Tools
Page | 92
Each key has a unique integer value. Below is the value for each key on the keypad.
const F1 = 65
const F2 = 66
const F3 = 67
const F4 = 68
const uparrow = 65
const leftarrow = 66
const rightarrow = 67
const downarrow = 68
const one = 49
const two = 50
const three = 51
const Yes = 43
const four = 52
const five = 53
const six = 54
const No = 45
const seven = 55
const eight = 56
const nine = 57
const bksp = 8
const period = 46
const zero = 48
const space = 32
const enter = 13
When a key is depressed the ANSI code is transferred your application and accessible using the variable
DVC62.value. Upon receipt the variable DVC62.key is set to true. After you have processed the receive key
depression you should set the DVC62.key variable to false and wait until it is set by the BIOS to true to process
the next key struck. Code like the following does this.
If (DVC62.key = true) then
Value = DVC62.value
DVC62.key = false
‘ add code to process the value received
End if
Setting up a Screen for Display
Use the DVC62.screen variable and DVC62.v1, …., DVC62.v12 variables to activate and personalize the
display.
DVC62.screen = splash ‘ screen name is splash
DVC62.v1 = value
…….
DVC62.v12 = value12
P/N: 021-00154, Rev. A.6 - updated for V4.7 Tools
Page | 93
6.8
DVC65
The DVC65 layout screen is similar to that of the DVC61 except it is
limited to 2 rows of 24 characters each. New DVC65 screens can be
defined by first clicking the right mouse button in the window and
selecting "Add Screen".
DVC65 Screens
A DVC65 Setup screen has a field to change the Name, display up
to 4 Variables, and a string of text. In the upper portion
(2x24 Test Display) of the setup screen, there is a preview of
the DVC65 display.
Name:
The name used in the bubble logic to access this screen and
its properties.
16 Alpha/Numeric characters only with no spaces
V1, V2, V3 & V4
Type
Refer to Section 8.2 for an explanation of Display Types.
X&Y
These are the X and Y Coordinates for the Displayed
Variables.
The Upper left corner is X = 1 and Y = 1
Test Value
This is the value displayed on the test screen to allow the user to preview the finished screen while in the
programming tool.
DVC65 Program Variables
Name.Status
Get the state of the flag.
Range: 0 = Module is Online
2 = Module is Offline
Name.Screen
Set the screen name
Range: Every defined Screen
Name.V1
Range: 0 to 65535
Set the value for the Var 1
Name.V2
Range: 0 to 65535
Set the value for the Var 2
P/N: 021-00154, Rev. A.6 - updated for V4.7 Tools
Page | 94
Name.V3
Range: 0 to 65535
Set the value for the Var 3
Name.V4
Range: 0 to 65535
Set the value for the V4 display variable
DVC65 Code Sample
Code
DVC65.Screen = Screen_Name
DVC65.V1 = ana_1
6.9
Comments
Point to DVC65 Screen to display
First Variable is set to analog input 1
DVC70
The DVC70 memory module is capable of storing (logging) data, date
and time information to nonvolatile memory in the DVC70. The
information to be stored is transmitted from the DVC7/10 via the
Controller Area Network (CAN bus) to the DVC70. The information on
the DVC70 can be downloaded to a laptop or PC using a RS232
communication port for analysis or review.
The DVC70 is capable of storing 3 types of logs:
Trend logs – consist of up to 10 monitored variables. Data storage is
automatic and independent of time or data value.
Event – consist of up to 5 monitored variables. This data logging
operation is started and stopped by the user’s application code.
Fault logs – consist of up to 5 monitored variables. This data logging
operation is started and stopped by the user’s application code.
DVC70 Screen
The DVC70 screen is divided into four areas: Name, MAC ID, Message
Editor, and Memory Buckets Setup Buttons (five
available). The Name is used to identify programmatically
your DVC70 module. The MAC ID is the CAN Bus
address the DVC10 will use to communicate with the
DVC70 and must be unique. To setup a Memory Bucket,
click on one of the five buttons, and the Log Input Setup
screen will appear. To add messages to the Message file,
click on the Message Editor button and the Message
Editing screen will appear.
Log Input Setup Screen
The Log Input screen is divided into twelve areas: Name,
Description, Data Type, Memory Allocation, Data
Protected, Time Stamp, Alarm, Alarm Percent, Scan Rate,
Number of Variables, Variable Names and Scaling Factors. Name is used to identify your Memory Bucket. The
Description field is optional and can be used for describing the bucket. Data type refers to what type of data
logging will occur. It is divided into three types:
P/N: 021-00154, Rev. A.6 - updated for V4.7 Tools
Page | 95
Trend logging, Event logging or Fault logging. Memory
Allocation sets the size of the particular bucket (in kilobytes)
out of a maximum of 5megabytes. The Data Protected
checkbox determines if new data can be written over old
data. The Time Stamp checkbox gives the option of
recording time, date and day in the log. Alarm and Alarm
Percent work together as a means of showing when the
Allocation Block is getting close to being filled. Scan Rate
determines how often the variables within a Trend log will
be tracked. The Number of Variables shows how many
variables will be tracked. Variable Names identify the
variables to be tracked and Scaling Factors allow for
floating point variables.
A common question is how many events can be recorded in
the DVC70 memory and for how long. Each message
consists of an optional timestamp that is 7 bytes long plus 2
bytes per variable defined for the event. When in trend
mode the scan rate also applies. So for the maximum of 10
variables in trend mode with a timestamp per line the data length is 27 bytes. Thus 4992k/27 = 185k events. At
one event per second this would equal 185Ksec/3600 sec per hour = 51 hours of recording. Another way of
looking at it is how many recordings can be captured. The range is 9 (1 variable and the timestamp) to 27 (10
variables and the timestamp) bytes per recording or 555k to 185k recordings. In event mode the time to record
185K to 555K events will vary depending how often you trigger the recording in your application.
Name:
The name used in the bubble logic screen to access this variable and properties.
Range: 16 Alpha/Numeric characters only with no spaces.
Description:
Used for output log description only.
Range: 40 Alpha/Numeric characters.
Data Type:
Identifies the data logging type (Trend or Event/Fault)
Range: Trend, Event, or Fault.
Note: Event and Fault logs are the same type of log. The nomenclature Event and Fault was chosen in order to
make it easier for the user to perceive fault situations.
Memory Allocation:
Determines the size of the Memory bucket
Range: 0, 128K, 256K, 512K, 1024K, 1536K, 2048K, 2560K, 3072K, 3584K, 4096K, 4608K, and 4992K
Note: The maximum amount of memory that can be allocated by all five-allocation blocks combined is 5120K.
Data Protected:
When the allocation block is filled to 100%, Data Protected determines if the stored data can be overwritten or
not.
Range: On, Off.
P/N: 021-00154, Rev. A.6 - updated for V4.7 Tools
Page | 96
Time Stamp:
When Time Stamp in Trend mode, the time, date, and day of each scan is stored as well as the scanned data
Range: On, Off.
Notes: Trend Logs: the user has the choice to deactivate Time Stamp, except when the data is not protected. If
the Time Stamp is deactivated, only the first record will be time stamped and the Program Loader Monitor will
automatically calculate the time in reference to the first time-stamp and the scan rate.
Event and Fault Logs: Time Stamp is activated by default. The user can’t change this option.
Alarm:
This output is usually wired to an LED or similar device. When the Memory bucket is filled up to a determined
percentage (see Alarm Percentage), the LED will start blinking as an alarm that the set point has been reached.
The LED will stay on once 100% is reached.
Range: On, Off.
Alarm Percentage:
When Alarm is ON, Alarm Percentage determines at which point (percentage) during the scanning of data to
allocation block memory the Alarm will start blinking. It can be used in the Bubble logic code to control other
logic sequences.
Range: 50%, 60%, 70%, 80%, 90%, 95%, 98%, and 100%.
Scan Rate:
The Scan Rate determines how often a variable will be logged in a Trend Log.
Range: 100ms – 108s
Note: Scan Rate does not apply to Event or Fault Logs.
Number of Variables:
The Number of Variables is used for tracking the Variables
within a Trend Log. For Event and Fault logs, this parameter
is only used by the Programming Tool.
Range: Trend 1 – 10 Variables
Event or Fault 1 – 5 Variables
Variable Names:
Enumerates the Bubble logic variable name to be logged
Range: 16 Alpha/Numeric characters only with no spaces.
Scaling Factors (Trend mode only):
Used by the Loader Monitor to convert integer data into
meaningful units of measurement (i.e. Floating Point – 2.5 V,
etc)
Range: None, 1:1, -1 Volt to 1 Volt, 0 Volts to 5 Volts, 0 Volts
to 10 Volts, 4 ma to 20 ma, Supply V, True / False, On / Off, 0.1, 0.01 (s), 0.001.
Note: The application programmer must set up Scaling Factors for Event and Fault logs in the code.
Message Editor Screen
The Message Editor is used when downloading Event or Fault data. The user defines error messages using
this editor, and then codes the conditions for trapping, logging, and displaying the errors in the Bubble logic. If
an Event or Error condition is met, the corresponding message number is also stored in the DVC70. When the
user downloads the data from the DVC70, the message number is compared to message numbers saved in a
text file. The actual message then gets written to the Loader Monitor output (.CSV file).
P/N: 021-00154, Rev. A.6 - updated for V4.7 Tools
Page | 97
Number:
This field contains the (message) number. This number is stored in the DVC70 during data collection, and is
used in order to determine the Message when the user downloads the data using the Loader Monitor.
Range: 1 – 32768.
Message:
This field contains the message to be added to the Message List. Message is what is displayed in the output
Log File.
Range: 40 Alpha/Numeric characters.
Note: When the user finishes typing the contents of a message, the Enter key must be pressed in order for the
message to be accepted.
Add Message:
Appends the message to the Message List
Delete Message:
Deletes the current message from the Message List
Edit Message:
Transfers the current message from the Message List to the Number and Message fields so that the message
can be modified and saved back to the Message List.
Load New Message File:
Allows the user to load a new message file
OK:
Accepts all changes made to one or more messages in the Message List and closes the Message Editor
Screen.
Note: In order to change an existing message, locate the message to be changed, press the Edit Message
button, modify the message shown in the Message field, and press the Add Message button.
DVC70 Program Variables
DVC70.Status
Displays the DVC70 Status (On \ Off line).
Possible Values: 0 = Online
2 = Offline
DVC70.ActiveB
P/N: 021-00154, Rev. A.6 - updated for V4.7 Tools
Page | 98
Range: 1 - 5 = Memory Bucket # (1 – 5) Active
DVC70.AlarmState
Range: 1 – 5 = Alarm State for Memory Bucket 1 – 5
DVC70.PercentUsed
Possible Values: 50%, 60%, 70%, 80%, 90%, 95%, 98%, and 100%
DVC70.MinSec
Bits: bits 0 – 6 (Seconds) – 0 - 59
bits 8 – 15 (Minutes) – 0 - 59
DVC70.DayHours
Bits: bits 0 – 4 (Hours) – 0 - 23
bit 5 PM or AM – 0 or 1
bit 6 12 or 24 hour clock – 0 or 1
bits 8 – 15 (Day of the Week) – 1 - 7
DVC70.MonthDate
Bits: bits 0 – 5 (Date) – 1 - 31
bits 8 – 13 (Month) – 1 - 12
DVC70.Year
Bits: bits 0 – 7 (Year) – 00 - 99
Memory Bucket Name
Range: 1 Name per Memory Bucket
Memory Bucket Name.VarName1 – 10 (Trend only)
Range: 1 Name per Variable
Memory Bucket Name.VarName1 – 5 (Event or Fault) – the application programmer uses this variable to set up
the Message to be displayed if the event becomes true and to set up the Scaling factor
Range: 1 Name per Variable
SF1 – 12
Possible Values:
SF1 = 0 = None
SF2 = 4096 = 1:1
SF3 = 8192 = -1 Volt to 1 Volt
SF4 = 12288 = 0 Volts to 5 Volts
SF5 = 16384 = 0 Volts to 10 Volts
SF6 = 20480 = 4 ma to 20ma
SF7 = 24576 = Supply Volts
SF8 = 28672 = True / False
SF9 = 32768 = On / Off
SF10 = 36864 = 0.1
SF11 = 40960 = 0.01 (s)
SF12 = 45056 = 0.001
Memory Bucket Name.Data1 – 5 (Event or Fault)
Range: 1 Data point for each Variable (1 – 5)
P/N: 021-00154, Rev. A.6 - updated for V4.7 Tools
Page | 99
Code Sample
Code
EngineTrend.EngineRPM = ana_1
Dvc70.ActiveB2 = Dig_2
Event_2.Truck_moving = 1 + SF10
Dim Day as Uint
Day = DVC70.DayHours / 256
If (Day = 1) then
DVC70.ActiveB2 = true
End if
6.10
Comments
First Variable of Engine Trend is set to analog input 1
Digital Input 2 toggles activity
Set the message to be displayed (in the event that
Event_2.Truck_moving is true) to Message # 1 and scale
the value for the data collected for the Truck_moving
variable to value/10
Variable for storing the day of the week
This calculation results in a Number between 1 and 7 (1 =
Sunday, 2 = Monday etc.)
If today is Sunday, start logging activity.
J1939/DVC80
The DVC5 controller interfaces directly to the J1939 CAN Bus from the engine. The DVC7 and DVC10
controllers have two ways of interfacing to J1939 CAN Bus messages. First the DVC7/10 can be connected
directly to the J1939 CAN Bus like the DVC5. This is only possible when the DVC7/10 controller does not also
have expansion modules to connect too over the CAN Bus using Device Net. When expansion modules are
used the DVC80 expansion module needs to be configured in your project. This module acts like a bridge
between the DVC7/10 Device Net CAN Bus and the J1939 CAN Bus to the engine. This bridge is necessary
because J1939 and Device Net have different message structures and cannot coexist on the same CAN Bus
wires.
J1939 Only Mode on the DVC5/7/10
For small systems that require only one DVC5/7/10 Master Module and no DVC expansion modules, a feature
has been added to the DVC5/7/10 to allow for communication directly between a DVC5/7/10 and J1939 CAN
Bus systems. The DVC5/7/10 may be used to send and receive messages directly on the J1939 CAN Bus
while conducting normal functions with its Inputs and Outputs. Note that a DVC61 display module needs to be
connected using the RS232 connection not the CAN Bus. The Virtual Display may be used in a normal manner.
The following information should be used as an outline for setting up a DVC5/7/10 to operate in J1939 Only
Mode.
DVC 5/7/10 Application Code
The application program must have a J1939/DVC80 in the project. Only RS232 connected modules such as the
DVC61, the Graphical Display and the Virtual Display can be added to the project as well.
Use the DVC80 Message screens to set up the send and receive messages to be communicated on the J1939
CAN Bus. The MAC ID on the DVC80 setup screen is not used in this configuration. Write your application in
the normal manner to control the operational parameters and processes for system operation. J1939 messages
shall be addressed in the application as if a DVC80 expansion module were present.
DVC5/7/10 Hardware Setup
Connect the incoming J1939 CAN H and CAN L signals to the DVC5/7/10 specific CAN Bus Connector as
outlined on the DVC5/7/10 Connector Pin out sheet. Remember to terminate the CAN Bus at the DVC5/7/10
using the appropriate terminator we supply.
P/N: 021-00154, Rev. A.6 - updated for V4.7 Tools
Page | 100
DVC5/7/10 Firmware Setup
With the Program Loader Monitor running and connected to the DVC5/7/10 navigate to the Factory Information
screen and select the following options then select “Send Changes”.
CAN Baud Rate = 250K baud
CAN Bus Type = J1939 Only
DVC J1939 Operation
At this point load the application into the DVC5/7/10 in the normal manner. The DVC will communicate directly
on the J1939 CAN Bus. All of the J1939 messages will be seen by the DVC controller but only those defined as
messages of interest to your application will be processed. J1939 CAN Bus messages may be viewed by
selecting the J1939/DVC80 status icon from the Program Loader Monitor main screen.
DVC80 J1939 Expansion Module
The DVC80 (J1939 Bridge) is a unique CAN Bus gateway/bridge
device. This module was built to serve as a data link between the
DVC CAN Bus and J1939 CAN Bus systems. It uses the DVC
CAN Bus Device Net protocol and SAE J1939 standard protocol to
receive, filter, and retransmit messages. The data gathered by
these messages can then be incorporated into the DVC Bubble
logic code.
The DVC80 layout screen is similar to that of the DVC61. New
DVC80 J1939 messages are added by clicking the right mouse
button on the screen and select "Add Message". The DVC80 may
contain up to 15 messages. The messages include both messages
to be sent at regular intervals to the engine and messages to be
received from the engine.
J1939 Message Set-up
The Programming tool has no pre-defined J1939 Messages. The
user is required to enter the data correctly from the J1939
Specification book. The user should not define multiple messages
with the same PGN numbers. The PGN number is the combination
of the PDU format byte and PDU Specific byte.
Command Name
The name prefix used in the bubble logic screen to access this message’s data
and status.
Range: 16 Alpha/Numeric characters only with no spaces.
Control
The Control field specifies if the message will sent to or received from the engine’s
ECM.
Range: Receive Data or Send Data
P/N: 021-00154, Rev. A.6 - updated for V4.7 Tools
Page | 101
Maximum Time
The meaning of this field is dependent on the Control type. If the Control type is Send Data then this field means
how often the message is transmitted out from the DVC controller and DVC80. If the Control type is Receive
Data then this field means how often the message is expected to be received. Error indications will occur if
these times are exceeded.
Range: 10ms to 10seconds.
PDU Format (PF)
The PF field identifies one of two PDU formats able to be transmitted (PDU1 or PDU2). PDU Formats are
described in the SAE J1939/21, Section 3.3.
Range: 0 to 255
PDU Specific (PS)
The meaning of this field is dependent on the value of PF. If the PF value is between 0 and 239 (PDU1), this PS
field contains a destination address. If the PF field is between 240 and 255 (PDU2), the PS field contains a
Group
Extension (GE) to the PDU Format. The Group Extension provides a larger set of values to identify messages,
which can be broadcast to all ECUs on the network.
Range: 0 to 255
Priority
The Priority field assigns how important the message is to be processed. The highest priority is 0 and lowest
priority is 7. (This field is not needed when “Control” type is “Receive Data”)
Range: 0 to 7
Data Length
Data Length is the length of the message in bytes.
Range: 1 to 8
Byte # Name
Byte Name is the suffix of the name to access a byte in Bubble Logic. For instance
eec1.status_eec1 would be used to access byte 1 of the defined message EEC1
shown here.
Range: 16 Alpha/Numeric characters only with no spaces.
DVC80 Program Variables
Name.NORSP
True when a message has not been received in the
“Maximum Time” period
Name.Byte#Name
Set/Get the current value of that byte of the J1939
CAN message
Range: 0 to 255
Name.disable
defaults to false.
True will prevent messages from being sent. This variable
Name.srcaddr
Message that are sent from the DVC7/10 will have this number as the J1939
source address. If this value is 0 (the default) the source address will be the
DVC80 macid value.
Message Example
Message Name:
Control
Maximum Time: 50ms
PDU Format (PF)
PDU Specific (PS) 4
EEC1
Receive Data from ECM
Engine Speed Dependent
240
PGN = (PF*256)+PS
P/N: 021-00154, Rev. A.6 - updated for V4.7 Tools
Page | 102
Priority
Data Length
3
5
EEC1.Status_EEC1
EEC1.Drive_DMD_Eng
EEC1.Actual_Eng
EEC1. EngRPML
EEC1. EngRPMH
EEC1. NoRSP
Not Required for Receive Data
Message Data
- Name to access byte 1 of message
- Name to access byte 2 of message
- Name to access byte 3 of message
- Name to access byte 4 of message
- Name to access byte 5 of message
- Name to access No Response Status bit
Code Example
Dim EngRpm as Uint
‘Define storage location for RPM Calc J1939
Dim EngTorque as Uint
‘Define storage location - Actual Engine Torque
EngRpm = (EEC1.EngRPMH * 256 + EEC1.EngRPML) / 8 ‘Convert from 0.125 RPM to 1 RPM per bit
If (EEC1.Actual_Eng > 124) then
‘Test to see if positive %Torque
‘ -note %Torque Resolution 1% pbit, -125% offset
EngTorque = EEC1.Atual_Eng – 125 ‘Engine Torque % - offset of 125% = positive %
Else
EngTorque
=
0
‘Use
0%
when
negative
%
detected
End if
Note: The Engine RPM example first converts two bytes into one number and then converts from 0.125 RPM
per bit into 1 RPM per bit.
SAE J1939 Message Examples
SAE
J1939
Descripti
on
Elec Eng
Cont
#2
–
EEC2
Elec Eng
Cont
#1
–
EEC1
Vehicle
Distance
Engine
Hours,
Revolutio
ns
Fuel
Consump
tion
Engine
Temperat
ure
Engine
Fluid /
Parameter
PDU2
(PF), (PS)
PGN
Decimal
PGN
Hex
Start
Byte
Data
Length
Value
Units
Offs
et
Accelerator Pedal Position
Percent Load at Current
Speed
240, 3
240, 3
61443
61443
F003
F003
2
3
1
1
0.4
1
%/bit
%/bit
0
0
Actual Engine &% torque
Engine Speed
240, 4
240, 4
61444
61444
F004
F004
3
4
1
2
1
0.125
%/bit
Rpm/bit
-125
0
Trip Distance
Total Vehicle Distance
Total Engine Hours
254, 224
254, 224
254, 229
65248
65248
65253
FEE0
FEE0
FEE5
1
5
1
4
4
4
0.125
0.125
0.05
km/bit
km/bit
H/bit
0
0
0
Trip Fuel
Total Fuel Used
254, 233
254, 233
65257
65257
FEE9
FEE9
1
5
4
4
0.5
0.5
L/bit
L/bit
0
0
Engine Coolant Temp
Fuel Temperature
Engine Oil Temperature
254, 238
254, 238
254, 238
65262
65262
65262
FEEE
FEEE
FEEE
1
2
3
1
1
2
C/bit
C/bit
C/bit
-40
-40
-273
Engine
Intercooler
Temperature
Fuel Delivery Pressure
Engine Oil Level
254, 238
65262
FEEE
7
1
1
1
0.0331
25
1
C/bit
-40
254, 239
254, 239
65263
65263
FEEF
FEEF
1
3
1
1
4
0.4
kPa/bit
%/bit
0
0
P/N: 021-00154, Rev. A.6 - updated for V4.7 Tools
Page | 103
Level
/
Pressure
Cruise
Control/
Vehicle
Speed
Fuel
Economy
Ambient
Condition
s
Inlet/Exha
ust
Condition
s
Vehicle
Electrical
Power
Transmis
son
Fluids
Engine
Fluid
Level/Pre
ssure
6.11
Engine Oil Pressure
Coolant Pressure
Coolant Level
Wheel Based Vehicle Speed
254, 239
254, 239
254, 239
254, 241
65263
65263
65263
65265
FEEF
FEEF
FEEF
FEF1
4
7
8
2
1
1
1
2
4
2
0.4
1/256
kPa/bit
kPa/bit
%/bit
Km/h/bit
0
0
0
0
Fuel Rate
Instantaneous Fuel Economy
Average Fuel Economy
Barometric Pressure
Air Inlet Temperature
254, 242
254, 242
254, 242
254, 245
254, 245
65266
65266
65266
65269
65269
FEF2
FEF2
FEF2
FEF5
FEF5
1
3
5
1
6
2
2
2
1
1
0.05
1/512
1/512
0.5
1
L/h/bit
km/L/bit
km/L/bit
kPa/bit
C/bit
0
0
0
0
-40
Boost Pressure
Intake Manifold Temp
Air Filter Differential Pressure
Exhaust Gas Temperature
254, 246
254, 246
254, 246
254, 246
65270
65270
65270
65270
FEF6
FEF6
FEF6
FEF6
2
3
5
6
1
1
1
2
kPa/bit
C/bit
kPa/bit
C/bit
0
-40
0
-273
Electrical Potential (Voltage)
Battery
Pot.
Voltage
(Switched)
Transmission Oil Pressure
Transmission Oil Temperature
254, 247
254, 247
65271
65271
FEF7
FEF7
5
7
2
2
2
1
0.05
0.0312
5
0.05
0.05
V/bit
V/bit
0
0
254, 248
254, 248
65272
65272
FEF8
FEF8
4
5
1
2
kPa/bit
C/bit
0
-273
Injector Metering Rail 1 Pres
Injector Metering Rail2 Pres
254, 219
254, 219
65243
65243
FEDB
FEDB
3
7
2
2
16
0.0312
5
1/256
1/256
MPa/bit
MPa/bit
0
0
Add Device Net Module
Communication between a DVC5/7/10 Master controller
and a CAN Bus Device Net module is possible using the
Programming Tool. To communicate with a CAN Bus
Device Net device first add a DNET icon into your
project by right clicking in the project window and
selecting the Add Device Net module option from the
popup menu. Next, double click the DNET icon to bring
up the Device Net module window as shown. Using this
window you define the variable names used to send or
receive information from the Device Net module with the
specified MAC ID.
A brief explanation follows that will help explain how
communication is accomplished between the DVC5/7/10
and a Device Net module. The DVC BIOS uses the
explicit message feature of the Device Net protocol.
Each CAN Bus message has an eight byte data field. The first byte of which is the explicit message header.
The other 7 bytes contain the actual data. Messages of more than 7 bytes will take multiple messages to be
transmitted. Each message uses the header to identify the part of the message being received. Your
application will not see the header byte but will have to assemble multiple bytes into application variables where
needed.
Within the Device Net Module window are several fields. The Name field identifies the device. It is the prefix to
reference consume and produce variables. The MAC ID field represents the CAN Bus identifier for the device.
P/N: 021-00154, Rev. A.6 - updated for V4.7 Tools
Page | 104
The Poll Update Rate specifies the rate at
which the DVC5/7/10 will send messages to
the Device Net module. The I/O Poll Consume
and Produce Bytes fields are counts of the
number of data bytes to be received or sent by
the DVC7/10 respectively. Each byte will have
a name with the defaults (Consume1,
Produce1 etc.) being as shown. You reference
a
given
byte
using
the
name
DNET1.Consume1
or
DNET1.Produce1.
Consume names refer to data received from
the device by the DVC7/10 and Produce
names refer to data sent to the device by the
DVC7/10.
Your application can change and/or interrogate consume and produce variables in the application code. When
you change a variable be sure to change all of the variables in the message within the Always or Bubble code to
avoid a partially changed message from being sent when the Poll Update Rate timer expires and the message
is sent.
6.12
DVC5/7/10 to DVC5/7/10
Multiple DVC5, DVC7 and DVC10s can talk to one another over
the CAN Bus. The DVC5/7/10 to DVC5/7/10 configuration
screen has a MAC ID, four Send Uint Names, and four Receive
Uint Names. Uint refers to the unsigned integer designation.
The MAC ID field is the MAC ID of the DVC5/7/10 to whom this
DVC5/7/10 wishes to communicate with and must be specified.
Send Uint Names 1 - 4 are the names used to access the
values to be made available to (sent to) the other DVC5/7/10.
Receive Uint Names 1 - 4 are the names used to access the
values to be received from the other DVC5/7/10. The send
messages are sent periodically by the DVC5/7/10s to each
other. The receive Uint names can be used in the program
logic.
When you wish to communicate more than four integer values between DVCs you will need to implement a
simple protocol. One way to do this is to use the first Send Uint Name as a message identifier with the actual
data being the other three Send variables. In the receiving DVC you would interrogate the first variable and set
the appropriate variables in you code.
Large projects that incorporate many DVC modules should consider being implemented by using more than one
DVC5/7/10 in the system and splitting the module control between the multiple DVC5/7/10s.
Configuration Set-up
Name:
The prefix name for the send and receive variables for this DVC5/7/10 to use.
Range: 16 characters
MAC ID:
The MAC ID of the DVC5/7/10 to be communicated with.
Range: 0 to 63.
P/N: 021-00154, Rev. A.6 - updated for V4.7 Tools
Page | 105
Send Uint Name 1 - 4:
This is the suffix Name for setting the data to the other DVC5/7/10.
Range: 16 Characters with no spaces. Usable characters are A-Z, a-z, 0-9, and "_".
Rules:
The first character cannot be a number.
Compiler Keywords or other Names already in use are not valid.
Receive Uint Name 1 - 4:
This is the suffix Name for the data sent from the other DVC5/7/10.
Range: 16 Characters with no spaces. Usable characters are A-Z, a-z, 0-9, and "_".
Rules:
The first character cannot be a number.
Compiler Keywords or other Names already in use are not valid.
DVC5/7/10 to 5/7/10 Program Variables
Name.Status Set/Get the state of DVC to be communicated with.
Name.SendName1
Set/Get the current value of that variable.
Range: 0 to 65535
Name.SendByte1Bit0,... Name.Sendbyte1.Bit15
Set/Get the current bit value of that variable.
Range: 0 to 1
Example
In this example, there are 4 variables that are being sent to another DVC10. The second DVC10’s MAC ID is
11. The second DVC10 is sent the current RPM, PSI, Set point, and a few Digital inputs. After the second
DVC10 processes the information, it returns the state of its output.
First DVC10 Setup: Send to MAC ID 11
DVC10to10.Send_RPM = Ana_1
DVC10to10.Send_PSI = Uni_1
DVC10to10.Send_Setpoint = 22%
DVC10to10.Send_Bits.Bit0 = Dig_1
DVC10to10.Send_Bits.Bit1 = Dig_2
Receive from MAC ID 11
Var = DVC10to10.Receive_Output
Second DVC10 Setup: Send to MAC ID 10
DVC10to10.Send_Output = PWM_1
Receive from MAC ID 10
PWM_1
(DVC10to10.Rec_RPM/3)+(DVC10to10.Rec_PSI /3)
PWM_2 = DVC10to10.Rec_Setpoint
HS1 = DVC10to10.Rec_Bits.Bit0
HS2 = DVC10to10.Rec_Bits.Bit1
P/N: 021-00154, Rev. A.6 - updated for V4.7 Tools
=
Page | 106
6.13
Virtual Display
The Virtual Display allows DVC5/7/10 users to
monitor variables using a Windows XP PC or
laptop computer. You can monitor up to 20
variables concurrently.
You add the Virtual Display to your project by
right clicking the mouse in the project window and
selecting the Add Virtual Display option. Only
one Virtual Display can be added but the Virtual
Display can have an unlimited number of screen
definitions. Double click the project window icon
and right click in the Virtual Display window to
Add screen definitions. Double click the screen
icon to configure the screen’s display attributes.
Virtual Display Screen
A Virtual Display screen has a location to change
its Name, define the location and format of up
to 20 variables and specify fixed strings of text.
In the upper right hand corner of the setup
screen, there is a preview of the Virtual Display.
Name:
The name used in the program logic to display
this screen and its variables.
Example:
Virtualdisplay.Screen = Screen1
Range: 16 Alpha/Numeric characters only with
no spaces.
V1, V2, V3 … V20:
These variables contain program values you
wish to be displayed at the define X and Y
coordinates and in the format specified. The
upper left corner of the display is X = 1 and Y = 1.
Example:
Virtualdisplay.v1 = Ana_1 ‘ Display Analog input voltage as a percent of the defined voltage range.
Range: Type, X Location, and Y Location.
Virtual Display Program Variables
VirtualDisplay.Screen
Contains the screen name for the active display
VirtualDisplay.V1
Contains the value for V1.
VirtualDisplay.V2
Contains the value for V2.
P/N: 021-00154, Rev. A.6 - updated for V4.7 Tools
Page | 107
VirtualDisplay.V3
…
VirtualDisplay.V20
6.14
Contains the value for V3.
Contains the value for V20.
Application Simulator
A useful facility for debugging your
DVC5/7/10 application without physically
being on the target machine is the
application simulator. Using this facility
much of your application code can be
debugged prior to actually installing the
controller and the application on the
target machine.
All of the inputs and outputs of the
DVC5/7/10 can be controlled using the
different blue icons.
These icons
represent
switches
and
analog
potentiometers.
The names you
specified for I/Os in your application are
displayed for easy reference. When you
depress (click) the push button icon your application running in the DVC5/7/10 will receive a true or false value
for the switch just like it would if a physical switch had been closed and a voltage input received on the
appropriate pin of the DVC5/7/10 connector. The potentiometer icons can be controlled by clicking on the white
radial line in the blue circle and moving it right or left or simply typing in the percent of the range you wish the
analog input to read. This simulates physically moving a potentiometer and conveys the appropriate voltage to
your application as a percent of the voltage range you specified when you configured the analog or universal
I/O. Furthermore, the simulator will cause analog inputs to jitter slightly by +1 or -1 of the analog inputs 0 to
1023 value. This simulates actual analog input jitter you will experience on your machine.
To use the simulator you simply add it to your
project using the DVC Programming Tool by
right clicking in the Project window, selecting
Application Simulator from the popup menu and
compiling the application. No program changes
are required. When you are finished with the
simulator delete its icon from the project window
and recompile.
After including the simulator icon in your project
and compiling, you load your application into the
DVC5/7/10 using the Program Loader Monitor.
The Program Loader Monitor will present a
simulation icon in its main window. Click on the
yellow status button to activate the simulator
and display the simulation window shown
above.
P/N: 021-00154, Rev. A.6 - updated for V4.7 Tools
Page | 108
6.15
D206 Touch Screen Color Graphical Display
With release 4.7 the DVC tools provide support for the D206
Touch Screen Color Graphical Display input/output device.
The display comes in various sizes along with black and white.
The midsize display is 5” by 7” and can be used in a landscape
or portrait orientation. The D206 connects to the DVC5/7/10
controller using the RS232 interface. Backlighting provides for
easy reading of the display. Power for the display can be
provided for by connecting to a DVC5/7/10 power pin or from
an external source.
Programming the D206
The D206 is programmed using the Programming Tool much like you would program the Virtual Display. The
main difference is that instead of specifying only text as you do for the Virtual Display you select objects from
the D206 screen Object’s menu and modify the fields of the objects where appropriate. An example simple
script of three objects would be:
‘ Sample script
1-Button, key/1/,x/1/,y/1/,clr/w/,lbl/1/,w/10/,h/10/
2-CheckBox, key/1/,x/1/,y/1/,clr/w/,state/1/,lbl/1/,w/10/,h/10/
3-Gauge, x/1/,y/1/,clr/w/,value/512/,w/20/,h/40/,min/0/,max/1023/
Each numbered line represents one object whose name is the first field. The additional fields each have a
descriptor (x,y,clr,..) and a value delimited by the / / pair of characters. You can change the values using the
editor or have a display variable mapped into a particular line and field number for changing the value in your
application. The field order needs to be maintained but the values can be changed. Fields have valid values
that are checked when the object fields are received by the
D206 display’s firmware. Location (x,y) and size (w,h) fields
are in terms of display pixels. In landscape orientation x can
be from 1-320 and y 1-240 pixels. In portrait orientation x can
be from 1-240 and y 1-320 pixels.
You basically program the display in four steps:
Step 1: Add the Graphical Display to Your Project
Add the Graphical Display icon to your project by right
clicking your mouse in the Project window and selecting “Add
Graphical Display” from the popup menu.
Step 2: Define the Screens
Next, construct the various displays images you want in your
application. Double click the GD icon in your project
window. Right click in the GraphicalDisplay: GD window
and select “Add Screen”. Do this once for each display
image you will need. Each screen you define has a name,
its own object script and display variable definitions which
include the variable type, field and line numbers for script
substitution.
P/N: 021-00154, Rev. A.6 - updated for V4.7 Tools
Page | 109
To specify the objects for a screen you first open the screen by double clicking the screen icon.
Using the Objects Menu you select the object types you wish to add to your screen from the 25 objects listed.
The object types are as follows:
Button
ButtonArray
ButtonBitmap
ButtonNumeric
CheckBox
FixedButtons
Gauge
GaugeMultiValue
GroupBox
Ellipse
Image
Label
Line
ListBox
Numeric
Rectangle
Scale
Slider
Tachometer
Text
Text=Numeric
Text_Numeric_Text
TrendChart
VerticalText
VirtualDisplay
The Objects and their Fields are:
1-Button,key/1/,x/1/,y/1/,clr/w/,lbl/1/,w/10/,h/10/
2-ButtonArray,lokey/1/,col/5/,row/2/,x/10/,y/10/,clr/w/,w/10/,h/10/,t1/ /,t2/ /,t3/ /,t4/ /,t5/ /,t6/ /,t7/ /,t8/ /,
t9/ /,t10/ /,t11/ /,t12/ /
3-BitmapButton,key/1/,x/1/,y/1/,clr/r/
4-ButtonNumeric,key/1/,x/1/,y/1/,clr/w/,lbl/1/,value/10/,w/10/,h/10/
5-CheckBox,key/1/,x/1/,y/1/,clr/w/,state/1/,lbl/1/,w/10/,h/10/
6-FixedButtons,w/25/,h/20/,clr/w/,t1/<1/,t2/<2/,t3/<3/,t4/<4/,t5/<5/,t6/6>/,t7/7>/,t8/8>/,t9/9>/,t10/10>/
7-Gauge,x/1/,y/1/,clr/w/,value/512/,w/20/,h/40/,min/0/,max/1023/
8-GaugeMultiValue,x/1/,y/1/,w/20/,h/100/,c1/r/,c2/b/,c3/g/,v1/30/,v2/30/,v3/30/
9-GroupBox,x/1/,y/1/,clr/w/,lbl/Title/,w/10/,h/10/
10-Ellipse,x/1/,y/1/,clr/w/,w/10/,h/10/
11-Image,x/1/,y/1/,clr/T/,imageno/0/,w/10/,h/10/
12-Label,x/1/,y/1/,clr/w/,text/..../,w/30/,h/20/,size/10/, justify/c/
13-Line,x1/1/,y1/1/,x2/10/,y2/10/,clr/b/,w/30/
14-ListBox,key/1/,x/1/,y/1/,clr/w/,text/..../,w/100/,h/20/,size/10/
15-Numeric,x/1/,y/1/,clr/w/,value/0/,w/30/,h/20/,size/10/, justify/c/
16-Rectangle,x/1/,y/1/,clr/w/,w/30/,h/20/
17-Scale,x/1/,y/1/,clr/b/,lng/20/,min/0/,max/100/,size/10/,side/l/
18-Slider,key/1/,x/1/,y/1/,clr/b/,min/0/,max/100/,value/50/,w/30/,h/20/,dir/v/
19-Tachometer,x/1/,y/1/,clr/w/,value/10/,min/0/,max/100/,radius/10/,w/30/
P/N: 021-00154, Rev. A.6 - updated for V4.7 Tools
Page | 110
20-Text,x/1/,y/1/,txtclr/w/,backclr/T/,text/..../,angle/0/,w/30/,h/20/,size/10/,justify/c/
21-TextNumeric,x/1/,y/1/,clr/w/,text/..../,value/0/,w/30/,h/20/,size/10/, justify/c/
22-TextNumericText,x/1/,y/1/,clr/w/,text1/..../,value/0/,text2/.../,w/30/,h/20/,size/10/, justify/c/
23-TrendChart,clear/0/,x/1/,y/1/,clr/r/,min/0/,max/100/,pts/10/,flag/0/,data/100/,w/10/,h/20/
24-VerticalText,x/1/,y/1/,clr/w/,text/..../,w/30/,h/20/,size/10/
25-VirtualDisplay,x/1/,y/1/,clr/w/,w/100/,h/100/
From the upper left clock wise are the following objects From the upper left clock wise are the
BitmapButton, Button, CheckBox, Button array and
Gauge, Image, Label, Listbox, Tachometer,
Fixed Buttons
Scale, Slider and Trendchart
The object fields and their meanings are:
angle
Specifies angle of text for text object. 0 the default is horizontal.
backclr
Background color for the text object. Refer to clr field for valid entries.
clear
Trendchart uses this field to clear the accumulated data when it is set to >0
clr
Specifies the color of the object as follows:.
Note: Upper or lower case letters can be used to specify a color.
B or BLUE
Blue
T
Transparent
O or ORANGE Orange
R or RED
Red
G
Green
BR or BROWN Brown
BL
Black
Y or YELLOW Yellow
P or PURPLE Purple
W or WHITE
White
CYAN
Cyan
DKGRAY
Dark Gray
FGREEN
Forrest Green
MAROON
Maroon
MGREEN
Moss Green
VIOLET
Violet
BORANGE
Burnt Orange
DKBROWN
Dark Brown
SGRAY
Steel Gray
GRAY
Gray
KGREEN
Kelly Green
MAGENTA
Magenta
P/N: 021-00154, Rev. A.6 - updated for V4.7 Tools
Page | 111
MNBLUE
Midnight Blue
NAVY
Navy
WGRAY
Warm Gray
data
The Trendchart uses this field as where the new data field to be recorded is located
flag
Trendchart uses this field to indicate when a new data point is being transmitted. This
field will alternate between > 0 and 0 (true and false).
h
Specifies the height in pixels of the object.
imageno
Bitmap object identifier. Consult HCT for more information on bitmaps.
justify
Text justification in the object l (left), c (center) or r (right)
key
This field specifies the integer value 0-99 to be returned to the DVC controller application
when the object is touched. 0 implies that the key is inactive and will not be returned
when the object is touched.
lbl
Text inside a button object
lokey
Used in Button Array to specify key values returned when touched. Lokey = Button(1,1)
value. Lokey+1 = Button (2,1) value, etc.
min
Lower value of a range for a scale
max
Upper value of a range for a scale
pts
Used in Trendchart to indicate the number of values to be displayed.
radius
Tachometer size
side
Scale side l (left) or r (right) with respect to the slider object typically.
size
Text size in pixels
state
Determines the Checkbox object state. > 0 means checked whereas 0 means blank
t
Specifies the text to be inserted into the object.
t1, ...
Specifies the text for each element of a button array. A blank field indicates that this
button is not active or shown
text
Use this field to specify the text to be displayed in the object. The Listbox uses a
semicolon to separate lines of text.
txtclr
Text color for the text object. Refer to clr field for valid entries.
value
Specifies the value (integer) to be displayed.
w
Specifies the width in pixels of the object.
x
Specifies the upper left x pixel coordinate of the object.
y
Specifies the upper left y pixel coordinate of the object.
P/N: 021-00154, Rev. A.6 - updated for V4.7 Tools
Page | 112
Editing a Display Screen
You can edit the object script using the Edit Display
Script window.
Editing consists of adding
comments, changing field values or display variable
types and field and line numbers. If you make a
mistake in the editing, an error message will be
displayed above the window otherwise the “No
Script Errors” message appears. The Display Script
window reflects the display variables v1 to v24
substitution in the script (i.e. *V1*). Each defined
variable has a line and field specification. Line is
the object line number and Field is the object field
number from 1 to N. The /../ pair delineate an
object’s field.
Comments can be inserted on their own line or at
the end of an object line. Comments start with a
single apostrophe and continue to the end of the
line.
When the application runs and a screen is called
out the V1 - V24 variable values are inserted into the object script in the format specified for that screen based
on the variable’s type and transmitted to the D206 display over the RS232 interface. If the any field has an
invalid specification (such as a non defined color text field etc.) the script will be displayed on the D206 display
with the line, field and error type of the first error displayed. Note that you will see abbreviations for the object
name along with the field names removed. This is done to speed up the downloading of the object script to the
display. The field in error is easily deduced.
Step 3: Bringing up a Screen on the display
Generally displaying screens and handling
object touches is handled in its own logic
sequence.
The logic sequence is
organized as follows. Each screen has a
bubble and the transition between screens
is controlled by the gd.key and gd.value
values. You navigate between the screens
based on touching objects or other external
events.
Example logic sequences are available
from HCT customer support.
P/N: 021-00154, Rev. A.6 - updated for V4.7 Tools
Page | 113
The variables you use when displaying a screen are named:
GD.screen
GD.v1, .... GD.v24
GD.portrait
A value of 1 = landscape, 2 = landscape rotated 180 degrees,
3 = portrait, 4 = portrait rotated 180 degrees. Zero the default = landscape.
GD.alarm
This variable must be set first to true and then to false for each alarm
beep and be about 250ms apart. Here is example alarm code:
dim alarmtimer as timer
if (alarmtimer = 0) then
alarmtimer = 250ms
if (gd.alarm = false) then
gd.alarm = true
else
gd.alarm = false
end if
end if
Step 4: Interacting with Objects being touched on the Display
The variables you use to sense and interpret the objects being touched on the display are:
GD.key
GD.value
GD.setting
When an object is touched that objects key field value (> 0 and < 100) is sent to your application and an audible
beep is sounded. The receipt of the key message by the DVC controller’s BIOS results in the GD.key variable
being set to true (> 0) and the GD.value variable being set to the object’s key value. The GD.setting variable is
set for those objects having multiple possible settings such as the Slider and the List Box objects. For these two
objects, GD.value identifies the slider or list box touched while the GD.setting is set to the slider value or the list
box line number selected. After you have processed receipt of the key value you should set the GD.key
variable to false (0). The DVC BIOS prevents another object touch from being received if the GD.key variable
has not been set to false. This mechanism insures that object touches are processed in the order they occur.
Example code is as follows:
If (GD.key) then
Value = GD.value
‘ GD.value is saved to value in case a new value is received before this one is
‘ completely processed.
Setting = GD.setting ‘ Slider object returns its position as well as its key value
‘ List Box object returns the entry line number selected as well as the object key
GD.key = false
‘ add code to process the value received
............
End if
P/N: 021-00154, Rev. A.6 - updated for V4.7 Tools
Page | 114
Special Object Notes
Rectangle
Rectangles are assumed to be behind other objects when displayed and as such can be used for background
color and illumination. For instance to make the display background all white include the following in your script.
Rectangle,x/1/,y/1/,clr/w/,w/320/,h/240/
Trendchart
This object plots the number of entries you specify. Between sending values to the object you need to reset the
new data field. Data to a trend chart is usually done at regular intervals as shown below. A one second interval
is about the fastest you can send data. This includes 500ms to send the new data and 500ms to reset the new
data flag. Each of these events requires the entire screen object script to be transmitted to the D206. 500ms
allows time for the object script to be sent to the display and processed.
An example of sending data to a Trendchart object is as follows:
Object
script
line
including
variable
substitution:
TrendChart,clear/*V4*/,x/1/,y/1/,clr/r/,min/0/,max/100/,pts/100/,flag/*V2*/,data/*V1*/,w/10/,h/20/
Application code:
dim interval as timer
dim first as uint
if (first = 0) then
first = 1
gd.v4 = true ‘ clear trendchart data
interval = 500ms
else
if (interval = 0s) then
interval = 500ms
gd.v4 = 0 ' reset clear
if (gd.v2) then ' toggle new data flag
gd.v2 = 0
else
gd.v2 = 1
end if
gd.v1 = newdatavalue
end if
Virtual Display
This object allows your Virtual display to be seen on the D206 without disconnecting the RS232 cable and
reconnecting it to your PC. You configure your Virtual display and activate it (i.e. select the screen and set
display variables) as you would normally in your application. When a D206 screen script with this object in it is
processed by the DVC controller’s BIOS it transmits the complete 10 lines of 40 characters each of Virtual
display text to the D206 which in turn displays the text per the object definition.
VirtualDisplay,x/1/,y/1/,clr/w/,w/100/,h/100/
P/N: 021-00154, Rev. A.6 - updated for V4.7 Tools
Page | 115
6.16
DP04 Pendant
With release 4.7 the DVC tools provide support for the DP04 Graphical Display Pendant with Keypad.
The Pendant is approximately 3” wide x 6” high and 1” deep. The DP04 connects to the DVC5/7/10 controller
using the RS232 interface. Backlighting provides for easy reading of the display. The unit has batteries for
power.
Programming the DP04
The DP04 is programmed using the Programming Tool much like you would
program the Graphical Display. The main difference is that instead of
specifying only text as you do for the Virtual Display you select objects from the
DP04 screen Object’s menu and modify the fields of the objects where
appropriate. Refer to the D206 Graphical Display documentation for how to
program the DP04.
The main difference between the Graphical display and the DP04 is that the DP04 supports a subset of the
graphical objects. The Objects menu indicates which objects are supported. The 10 objects supported are
shown below in the Display script window.
P/N: 021-00154, Rev. A.6 - updated for V4.7 Tools
Page | 116
One added feature of the DP04 is the ability to log data to its flash memory card. The log object is used to log
up to 12 data variables. The DP04 timestamps the log messages and creates a comma delimited file for import
from the flash memory card into Excel.
Log Object
Log,Record/1/,L1/name/,F1/ /,L2/name/,F2/ /,.........,L12/name/,F12/ /
You specify where the V1, ...V24 variables are to be located and their format.
The Log object provides for up to 12 fields each with their name and value are specified in the LN and FN fields.
Each time a new record is to be recorded you need to increment the Record field’s value.
P/N: 021-00154, Rev. A.6 - updated for V4.7 Tools
Page | 117
7
Program Loader Monitor
7.1
Introduction
The Program Loader Monitor is used to download programs to the DVC5/7/10 and to display information from all
of the DVC modules connected together via the CAN Bus. It runs on your Windows PC and uses a RS232
cable to communicate with the DVC5/7/10. Data from DVC expansion modules (i.e. DVC21, DVC70 etc.) is
transmitted through the DVC7/10 to the Program Loader Monitor. Program Loader Monitors specific to an
expansion module are provided and are used to examine or change the module’s MAC ID and CAN Bus baud
rate.
7.2
Connecting to the DVC5/7/10
Locate an open serial communications port on your Windows XP PC. Plug one end of the DVC RS232 serial
cable into the serial port (i.e. COM1, COM2, COM3, etc.) on the computer. Plug the other end into the
DVC5/7/10 serial cable weather pak connector on the DVC5/7/10 module.
Note: If the RS232 serial cable is connected and the Program Loader Monitor program is not running, the
DVC5/7/10 will enter programming mode on power up. The MS and NS lights on the controller will alternate
flashing green. To exit programming mode start the Program Loader Monitor program and power up the
DVC5/7/10 or disconnect the RS232 cable, and then cycle power on the DVC5/7/10.
7.3
Starting the Program Loader Monitor
From Windows press the “Start” button and then select the file
c:\Program Files\HCT Products\Program Loader Monitor
P/N: 021-00154, Rev. A.6 - updated for V4.7 Tools
Page | 118
The first time you execute the Program Loader Monitor the following screen appears. Select the PC COMM port
to which your RS232 cable is attached.
7.4
Main Program Loader Monitor Screen
Normally the first screen you will see after executing the Program
Loader Monitor program is as shown below. This window shows all
of the modules in your applications project. Each module has an
icon and status button. Up to 14 DVC modules controlled by the
DVC10 on the CAN Bus can be monitored. Although EE memory
and Virtual Display are not actual modules, their status screens are
accessed from this main menu. Module icons that are blurred
indicate that the DVC controller is not communicating with that
module. Generally this is due to the DVC controller and the
expansion module having different CAN Bus baud rates, the
expansion modules MACID not matching the MACID specified for
that module using the Programming Tool or simply the CAN
connection to the expansion module is absent or faulty.
To monitor a particular component double click on its Status button.
To load the DVC10 monitor screen, double click on the DVC10
Master (yellow button).
You may need to enter a password to gain access to certain
features of the Program Loader Monitor. The optional passwords
are assigned using the Programming Tool. The default password
level is 3. There are four password levels:
Level 0 – If the system is password protected and a valid password
has not been entered level 0 is assigned. This level allows you to
see factory information about the system only.
Level 1 – Access to parameters and the ability to send changes.
Level 2 – Ability to download application programs.
Level 3 – Ability to change MAC ID, CAN Bus baud rate or download BIOS programs.
DVC5/7/10 Master Display
The Program Loader Monitor is used to observe DVC5/7/10 actual input and output specific information as your
application executes. The names assigned to them in the Programming Tool appear on the main screen shown
below. The runtime graph is used to plot any two variables as fast as the computer can collect data from the
DVC5/7/10. Dials will appear to display RPM when pulse inputs are assigned.
P/N: 021-00154, Rev. A.6 - updated for V4.7 Tools
Page | 119
The Program Loader Monitor determines the DVC controller type it is connected too automatically and the main
screen will be modified to reflect the input outputs of that controller.
Virtual Display Status
The Virtual Display screen
is a PC resident display
window that is activated
from the Program Loader
Monitor’s main screen. The
display is used to display
program
variables
for
debugging or run time
information.
As your
program executes up to 20
variables can be displayed
on a single screen along
with descriptive text. Your
application can also switch
between different screen
images.
P/N: 021-00154, Rev. A.6 - updated for V4.7 Tools
Page | 120
7.5
Program Loader
You use the Program Loader (yellow button in the center of the
DVC5/7/10 monitoring window above) to reprogram the DVC
BIOS and Application programs. When selected the Program
Loader button sets a signal in the serial cable that allows the
DVC5/7/10 to go into programming mode on DVC5/7/10 power
up. After selecting the Program Loader button and power
cycling the DVC5/7/10, there are two ways to determine that the
DVC controller is in programming mode. First, the MS (module
status) and NS (network status) LEDs should flash green on the
DVC5/7/10 one after the other. Second the Programming Mode
indicator will turn green and say “Enabled” as shown.
To load your Application select the Load Application button and
navigate using the file browser to the project “.pgm” file to be
loaded. To load a new BIOS please consult with HCT support
engineers. After waiting a few seconds you will be prompted to
power cycle the DVC5/7/10 again to execute the newly loaded
program.
7.6
Output Groups
Double click the Output Groups yellow button (in the middle of
the Monitor window) to activate this window. The information
displayed is the same as the information programmed with the
DVC Programming Tool. The user can alter the information in
yellow. The information is updated to the DVC5/7/10 temporary
memory once the Send Changes button is pressed. The
DVC5/7/10 then operates on the temporary values until the unit is
reset or powered cycled.
Note: The temporary memory can be saved to a file and imported
into the DVC Programming Tool by using the “Export to File”
button on the main Program Loader Monitor screen.
7.7
Analog and Universal Inputs
Double click the Analog Inputs yellow button (in the middle
of the Monitor window) to activate this window. The
information displayed is the same as the information
programmed with the DVC Programming Tool. The user
can alter the information highlighted in yellow. The
information is updated to the DVC5/7/10 temporary
memory once the Send Changes button is pressed. The
DVC5/7/10 then operates on the temporary values until the
unit is reset.
Note: The temporary memory can be saved to a file and
imported into the HCT programming tool by using the
“Export to File” button.
P/N: 021-00154, Rev. A.6 - updated for V4.7 Tools
Page | 121
7.8
Input / Output Functions
Double click the IO Functions yellow button (in the middle of
the Monitor window) to activate this window. The information
displayed is the same as the information programmed with the
HCT Programming Tool. The user can alter the Input% vs.
Output%. The information will be updated to the DVC5/7/10
temporary memory once the Send Changes button has been
pressed. The DVC5/7/10 then operates on the temporary
values until the unit has been reset.
Note: The temporary memory can be saved to a file and
imported into the HCT programming tool by using the “Export
to File” button.
7.9
Factory Information
Double click the Factory Info yellow button (in the middle of
the Monitor window) to activate this window. The information
displayed is programmed by HCT manufacturing.
Note: If you change the CAN Bus baud rate for the
DVC5/7/10 you should also change all of the baud rates for
the other modules on the CAN Bus. If you change the
DVC5/7/10 MAC ID then be sure you assign it a number that
is unique with respect to the other modules on the CAN Bus.
7.10
EE memory
Double click on the EE
memory Status icon on the
main
Program
Loader
Monitor window to activate
this screen. EE memory is non-volatile (i.e. it retains the value even when
power is turned off). Memory variable names and values are set using the
Programming Tool or as the program executes. The selector at the top of the
screen will allow you to page through the variables. You can change the
variables integer values using the up and down arrows next to the variable’s
name. The new values can be sent to the DVC5/7/10 EE memory by selecting
the Send Changes button. Additionally, the Save to File button allows the user
to save the EE variables and their respective values to a .DAT file on the PC.
The Restore from File button allows the user to recall previously saved EE
variable values from a .DAT file. The Push to Retrieve button initiates the
Restore operation after the Restore From File button is selected.
P/N: 021-00154, Rev. A.6 - updated for V4.7 Tools
Page | 122
7.11
DVC21 (Sinking and Sourcing Digital Inputs)
and the Loader Monitor
The following screen appears when a DVC21 is connected
to the DVC7/10 and the Status button for the DVC21 is
pressed:
The names of all DVC21 variables (which were defined in
the application program) appear under the Digital Inputs 1
– 20 and Digital Inputs 21 – 40 headers, while the status
of each input is displayed to the right of the DVC21
variable name.
When the Program Loader Monitor is connected directly to
the DVC21 using a RS232 cable, the following screen will
appear:
You can alter the information highlighted in yellow, except
for the Software Version.
Caution: If the MAC ID is changed to a value different from
that in the DVC21 configuration screen and the Send
Changes button is pressed, the new value will be saved
into temporary memory. If the DVC7/10 is plugged in, it
will not recognize or be able to communicate with the
DVC21 until the application is changed and reloaded onto
the DVC7/10. Similarly, if the baud rate is changed to a
value different than the rate in use by the DVC7/10 and
the Send Changes button is pressed, the new value will be
saved into temporary memory. If the DVC7/10 is plugged
in, it will not be able to communicate with the DVC21 until
its baud rate is changed to match that of the DVC21.
7.12
DVC22 (Sinking Digital Inputs) and the Loader
Monitor
The following screen appears when a DVC22 is connected
to the DVC7/10 and the Status button for the DVC22 is
pressed:
The names of all DVC22 variables (which were defined in
the application program) appear under the Digital Inputs 1
– 20 and Digital Inputs 21 – 40 headers, while the status
of each input is displayed to the right of the DVC22
variable name.
When the Program Loader Monitor is connected directly to
the DVC22 using a RS232 cable, the following screen will
appear:
The user can alter the information highlighted in yellow,
except for the Software Version.
P/N: 021-00154, Rev. A.6 - updated for V4.7 Tools
Page | 123
Caution: If the MAC ID is changed to a value different from that in the DVC22 configuration screen and the Send
Changes button is pressed, the new value will be saved to temporary memory. If the DVC7/10 is plugged in, it
will not recognize or be able to communicate with the DVC22 until the application is changed and reloaded onto
the DVC7/10. Similarly, if the baud rate is changed to a value different than the rate in use by the DVC7/10 and
the Send Changes button is pressed, the new value will be saved to temporary memory. If the DVC7/10 is
plugged in, it will not be able to communicate with the DVC22 until its baud rate is changed to match that of the
DVC22.
7.13
DVC41 (High-Side Outputs) and the Loader Monitor
The following screen appears when the
Status button for the DVC41 is pressed:
The names of all DVC41 variables (which
were defined in the application program)
appear under the High Side Outputs 1 –
12 header, the Command State appears
next to the respective variable, while the
status of each output and the LED mode
are displayed to the right of the Command
State.
When connected directly to the DVC41,
the following screen will appear:
The user can alter the information
highlighted in yellow, except for the Software
Version.
Caution: If the MAC ID is changed to a value
different from that in the DVC41
configuration screen and the Send Changes
button is pressed, the new value will be
saved to temporary memory. If the DVC7/10
is plugged in, it will not recognize or be able
to communicate with the DVC41 until the
application is changed and reloaded into the
DVC7/10. Similarly, if the baud rate is
changed to a value different than the rate in
use by the DVC7/10 and the Send Changes
button is pressed, the new value will be
saved to temporary memory. If the DVC7/10 is plugged in, it will not be able to communicate with the DVC41
until its baud rate is changed to match that of the DVC41.
7.14
DVC50 (Multiple Output Types Module) and the Loader Monitor
The DVC50 in slave mode can be monitored using the Program Loader Monitor on your PC that is connected to
a DVC7/10. It can also be monitored by directly connecting the 30 pin and 18 pin DVC7/10 cables to the
DVC50. When monitoring a DVC50 through the DVC7/10, the window shown is displayed. Note that in this
mode modifying the IO parameters is not possible as the Output Groups and other IO type buttons are
deactivated because changes cannot be sent to the DVC50 through the DVC7/10. To do that you need to
P/N: 021-00154, Rev. A.6 - updated for V4.7 Tools
Page | 124
connect directly to the DVC50 using the DVC7/10
cables. Also some graph functions are not available
unless the user is connected directly to the DVC50.
This screen appears when the Program Loader
Monitor is directly connected to the DVC50. This
screen enables the user to monitor the status of,
and send changes to the DVC50 in the same way
as with the DVC7/10 screen.
External screens such as Output Groups and
Factory Info etc. are accessed in the same way as
with the DVC7/10.
When you select the Output Groups button the following window appears just like for the DVC7/10. You can
change the settings in yellow and update the DVC50 by hitting the Send Changes button. The other IO types
have similar windows for modifying the parameters for that
specific IO type.
DVC50 Factory Info Screen
The DVC50 Factory Information screen shown here displays the
same information as the DVC7/10 Factory Information Screen.
Note: If the MAC ID or Baud rate is changed to a value different
from that in the DVC50 configuration screen and the Send
Changes button is pressed, the new values will be saved to
non-volatile memory in the DVC50. If the DVC7/10 is plugged
in, it will not recognize or be able to communicate with the
DVC50 until the application is changed to reflect the new
DVC50 MAC ID and reloaded onto the DVC7/10. The DVC7/10
factory info window is used to set the DVC Baud rate to the
same value as the DVC50.
P/N: 021-00154, Rev. A.6 - updated for V4.7 Tools
Page | 125
7.15
DVC61 (Display Module) and the Loader Monitor
The following screen appears when connected directly to
the DVC61. This screen enables the user to monitor the
status of the Inputs, Baud rate, Supply Voltage, Serial
Number and MAC ID as well as changing some of the
features of the DVC61. When viewing this screen while
connected to the DVC5/710 certain features will be “grayed
out” because changes cannot be sent to the DVC61
through the DVC5/7/10.
MAC ID
This setting is used to set the modules address for
communication on the CAN Bus. Possible values range from 0 to 63 and the user must select “Send Changes”
to invoke a change.
Caution: If the MAC ID is changed to a value different from that in the Programming Tool’s DVC61 configuration
screen and the Send Changes button is pressed, the new value will be saved to temporary memory. If the
DVC7/10 is plugged in, it will not recognize or be able to communicate with the DVC61 until the application is
changed and reloaded onto the DVC7/10.
Baud Rate
This pull down menu is used to select between different CAN Bus communication rates. Possible values are
125Kps, 250Kps and 500Kps, the user must select “Send Changes” to invoke a change.
Caution: If the baud rate is changed to a value different than the rate in use by the DVC7/10 and the Send
Changes button is pressed, the new value will be saved to temporary memory. If the DVC7/10 is plugged in, it
will not be able to communicate with the DVC61 until its baud rate is changed to match that of the DVC61 using
the Program Loader Monitor factory info window.
Default LCD Contrast / Backlight
Changing these settings and selecting “Send Changes” will reset the default values for Contrast and Backlight
levels for this unit.
Default Screen / Blank Screen
This pull down menu is used to select between the “High Country Tek” default screen and a “Blank” screen to be
displayed at power up until the application writes its own screen to the display module. The user must select
“Send Changes” to invoke a change.
CAN Terminating Resistor On / Off
This pull down menu is used to set whether the internal CAN Bus terminating resistor is active or not. The user
must select “Send Changes” to invoke a change.
Display Screen (Button)
This switch allows the user to toggle between monitoring the unit’s settings and monitoring the current screen
being displayed by the application.
P/N: 021-00154, Rev. A.6 - updated for V4.7 Tools
Page | 126
7.16
DVC70 (Logging Module) and the Loader Monitor
This screen appears when you monitor the
DVC70 through the DVC7/10. The window is a
status display and to change settings or
download accumulated data you will need to
connect the Program Loader Monitor directly to
the DVC70.
The following screen appears when connected
directly to a DVC70.
This screen enables
monitoring of Memory bucket space and the
download of data from the DVC70 to your PC.
Features of the DVC70 Program Loader Monitor
screen are:
Alarm Warning will be shown when a certain
percentage of the Memory bucket or Allocation
block memory being viewed has been filled with
data. This depends on the settings chosen by the
user during set up using the Programming Tool.
Active Warning means that the DVC70 is in the
process of logging data.
Extract button – this button extracts all the data for
the selected Allocation Block or Memory bucket.
The data is then processed and saved to a “.CSV” file. The CSV file can be viewed using MS Excel.
Erase button – this button erases all the data present in the selected Allocation Block.
Set to PC time button – this button sets the DVC70 to the same time displayed in the user’s PC.
Extract and Erase All button – this button extracts and erases all the data present in the DVC70 from all
Allocation Blocks.
Format DVC70 button – this button erases the present Profile in the DVC70. This should be done when the
data being logged has been changed in the Programming Tool. The new Profile reflecting the changes is then
activated.
Allocation Block Selection – this slide ‘bar’ allows the user to choose from amongst the 5 possible Allocation
Blocks/Memory buckets.
Memory Used Indicator – this indicator shows both a graphical as well as a percent number which reflect how
much of the selected Allocation Block has been used for data logging.
Note: the user selects the Allocation Block size during set up in the Programming Tool.
P/N: 021-00154, Rev. A.6 - updated for V4.7 Tools
Page | 127
Device Status Box – This is the location where users can make changes. Users are able to change the MAC ID
and Baud Rate for the DVC70.
Send Changes Button – Once the user has made the desired changes to the MAC ID and / or Baud Rate,
pressing the Send Changes button forces the changes to take place in the DVC70 unit.
Exit Button – exits the DVC70 Loader Monitor Screen.
Extracting Individual Allocation Block Selection Data
In order to extract data, the user must follow these steps:
Select The Allocation Block to be extracted by moving the bar from 1 to 5.
Press the Extract button.
The Program Loader Monitor will then ask you to select the “.inf” file to write to. The “.inf” file is normally created
when an application is compiled by the Programming Tool and is located in the same directory as the DVC
project file.
Find and select the appropriate “.inf” file and press the Open button.
A Progress bar showing the data being downloaded and processed will appear and the Extract button will show
the text “Please Wait”. When the data extraction is finished, the Progress bar will disappear and the Extract
button will contain the text “Extract”.
You should note that in addition to creating an “.inf” file the extraction process would also create a “.csv” file with
the Memory bucket name, which contains the actual data in an Excel spreadsheet readable format.
Erasing Individual Allocation Block Selection Data
In order to erase data, the user must follow these steps:
Select The Allocation Block to be erased by moving the bar from 1 to 5.
Press the Erase button
The Erase button will show the text “Please Wait”.
When the data erasure is finished, the Erase button will be redisplayed.
Extract and Erase All
In order to extract data from all Allocation Blocks, the user must follow these steps:
Press the Extract and Erase All button.
The Loader monitor will then ask which “.inf” file to load. The “.inf” file is created when an application is
compiled by the Programming Tool and is located in the same directory as the DVC file.
Find and select the appropriate “.inf” file and press the Open button.
A Progress bar showing the data being downloaded and processed will appear for each Allocation Block. When
the data extraction is finished, the Progress bar will disappear and all 5 Allocation Blocks will be cleared.
Note: Although all 5 Allocation Blocks are cleared, the Unit’s profile remains the same.
You should note that in addition to creating an “.inf” file the extraction process would also create a “.csv” file with
the Memory bucket name, which contains the actual data in an Excel spreadsheet readable format.
Format DVC70
In order to format the DVC70, follow these steps:
Press the Format DVC70 button
A message will appear asking if the user is sure he wants to Format the DVC70. Press the Yes button.
A message will flash on the left upper side of the screen while the DVC70 is formatted.
Note: When the DVC70 is formatted, all the data and the profile are erased.
Setting the Module Time to the PC Time
The DVC70 time can be changed to match the PC time by just pressing the Set button. This feature is useful
whenever the unit is in use in a different time zone or has been in a powered off state for a few weeks.
P/N: 021-00154, Rev. A.6 - updated for V4.7 Tools
Page | 128
Viewing the Output File(s)
Whenever an allocation block is extracted, an output “.csv” file is created.
The output files have the same name as the Allocation Block/Memory bucket name specified while developing
the application using the Programming Tool with the added extension “.CSV” (i.e. EngineTrend.csv).
In order to view the DVC70 output files, do the following:
Open Microsoft Excel
Click on File and select Open
Select Text Files (*.prn; *.txt; *.cvs) in the dropdown list next to Files of Type
Locate the “.csv” file you want to open and press the Open button.
Excel will display the file.
User Modifiable Parameters
The following parameters can be modified:
MAC ID
Baud Rate
Note: If the MAC ID is changed to a value different from that in the DVC70 configuration screen and the Send
Changes button is pressed, the new value will be saved to temporary memory. If the DVC10 is plugged in, it will
not recognize or be able to communicate with the DVC70 until the application is changed and reloaded onto the
DVC7/10.
Note: If the baud rate is changed to a value different than the rate in use by the DVC7/10 and the Send
Changes button is pressed, the new value will be saved to temporary memory. If the DVC7/10 is plugged in, it
will not be able to communicate with the DVC70 until its baud rate is changed to match that of the DVC70.
7.17
DVC80 (J1939 to CAN Bus Module) and the Loader Monitor
This screen appears when the Program Loader Monitor is
connected to the DVC5/7/10 and the status button next to
DVC80 on the main menu screen is clicked. The DVC80
icon appears when a DVC80 has been added to the project
using the DVC Programming Tool. The screen indicators
will appear when the corresponding messages have been
programmed in the DVC5/7/10 project with the
Programming Tool. The indicators available for display are
“Percent Load at Current Speed”, “Engine Speed”, “Total
Engine Hours”,
“Engine Coolant Temp”, “Engine Oil
Pressure”, “Fuel Rate” and “Boost Pressure”. These
parameters are supported by the major engine
manufactures like John Deere, Cat Marine, Cummins,
Detroit Diesel, Deutz – EMR and Perkins 1300 EDI. The
user is not limited to this information alone. All other
messages can be displayed using the “Detail” button. The Detail button will display indicators with all messages
being monitored along with a help window to explain or give more information on a particular indicator. When
connected to the DVC5/7/10 the messages available to be displayed are limited to the messages have been
programmed in the DVC5/7/10. The user can get more information by connecting directly to the DVC80, where
14 pre programmed messages and 5 user messages can be monitored.
P/N: 021-00154, Rev. A.6 - updated for V4.7 Tools
Page | 129
When connected directly to the DVC80,
the following screen will appear:
In addition to the information displayed
when connected to the DVC80 via the
DVC5/7/10, the following can also be
monitored:
Config button – allows the user to
modify extra parameters in the DVC80
configuration. When connected to the
DVC5/7/10 the user can only modify the
Log Rate. Otherwise, the user can
modify the MAC ID, DVC80 CAN Baud,
User Defined PGN, and Display
Message.
Detail button – displays a help window.
The user then can point his/her mouse
to each indicator in order to see specific
information on programming.
Metric button – Allows for switching
between US Standard measurements
to metric precision.
Log Rate – defines the amount of time between each data sample.
Save Log Rate button – Saves the change in Log Rate to file on the computer.
Log Messages to file button – Allows for saving the J1939 messages to a .CSV file. When this button is
pressed, the path to the file is displayed on the DVC80 Loader monitor screen.
Exit Button – exits the DVC80 Loader Monitor Screen.
Software Version – Current software version.
Supply Volts - For monitoring supply volt levels
PGN, byte1, byte2, …,byte8 – for displaying messages
Send Changes button - Once the user has made the desired changes to the MAC ID, DVC CAN Baud, User
Defined PGN, and Display Message, pressing the Send Changes button forces the changes to take place in the
DVC80 unit.
User Defined PGN (Parameter Group Number) – This
field is divided into the User defined PGN index,
which ranges form 0 to 4, and the PGN number.
Display Message - Users can choose 1 of 14
predefined messages or 0 of 4 user defined
messages to be displayed in the PGN, byte1,
byte2…byte8 display
Note: If the MAC ID is changed to a value different
from that in the DVC80 configuration screen and the
Send Changes button is pressed, the new value will
be saved to temporary memory. If the DVC7/10 is
plugged in, it will not recognize or be able to
communicate with the DVC80 until the application is
changed and reloaded onto the DVC7/10.
Note: If the baud rate is changed to a value different
P/N: 021-00154, Rev. A.6 - updated for V4.7 Tools
Page | 130
than the rate in use by the DVC7/10 and the Send Changes button is pressed, the new value will be saved to
temporary memory. If the DVC7/10 is plugged in, it will not be able to communicate with the DVC80 until its
baud rate is changed to match that of the DVC80.
When connected directly to the DVC80 and the detail button is on, a help window appears and the user can
point his/her mouse to each indicator in order to see specific information on programming.
When connected to the DVC5/7/10 and the data-logging button is active, the unit logs J1939 information to a file
at the data log rate. Notice that the detail button cannot be deactivated until data logging is stopped.
The Metric button allows the user to display the data in either Metric units (when the button is in the Up position)
or Standard U.S. units (when the button in the Low position).
P/N: 021-00154, Rev. A.6 - updated for V4.7 Tools
Page | 131
8
Programming Notes
8.1
Examples of Program Statements and Logical Operators
Dim Fault as Uint
Dim Timer_0 as Timer
Dim Scale_Factor as EEmem
Const Low_Limit = 256
PWM_1.Enable = True
If (Dig_1 AND Dig_2) Then
PWM_1 = Ana_1 / Scale_Factor
ElseIf (Dig_1 OR Dig_2) Then
PWM_1 = (Ana_1 / Scale_Factor) / 2
ElseIf (Dig_3 XOR Dig_4) Then
PWM_1 = ((Ana_1 / Scale_Factor) * 2)
ElseIf (Dig_1 = NOT Dig_5) Then
PWM_1 = 0x0200
Else
PWM_1 = Low_Limit
End If
If (Uni_1 <= 5.5%) Then
HS1 = True
HS2 = False
ElseIf (Uni_1 > 5.5% and Uni_1 < 10%) Then
HS1 = False
ElseIf (Uni_1 >= 10.5%) Then
HS1 = True
End If
If (Uni_1 <> 0) Then
HS4 = True
Else
HS4 = False
End If
If (Dig_7) Then
Timer_0 = 2.5s
ElseIf (Dig_8) Then
Timer_0 = 500ms
End If
Fault = (supply >13.8sv)
Dim Timer_0 Timer
If (Timer_0 = 0) Then
Dig_1 = Not (Dig_1)
Timer_0 = 2s
End If
Dim STRname as String “string “
VirtualDisplay.v1 = STRname
8.2
Declare “Fault” as a variable for use in the project
Declare “Timer_0” as a count down timer
Declare “Scale_Factor” as a location in EEmemory
Declare the constant “Low_Limit” to equal 256
Set PWM_1.enable to True
If Dig_1 and Dig_2 are true then,
Set the value of PWM_1 to the equation (Analog input 1 divided
by the value stored in the EEmemory location “Scale_Factor”
If Dig_1 or Dig_2 are true but not both then,
Set the value of PWM_1 to the Equation (Analog input 1 divided
by the value stored in the EEmemory location “Scale_Factor”
divided by 2)
If Dig_1 or Dig_2 are true but not both then,Set the value of
PWM_1 to the Equation (Analog input 1 divided by the value
stored in the EEmemory location “Scale_Factor” multiplied by 2)
If Dig_1 is not equal to Dig_5 then,
Set the value of PWM_1 to 200hex (or 50%)
If none of the above statements are true then, Set the value of
PWM to the constant “Low_Limit” End of the IF Statement
If Uni_1 is equal to or less than 5.5% then,
High-Side 1 equals True
High-Side 2 equals False
If Uni_1 is greater than 5.5% and less than 10% then,
If Uni_1 is equal to or greater than 10.5% Then…
End of If Statement
If Uni_1 is not zero then,
High-Side 4 equals True
If Uni_1 is zero then
High-Side 4 equals False
End of If Statement
If Dig_7 is True then,
Set Timer_0 to 2.5 seconds
If Dig_8 is True then,
Set Timer_0 to 500 milliseconds
End of If Statement
If the Supply Voltage is greater than 13.8 Volts “Fault” equals
True
Toggles a Digital input every time the Timer times out
Defines STRname as string type and assigns “string” to it.
Variable Display Types
0 to 100%
Scales the displayed value to a percentage of the value in engineering units (0 to 1023) and displays as a whole
number. For example if the variable was displaying the input Ana_1 and the value at the input was 327 in
engineering units (31%) then the displayed value would be 31 (%).
P/N: 021-00154, Rev. A.6 - updated for V4.7 Tools
Page | 132
5 Digit Uint
Displays the actual value of the variable being displayed with no scaling factor applied an as a 5 character field
right justified. DVC products support Uint numbers from 0 to 65535.
Supply Volts
Scales the displayed value of a variable to units of Supply Volts. For example, if the variable being displayed
was named Supply and the Power In voltage was 13.8 volts the displayed value would be 13.8.
True and False Displays
Scales the displayed value of a variable to a True or False display value, True is represented by a positive
numerical value of 1 to 65535 and False is represented by a numerical value of 0. The available display
selections for True / False are;
T, F
True, False
Fwd, Rev
Left, Right
Remote, Ground
Fwd/Rev, Stop
Yes, No
Decimal Displays
Scales the displayed value of a variable to a decimal display value by multiplying the variable by the selected
number. The available display selections for decimal displays are:
0.1
0.01 (s)
0.001
0.0001
Note: You should use 0.01 (s) to display a time variable in seconds. This is because the time variables are
stored as integer numbers that are a multiple of 10ms. Therefore, dividing the variable value by 100 (0.01 (s))
gives a display value in seconds.
String
This will display a preset string of text on the display. This allows the user to display a changing word on the
display. When using Strings to display information on the system, the length of the text string should not exceed
the maximum number of characters on the line that it is displayed or extend into other information displayed on
the same line. If the text string is too large, it will wrap to the next line and corrupt the information displayed
there or write over existing information resulting in undesired effects.
When removing displayed information from strings, e.g. switching between different strings on the display, the
user must completely overwrite the old information. If the new information is smaller in length than the old
information, use blank spaces in the string to erase the information being written over.
8.3
Variable initialization
When a DVC5/7/10 application starts after power is cycled, all internal program variables are set to 0. To
specifically set a variable to another value before execution you should define a startup bubble in the first logic
sequence defined (refer to the Binary Counter Programming example) that after it executes it transitions to
another bubble and never returns to the startup bubble. The only caveat to this technique is that the Always
code will execute prior to the first logic sequence startup bubble so care should be taken in the Always code.
P/N: 021-00154, Rev. A.6 - updated for V4.7 Tools
Page | 133
8.4
Program Debugging and Variable tracing
Use the Virtual Display facility of the Program Loader Monitor, D206 Graphical Display or DVC61 display. Refer
to the Binary Counter programming example for an illustration in the use of the Virtual Display. The advantage
of using a DVC61 is that it can be attached directly to the DVC5/7/10 RS232 connector or the CAN Bus and
does not require a PC to be connected.
8.5
J1939 Only Mode on the DVC5/7/10
For small systems that require only one DVC5/7/10 Master Module and no DVC Slave Modules, a feature has
been added to the DVC5/7/10 to allow for communication directly between a DVC5/7/10 and J1939 CAN Bus
systems. The DVC5/7/10 may be used to send and receive messages directly on the J1939 CAN Bus while
conducting normal functions with its Inputs and Outputs.
Some system configuration limitations apply when using this feature. DVC Slave Modules that communicate on
the Device Net CAN Bus may not be used in the project. Note that a DVC61 display module needs to be
connected using the RS232 connection not the CAN Bus. The Virtual Display may be used in a normal manner.
The following information should be used as an outline for setting up a DVC5/7/10 to operate in J1939 Only
Mode.
DVC 5/7/10 Application Code
The application program used to run a DVC5/7/10 in J1939 Only Mode must have a DVC5/7/10 and a
J1939/DVC80 in the application, any RS232 connected display device and may contain a Virtual Display to
monitor desired variables. No other modules can be added.
Use the DVC80 Message screens to set up the send and receive messages to be communicated on the J1939
CAN Bus. The MAC ID on the DVC80 setup screen is not used in this configuration. Write your application in
the normal manner to control the operational parameters and processes for system operation. J1939 messages
shall be addressed in the application as if a DVC80 were present on the system.
DVC5/7/10 Hardware Setup
Connect the incoming J1939 CAN H and CAN L signals to the DVC5/7/10 specific CAN Bus Connector as
outlined on the DVC5/7/10 Connector Pin out sheet.
DVC5/10 P4-4 = J1939 CAN H
DVC5/10 P4-5 = J1939 CAN L
DVC5/7/10 Firmware Setup
With the Program Loader Monitor running and connected to the DVC5/7/10 navigate to the Factory Information
screen and select the following options then select “Send Changes”.
CAN Baud Rate = 250K baud
CAN Bus Type = J1939 Only
J1939 Operation
At this point load the application into the DVC5/7/10 in the normal manner. The DVC will communicate directly
on the J1939 CAN Bus. All of the J1939 messages will be seen by the DVC controller but only those defined as
messages above will be processed. J1939 CAN Bus messages may be viewed by selecting the J1939/DVC80
status icon from the Program Loader Monitor main screen.
P/N: 021-00154, Rev. A.6 - updated for V4.7 Tools
Page | 134
9 Application Notes
9.1
CAN Bus Configuring
DVC modules communicate using the CAN Bus protocol and wiring scheme. Each module (including the
master DVC10) has an identifying CAN Bus MAC ID number. The two digits number MAC ID of each module
must be unique. MAC ID numbers can be assigned in two ways. Using the Programming Tool each module in
your project has a configuration window that contains a MAC ID entry field. Generally the default values will not
need to be changed. The second method is to use the Program Loader Monitor connected to an individual
module’s RS232 port to specify the MAC ID number.
It should be noted that the CAN Bus communication system gives preference to modules with the lowest MAC
ID number when multiple modules are trying to use the bus simultaneously. Therefore, systems generating a lot
of CAN Bus traffic should assign the lower MAC ID numbers to the most critical modules. A display module for
instance could have a high MAC ID number.
9.2
CAN Bus Termination Options
Electrical termination of the CAN Bus can be accomplished in two ways. First, you can simply connect a small
terminating component to the furthest module. The second method is to use a DVC61 which can be
programmed using the Program Loader Monitor to provide CAN Bus termination from its internal components.
9.3
DVC5/7/10 Powering
To use a DVC5/7/10 in the programming examples or in your system you need to be able to power up the
DVC5/7/10. Refer to the DVC5/7/10 hardware manuals for details on this. Basically you will need to supply
+8.5vdc to +32vdc and .5amps to the modules. For a DVC10 connect the switch power supply leads to pins A1
and A2 and a ground or power common connection to pin F1. These pins are all on the 18-pin connector of the
DVC10. As you look at this connector with the label side up of the DVC10, A1 and A2 are the two vertical pins
at the up left corner of the connector. F1 is pin in the upper right corner of the connector.
9.4
Driving Alarms from outputs
When driving a alarm from a bang bang output. When the output is turned off, the alarms still emit a low level
signal. Turning off the .OpenDisable bit,allows enough current to flow to allow the alarm to sound.
Solution:
The High Side outputs have a 75K pull up resistor to the supply voltage in order to allow for open detection.
This would allow 160uA and 320uA respectively for 12/24 volt systems to flow from out High Side Outputs.
Therefore, adding an external pull down resister to the output or other isolation would help.
P/N: 021-00154, Rev. A.6 - updated for V4.7 Tools
Page | 135
10 Hardware Installation
Listed below are the hardware connection diagrams for the various DVC products. Additional information can
be found on the website, http://www.highcountrytek.com/web/index.htm.
10.1
DVC5 Hardware Connections
DVC5
30 Pin Metri-Pak connector
Pin
Function
Pin Function
Pin
Function
A1
A2
A3
B1
B2
B3
C1
C2
C3
D1
NC
NC
NC
RXD
TXD
RTS
REF OUT
ANA PULSE 1
SIG COM
REF OUT
D2
D3
E1
E2
E3
F1
F2
F3
G1
G2
G3
H1
H2
H3
J1
J2
J3
K1
K2
K3
SIG COM
DIG 3
DIG 4
SIG COM
GND
GND
GND
(+) POWER IN
(+) POWER IN
(+) POWER IN
DVC5
18 Pin Metri-Pak connector
Pin
Function
Pin Function
A1
A2
A3
B1
B2
B3
C1
C2
C3
HS1
PWM 1
PWM 1
HS2
PWM1 "EDC"
PWM1 "EDC"
HS3
PWM 2
PWM 2
D1
D2
D3
E1
E2
E3
F1
F2
F3
DVC5
5 Pin J1939 connecter
Pin
Function
1
2
3
4
5
DRAIN
**V+ (NC)
**V+ (NC)
CAN H
CAN L
P/N: 021-00154, Rev. A.6 - updated for V4.7 Tools
ANA PULSE 2
SIG COM
REF OUT
ANA 1
SIG COM
REF OUT
ANA 2
SIG COM
DIG 1
DIG 2
HS4
PWM2"EDC"
PWM2"EDC"
HS5
HS6
NC
NC
NC
NC
Page | 136
** Power and GND are not supplied to the CAN Bus by the DVC5
10.2
DVC7 Hardware Connections
DVC7
30 Pin Metri-Pak connector
Pin
Function
Pin Function
Pin
Function
L1
L2
L3
M1
M2
M3
N1
RS232 TXD
RS232 RXD
RS232 RTS
CAN H
GND
GND
CAN L
P2
P3
R1
R2
R3
S1
S2
ANA 1
GND
UNI 2
ANA 2
REF OUT
UNI 3
DIG 1
T3
W1
W2
W3
X1
X2
X3
DIG 3
PWM 1
PWM 2
HS 5
HS 2
HS 4
HS 6
N2
N3
P1
GND
GND
UNI 1
S3
T1
T2
DIG 2
HS 1
HS 3
Y1
Y2
Y3
(+) POWER IN
(+) POWER IN
(+) POWER IN
10.3
DVC10 Hardware Connections
DVC10
30 Pin Metri-Pak connector (P1)
Pin
Function
Pin Function
Pin
Function
A1
A2
A3
B1
B2
B3
C1
C2
C3
D1
RXD
TXD
RTS
SIG COM
SIG COM
SIG COM
UNI 1 POT REF
UNI 1 INPUT
SIG COM
UNI 2 POT REF
D2
D3
E1
E2
E3
F1
F2
F3
G1
G2
G3
H1
H2
H3
J1
J2
J3
K1
K2
K3
DIG 2 INPUT
ANA 3 POT REF
ANA 3 INPUT
DIG 3 INPUT
DIG 4 INPUT
DIG 5 INPUT
DIG 6 INPUT
(+) POWER IN
DIG 7 INPUT
DIG 8 INPUT
UNI 2 INPUT
SIG COM
UNI 3 POT REF
UNI 3 INPUT
SIG COM
ANA 1 POT REF
ANA 1 INPUT
DIG 1 INPUT
ANA 2 POT REF
ANA 2 INPUT
DVC10
18 Pin Metri-Pak connector (P2)
Pin
Function
Pin Function
A1
A2
(+) POWER IN
(+) POWER IN
D1
D2
P/N: 021-00154, Rev. A.6 - updated for V4.7 Tools
HS OUT 5
HS OUT 6
Page | 137
A3
B1
B2
B3
C1
C2
C3
PWM OUT 1
HS OUT 1
HS OUT 2
PWM OUT 1
HS OUT 3
HS OUT 4
PWM OUT 2
D3
E1
E2
E3
F1
F2
F3
PWM OUT 2
PWR COM
PWM OUT 3
PWM OUT 3
PWR COM
PWR COM
PWR COM
DVC10
5 Pin J1939 connecter (P4)
Pin
Function
1
2
3
4
5
DRAIN
**V+ (NC)
**V+ (NC)
CAN H
CAN L
** Power and GND are not supplied
to the CAN Bus by the DVC5
10.4
DVC21 Hardware Connections
DVC21
30 Pin Metri-Pak connector (P5)
Pin
Function
Pin Function
Pin
Function
A1
A2
A3
B1
B2
PWR COM
PWR COM
PWR COM
PWR COM
(+) POWER IN
D2
D3
E1
E2
E3
DIG IN 6 (SINK)
DIG IN 7 (SINK)
DIG IN 8 (SINK)
DIG IN 9 (SINK)
DIG IN 10 (SINK)
G3
H1
H2
H3
J1
B3
DIG IN 1 (SINK)
F1
DIG IN 11 (SINK)
J2
C1
DIG IN 2 (SINK)
F2
DIG IN 12 (SINK)
J3
C2
DIG IN 3 (SINK)
F3
DIG IN 13 (SINK)
K1
C3
DIG IN 4 (SINK)
G1
DIG IN 14 (SINK)
K2
D1
DIG IN 5 (SINK)
G2
DIG IN 15 (SINK)
K3
DIG IN 16 (SINK)
DIG IN 17 (SINK)
DIG IN 18 (SINK)
DIG IN 19 (SINK)
DIG IN 20 (SINK)
DIG
IN
21
(SOURCE)
DIG
IN
22
(SOURCE)
DIG
IN
23
(SOURCE)
DIG
IN
24
(SOURCE)
DIG
IN
25
(SOURCE)
P/N: 021-00154, Rev. A.6 - updated for V4.7 Tools
Page | 138
DVC21
18 Pin Metri-Pak connector (P6)
Pin
Function
Pin Function
A1
A2
A3
B1
B2
B3
C1
C2
C3
DIG IN 26 (SOURCE)
DIG IN 27 (SOURCE)
DIG IN 28 (SOURCE)
DIG IN 29 (SOURCE)
DIG IN 30 (SOURCE)
DIG IN 31 (SOURCE)
DIG IN 32 (SOURCE)
DIG IN 33 (SOURCE)
DIG IN 34 (SOURCE)
D1
D2
D3
E1
E2
E3
F1
F2
F3
DIG IN 35 (SOURCE)
DIG IN 36 (SOURCE)
DIG IN 37 (SOURCE)
DIG IN 38 (SOURCE)
DIG IN 39 (SOURCE)
DIG IN 40 (SOURCE)
RXD
TXD
SIG COM
DVC21
5 Pin J1939 connecter (P7)
Pin
Function
1
2
3
4
5
DRAIN
**V+ (NC)
**V+ (NC)
CAN H
CAN L
** Power and GND are not supplied
to the CAN Bus by the DVC5
10.5
DVC22 Hardware Connections
DVC22
30 Pin Metri-Pak connector (P19)
Pin
Function
Pin Function
Pin
Function
A1
A2
A3
B1
B2
B3
C1
C2
PWR COM
PWR COM
PWR COM
PWR COM
(+) POWER IN
DIG IN 1 (SINK)
DIG IN 2 (SINK)
DIG IN 3 (SINK)
D2
D3
E1
E2
E3
F1
F2
F3
G3
H1
H2
H3
J1
J2
J3
K1
DIG IN 16 (SINK)
DIG IN 17 (SINK)
DIG IN 18 (SINK)
DIG IN 19 (SINK)
DIG IN 20 (SINK)
DIG IN 21 (SINK)
DIG IN 22 (SINK)
DIG IN 23 (SINK)
P/N: 021-00154, Rev. A.6 - updated for V4.7 Tools
DIG IN 6 (SINK)
DIG IN 7 (SINK)
DIG IN 8 (SINK)
DIG IN 9 (SINK)
DIG IN 10 (SINK)
DIG IN 11 (SINK)
DIG IN 12 (SINK)
DIG IN 13 (SINK)
Page | 139
C3
D1
DIG IN 4 (SINK)
DIG IN 5 (SINK)
G1
G2
DIG IN 14 (SINK)
DIG IN 15 (SINK)
K2
K3
DIG IN 24 (SINK)
DIG IN 25 (SINK)
DVC22
18 Pin Metri-Pak connector (P20)
Pin
Function
Pin Function
A1
A2
A3
B1
B2
B3
C1
C2
C3
DIG IN 26 (SINK)
DIG IN 27 (SINK)
DIG IN 28 (SINK)
DIG IN 29 (SINK)
DIG IN 30 (SINK)
DIG IN 31 (SINK)
DIG IN 32 (SINK)
DIG IN 33 (SINK)
DIG IN 34 (SINK)
D1
D2
D3
E1
E2
E3
F1
F2
F3
DIG IN 35 (SINK)
DIG IN 36 (SINK)
DIG IN 37 (SINK)
DIG IN 38 (SINK)
DIG IN 39 (SINK)
DIG IN 40 (SINK)
RXD
TXD
SIG COM
DVC22
5 Pin J1939 connecter (P21)
Pin
Function
1
2
3
4
5
NC
NC
NC
CAN H
CAN L
** Power and GND are not supplied
to the CAN Bus by the DVC5
10.6
DVC41 Hardware Connections
DVC41
30 Pin Metri-Pak connector (P8)
Pin
Function
Pin Function
Pin
Function
A1
A2
A3
B1
B2
B3
HS OUT 1
PWR COM
RXD
HS OUT 2
PWR COM
TXD
D2
D3
E1
E2
E3
F1
G3
H1
H2
H3
J1
J2
PWR COM
HS OUT 12
PWR COM
PWR COM
(+) POWER IN 1
(+) POWER IN 2
P/N: 021-00154, Rev. A.6 - updated for V4.7 Tools
PWR COM
PWR COM
HS OUT 5
HS OUT 6
HS OUT 7
HS OUT 8
Page | 140
C1
C2
C3
D1
HS OUT 3
SIG COM
PWR COM
HS OUT 4
F2
F3
G1
G2
HS OUT 9
HS OUT 10
HS OUT 11
PWR COM
J3
K1
K2
K3
(+) POWER IN 3
(+) POWER IN 1
(+) POWER IN 2
(+) POWER IN 3
DVC41
5 Pin J1939 connecter (P9)
Pin
Function
1
2
3
4
5
DRAIN
**V+ (NC)
**V+ (NC)
CAN H
CAN L
** Power and GND are not supplied
to the CAN Bus by the DVC5
Special Notes:
1. (+) Power IN 1 supplies power to the DVC41 module
and HS OUT 1, HS OUT 2, HS OUT 3 and HS OUT 4.
2. (+) Power IN 2 supplies power to HS OUT5, HS OUT6, HS OUT7,
and HS OUT 8.
3. (+) Power IN 3 supplies power to HS OUT9, HS OUT10, HS OUT11,
and HS OUT 12.
10.7
DVC50 Hardware Connections
DVC50
30 Pin Metri-Pak connector (P16)
Pin
Function
Pin Function
Pin
Function
A1
A2
A3
B1
B2
B3
C1
C2
C3
RXD
TXD
D2
D3
E1
E2
E3
F1
F2
F3
G1
G3
H1
H2
H3
J1
J2
J3
K1
K2
DIG 2 INPUT
(+) 5V POT REF
ANALOG IN 4
DIG 3 INPUT
DIG 4 INPUT
DIG 5 INPUT
DIG 6 INPUT
(+) POWER IN
DIG 7 INPUT
SIG COM
SIG COM
SIG COM
(+) 5V POT REF
PULSE / ANALOG 1
SIG COM
P/N: 021-00154, Rev. A.6 - updated for V4.7 Tools
PULSE / ANALOG 2
SIG COM
(+) 5V POT REF
ANALOG IN 1
SIG COM
(+) 5V POT REF
ANALOG IN 2
DIG 1 INPUT
(+) 5V POT REF
Page | 141
D1
(+) 5V POT REF
G2
ANALOG IN 3
K3
DIG 8 INPUT
DVC50
18 Pin Metri-Pak connector (P17)
Pin
Function
Pin Function
A1
A2
A3
B1
B2
B3
C1
C2
C3
(+) POWER IN
(+) POWER IN
PWM OUT 1
HS OUT 1
HS OUT 2
PWM OUT 1
HS OUT 3
HS OUT 4
PWM OUT 2
D1
D2
D3
E1
E2
E3
F1
F2
F3
HS OUT 5
HS OUT 6
PWM OUT 2
PWR COM
PWM OUT 3
PWM OUT 3
PWR COM
PWR COM
PWR COM
DVC50
5 Pin J1939 connecter (P18)
Pin
Function
1
2
3
4
5
DRAIN
**V+ (NC)
**V+ (NC)
CAN H
*
** Power and GND are not supplied
to the CAN Bus by the DVC50
10.8
DVC61 Hardware Connections
DVC61
12 Pin connector
Pin
Function
Pin Function
1
2
3
4
5
6
INPUT 1A/1B
INPUT 2A/2B
(+) PWR
GROUND
CAN H
CAN L
7
8
9
10
11
12
P/N: 021-00154, Rev. A.6 - updated for V4.7 Tools
RS-232 (TXD)
RS-232 (RXD)
GROUND
INPUT 3A/3B
INPUT 4A/4B
INPUT 5A/5B
Page | 142
* For Active High connections, the SPST switch will be connected between
the appropriate input and (+) power.
* For Active Low connections, the SPST switch will be connected between
the appropriate input and ground.
10.9
DVC70 Hardware Connections
DVC70
18 Pin Metri-Pak connector (P12)
Pin
Function
Pin Function
A1
A2
A3
B1
B2
B3
C1
C2
C3
RXD
TXD
RTS
SIG COM
D1
D2
D3
E1
E2
E3
F1
F2
F3
(-) PWR BAT
(+) PWR IGN
ALARM OUT
PWR COM
PWR COM
PWR COM
DVC70
5 Pin J1939 connecter (P13)
Pin
Function
1
2
3
4
5
NC
NC
NC
CAN H
CAN L
10.10 DVC80 Hardware Connections
DVC80
18 Pin Metri-Pak connector (P14)
Pin
Function
Pin Function
A1
A2
A3
B1
B2
RXD
TXD
SIG COM
SIG COM
(+) 5VDC
D1
D2
D3
E1
E2
P/N: 021-00154, Rev. A.6 - updated for V4.7 Tools
J1939 CAN H
J1939 CAN L
(+) POWER IN
Page | 143
B3
C1
C2
C3
(+) 5VDC
TERM1
TERM2
E3
F1
F2
F3
PWR COM
PWR COM
DVC80
5 Pin J1939 connecter (P15)
Pin
Function
1
2
3
4
5
NC
NC
NC
CAN H
CAN L
P/N: 021-00154, Rev. A.6 - updated for V4.7 Tools
Page | 144
11
Safety is Everyone’s Responsibility
Safe work practices need to be observed in building the hardware connections, mounting the units to the
machinery, and programming the controllers.
11.1
Safety in building the hardware connections
Safety should be at the forefront of the development team’s thoughts. Many times during development,
technicians and engineers will fabricate test fixtures, care must be taken not to short circuit power supplies and
output devices. Please adhere to all federal, state, and local laws regarding safety.
11.2
Safety in mounting the DVC units
Mounting the DVC units on mobile applications have their own safety guidelines. Care must be taken to locate
a safe place on the machine free from excessive heat, and moving parts that may sever the controller’s wiring
harness or physically harm the controllers. Please adhere to all federal, state, and local laws regarding safety.
11.3
Safety in programming the controllers
Safety to personnel and machinery must be observed when programming moveable functions. Test program
changes to minimize safety hazards. If possible don’t test a machine at full function, only test program
modification area in a controlled environment. Make sure to let other personnel in the area know that a change
is being tested and possible negative outcomes. Please adhere to all federal, state, and local laws regarding
safety.
P/N: 021-00154, Rev. A.6 - updated for V4.7 Tools
Page | 145
Appendix A
Compiler Keywords
Always, ALWAYSCODE
AI1BITS0, AI2BITS0, AI3BITS0
BACKLIGHTON, BACKLIGHTOFF
BREG9, BREG8, BREG7, BREG6, BREG5, BREG4, BREG3, BREG2, BREG1, BREG0, BITTEMP
DIGBITS
DVCLED_1, DVCLED_2, DVCLED_3, DVCLED_4
EECOMMAND, EEREAD, EEWRITE
Else, ElseIf, End if
FALSE, FAULTON, FAULTOFF, FAULTBLINK
IF, IFTEST, INIT
K9, K8, K7, K6, K5, K4, K3, K2, K1, K0, KNOKEY, KEND, KCLEAR, KF4, KF3, KF2, KF1, KHOME, KDOWN,
KUP, KENTER, KRIGHT, KLEFT
LEFTBIT
LONGREG0, LONGREG1, LONGREG2, LONGREG3, LONGREG4, LONGREG5, LONGREG6, LONGREG7,
LONGREG8, LONGREG9
MATHTEMP, MATHTEMP2
MS
Not
OFF, ON
OUT1BITS0, OUT2BITS0, OUT3BITS0
RIGHTBIT
S
STATUS_OFFLINE, STATUS_ONLINE, STATUSON, STATUSOFF, STATUSBLINK
SUPPLY
TRUE
Then
UAI1BITS0, UAI2BITS0, UAI3BITS0
WREG0, WREG1, WREG2, WREG3, WREG4, WREG5, WREG6, WREG7, WREG8, WREG9
P/N: 021-00154, Rev. A.6 - updated for V4.7 Tools
Page | 146
Appendix B
Programming Statement Examples
Dim Fault as Uint
Dim Timer_0 as Timer
Dim Scale_Factor as EEmem
Const Low_Limit = 256
PWM_1.Enable = True
If (Dig_1 AND Dig_2) Then
PWM_1 = Ana_1 / Scale_Factor
ElseIf (Dig_1 OR Dig_2) Then
PWM_1 = (Ana_1 / Scale_Factor) /2
ElseIf (Dig_3 XOR Dig_4) Then
PWM_1 = ((Ana_1 / Scale_Factor) * 2)
ElseIf (Dig_1 = NOT Dig_5) Then
PWM_1 = 0x0200
Else
PWM_1 = Low_Limit
End If
If (Uni_1 <= 5.5%) Then
HS1 = True
HS2 = False
ElseIf (Uni_1 > 5.5% and Uni_1 < 10%) Then
HS1 = False
HS2 = True
ElseIf (Uni_1 >= 10.5%) Then
HS1 = True
HS2 = True
End If
If (Uni_1 <> 0) Then
HS4 = True
Else
HS4 = False
End If
If (Dig_7) Then
Timer_0 = 2.5s
ElseIf (Dig_8) Then
Timer_0 = 500ms
End If
Fault = (supply >13.8sv)
P/N: 021-00154, Rev. A.6 - updated for V4.7 Tools
Declare “Fault” as a variable for use in the project
Declare “Timer_0” as a count down timer
Declare “Scale_Factor” as a location in EEmemory
Declare the constant “Low_Limit” to equal 256
Set PWM_1.enable to True
If Dig_1 and Dig_2 are true then,
Set the value of PWM_1 to the equation (Analog
input 1 divided by the value stored in the
EEmemory location “Scale_Factor”
If Dig_1 or Dig_2 are true then, set the value of
PWM_1 to the Equation (Analog input 1 divided by
the value stored in the EEmemory location
“Scale_Factor” divided by 2)
If Dig_1 or Dig_2 are true but not both then,
Set the value of PWM_1 to the Equation (Analog
input 1 divided by the value stored in the
EEmemory location “Scale_Factor” multiplied by 2)
If Dig_1 is not equal to Dig_5 then,
Set the value of PWM_1 to 200hex (or 50%)
If none of the above statements are true then,
Set the value of PWM to the constant “Low_Limit”
End of the IF Statement
If Uni_1 is equal to or less than 5.5% then,
High-Side 1 equals True
High-Side 2 equals False
If Uni_1 is greater than 5.5% and less than 10%
then…
If Uni_1 is equal to or greater than 10.5% Then…
End of If Statement
If Uni_1 is not zero then,
High-Side 4 equals True
If Uni_1 is zero then
High-Side 4 equals False
End of If Statement
If Dig_7 is True then,
Set Timer_0 to 2.5 seconds
If Dig_8 is True then,
Set Timer_0 to 500 milliseconds
End of If Statement
If the Supply Voltage is greater than 13.8 Volts
“Fault” equals True
Page | 147
Dim Timer_0 Timer
If (Timer_0 = 0) Then
Dig_1 = Not (Dig_1)
Timer_0 = 2s
End If
Dim STRname as String “string “
VirtualDisplay.v1 = STRname
P/N: 021-00154, Rev. A.6 - updated for V4.7 Tools
Toggles a Digital input every time the Timer times
out
Defines STRname as string type and assigns
“string” to it.
Page | 148
Appendix C
Troubleshooting Systems
Basic Electronics Theory and DVC System Troubleshooting
Electronics is not nearly as scary as a high-pressure hydraulic leak and is much less messy. With basic
understanding and simple tools, electronics can be applied and trouble shot easily and successfully.
All of HCT's products involve electronics and HCT’s goal is to make it easy for you to quickly get them to work in
your systems. To make you more comfortable with integrating electronic controls with fluid power we have
provided you with a quick introduction to basic electronics below and a means to tell if it is working.
Basic Electronics Introduction
The basic medium of exchange is an electron. When a whole bunch of electrons get together with a destination
in mind it is called voltage like in a battery. Voltage is the pressure that causes the electrons to want to flow.
When the electrons move, it is called current. Current makes things happen. It is analogous to "fluid" flow.
Resistance is the restriction to current's flow in a wire. More voltage (i.e. pressure) will result in more current
flow through a wire for a given resistance. Flowing current causes magnetic fields to surround the wire
conducting the current. When current flows through a coil surrounding a magnetic material (i.e. spool) the
magnetic fields are concentrated and produce a Magnetic force. This Magnetic force is proportional to the
current flow, number of coil turns and the magnetic material surrounded by the coil. The produced magnetic
force can be used to cause valve spool and electric motor movement. Just as forcing fluid through a restriction
generates heat, forcing current through resistance also generates heat. The heat is measured in wattage.
Inductance is the property of a coil to resist changes in current flow and therefore to maintain the generated
magnetic force. More inductance will cause more "inertia". Capacitance is the property of a capacitor to resist
changes in voltage across its two terminals. More capacitance will cause more "shock absorbing" action to
remove voltage (pressure) spikes. Now that the basic concepts have been introduced we present to you the
basic formulas of how the above terms are calculated. No formulas involving magnetism, inductance or
capacitance are presented as they usually involve calculus, which is seldom are useful to consumers of
electronics and understanding that level of detail is left to us.
Useful formulas
W = watts, V = volts, I = amps, R = ohms
V=I*R
V=W/I
V = Square Root (W * R)
W=V*I
W=I*I*R
W=V*V/R
I=V/R
I=W/V
I = Square Root (W / R)
R=V/I
R = (V * V) / W
R = W / (I * I)
How to hook it up
Current insists on being able to flow back to where it started from be it the negative terminal of a battery or the
ground and thus the name circuit. Current has to return to the tank or you run out and no power is transferred.
You must have two wires hooked up to work. The first wire usually connects the circuit input to the more positive
voltage coming out of the power supply or battery which is often referred to as Power, Positive, High or Plus.
The second wire connects the output of the circuit to the more negative voltage commonly referred to as
Ground, Return, Common, Negative, Low or Minus. This current return second wire of a circuit can often be
connected directly to the chassis of the system. The chassis ultimately will connect to the negative terminal of a
battery or ground. In this case care must be exercised that there are no cracks or joints that cause unnoticed
P/N: 021-00154, Rev. A.6 - updated for V4.7 Tools
Page | 149
breaks or restrictions in the current's path through the chassis as they add resistance to the circuit and thereby
lower the current flow and the resultant magnetic force produced. If more than one circuit uses the same wires,
they interact, just as would happen if an undersized hose were used to return the fluid from many valves to tank.
The pressure drop across the restriction in the wire is the resistance multiplied by the sum of all the currents
using the wire. This voltage drop is seen by all of the circuits using the wire. The expected currents should be
added up and an appropriately sized wire selected, or individual wires to each load/circuit can be used. The
gauge and length of the wire affects its resistance. Even a short machine can have long wires if they are routed
poorly. Note that corroded contacts in any circuit can have very high resistance. Also use waterproof parts if
there is any chance of water contacting the circuit.
Protection with Fuses and Special switches
Safe electronics require the use of fuses to protect equipment and people. Fuses seldom are fast enough to
protect electronic components from damage, but they will usually limit potential fire damage and avoid burning
up the wiring. HCT’s products all provide internal protection circuits for the HCT modules in your system in the
advent of a wiring mistake or other over voltage condition. Note that fuses, circuit breakers, connectors, relays
and switches all have resistance. Fuses and circuit breakers are typically the worst offenders and should be
accounted for even at moderate current values (1 to 10 amps), while the others are typically quite small and are
only a problem at high currents.
Use so-called "inductive load" rated switches when driving coils. The coil inductance tries to keep the current
constant when you turn off the switch. Trying to instantly turn off current to a coil will result in an arc across the
switch if no means of arc suppression is employed. That is basically how spark plugs work.
All of HCT’s products that are used for controlling valve spool movement by controlling the coil current provide
for this arc suppression and do not require an external switch to apply the coil current. Refer to the Pulse Width
Modulation (PWM) write-up in the Appendices for a full discussion.
Get the entire valve shift you need
Valve coils have a resistance. This resistance demands a certain amount of voltage to drive enough current to
create the magnetic force to shift the spool fully. The valve manufacturers typically build their coils to have
enough resistance that they will not draw too much current and burn up, but will be able to run off of typical 12 or
24volt power sources. The amount of voltage you have to work with is the battery, alternator or power supply
voltage. Extra resistance spread throughout the circuit may reduce the conducted current and prevent proper
valve operation. Valve coils are made of copper wire and have resistance, so forcing current through them
causes them to heat up. Copper wire increases its resistance when it gets hot. This heating phenomenon is
most troublesome for currents over one amp. Coils can also become hot when hot fluid is run through the valve
or if located next to a running engine. It is hard to predict coil temperature and even harder to get the resistance
vs. temperature curve from the manufacturer, not to mention getting the resistance or voltage drop
specifications on all valve drivers, fuses and switches etc.
These resistance variations can prove troublesome to getting a system to work properly and reliably especially
one with many valves. HCT’s products incorporate circuits to regulate the current to a valve’s coil independent
of circuit resistance variations within a machine and machine-to-machine. The Pulse Width Modulation (PWM)
technique used by HCT solves this problem. Without this capability one would resort to the cut and try
approach, which can be used with some success. However, this requires that the person commissioning the
machine must know what to look for if the electronics is not fully shifting the valve. Some coils increase their
resistance by over 50% when very hot and no longer draw enough current to fully shift at normal alternator
voltages. 10volt coils can often be substituted for 12volt coils when this happens, but the coil current will usually
be higher for full shift on the lower voltage valve, which compounds problems with wire resistance.
Trouble shooting the electronics in your system
Electrons are usually invisible and silent, which makes it hard to find leaks or restrictions. A well-equipped
troubleshooter must have a digital volt / ohm / amp meter, mating connectors or break out boxes, and may need
an oscilloscope to see quickly changing voltages or pulses. We recognize that this is probably asking too much,
so HCT’s products incorporate LEDs to help troubleshoot your system with our products.
P/N: 021-00154, Rev. A.6 - updated for V4.7 Tools
Page | 150
Flashing LEDs on HCT’s products usually indicate that a problem. How to isolate the cause of the problem is
what we will cover next.
HCT products typically have a power LED to indicate that there is enough voltage to run the specific
module/product. The power LED should be steady on! Off or flashing indicates a power problem and you must
find it and fix it before worrying about any other symptoms. Note that on our products that power LED will flash
steadily to indicate that the power supply voltage is higher than the maximum specified. When the power supply
is too high the units will shut down, which also turns off the power LED or makes it flash erratically. Check the
power and ground wires, switches, connectors and fuses to verify they are installed properly. If no obvious fault
is found, use the voltmeter to measure the voltage between power and ground with the unit plugged in and
drawing power if possible. Verify the reading against the unit’s power specification.
All of our product
datasheets are available from our web site. Start at the unit and work your way back toward the power supply
till the problem is found. If you do not have a voltmeter, jump the product's power input to the battery to verify
that the power LED comes on. Now that you can trust the unit, move the jumper wires further down stream, past
switches, wires and connectors till the light goes out.
Our DVC10 and DVC50 products have variable current outputs for controlling proportional valves. Each such
PWM output has a red/green LED that gives a relative indication of the current output. If the PWM % LED is fully
red, the unit is not trying to drive much current or there is a short circuit. Disconnect the coil at the valve
housing and measure its resistance and compare it to the specifications. If the PWM % LED is fully green, the
unit can not drive as much current as it wants to, probably due to an open circuit or insufficient voltage for the
resistance to be driven. This can also be caused by adjusting the DVC unit to drive more current than is actually
required to do the job. In this case readjust the card if the system if functioning correctly but the PWM % LED is
fully green. If the system is not operating at the desired speed, disconnect the coil at the card and measure its
resistance and compare it to the specifications. If the coil is OK, measure the power supply voltage at the card's
power input and coil output while the card is driving the coil. If the coil voltage is within a volt of the power supply
(typical, see card's specifications), the card is functioning correctly. You may reduce the voltage drop from the
power supply to the card by shortening the wiring, using bigger wires or fewer switches and connectors.
Choosing a coil rated for less voltage can also solve this problem. If the PWM % LED is off, the unit is not trying
to drive that output, troubleshoot the inputs. Our DVC products flash the PWM % LED to indicate a short
(flashing red/off) or and open (flashing green/off).
Most of our products have single color LEDs to indicate the state of simple on/off outputs and some times the
state of inputs. Shorted on / off outputs are indicated by rapid flashing and open outputs by slow flashing. Error
LEDs come on or flash to indicate a wide variety of problems, see the unit specifications.
A good quality meter that can read DC voltage up to 50 volts, current up to 10 amps and resistance down to 1
ohm should be part of your tool kit. An extra battery is also a good idea. We recommend you buy a digital meter
to avoid having to figure out which analog scale you need to look at while the system is causing major noise and
confusion. There are many quality meters available, but Radio Shack is often the easiest place to find and has a
nice selection to choose from. Very important safety tip: The current range of the meter will measure the
maximum current the power supply can put out if you accidentally hook it across the power source! You must
also avoid hooking up the current meter correctly, but selecting a range that is too low. These actions typically
blow the fuse in the meter and usually a new fuse cannot be found easily. Make current measurements by
inserting a meter in series in the circuit. Make voltage measurements by connecting a meter across the circuit.
Make resistance measurements with the circuit turned off and disconnected from the rest of the machine by
connecting across the circuit. If blown current fuses prove to be a problem, HCT recommends that a 1 ohm, 10
watt resistor (Radio Shack or etc.) be temporarily spliced in series with the circuit and the voltage across the
resistor will reflect the current to be measured. A voltmeter hooked across the resistor will read the voltage drop
due to the current. The current is equal to the voltage for the case of a one-ohm resistor. Note that these
resistors are typically 5%, so the accuracy will be less than that of a current meter. Use a 0.1ohm resistor
(typically a special order) if the 1ohm resistor causes too much resistance in the circuit. Remember to multiply
the answer by 10 to get the current value. This resistor is also the easiest way to measure dither amplitude and
frequency with an oscilloscope, but be sure that the scope is floating with respect to ground (battery power or
use two wire AC cord adapter).
P/N: 021-00154, Rev. A.6 - updated for V4.7 Tools
Page | 151
Our DVC products have an available computer interface to your PC. This is by far the most effective way to
setup and troubleshoot our products. We provide all of the information represented by the LEDs plus a lot more.
Meters and running graphs give quick looks at what your system is doing, while enunciators tell you what the
unit is trying to do. Data logging and remote operation can be used to consult with our staff to help debug
difficult problems.
Troubleshooting the CAN Bus Communication network
Once the unit is correctly wired and known to be functioning as HCT intended, the machine may still not be
functioning as you intended. The most common problem is communication settings. Flashing NS or MS LEDs
on DVC modules indicates problems. Three common causes of network NS problems are lack of or a loose bus
terminator component, inconsistent baud rates across the set of connected DVC modules and incorrect MAC ID
settings on 1 or more modules. The module baud rates and MAC IDs can be determined by connecting a
RS232 cable between your PC running the Program Loader Monitor and the DVC unit. The settings should
agree with the setting programmed in the DVC10.
Good grounding practices
When welding on the machine, all power and ground connections need to be removed from the controller. Be
aware, that some sensor manufactures ground their switch cases. If a switch case is grounded, such as a
pressure transducer, then that ground could be connected to the DVC module and therefore compromise the
integrity of the controller during welding.
Ground the controller on all pins using suitable grounding wire.
P/N: 021-00154, Rev. A.6 - updated for V4.7 Tools
Page | 152
Appendix D
Current Regulation using PID techniques
PID, proportional integral differential control, is a powerful and popular method of regulating systems. Typical
applications include speed control and position control. HCT uses PID to control a proportional valve’s
performance to compensate for the variations in system parameters such as the wire lengths and other
resistance sources that can effect the positioning of a valve.
It will be easier to tune your system’s valves using a PID loop if you understand the basic concepts first.
This is intended to be a brief over view of a very complicated subject. See HCT manuals for more details on how
to tune our products.
The spool in a proportional valve moves due to the magnetic field that is created by the current through the
valve’s coil. The amount of coil current is proportional to the supply voltage applied to the high-side coil contact,
the amount of time (duty cycle) that the current is allowed to flow through the coil by the opening and closing of
a switch on the low-side of the coil and the total resistance in the complete current path to and from the coil.
PID is a method by which the duty cycle of the applied current is varied to achieve the desired current through
the coil given all of the system wiring variations. PID also provides a means by which this desired current is
reached quickly and accurately. Pulse Width Modulation (PWM) is term used for the amount of time current is
allowed to flow through the coil. PID increases or decreases the PWM percentage according to the error seen
in the measured current through the coil versus the desired current.
The basic proportional valve control circuit looks like the following:
High-Side
Voltage source
+V
Valve (Spool) Positioning Coil
Switch
Low-Side Input
Programmable
Switch (PWM)
Current Measuring Device
GND
Ideally closed loop control (like PID) of systems is used to cause the system/valve to arrive at a commanded
state (i.e. valve fluid flow) exactly. This form of control automatically adjusts out many non-ideal characteristics
of your system and is perform on each proportional valve individually. To have this level of control there must be
feedback from the system to tell the closed loop controller where the system is so that it will know when it has
arrived at the desired state. First, there must be a command from the user (current or fluid flow value) to tell the
controller where the system should be. When the feedback (current or actual fluid flow) differs from the
command there is an error. So just correct it right? The problem is inertia, inductance and delay in the system,
sensors and electronics. These effects can cause over correction by the controller. For example if you try to
point a satellite mini dish by having someone yell STOP when the signal is good, you will generally over shoot
the optimum position given the time it takes the person to react to observing the good signal. Over shoot is
going past the desired setting because of a delay in getting the feedback, or a delay in stopping the change in
the system. If you see that you have gone past the commanded system state and then reverse the movement to
compensate, you can then over shoot in the opposite direction. Multiple over shoots are called oscillation. One
solution to the delay problem is to slow down the system's rate of change so much that the delays and inertia
are insignificant. This is usually not a good solution, as most designers want a quick and controlled response
from the machine.
How the system responds to the error is tunable by setting the PID parameters (2-3 numeric constants typically
set to 10 for DVC products). These settings will determine the speed of correction, degree of over shoot,
maximum error and final error. The settings are termed the proportional, integral and differential settings. They
are used in combination to determine the PWM% change each timing cycle. The proportional term as its name
implies will drive the output proportional to the error (set the PWM %), causing the system to change more
rapidly as the error increases. As the error approaches zero, the proportional term also approaches zero and will
P/N: 021-00154, Rev. A.6 - updated for V4.7 Tools
Page | 153
always get there before the system does. Proportional control alone is the simplest to use, but will result in some
steady state error. Increasing the proportional term enough to limit the steady state error to a small value can
cause over shoot and oscillation. The integral term adds up the error as a function of time and drives the output
harder as the error increases and as time in error increases. An analogy is that the integral of the flow rate of
water is the depth in a bucket. The integral error term is positive when filling the bucket and will go negative
when the bucket is filled beyond the desired level. The integral term is typically slower to respond (i.e. correct an
error), but will cause an extremely small final error as any detectable error will continue to add up till the output
changes in direction to correct it. This term can also cause oscillation if set too high, and will need the help of
the P term for fast machine operation. The differential term reacts to the speed of change in the detected error.
This term is primarily used to slow down the change in system output as it nears the correct state, to limit over
shoot. DVC products do not implement this term in our valve controllers, as we do not believe they will benefit
from it.
DVC products provide selectable PID tuning options for each valve in your system. You can vary the P and I
values or use our defaults. Experience with your particular valves will indicate whether our defaults, you’re
changing of the defaults or even writing you won PID loop is best for your systems performance
See HCT manuals for more details on how to tune our products.
P/N: 021-00154, Rev. A.6 - updated for V4.7 Tools
Page | 154
Appendix E
Pulse Width Modulation (PWM) and Dither
HCT’s DVC products provide selectable PWM and Dither capabilities for each proportional valve in your system.
Our default settings will generally suffice for most applications but a user can specify different values if desired.
The DVC product’s control circuits and internal BIOS automatically handle the application of the PWM and
Dither control signals.
Current flowing through a valve’s coil creates a magnetic field. This field provides the force to move the valve’s
spool and thereby adjust the fluid flow in the valve. The voltage across the coil divided by the coil resistance is
equal to the coil current. This current is supplied by an external power supply, which generally is a battery. The
total circuit is made up of all the components from the power supply’s positive terminal to the power supply’s
negative terminal. The circuit’s accumulative resistance due to the connecting wire lengths, the coil, and
switches determine the actual current. Very easy so far, but proportional valves are only useful if the current
can be changed.
A potentiometer can be used to vary the resistance in series with the coil to set the coil current to the desired
value. Unfortunately this simple technique is very inefficient and not practical for higher currents. Adding
resistance to control the current prevents the use of the electronics that provide current regulation, dither (static
friction compensation), short circuit protection, current ramping, and dead band elimination. Pulse width
modulation (PWM) is an efficient technique for driving current through a valve’s coil that allows these features to
exist. PWM does not waste any significant power or generate unnecessary heat.
How PWM works
The coil current value is set by turning a low resistance switch on and off at the PWM frequency (FIG. 1).
BLOCK DIAGRAM
+POWER
+COIL
VALVE
DRIVER
DIODE
VALVE
POWER
SUPPLY
+
-
PWM
SWITCH
COIL
-COIL
FIG. 1
PWR COM
P/N: 021-00154, Rev. A.6 - updated for V4.7 Tools
Page | 155
SWITCH CLOSED
+POWER
+COIL
VALVE
DRIVER
DIODE
+
VALVE
POWER
SUPPLY
+
-
COIL
-COIL
PWM
SWITCH
CURRENT
FIG. 2
PWR COM
A simplified explanation of coil inductance is required to explain the preceding sentence. The coil's magnetic
field stores more energy as the current increases, much as a flywheel stores mechanical energy as the
rotational speed increases. Inductance is the measure of the electrical inertia that acts to oppose increasing or
decreasing the coil current. PWM takes advantage of this inductive effect by switching power to the coil on and
off. When the valve driver's switch (PWM switch) is closed, full power supply voltage appears across the coil
and attempts to increase the current flow to the maximum (FIG. 2). The coil prevents an instant change in
current by appearing to have a larger resistance than it really does. This resistance decreases with time, so the
current increases as long as the switch is closed. This continues until the rated current of the coil is reached, or
the switch is opened. When the valve driver opens the switch the coil will attempt to maintain its current flow.
SWITCH OPEN
+POWER
+COIL
VALVE
DRIVER
DIODE
VALVE
POWER
SUPPLY
+
-
PWM
SWITCH
PWR COM
-COIL
COIL
+
CURRENT
FIG. 3
The coil reverses its voltage, acts as a generator and drives its current through the diode (called a fly back
diode) (FIG. 3). The diode requires a voltage of about -0.5 volts to make this current flow. The direction of
current flow through the coil does not reverse. The current flows out of the low side of the coil through the
diode. The current decreases as long as the switch is open, with no power drawn from the power supply. The
coil current flowing through the diode provides the force required to maintain the position of the spool. The
current will be almost constant if the PWM frequency is high enough. At high PWM frequencies there is not
enough time for the current to change much before the switch changes state again, and reverses the last
change. The average value of coil current is relative to the PWM duty cycle, i.e. proportional to the time the
P/N: 021-00154, Rev. A.6 - updated for V4.7 Tools
Page | 156
switch is on compared to the time the switch is off (FIG. 4). The switch would be always open and no coil
current flows at a 0 % duty cycle. The switch is always closed and maximum current flows at 100 % duty cycle.
SUPPLY
COIL
VOLTS 0 V
-0.5 V
FULL
COIL
CURRENT
0A
ON
SWITCH
OFF
FIG. 4
TIME
Stiction (static friction or friction when the valve is at rest compared to the lower friction when the valve is
moving) and hysterisis can make controlling valves seem erratic and unpredictable.
Friction of a sliding object is less than when it is stationary. Stiction can keep the spool from moving for small
control input changes, and then the spool moves too far when the control input changes enough to free it. The
force required to get the spool to move is generally more than is required to go to the desired spool shift.
Friction of a sliding object causes a reduction in distance moved. Hysterisis can cause the spool shift to be
much different for the same control input depending on whether the control is changing up or down. The friction
of the moving spool is resisting the current's attempt to move it, so the spool shift will be less than desired. The
direction the spool was shifting determines if the spool ended up shifted too far or not far enough.
Dither is a rapid, small movement of the spool about the desired shift point. It is intended to keep the spool
moving to avoid stiction and to average out hysterisis. Dither must be large and slow enough to make the spool
move and small and fast enough not to cause pulsing or resonance in the system due to fluid flow variations.
These requirements can conflict. The goal is to provide just enough dither to fix the problems without creating
new ones.
Dither is caused by coil current changes (“ripples”) at some frequency and amplitude about the commanded
average value. The spool will not follow high frequency ripples as well as low frequency ripples due to inertia.
The amplitude of the ripples determines how far, and if, the spool will move at a given frequency.
Low frequency PWM
Low frequency PWM, typically less than 300 Hz, generates dither as a byproduct of the PWM process (FIG. 6).
This is a violation of the earlier assumption that the changes in current will be fast and small enough not to be
noticed by the spool.
P/N: 021-00154, Rev. A.6 - updated for V4.7 Tools
Page | 157
LOW FREQUENCY PWM
FULL
COIL
CURRENT
0A
ON
SWITCH
OFF
TIME
FIG. 6
The amount of dither changes as the average coil current changes. The dither is a maximum at 50% duty cycle
and decreases to zero at 0 and 100 % duty cycles. This may result in too much dither at some current levels
and not enough at others.
The dither current amplitude at a given average current is a function of coil inductance and PWM frequency.
The inductance of coils within a manufacturer's line is generally a function of their rated voltage and wattage.
24volt low wattage coils usually have more inductance (thus less byproduct dither for a given PWM frequency)
than 12volt high wattage coils.
Different spools having a different response to the same dither current further complicate this. Changing the
PWM frequency will allow adjusting the dither, but the amplitude and frequency of the dither cannot be set
independently as may be required.
High frequency PWM
When the PWM frequency is high enough, typically above 5 KHz, the coil current will not have time to change
significantly (FIG. 7). No "byproduct" dither is produced by high frequency PWM.
HIGH FREQUENCY PWM
FULL
COIL
CURRENT
0A
ON
SWITCH
OFF
TIME
FIG. 7
The use of high frequency PWM with a dither generator (FIG. 8) solves many of the problems with low
frequency PWM dither. The dither waveform is produced deliberately and added to the command input.
P/N: 021-00154, Rev. A.6 - updated for V4.7 Tools
Page | 158
HIGH FREQUENCY PWM WITH DITHER GEN
FULL
COIL
CURRENT
0A
DITHER
GEN
FIG. 8
TIME
The dither current waveform can be regulated to maintain the desired amplitude regardless of the inductance of
the coil. The dither amplitude decreases toward zero as the duty cycle nears 0 or 100%, but is constant over
the rest of the current range. The valve will not be used at zero or full current in many systems and the dither
amplitude will be constant over the usable range of coil current. The dither generator allows the dither
amplitude and frequency to be adjusted independently for maximum positive effect with minimum system
problems.
P/N: 021-00154, Rev. A.6 - updated for V4.7 Tools
Page | 159
Appendix F
Flowchart (Sequence of Operations) example
This example will demonstrate how to create a flowchart and Sequence of Operations. This example may or
may not work, it is for educational purposes only.
Programming Team:
Paul – Programmer, Electrical Engineer
Mark – Program Manager
Amanda – Application Engineer
Todd – Hydraulics Engineer
Date:
6/4/08
Program Description:
Using the HCT DVC family, control steering and propulsion functions of a new skidsteer model
Using a j1939 equipped diesel engine.
Functional Description:
The operator has control over one joystick. Critical functions are the engine rpm > 1000rpm and high
side pressure is below 2000psi, then the system looks for input from the joystick as indicated below.
Joystick has 5 positions
Joystick forward – skidsteer moves forward motion
Joystick back – skidsteer moves in reverse motion
Joystick right – skidsteer turns right
Joystick left – skidsteer turns left
Joystick center – skidsteer stops in present position
I/O needed
Inputs Joystick forward
Joystick back
Joystick right
Joystick left
Joystick center
Left wheels, high side press. Trans
Right wheels, high side press. Trans
Engine load
Engine rpm
digital input 1, active high
digital input 2, active high
digital input 3, active high
digital input 4, active high
digital input 5, active high
0-3000psi transducer, 0-5v, 0-100% input
0-3000psi transducer, 0-5v, 0-100% input
j1939 signal
j1939 signal
Outputs
Left wheels pump forward control pwm Min cur 0.2a, Max cur 0.9a
Left wheels pump reverse control pwm Min cur 0.2a, Max cur 0.9a
Right wheels pump forward control pwm Min cur 0.2a, Max cur 0.9a
Right wheels pump reverse control pwm Min cur 0.2a, Max cur 0.9a
Turning left indicator, bang bang out
LED indicator along with standard relay
Turning right indicator, bang bang out LED indicator along with standard relay
Step #1
Assure engine rpm is above 1000rpm
Assure high pressure, left wheel system < 2000psi
Assure high pressure, right wheel system < 2000psi
P/N: 021-00154, Rev. A.6 - updated for V4.7 Tools
Page | 160
Step #2
Step #2a
Holding position, wait for operator input for direction.
if joystick is in center position. Stop motion
Then
Left wheels pump, 0% displacement, neither forward/reverse enable
Right wheels pump, 0% displacement, neither forward/reverse enable
if joystick is in forward position. Forward
Then
Left wheels pump, ramp 50% displacement, forward enable
Right wheels pump, ramp 50% displacement, forward enable
Step #2b
if joystick is in back position. Reverse
Then
Left wheels pump, ramp 50% displacement, reverse enable
Right wheels pump, ramp 50% displacement, reverse enable
Step #2c
if joystick is in right position. Turn right
Then
Left wheels pump, ramp 50% displacement, forward enable
Right wheels pump, ramp 50% displacement, reverse enable
Step #2d
if joystick is in left position. Turn left
Then
Left wheels pump, ramp 50% displacement, reverse enable
Right wheels pump, ramp 50% displacement, forward enable
When the flow chart is complete, start the Intella software and define the project, then declare all I/O.
P/N: 021-00154, Rev. A.6 - updated for V4.7 Tools
Page | 161
Now, create the framework for the different bubbles
P/N: 021-00154, Rev. A.6 - updated for V4.7 Tools
Page | 162
Notice the bubbles are directly related to the flowchart steps, now the programmer needs to write code for the
individual bubbles. This is a very simple example, but it gives a demonstration of how the flowchart can be
created and then converted into the bubble logic.
Appendix G
HCT Terminology and Definitions
Always bubble – Time critical logic needs to be contained here because this bubble will be executed based
on the process update time(default 10ms).
Analog Inputs – The state of the input is measured from 0-5vdc. Under the universal Input configuration the
input ranges are (-1 to +1 volt), (0 to 5volts), (0 to 10volts), or (0 to 22mA).
Bang Bang Valve – Discrete function on/off type valve.
Compile – This function (Ctrl-M) will create a .pgm file that will be loaded into the DVC system. Any syntax
errors in the program will be flagged in this step.
Counter Mode Input – Input counts high pulses depending input range, counts would be reset through
program.
Current Regulation - provides for automatic hardware and BIOS based adjustments to maintain the coil
current at the application code’s PWM% setting.
Digital Inputs – The state of the input is either a logical 0 (off) or a logical 1 (on).
Dual Coil High-Side Output- Gives programmer access to (2) PWM high side outputs.
DVC – Digital Valve Controller.
EEMemory - Electronically erasable memory (EE Memory) is memory that is maintained (non volatile) when
there is no power to the DVC5/7/10. EEmemory locations can be used to interface to the compiled, running
DVC program.
Enable Current Ramps - The output current will be ramped up or down based on the ramp times to the LowSide Name setpoint.
Enable Process PI - provides a facility where the application program sets a desired setpoint value and then
continually determines a feedback variable
Input/Output Funcions – Patented feature of HCT, allows programmer to simplify math functions by custom
configuring an output based on a programmable input. Could be used to give a non-linear output of a pump.
High-Side Only Output – Gives programmer access to (2) bang bang high side outputs.
Output Group – The outputs of the DVC module can be configured into 4 groups, Dual Coil High Side, Single
Coil High-Side, Single Coil Low-Side, High-Side Only.
Password (App) – Level 2 Password to limit access to certain screens in the Loader Monitor.
Password (Bios) – Level 3 Password to limit access to certain screens in the Loader Monitor.
Password (Send) – Level 1 Password to limit access to certain screens in the Loader Monitor.
Process Update Time (ms) – Sets the process time from 1 to 20ms. Default is 10ms.
Program Loader Monitor(PLM) – software used to download programs into DVC modules. Also used to
monitor program ‘online’.
Programming Tool – Intella software used to author and modify DVC code.
PWM Duty Cycle Control - The Low-Side Name allows direct PWM control.
PWM Frequency – Controls the frequency output.
PWM (Pulse Width Modulation) – Proportional control 0-100%.
RPM Pulse Input – Input will count pulses, set pulses time out and pulses per rev. Could be used to count
teeth on a gear to determine speed of a driveshaft.
Single Coil Low-Side Output- Gives programmer access to (1) PWM low side output and (2) bang bang high
side valves.
Single Coil High-Side Output- Gives programmer access to (1) PWM high side output and (1) bang bang
high side valves.
System Heartbeat – Controller emits a pulse at a regular interval. Sometimes used to acknowledge a module
is still online and communicating.
Universal Inputs – These inputs can be configured for three types of inputs, Analog Input, RPM Pulse Input,
counter mode or digital input.
P/N: 021-00154, Rev. A.6 - updated for V4.7 Tools
Page | 163
Appendix H
Sensor Manufacture recommendations
Specifications for inputs and output parameters can be located in section 3 Programming the DVC Family
The following list of device manufactures have been used in projects with the DVC family. HCT is not endorcing
the following manufactures, just simply giving the end user a partial list of usable devices.
MTS sensos: http://www.mtssensors.com/ Linear position and liquid-level sensors.
Cherry sensors: http://www.cherrycorp.com/ various switches.
AI-tek sensors: http://www.ai-tek.net/?gclid=CNnZycHF75MCFQEpIgodoWv3Vg speed indicators.
Webtec sensors: http://www.webtec.co.uk/ assorted hydraulic components.
P/N: 021-00154, Rev. A.6 - updated for V4.7 Tools
Page | 164
Appendix I
Frequently Asked Questions
Description: DVC controller goes into programming mode when powered on.
Models Affected: DVC5, DVC7 and DVC10
Background:
The DVC controller is in programming mode when its MS and NS LEDs blink green in an alternating pattern.
When the controller is in normal execution mode the MS and NS LEDs will be solid green, red or not
illuminated.
The DVC controller normally goes into programming mode when the Program Loader Monitor running on your
PC is active, the serial RS232 cable is connected between the PC and the DVC controller, you are attempting
to load an application and the DVC is powered cycled. The DVC, when it is powered cycled looks at the
RS232 lines (RTS specifically) to decide if it should go into programming or normal execution mode. On some
PCs depending on the installed RS232 driver and the last program to access the serial port the RTS line can
be left in a state where the DVC believes it should go into Programming mode even though the Program
Loader Monitor is not running.
Solution:
To insure that this does not happen, disconnect the serial cable from the PC or the DVC controller and power
cycle the DVC. Reconnect the cables, and operate as normal.
Module & Network Status (MS/NS)
Alternating Flashing Green – Device is being programmed
(BIOS or Application Code).
DVC7
Module Status (MS) (R/G)
Off – There is no power applied to the Module.
On green – The module is operating in a normal condition.
Flashing green – Device is in standby state, May need commissioning.
Flashing red – Recoverable Fault.
On red – Module has an unrecoverable fault.
Flashing Red/Green – Device is in self-test.
Network Status (NS) (R/G)
Off – There is no J1939 device (or other DVC5) in the project.
Flashing green – J1939 device in project but communication has not been established.
On green – J1939 communication has been established.
Flashing red – The J1939 communication is in a timed-out state.
On red – The device has detected an error that has rendered it incapable of
communicating on the network.
P/N: 021-00154, Rev. A.6 - updated for V4.7 Tools
Page | 165
Re-Commissioning DVC Master Modules
Introduction
This procedure should be used to regain use of a DVC Master Module (DVC10, DVC7 or DVC5) if the module
Flash Memory becomes corrupt due to a power interruption during a BIOS/Application Program download or
any other reason. The presenting symptoms include a module that will not communicate with a PC or other
modules on the buss and the Module Status (MS) and Node Status (NS) indicators are flashing green
alternately at a one second interval.
There are two procedures listed below as a guide to regaining control of a DVC Master Module. The
procedures are for BIOS / Program Loader Monitor 4.0 and BIOS / Program Loader Monitor 4.2 and higher.
BIOS / PLM Version 4.0
Users must have a working DVC Module to establish RS232 communication with the Program Loader Monitor
(PLM) before reprogramming an Un-Commissioned Master Module. If there is no working module available,
the user must download and use the latest software revision release as well as the procedure for BIOS /
Program Loader Monitor 4.2 and higher.
1.
2.
3.
4.
5.
6.
7.
8.
9.
10.
11.
12.
13.
14.
15.
Connect the PC to a working DVC Module with the DVC using normal procedures and launch the PLM version
4.0.
When communication between the DVC and the PLM has been established, disconnect the working DVC and
connect the non-working DVC.
Within the PLM, Select the DVC10 MASTER switch to open the Main DVC10 Screen. Reference Figure, 1
below.
Within the Main DVC10 Screen Select the Program Loader switch to open the Program Loader Screen.
Reference Figure, 2 and 3 below.
Within the Program Loader screen, select the module to be programmed from the pull down menu in the upper
left hand corner of the screen. Reference Figure, 4 below.
a.
If the Serial Label on the back of the module does not have a box with “REV B” written between the
model number and the serial number, select DVC-10 on the pull down menu.
b.
If the Serial Label on the back of the module does have a box with “REV B” written between the model
number and the serial number, select DVC-10B on the pull down menu.
Cycle Power and wait for the unit to enter programming mode signified by the red indicator on the
programming loader screen turning green and the programming buttons to be active.
Cycle Power again and wait for the unit to enter programming mode signified by the red indicator on the
programming loader screen turning green and the programming buttons to be active.
Select the Load BIOS switch and load the DVC10 BIOS version 4.0.
When the BIOS has finished loading, select the Load Application switch and load an application.
After the Application has loaded Cycle Power.
On the Main Screen, Figure 1 enter the word “victory” into the password field. The password level should
change to 4.
On the Main DVC10 screen, Figure 2, select the Factory Information switch.
On the Factory Information screen in the same pull down menu as was on the Program Loader screen, select
the same DVC10 model that was selected before downloading the BIOS / Program.
Select Send Changes
The unit should now be operational.
P/N: 021-00154, Rev. A.6 - updated for V4.7 Tools
Page | 166
Figure 1
Figure 2
P/N: 021-00154, Rev. A.6 - updated for V4.7 Tools
Page | 167
Figure 3
Figure 4
BIOS / PLM Version 4.2 and Higher
This procedure should be used with PLM version 4.2 and higher.
1.
2.
3.
4.
5.
6.
7.
Within the PLM, Select the DVC10 MASTER switch to open the Main DVC10 Screen. Reference Figure, 1.
Within the Main DVC10 Screen Select the Program Loader switch to open the Program Loader Screen.
Reference Figure, 2 and 3.
Cycle Power and wait for the unit to enter programming mode signified by the red indicator on the
programming loader screen turning green and the programming buttons to be active.
Select the Load BIOS switch and load the DVC10 BIOS version 4.x.
When the BIOS has finished loading, select the Load Application switch and load an application.
After the Application has loaded Cycle Power.
The unit should now be operational.
P/N: 021-00154, Rev. A.6 - updated for V4.7 Tools
Page | 168
How can I program a variable voltage output?
We refer to this capability as a Dan Foss output. We ship DVC controllers with the necessary circuitry
preconfigured. Each output group can be configured as a Dan Foss type when you order the
unit. Should you wish to configure a Dan Foss output to normal PWM output you need to add a resistor and
capacitor.
DVC PWM Pin
+Supply ------1kohm resistor-----O-------4.7k resistor-----O Dan
Foss Output
|
|
| .1 microfarad cap
|
|
|
Ground
PWM Cmd > |
|
.075 ohm
|
|
Ground
P/N: 021-00154, Rev. A.6 - updated for V4.7 Tools
Page | 169
High Country Tek Inc.
208 Gold Flat Court
Nevada City, CA, 95959.
Customer Service
Phone: 1 530 265 3236
www.highcountrytek.com
High Country Tek Inc. was started in 1980 as a high quality
contract electronics manufacturing company and we have grown
over the years to expand not only this aspect of our business, but
also moving into the arena of providing our many successful
customers with innovative and elegant electro-hydraulic control
solutions.
We are able to offer our own cost effective range of dedicated
function, specialty controllers for systems such as Hydraulic fan
drives and mobile generator control, as well as a comprehensive
range of industry leading ruggedized user configurable, digital
modules that can be combined and programmed to realize even the
most difficult and expansive systems.
We initiate and manage both the hardware and software design with
our in-house team of experienced engineering staff from the head
office in Nevada City, CA. and have several industry experienced
Field application engineers placed around the country able to
support and work with you on projects from concept to fulfillment.
High Country Tek Inc. is known for product quality, pioneering
technology and second to none customer service. Please visit our
website ( www.highcountrytek.com ) to see our full product
capabilities or contact us with your immediate or future control
needs, we would be glad to work with you.
Thank you for using High Country Tek Inc. products.
P/N: 021-00154, Rev. A.6 - updated for V4.7 Tools
Page | 170