1
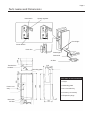
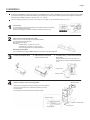
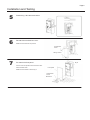
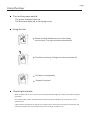
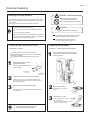
Ardrich
HAND DRYERS
User Manual
MODEL A266DD-(W or S)
AUTOMATIC DUAL JET HAND DRYER
Page 2
WARNING
personal injury accidents will happen if use improperly
Do not open the front panel otherwise...you may get an electric shock.
Prohibited
Do not use in
wet places
Children should not play on the machine.
Do not use in a wet environment which is subject to sprayed water and
the places where the condensation may form. This may cause electric shock
and dryer malfunction.
Do not allow the unit get wet....you may get an electric shock.
Do not modify and disassemble the dryer unnecessarily.
This may cause a fire, electric shock or personal injury.
Rated power is required.
Do not allow the
dryer to get wet
If power tolerance is over +/-10%, there may be breakdown
If using incorrect power supply, fire, electric shock
and machine malfunction may happen.
Please use dedicated power outlet.
If using together with other appliances, the outlet may cause abnormal
heat, leading to fire.
Do not
disassemble
Please comply
with instructions
Ground
WARNING
Power must be cut off when maintenance to prevent the risk of electric shock.
Drain tank and air filter must be installed.
,
If the machine doesn t work or has been subjected to abnormal conditions,
cut off the power to prevent accidents. Ask supplier to check and repair.
The dryer must have a reliable grounding wire to prevent electric shock.
This appliance is not intended for use by persons (including children) with
reduced physical, sensory or mental capabilities,or lack of experience and
knowledge, unless they have been given supervision or instruction concerning
use of the appliance by a person responsible for their safety.
If the cord is damaged, it must be replaced by the manufacturer, its service
agent or similarly qualified persons inorder to avoid a hazard.
For additional protection, the installation of a residual current device (RCD)
having a rated residual operating current not exceeding 30mA is advisable in the
electrical circuit supplying the bathroom. Ask your installer for advice.
Install hand dryers adjacent to wash-basins, out of the way of storage cabinets or
other objects to optimise access and movement around the dryer. In congested
areas, position dryers to ensure good traffic flow between wash-basins and dryers.
If more than one is used, dryers should be placed at least 600 mm apart.
Required Clearances
From dryer to sides walls Minimum of 200 mm
To ceiling or shelf above Minimum of 200 mm
From the dryer bottom to the floor Minimum of 150 mm
Page 3
Parts names and Dimensions
Heat switch
Speed regulator
Check light
Power switch
Drain line
Power light
Drain tank
Air filter
Terminal box
location
Mounting plate
INCLUDED IN THE PACKAGE
1 x Dryer
Power cord
entry
1 x Mounting plate
1 x 2.5 mm Allen key
6 x Screws (12 x 30mm)
6 x Expansion plugs
Drain tank
Air filter
Page 4
Precautions before installing
Do not install in the following types of location, otherwise this may cause malfunction:
Locations where the temperature can exceed -10 C or 40 C.
Locations where the dryer may come into direct contact with water.
Locations where the dryer is under direct or strong sunlight
Locations where there is a lot of condensation.
Locations where corrosive, neutral, or reductive gases are present.
Places lower than - 20m or higher than 2000m above sea level
Installation location
Install somewhere the dryer will be easy to access.
Do not install the dryer too low. The bottom of the dryer must be at least 150 mm higher than the floor.
The either side of the dryer must be at least 200 mm away from any walls.
Avoid locations where people or doors might bump into the dryer.
Choose a completely flat surface on the wall to install the dryer.
Hooks
Mounting plate
Expansion plug
Position of lower holes
Fixing screw
Fixing screws
Page 5
Installation
Fixed wiring installation should be carried out by a qualified person. Power requirements are - 220 -240 Volt AC 50 Hz (1.4kW).
_
+
Connect fixed wiring to the terminals marked L and N and ground. This dryer is a Class I appliance and requires an electrical
earth (ground). Suitable fixed wire conductor size - 1.0 - 2.5 mm2
A drop in voltage is possible if the power cord exceeds 11 m in length, so we recommend using a 2mm2 cord.
1
2
Fixed wiring
For fixed wiring the wire should emerge from the wall at 630mm from the floor
80 mm from left side of the dryer.
Fixed wire emerging from the wall should be not less than 400mm long.
Attach the mounting plate to the wall
Attach the dryer to the wall using the appropriate fastener.
The wall should be reasonably flat.
Use washer(s) to fill gaps.
Wall types:
• Brick/Concrete – Use 6 mm x 40 mm
• Stud/Drywall – Use 6mm x 40 mm screws.
Use 6 mm toggle bolts for dry-wall plaster wall.
Mounting plate height -
For the standard dryer height - 890mm (floor to the bottom of the mounting plate
3
1. Remove the drain tank.
2. Remove the front panel.
Remove the two screws.
3. For fixed wiring - remove the terminal
box cover.
Remove the terminal box cover screw and
remove the cover. Remove the flexible power
cord.
Fixing screw
Wiring access
4
Attach the dryer to the mounting plate.
Mounting plate
If fixed wiring is used pull the fixed wire through the wiring aparture
from the rear of the dryer, then attach/hook the dryer onto the
mounting plate.
Secure the dryer to the wall with the two bottom screws.
Hooks
Expansion plug
Position of lower holes
Fixing screws
Fixing screw
Page 6
Installation and Testing
5
6
Fixed wiring - Wire the terminal box
Re-attach the terminal box cover.
Make sure the wires are not pinched.
Terminal box
screw
Wiring access
7
Re -attach the front panel.
Dryer
Put the cover into position and fit the two screws.
Attach the drain tank.
Front panel
Make sure the air filter is all the way in.
Terminal box
screw
Drain tank
Page 7
Using the dryer
Turn on the power switch.
The power indicator lights up.
The blue lamp lights up in the drying cavity.
Using the Unit
Stretch out both hands and move them slowly
into the dryer. The dryer will start automatically.
Pull them out slowly, letting the air blow the water off.
Pull them out completely.
Repeat if required.
Check Light Indicator
When a malfunction or error occurs, the check light will either light up or flash (lower left front panel,
right side).
Turn off the power switch, wait about 40 seconds until all the indicators go off, then turn on the
power switch.
If the indicator still lights up or flashes, turn off the power, disconnect the dryer from the power and
contact your dealer. If the check light remains off, the dryer is ready to use.
Page 8
Routine Cleaning
WARNING
Cleaning the dryer exterior
Before you clean the dryer
turn off the power switch.
Do not splash water on the dryer.
Clean the dryer with a soft cloth.If the unit gets very dirty, clean
with a soft cloth dampened with neutral agent, then clean with a
dry soft cloth.
Remove the dirt from the sensor to prevent malfunction.
Caution
Only use the neutral cleaning agents.
Do not use thinners, acidic or alkaline toilet cleaners
Wear gloves when cleaning.
Do not use a abrasive cleaners.
Note
Alcohol may be used to clean the hand drying cavity area.
Do not use alcohol anywhere else. Alcohol is intended for
disinfection (concentration below 83%).
The antibacterial coating is effective when
bacteria is exposed the coated surfaces
The antibacterial coating becomes
ineffective when surfaces get dirty.
Draining and cleaning the tank
Cleaning the air filter
Frequency - weekly
Frequency - Generally required weekly
The water blown off hands is called ー drain water.
Empty the drain water at any time, to prevent accumulated
water from overflowing.
Accumulated water may smell if left too long in the tank.
1
2
3
1
Pull the drain tank out in the
horizontal direction.
This ensures the drain water
does not spill.
Open the tank cover and empty the water.
Pull the cover up with your fingers in the direction
of the arrow on the top of the cover and then remove
the cover completely.
Wash out the interior of the drain tank.
Close the tank cover and slide the drain tank back
into the dryer.
2
3
If you wash the air filter with water
ensure it is dry before refitting.
Note
Open the side panel with the allen key,
Use a cloth to regularly wipe and clean
drainage routes.
Remove the air filter
Pull the air filter out by the
handle.
Cleaning the air filter
Beat lightly by hand or use a
vacuum cleaner.
If very dirtywash with warm water.
Place back into the dryer.