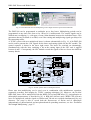
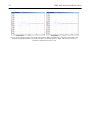
1
High Performance
Photon Counting
User Manual
NUV and Blue
ps Diode Lasers
Designed and manufactured
in cooperation with
Becker & Hickl GmbH
BDL-SMC Picosecond Diode Lasers
1
’Tel.
+49 / 30 / 787 56 32
FAX
+49 / 30 / 787 57 34
http://www.becker-hickl.com
email: [email protected]
Becker & Hickl GmbH
High Performance
Photon Counting
BDL-375-SMC
BDL-405-SMC
BDL-440-SMC
BDL-473-SMC
NUV and Blue Picosecond Diode Lasers
Picosecond pulsed operation or CW operation
Free-beam operation or coupling into optical fibre
Correction of beam-profile and astigmatism
High power density in focused spot
60% of power delivered into single-mode fibre
Compatible with all commonly used fibre couplers
Repetition rate from 20 MHz to 80 MHz
Wavelengths of 375 nm, 405 nm, 440 nm, and 473 nm
Fast on/off control, multiplexing capability
Excellent timing stability
All driving and control electronics integrated
Simple +12V power supply
Compatible with the bh TCSPC systems
Designed an manufactured in cooperation with
2
BDL-SMC Picosecond Diode Lasers
Becker & Hickl GmbH
Nahmitzer Damm 30
12277 Berlin
Germany
Tel. +49 / 30 / 787 56 32
FAX +49 / 30 / 787 57 34
http://www.becker-hickl.com
email: [email protected]
LASOS Lasertechnik GmbH
Carl-Zeiss-Promenade 10
07745 Jena, Germany
Tel. +49 3641 2944-0
Fax +49 3641 2944-17
[email protected]
www.lasos.com
1st Edition, May 2006
This manual is subject to copyright. However, reproduction of small portions of the material in
scientific papers or other non-commercial publications is considered fair use under the copyright
law. It is requested that a complete citation be included in the publication. If you require
confirmation please feel free to contact Becker & Hickl.
BDL-SMC Picosecond Diode Lasers
3
Contents
Overview............................................................................................................................................................................. 4
General Description ............................................................................................................................................................ 5
System Components ....................................................................................................................................................... 5
Status Indicators, Connectors and Controls.................................................................................................................... 5
Laser Switch Box ........................................................................................................................................................... 6
Operating the BDL-SMC Lasers......................................................................................................................................... 7
Free-Beam Operation ..................................................................................................................................................... 7
Fibre Coupling ............................................................................................................................................................... 8
Alignment of Point-Source Coupler .......................................................................................................................... 8
Alignment of OZ Optics Coupler ............................................................................................................................ 10
Trigger Output.............................................................................................................................................................. 11
Control Inputs .............................................................................................................................................................. 13
Software Control of the Laser Power ........................................................................................................................... 14
Laser OFF Signal ......................................................................................................................................................... 14
TCSPC Systems with the BDL-SMC Lasers................................................................................................................ 16
Multiplexing Lasers...................................................................................................................................................... 16
Laser Safety.................................................................................................................................................................. 18
Understanding Picosecond Diode Lasers.......................................................................................................................... 20
Picosecond Operation of Laser Diodes ........................................................................................................................ 20
Average Power and Peak Power .................................................................................................................................. 21
Pulse Shape .................................................................................................................................................................. 22
Application to Fluorescence Lifetime Spectroscopy......................................................................................................... 24
Fluorescence Lifetime Experiments ............................................................................................................................. 24
Autofluorescence of Tissue .......................................................................................................................................... 25
Recording Chlorophyll Transients ............................................................................................................................... 26
Excitation Wavelength Multiplexing............................................................................................................................ 27
Laser Scanning Microscopy ......................................................................................................................................... 29
Fluorescence Correlation Spectroscopy (FCS)............................................................................................................. 30
Specification ..................................................................................................................................................................... 33
BDL-375-SMC............................................................................................................................................................. 33
BDL-405-SMC............................................................................................................................................................. 34
BDL-440-SMC............................................................................................................................................................. 35
BDL-473-SMC............................................................................................................................................................. 36
Connector Pin Assignment, all BDL Lasers................................................................................................................. 37
Dimensions................................................................................................................................................................... 38
References......................................................................................................................................................................... 39
Index ................................................................................................................................................................................. 40
4
BDL-SMC Picosecond Diode Lasers
Overview
The BDL-375-SMC, BDL-405-SMC, BDL-440-SMC and BDL-473-SMC lasers emit at typical
wavelengths of 375 nm, 405 nm, 440 nm, and 473 nm, respectively. The lasers can be switched
between picosecond pulse operation and CW operation.
In the picosecond mode, pulse repetition rates of 20 MHz, 50 MHz, and 80 MHz can be selected.
The pulse width is in the range of 40 ps to 90 ps, the CW-equivalent power between 0.2 and
1.5 mW. The high repetition rate and the short pulse width make the BDL-SMC lasers ideally suited
for time-correlated single photon counting (TCSPC) applications [8, 9].
In the CW mode an output power of up to 40 mW is available. The lasers can thus be used for a
number of applications that require both continuous excitation at high power and excitation with ps
pulses. Typical examples are single-molecule experiments by fluorescence correlation, antibunching and burst-integrated fluorescence lifetime or multi-parameter-spectroscopy [11, 13, 21].
By switching between CW and ps operation, these techniques can be applied to the same sample or,
in some cases, even to the same molecules.
All BDL-SMC lasers come with a beam corrector that corrects both for beam shape and
astigmatism. The lasers are compatible with all commonly used single-mode fibre couplers. Due to
the excellent correction of the beam up to 70% of the laser power can be coupled into a single-mode
fibre. Thus, high laser power can be focused into a diffraction limited spot. The lasers are thus
excellent excitation sources for single-molecule spectroscopy and time-resolved laser scanning
microscopy.
The BDL laser modules have a TTL controlled shutdown input that can be used to switch the laser
off and on within a time of 1 us. Thus, lasers of different wavelength can be multiplexed at
microsecond periods. In laser scanning microscopes the shutdown function is used to switch off the
laser during the line and frame flyback.
The BDL-SMC lasers are operated from a simple wall-mounted +12 V power supply. The complete
control and driving electronics is contained in the laser module. The design of the BDL-SMC lasers
results in exceptionally low RF noise radiation and low timing drift between the electrical trigger
output and the light pulses.
BDL-SMC Picosecond Diode Lasers
5
General Description
System Components
The BDL-SMC laser is shown in Fig. 1. The power supply module is shown left. It is a simple wallmounted +12V stabiliser. Fig. 1, middle shows the laser switch box. The box contains the key
switch mandatory for class 3B lasers, and a switch to select between three pulse frequencies and
CW operation. Input connectors for control signals are located at the back of the switch box. Via the
control connectors, the laser can switched on and off at µs rate (see Fig. 15, page 15). Moreover, the
laser power can be controlled by an analog signal of 0 to 10V, and the frequency can be switched by
external TTL signals (see ‘Control Inputs’, page 13).
Fig. 1: BDL-SMC laser. Left: Wall mounted power supply. Middle: Switch box with safety key, switch for
frequency and CW / pulsed operation and control signal inputs. Right: Laser module containing the complete
driving and control electronics.
Fig. 1, right, shows the laser module. It contains the complete pulse generator and driver electronics,
the control electronics and an the active temperature stabilisation of the laser diode. The diode itself
is mounted on a peltier cooler inside the laser module. The beam profile corrector is attached to the
outside of the laser housing. The front end of the corrector has threaded holes that fit to the standard
1” pitch of the commonly used fibre couplers or manipulators. Fig. 1 shows the BDL-SMC laser
with a fibre manipulator from Point Source, UK.
Status Indicators, Connectors and Controls
The back panel of the laser head is shown in Fig. 2. The left LED indicates that the laser is active.
The LED flashes when the power of the laser is on and the ‘/Laser Off’ signal is ‘high’ or
unconnected. The other two LEDs show the status of the cooler of the laser diode. The right LED is
on when the cooling of the laser diode is active. It may turn off after some time of operation when
the diode has been cooled down and almost no cooling power is required to hold it at constant
temperature. The red LED in the middle turns on when the cooling power is high. It normally turns
off after some minutes of operation.
The 15-pin sub-D connector connects the power supply and control signals from the laser switch
box to the laser. The lasers are delivered with appropriate connecting cables, so that user access to
the 15 pin connector is not normally needed. For pin assignment please see page 37.
6
BDL-SMC Picosecond Diode Lasers
Fig. 2: Back panel of the BDL-SMC laser
A trigger output signal is available at an SMA connector. The shape of the signal is shown in Fig.
10, page 11. Depending on the laser power, he amplitude of the synchronisation signal may vary
between about 100 and 300 mV.
There are two potentiometers at the back of the laser module. The ‘Power’ adjust changes the
operating voltage of the driving generator. The ‘Bias’ adjust changes the bias voltage of the laser
diode. Higher voltage and higher (positive) bias give higher output power. The best pulse shape is
obtained with minimum (negative) bias and high driving power. Please see also ‘Picosecond
Operation of Laser Diodes’, page 20.
Please note that the power of the BDL-SMC lasers can also be changed by an analog input signal.
By using the DCC-100 detector controller card of the bh TCSPC systems [3, 9] the laser power can
be controlled per software, see Fig. 14, page 14. Controlling the power per software is not only
more convenient than turning a potentiometer but also makes it easier to restore previously used
settings.
Laser Switch Box
The laser switch box is shown in Fig. 3. The box contains the mandatory laser safety elements of
class 3B lasers: a key switch and emission indicators. Laser action is indicated by four LEDs of
different coulour, at least one of them being visible through any laser safety eyewear. The ‘Laser
Off’ LED shows the status of the laser on/off signal.
Fig. 3: Laser switch and connection box
The connectors for the control signals are shown in Fig. 3, right. There are two SMA connectors,
one for the on/off signal and one for the analog power control signal. The same signals can be
connected to a 15 pin sub-D connector. This connector has also inputs for switching between 20, 50,
and 80 MHz, and CW operation. Please note that the frequency switch must be in the ‘CW’ position
when electronic frequency control is used. For pin assignment and signal specification, please see
‘Control Inputs’, page 13.
The 15 pin connector at the laser side can be used as a ‘remote interlock connector’. The connector
can be pulled off or plugged in at any time without causing damage to the laser.
BDL-SMC Picosecond Diode Lasers
7
Operating the BDL-SMC Lasers
Free-Beam Operation
The BDL-SMC lasers can be used both in free-beam or fibre coupled systems. For free-beam
operation the lasers are used without a fibre coupler attached, see Fig. 4.
Fig. 4: Free-beam operation of the BDL-SMC laser
The beam diameter is about 0.7 mm. The beam profile at 1 m distance from a BDL-405-SM laser is
shown in Fig. 5. The definition of the profile improves with increasing power. Because of the high
peak power in the pulsed mode the beam profile is slightly better than in the CW mode.
Fig. 5: Beam profile in 1m distance from the laser. BDL-405-SMC, CW mode, 30 mW
The collimator and beam correction optics of the BDL-SMC lasers is aligned during manufacturing.
Once the optics are aligned the elements are fixed in place permanently. Therefore, please do not
attempt to change anything in the optics of the laser. If you need focusing, other beam diameters, or
other beam shape, please use external optics. The intensity distribution in the focus of a 200-mm
lens is shown in Fig. 6.
Fig. 6: Intensity distribution in the focus of a 200-mm lens. BDL-405-SMC, CW mode, 30 mW
8
BDL-SMC Picosecond Diode Lasers
Fibre Coupling
Optical fibres consist of a core with high index of refraction and a cladding with lower index of
refraction. The light is kept inside the core of the fibre by total internal reflection. Optical fibres
come in two different versions - multi-mode fibres and single-mode fibres.
Multi-mode fibres have diameters from typically 50 µm to 1 mm. Any light within a given input
cone is transferred to the output. Coupling light into a multi-mode fibre is therefore relatively easy.
However, rays of different angles to the optical axis have different optical path lengths and,
consequently, different transit times. Therefore a light pulse coupled into a multi-mode fibre spreads
out in time. For a fibre of 1m length illuminated at maximum numerical aperture the transit time
spread is on the order of 100 ps. The transit time spread is independent of the diameter of the fibre
[14]. The second drawback of multi-mode fibres is that the light leaves the end of the fibre from the
whole cross section of the core, and within a cone of large angle. Focusing the light from the fibre
into a small spot, at best, yields a de-magnified image of the core cross section. A diffractionlimited spot cannot be obtained.
Single-mode fibres have core diameters on the order of 3 µm. Because of the small diameter only a
single wave mode is transmitted through the fibre. Coupling into a single-mode fibre is difficult not
only because of the small diameter but also because of the relatively small angle of the input light
cone. However, the light leaves the fibre output as a single wave mode. That means, the light
virtually comes from an infinitely small spot. Light transmitted by a single-mode fibre can therefore
focused into a diffraction-limited spot. Moreover, because only a single wave mode is transmitted,
there is virtually no transit time spread.
Because of the superior features of single-mode fibres the BDL-SMC lasers are available with
single-mode fibre coupling. The lasers are compatible with almost any of the commonly used
single-mode fibre couplers.
Alignment of Point-Source Coupler
The fibre-coupling system of Point Source Ltd., UK, uses special fibres that have a focusing lens
permanently attached to the fibre input. Both the lens and the fibre are assembled in a cylindrical
adapter that is inserted into a fibre manipulator, see Fig. 7. The Point-Source system thus avoids any
alignment at the sub-µm scale [20]. The result is high efficiency and extraordinarily good long-term
stability. Due to the good long-term stability commercial laser scanning microscope almost
exclusively use the Point Source system.
The fibre manipulator has four adjustment screws, A1, A2, B1 and B2. Inside the manipulator, the
fibre input adapter is pressed against the alignment screws by a spring-loaded counter-bearing.
Thus, the fibre adapter can both be shifted and tilted by turning the adjustment screws. Under
normal use, e.g. after removing and re-inserting the fibre, only fine adjustments are required. It is
then sufficient to adjust the front screws, A2 and B2, for maximum image intensity. Do not turn the
screws by more than 1/2 turn. Once the manipulator is totally misaligned you have to go through the
complete alignment procedure.
BDL-SMC Picosecond Diode Lasers
9
Fig. 7: Front end of the BDL-405SM laser. Beam profile corrector, fibre manipulator with alignment screws,
input adapter of the single-mode fibre, and alignment tool.
The complete alignment procedure is illustrated in Fig. 8. For the first steps an alignment tool is
required, see Fig. 7. The tool is a tube which has a pinhole in the optical axis.
Step 1:
Step 4:
adjust A1 and B1
B1
adjust A1 and B1
insert alignment tool
this side first
B1
insert fibre
A1
A1
Step 2:
adjust A1 and B1
B2
Step 5:
adjust A1 and A2
turn screws in same direction
insert alignment tool
this side first
A1 A2
A2
Step 6:
adjust B1 and B2
turn screws in same direction
Step 3: Repeat step 1
adjust A1 and B1
B1
insert alignment tool
this side first
B1
B2
A1
Fig. 8: Steps of the alignment procedure
To align the fibre coupler, proceed as follows [20]:
1) Insert the alignment tool as indicated in Fig. 8 and adjust A1 and B1 for maximum throughput.
2) Reverse the alignment tool and adjust A2 and B2 for maximum throughput.
3) Repeat step 1. After step 3 the optical axis of the fibre manipulator is aligned with the axis of
the laser beam.
4) Insert the fibre. Adjust A1 and B1 for maximum output intensity.
5) Adjust A1 and A2 for maximum intensity. This step is a lateral shift of the optical axis.
Therefore turn both screws in the same direction until you find the setting that yields maximum
intensity.
6) Adjust B1 and B2 for maximum intensity. This step is a lateral shift of the optical axis.
Therefore turn both screws in the same direction until you find the setting that yields maximum
intensity.
10
BDL-SMC Picosecond Diode Lasers
Alignment of OZ Optics Coupler
The OZ Optics coupler consists of two plates, separated by a resilient O ring. The plate holding the
fibre receptacle is tilted against the laser head adapter by three screws, 1,2,3, see Fig. 9, left. The
laser head adapter contains a lens that focuses the laser beam into the core of the fibre. By adjusting
the three screws one can move the core of the fibre laterally with respect to the focus [19]. To adjust
the focus longitudinally the connector of the fibre has a differential thread, see Fig. 9, right. When
the adjustment is complete the front plate is locked against the base plate by tightening the lock
screws, a, b, c. The longitudinal focus adjustment is locked by tightening the focus lock nut, see Fig.
9, right.
Focus
lock
Focus
adjustment
Fig. 9. Left: OZ Optics coupler, with adjustment screws, 1,2,3, and lock screws, a, b, c. Right: Fibre connector
with focus adjustment
For fine adjustment it is normally sufficient to loosen the lock screw a, b, c, by a quarter turn and
turn the adjust screws, 1,2,3, until maximum intensity is transmitted through the fibre. Then tighten
the lock screws one after another in small steps, see below, alignment step 14.
If the coupler is totally misaligned so that no light is transmitted through the fibre, proceed as
described below [19].
7) Without a fibre, examine the output on a sheet of paper. If the image on the screen is not
centred, adjust the lateral position of the focusing lens with respect to the laser beam. To do this,
loosen the tilt adjustment screws, 1,2,3, by about half a turn, and apply lateral pressure to the
side of the coupler flange. This will shift the lateral position of the coupler flange with respect to
the laser head adapter. Once the image has been centred, tighten the tilt adjustment screws to
their original position.
8) Insert a multi-mode fibre of a core diameter of 50 to 100 µm. Observe the transmitted light on a
sheet of paper. Make sure that the lock screws, a, b, c, are not pressing against the base plate.
Adjust the tilt screws, 1,2,3, until you obtain maximum intensity and a symmetrical intensity
pattern on the paper.
9) Tighten the tilt screws evenly, while maintaining maximum intensity and a symmetrical
intensity pattern. No more than 1.27 mm (0.05”) space should be left between the base adapter
and the coupler flange.
10) Remove the multi-mode fibre and put in the single-mode fibre. At least a small amount of light
should be transmitted through the fibre. Adjust the tilt screws, 1,2,3, until you obtain maximum
throughput. Important: The Airy disk pattern in the focus of the lens may have secondary
maxima. If the throughput is unacceptably low, make sure that you are in the central peak of the
Airy disk.
11) Adjust the focus by rotating the focus adjustment of the fibre connector. It may be necessary to
readjust the tilt screws.
BDL-SMC Picosecond Diode Lasers
11
12) Once the best focus is achieved, tighten the nut that locks the focus adjustment.
13) Turn in the three lock screws, a, b, c until the just make contact with the laser head adapter.
14) Tighten the lock screws by an additional quarter turn. If the throughput drops, adjust the lock
screws slightly until optimum coupling efficiency is restored.
Trigger Output
TCSPC measurements require a timing reference signal from the laser [8, 9]. To minimise timing
drift the BDL-SMC lasers derive a trigger signal directly from the laser diode. The electrical pulse
shape is shown in Fig. 10.
Fig. 10. Left and middle: Electrical pulse from the trigger output, 50 mV/div., left 10 ns / div., middle 2 ns/div.
Recorded with Tektronix TDS 3052 Oscilloscope. Right: A-PPI pulse inverter
The polarity of the trigger pulse is positive. To connect the pulse into the SYNC input of a bh
TCSPC module, please use an A-PPI pulse inverter, see Fig. 10, right. The adapter is delivered with
all bh TCSPC modules.
The time difference between the trigger pulse and the light pulse is less than 1 ns and does not
change appreciably for different output power and for different repetition rate. The shift of the light
pulse with the power referred to the trigger pulse is shown in Fig. 11. The repetition rate was 50
MHz, the power was varied between 0.3 mW and 1.3 mW. The total shift with the power is about
200 ps.
Fig. 11: Shift of the light pulse with the output power referred to the trigger pulse. Left to right: Power 0.3 mW,
0.5 mW, 0.8 mW and 1.3 mW. Recorded with bh SPC-730 TCSPC module [9] and Hamamatsu R3809U MCPPMT [12].
When using the BDL-SM lasers in conjunction with the bh TCSPC modules please keep in mind
that the TCSPC modules use reversed start stop. Reversed start-stop operation of TCSPC requires a
reference pulse at the end of the signal period or, better, at the end of the recorded time interval
12
BDL-SMC Picosecond Diode Lasers
[8, 9]. At the high repetition rate of the BDL-SMC lasers the next laser pulse is no more than 50 ns
away so that a reasonable recording is achieved without problems. However, it is not always clear
which laser pulse actually stops the time measurement. It can happen that the stop pulse is not the
same laser pulse that excited the detected photon but a pulse from a period before or after. Stopping
with a pulse from a different period is no problem if the laser pulses have a constant period and no
pulse-to-pulse jitter. The BDL-SMC lasers have, however, selectable pulse periods. Moreover, the
clock oscillator of a diode laser may have a pulse-to-pulse jitter of some 10 ps. If the reference
pulses come from the wrong signal period the position of the recorded signal in the TAC range
changes when the laser period is changed. Moreover the pulse-to pulse jitter adds to the transit time
spread of the TCSPC system.
To stop the TAC with the correct laser pulse, the reference signal should be delayed so that the
reference pulse arrives after a photon pulse from the same period [8, 9]. The correct delay in the
reference channel is the detector transit time, plus the width of the recorded time interval, plus a few
ns for the TAC start delay. The relation of the detector and reference delay is shown in Fig. 12.
Fluorescence
Laser
Time
Detector transit time
Reference pulse
from laser,
undelayed
Time interval to be recorded
Photon pulses from Detector
Time
Delay to be inserted in reference channel
Previous
reference pulse,
delayed
Delayed
reference
pulse
TAC stop
Time
Fig. 12: Reversed start-stop should be used with a delay in the reference channel to stop the TAC with the
correct laser pulse [9]
Typical signal transit times of detectors are
MCP PMTs
Hamamatsu R7400 TO-8 PMTs
Hamamatsu H5783 photosensor modules
bh PMC-100 detector module
30 mm side-window PMTs
XP 2020 linear focused PMTs
1 ns
5 - 6 ns
5 - 6 ns
5 - 6 ns
25 ns
25 ns
A good stop delay to start with is 15 ns or 3 m cable for an MCP PMT and 25 ns or 5 m cable for
TO-8 PMTs. Please see [9] for details.
BDL-SMC Picosecond Diode Lasers
13
Control Inputs
The control input connectors at the switch box are shown in Fig. 13.
Fig. 13: Control inputs
The pin assignment of the external control connector is
1
not connected
9
2
Frequency 20 MHz
10
3
Frequency 50 MHz
11
4
Frequency 80 MHz
12
5
GND
13
6
not connected
14
7
/Laser Off
15
8
not connected
not connected
not connected
not connected
Power / Bias, 0 to +10 V
not connected
not connected
GND
Pin 2,3,4, Frequency select pins
Frequency select pins, CMOS compatible. The laser works at the selected frequency when the
corresponding pin is at ‘high’ or open and the other pins are at ‘low’ or connected to ground.
Important: The frequency select pins are connected in parallel to the frequency select switch. They
can only be used when the frequency select switch is in the ‘CW’ position. In all other positions of
the switch the pin corresponding to the frequency selected is connected to ground. Please make sure
that the source of the control signals connected to pin 2, 3 and 4 is short-circuit proof.
Pin 5, Ground
Reference pin for all signals and power supply ‘-’ pin.
Pin 7, /Laser Off
Connecting this pin to TTL/CMOS ‘Low or’ GND switches the laser off. The laser beam is shut
down and the trigger output becomes inactive. After disconnecting the pin from GND or switching
to TTL/CMOS ‘high’ the laser resumes normal operation (see Fig. 15). Leave the pin open if you
want the laser to run continuously. Please notice that the laser does not deliver trigger pulses when it
is switched off by /Laser Off = ‘low’. For bh TCSPC modules this is no problem. However, if the
/Laser Off signal is pulsed at high rate the SPC module will display an average SYNC rate, i.e. a
rate lower than the frequency selected by the frequency selection switch.
The /Laser OFF signal can also be connected to an SMA connector, see Fig. 13. The SMA input is
connected in parallel with pin 7 of the sub-D connector.
14
BDL-SMC Picosecond Diode Lasers
Pin 12, Power / Bias
An input voltage applied to pin 12 changes the bias of the laser diode. The voltage can be in the
range of 0 V to +10 V. The output power increases with the voltage. The Power / Bias signal can
also be connected to an SMA connector, see Fig. 13. The SMA input is connected in parallel with
pin 12 of the sub-D connector.
Pin 15, Ground
Reference pin for all signals and power supply ‘-’ pin.
Software Control of the Laser Power
The ‘Power / Bias’ input can be used for electronic power control of the BDL-SMC lasers. The
power control signal is connected either to an SMA connector or to pin 12 of a 15-pin connector,
both located at the back of the laser switch box. Controlling the laser power electronically is
particularly convenient in TCSPC systems that use the bh DCC-100 detector controller [3], see Fig.
14, left.
Fig. 14. Left: DCC-100 detector controller card. Right: DCC-100 software panel
Fig. 14, right shows the software control panel of the DCC-100. The ‘Connector 1’ channel is used
to control the power of the laser, while ‘Connector 3’ controls the detector. The ‘b7’ bit of the
digital outputs (‘Connector 2’) is used to switch the laser on and off.
Laser OFF Signal
The BDL-SMC lasers can be switched on and off by applying a TTL/CMOS signal to pin 7 of the
sub-D connector. TTL Low or connecting the pin to GND switches the laser off. The ‘/Laser OFF’
signal works both in the picosecond mode and in the CW mode. The reaction times are typically
/Laser OFF low to emission on
/Laser OFF high to emission off
ps mode
< 1 µs
< 100 ns
CW mode
3 µs
3 µs
The on-off behaviour is shown in Fig. 15. The curves were recorded by a pin photodiode connected
to a Tektronix TDS 3052 oscilloscope. Important: If you want to test the switching behaviour, apply
a reverse bias to the photodiode and switch the oscilloscope to an input impedance of 50 Ω. To
obtain sufficient signal amplitude at 50 Ω it may be necessary to use an avalanche photodiode.
BDL-SMC Picosecond Diode Lasers
15
Fig. 15: On/Off behaviour of the BDL-SMC laser. Left to right: CW mode, 20 MHz, 80 MHz. Upper trace laser
intensity, lower trace /Laser OFF signal. Recorded with avalanche photodiode connected to Tektronix TDS 3052.
Time scale 4 µs per division.
The variation of the shape of the laser pulses after the off/on transition is shown in Fig. 16. 40 µs
TTL high pulses were applied to the /Laser OFF input, and the sequence was accumulated in the
Scan Sync Out mode of an SPC-830 TCSPC module for 105 on/off transitions [9]. The photons
were detected by an R3809U-52 MCP-PMT [12]. Each curve of the sequence represents an interval
of 500 ns. As can be seen from Fig. 16, right, the pulse shape is stable after 2 µs. The shift of the
pulses within the first 2 µs is less than 30 ps.
Fig. 16: Transient pulse shape variation of the BDL-SMC lasers after transition from /Laser OFF = low to
/Laser OFF = high. 40 µs TTL high pulses were applied to the ‘/Laser OFF’ input. Repetition rate 50 MHz.
SPC-830 TCSPC module with R3809U MCP-PMT, triggered sequential recording in Scan Sync In mode. Each
curve of the sequence represents an interval of 500 ns. Left: Curve plot. Right: Contour plot.
16
BDL-SMC Picosecond Diode Lasers
TCSPC Systems with the BDL-SMC Lasers
A wiring diagram of a TCSPC system with a BDL-SMC laser, a PMC-100 detector, a DCC-100
detector controller, and an SPC TCSPC module is shown in Fig. 17.
power
’on’
PMC Power supply
& ovld cable
Detector
DCC-100
3
’Trigger’ A-PPI
Delay
5m
BDL-SMC
2
’CFD’
PMC-100
Laser
1
’SYNC’
SPC module
Laser
power supply
+12V
Fig. 17: Connection diagram of a TCSPC system with a BDL-SMC laser, a PMC-100 detector, a DCC-100
detector controller and an SPC module
The DCC-100 module controls both the laser and the detector. The laser power can be changed via a
control signal from connector 1 of the DCC-100. The emission is switched on and off via connector
1 (see also Fig. 14).
The trigger output pulses of the lasers are inverted by an A-PPI pulse inverter and fed into the
SYNC (stop) input of the SPC module. A cable of 5 m length is used to place the stop pulse after
the photon pulses originating from photons detected in the signal period of a particular trigger pulse
(see Fig. 12).
A PMC-100 detector is used to detect the light from a sample. The PMC-100 is controlled via
connector 3 of the DCC-100. The DCC-100 controls the gain of the detector, provides the power
supply for the internal preamplifier, high-voltage generator, and cooler of the PMC-100. In case of
overload, the DCC-100 shuts down the high voltage of the PMT of the PMC-100.
The single-photon pulses of the PMC-100 are fed into the CFD (start) input of the SPC module.
A large number of modifications of the TCSPC setup are possible. The detector may be replaced
with an ultra-fast R3809U MCP PMT, with a single-photon avalanche photodiode, or with a multispectral detector assembly. For recording fluorescence lifetime images, the TCSPC system may
also be connected to a laser scanning microscope, see ‘Laser Scanning Microscopy’, page 29. For
details please see [9].
Multiplexing Lasers
By controlling several lasers via their /Laser OFF inputs the lasers can be multiplexed at periods
down to the microsecond range. Normally laser multiplexing is used in conjunction with
multiplexed TCSPC operation [8, 9]. That means, the routing signal inputs of the TCSPC module
are used to direct the photons of the individual lasers into separate photon distributions.
To simplify the generation of the multiplexing and routing signals the DDG-200 digital delay
generator card is available, see Fig. 18. The card is controlled via the software panel shown in Fig.
18, right.
BDL-SMC Picosecond Diode Lasers
17
Fig. 18. Left: DDG-200 card for multiplexing control. Right: Software panel of the DDG-200
The DDG-200 can be programmed to multiplex up to four lasers. Multiplexing periods can be
programmed at any time scale from a few 100 ns to 10 milliseconds. The control signals can be
defined non-overlapping, i.e. with gaps of some 100ns duration between the individual lasers. This
guarantees that any crosstalk is avoided, even if the routing and multiplexing signals get delayed in
the connecting cables.
A TCSPC system with two multiplexed lasers is shown schematically in Fig. 19. A bh DDG-200
card is used to generate the ‘ON’ signals for the lasers and routing signals for the SPC module. The
control sequence is shown in the lower right corner. The lasers are switched on alternatingly.
Simultaneously with the laser switching, a bit at the routing input of the SPC card is toggled
between 0 and 1. Consequently, the SPC module records the signals of the two lasers into different
memory blocks.
Laser power
control
Detector
DCC-100
PMC Power supply
& ovld cable
PMC-100
’CFD’
Delay
5m
’Routing’
A-PPI
Power
combiner
’Trigger’
’on’
DDG-200
Laser
power supply
Control sequence:
Routing
’Trigger’
’on’
SPC module
power
BDL-SMC
or BHLP
BDL-SMC
or BHLP
’SYNC’
power
1
0
1
’ON’
Laser 1
Laser
power supply
’ON’
Laser 2
Fig. 19: TCSPC system with two multiplexed lasers
Please note that multiplexing can be used even in combination with multidetector operation,
sequential recording, and imaging by TCSPC scanning techniques [9]. Moreover, the bh blue
BDL-SMC lasers can be multiplexed with the BHLP-700 red and NIR lasers [5]. An application to
chlorophyll measurements is described in [8]. A BDL-405 (405 nm) and a BHLP-700 (650 nm)
laser are multiplexed, and the signals at 540 nm and 700 nm are recorded simultaneously by two
detectors. The setup is able to record both the fluorescence of flavins and of chlorophyll
independently of photochemical and non-photochemical quenching transients, see also ‘Excitation
Wavelength Multiplexing’, page 27.
18
BDL-SMC Picosecond Diode Lasers
Laser Safety
The BDL-SMC lasers are class 3B laser products. The laser safety regulations dictate that the lasers
be labelled with the stickers shown in Fig. 20, and that the labels and the location of the labels on
the lasers be described in the manual. The laser class is indicated on the laser by an ‘explanatory
label’, Fig. 20, left. The laser aperture is marked with the aperture labels, Fig. 20, middle and right.
/$6(5/,*+7
$92,'(;32685(72%($0
&/$66%/$6(5352'8&7
400-700 nm
CW/P.R.F. 20 MHz - 100 MHz see manual
<5W peak (<1ns), <0.5 W average power AEL
CLASSIFIED PER IEC 60828-1 Ed. 1.2, 2001-08
Fig. 20. Left to right: Explanatory label, aperture labels.
Moreover, each laser has a manufacturer identification, as shown in Fig. 21.
Becker & Hickl GmbH
Nahmitzer Damm 30, 12277 Berlin, Germany
www.becker-hickl.com
BDL-405-SMC Picosecond Diode Laser
405 nm, CW / 20 / 50 / 80 MHz, S/N 95 1015
Manufactured: December 2005
Complies with FDA performance standards for laser products except
for deviations pursuant to Laser Notice No. 50, dated July 26, 2001
Fig. 21: Manufacturer identification label
The position of the labels on the laser modules is shown Fig. 22.
Fig. 22: Location of the labels on the lasers
Laser safety regulations forbid the user to open the housing of the laser, or to do any maintenance or
service operations at or inside the laser. Use of controls or adjustments or performance of
procedures other than specified herein may result in hazardous radiation exposure or damage to the
laser module.
Moreover, do not look into the laser beam through lenses, binoculars, microscopes, camera finders,
telescopes, or other optical elements that may collimate the light into your eye. When using the
lasers in combination with a microscope make sure that the beam path to the eyepieces is blocked
for the laser wavelength when the laser is on. If an optical fibre connected to a 3B laser has to be
replaced, the laser has to be turned off.
It is required to have a ‘remote interlock connector’ that can be pulled to turn off the laser reliably.
In that case, use the 15 pin connector at the laser side of the laser switch box. The connector can be
pulled off or plugged in at any time without causing damage to the laser.
BDL-SMC Picosecond Diode Lasers
19
Fig. 23: Remote interlock connector: Pull the 15 pin connector at the laser side of the switch box to turn off the laser
20
BDL-SMC Picosecond Diode Lasers
Understanding Picosecond Diode Lasers
Picosecond Operation of Laser Diodes
The BDL-SMC lasers are based on commercially available blue laser diodes [17]. Picosecond
pulsing of laser diodes requires to drive extremely short current pulses trough the pn junction of the
diode. Unfortunately commercial laser diodes are not optimised for this kind of operation. In
particular, the junction capacitance Cj and the lead inductance Ll form an LC low pass filter that
impedes a fast voltage rise across the diode junction. The situation is shown in Fig. 24.
For low driving power the generator pulse initiates a damped sine-wave voltage across the diode
junction. When the first positive peak reaches the forward conducting voltage of the diode, current
starts to flow through the junction. As long as the laser threshold is not reached the light pulse is
weak and broader than the current pulse.
If the driving power is increased the first positive peak drives a substantial forward current through
the diode junction. The dynamic impedance of the junction drops dramatically, preventing the
voltage at the junction to increase much above the forward voltage. The current through the junction
exceeds the laser threshold for a short fraction of the sine wave period, and a short light pulse is
emitted.
If the driving power is increased further the forward current pulse and consequently the light pulse
becomes stronger. The decrease in the dynamic resistance of the pn junction and the nonlinearity of
the laser emission cause the optical pulse width to decrease. Eventually, the subsequent peaks of the
sine wave start to drive a forward current through the diode junction resulting in a tail or afterpulses
of the light pulse.
Generator
Rg
Laser
L l Diode
Vj
Ij
Vg
Cj
Generator voltage
R g Generator resistance
L l Lead inductance of diode
Cj Junction capacitance of diode
Vg
Generator Voltage
low
medium
high
Vj
Voltage accross
Laser Diode
Junction
Vg
Ij
Current through
Laser Diode
Junction
Light
Emission
Fig. 24: Junction voltage Vj and junction current Ij in a picosecond laser diode for different driving pulse
amplitude Vg
The behaviour of the junction current explains why there is a relation between the pulse shape and
the pulse power. Good pulse shapes can be obtained only at moderate optical power. Using a
stronger laser diode does not generally help. It can actually make the situation worse because the
junction capacitance of the larger laser diode is higher.
BDL-SMC Picosecond Diode Lasers
21
An additional control parameter is obtained by adding a bias voltage to the driving pulse. For blue
laser diodes, which have a forward conducting voltage of 4 to 5 V, the bias can be positive (in
forward direction) or negative (in reverse direction). The influence of the diode bias is shown in Fig.
25.
Generator
Rg
Laser
L l Diode
Vj
Vg
Generator Voltage
Ij
Vg
Cj
Vj
Voltage accross
Laser Diode
Junction
V bias
Bias 3
Bias 2
Bias 1
Vg
Ij
Current through
Laser Diode
Junction
Generator voltage
V bias Bias voltage
Rg
Ll
Cj
Generator resistance
Lead inductance of diode
Junction capacitance of diode
Light
Emission
Fig. 25: Junction voltage Vj and junction current Ij in a picosecond laser diode for different diode bias voltage
Positive bias results in higher output power, but makes afterpulsing more likely. Reverse bias helps
to suppress afterpulses but reduces the power. In general the best optical pulse shape is obtained by
using high driving amplitudes and a bias as low (negative) as possible.
It should be noted that the operating conditions of picosecond pulsed laser diodes are different from
those of modulated laser diodes used in communication equipment. A modulated laser diode is
always forward biased, and there is a continuous forward current through the laser diode.
Consequently, the diode junction has a low dynamic impedance that shorts the junction capacitance.
The speed of the diode is then determined mainly by the lead inductance and the generator
impedance.
Average Power and Peak Power
The typical pulse width for a picosecond laser diode is in the range of 40 to 100 ps. For a repetition
rate in the 20 to 80 MHz range the duty factor is on the order of 300. As shown in Fig. 26, the result
is a relatively high peak power even for low average (CW equivalent) power.
Pp
peak power
Pp = Pa
Tpw
Tper
Tpw
Pa
average power
Tper
Fig. 26: Relation between peak power, average power, pulse width and pulse period
22
BDL-SMC Picosecond Diode Lasers
For ps diode lasers, the optical peak power is far beyond the permissible steady state power for the
laser diodes used. Due to the short pulse width the high peak power does not cause any thermal
damage. However, damage may also occur by extremely fast nonlinear optical effects. It is therefore
recommended to avoid unnecessarily high peak power, and not to exceed the power at which
substantial afterpulses develop.
Pulse Shape
Fig. 27 through Fig. 30 show pulse shapes, pulse width and peak power for different BDL-SMC
lasers. It should be noted here that the Nichia laser diodes used in the BDL lasers are continuously
improved. For example, the optical output power of the 405 nm diodes has been increased by a
factor of 10 within two years. At the same time, there was a substantial improvement in efficiency,
i.e. in the output power for a given forward current. Fig. 27 through Fig. 30 should therefore
considered to demonstrate the general relation between power and pulse parameters, not the
quantitative values.
Pulse shapes for a BDL-405-SMC laser for different average optical power at 50 MHz are shown in
Fig. 27.
50 MHz, 0.4 mW
FWHM = 127 ps
50 MHz, 0.8 mW
FWHM = 84 ps
50 MHz, 1.2 mW
FWHM = 62 ps
50 MHz, 1.6 mW
FWHM = 52 ps
Fig. 27: Pulse shapes for a BDL-405-SMC laser at 50 MHz. Recorded with Hamamatsu R3809U-50 MCP [12]
and BH SPC-730 TCSPC module [9].
The curves were recorded with a Hamamatsu R3809U-52 MCP PMT and a bh SPC-730 TCSPC
module. The R3809U-52 was operated at 3 kV, yielding an instrument response function (IRF) of
30 ps fwhm. Important: The instrument response function of the R3809U-52 has a shoulder of
about 300 ps duration [8, 9, 12]. The afterpulse visible in the recorded pulse shape, in a large part,
comes from that shoulder, not from the laser pulse itself.
The pulse width decreases continuously with increased output power. The best pulse shape for
80 MHz, 50 MHz, and 20 MHz is obtained at 1.6 mW, 1 mW, and 0.4 mW, respectively. Typical
curves of the peak power and the pulse width are shown in Fig. 28.
BDL-SMC Picosecond Diode Lasers
23
600
mW
500
Peak
Power
Pulse
Width
Pulse
Width
Peak
Power
100
ps
400
300
fwhm
50
200
100
0
0.2
0.4
0.6
0.8
1.0
1.2
average (CW equivalent) power
1.4
1.6 mW
Fig. 28: Pulse width and peak power for a BDL-405 versus average power at 50 MHz repetition rate. Pulse
width corrected for 30ps IRF width of detection system.
Typical pulse shapes of the BDL-440-SMC and the BDL-473-SMC are shown in Fig. 29 and Fig.
30.
Fig. 29: Pulse shapes for a BDL-440-SMC laser at 50 MHz. Recorded with Hamamatsu R3809U-50 MCP and
bh SPC-830 TCSPC module.
Fig. 30: Pulse shapes for a BDL-473-SMC laser at 50 MHz. Recorded with Hamamatsu R3809U-50 MCP and
bh SPC-830 TCSPC module.
24
BDL-SMC Picosecond Diode Lasers
Application to Fluorescence Lifetime Spectroscopy
Fluorescence Lifetime Experiments
The BDL-SMC lasers in conjunction with the bh TCSPC modules make fluorescence lifetime
measurements an easy task. A simple fluorescence lifetime system is shown schematically in Fig.
31.
Trigger
Pulse inverter
A-PPI
Stop
Excitation
filter
BDL-SMC Laser
SPC-630, -730, -830
to TCSPC
Start
Cuvette
Emission
filter
PMC-100
PMT module
Power supply
and control
DCC-100
Fig. 31: Fluorescence lifetime measurement setup
For samples with strong scattering possible background emission of the laser diode may be removed
by a bandpass filter in the excitation path. Moreover, it may be convenient to have variable ND
filter placed in the excitation path.
After passing the filters the laser beam is sent into the sample cell. The fluorescence light is detected
at an angle of 90° from the excitation beam. The detector is a bh PMC-100 module. It is controlled
via a DCC-100 detector controller card. The PMC-100 is located close to the sample cell. The
fluorescence light is collected directly, i.e. without an additional transfer lens. The detection
wavelength interval is selected by a bandpass filter at the input of the detector.
Important: In the BDL-SMC lasers the polarisation of the laser beam is horizontal. Sending a
horizontally polarised laser beam into the sample and detecting the fluorescence under an angle of
90° from the excitation would result in detecting only Is components of the fluorescence, i.e.
projections of the electrical field vectors perpendicular to the polarisation of the laser. This would
result in large distortion of the measured decay functions by rotational depolarisation [8, 9, 18]. In
the setup shown in Fig. 31 the laser is therefore turned by 90°. Polarisation effects can further be
reduced by tilting the laser or placing a polariser in the beam path. Unfortunately the exact angles
depend on the numerical aperture of the detection light path which is not exactly predictable.
The PMC-100 detector is controlled by a DCC-100 detector controller. The DCC-100 provides the
power supply for the PMT module, the preamplifier, and the cooler of the PMC-100. Moreover, it
provides software controlled detector gain and overload shutdown.
The photon pulses of the PMC-100 are connected directly to the TCSPC module. Any bh SPC
module can be used. The stop (timing reference) signal comes from the trigger output of the laser.
An example of a fluorescence decay measurement is shown in Fig. 32. Stilben (blue curve) and
Rhodamin 110 (red curve) were excited by a BDL-405-SMC laser. The black curve is the IRF
obtained from a scattering solution.
BDL-SMC Picosecond Diode Lasers
25
Fig. 32: Fluorescence decay curves of stilben (blue) and rhodamin 110 (red), excited at 405 nm (black). Time
scale 3 ns per division, time channel width 12 ps.
Despite of its simplicity the setup features high sensitivity and good time resolution. Another
advantage is that light reflected at the emission filter and the photocathode of the detector is not
focused back into the sample. Therefore the setup has less problems with optical reflections then
more complex optical systems.
In all fluorescence measurement that use deconvolution of the fluorescence data from the instrument
response function (IRF) the laser must be operated at the same power for the fluorescence
measurement and the IRF measurement. As shown in Fig. 27, page 22, to Fig. 30, the shape of the
laser pulse changes with the power. Changing the laser power between the recordings may therefore
lead to a wrong shape of the IRF and, consequently, to a poor fit of the data and large lifetime errors
for fast lifetime components.
Autofluorescence of Tissue
A simple optical setup for single-point multi-spectral measurements of tissue autofluorescence is
shown in Fig. 33, left. A BDL-405-SMC or a BDL-375-SMC laser is used for excitation. A fibre
probe is used to excite the sample and to collect the fluorescence light. The probe contains 7 multimode fibres of 0.5 mm diameter. The central fibre delivers the laser, the surrounding fibres collect
the fluorescence. The detection system consists of a bh ‘PML-Spec’ multi-wavelength assembly and
an SPC-830 TCSPC module. The detection system records decay curves in 16 wavelength intervals
simultaneously. Multi-spectral fluorescence decay data of human skin obtained this way are shown
in Fig. 33, right.
PML-SPEC detetcor assembly
ps Diode
Laser
Polychromator
Single
Fibre
Filter 420nm LP
16-anode PMT
with Routing
TCSPC Module
Fibre bundle
BDL-405-SMC
Cross
section
of
bundle
Grating
LOT, MS125
PML-16
Becker & Hickl
SPC-830
Sample
Fig. 33: Left: Optical setup for single-point autofluorescence measurement. Right: Multi-spectral fluorescence
decay data of human skin. Time scale 0 to 15 ns, wavelength scale 410 to 600 nm, intensity scale logarithmic
from 500 to 30,000 counts per channel.
26
BDL-SMC Picosecond Diode Lasers
The count rates obtained from biological tissue are surprisingly high. At an excitation wavelength of
405 nm a count rate of 2⋅106 s-1 could be obtained at an excitation power of only 60 µW.
Recording Chlorophyll Transients
The fast on/off switching capability of the BDL-SMC lasers can be used to record excitation-driven
transient fluorescence phenomena.
Typical examples of transient fluorescence effects are the ‘Kautski effect’ or the ‘fluorescence
transients’ of chlorophyll in living plants [16]. When a dark-adapted leaf is exposed to light the
intensity of the chlorophyll fluorescence starts to increase. After a steep rise the intensity falls again
and finally reaches the steady-state level. The rise time is of the order of a few milliseconds to a
second, the fall time can be from several seconds to minutes. The initial rise of the fluorescence
intensity is attributed to the progressive closing of reaction centres in the photosynthesis pathway.
Therefore the quenching of the fluorescence by the photosynthesis decreases with the time of
illumination, with a corresponding increase of the fluorescence intensity. The fluorescence
quenching by the photosynthesis pathway is termed ‘photochemical quenching’. The slow decrease
of the fluorescence intensity at later times is termed ‘non-photochemical quenching’.
Results of a non-photochemical quenching measurement are shown in Fig. 34. The fluorescence in a
leaf was excited by a bh BDL-405-SMC picosecond diode laser. The fluorescence was detected by a
bh PML-SPEC multi-wavelength detection assembly [2], see Fig. 33. Decay curves in the 16
wavelength intervals of the PML-SPEC were recorded by a bh SPC-803 TCSPC module.
Simultaneously with the switch-on of the laser a recording sequence was started in the TCSPC
module. 30 recordings were taken in intervals of 2 seconds; Fig. 34 shows four selected steps of this
sequence. The decrease of the fluorescence lifetime with the time of exposure is clearly visible.
Fig. 34: Non-photochemical quenching of chlorophyll in a leaf, excited at 405 nm. Recorded wavelength range
from 620 to 820 nm, time axis 0 to 8 ns, logarithmic display, normalised on peak intensity. Left to right: 0 s, 20 s,
40 s, and 60 s after start of exposure.
Fig. 35 shows fluorescence decay curves at selected wavelengths versus the time of exposure,
extracted from the same measurement data set as Fig. 34. The sequence starts at the back and
extends over 60 seconds. Also here, the decrease of the fluorescence lifetime with the time of
exposure is clearly visible.
Fig. 35: Non-photochemical quenching of chlorophyll in a leaf, excited at 405 nm. Fluorescence decay curves in
different wavelength channels versus time of exposure. 2 s per curve, sequence starts from the back. Extracted
from same measurement data as Fig. 34.
BDL-SMC Picosecond Diode Lasers
27
The non-photochemical transients shown above occur on a time scale of several 10 seconds. Good
results are therefore obtained by recording a single sequence of decay curves at an acquisition time
of a few seconds per curve.
The photochemical quenching transients are much faster. Recording these transients requires a
resolution of less than 100 µs per step of the sequence. Of course, the number of photons detected in
a time this short is too small to build up a reasonable decay curve. Photochemical quenching
transients must therefore be recorded by triggered sequential recording [8, 9]. The principle is
shown in Fig. 36. The excitation laser is periodically switched on an off via the ‘/laser off’ signal.
Each ‘on’ phase initiates a photochemical quenching transient in the leaf; each ‘off’ phase lets the
leaf recover. Within each ‘on’ phase a fast sequence of decay curves is recorded in the TCSPC
module. The measurement is continued for a large number of such on-off cycles, and the results are
accumulated.
Laser
on
off
90ms
2.5ms
on
2.5ms
Experiment trigger
to SPC module
Recording
sequence
Recording
sequence
Leaf recovers
Fig. 36: Triggered sequential recording of photochemical quenching transients. The laser is cycled on and off.
Each ‘on’ phase starts a photochemical quenching transient in the leaf. A sequence of waveform recordings is
taken within each ‘on’ phase. A large number of such on/off cycles is accumulated to obtain enough photons with
the individual steps of the accumulated sequence.
A typical result is shown in Fig. 37. The ‘on’ time was 2.5 ms. Within this time a sequence of 50
decay curves of 50 µs collection time each was recorded. The ‘off’ time was 90 ms. 20,000 of such
on-off cycles were accumulated.
Fig. 37: Photochemical quenching of chlorophyll in a leaf. Fluorescence decay curves in different wavelength
channels versus time. Triggered sequential recording, 50 µs per curve, 20,000 measurement cycles accumulated
Excitation Wavelength Multiplexing
Excitation wavelength multiplexing is used to excite different fluorophores during the same
measurement. Compared with sequential measurement at different excitation wavelengths fast
multiplexing has the advantage that changes in the fluorescence behaviour of the sample have the
same effect on all fluorescence signals recorded.
A typical application of multiplexed excitation are measurements at living plants. Green leaves
show the typical chlorophyll fluorescence around 700 nm, and a blue-green fluorescence from
28
BDL-SMC Picosecond Diode Lasers
flavinoids. Due to the Kautski effect, the fluorescence intensity and lifetimes vary with the time of
exposure and are thus different for different excitation wavelength and different excitation intensity.
It is therefore difficult to obtain comparable results for different excitation conditions. An
experiment that avoids this problem is shown in Fig. 38.
The sample is excited by two lasers. A BDL-405-SMC and a BHLP-700 (650 nm) are multiplexed.
The light from the sample is split into a 515-nm and a 700-nm component by a dichroic mirror and
two bandpass filters. The fluorescence components are detected by two PMT modules. The PMTs
are connected to the TCSPC module via a HRT-41 router [1]. Thus, both fluorescence components
are recorded simultaneously. One routing bit is required to separate the photons of both detectors. A
second routing bit is used to separate the photons excited by the two lasers. The stop signal for the
TCSPC module comes from the synchronisation outputs of the lasers. Because only one laser is
active at a time, the pulses can be combined by a simple power combiner.
Multiplexing
signal
Synchronisation
from lasers
Laser 1
405 nm
BDL-405-SMC
Sample
Dichroic
mirror
Bandpass
filter 700 nm
Power combiner
Multiplexing
signal
SPC-830
TCSPC module
stop
Laser 2
650 nm
BHLP-700
Bandpass
filter 515 nm
Detector 1
PMC-100
Detector 2
PMC-100
Router
routing
start
HRT-41
Fig. 38: Simultaneous measurement at two excitation and two emission wavelengths
A typical result is shown in Fig. 39. Fluorescence decay curves for a fresh leaf are shown left,
results for a dry leaf right. The synchronisation signal of the 650 nm laser was delayed by 3 ns to
make the curves better distinguishable. The multiplexing period was 50 ms. At this rate the lifetime
is modulated by photochemical quenching, but not by non-photochemical quenching. Therefore,
different lifetimes of the 695 nm emission are obtained for both wavelengths. No such effect is seen
in the 695 nm emission of the dry leaf. The green emission at 515 nm from the fresh leaf has a
considerably lower intensity, a shorter lifetime, and a multi-exponential decay profile. This indicates
that a strong, non-uniform quenching process is at work. Both the intensity and the lifetime of the
green emission increase in the dry leaf.
Fig. 39: Dual-wavelength excitation and dual-wavelength detection of the fluorescence of a fresh leaf (left) and a dry
leaf (right). Multiplexed excitation at 405 nm and 650 nm, dual-detector recording at 515 nm and 695nm.
BDL-SMC Picosecond Diode Lasers
29
Laser Scanning Microscopy
Laser scanning microscopes can relatively easily be upgraded for fluorescence lifetime imaging by
multi-dimensional TCSPC [8, 9]. FLIM is especially easy with multiphoton microscopes [7, 10].
The Ti:Sapphire laser of these microscopes is an almost ideal excitation source for FLIM. Standard
confocal microscopes, however, use only continuous lasers. Upgrading a standard confocal
microscope with FLIM therefore requires a suitable pulse excitation source to be added [23].
All confocal microscopes couple the visible lasers into the optical beam path via single-mode fibres.
Most of the microscopes use the coupler and fibre manipulator systems of Point Source Ltd., UK.
Attaching a BDL-SMC laser to a confocal microscope is therefore relatively easy. The only
requirement is that a free input fibre be available. Many microscopes have a 405 nm continuous
diode laser integrated. The excitation problem of FLIM is then easily solved by attaching the fibre
of this laser to a BDL-405-SMC. Experiments requiring high continuous power can, in most cases,
by performed in the CW mode of the BDL-405-SMC. It is therefore not necessary to switch the
fibre between the BDL-405-SMC and the diode laser of the microscope.
Lasers of 440 or 473 nm wavelength can, in principle used in the same way. However, coupling the
laser light into the sample requires a dichroic beamsplitter of the correct wavelength in the scanner
optics. The 473 nm laser can often be coupled via the 488 nm beam path. Unfortunately, replacing
the 488 nm Argon laser with the 473 nm diode laser is often not acceptable. Therefore, please
contact bh or the manufacturer of your microscope before you consider attaching a 473 nm laser to
it.
Wiring diagrams for a single-detector FLIM system and a multi-spectral FLIM system are shown in
Fig. 40, left and right. For details, please see [6] and [9].
Beam Blanking
from Microscope
Beam Blanking
from Microscope
Laser Power Control
Power Supply
Laser Power Control
Power Supply
Con 1
Con 1
DCC-100
DCC-100
Con 2
Power
& Control
BDL-405 SM
Single-Mode
Fibre into
Microscope
Fibre
from
Scan
Head
PMC100
Scan Clocks
from
Microscope
Power Supply
& Control
Con 3
Con 3
BDL-405 SM
A-PPI
Single-Mode
Fibre into
Microscope
Laser Sync Output
Fibre Filter
Adapter
Power
& Control
Laser
Con 2
Power Supply
& Control
A-PPI
to PML-16
Laser Sync Output
PML-SPEC Assembly
PML-16C
Routing
SYNC
Scan Clocks
SPC-830
Routing
CFD
SYNC
Scan Clocks
Fibre from
Scan Head
Output
Routing
SPC-830
CFD
Scan Clocks
from
Microscope
Fig. 40: Wiring diagrams of a single-detector FLIM system (left) and a multi-spectral FLIM system (right)
For FLIM, the excitation power required in the focus of the microscope objective lens is not
particularly high. Many samples can be exited with less than 50 µW. However, in scanning
microscopes the back aperture of the objective is often over-illuminated to obtain a uniform
intensity distribution over the whole aperture. Moreover, a substantial fraction of the excitation light
gets lost in the scanner and the microscope optics. The high coupling efficiency of the BDL-SMC
lasers is therefore a considerable benefit. There is sufficient power margin, and the laser can be
operated at a power that yields optimum pulse shape.
Fig. 41 shows fluorescence lifetime images of plant tissue recorded in a Zeiss LSM 510 upgraded
with a bh BDL-405-SMC laser and SPC-830 TCSPC module. Plant tissue makes good test samples
because it contains a wide variety of different fluorophores. The fluorescence decay functions are
30
BDL-SMC Picosecond Diode Lasers
therefore multi-exponential. Left to right, Fig. 41 shows images of the lifetime of the fast
component, the lifetime of the slow component, and the ratio of the amplitudes of the fast and the
slow component of the fluorescence.
Fig. 41: Fluorescence lifetime images of plant tissue. Double-exponential decay analysis, left to right: Lifetime of fast
component, lifetime of slow component, ratio of amplitudes of fast and slow component. bh BDL-405-SMC laser, Zeiss
LSM 510, bh SPC-830 TCSPC module.
Fluorescence Correlation Spectroscopy (FCS)
Fluorescence correlation spectroscopy (FCS) is based on exciting a small number of molecules in a
femtoliter volume and correlating the fluctuations of the fluorescence intensity. The fluctuations are
caused by diffusion, rotation, intersystem crossing, conformational changes, or other random
effects. The technique dates back to a work of Magde, Elson and Webb published in 1972 [15].
Theory and applications of FCS are described in [22].
The required femtoliter volume can be obtained by one-photon excitation and confocal detection or
by two-photon excitation, see Fig. 42. The principle is the same as in a laser scanning microscope.
A continuous or high-repetition rate laser beam is focused into the sample through the microscope
objective lens. The fluorescence light from the sample is collected by the same lens, separated from
the laser by a dichroic mirror, and fed through a pinhole in the upper image plane of the microscope
lens. In a confocal microscope the fluorescence light from above or below the focal plane is not
focused into the pinhole and therefore substantially suppressed. With a high-aperture objective lens
the effective sample volume is of the order of a femtoliter, with a depth of about 1.5 µm and a width
of about 400 nm.
Due to its good beam quality the BDL-SMC lasers are excellently suitable for FCS experiments.
The laser can be either free-beam coupled into the microscope, or fibre coupling may be used. FCS
experiments and other single-molecule techniques especially benefit from the capability of the
BDL-SMC lasers to be operated both in the ps and in the CW mode. Thus, combined FCS / lifetime
experiments [10] or burst-integrated fluorescence lifetime (BIFL) experiments [21] can be
performed in the ps mode , whereas pure correlation experiments can take advantage of the high
power available in the CW mode [11].
FCS and BIFL experiments can be performed efficiently in the ‘FIFO’ or ‘Time Tag’ mode of the
bh TCSPC modules. Please see [8, 9] for details. An example of a combined FCS/lifetime
measurement is shown in Fig. 43.
BDL-SMC Picosecond Diode Lasers
31
Laser
Laser
Lens
Pinhole
Detector
Dichroic
Mirror
Detection
Volume
Tube Lens
Excited
Objective
Lens
Sample
Detected
Fig. 42: Fluorescence correlation spectroscopy. Left: Basic optical setup. Right: Beam waist of laser and
confocal detection volume
Fig. 43: Combined FCS / Lifetime measurement of a dye solution. Left: Fluorescence decay curve. Right: FCS
curve.
Once the optical system is setup correctly, FCS measurements on highly diluted dye solutions (on
the order of 10-9 mol/l) are relatively easy. This is not necessarily the case for FCS measurement in
living cells. Especially in transfected cells the fluorophore concentration cannot be accurately
controlled. It is usually much higher than required for FCS. The number of molecules in the focus
can easily be on the order of 100 or even 1000, resulting in an extremely small amplitude of the
correlation function [10]. Reasonable FCS results from such specimens can, of course, only be
obtained if the fluctuation of the laser power are smaller than the fluctuation of the number of
molecules in the focus.
Fig. 44 shows autocorrelation curves of the laser intensity for a BDL-405-SMC laser. The curves
resemble FCS results obtained from a samples that does not show any intrinsic intensity
fluctuations. Fluctuations at times shorter than 1 ms would show up as bumps in the curves,
fluctuations at longer time scales as an offset from C = 1. No such effects are visible in Fig. 44. That
means the BDL-SMC lasers can be used for FCS down to correlation coefficients smaller than
1.001.
32
BDL-SMC Picosecond Diode Lasers
Fig. 44: Autocorrelation (FCS) curves of the laser intensity. BDL-405-SMC laser, recorded over 5 minutes with
R3809U MCP PMT and SPC-830 TCSPC module. Left: pulsed operation. Right: CW operation. Scale of
correlation coefficient from 0.99 to 1.01.
BDL-SMC Picosecond Diode Lasers
33
Specification
BDL-375-SMC
Optical
Repetition Rate
Wavelength
Pulse Width (FWHM, at 1 mW power, 50 MHz)
Peak Power
Average Power
(Average CW equivalent power,
user adjustable)
Beam diameter before coupler
Polarisation
Coupling efficiency into fibre, typically
Stability of Repetition Rate
Pulse-to Pulse Jitter
Reaction time to ‘Laser on’ signal (pulsed mode)
Reaction time to ‘Laser on’ signal (CW mode)
Power and pulse shape stabilisation after switch-on
Fibre coupler
20-50-80 MHz, or CW operation
370 nm to 380 nm, typ. 375 nm
50 to 90 ps
10 to 100 mW 1)
20 MHz:
0.05 mW to 0.16 mW 2)
50 MHz:
0.1 mW to 0.4 mW 2)
80 MHz:
0.15 mW to 0.6 mW 2)
CW mode:
0.5 mW to 5 mW 2)
0.7 mm, TEM00 mode
horizontal
20%
± 100 ppm
< 20 ps
1 µs
3 µs
3 min
all 1” footprint couplers: Point Source, Schäfter&Kirchhoff, OZ Optics, Linus
Trigger Output
Pulse Amplitude
Pulse Width
Output Impedance
Connector
Delay from Trigger to Optical Pulse
Jitter between Trigger and Optical Pulse
+100 to +300 mV (peak) into 50 Ω
1 ns
50 Ω
SMA
< 500 ps
< 10 ps
Control Inputs
Frequency 20 MHz
Frequency 50 MHz
Frequency 80 MHz
CW operation
Laser ON / Off
External Power Control
TTL / CMOS high 3)
TTL / CMOS high 3)
TTL / CMOS high 3)
TTL / CMOS high 3)
TTL / CMOS low 3)
analog input, 0 to + 10V
Power Supply
Power Supply Voltage
Power Supply Current
Power Adapter
+ 9 V to +12 V
300 mA to 1 A 4)
AC-DC power adapter, with key switch and control box in cable
Mechanical Data
Dimensions
Mounting Thread
160 mm x 90 mm x 60 mm
two M6 holes
Maximum Values
Power Supply Voltage
Voltage at Digital Control Inputs
Voltage at Ext. Bias Input
Ambient Temperature
0 V to +15 V
-2 V to +7 V
-12 V to + 12 V
0 °C to 40 °C 5)
1) Typical values, sample tested. Depends on pulse width and selected power.
2) Recommended power adjust range. Lower power gives broader pulses, higher power gives ringing in pulse shape. Power levels above the given range can be selected, but may impair the lifetime of
the laser diode.
3) All inputs have 10 kΩ pull-up resistors. Open input is equivalent to logic ‘high’.
4) Dependent on ambient temperature. Cooling current changes due to temperature regulation of laser diode
5) Operation below 13 °C may result in extended warm-up time.
Caution: Class 3B laser product. Avoid direct eye exposure. Light emitted by the device may be
harmful to the human eye. Please obey laser safety rules when operating the devices.
Complies with US federal laser product performance standards.
34
BDL-SMC Picosecond Diode Lasers
BDL-405-SMC
Optical
Repetition Rate
Wavelength
Pulse Width (FWHM, at 1 mW power, 50 MHz)
Peak Power
Average Power
(Average CW equivalent power,
user adjustable)
Beam diameter before coupler
Polarisation
Coupling efficiency into fibre, typically
Stability of Repetition Rate
Pulse-to Pulse Jitter
Reaction time to ‘Laser on’ signal (pulsed mode)
Reaction time to ‘Laser on’ signal (CW mode)
Power and pulse shape stabilisation after switch-on
Fibre coupler
20-50-80 MHz, or CW operation
401 nm to 410 nm, typ. 405 nm
50 to 90 ps
80 to 500 mW 1)
20 MHz:
0.12 mW to 0.6 mW 2)
50 MHz:
0.3 mW to 1.6 mW 2)
80 MHz:
0.4 mW to 2.4 mW 2)
CW mode:
5 mW to 40 mW 2)
0.7 mm, TEM00 mode
horizontal
60%
± 100 ppm
< 20 ps
1 µs
3 µs
3 min
all 1” footprint couplers: Point Source, Schäfter&Kirchhoff, OZ Optics, Linus
Trigger Output
Pulse Amplitude
Pulse Width
Output Impedance
Connector
Delay from Trigger to Optical Pulse
Jitter between Trigger and Optical Pulse
+100 to +300 mV (peak) into 50 Ω
1 ns
50 Ω
SMA
< 500 ps
< 10 ps
Control Inputs
Frequency 20 MHz
Frequency 50 MHz
Frequency 80 MHz
CW operation
Laser ON / Off
External Power Control
TTL / CMOS high 3)
TTL / CMOS high 3)
TTL / CMOS high 3)
TTL / CMOS high 3)
TTL / CMOS low 3)
analog input, 0 to + 10V
Power Supply
Power Supply Voltage
Power Supply Current
Power Adapter
+ 9 V to +12 V
300 mA to 1 A 4)
AC-DC power adapter, with key switch and control box in cable
Mechanical Data
Dimensions
Mounting Thread
160 mm x 90 mm x 60 mm
two M6 holes
Maximum Values
Power Supply Voltage
Voltage at Digital Control Inputs
Voltage at Ext. Bias Input
Ambient Temperature
0 V to +15 V
-2 V to +7 V
-12 V to + 12 V
0 °C to 40 °C 5)
1) Typical values, sample tested. Depends on pulse width and selected power.
2) Recommended power adjust range. Lower power gives broader pulses, higher power gives ringing in pulse shape. Power levels above the given range can be selected, but may impair the lifetime of
the laser diode.
3) All inputs have 10 kΩ pull-up resistors. Open input is equivalent to logic ‘high’.
4) Dependent on ambient temperature. Cooling current changes due to temperature regulation of laser diode
5) Operation below 13 °C may result in extended warm-up time.
Caution: Class 3B laser product. Avoid direct eye exposure. Light emitted by the device may be
harmful to the human eye. Please obey laser safety rules when operating the devices.
Complies with US federal laser product performance standards.
BDL-SMC Picosecond Diode Lasers
35
BDL-440-SMC
Optical
Repetition Rate
Wavelength
Pulse Width (FWHM, at 1 mW power, 50 MHz)
Peak Power
Average Power
(Average CW equivalent power,
user adjustable)
Beam diameter before coupler
Polarisation
Coupling efficiency into single-mode fibre, typically
Stability of Repetition Rate
Pulse-to Pulse Jitter
Reaction time to ‘Laser on’ signal (pulsed mode)
Reaction time to ‘Laser on’ signal (CW mode)
Power and pulse shape stabilisation after switch-on
Fibre coupler
20-50-80 MHz, or CW operation
436 nm to 448 nm, typ. 440 nm
40 to 90 ps
40 to 250 mW 1)
20 MHz:
0.07 mW to 0.2 mW 2)
50 MHz:
0.3 mW to 1 mW 2)
80 MHz:
0.4 mW to 1.2 mW 2)
CW mode:
1 mW to 20 mW 2)
0.7 mm, TEM00 mode
horizontal
60%
± 100 ppm
< 20 ps
1 µs
3 µs
3 min 5)
all 1” footprint couplers: Point Source, Schäfter&Kirchhoff, OZ Optics, Linus
Trigger Output
Pulse Amplitude
Pulse Width
Output Impedance
Connector
Delay from Trigger to Optical Pulse
Jitter between Trigger and Optical Pulse
+100 to +300 mV (peak) into 50 Ω
1 ns
50 Ω
SMA
< 500 ps
< 10 ps
Control Inputs
Frequency 20 MHz
Frequency 50 MHz
Frequency 80 MHz
CW operation
Laser ON / Off
External Power Control
TTL / CMOS high 3)
TTL / CMOS high 3)
TTL / CMOS high 3)
TTL / CMOS high 3)
TTL / CMOS low 3)
analog input, 0 to + 10V
Power Supply
Power Supply Voltage
Power Supply Current
Power Adapter
+ 9 V to +12 V
300 mA to 1 A 4)
AC-DC power adapter, with key switch and control box in cable
Mechanical Data
Dimensions
Mounting Thread
160 mm x 90 mm x 60 mm
two M6 holes
Maximum Values
Power Supply Voltage
Voltage at Digital Control Inputs
Voltage at Ext. Bias Input
Ambient Temperature
0 V to +15 V
-2 V to +7 V
-12 V to + 12 V
0 °C to 40 °C 5)
1) Typical values, sample tested. Depends on pulse width and selected power.
2) Recommended power adjust range. Lower power gives broader pulses, higher power gives ringing in pulse shape. Power levels above the given range can be selected, but may impair the lifetime of
the laser diode.
3) All inputs have 10 kΩ pull-up resistors. Open input is equivalent to logic ‘high’.
4) Dependent on ambient temperature. Cooling current changes due to temperature regulation of laser diode
5) Operation below 13 °C may result in extended warm-up time.
Caution: Class 3B laser product. Avoid direct eye exposure. Light emitted by the device may be
harmful to the human eye. Please obey laser safety rules when operating the devices.
Complies with US federal laser product performance standards.
36
BDL-SMC Picosecond Diode Lasers
BDL-473-SMC
Optical
Repetition Rate
Wavelength
Pulse Width (FWHM, at 1 mW power, 50 MHz)
Peak Power
Average Power
(Average CW equivalent power,
user adjustable)
Beam diameter before coupler
Polarisation
Coupling efficiency into single-mode fibre, typically
Stability of Repetition Rate
Pulse-to Pulse Jitter
Reaction time to ‘Laser on’ signal (pulsed mode)
Reaction time to ‘Laser on’ signal (CW mode)
Power and pulse shape stabilisation after switch-on
Fibre coupler
20-50-80 MHz, or CW operation
467 nm to 476 nm, typ. 473 nm
40 to 90 ps
40 to 250 mW 1)
20 MHz:
0.07 mW to 0.2 mW 2)
50 MHz:
0.3 mW to 1 mW 2)
80 MHz:
0.4 mW to 1.2 mW 2)
CW mode:
0.5 mW to 10 mW 2)
0.7 mm, TEM00 mode
horizontal
60%
± 100 ppm
< 20 ps
1 µs
3 µs
3 min 5)
all 1” footprint couplers: Point Source, Schäfter&Kirchhoff, OZ Optics, Linus
Trigger Output
Pulse Amplitude
Pulse Width
Output Impedance
Connector
Delay from Trigger to Optical Pulse
Jitter between Trigger and Optical Pulse
+100 to +300 mV (peak) into 50 Ω
1 ns
50 Ω
SMA
< 500 ps
< 10 ps
Control Inputs
Frequency 20 MHz
Frequency 50 MHz
Frequency 80 MHz
CW operation
Laser ON / Off
External Power Control
TTL / CMOS high 3)
TTL / CMOS high 3)
TTL / CMOS high 3)
TTL / CMOS high 3)
TTL / CMOS low 3)
analog input, 0 to + 10V
Power Supply
Power Supply Voltage
Power Supply Current
Power Adapter
+ 9 V to +12 V
300 mA to 1 A 4)
AC-DC power adapter, with key switch and control box in cable
Mechanical Data
Dimensions
Mounting Thread
160 mm x 90 mm x 60 mm
two M6 holes
Maximum Values
Power Supply Voltage
Voltage at Digital Control Inputs
Voltage at Ext. Bias Input
Ambient Temperature
0 V to +15 V
-2 V to +7 V
-12 V to + 12 V
0 °C to 40 °C 5)
1) Typical values, sample tested. Depends on pulse width and selected power.
2) Recommended power adjust range. Lower power gives broader pulses, higher power gives ringing in pulse shape. Power levels above the given range can be selected, but may impair the lifetime of
the laser diode.
3) All inputs have 10 kΩ pull-up resistors. Open input is equivalent to logic ‘high’.
4) Dependent on ambient temperature. Cooling current changes due to temperature regulation of laser diode
5) Operation below 13 °C may result in extended warm-up time.
Caution: Class 3B laser product. Avoid direct eye exposure. Light emitted by the device may be
harmful to the human eye. Please obey laser safety rules when operating the devices.
Complies with US federal laser product performance standards.
BDL-SMC Picosecond Diode Lasers
37
Connector Pin Assignment, all BDL Lasers
External control connector at the laser switch box
1
not connected
9
2
Frequency 20 MHz
10
3
Frequency 50 MHz
11
4
Frequency 80 MHz
12
5
GND
13
6
not connected
14
7
/Laser Off
15
8
not connected
not connected
not connected
not connected
Power / Bias, 0 to +10 V
not connected
not connected
GND
15 pin connectors at the laser and at the left side of the laser switch box
1
not connected
9
Test output, internal bias
2
Frequency 20 MHz
10
+12 V from power supply
3
Frequency 50 MHz
11
not connected
4
Frequency 80 MHz
12
Power / Bias, 0 to +10 V
5
GND
13
not connected
6
not connected
14
not connected
7
/Laser Off
15
GND
8
Test output, internal +7V
9 pin connector at the right side of the laser switch box
1
+12 V from power supply
6
2
+12 V from power supply
7
3
not connected
8
4
GND
9
5
GND
+12 V from power supply
not connected
GND
GND
38
BDL-SMC Picosecond Diode Lasers
Dimensions
125
51
3
69
40
20
14
160
88
204
264
Fig. 45: BDL-SMC lasers, dimensions in mm. Laser shown with Point Source Coupler.
Mounting plane of
fibre coupler
Beam
output
M6
Mounting holes
M6
88
25.4
25.4
33
101
Fibre coupler mounting plane
160
204
264
Fig. 46. Left: Mounting plane of fibre coupler. Right: Bottom view, with M6 mounting holes
BDL-SMC Picosecond Diode Lasers
39
References
1.
Becker & Hickl GmbH, Routing modules for time-correlated single photon counting, manual, available on
www.becker-hickl.com
2.
Becker & Hickl GmbH, PML-16-C,16 channel detector head for time-correlated single photon counting, user
handbook, available on www.becker-hickl.com, (2006)
3.
Becker & Hickl GmbH, DCC-100 detector control module, manual, available on www.becker-hickl.com
4.
Becker & Hickl GmbH, MSA-200, MSA-300, MSA-1000 Photon counters / multiscalers, application manual.
www.becker-hickl.com (2002)
5.
Becker & Hickl GmbH, BHL-600 and BHLP-700 Red and Near-Infrared Picosecond Diode Laser Modules,
available on www.becker-hickl.com
6.
Becker & Hickl GmbH, Modular FLIM Systems for Zeiss LSM 510 Laser Scanning Microscopes (2005), available
on www.becker-hickl.com
7.
W. Becker, A. Bergmann, M.A. Hink, K. König, K. Benndorf, C. Biskup, Fluorescence lifetime imaging by timecorrelated single photon counting, Micr. Res. Techn. 63, 58-66 (2004)
8.
W. Becker, Advanced time-correlated single-photon counting techniques. Springer, Berlin, Heidelberg, New York,
2005
9.
W. Becker, The bh TCSPC handbook. Becker & Hickl GmbH (2005), available on www.becker-hickl.com
10. W. Becker, A. Bergmann, E. Haustein, Z. Petrasek, P. Schwille, C. Biskup, L. Kelbauskas, K. Benndorf, N.
Klöcker, T. Anhut, I. Riemann, K. König, Fluorescence lifetime images and correlation spectra obtained by multidimensional TCSPC, Micr. Res. Tech. 69, 186-195 (2006)
11. S. Felekyan, R. Kühnemuth, V. Kudryavtsev, C. Sandhagen, W. Becker, C.A.M. Seidel, Full correlation from
picoseconds to seconds by time-resolved and time-correlated single photon detection, Rev. Sci. Instrum. 76, 083104
(2005)
12. Hamamatsu Photonics K.K., R3809U-50 series Microchannel plate photomultiplier tube (MCP-PMTs) (2001)
13. R. Kühnemuth, C.A.M. Seidel, Principles of single molecule multiparameter fluorescence spectroscopy. Single
Molecules 2 (2001) 251-254
14. A. Liebert, H. Wabnitz, D. Grosenick, R. Macdonald, Fiber dispersion in time domain measurements compromising
the accuracy of determination of optical properties of strongly scattering media, J. Biomed. Opt. 8, 512-516 (2003)
15. D. Magde, E. Elson, W.W.W. Webb, Thermodynamic fluctuations ina reacting system - measurement by
fluorescence correlation spectroscopy, Phys. Rev. Lett. 29, 705-708 (1972)
16. K. Maxwell, G.N. Johnson, Chlorophyll fluorescence - a practical guide, Journal of Experimental Botany 51, 659668 (2000)
17. S. Nakamura, S.F.Chichibu, Introduction to nitride semiconductor blue lasers and light emitting diodes. Taylor &
Francis (2000)
18. D.V. O’Connor, D. Phillips, Time Correlated Single Photon Counting, Academic Press, London 1984
19. OZ Optics Ltd., Operating instructions, Laser to fibre coupler with adjustable focus, (2002)
20. Point Source Ltd., Kineflex fibre manipulator, operating instructions
21. M. Prummer, B. Sick, A. Renn, U.P. Wild, Multiparameter microscopy and spectroscopy for single-molecule
analysis, Anal. Chem. 76, 1633-1640 (2004)
22. R. Rigler, E.S. Elson (eds), Fluorescence Correlation Spectroscopy, Springer Verlag Berlin, Heidelberg, New York
(2001)
23. A. Rück, F. Dolp, C. Happ, R. Steiner, M. Beil, Fluorescence lifetime imaging (FLIM) using ps pulsed diode lasers
in laser scanning microscopy. Proc. SPIE 4962-44 (2003)
40
BDL-SMC Picosecond Diode Lasers
Index
Alignment of fibre coupler
OZ Optics 10
Point Source 9
A-PPI pulse inverter 11
Autofluorescence of tissue 25
Average power 21
Beam diameter 7
Beam profile 7
Beam profile corrector 4, 5, 7
Bias adjust 6
Chlorophyll transients 26, 27
Confocal detection 30
Connectors
for control signals 6
pin assignment 37
trigger output 6
Control inputs 6
connector pin assignment 13, 37
external power control 14
frequency select 13
laser off signal 13, 14
on-off reaction times 14
CW mode 4
DCC-100 card 14, 24, 29
DDG-200 card 16
Delay of stop signal, of TCSPC 12
Delayed start-stop operation, of TCSPC 12
Dimensions 38
Emission indicators 6
FCS 30
confocal detection 30
fluctuation of laser intensity 31
focal volume 30
optical system 30
pinhole 30
Fibre
fibre manipulator 5
Fibre coupler 8
alignment, OZ Optics 10
alignment, point source 9
OZ Optics 10
Point Source 8
FLIM 29
excitation power 29
single-mode fibre coupler 29
wiring diagram of system 29
Fluorescence
autofluorescence of tissue 25
depolarisation 24
lifetime experiments 24
lifetime imaging 29
multi-spectral detection 25, 26
of chlorophyll 26, 27
Fluorescence Correlation Spectroscopy 30
Free-beam operation 7
Jitter
of pulse period 11
Key switch 6
Laser scanning microscope 29
Laser switch box 5, 6
Multi-mode fibres 8
Multiplexing lasers 16
BDL and BHLP lasers 17
by DDG-200 card 17
chlorophyll measurement 28
TCSPC system 17
On/Off signal 4, 27, 28
Peak power 21
PMC-100 detector 24, 29
Power
average 21
control from DCC-100 card 14
influence on pulse shape 22
manual adjust 6
peak 21, 22
pulse shape 22
software control 6, 14
Power supply 4, 5
ps mode 4
ps operation of laser diodes 20
Pulse period jitter 11
Pulse shape 20, 22
Reference signal for TCSPC 11
Remote interlock connector 6
Reversed start-stop 11
Safety
emission indicators 6
key switch 6
labels 18
laser class 18
remote interlock 6, 18
Shutdown 4
Single-mode fibres 8
Specification
BDL-375-SMC 33
BDL-405-SMC 34
BDL-440-SMC 35
BDL-473-SMC 36
connector pin assignment 37
dimensions 38
Stability, of laser intensity 31
Status LEDs 5
Stop signal of TCSPC
delay of stop pulses 12
stop pulse from correct pulse period 12
Switch box 5, 6
control inputs 13
Synchronisation of TCSPC modules 11
Synchronisation signal 6
Synchronisation signal for TCSPC 11
TCSPC
delay of stop signal 12
FLIM 29
fluorescence decay setup 24
BDL-SMC Picosecond Diode Lasers
multiplexing lasers 17, 28
multi-wavelength 25, 26, 29
reference signal 11
stop signal 11
41
synchronisation with laser 11
TCSPC system with BDL-SMC 16
wiring diagram 16, 29
Trigger output 6, 11