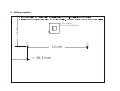
1
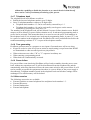
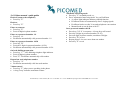
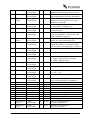
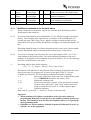
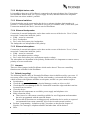
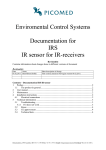
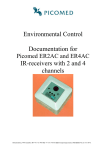
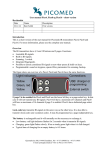
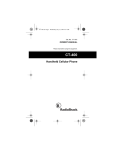
Environmental control
Documentation for
PicoPhone Loudspeaking analog
telephone
Brokelandsheia, N-4993 Sundebru, Ph +47 3711 9950 Fax +47 3711 9951 E-mail: [email protected] Foretaksnr 962 211 631 MVA
Revision history
When changes are made on the product or in the documentation, this will be given a revision
number. The list below keeps track of these changes. It will be signed by the person
responsible for updating the documentation.
Rev.no Chapt. Page
E0103 All
All
E0203 3.17
12
7.2.2
20
E0303 All
All
E0404
7.6, 8
25, 26
Comment
First version with English text.
Changed the appearance of the quick guide.
Inserted wiring diagram between EFP-Picolo.
Updated in accordance to SW version 1.02.
Changed record key for sound recordings.
Corrected IR-format compatibility.
Manual divided in 3 versions according to product
versions.
New version of EC Declaration of Conformity.
Added information in drilling template.
Date
14.02.03
25.02.03
Sign.
BHS
BHS
04.08.03
BHS
30.01.04
BHS
Contents – Documentation PicoPhone
1
2
Introduction ......................................................................................................................4
Getting started ..................................................................................................................4
2.1 Keys ................................................................................................................................5
2.2 Light indicators...............................................................................................................5
2.3 Connections ....................................................................................................................5
3
User manual ......................................................................................................................6
3.1 Incoming call ..................................................................................................................6
3.2 Outgoing call ..................................................................................................................6
3.3 Telephone conversation..................................................................................................6
3.4 Functions ........................................................................................................................7
3.4.1 Stand by ..................................................................................................................7
3.4.2 Hook off..................................................................................................................7
3.4.3 Volume adjustment.................................................................................................8
3.4.4 Auditive feedback...................................................................................................8
3.4.5 Voice message ........................................................................................................8
3.4.6 Automatic answering function................................................................................8
3.4.7 Telephone book ......................................................................................................9
3.4.8 Tone generating ......................................................................................................9
3.4.9 Power failure...........................................................................................................9
3.4.10 Accessories .............................................................................................................9
3.4.11 User manual - quick guide....................................................................................10
4
Programming ..................................................................................................................11
4.1 Getting started...............................................................................................................11
4.2 Programming – plain ....................................................................................................11
4.3 Programming – advanced .............................................................................................12
4.3.1 1
) Additional explanations for the table above .........................................................14
4.3.2 2
) Additional explanations for the table above .........................................................15
4.4 Programming – IR-training ..........................................................................................15
4.5 Programming – back to default settings .......................................................................15
5
Maintenance ....................................................................................................................16
PicoPhone loudspeaking analog telephone
Page 2.
6
Trouble shooting.............................................................................................................16
6.1 When errors arise..........................................................................................................17
7
Technical information ....................................................................................................17
7.1 Fixed mounting.............................................................................................................17
7.2 Electrical connections...................................................................................................17
7.2.1 Fixed 12 VDC and external IR-sensor .................................................................17
7.2.2 Multiple indoor units ............................................................................................19
7.2.3 External switches..................................................................................................19
7.2.4 External loudspeaker ............................................................................................19
7.2.5 External microphone.............................................................................................19
7.3 Jumpers.........................................................................................................................19
7.4 Default (recycling)........................................................................................................19
7.5 Technical data...............................................................................................................20
7.6 CE markings .................................................................................................................20
Drilling template .....................................................................................................................22
PicoPhone loudspeaking analog telephone
Page 3.
1 Introduction
This documentation are made for Picomeds PicoPhone loudspeaking IR-controlled analog
telephone, which is a part of Picomeds environmental system. It does not have any telephone
receiver, only loudspeaking function. An external loudspeaker and/or microphone can be
connected. It is controlled by a remote controller which transmits infrared (IR) signals. One
can use Picomeds IR-remote controllers, or it is possible to let the device be controlled by a
foreign IR-remote controller. There is a built-in IR-receiver, and in addition it is possible to
connect two external IR-sensors. PicoPhone is designed for indoor use. Picomeds
loudspeaking phones can be delivered in different variants. These are:
Picolo – doorphone with one or two outdoor devices.
PicoPhone – analog telephone.
PicoCombi – dual purpose doorphone and analog telephone.
It is possible to record speech into it, and the recorded speech are divided into two types:
Auditive feedback which is ment to be used as guidance for the user about which
functions are choosen. For example as a information about which digits pressed in a
telephone number.
Voice messages which can be played back to the one you are speaking with in the
telephone.
Switches can be connected to the loudspeaking products to control the main functions, in
addition to external speaker and microphone. A built-in automatic answering function can be
activated if required.
There is a number of programmable settings to make. I.e the number of ringing signals before
the automatic answering function triggers, which IR-format to be the active one, trainable IR
and so on.
2 Getting started
The following parts are included when the product is delivered:
Device.
Powersupply for connection to AC power outlet.
Telephone wire.
This documentation.
In addition a remote controller which transmits infrared signals (IR) should be used to control
the device to get full access to all functions.
Connect the power supply to a 230 VAC line and thereafter connect the output from the
power supply to the connection point marked with ”12V” on the reverse of the apparatus.
Connect the telephone wire to an analog telephone line and the other end of the wire to the
reverse of the apparatus in the connection marked with ”Tele”.
The device is now ready for use. When delivered, it is adjusted to be controlled by IR-format
New Assistant with user code 5 (NA5). All channels from 0 to 15 (0-9, A-F) should be
accessible on the IR-remote controller to control the loudspeaking devices fully.
An overview of the main functions are given in 3.4.11.
PicoPhone loudspeaking analog telephone
Page 4.
A complete description of all functions are given in chapter 3.
How to save numbers (up to 50 pcs) in the telephone book are described in chapter 4.2.
To get the most out of all functions in the PicoPhone, the installer should go through all
settings and make any changes in the advanced programming mode. This mode are
described in chapter 4.3.
It is recommended that auditive feedback is recorded before the unit shall be used. You
will find more information about this in chapter 3.4.4 and 4.3.
2.1 Keys
There are 2 visible keys on the front of PicoPhone.
Denomination
Function
Telephone symbol
Hook on/off.
Hand with telephone symbol Enable/disable automatic answering function.
2.2 Light indicators
There are 3 lightindicators on the front of PicoPhone.
Denomination
Function
Power on
Green.
Illuminates when power are connected to the device.
Telephone receiver
Red.
Illuminates when hooked off.
Flashing to indicate ”ready to hook off”.
Automatic answering
Yellow.
Steady on when automatic answering function is enabled.
Flashes slow in programming – plain mode.
Flashes fast in programming – advanced mode.
Double flashing in IR-training mode.
Triple flashing in default recycling mode.
2.3 Connections
On the reverse of the PicoPhone there are the following connections:
Denomination Type
Function
1
3,5 mm monojack.
External switch, phone book no 1.
2
3,5 mm monojack.
External switch, phone book no 2.
3
3,5 mm monojack.
External switch, phone book no 3.
Door
3,5 mm monojack.
Not used on PicoPhone.
Ph
3,5 mm monojack.
External switch, telephone.
12V
4 pins ”telephonecontact”. Power connection. Only the enclosed
powersupply must be used together with the
device.
Tele
4 pins ” telephonecontact” Connection of analog telephone line.
(6 pins wide).
Mic
3,5 mm stereojack.
External microphone.
Sp
2,5 mm stereojack.
External loudspeaker.
Internal loudspeaker will automatically be disconnected when an external loudspeaker is
connected.
PicoPhone loudspeaking analog telephone
Page 5.
Internal microphone will automatically be disconnected when an external microphone is
connected.
3 User manual
PicoPhone can operate in different modes. These are:
Ordinary use.
Programming – plain. Programming made only by use of an IR-remote controller. This
mode shall be used to save telephone numbers in the telephone book.
Programming – advanced. Gives access to advanced settings only. Ment to be used by
technicians when installing the device.
Programming – IR-training. Let the device teach IR-signals from foreign IR-remote
controllers. Make it possible to control it with other IR-remote controllers.
In chapter 3.4.11 an overview of the main functions are given on one page. The page is ment
as a quick guide for the user.
3.1 Incoming call
PicoPhone gives a ringing signal to indicate an incoming call. You may hook off by the use of
the remote controller, key on device, external switch or by the help of the automatic
answering function if this is enabled. When the automatic answering function activates, there
will be given a warning-tune, and then the PicoPhone hooks off after a predefined number of
ringing signals (the number can be changed in advanced programming mode).
3.2 Outgoing call
By the help of a remote controller or external switches it is possible to make a phone call.
PicoPhone will wait for the dialling tone before the telephone number are transmitted. If the
dialling tone not is possible to detect for the device, the number will be transmitted after a
predefined time. All numbers will be transmitted as DTMF.
PicoPhone can be programmed with a fixed prefix (i.e ”0”) to be used in combination with a
telephone switch board. If a prefix is enabled, the device will wait for dialling tone after the
prefix number is transmitted. When the telephone book is used, the device will transmit the
prefix automatically.
3.3 Telephone conversation
The telephone line will be active until:
The user disconnects (”hook on”) with the remote controller, key on PicoPhone, or an
external switch.
The person you are talking to, hooks on.
If the conversation is started by the automatic answering function, it will be ended when
the predefined conversation time (programmable in advanced programming mode)
expires. In this case it will be given 4 warning tones before disconnection.
PicoPhone loudspeaking analog telephone
Page 6.
3.4 Functions
3.4.1 Stand by
0 F 0
0 F ”hold Autoanswer
key” (on device)
A
<1-9> (direct dialling)
<External switches 1-3>
B <01-50>
C <telephone number> E
D
E
Telephone key on device
F
Automatic answering key
on device
3.4.2 Hook off
<0-9>
<External switches 1-3>
A
B
C
D
E
Telephone key on device
F
Automatic answering key
on device
Entrance to Programming – plain.
Entrance to Programming – advanced.
The autoanswering key on the apparatus has to be
pressed maximum 3 seconds after the time when ”F” is
released, and it has to be pressed for at least 3 seconds.
Hook off and redial the last used telephone number.
Hook off and transmit phone book number no 1-9.
Hook off and transmit phone book number no 1-3.
Hook off and transmit phone book number no 01-50. Two
digits has to be pressed.
Telephone indicator flashes slowly after ”B” is pressed,
and will illuminate steady after the second no is pressed.
If it takes more than 5 minutes without any keys pressed
when telephone indicator flashes, the device will go back
to standby.
On hook dialling preparation.
The telephone indicator will be flashing when ”C” is
pressed and it will illuminate steady when ”E” is pressed.
If it takes more than 5 minutes without any keys pressed
when telephone indicator flashes, the device will go back
to standby.
The telephone number can contain the same characters as
numbers in the telephone book, ref chapter 4.2.
External switch 1-3 (instead of a telephone number) will
hook off and transmit telephone book number 1-3.
No function.
Hook off. Telephone indicator will illuminate.
Enable/disable automatic answering function. Automatic
answering indicator changes status.
Transmit DTMF 0-9.
Transmit phone book number no 1-3.
Transmit DTMF *.
Transmit DTMF #.
Generate R-key signal = hook flash.
No function.
End conversation.
Volume adjustment in steps from 1-5.
Enable/disable automatic answering function. Automatic
answering indicator changes status.
PicoPhone loudspeaking analog telephone
Page 7.
3.4.3 Volume adjustment
Volume adjustments for the telephone function on PicoPhone may be adjusted with the
remote controller in 5 steps. If the volume has been changed, the new value is stored and used
for later telephone conversations. When pressing ”F” on remote controller the volume will
increase and it will be indicated by one short ”beep” for each press. When changing from
volume 4 to 5 (maximum) it will be indicated by a long ”beep”. The next keypress on ”F” will
change the volume to 1 (minimum).
3.4.4 Auditive feedback
The following words can be recorded :
"0-9", "*", "#", "Empty", "Saved", "Error" and "Pause".
These words may be used as an auditive feedback in ordinary use, and while programming the
device. If the user dont have any need for this auditive feedback it can be disabled (in
advanced programming mode). Auditive feedback in advanced programming mode can not be
disabled.
If auditive feedback is enabled, it will be heard in the following situations:
When someone tries to transmit an unprogrammed telephone book number it will say
”empty”.
When someone transmits a telephone book number it will say the position of the number
in the telephone book.
When the keys for 0-9, *, # are pressed and the telephone line not is activated (”C”), every
digit will be said. If the keys are pressed faster than the digits are presented, the feedback
will not be stopped. It will be stopped when the keys ”E” or ”C” are pressed.
3.4.5 Voice message
Three different voice messages with a duration up to 5 seconds may be recorded. 1, 2 or all 3
may be assigned to 1 or 2 different situations in a free order. When the situation becomes real,
the message will be spoken automatically. The situtations are:
1. Answering incoming telephone conversation.
Initiated by the user or automatic answering function.
2. End telephone conversation.
Initiated by the user or timeout when using automatic answering function.
Example:
You may for instance record the following: ”Hi, this is John. I am not able to talk, but I
understand what you say” as message number 1 (this is done in advanced programming
mode). So, let message number 1 be ”copied” to situation 1 (also done in advanced
programming mode). When John answer the phone (=situation number 1 in the list above)
message number 1 will be automatically played back in the beginning of the conversation.
3.4.6 Automatic answering function
The automatic answering function can be turned on and off with an IR-remote controller or
with the ”automatic answering function key” on PicoPhone. A light indicator will illuminate
when the function is enabled. Please refer to chapter 3.1 and 3.3 for more information.
Be aware of the following: if this function is enabled, it is possible to call to the user
and listen to what happens in the room. If the device is used by a disabled person
PicoPhone loudspeaking analog telephone
Page 8.
without the capability to disable the function or to control the device him/herself,
there can be a risk of involuntary monitoring of the person.
3.4.7 Telephone book
The telephone book in PicoPhone are able to:
Redial the last used telephone number up to 50 digits.
Store 50 telephonenumbers with up to 50 digits each.
Telephone book numbers 1-3 can be activated by external keys 1-3.
Telephone book numbers 1-9 can be activated by one keypress on the remote
controller by pressing one of the keys 1-9.
The numbers in the telephone book will not deleted if a power failure situation occur. Redial
memory will be deleted if a power failure situation occur. In advanced programming mode a
prefix can be activated. This means that there is no need to save the prefix in all numbers in
the telephone book if it is activated once in advanced programming mode. A pause (”F”) can
be a part of a number in the telephone book. PicoPhone will wait a predefined time before the
numbertransmitting continues if ”F” is a part of the telephone number.
3.4.8 Tone generating
PicoPhone generate tones as a responce to user inputs. Generated tones will occur when:
Keypress on device (also if key has no action in actual setting) except from when DTMF
are transmitted or when recorded speech are played back.
When a timeout occur after a ”B” or ”C” sequence in ordinary use.
When entering a programming mode.
When hook on is automatically executed.
3.4.9 Power failure
If a power failure come into being PicoPhone will go back to standby when the power come
back, without any operations on it. It will be disconnected from the telephone line and the
automatically answering function will have the same status as before the power failure. It will
not be possible to operate the equipment when there is a power failure or the power supply is
disconnected. Telephone numbers stored in the telephone book and all other settings will be
unchanged. The redial memory will be deleted.
3.4.10 Accessories
The following accessories are available:
External switches to control telephone line and phone book numbers 1-3.
External IR-sensor.
External loudspeaker.
External microphone.
PicoPhone loudspeaking analog telephone
Page 9.
3.4.11 User manual - quick guide
Hook off (answer the telephone)
Press key ”E”
Hook on
Press key ”E”
Phone to someone
Press key ”E”
Press all digits in phone number
Phone to a prestored number 1-9
Press key 1-9
PicoPhone automatically calls prestored number 1-9
Phone to a prestored number 10-50
Press key ”B”
Press the 2 digits in prestored number (10-50)
PicoPhone automatically calls prestored number 10-50
Automatic answering mode
Press key ”F” in standby mode, or:
Press "automatical answering mode" key on PicoPhone
A yellow light indicator indiactes enabled function
PicoPhone hooks off automatically after 5 ringing signals
PicoPhone hooks on after 30 seconds telephone conversation
Manual hook on can be done with "E"
Store prestored numbers 01-50
Press keys ”0-F-0” in sequence. A loong beep will sound
Press the 2 digits in prestored number (01-50)
Press all digits in phone number, maximum 50 digits
Press key ”D” to save
Repeat points 2-4 to save more than one number
Press key ”E” to exit
On hook dialling preparation
Press key ”C” - slow blinking telephone light indicator
Press all digits in phone number
Press ”E”. PicoPhone automatically calls number
Repeat last used telephone number
Press key ”A”
PicoPhone automatically calls last used number
Volumecontrol
Press key ”F” when you are speaking in the phone
A long "beep" indicates maximum volume
Brokelandsheia, N-4993 Sundebru, Ph +47 3711 9950 Fax +47 3711 9951 E-mail: [email protected] Foretaksnr 962 211 631 MVA
4 Programming
PicoPhone may be programmed in different ways.
Save and edit telephone numbers in telephone book.
Programming – plain:
Adjustments ment to be performed by a technician.
Programming – advanced:
Copy and ”learn” foreign IR-signals.
Programming – IR-training:
Programming – default/recycling: Restore default settings.
Observe that:
When installing a PicoPhone you should as a first job enter advanced programming
mode and record speech to the auditive feedback (point 31 in the list). This should be
done because this feedback will be a very good help in programming mode.
In programming mode the device will not respond on telephone call.
The device will leave programming mode if no keys are pressed within 60 seconds.
If auditive feedback is needed in ordinary use, it has to be enabled (point 4 in the list).
Specific for plain and advanced programming mode:
PicoPhone leaves programming mode if any keys on device is pressed.
The ”D” key can be pressed everywhere in the programming mode. When a ”D” is
pressed at the end of a programming sequence it means ”store value”. If ”D” is pressed in
the middle of a sequence the sequence can start from the beginning again, without storing
any values.
The ”E” key can be pressed everywhere in the programming mode to leave the mode.
Invalid keystrokes will be indicated with the auditive feedback ”error”, and the sequence
are ready to start from the beginning. This is one situation where it is important to have
done the auditive feedback recordings in point 31 in advanced programming mode.
4.1 Getting started
When installing a PicoPhone you should as a first job enter advanced programming
mode and record speech to the auditive feedback (point 31 in the list). This should be
done because this feedback will be a very good help in programming mode.
First of all; decide which type of programming mode should be entered.
Enter programming mode as described in the actual chapter.
An IR-remote controller has to be present to perform plain and advanced programming.
As a default value, the device responds to IR-format New Assistant user code 5 (NA5).
If no remote controller with NA5 is present, an other remote controller can be used. In this
situation the device has to learn the IR-signals. Execute the IR-training process in chapter
4.4 first.
4.2 Programming – plain
In this mode it is possible to store, edit and delete telephone numbers in the telephone book.
Auditive feedback is indicated with italic letters.
To enter this mode do as the following text says:
1. Press ”0 – F – 0” on remote controller when device is in standby mode.
2. When entering programming mode, it will be indicated by a slow flashing light indicator
for the automatic answering function.
01-50
<Existing number
<telephone number> D
PicoPhone loudspeaking analog telephone
Saved
Telephonenumber
Page 11.
01-50
>/ Empty
<Existing number
>/ Empty
Pressed numbers
D
Saved
will be stored.
Telephonenumber
will be deleted.
When a telephone book number is given, the stored telephone number will be played back
digit by digit. If no number is stored, the word ”empty” will be played back.
When a number is entered, all digits will be played back one for one. If the keystrokes are
faster than the speech, the digits will be queued and played back one for one. The
playback will be interrupted by key ”D” (store) or ”E” (exit programming mode).
If more than 50 digits are entered, all digits after the 50th will be ignored. The ignored
digits will neither be played back.
The telephone numbers may contain the following:
Digit/letter Belonging playback Function
0-9
DTMF 0-9
0-9
A
DTMF *
*
B
DTMF #
#
C
”Clear”. Deleting all digits. Wait for new digits.
Empty
F
Stores a pause with the same lengt as for the one
Pause
programmed as a part of a prefix (done in
advanced programming mode).
4.3 Programming – advanced
It is ment that this mode shall be entered by technicians with a good insight in the product. It
is important that the technician choose the best settings so the user can make the most out of
the benefits of the product. Especially with the built in speech functions which are available.
When installing a PicoPhone you should as a first job enter advanced programming
mode and record speech to the auditive feedback (point 31 in the list). This should be
done because this feedback will be a very good help in programming mode.
Observe that:
Auditive feedback are indicated with italic letters.
Comma "," in the table indicate possible values, i.e "0,1" indicates "0" or "1".
Values in paranthesis are default values.
”C” can be pressed everywhere in this mode. The sequence is interrupted and the device is
ready for a new sequence.
To enter this mode do as the following text says:
1. Press ”0 – F” on the remote controller while device is in standby mode.
2. Thereafter, and within 3 seconds, press and hold the key for ”automatically answering
function” on the device for 3 seconds.
3. When the light indicator for ”automatically answering function” is executing rapid
flashing you have entered the advanced programming mode.
4. Release the key for automatically answering function.
For some of the lines here, there are given an additional explanation beneath the table.
00
Version number readout.
SW version
PicoPhone loudspeaking analog telephone
Page 12.
01
022
03
3-20 (5)
Pressed digit
Stored digit 1-30 (5)
Pressed digit
Stored digit/ -, 1-99 (-)
Empty
Pressed digit
D
Saved
D
Saved
D
Saved
0,1 (0)
Pressed digit
6-99 (45)
Pressed digit
5-99 (30)
Pressed digit
D
Saved
D
Saved
D
Saved
D
Saved
D
Saved
100-999 (115)
Pressed digit
0
Pressed digit
00-11b (10)
Pressed digit
D
Saved
Number of ringing signals before the
automatic answering function activates.
Number of seconds before the automatic
answering function activates doorphone.
Number of minutes open telephone line in
automatic answering mode. No value
indicates 30 seconds.
Auditive feedback on/off. 0 = deactivated,
1 = activated. In ordinary use.
Number of seconds open doorphone
communication.
Number of seconds from a bell button
press on doorphone 2, until it not is the
active doorphone anymore.
Fixed prefix or not. The digit give the
prefix. No value means no prefix.
Maximum time in seconds after a prefix
before the number is transmitted. Time
will be shorter if dialling tone is detected.
Number of milliseconds for R-key flash.
D
Saved
Delete and deactivate learned IR.
D
Saved
0-31 (5)
Pressed digit
0-3 (0)
Pressed digit
0-1 (0)
Pressed digit
0-4095 (0)
Pressed digit
0-9, A-F (D)
Pressed digit
D
Saved
Activate IR-format, 0 = off, 1 = on.
1. Digit 1 indicate New Assistant.
2. Digit 2 indicate Gewa.
User code for New Assistant.
D
Saved
User group for Gewa.
D
Saved
D
Saved
Activate New Assistant/Gewa lockcode.
0 = off, 1 = on.
Value for New Assistant/Gewa lockcode.
D
Saved
Stored digit
04
Stored digit
052
Stored digit
062
Stored digit
07
Stored digit/ -, 0-99 (-)
Empty
Pressed digit
Stored digit 3-8 (3)
Pressed digit
08
09
Stored digit
10
Empty
11
Stored digit
12
Stored digit
13
Stored digit
14
Stored digit
15
0
161
Stored digit
17
18
19
20
211
221
231
24
25
261,2
Empty
Empty
Empty
Empty
Playback
Playback
Playback
Empty
Empty
Stored digit/
Empty
Stored digit/
Empty
271,2
Voice input
Voice input
Voice input
–, nnn (-)
Pressed digit
–, nnn (-)
Pressed digit
PicoPhone loudspeaking analog telephone
Saved
Saved
Saved
D
Saved
D
Saved
Indicate which ”key” the New Assistant
/Gewa lockcode shall be assigned to.
Not in use.
Not in use.
Not in use.
Not in use.
Record voicemessage 1.
Record voicemessage 2.
Record voicemessage 3.
Not in use.
Not in use.
Activate voicemessage(s).
(Answer doorphone)
Activate voicemessage(s).
(Unlock/open door)
Page 13.
281,2
291
301
Stored digit/
Empty
Stored digit/
Empty
Stored digit/
Empty
311
4.3.1
16
21-23
–, nnn (-)
Pressed digit
–, nnn (-)
Pressed digit
–, nnn (-)
Pressed digit
Voice input
D
Saved
D
Saved
D
Saved
D
Saved
Activate voicemessage(s).
(End conversation with outdoor unit)
Activate voicemessage(s) for situation 1.
(Answer telephone)
Activate voicemessage(s) for situation 2.
(End telephone conversation)
Record auditive feedback words.
1
) Additional explanations for the table above
When a lockcode is activated for a given key, then the other IR-format(s) will be
deactivated for the actual key.
To record word/sentences press and hold the "F" key, talk the message, and release
the key. The recording stops when the key is released, or the available time of 5
seconds are used. Then a long ”beep” appears, and the recorded message will be
played back. The speech will be stored while recording it, not when pressing the ”D”
key.
Recording should be done in a silent environment with a clear voice with the mouth
near the microphone which is situated in the left front corner of the device.
26-30
To activate a message, you may enter one, two or three digits (value 1,2 or 3) for
each situation in the prefered order. The value indicates the number of the voice
message. A description of each situation are given in chapter 3.4.5. A voice message
has to be recorded before it can work.
31
Recording shall be done in this sequence:
"0-9", "*", "#", "Empty", "Saved", "Error" and "Pause".
Record one word and listen to the playback. Each word may be played back several
times if necessary. If not approved, you may record again. There is 1 second
available for each word. The following keys shall be used while recording:
Record one word. Do it in the same way as described in point
F
21-23. OBSERVE: Read also text for key ”B/#”.
Playback a recorded word.
A
Go to next word in the sequence. If the last word is recorded,
B
("Pause") there will come 3 short ”beep” and the device are
ready to record the first word ("0") in the sequence again.
Finish the sequence.
D
Start with "0", go on with ”1” and so on. ”Pause” is the last word.
Important!
When installing a PicoPhone you should as a first job enter advanced
programming mode and record speech to the auditive feedback (point 31 in
the list). This should be done because this feedback will be a very good help
in programming mode.
Remember to activate auditive feedback in point 04 if this shall be active in
ordinary use of the equipment.
PicoPhone loudspeaking analog telephone
Page 14.
4.3.2 2) Additional explanations for the table above
These points does not have any effect for PicoPhone's functions.
4.4 Programming – IR-training
When entering this mode, then the PicoPhone automatically will activate the trained IRformat, while the other IR-formats will remain unaltered. This means that it is possible to use
more than one remote controller to control the device. To enter IR-training mode, only keys
on the device shall be used. There is an additional ("hided") key on PicoPhone to be used. It is
placed between and a little bit above the two existing keys. In the text beneath it is refered to
as "hided" key.
1. Press and hold the automatic answering key. Light indicator changes as normal.
2. Press once on hided key.
3. Press twice on telephone key.
4. Press twice on hided key.
5. Release the automatic answering key. The automatic answering light indicator will start
double flashing with a pause to indicate that mode IR-training is entered. Channel number
is set to 0.
Maximum time for the points above is 8 seconds.
The word "0" (channelnumber is 0) will be played back. If there is no IR on the actual
channel, the device will also play back the word ”Empty”. The device is now ready to train the
channels 0-15. Observe that IR-training not can be done with IR-signals applied to the
external IR-sensors. The following 3 things can be done:
a) Train the device with an IR-remote controller. Point the remote controller against the IRreceiver placed under the dark glass in the front of the device. The distance from the front
of the remote controller and the IR-glass on the device should be approximately 2-5 cm.
Press the key designated to the channel number which are active1. After the first
successful IR-training, the device will playback "Saved Beep". Then press the hided key
and repeat the IR-training once again with the same key. After the second successful IRtraining procedure on the channel the device playback "Saved Beep Beep". A double IRtraining is neccessary to manage IR-remote controllers which transmits different IRsignals when executing repeated keystrokes on the same key.
b) Delete trained IR with a press on the automatic answering key. The device will playback
”Empty”.
c) Go to the following channel number with a keystroke on the hided key. The new channelnumber will be played back if it is among channel 0-11 (10 = * and 11 = #). The channels
12-15 will be indicated with a ”Beep”. If there isn’t any trained IR-signal on a channel, the
device will also play back the word ”Empty”. When passing the last channel (15) the
device will leave IR-training programming mode.
To delete all trained IR-signals, enter advanced programming mode and execute the
”deactivate and delete IR” command, or make a recycling to get the device back to default
settings. PicoPhone will leave IR-training on timeout.
4.5 Programming – back to default settings
There is a 2-stage process to execute to get the PicoPhone back to default settings. This
sequence is controlled by the keys on the device. Details about hided key: refer to chapter 4.4.
Step 1 restores all changeable parametres back to default settings.
1
One should give a very short and concise keystroke.
PicoPhone loudspeaking analog telephone
Page 15.
Step 2 is a continuation of step 1, and if executed, all recorded speech will be deleted
(words in auditive feedback and voice messages).
Do as following:
1. Press and hold the key for automatically answering function. Light indicator for function
will change as normal.
2. Press hided key once.
3. Press 3 times on telephone key.
4. Press 3 times on hided key.
5. Release the key for automatically answering function. Light indicator for function will
start triple flashing. You will hear ” Beep-Beep-Beep" as a confirmation for a correct
entered mode.
6. To start recycling: press the key for automatically answering function and restoring
process starts. If the key not is released at once, but pressed for 3 seconds, also step 2
(delete all recorded speech) will be executed. The speech deleting process lasts for 5
seconds. A long ”Beep” will sound when the process are finished.
Maximum time for the points 1-5 is 8 seconds. Maximum time between the points 5-6 is 8
seconds.
When restoring the values, the following are done:
Alle telephone numbers in the telephone book will be deleted.
Redial memory will be deleted.
Volume level will be set to value = 3.
Automatic answering function disabled.
Alle values which can be altered in advanced programming mode will be set to default.
Trained IR will be deleted.
5 Maintenance
Picomeds PicoPhone loudspeaking IR-controlled loudspeaking analog telephone is developed
to work without any sceduled maintenance. The equipment should be cleaned when
neccessary. Wipe the equipment with a slightly damp cloth or an antistatic cloth. Never use a
dry cloth, while this result in risk of static charges. It shall not be exposed for fluids in any
way.
6 Trouble shooting
If your equipment does not behave as expected, first of all try to solve the problem yourself
using the following table.
Symptom
Completely dead. No light
indicators illuminated.
Possible cause
No power connected.
PicoPhone loudspeaking analog telephone
Reccomended action
Ensure that the power
supply is the correct one
which was delivered with
the equipment.
Ensure that the power
supply is connected to a
functioning wall outlet.
Ensure that the power
supply is properly
connected to the
Page 16.
Very low volume in the
speaker.
Does not respond to IRremote controller.
Volume set to minimum.
Device is covered.
IR-glass in front of device
is covered.
Wrong IR-signals.
There are no fuses inside the device which shall be replaced.
equipment.
Hook off, press ”F”.
Remove covering.
Remove covering.
Reprogram or do IRtraining once again.
6.1 When errors arise
If there are errors which are not possible to solve, contact your supplier of the equipment, or
the national distributor. Please make a note beneath of the telephone number to your supplier.
Name
Supplier:
Telephone number, adress etc.
National distributor:
7 Technical information
The device is made by:
Injection moulded box in recycleable ABS.
Frontglass made of plexiglass (Polycarbonat).
2 PCBs: a maincard in bottompart with contacs, and a keypad PCB mounted in top-part.
Microphone and loudspeaker mounted in rubber gaskets to dampen mechanical vibrations.
Frontfoil. Productname, lightindicators and keys are visually viewed on it.
7.1 Fixed mounting
PicoPhone are designed to be placed on a flat surface, or it can be hanged vertically with the
help of the built-in screwholes.
Ensure that cables not are crushed between the device and surface.
The microphone is placed in the line between top and bottom part of the unit. When
placed vertically on a wall, pay attention to the attenuation of the users voice if the unit
are placed lower than the users mouth.
A drilling template is made and attached at the end of this documentation.
7.2 Electrical connections
Severe terminal strips are placed inside the box.
Connections are made for cables of size 0,14-1,5 mm2 (35-16 AWG).
Remove insulation = 6 mm.
The figure beneath shows the position for terminal strips, contacts and jumpers.
7.2.1 Fixed 12 VDC and external IR-sensor
0V
0 V.
+12V
+12 VDC fixed. Ment for IR-sensors and bell buttons. I < 65 mA.
LED
Controls LED on external IR-sensor(s).
PicoPhone loudspeaking analog telephone
Page 17.
IR
IR-signal from external IR-sensor(s).
1 or 2 external IR-sensors (Picomed ES2) can be connected to the terminal strip. They will be
supplied with 0 and +12 VDC together with LED signal from the device. The IR-signal wires
are also connected at the same terminal strip. There is a lightindicator placed in the front of
the main PCB which indicates that IR is received. This LED is working in parallell with the
LED indicators on the external IR–sensor(s). Observe that IR-training not can be done with
IR-signals applied to the external IR-sensor(s).
!
"
)
*
PicoPhone loudspeaking analog telephone
#
$ % &
$ '( Page 18.
7.2.2 Multiple indoor units
It is possible to have up to 4 PicoPhone's connected to the same telephone line. If more than
one PicoPhone shall be used, use 1 power supply for each, and then connect the telephone
lines from one unit to another i parallell.
7.2.3 External switches
External switches can be connected to the device to activate telephone book numbers in
position 1-3 and telephone key. This shall be one-pole N.O switches with 3,5 mm mono jack.
Connection marked with "Door" is not in used on PicoPhone.
7.2.4 External loudspeaker
Connection of external loudspeaker can be done on the reverse of the device. Use a 2,5 mm
stereojack. Connections inside the jack is:
Earth – not to be connected.
Pin 2: loudspeaker.
Pin 3 at the end (center pin): loudspeaker.
The loudspeaker are independent of the polarity.
7.2.5 External microphone
Connection of external microphone can be done on the reverse of the device. Use a 3,5 mm
stereojack. Connections inside the jack is:
Earth – not to be connected.
Pin 2: microphone positive voltage.
Pin 3 at the end (center pin): microphone negative voltage.
The microphone are dependent of the polarity, and therefore it is important to connect correct
polarity to correct connection.
7.3 Jumpers
There are some jumpers inside PicoPhone which can be altered. These are controlling
functions not available for the PicoPhone.
7.4 Default (recycling)
The following shall be done on Picomeds PicoPhone when it shall be used by a new user. If
neccessary, make a copy of this page, fill inn serial number, version and tick off the points
which are done with signature and date at each point, and file it as your routines requires.
Serialnumber:
Check the equipment. Is there any physical damages, cracks etc in box or foil.
Check that foil is not damaged, that it is fastened all around the edges and that it not has
loosened from its surface.
Clean the device.
Ensure that all components are available, power supply and telephone wire.
Make a function check.
There has to be a IR-remote controller available for test. Equipment and transmitter
has to be programmed with the same IR-format.
Ensure that all functions are working properly and that the device works as expected
on commands from remote controller, keys on device and external switches.
Perform ”programming – default/recycling” procedure as described in chapter 4.5.
Signals, voice messages, telephone numbers and other data will be deleted.
Store.
PicoPhone loudspeaking analog telephone
Page 19.
7.5 Technical data
Type
Operate
Power supply
Power consumption
Temperature
Measurements
Weight
Key size
Material in box
Waste management
Developed and manufactured in
Picomed PicoPhone loudspeaking IR-controlled analog
telephone.
Picomed IR-remote controller with 16 channels.
An other IR-remote controller with 16 channels.
Keypad for main functions.
External switches may be connected.
Enclosed: Mascot 8713 Medical.
< 250 mA internal consumption.
Designed for indoor use, 0 C.
LxWxH: 165 x 210 x 50 mm.
0,5 kg without powersupply and cable.
20 x 12 mm ovale.
ABS, recycleable.
Plexiglass (Polycarbonat) in IR-glass.
Dispose as electronic waste.
Norway.
7.6 CE markings
Picomeds environmental control systems are developed and manufactured in accordance with
EU directives, national regulations and harmonised standards which are applicable, and
thereafter marked with the CE-mark. The Declaration of Conformity is in English version and
it is set out on the next page.
PicoPhone loudspeaking analog telephone
Page 20.
8 Drilling template
!