1
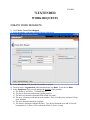
1
4/18/2006
7i Requestors Manual
updated 4/18/06
TABLE OF CONTENTS
GENERAL INSTRUCTIONS ........................................................................................................ 2
LOGGING IN TO 7i EXTENDED ................................................................................................ 3
WORK REQUESTS ....................................................................................................................... 4
CREATE WORK REQUESTS................................................................................................... 4
VIEW WORK REQUESTS........................................................................................................ 7
VIEW AND MODIFY WORK REQUESTS ............................................................................. 7
VIEW WORK ORDERS AND WORK ORDER COMMENTS ............................................... 8
WORK ORDER STATUS.......................................................................................................... 8
PRINT WORK ORDERS ........................................................................................................... 9
2
4/18/2006
GENERAL INSTRUCTIONS
Before you begin:
1) 7i (also called 7i Extended)– A work order system that uses a user-friendly web-based
format.
2) ALL CAPS—
a) Everything you enter in 7i Extended should be entered in uppercase. This is true even
though some of the screen shots below may display lowercase text.
3) FMD employees please note: Activity vs. Task—
a) MP2 and WebLink used the term “Task” to refer to the work to be performed.
b) 7i uses the term “Activity,” instead, to refer to the work to be performed. You will see
the term “Activity” used throughout this manual.
c) A new feature in 7I Extended allows multiple Activities to be associated with one work
order, unlike in MP2, which allowed only one Task to be associated with a work order.
4) FMD’s external customers used WebLink before 7i Extended was implemented. These
external customers will be called requestors in this manual. Requestors will use 7i
Extended.
5) When the instructions in this manual direct you to “click” an item, you should click the left
button on your computer mouse.
6) Different types of fields
a) In 7i Extended, a field with no lookup button to the right is a free text field.
b) In 7i Extended, a field with a lookup button to the right allows you to type information
(if you know it) or use the lookup button to find it. What you type must match what is in
the lookup table.
c) If a field is white, it is not required by 7i Extended to advance to the next field.
However, FMD’s policies may require that you fill in some white fields.
d) If a field is blue it is required.
7) Closing 7i —
a) When you exit 7i Extended, click LOGOUT (top right corner). This will ensure that
you properly close your 7i Extended session.
8) If you want to use a Dataspy to find work orders closed today, use the following condition:
a) Activity End Date >= -0 (minus sign 0). This Dataspy can now be run each day to see
the current date’s work orders.
9) Click on the small orange disk on the right-hand side of screen to save the current layout for
future sessions.
10) Click on the green X below the small orange disk (right-hand side of screen) to export the
current screen to MS Excel.
3
4/18/2006
LOGGING IN TO 7i EXTENDED
1) Start Internet Explorer 6.0—
a) Double-click on the Internet Explorer icon on your Desktop
b) 7i Extended requires that you use Internet Explorer version 6.0 or later.
2) To access 7i Extended manual—Go to http://www.fmd.duke.edu
a) Click Work Request
b) Click 7i Customer Manual (pdf)
c) Manual will open in Adobe Acrobat Reader.
3) To access 7i Extended login page—
a) Go to http://www.fmd.duke.edu
b) Click Work Request to go to the 7i Extended login page
i) This will take you to the URL listed below:
http://fmdlinas.fac.duke.edu:7779/web/base/logindisp?tenant=production
c) Add login web page as a Favorite—
i) Click Favorites, Add to Favorites, OK
ii) Next time you login, just click Favorites and choose Datastream 7i
4) Login—
a) Type your User ID, typically your last name, first initial (i.e. SMITHJ for Jim Smith)
b) Type your password
i) The first time you login type 111111 (6 ones)
c) Click Login. The Starting Point home page will appear.
d) After you login the first time, change your password. You must choose a password that
contains at least six characters
i) To change password, click My Account at top of screen
ii) Type current password
iii) Type new password (at least six characters, combine letters and numbers)
iv) Retype new password
v) Click Save Record button at top left of screen (button that looks like a disk)
4
4/18/2006
7i EXTENDED
WORK REQUESTS
CREATE WORK REQUESTS
1) Click Work, Create Work Request
2) At the beginning, your form will look like the form below.
3) In the Description field, describe the problem or project.
4) The next item is Organization which should already say Duke. Leave this as Duke.
5) In the Equipment field you will indicate the location of the problem.
a) The format is as follows: 7261RM0204-02
b) The first 4 characters indicate the building number.
c) The next two characters should be RM (stands for room).
d) The next 4 characters indicate the room number. Place a leading zero in front of 3 digit
room numbers.
e) The next character should be a hyphen.
f) The last two characters indicate the floor. Type 00 for basement level and 99 for subbasement level. A floor of A2 would indicate the 2nd floor, A wing.
5
4/18/2006
g) You can type the location directly into the Equipment field or use the filter to find it
(click the button to the right).
h) In the filter, type a building number, click Run, and choose the location from the list or
type a partial location, click Run, and choose the location. Then click OK.
6) Skip Department field.
7) Under the work order section, click down arrow and choose a Type (of work order ).
8) Skip Class field.
9) Skip Status field.
10) Click down arrow and choose a Priority.
11) Skip Sched. Start Date field.
12) Skip Cost Code field. If you are submitting a maintenance repair request, you do not need to
provide a fund code. If you are requesting a special departmental project that is not required
for the maintenance of the building, provide your department’s fund code in the Comments
field.
13) Click button to right of Problem Code field and choose a Problem Code. You may use the
filter to find the correct Problem Code.
14) Skip Assigned To field.
15) The Requested By field should already indicate your User ID. Leave this as it is.
16) Skip Date Reported field.
17) Comments. Provide three pieces of information in the Comments section.
a) Enter your Full Name and Phone Number if you are the point of contact. If someone
else should be the contact for this work request, provide that person’s Full Name and
Phone Number as well as your Full Name and Phone Number.
b) Enter the Fund Code for the work only if it is a special project that is not required
building maintenance. Examples of building maintenance include repairing leaks and
replacing light bulbs. An example of a special departmental project would be hanging a
sign.
c) In more detail, describe the nature of the problem or project. The Comments field
provides room to include a more complete description than the Description field.
d) Although the Comments field provides unlimited space, please be concise and specific.
Specific information helps our workers to locate the problem quickly and complete work
efficiently. All information you enter is eventually forwarded to SAP and becomes part
of Duke’s permanent records. Keep this in mind.
18) Click Submit or Submit and Add Another. If you click Reset, you will clear the form.
6
19) Your completed form will be similar to the form below.
20)
4/18/2006
7
4/18/2006
VIEW WORK REQUESTS
1) Click Work, View Work Requests.
2) Find the row that refers to the work request you want to view and double-click on it.
3) On the Work Request Details page you can view the Work Request and observe the Status.
VIEW AND MODIFY WORK REQUESTS
4) Click Work, View Work Requests.
5) Find the row that refers to the work request you want to view or modify and double-click on
it.
6) On the Work Request Details page you can view or modify the work request.
7) While it is still a work request, you can change information. Once it becomes a work order
(with a Status other than Work Request), you will have to contact the FMD Work Control
Center to change information.
8) Click Submit to tell 7i Extended to make the changes. 7i Extended will present you with a
message telling you that the changes were made.
9) Former WebLink users (called requestors in 7i Extended) cannot approve work requests.
Only the FMD Work Control Center employees can approve work requests. Approving a
work request changes it to a work order.
8
4/18/2006
VIEW WORK ORDERS AND WORK ORDER COMMENTS
1) Click Work, Work Orders. 7i Extended brings up the work order List View page. This
page enables you to view work orders.
2) Click Record View tab. Record View enables you to view a work order’s details.
3) Click on the work order for which you need to view comments.
4) Click the Comments tab. 7i Extended brings up the Comments screen. On this screen you
can view the comments for the work order you have selected.
WORK ORDER STATUS
1) Work Request - Initial status that indicates work request has not reached the Work Control
Center or been approved.
2) Open - Indicates that it has reached the Work Control Center which has approved it, turning
it into a work order. At this point, it is transferred to a shop and is being worked on.
3) Completed - The shop has indicated that it has completed the work for the work order.
4) Rejected - Work Control Center could not approve the work order for some reason (very
rare).
5) Note: Remember that requestors can change work request information using the View Work
Requests page. However, once a work request is approved by the Work Control Center and
becomes a work order, requestors cannot change work order information in 7i Extended. At
that point, requestors should contact the FMD Work Control Center to change work order
information.
9
4/18/2006
PRINT WORK ORDERS
1) Remember that requestors can change work request information. However, once a work
request is approved, as a work order, by the Work Control Center requestors cannot change
work order information in 7i Extended. Requestors should contact the FMD Work Control
Center to change work order information.
2) Both work orders and work requests can be printed in 7i Extended.
3) To print work orders or work requests click Work, Work Orders. This brings up the List
View screen and displays work orders and work requests.
4) Select the work order or work request.
a) While in List View, click on the work order or work request one time to highlight it (you
may also double-click on the work order or work request to view it in Record View).
b) You can now print the work order or work request.
c) Click the print button. The print button is in a row of buttons at the upper-left of your
screen and it looks like a small printer.
d) Adobe Acrobat Reader generates the printable work order.
e) Click Acrobat’s printer button, which is on the left side of the toolbar and above the work
order.
f) Click OK. The work order will print on your printer.