1
smar - ProjectWorX
First in Fieldbus
USER’S MANUAL
ProjectWorX
MAY / 06
ProjectWorX
VERSION 8
TM
FOUNDATION
P V I E WP WK M E
www.smar.com
Specifications and information are subject to change without notice.
Up-to-date address information is available on our website.
web: www.smar.com/contactus.asp
Table of Contents
TABLE OF CONTENTS
CHAPTER 1 - INTRODUCTION ................................................................................................................. 1.1
OVERVIEW OF PROJECTWORX....................................................................................................................... 1.1
STARTING PROJECTWORX.............................................................................................................................. 1.1
PROJECTWORX SNAP-INS AND TREE CONTROL .................................................................................................1.2
TOOLBARS.......................................................................................................................................................... 1.2
MMC TOOLBAR..........................................................................................................................................................1.2
SNAP-IN TOOLBAR....................................................................................................................................................1.3
MENUS ................................................................................................................................................................ 1.3
ACTION MENU ...........................................................................................................................................................1.3
VIEW MENU................................................................................................................................................................1.4
TOOLS MENU.............................................................................................................................................................1.5
HELP MENU ...............................................................................................................................................................1.6
CHAPTER 2 - USING THE PROJECTS CONSOLE .................................................................................. 2.1
PROJECT MANAGEMENT ................................................................................................................................. 2.1
ORGANIZATION OF PROJECT FOLDERS................................................................................................................2.1
APPLICATION FILES..................................................................................................................................................2.2
OPC SERVER CONFIGURATIONS ...........................................................................................................................2.2
CREATING A NEW PROJECT............................................................................................................................ 2.3
IMPORTING FILES INTO A PROJECT............................................................................................................... 2.3
MANAGING PROJECT FILES............................................................................................................................. 2.6
DELETING PROJECT FILES......................................................................................................................................2.7
RENAMING PROJECT FILES ....................................................................................................................................2.8
DUPLICATING PROJECT FILES................................................................................................................................2.8
PACKING AND UNPACKING PROJECTS ......................................................................................................... 2.9
PACKING PROJECTS ................................................................................................................................................2.9
UNPACKING PROJECTS .........................................................................................................................................2.10
UNPACKING EXISTING PROJECTS .......................................................................................................................2.12
UNPACKING PROJECTS THAT CONTAIN SQL CONFIGURATION DATABASES ................................................2.13
LOG FILES FOR PACKED AND UNPACKED PROJECTS ......................................................................................2.14
VIEWING PROJECT PROPERTIES ................................................................................................................. 2.14
GENERAL TAB .........................................................................................................................................................2.15
SUMMARY TAB ........................................................................................................................................................2.16
PROJECT FILES TAB...............................................................................................................................................2.17
PASSWORD PROTECTION TAB .............................................................................................................................2.17
APPLICATION PREFERENCES ....................................................................................................................... 2.19
GENERAL TAB .........................................................................................................................................................2.20
FILES TAB ................................................................................................................................................................2.22
LOG FILES................................................................................................................................................................2.23
SOURCE CONTROL ................................................................................................................................................2.24
USING THE FIND AND REPLACE UTILITY ..................................................................................................... 2.25
GLOBAL FIND AND REPLACE UTILTY ...................................................................................................................2.25
USING THE GLOBAL SEARCH FEATURE ..............................................................................................................2.27
SEARCH AND REPLACE INDIVIDUAL FILES .........................................................................................................2.29
ACTIVATING AND RUNNING PROJECTS....................................................................................................... 2.30
MAKING A PROJECT ACTIVE .................................................................................................................................2.30
STARTING THE ACTIVE PROJECT ........................................................................................................................2.31
STOPPING THE ACTIVE PROJECT ........................................................................................................................2.32
MACHINE STARTUP AND PROJECT RUNTIME SETTINGS..................................................................................2.32
GENERATING REPORTS................................................................................................................................. 2.33
CUSTOMIZING THE PROJECTS VIEW ........................................................................................................... 2.34
ADDING CUSTOM ITEMS TO THE PROJECTS TREE ................................................................................... 2.35
CHAPTER 3 - MANAGING APPLICATION FILES..................................................................................... 3.1
OVERVIEW OF APPLICATION FOLDERS AND FILES ..................................................................................... 3.1
ADDING AND CREATING APPLICATION FILES............................................................................................... 3.2
CREATING A NEW APPLICATION FILE ....................................................................................................................3.2
ADDING AN APPLICATION FILE TO A PROJECT ....................................................................................................3.3
ADDING A SQL SERVER CONFIGURATION DATABASE TO A PROJECT .............................................................3.5
CHECKING THE DATABASE STATUS ......................................................................................................................3.6
III
ProjectWorX – User’s Manual
ACTIVATING CONFIGURATION DATABASES .........................................................................................................3.7
COMPACTING MICROSOFT ACCESS DATABASES ...............................................................................................3.8
EXPORTING AND IMPORTING CONFIGURATION DATABASES ............................................................................3.8
OPC TAG VERIFICATION ........................................................................................................................................3.10
GRAPHWORX TREE ........................................................................................................................................ 3.11
GRAPHWORX DISPLAYS ........................................................................................................................................3.12
CREATING A NEW GRAPHWORX DISPLAY FILE..................................................................................................3.12
SPECIFYING A GRAPHWORX STARTUP DISPLAY FILE ......................................................................................3.14
GRAPHWORX TEMPLATES ....................................................................................................................................3.14
CREATING A NEW GRAPHWORX TEMPLATE FILE ..............................................................................................3.15
GRAPHWORX SYMBOLS ........................................................................................................................................3.16
GRAPHWORX VBA WIZARD ...................................................................................................................................3.17
ALARMWORX TREE ......................................................................................................................................... 3.18
ALARMWORX CONTAINER.....................................................................................................................................3.19
ALARM LOGGER CONFIGURATOR........................................................................................................................3.20
ALARM SERVER CONFIGURATOR ........................................................................................................................3.20
MULTIMEDIA CONFIGURATOR ..............................................................................................................................3.21
ADDING A MULTIMEDIA CONFIGURATION DATABASE .......................................................................................3.22
CREATING A NEW MULTIMEDIA SQL CONFIGURATION DATABASE.................................................................3.23
CHECKING THE DATABASE STATUS ....................................................................................................................3.24
ALARMWORX VIEWER............................................................................................................................................3.24
TRENDWORX TREE ......................................................................................................................................... 3.25
TRENDWORX CONTAINER.....................................................................................................................................3.25
TRENDWORX PERSISTENT TRENDING................................................................................................................3.26
TRENDWORX REPORTING.....................................................................................................................................3.26
TRENDWORX LOGGER CONFIGURATOR.............................................................................................................3.27
ACTIVATING TRENDWORX LOGGER CONFIGURATION DATABASES...............................................................3.27
TRENDWORX VIEWER............................................................................................................................................3.28
DATAWORX TREE............................................................................................................................................ 3.28
DATAWORX PROJECTS..........................................................................................................................................3.29
SPECIFYING A DATAWORX ACTIVE CONFIGURATION.......................................................................................3.29
SCRIPTWORX TREE ........................................................................................................................................ 3.30
SCRIPTWORX SCRIPTS..........................................................................................................................................3.30
SPECIFYING A SCRIPTWORX STARTUP SCRIPT ................................................................................................3.31
SCRIPTWORX VBA FILES .......................................................................................................................................3.31
MOBILEHMI TREE ............................................................................................................................................ 3.32
MOBILEHMI CONFIGURATIONS.............................................................................................................................3.32
ADDING A MOBILEHMI CONFIGURATION DATABASE .........................................................................................3.33
CREATING A NEW MOBILEHMI SQL CONFIGURATION DATABASE...................................................................3.34
CHECKING THE DATABASE STATUS ....................................................................................................................3.35
SCREEN MANAGER TREE .............................................................................................................................. 3.35
SCREEN MANAGER LAYOUT FILES ......................................................................................................................3.36
CREATING A NEW SCREEN MANAGER LAYOUT FILE ........................................................................................3.36
SPECIFYING A SCREEN MANAGER STARTUP LAYOUT .....................................................................................3.38
GENBROKER TREE ......................................................................................................................................... 3.39
GENBROKER CONFIGURATIONS ..........................................................................................................................3.39
CREATING A NEW GENBROKER CONFIGURATION ............................................................................................3.40
ACTIVATING A GENBROKER CONFIGURATION...................................................................................................3.41
REPORTWORX TREE ...................................................................................................................................... 3.42
REPORTWORX CONFIGURATIONS.......................................................................................................................3.43
ADDING A REPORTWORX CONFIGURATION DATABASE ...................................................................................3.44
CREATING A NEW REPORTWORX CONFIGURATION DATABASE .....................................................................3.44
CHECKING THE DATABASE STATUS ....................................................................................................................3.45
WEBHMI TREE.................................................................................................................................................. 3.45
PROCESSVIEW TRAY TREE ........................................................................................................................... 3.46
LANGUAGE ALIASING TREE........................................................................................................................... 3.47
LANGUAGE CONFIGURATIONS .............................................................................................................................3.47
GLOBAL ALIASING TREE ................................................................................................................................ 3.48
GLOBAL ALIASING CONFIGURATIONS .................................................................................................................3.48
OPC DATASPY TREE....................................................................................................................................... 3.49
OPC DATASPY CONFIGURATIONS .......................................................................................................................3.49
MY FILES TREE ................................................................................................................................................ 3.49
MICROSOFT OFFICE TREE............................................................................................................................. 3.50
OPC SERVERS TREE ...................................................................................................................................... 3.50
IV
Table of Contents
OPC SIMULATOR TREE ..........................................................................................................................................3.51
CREATING A NEW SIMULATOR OPC SERVER CONFIGURATION FILE .............................................................3.51
ACTIVATING A SIMULATOR OPC SERVER CONFIGURATION ............................................................................3.52
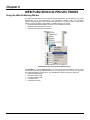
CHAPTER 4 - PROCESSVIEW TRAY, SYSTEM TOOLS AND SECURITY ............................................. 4.1
PROCESSVIEW TRAY........................................................................................................................................ 4.1
STARTING AND STOPPING APPLICATIONS USING PROCESSVIEW TRAY.........................................................4.1
STARTING APPLICATIONS FROM PROCESSVIEW TRAY......................................................................................4.1
STOPPING APPLICATIONS FROM PROCESSVIEW TRAY .....................................................................................4.2
SETTING APPLICATION PROPERTIES FROM PROCESSVIEW TRAY ..................................................................4.2
VIEWING APPLICATION PARAMETERS IN PROCESSVIEW TRAY........................................................................4.4
SYSTEM TOOLS ................................................................................................................................................. 4.5
SECURITY ADMINISTRATION ........................................................................................................................... 4.5
CHAPTER 5 - BACKING UP PROJECTS TO VISUAL SOURCESAFE.................................................... 5.1
VISUAL SOURCESAFE INTEGRATION............................................................................................................. 5.1
SETTING UP A USER PROFILE IN VISUAL SOURCESAFE ....................................................................................5.1
LOGGING INTO VISUAL SOURCESAFE FROM PROJECTWORX .................................................................. 5.3
SOURCE CONTROL OPTIONS.......................................................................................................................... 5.4
COMMENTS FOR SOURCE CONTROL ACTIONS ...................................................................................................5.5
ADDING FILES TO VISUAL SOURCESAFE ...................................................................................................... 5.6
ADDING INDIVIDUAL FILES TO VISUAL SOURCESAFE .........................................................................................5.6
ADDING GROUPS OF APPLICATION FILES TO SOURCESAFE.............................................................................5.7
ADDING PROJECTS TO VISUAL SOURCESAFE .....................................................................................................5.8
VIEWING FILES ADDED TO VISUAL SOURCESAFE ...............................................................................................5.9
CHECKING FILES OUT OF VISUAL SOURCESAFE....................................................................................... 5.10
CHECKING INDIVIDUAL FILES OUT OF VISUAL SOURCESAFE..........................................................................5.10
CHECKING BATCHES OF FILES OUT OF VISUAL SOURCESAFE.......................................................................5.11
UNDOING FILE CHECK OUT FROM SOURCESAFE..............................................................................................5.12
CHECKING FILES INTO VISUAL SOURCESAFE............................................................................................ 5.13
CHECKING INDIVIDUAL FILES INTO VISUAL SOURCESAFE...............................................................................5.13
CHECKING BATCHES OF FILES INTO VISUAL SOURCESAFE............................................................................5.14
RETRIEVING FILE VERSIONS FROM VISUAL SOURCESAFE ..................................................................... 5.15
GETTING THE LATEST FILE VERSION ..................................................................................................................5.15
VIEWING FILE HISTORY .........................................................................................................................................5.16
REMOVING FILES FROM VISUAL SOURCESAFE ......................................................................................... 5.18
CREATING A PROJECT FROM VISUAL SOURCESAFE................................................................................ 5.19
CHAPTER 6 - WEB PUBLISHING IN PROJECTWORX............................................................................ 6.1
USING THE WEB PUBLISHING WIZARD .......................................................................................................... 6.1
WEB PUBLISHING FROM ALARM AND TREND VIEWER FILES.............................................................................6.2
GRAPHWORX-BASED HTML ....................................................................................................................................6.3
ALARMWORX-BASED HTML.....................................................................................................................................6.3
TRENDWORX-BASED HTML.....................................................................................................................................6.3
LOCAL HTML FILES...................................................................................................................................................6.4
PUBLISHED DOCUMENTS ........................................................................................................................................6.4
LAUNCHING THE WEB PUBLISHING WIZARD IN PROJECTWORX.......................................................................6.5
EXPORT AND PUBLISH OPTIONS IN PROJECTWORX .................................................................................. 6.8
EXPORTING AND PUBLISHING MULTIPLE DISPLAY FILES IN PROJECTWORX .................................................6.9
EXPORTING AND PUBLISHING INDIVIDUAL DISPLAY FILES IN PROJECTWORX.............................................6.10
EXPORTING A DISPLAY FILE LOCALLY IN PROJECTWORX...............................................................................6.12
PUBLISHING A DISPLAY FILE TO A WEB SERVER IN PROJECTWORX .............................................................6.13
PUBLISHING CUSTOMIZATION OPTIONS .............................................................................................................6.14
GENERAL SETTINGS ..............................................................................................................................................6.15
SERVER SWITCHING SUPPORT............................................................................................................................6.15
SCREEN RESOLUTION SETTINGS ........................................................................................................................6.16
PUBLISHING OPTIONS............................................................................................................................................6.17
PUBLISHING CHANNEL...........................................................................................................................................6.18
PUBLISHING FILES AT A LATER TIME...................................................................................................................6.19
WEB PUBLISHING LOG ................................................................................................................................... 6.20
V
ProjectWorX – User’s Manual
VI
Chapter 1
INTRODUCTION
Overview of ProjectWorX
ProcessView contains numerous applications with multiple components, requiring a well-trained
user in order to successfully create, integrate, deploy, and manage projects. Each of these
components requires complex setup of many different types of configuration files, databases, and
OPC servers, as well as runtime and security settings. To simplify the management and deployment
of the broad spectrum of ProcessView applications, Smar has introduced ProjectWorX, a sort of
"super configurator" that integrates all ProcessView applications into a single, easy-to-manage
format. The ProjectWorX user interface is basically a container embedded in the Microsoft
Management Console (MMC). The ProjectWorX console conveniently consolidates all of your
ProcessView files in one easily accessible location, enabling you to:
• Organize all ProcessView application files into separate projects.
• Create new ProcessView application files and OPC server configurations.
• Import application files into projects.
• Start and stop ProcessView applications.
• Pack project files into a single, compressed file, and unpack project files for easy deployment to
multiple computers.
• Activate entire projects into runtime mode.
• Control the layout of windows using the Screen Manager.
• Configure security settings to password-protect projects.
• Back up project files to Microsoft Visual SourceSafe.
• Search for and replace machine names and OPC tags throughout all project files using a global
find/replace utility.
• Publish projects to the Web.
• Control and monitor runtime functions for all applications using GenTray.
• Launch ProcessView system tools.
• Generate comprehensive reports for all files and projects.
• Import and manage third-party applications.
Starting ProjectWorX
To launch ProjectWorX:
1. From the Windows Start menu, select Programs > Smar ProcessView > ProjectWorX.
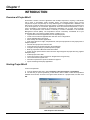
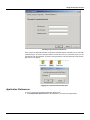
2. The first time you open ProjectWorX, you are asked to select a folder in which the ProjectWorX
database will be stored, as shown in the figure below. Browse for a projects folder, and then click
OK.
Main Projects Folder Selection
1.1
ProjectWorX – User’s Manual
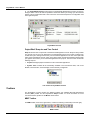
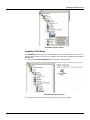
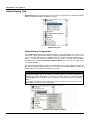
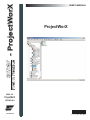
3. The ProjectWorX Projects console opens in the Microsoft Management Console, as shown in
the figure below. This is the main ProjectWorX console that allows you manage your ProcessView
projects. This is a split window with a tree control view in the left-hand pane and a configuration view
in the right-hand pane.
ProjectWorX Console
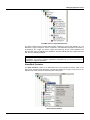
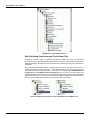
ProjectWorX Snap-ins and Tree Control
Snap-ins are the basic components of the Microsoft Management Console. Snap-ins always reside
in a console; they do not run by themselves. The ProjectWorX portion of the console contains snapins that allow you to manage and monitor your ProcessView applications. The tree control (left-hand
pane) of the ProjectWorX console, shown in the figure below, provides management tools that help
you organize and monitor your ProcessView applications into projects. The tree control contains the
following snap-ins:
•
Projects: Manages projects and files for most ProcessView applications.
• System Tools: Includes all the functionality available in the ProcessView tools, such as Dr
DCOM, License Monitor, Screen Manager, and the Security Configurator.
Tree Control of ProjectWorX Console
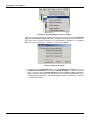
Toolbars
The ProjectWorX console contains two different toolbars: the standard Microsoft Management
Console (MMC) toolbar and the ProjectWorX Snap-in toolbar. For more information on menu
command functions, please see the Menus section below.
MMC Toolbar
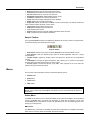
The MMC toolbar, shown in the figure below, contains the following commands (from left to right):
MMC Toolbar
1.2
Introduction
• Back: Moves back to the previous level in the tree view.
• Forward: Moves forward to the next level in the tree view.
• Up One Level: Moves up one level in the tree view.
• Show/Hide Console Tree: Displays/hides the tree control.
• Cut/Paste: Cuts/pastes the currently selected item.
• Copy: Copies the currently selected item to the clipboard.
• Delete: Deletes the currently selected item.
• Export List: Exports the columns in the MMC console to a text log file. The text file contains the
column headers and lists the items in each column.
• Large Icons: Displays items as large icons.
• Small Icons: Displays items as small icons.
• List: Displays items as a list.
• Details: Displays items as a list with detailed information about the items.
• Help: Launches the online Help documentation.
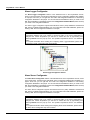
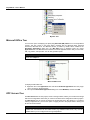
Snap-in Toolbar
The ProjectWorX Snap-in toolbar (not displayed in Windows XP or later), shown in the figure below,
contains the following commands (from left to right):
Snap-in Toolbar
• New Project: Creates a new project under the Projects tree of the ProjectWorX console.
• Pack Project: Packs the selected project (with all included application files) into a single
compressed file.
• Unpack Project: Unpacks a packed project and imports the project into the ProjectWorX
console.
• Find/Replace: Launches the global find/replace utility, allowing you to search for and replace
machine names and OPC tags throughout an entire project.
• Security Login: Launches the Security Login Utility, which prompts for the user name and
password to log into the Security Server.
Menus
The menu bar of the ProjectWorX console contains the following menus:
•
Action menu
•
View menu
•
Tools menu
•
Help menu
NOTE
The Tools menu and the Help menu are completely provided by the ProjectWorX snap-in. The
Action menu contains both standard MMC commands as well as commands that are specific to
ProjectWorX.
Action Menu
The Action menu lists the action commands available for each item and subitem in the ProjectWorX
console. The Action menu commands vary depending on which item is selected. You can also
access Action menu commands for each item by right-clicking the item and selecting actions from
the pop-up (context) menus.
MMC Actions
The Action menu commands for the MMC are listed in the table below. For additional information
about these commands, please see the MMC Help documentation.
1.3
ProjectWorX – User’s Manual
MMC Action Menu Commands
COMMAND
New Window From Here
FUNCTION
Opens a new window from the selected root item in the tree
control.
Rename
Renames the selected item.
Export List
Exports the columns in the MMC console to a text log file.
The text file contains the column headers and lists the items
in each column.
Refresh
Refreshes the view in the right-hand pane.
Delete
Deletes the selected item.
Help
Launches the online Help documentation.
Project Actions
The Action menu commands for the Projects tree are listed in the table below.
NOTE
You can also access Action menu commands by right-clicking items in the Projects tree.
Project Action Menu Commands
COMMAND
New Project
Unpack Project
Pack Project
Activation
Explore
Global Find/Replace
New Project From SourceSafe
Add File to Project
Generate Report
Exit ProjectWorX
FUNCTION
Creates a new project under the Projects tree of the
ProjectWorX console.
Unpacks a packed project and imports the project into the
ProjectWorX console.
Packs an entire project (with all included application files)
into a single compressed file.
Activates the selected project.
Displays the current project directory in the Windows
Explorer view.
Searches for and replaces machine names and OPC tags in
all the project files.
Creates a new project from an existing project in Microsoft
Visual SourceSafe.
Imports an existing file into the project.
Creates a comprehensive report for all files and applications
in the project.
Closes the ProjectWorX console.
Application-Specific Actions
Each ProcessView application (e.g. GraphWorX, AlarmWorX, etc.) within a project contains
application-specific action menus for adding and creating project files. Please see Chapter 3 for
information about managing application files.
View Menu
The View menu commands are listed in the table below.
View Menu Commands
COMMAND
Choose Columns
Large Icons
Small Icons
1.4
FUNCTION
Hides/displays columns in a detailed list.
Note: This command is only available when Detail is also
selected on the View menu.
Displays items as large icons.
Displays items as small icons.
Introduction
COMMAND
List
Detail
FUNCTION
Displays items in a list.
Displays items in a list along with detailed information about
the configuration of each item.
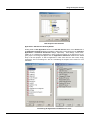
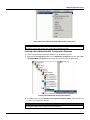
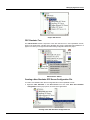
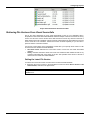
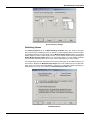
Hiding and Displaying Detail Columns
Selecting Detail from the View menu displays the items in the selected folder along with detailed
information about the configuration of each item. In the figure below, for example, the items in the
My Project folder in the tree control are listed in the right-hand pane of the console by Name, file
Size, and the date the files were Modified.
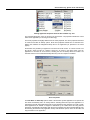
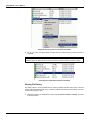
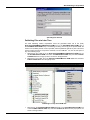
Selecting Add/Remove Columns from the View menu opens the Add/Remove Columns dialog
box, as shown in the figure below. The column names listed in the Displayed Columns list (e.g.
Name, Size, and Modified) are currently shown in the details view. The column name listed in the
Hidden Columns list (Reference to) is not shown in the details view. Click the Add and Remove
buttons to move column names back and forth between the Displayed columns list and Hidden
columns list.
To hide a column, in the Displayed columns list click the column you want to hide, and then click
Remove. To display a column, in the Hidden columns list click the column you want to display, and
then click Add. To undo a move, click the Reset button.
NOTE
Column names may vary per items in the tree control. For additional information, please see the
MMC Help documentation.
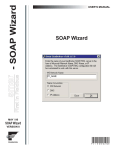
Selecting Which Columns To Display in the Details View
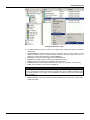
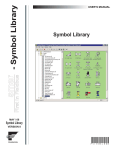
Tools Menu
The Tools menu commands are listed in the table below.
Tools Menu Commands
COMMAND
Put [Active Project] in Runtime
Shut Down [Active Project]
Machine Startup Configuration
Publish Wizard
Login to SourceSafe
Application Preferences
FUNCTION
Enters the currently active project into runtime.
Stops the currently active project. (Note: This command
is available in runtime mode only.)
Configures the project startup settings for the current
computer.
Launches the Web Publishing Utility.
Opens the Microsoft Visual SourceSafe login screen.
Opens the ProjectWorX Application Preferences dialog
1.5
ProjectWorX – User’s Manual
COMMAND
FUNCTION
box, which specifies settings for files and source control.
Opens the properties for the selected project. Displays
information about the general properties, project files,
and security settings for each project.
Launches the ProcessView Security Login Utility.
Automatically compacts the ProjectWorX database.
Changes the folder in which the ProjectWorX database is
stored.
Project Properties
Security Login
Compact Database
Change Database Location
Compacting the ProjectWorX Database
The ProjectWorX console data are stored in a Microsoft Access database file. ProjectWorX includes
a database compacting feature that minimizes the size of this file. To minimize the size of this
database, select Compact Database from the Tools menu.
Changing the Database Location
You can change the folder in which the ProjectWorX database is stored at any time by selecting
Change Database Location from the Tools menu, as shown in the figure below. Browse for a
projects folder, and then click OK.
Main Projects Folder Selection
Help Menu
The Help menu commands are listed in the table below.
Help Menu Commands
COMMAND
Help Topics
About Application
1.6
SHORTCUT KEY
F1
FUNCTION
Launches the online Help documentation.
Launches the About Box, which contains
information about the product version number,
copyright, and available disk space. It also
contains information about how to contact the
company.
Chapter 2
USING THE PROJECTS CONSOLE
Project Management
The Projects tree in the ProjectWorX console tree control (left-hand pane) is where you manage all
of your ProcessView project files. Each time you add a new project to the ProjectWorX console, a
folder is created for that project in the "Bin" directory. From this single location in the ProjectWorX
console you can conveniently add existing ProcessView application files, create and launch new
files, and check files into Microsoft Visual SourceSafe. As shown in the figure below, you can create
multiple projects (e.g. Boiler Room, Power Plant, and Factory).
Projects Snap-in in ProjectWorX Console
Organization of Project Folders
The top-level tree for each project contains two primary subtrees: Applications and OPC Servers,
as shown in the figure below. Each project also contains a "ProjInfo.ini" file, which an initialization
file that contains information about the project, as well as a .sec file, which is the Security Server
configuration file for the project. For more information about project security, please see the
Enabling Project Password Protection section below.
Main Projects Tree Control and Files
2.1
ProjectWorX – User’s Manual
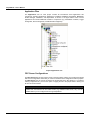
Application Files
The Applications tree for each project contains all ProcessView client applications and
components, including GraphWorX, AlarmWorX, TrendWorX, DataWorX, ScriptWorX, MobileHMI,
Screen Manager, GenBroker, and ReportWorX, as shown in the figure below. Each of these
applications has several additional modules or components (e.g. AlarmWorX Container, Logger
Configurator, Server Configurator, and Multimedia Configurator).
Project Applications Tree
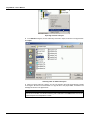
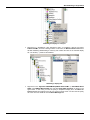
OPC Server Configurations
The OPC Servers tree for each project, shown in the figure below, allows you to create and manage
OPC server configurations. Each time you create a new OPC server configuration inside a project in
the OPC Servers tree, the new file is saved to the project folder in the "Bin" directory. If you add an
existing configuration file, you have the option of copying the file to the project folder or running the
file from its current location.
NOTE
ProjectWorX currently supports configuration for the Simulator OPC Server only, which is
installed with ProcessView. All other OPC servers (e.g. DataStore OPC Server, etc.) must be
installed before you can configure them through ProjectWorX.
2.2
Using the Projects Console
Project OPC Servers
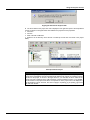
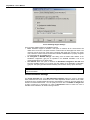
Creating a New Project
To create a new project in the ProjectWorX console:
1. Right-click the Projects folder in the tree control and select New Project from the pop-up menu,
as shown in the figure below.
Creating a New Project
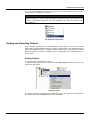
2. Type a name for the new project, as shown in the figure below, and then click OK. The new
project appears under the Projects folder.
Naming the New Project
Importing Files Into a Project
ProjectWorX allows you to import files (of any type) into projects. You can import single files or
multiple files at once.
To add a file to a project in the ProjectWorX console:
1. Right-click the project and select Add File to Project from the pop-up menu, as shown in the
figure below.
2.3
ProjectWorX – User’s Manual
Importing a File Into a Project
2. In the Add file dialog box, choose a directory and a file to import, as shown in the figure below.
Click Open.
Choosing a File To Add to the Project
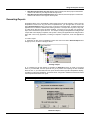
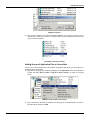
3. When you import a file into a project, you can copy the file to the local project directory instead
of running the file from its current location. To copy the file to the project folder, click Yes in the
message box shown in the figure below.
NOTE
If you import a file and choose not to copy the file to the project folder, ProjectWorX runs the file
from its current location, and the file's directory path is indicated in the Reference to column the
right-hand pane of the ProjectWorX console.
2.4
Using the Projects Console
Copying the File Into the Project Folder
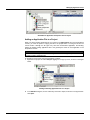
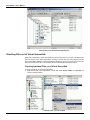
4. The file is added to the project tree and is displayed in the right-hand pane of the ProjectWorX
console, as shown in the figure below. Files added to the project have four properties:
• File name.
• File size.
• Date of the last modification.
• Reference to the directory where the file is located (if the file does not reside in the project
folder).
Files Imported Into Project
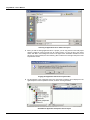
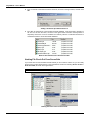
NOTE
If you manually a copy file to a project folder in Windows Explorer, the next time you open that
project in the ProjectWorX console ProjectWorX will detect the file and ask you whether to import
the file into the project, as shown in the figure below. If you click Yes, the file is added to the
project tree and is displayed in the right-hand pane of the ProjectWorX console. If you click No,
the file remains in the project folder but is not imported into to the project and is not displayed in
the ProjectWorX console. However, this does not apply to unpacking_log.txt, packing_log.txt and
all .mdb and .udl files.
2.5
ProjectWorX – User’s Manual
Adding Copied Files to Project
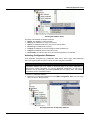
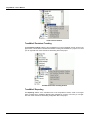
Managing Project Files
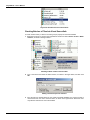
All the files in a project can be handled through a pop-up menu available by right-clicking on the file
name, as shown in the figure below. The commands available for each file depend on the file type.
Generic files can be opened, duplicated, renamed, deleted, etc., while the Packing Log can only be
opened and deleted. Drag-and-drop and cut-and-paste functions in the ProjectWorX console are
similar to those in Windows Explorer, but you can paste and drop files only between trees of the
same type. For example, a GraphWorX display file from the GraphWorX tree cannot be copied to
the AlarmWorX tree.
You can also make the file Read-only so that it cannot be modified. An additional Add to Source
Control option allows you to check files into Microsoft Visual SourceSafe. For more information
about the Source Control option, please see Chapter 5.
NOTE
You can select a group of files for cut/copy/paste/delete. Additionally, files that can be published
to HTML can also be multi-selected and have the Web Publisher run on all of them. “Group”
SourceSafe actions can also be performed on multiple selections that support SourceSafe.
Context Menu for a Generic Project File
2.6
Using the Projects Console
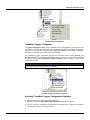
Deleting Project Files
To delete a project file from the ProjectWorX console:
1. Right-click the file and select Delete from the pop-up menu, as shown in the figure below.
Deleting a Project File
2. A message box appears asking you whether to delete the file, as shown in the figure below.
Click Yes to delete the file.
Confirming File Deletion
3. A second message box appears asking you whether you want to delete the file from the disk, as
shown in the figure below. If you click Yes, the file is deleted entirely from the project folder. If you
click No, the folder is hidden from the ProjectWorX console but remains inside the project folder.
Confirming Deletion of File From Project Folder
NOTE
Deleting a Microsoft SQL Server database configuration file from a project (e.g. for MobileHMI
and AlarmWorX Multimedia) will delete it only from the project, not from SQL Server. (The .udl
file will not be deleted as well.)
2.7
ProjectWorX – User’s Manual
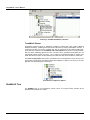
Renaming Project Files
To rename a project file in the ProjectWorX console:
1. Right-click the file and select Rename from the pop-up menu, as shown in the figure below.
Renaming a Project File
2. The file name field becomes modifiable. Type a new name for the file, as shown in the figure
below. Press the Enter key.
Typing a New Name for the File
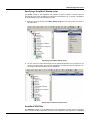
Duplicating Project Files
To make a copy of a project file in the ProjectWorX console:
1. Right-click the file and select Duplicate File from the pop-up menu, as shown in the figure
below.
Duplicating a Project File
2.8
Using the Projects Console
2. A copy of the file appears, as shown in the figure below. You can rename the copy of the file or
move the copy to a different project directory.
NOTE
Drag-and-drop and cut-and-paste functions in the ProjectWorX console are similar to those in
Windows Explorer, but you can paste and drop files only between trees of the same type. For
example, a GraphWorX display file from the GraphWorX tree cannot be copied to the
AlarmWorX tree.
File Copied to Project Folder
Packing and Unpacking Projects
The pack/unpack projects feature of the ProjectWorX console allows you to pack up an entire
project (with all included application files) into a single, compressed file. This is especially useful for
system administrators who want to configure a project and then send or copy the project to several
different computers (e.g. nodes on a network). Then the packed file can be unpacked and run on
each computer.
Packing Projects
To pack a project in the ProjectWorX console:
1. Right-click the project in the tree control and select Pack Project from the pop-up menu, as
shown in the figure below.
Packing a Project
2. Choose a directory in which to save the packed project (.pwx) file, as shown in the figure below.
Give the file a name in the File Name field, and then click Save.
2.9
ProjectWorX – User’s Manual
Saving the Packed Project
3. Once the project has been packed, a confirmation message appears, as shown in the figure
below. Click OK.
Project Successfully Packed
4. A packing log (HTML) file opens listing the packed files as well as any errors or warnings. The
log file is also visible in the project root folder, as shown in the figure below.
Packing Log File
Unpacking Projects
To unpack (import) a packed project in the ProjectWorX console:
1. Right-click project tree control and select Unpack Project from the pop-up menu, as shown in
the figure below.
2.10
Using the Projects Console
Unpacking a Project
2. Choose a packed ProjectWorX project (.pwx) file, as shown in the figure below. Then click
Open.
Selecting a Project File to Unpack
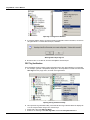
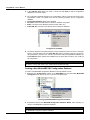
3. You will be asked permission to modify pathways to match the new directory location of the
unpacked project. If you click Yes, the paths will be changed. If you click No, the project will retain
its original directory paths.
Modifying File Pathways
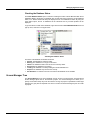
4. Once the project has been unpacked, a confirmation message appears, as shown in the figure
below. Click OK.
2.11
ProjectWorX – User’s Manual
Project Successfully Unpacked
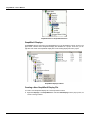
5. An unpacking log (HTML) file opens listing the unpacked files as well as any errors or warnings.
The log file is also visible in the project root folder, as shown in the figure below.
Unpacking Log File
Unpacking Existing Projects
ProjectWorX includes a feature that allows you to overwrite an existing project by unpacking a
newer version of that project. For example, if a system administrator makes changes to a project
and needs to deploy an updated version of the project to multiple users on different network nodes,
each user on each node can unpack and automatically update the project.
When you unpack a packaged (updated) version of an existing project (i.e. a project with the same
name) in the ProjectWorX Console, ProjectWorX scans each file in the packaged project.
ProjectWorX automatically unpacks any new files in the packaged project (i.e. files that have been
added to the project since the last version). For packaged files that already exist (i.e. with the same
name) inside the project, ProjectWorX also checks the date/time of the files. If the date/time of a
packaged file is the same as the date/time of the existing file of the same name, nothing happens. If
a packaged file is newer (i.e. more recent date/time) than the existing file of the same name,
ProjectWorX automatically unpacks the newer file and overwrites the existing file. If a packaged file
is older than the existing file of the same name, ProjectWorX warns you of this fact and gives you
the option to overwrite the file.
NOTE
Difference unpacking of projects will not work for Microsoft SQL Server databases. When
unpacking SQL-based configuration files, the files will not be overwritten even if the packed
project contains newer files of the same name.
2.12
Using the Projects Console
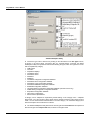
Unpacking Projects That Contain SQL Configuration Databases
ProjectWorX makes it possible to import configuration databases that reside inside Microsoft SQL
Server databases. Several ProcessView applications, such as MobileHMI, AlarmWorX Multimedia,
and ReportWorX, use SQL configuration databases. Universal Data Link (.udl) files are used to
connect to the Microsoft SQL Server database. ProjectWorX utilizes the import/export capability for
the packing and unpacking of SQL items. The advantage of this approach is that all necessary
configuration information gets packed up and sent along in concise XML files. The drawback is that,
at the time of unpacking, a configurator’s “configuration database wizard” must be run in order to
create a container database in which to import the XML file. Near the end of the unpacking process,
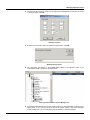
the you see a dialog that looks like the one shown in the figure below.
ProjectWorX Searching for Available SQL Items
While this dialog is open, you can check/uncheck each item by simple clicking on it. If you click OK,
ProjectWorX will launch the appropriate configuration database wizard for each of the items with a
red check mark next to it. By going through the wizard, you are creating an empty “skeleton”
database into which ProjectWorX can insert the packed XML file. This allows you complete control
over database properties, such as the SQL Server upon which it exists and the maximum log file
size. ProjectWorX also remembers which databases were the active databases when the project
was packed, and is able to restore that active state upon creation of the database. It is not
necessary, in the wizard, to give the unpacked database the exact same name shown in the
Database Name column in this dialog; you can choose any arbitrary name.
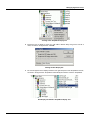
It is important to emphasize that you have the option of skipping one or more wizards at the time this
dialog is presented by either un-checking items in the list, or canceling the wizards as they appear.
The consequence of this action is that the SQL databases for which the wizard was not run will be
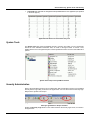
incomplete but they are not lost. Databases that were not properly set at this stage will appear with
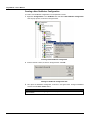
an exclamation point icon, as shown in the figure below. These items, as they appear, have
restricted functionality. They can only be deleted or restored. You can double-click an item (or
right-click and select Restore) to launch the appropriate configuration database wizard, as shown in
the figure below. ProjectWorX still has the XML file containing the item’s configuration and is able to
import it into the newly created database.
2.13
ProjectWorX – User’s Manual
SQL Items As They Appear If They Were Not Completely Configured During Unpacking
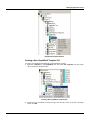
Log Files for Packed and Unpacked Projects
When projects are packed or unpacked, a packing log or an unpacking log is created in the project
folder, as shown in the figure below. These files contain useful information about what has been
packed\unpacked, including any errors and warnings issued during the process.
NOTE
Any referenced files in a project are also packed/unpacked. When unpacking the project, all the
referenced files (which are listed with a warning in the packing log file) are placed in the same
location as they were initially. ProjectWorX tries to recreate the locations necessary for
referenced external files (i.e. files that are located in a directory outside the project folder).
Referenced files that are located in a subfolder within the project folder are unpacked into the
subfolder.
Packing/Unpacking Log Files in Project Folder
Viewing Project Properties
To view or change the settings for a project in the ProjectWorX console:
1. Right-click the project in the tree control and select Properties from the pop-up menu, as shown
in the figure below.
2.14
Using the Projects Console
Viewing the Project Properties
2. This opens the Properties dialog box for the project, which contains the following tabs:
•
General
•
Summary
•
Project Files
•
Password Protection
General Tab
The General tab of the project Properties dialog box, shown in the figure below, contains the
following fields.
Project Properties: General Tab
2.15
ProjectWorX – User’s Manual
•
Name: Displays the project name as it is shown in the Projects tree of the ProjectWorX
console.
NOTE
You cannot rename the project in the Properties dialog box. To rename a project, you must
right-click the project in the Projects tree of the ProjectWorX console and select Rename from
the pop-up menu.
•
•
•
•
•
•
Location: Displays the directory path for the project folder.
Title: Optional field used to describe the project or to provide an alternate or expanded name
for the project.
Project Version: If you have multiple revisions of the project, you can give each revision a
version number.
ProjectWorX Version: Displays the ProjectWorX version number with which the project was
created. (This is important for compatibility with future ProjectWorX versions.)
Date: Displays the reference date for the project.
Time: Displays the reference time for the project.
NOTE
The Project Version, Date, and Time fields are completely modifiable, and there are no
restrictions on the data formats.
Click the Apply button to save any changes to these fields.
Summary Tab
The Summary tab of the project Properties dialog box, shown in the figure below, contains the
following fields.
Project Properties: Summary Tab
•
•
•
Project Author: Name of the person who created the project.
Last Modification By: Name of the person who made the most recent change to the project.
Last Modification Timestamp: Every time a change is made to the project (e.g. adding or
removing a file), this field automatically displays the time and date of the change.
Comments: Provides a blank field for user comments or project descriptions.
2.16
Using the Projects Console
Click the Apply button to save any changes to these fields.
Project Files Tab
The Project Files tab of the project Properties dialog box, shown in the figure below, contains
three columns: Status, File Name, and File Type.
Project Properties: Project Files Tab
The Status column indicates the following general status of the project files as follows:
•
Present (in green type): The file is found in the directory path indicated in the File Name
column.
•
Missing (in boldface red type): The file cannot be found in the specified path. If any files are
missing, a warning message is displayed (in boldface red type) in the lower left indicating the
number of broken (missing) file links in the project.
If you add a SQL database (e.g. MobileHMI or ReportWorX configuration database), you could have
other states reflecting the database status:
•
Can't login: The database exists, but the user does not have the access rights to log in into it.
•
Offline: Database is currently offline.
•
Loading: Database is currently loading.
•
Recovering: Database is recovering.
•
Suspect: Database is suspect and then offline.
•
Unreachable: Database is not available because of an unknown error.
The File Name column lists the directory path and name for every file in the project (regardless of
the file status).
The File Type column provides information about the file type (e.g. GraphWorX display, AlarmWorX
container, etc.).
Clicking the Refresh List button allows you to dynamically update the files list without having to
close and reopen the Properties dialog box (i.e. when trying to resolve broken links).
Password Protection Tab
The Password Protection tab of the project Properties dialog box, shown in the figure below, is
used to set the password for each project. This password protects the project from being:
•
Accessed through ProjectWorX.
2.17
ProjectWorX – User’s Manual
•
Unpacked into ProjectWorX.
The project password protection is disabled by default, as shown in the figure below.
NOTE
The project files on the hard drive and the project folder are NOT protected by this password.
Project Properties: Password Protection Tab
Enabling Project Password Protection
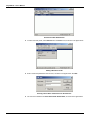
To enable password protection for a project, in the Password Protection tab of the project
Properties dialog:
1. Type a password in the New Password field.
2. Retype the password in the Repeat Password field.
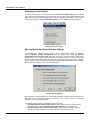
3. Click the Apply button.
4. The password is now enabled, and a message appears stating: "This project is password
protected," as shown in the figure below. Click OK.
NOTE
Passwords are case-sensitive. Once password protection is enabled, the user must also provide
the Old Password when changing the password.
2.18
Using the Projects Console
Enabling Project Password Protection
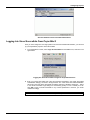
Once a project is password-protected, the project's protected status is indicated by a red circle with
a slash through it, as shown in the figure below. The next time you try to access the project, you are
prompted to enter the password, as shown in the figure below. Enter the password and click OK to
gain access to the project.
Logging Into a Password-Protected Project
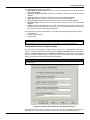
Application Preferences
To view or change the ProjectWorX Application Preferences:
1. Select Application Preferences from the Tools menu, as shown in the figure below.
2.19
ProjectWorX – User’s Manual
Viewing the Application Preferences
2.
•
•
•
•
This opens the Application Preferences dialog box, which contains the following tabs:
General
Files
Log Files
Source Control
General Tab
The General tab of the Application Preferences dialog box, shown in the figure below, controls the
following basic parameters in ProjectWorX.
Application Preferences: General Tab
Project Root Folder
You can view/set the Project Root Folder from the by clicking the ... button on the General tab of
the Application Preferences dialog box. Select a folder in which the ProjectWorX database will be
stored, as shown in the figure below. Browse for a projects folder, and then click OK.
NOTE
This has same behavior as the Change Database Location command on the Tools menu, and
changes do not take effect until ProjectWorX is restarted.
2.20
Using the Projects Console
Main Projects Folder Selection
Applications / OPC Servers Shown by Default
Clicking either the Set Applications button or the Set OPC Servers button on the General tab of
the Application Preferences dialog box displays a dialog that is nearly identical to the Customize
Applications or Customize OPC Servers dialogs, respectively. Those dialogs, shown below,
enable you to customize the applications or OPC servers that appear in the project tree for any
given project. The dialogs that appear from the Applications Preferences determine the default
set-up of all new projects. To hide an application or OPC server from the tree control, simply
uncheck the item in the dialog box. See the "Customizing the Projects View" section for more
information.
Customizing the Applications and OPC Servers Views
2.21
ProjectWorX – User’s Manual
Files Tab
The Files tab of the Application Preferences dialog box, shown in the figure below, determines the
behavior of files added or removed from ProjectWorX.
Application Preferences: Files Tab
File Deletion
The Prompt when removing files from ProjectWorX check box on the Files tab of the
Application Preferences dialog box is checked by default. When you delete a file from a project, a
message box appears asking you whether to delete the file, as shown in the figure below. Click Yes
to delete the file.
Confirming File Deletion
The Automatically delete files after removing them check box on the Files tab of the
Application Preferences dialog box is not checked by default. When you delete a file from a
project, a second message box appears asking you whether you want to delete the file from the
disk, as shown in the figure below. If you click Yes, the file is deleted entirely from the project folder.
If you click No, the folder is hidden from the ProjectWorX console but remains inside the project
folder.
2.22
Using the Projects Console
Confirming Deletion of File From Project Folder
File Acceptance
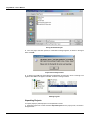
The Automatically check the project folders for files that are currently not contained in the
project check box on the Files tab of the Application Preferences dialog box is checked by
default. If you manually a copy file to a project folder in Windows Explorer, the next time you open
that project in the ProjectWorX console ProjectWorX will detect the file and ask you whether to
import the file into the project, as shown in the figure below. If you click Yes, the file is added to the
project tree and is displayed in the right-hand pane of the ProjectWorX console. If you click No, the
file remains in the project folder but is not imported into to the project and is not displayed in the
ProjectWorX console. However, this does not apply to unpacking_log.txt, packing_log.txt and all
.mdb and .udl files.
Adding Copied Files to Project
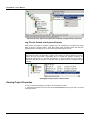
Log Files
The Log Files tab of the Application Preferences dialog box, shown in the figure below, controls
when log files are shown. There are four tabs controlling the four types of log files:
•
•
•
•
Packing
Unpacking
Publish to HTML
Search/Replace
Each tab has the option to show the log file, not show the log file, or have the show/hide behavior
depend on the presence or absence of errors and warnings. Additionally, you can select whether
the log files append the newest entries at the beginning of the log file or at the end of the log file.
2.23
ProjectWorX – User’s Manual
Application Preferences: Log Files Tab
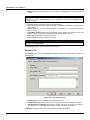
Source Control
The Source Control tab of the Application Preferences dialog box, shown in the figure below,
determines the default settings for backing up project files to Microsoft Visual SourceSafe.
Application Preferences: Source Control Tab
2.24
Using the Projects Console
SourceSafe Comments
When you check an item into or out of SourceSafe, you can optionally supply a comment with it. The
Prompt for comments when checking files in/out check box on the Source Control tab of the
Application Preferences dialog box is checked by default. The default comments seen on the Check
in, Check out, and Add dialogs can be adjusted here as well. If you have selected not to show the
comments dialogs, then these default comments are automatically applied to items checked into
and checked out of SourceSafe.
SourceSafe Root Project Name
The last field, labeled Source Safe Root Project Name, determines the root project upon which all
ProjectWorX projects are added into SourceSafe.
NOTE
In ProjectWorX versions 7.0 and 7.1, this string was hard coded. If you have items that you
checked in through ProjectWorX versions 7.0 and 7.1, it is strongly recommended that you do
not change this string. While this field is controlled by the registry once it is changed, its default
value is "ProjectWorX" (due to the hard-coding in versions 7.0 and 7.1). This “ProjectWorX”
string is not affected by providing ProjectWorX with an OEM name. If you really need to change
it, you can modify the one and only appearance of the string “ProjectWorX” in the resource .dll
(PWX32_ENU.dll).
Using the Find and Replace Utility
The Global Find/Replace Utility in ProjectWorX provides a project-wide function to search for and
replace machine names, OPC tags, and trend pens throughout all files in a project. The utility
applies only to files included in the specified project folder.
Global Find and Replace Utilty
To use the Global Find\Replace Utility:
1. Right-click a project in the Projects tree of the ProjectWorX console and select Global
Find/Replace from the pop-up menu, as shown in the figure below.
Starting the Global Find/Replace Utility
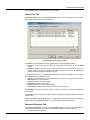
2. The Global Find\Replace Utility dialog box opens, as shown in the figure below.
2.25
ProjectWorX – User’s Manual
Global Find/Replace Utility
3. Choose the type of file to search for by clicking on the check boxes in the File Types column,
as shown in the figure above. Functioning like any "find-and-replace" command, the Global
Find/Replace Utility in ProjectWorX searches the following file types, which are organized in a tree
and are separated by category:
• HTML pages
• Text files
• GraphWorX displays
• TrendWorX Viewer
• AlarmWorX Viewer
• GenBroker
• DataWorX
• TrendWorX Configurator configuration database
• AlarmWorX Server configuration database
• AlarmWorX Logger configuration database
• AlarmWorX Multimedia configuration database
• MobileHMI configuration database
• Language Aliasing Configurator configuration database (Unicode version only)
• Global Aliasing Configurator configuration database
• ReportWorX configuration database
• OPC Server configurations
• Microsoft Excel spreadsheets
A category can be collapsed or expanded by double-clicking on the category name. Collapsed
items inform you of the number of items inside that are checked versus the total number of items
inside. You can check/uncheck individual items or an entire category. An unchecked category turns
search and replace off for all the items it contains.
4. The Global Find/Replace Utility searches for the text typed in the Find what field and replaces it
with the text typed in the Replace with field, as shown in the figure below.
2.26
Using the Projects Console
Specifying Search Parameters
5. Choose from the following search parameters:
•
Match case: Performs a case-sensitive search.
•
Match whole word: Performs a search/replace only on the entire word.
6. Clicking the Node buttons opens the Select Local or Remote Node dialog box, as shown in the
figure below. The three radio buttons (MS Network, DNS or IP Address) allow you to change the
name or address in the Replace with field. A node name or IP address appears in the Replace
with field if you select one of these options.
Microsoft Network Option
7. The Options menu at the top-left corner of the Global Find/Replace Utility, shown in the figure
below, allows for multiple select/deselect of items. The Select All and Deselect all menus
respectively select and deselect all of the items through the entire tree. If the focus is currently on a
particular category, then the bottom two menu options will select/deselect all items in the currently
selected category.
Find/Replace Selection Options
Using the Global Search Feature
In addition to the find/replace function, ProjectWorX allows you to perform a basic search operation
(e.g. for an OPC tag) across files in a project. An example search is described below:
1. Create one or more GraphWorX displays in a project.
2. For each display, map one or more tags to a simulated tag, such as "gfwsim.ramp.long."
3. Right-click on the project and select Global Find/Replace from the pop-up menu, as shown in
the figure below.
2.27
ProjectWorX – User’s Manual
Starting the Global Find/Replace Utility
4. This opens the find/replace dialog box. Click on the Search tab, as shown in the figure below,
and type "gfwsim" in the Find what field. Click the Search button.
Performing a Global Search
5. The Search Results dialog box appears, as shown in the figure below. This dialog lists all
GraphWorX displays (file name, file type, and directory path) in the project that contain the search
parameter "gfwsim." Double-clicking on any of these displays will launch the display.
NOTE
GraphWorX displays are used here as an example. The global search feature works for all file
types listed in the box on the right hand side of the Search dialog box.
2.28
Using the Projects Console
Viewing the Global Search Results
Search and Replace Individual Files
You can perform a search and replace function on an individual file rather than having to go through
the Global Search and Replace Utility. Simply right-click on a file and select Search or Replace
from the pop-up menu, as shown in the figure below.
Search and Replace for Individual Files
These two dialogs are simply miniature versions of the Global Search and Replace Utility. The
Node, Match Case, and Match Whole Word options have the same behavior as they do in the
Global Search and Replace dialog.
2.29
ProjectWorX – User’s Manual
Searching an Individual Item
Replacing an Individual Item
Activating and Running Projects
The ProjectWorX console enables you to create and manage multiple ProcessView projects, each
of which may contain many different types of application files. Only one project can be put into
runtime mode at a time. In order to enter a project into runtime mode, you must first designate the
project as the currently active project. When you make a project active in the ProjectWorX console,
all the connected included databases that are active for the project and all the settings to properly
set up the ProcessView Tray are "made active" on the current machine. If there are multiple
configuration databases for a single application within the active project, only the active database for
that application will enter runtime mode.
Making a Project Active
To make a project active in the ProjectWorX console:
1. Right-click the project in the tree control and select Activation > Make Project Active from the
pop-up menu, as shown in the figure below.
Making a Project Active
2. A dialog box appears confirming that the project is now active, as shown in the figure below.
This dialog box provides a final report after activating the project. Click OK.
NOTE
You can also view the activation report at any time by choosing select Activation > Make Active
List from the pop-up menu, as shown in the figure above. Click Print if you want to print out the
activation report.
2.30
Using the Projects Console
Project Activation Confirmed in the Activation List
3. The icon for the project is now green to indicate that it is the currently active project,
as shown in the figure below.
NOTE
Activating a project does NOT set the active project into runtime mode. For information about
how to enter a project into runtime mode, see Starting the Active Project below.
Active Project Indicated by Green Icon in ProjectWorX Console
Starting the Active Project
Once you have activated a project, you can enter the entire project into runtime by selecting Put
[Project Name] in Runtime from the Tools menu, as shown in the figure below. The name of the
currently active project appears in the Tools menu command. In the example shown below, the
project called "Factory" is the currently active project, so selecting Put 'Factory' in Runtime from
the Tools menu enters the project into runtime mode.
Starting the Active Project
2.31
ProjectWorX – User’s Manual
Stopping the Active Project
To take the active project out of runtime mode, select Shut Down [Project Name] from the Tools
menu, as shown in the figure below. The name of the currently running, active project appears in the
Tools menu command. In the example shown below, the project called "Factory" is the currently
running active project, so selecting Shut Down 'Factory' from the Tools menu stops the project.
Stopping the Active Project
Machine Startup and Project Runtime Settings
In the Tools menu, particular attention must be given to the Machine Startup Configuration.
Selecting Machine Startup Configuration from the Tools menu opens the Machine
Configuration for the Active Project dialog box, as shown in the figure below. These startup
settings apply to the computer on which the active ProjectWorX project is currently running. This
means that the dialog startup settings are applied to the currently active project for that computer.
Thus, if the active project changes after some of these settings have been decided, then the settings
will automatically be applied to the newly activated project.
Machine Startup Settings
Checking Place a "Project Startup" icon on the Desktop creates a shortcut to the ProcessView Tray
application on your computer's desktop. ProcessView Tray is used to launch ProcessView
applications from the Windows taskbar.
The following runtime options are available for the active project:
•
Do not automatically start the Active Project: When selected, the active project must be
started manually by choosing Put [Active Project] in Runtime from the Tools menu.
•
Start Active Project when the current user logs in: When selected, the active project is
entered into runtime mode when the current user logs into the Security Server.
2.32
Using the Projects Console
•
•
Start Active Project when any user logs in: When selected, the active project is entered into
runtime mode when any user logs into the Security Server.
Start Active Project with unattended login: When selected, the active project is entered into
runtime mode even if no one logs into the computer.
Generating Reports
ProjectWorX allows you to automatically create HTML reports by simply selecting a menu from the
ProjectWorX console. From any point in the ProjectWorX tree, you can right-click on an item and
select Generate Report from the pop-up menu, as shown in the figure below. An HTML report of all
applications at or below the selected item will be generated. The report lists any files, if they exist,
in a table along with their sizes and dates modified. The closer to the root that one generates a
report, the more items the report will cover. For example, clicking the GraphWorX tree will generate
a report that covers displays, templates, and symbols. Clicking the Applications tree will generate a
report that covers every application, including its respective components, under the Applications
tree.
To create a report:
1. Right-click an item in the ProjectWorX console tree control and select Generate Report from
the pop-up menu, as shown in the figure below.
Creating a Report
2. A message box will ask whether to generate an Exhaustive report, as shown in the figure
below. If you select No, then the report will not go any further than reporting the files contained
within the tree. If you select Yes, then the report will find all OPC tags within GraphWorX displays,
TrendWorX configuration databases, and Alarm Server configuration databases and list them below
each respective item listed in the report.
NOTE
An exhaustive report can take substantially longer to create than a nonexhaustive report.
Exhaustive Report
2.33
ProjectWorX – User’s Manual
3. A report for the selected item is generated in an HTML file, as shown in the figure below. This
particular report was generated by selecting Generate Report at the root of the Applications tree
for a project called "Factory." Each tree item underlined in boldface blue type can be clicked to
expand/contract its child branches. (Items will not be expanded, however, if they have no children.
For example, there may be no GraphWorX displays, and therefore, clicking on "Displays" will do
nothing.) The top of the report contains a title, a date, and summary information on the number of
files and total size of all items in the project.
In an exhaustive report, all of the OPC tags contained within a display are shown under the
appropriate display files. In this case, clicking on a file name will collapse the tags seen, and
clicking on it again will expand those tags.
NOTE
Any files that are in the project, but physically missing, will appear in boldface red type.
HTML Report Generated
Customizing the Projects View
You can customize the appearance of the tree control for each project by choosing which
Applications or OPC Servers to display and the order in which to display them.
To customize the projects view:
1. Right-click the Applications tree or the OPC Servers tree and select Customize from the popup menu, as shown in the figure below.
Customizing the Projects View
2.34
Using the Projects Console
2. This opens the Show/Hide dialog box, as shown in the figure below. The checked items
currently appear in the ProjectWorX console. To hide an application from the tree control,
simply uncheck the item in the dialog box. If the Make Default for All New Projects check box
is checked, the Show/Hide settings will be automatically be applied to all new projects created
thereafter. Click OK.
Choosing Which Applications to Hide/Display
NOTES
You have the option of displaying the Microsoft (MS) Office tree. This tree manages files for
Microsoft Word, Microsoft PowerPoint, Microsoft Excel, and Microsoft Access. When enabled in
the Show/Hide Applications dialog box, the MS Office tree is displayed under the project
Applications tree.
By default, only currently installed OPC servers are displayed in the OPC Servers tree of the
ProjectWorX console. To disable this default setting, uncheck the Use Only Installed OPC
Servers check box in the Show/Hide OPC Servers dialog box, as shown in the figure above.
Adding Custom Items to the Projects Tree
ProjectWorX has the ability to detect and add additional products to either the “Applications” node or
the “OPC Server” node in a project. Adding additional products, however, requires that one supply
the appropriate icons and string constants to ProjectWorX. Moreover, one must supply custom
code to interface with the application being added (how to launch the application, how to perform
custom actions, etc, Boolean values for which custom actions are supported, etc.) Smar has a
Microsoft Visual C++ plug-in, serving as a “New Workspace” wizard, that generates a skeleton
workspace which, when compiled, will add a custom application to ProjectWorX. This feature is not
provided with the standard ProcessView installation. Please contact Smar Technical Support for
more information on this custom application toolkit.
2.35
ProjectWorX – User’s Manual
2.36
Chapter 3
MANAGING APPLICATION FILES
Overview of Application Folders and Files
The top-level tree for each project in the ProjectWorX console contains two primary subtrees:
Applications and OPC Servers. The Applications tree for each project, shown in the figure below,
many ProcessView client applications and components:
•
•
•
•
•
•
•
•
•
•
•
•
•
•
•
•
AlarmWorX
DataWorX
GenBroker
ProcessView Tray
Global Aliasing Configurator
GraphWorX
Language Aliasing Configurator (Unicode version only)
Microsoft (MS) Office
MobileHMI
My Files
OPC DataSpy
ReportWorX
Screen Manager
ScriptWorX
TrendWorX
WebHMI
Each of these application trees has several additional modules or components. For example, the
AlarmWorX tree contains files for the AlarmWorX Container, Logger Configurator, Server
Configurator, Multimedia Configurator, and Viewer.)
NOTE
For detailed information about each application, please see the application's Help file.
Project Applications Tree
3.1
ProjectWorX – User’s Manual
Adding and Creating Application Files
The Applications tree in the ProjectWorX console allows you to manage your ProcessView projects
by adding or creating new files for each application component.
Creating a New Application File
Each time you create a new application file inside a project in the Applications tree of the
ProjectWorX console, the new file is saved to the main project directory. Although the file types vary
with each ProcessView application (e.g. display files, Microsoft Access configuration databases,
etc.), the following method for creating new application files is the generally the same for each
application in the ProjectWorX console. An example is shown below using the AlarmWorX
Container:
NOTE
Microsoft SQL Server configuration files are handled differently. Please see "Adding a SQL
Server Configuration Database to a Project" below for more information.
1. Right-click the desired component (e.g. Alarm Container) in the application tree (e.g.
AlarmWorX) in the ProjectWorX console and select New [File Type] (e.g. New AlarmWorX
Container) from the pop-up menu, as shown in the figure below.
Creating a New Application File in a Project
2. Give the new file a name, as shown in the figure below. Click OK.
Naming the New File
3. The new file appears in the component tree (in this case the Alarm Container) and is displayed
in the right-hand pane of the ProjectWorX console, as shown in the figure below. ProjectWorX
automatically launches the new file in the selected application (Alarm Container).
3.2
Managing Application Files
File Added to Application Component Tree in Project
Adding an Application File to a Project
When you add an existing application file to a project in the Applications tree of the ProjectWorX
console, you have the option of copying the file to the project folder or running the file from its
current location. Although the file types vary with each ProcessView application, the following
method for adding existing application files is the generally the same for each application in the
ProjectWorX console.
NOTE
The method for adding Microsoft Access configuration databases is generally the same as the
method for adding application files.
An example is shown below using the AlarmWorX Container:
1. Right-click the project and select Add [File Type] from the pop-up menu, as shown in the figure
below.
Adding an Existing Application File to a Project
2. In the Add file dialog box, choose a directory and a file to import, as shown in the figure below.
Click Open.
3.3
ProjectWorX – User’s Manual
Choosing an Application File to Add to the Project
3. When you add an existing application file to a project, you can copy the file to the local project
directory instead of running the file from its current location. To copy the file to the project
folder, click Yes in the message box shown in the figure below. Otherwise click No to run the
file from its current location; the file's directory path is referenced in the right-hand pane of the
ProjectWorX console.
Copying the Application File Into the Project Folder
4. The file appears in the component tree (in this case Alarm Container) and is displayed in the
right-hand pane of the ProjectWorX console, as shown in the figure below.
File Added to Application Component Tree in Project
3.4
Managing Application Files
5. To launch the application file, either double-click the file or right-click the file and select Open
from the pop-up menu, as shown in the figure below.
Opening an Application File
Adding a SQL Server Configuration Database to a Project
ProjectWorX makes it possible to import configuration databases that reside inside Microsoft SQL
Server databases. Several ProcessView applications, such as MobileHMI, AlarmWorX Multimedia,
and ReportWorX, use SQL configuration databases. Universal Data Link (.udl) files are used to
connect to the Microsoft SQL Server database.
NOTE
Deleting a Microsoft SQL Server database configuration file from a project will delete it only from
the project, not from SQL Server. (The .udl file will not be deleted as well.)
The following conditions apply to SQL Server configuration databases in ProjectWorX:
• ProjectWorX will not accept SQL Server configuration databases whose file names contain
spaces because Microsoft SQL Server 2000 is not able to bulk export such databases.
• If a SQL configuration has dependent files (e.g. image files, sound files, etc.), these files will be
packed along with the project automatically as referenced files.
• If ProjectWorX is used to perform certain operations on configurations while an instance of the
configurator is open, a dialog box will be shown asking the user to close the configurator.
ProjectWorX is blocked until the configurator is closed.
• Difference unpacking of projects will not work for SQL-based configurations. When unpacking
SQL configuration files, all SQL configurations will not be overwritten even if the packed project
contains newer files of the same name.
• ProjectWorX does not support direct check-in/check-out SQL databases to Microsoft Visual
SourceSafe.
To add a SQL configuration database to a project:
1. Right-click the configuration tree and select Add Configuration, as shown in the figure below.
3.5
ProjectWorX – User’s Manual
Adding a SQL Server Configuration Database
2. In the Add UDL Files dialog box, select a .udl file and click Open to add the configuration
database to the current project.
3. The configuration database appears in the configurations subtree in the right-hand pane of the
ProjectWorX console. The details view lists the following properties for the configuration database:
• Configuration Database: Name of the database
• On Server: Name of the SQL Server in which the database was created
• Status: The status of the database (could be normal, offline, etc)
• Linked UDL File: The path to the UDL file used to identify the database
4. The new file appears in the right-hand pane of the ProjectWorX console, as shown in the figure
below. If you right-click the file, the Create UDL File option is normally grayed out, as shown in the
figure below. If the link to the .udl file is ever broken inside the ProjectWorX database, the Create
UDL File option will become available and you will be able to create a new .udl file for the
configuration.
Configuration File Added
Checking the Database Status
The Check Database Status option is useful for checking the status of all the Microsoft SQL Server
databases added to the project. ProjectWorX does not poll SQL Server regularly to get the database
status, so a “Normal” status will always be displayed even if the database is offline. By using the
check status option, the list of databases will be refreshed and any eventual problem will be
displayed.
To get the status of a SQL Server database, right-click and select Check Database Status from the
pop-up menu, as shown in the figure below.
3.6
Managing Application Files
Checking the Database Status
The status of the database is indicated as follows:
Normal: The database is online and ready
Missing: The database is no longer on the server.
Offline: The database is still on the server but is currently offline.
Recovering: The database is recovering.
Loading: The database is currently loading and will be available soon.
Suspect: The database may have become corrupt.
Not Available: An unknown error has occurred and the database is not available.
•
•
•
•
•
•
•
Activating Configuration Databases
Some application configurators (e.g. MobileHMI, Alarm Server, Alarm Logger, Alarm Multimedia,
and Trend Logger) provide an option to specify an active configuration database.
NOTE
For active Microsoft SQL Server configuration databases, information is stored inside the
ProjectWorX database and is not subject to continuous polling. If the active configuration is
changed from outside ProjectWorX (e.g. with the MobileHMI Configurator) you will have to
refresh the view by right-clicking and selecting Refresh from the pop-up menu. This updates
ProjectWorX with the new database status.
To activate a configuration database:
1. Right-click the configuration database and select Make Configuration Active from the pop-up
menu, as shown in the figure below.
Specifying the Active Configuration Database
3.7
ProjectWorX – User’s Manual
2. The icon next to the configuration file changes from the standard icon to a globe icon to indicate
that it is active, as shown in the figure below.
Configuration Database Activated
Compacting Microsoft Access Databases
Microsoft Access databases are subject to database fragmentation over time. In ProjectWorX, you
can compact a Microsoft Access (.mdb) configuration database file in the project by simply rightclicking the .mdb file and selecting Compact Database, as shown in the figure below. Compacting
reclaims unused space and drastically improves database performance.
NOTE
No users or client applications should be connected to the database at the time of compacting.
Compacting a Microsoft Access Database
Exporting and Importing Configuration Databases
ProjectWorX can perform the export and import options available in the various configurators, which
allow you to export and import configuration databases to and from .csv and XML files.
To export a configuration database file:
1. Right-click on the file and select Export Data from the pop-up menu, as shown in the figure
below.
3.8
Managing Application Files
Exporting a Configuration Database
2. Type a name for the file, as shown in the figure below.
Naming the Exported File
3. When you export a configuration database to a .csv file or an XML file, the exported file is
automatically placed in the Exported Data Files section, as shown in the figure below. This
maintains any files exported from configurators. Furthermore, the Exported Data Files section
supports functionality missing from the SQL configurations, such as SourceSafe behavior, file
renaming, cut and paste, and duplication.
Exported Data File
To import a .csv or XML file into an existing configuration database:
1. Right-click on the file and select Import Data from the pop-up menu, as shown in the figure
below.
3.9
ProjectWorX – User’s Manual
Importing a Configuration Database
2. A message appears warning you that the existing configuration will be overwritten, as shown in
the figure below. To continue with the import, click Yes.
Warning Before Importing File
3. Browse for the .csv or XML file, and then click Open to start the import.
OPC Tag Verification
The ProjectWorX console includes a feature that lists all of the OPC tags that belong to certain files:
1. For example, right-click a GraphWorX display file in the ProjectWorX Console and select List
OPC Tags from the pop-up menu, as shown in the figure below.
Opening the Tag Verification Utility
2. This opens the Tag Verification Utility, which lists all OPC tags contained within the display file.
You can verify the status of tags in one of three ways:
• Double-click a tag under OPC Tag Name.
• Select one or more tags under OPC Tag Name and click the Verify Selected button.
3.10
Managing Application Files
•
•
Click the Verify All button to check the status of all tags in the display file.
Click Export List to export the data to a text file.
Each of the tags selected for verification shows an indicator of good (green), bad (red), or uncertain
(yellow) as a form of verification, as shown in the figure below.
Clicking the Options button exposes some additional features, as shown in the figure below:
The Show Resolved Aliases check box is only enabled if one or more item is an alias or has
an alias embedded inside itself. If the check box is left unchecked, each item is shown exactly how it
appears in configuration mode in GraphWorX. While in this mode, moving the mouse oven an item
in the list will show a ToolTip displaying the value to which the aliased tag resolves. If the Show
Resolved Aliases check box checked, then the items in the list will be displayed with their aliases
resolved, and the ToolTip text will show the tag as it appears in the GraphWorX display
configuration.
• The additional option has been added to set a timeout for tags that are in an “uncertain” (yellow)
state. If a tag is yellow for the specified amount of time, it will be changed to a “timed out” state
(red). This behavior has been implemented because tags are not released (are taking up client
units) as long as they are in the “uncertain” state. When the tag times out, it is immediately
released. In order to simplify the task of checking the validity of tags, items that are strings or
numeric constants (or aliases resolving to strings or numeric constants) are immediately set to a
“string” or “numeric” state (green) as there is no need for further verification.
•
Verifying OPC Tags
GraphWorX Tree
The GraphWorX tree in the ProjectWorX console, shown in the figure below, manages files for the
following GraphWorX components:
• Displays
• Templates
• Symbols
• VBA Wizards
3.11
ProjectWorX – User’s Manual
GraphWorX Tree in ProjectWorX Console
GraphWorX Displays
The Displays subtree component of the GraphWorX tree in the ProjectWorX console, shown in the
figure below, includes all the GraphWorX display files available for a project. From here you can
right-click and create new GraphWorX display files or add existing display files to the project.
GraphWorX Displays Subtree
Creating a New GraphWorX Display File
To create a new GraphWorX display file in the ProjectWorX console:
1. Right-click Displays in the GraphWorX tree and select New Display from the pop-up menu, as
shown in the figure below.
3.12
Managing Application Files
Creating a New GraphWorX Display File
2. Choose the type of display to create (e.g. with VBA or without VBA), and give the new file a
name, as shown in the figure below. Click OK.
Naming the New Display File
3. The new file appears in the Displays subtree in the right-hand pane of the ProjectWorX console,
as shown in the figure below. ProjectWorX automatically launches the new file in GraphWorX.
New Display File Added to GraphWorX Display Tree
3.13
ProjectWorX – User’s Manual
Specifying a GraphWorX Startup Display File
The GraphWorX Display tree provides an option to specify a startup display that automatically
opens when GraphWorX is started from ProcessView Tray. To specify a GraphWorX display file as
the startup display in the ProjectWorX console:
1. Right-click the display file (e.g. "Main Display.gdf") and select Make Startup Display from the
pop-up menu, as shown in the figure below.
Specifying a GraphWorX Startup Display
2. The icon next to the display file changes from the standard GraphWorX icon to a globe icon, as
shown in the figure below. The next time GraphWorX is launched from the ProcessView Tray,
the startup display will automatically open in GraphWorX.
Startup Display Indicated in GraphWorX Display Tree
GraphWorX Templates
The Templates subtree component of the GraphWorX tree in the ProjectWorX console, shown in
the figure below, includes all the GraphWorX template files available for a project. From here you
can right-click and create new GraphWorX template files or add existing template files to the project.
3.14
Managing Application Files
GraphWorX Templates Subtree
Creating a New GraphWorX Template File
To create a new GraphWorX template file in the ProjectWorX console:
1. Right-click Templates in the GraphWorX tree and select New Template from the pop-up
menu, as shown in the figure below.
Creating a New GraphWorX Template File
2. Choose the type of template to create, and give the new file a name, as shown in the figure
below. Click OK.
3.15
ProjectWorX – User’s Manual
Naming the New File
3. The new file appears in the Templates subtree in the right-hand pane of the ProjectWorX
console, as shown in the figure below. ProjectWorX automatically launches the new file in
GraphWorX.
New File Added to GraphWorX Templates Subtree
GraphWorX Symbols
The Symbols subtree component of the GraphWorX tree in the ProjectWorX console, shown in the
figure below, includes all the GraphWorX Symbol Library files available for a project. From here you
can right-click and add existing Symbol Library files to the project, as well as add new symbols.
The way ProjectWorX handles Symbol Library files differs slightly from that of other file types. The
Symbol Library files, which are usually used from within GraphWorX, are by default placed in the
Smar\ProcessView\Symbols\ directory created when ProcessView is installed. However, it is
possible to have Symbols Library files in other locations on the hard drive; ProjectWorX simply
references the files from that location.
NOTE
When unpacking a project, ProjectWorX automatically distinguishes between Symbol Library
files located in the Smar\ProcessView\Symbols\ folder and Symbol Library files located in other
directories. Therefore ProjectWorX handles these files with the necessary care, placing them
back in the proper location and prompting the user before overwriting existing files.
3.16
Managing Application Files
GraphWorX Symbols Subtree
GraphWorX VBA Wizard
The VBA Wizard subtree component of the GraphWorX tree in the ProjectWorX console, shown in
the figure below, allows you to create a new display with a Microsoft Visual Basic for Applications
(VBA) Wizard.
1. Click on the Create New VBA Wizard icon, as shown in the figure below.
GraphWorX VBA Wizard Subtree
2. Give the new file a name, as shown in the figure below, and then click OK.
3.17
ProjectWorX – User’s Manual
Creating a New GraphWorX VBA Display
3. ProjectWorX automatically launches the new display file in GraphWorX, opening the Symbol
Library as well. The new VBA file appears in the Displays subtree in the right-hand pane of the
ProjectWorX console, as shown in the figure below.
New VBA Display File Added to GraphWorX Display Tree
AlarmWorX Tree
The AlarmWorX tree in the ProjectWorX console, shown in the figure below, manages files for the
following AlarmWorX components:
• Alarm Container
• Logger Configurator
• Server Configurator
• Multimedia Configurator
• Viewer Configuration
3.18
Managing Application Files
AlarmWorX Tree in ProjectWorX Console
The Alarm container files are handled with the basic operations to create, add, duplicate, etc. The
AlarmWorX Logger Configurator, Server Configurator, and Multimedia Configurator are handled a
bit differently. The Logger and Server support both Microsoft Access (.mdb) databases and
Microsoft SQL Server (or MSDE) based databases. AlarmWorX Multimedia only supports Microsoft
SQL Server (or MSDE) databases.
NOTE
Configuration files that use Microsoft Access databases cannot be renamed or duplicated in
ProjectWorX. If you want to rename or duplicate the configuration file, you should do it within the
appropriate configurator application.
AlarmWorX Container
The Alarm Container subtree of the AlarmWorX tree in the ProjectWorX console, shown in the
figure below, includes all the AlarmWorX container files available for a project. From here you can
right-click and create new files or add existing files to the project.
Alarm Container Subtree
3.19
ProjectWorX – User’s Manual
Alarm Logger Configurator
The Alarm Logger Configurator subtree of the AlarmWorX tree in the ProjectWorX console,
shown in the figure below, includes all the AlarmWorX Logger configuration database files available
for a project. From here you can right-click and create new configuration databases or add existing
configuration databases to the project. You can also activate the database. When you create a new
SQL Server database, ProjectWorX launches the Configuration Database Wizard, which will help
you create a new configuration database.
The Alarm Logger Configurator supports both Microsoft Access (.mdb) databases and Microsoft
SQL Server (or MSDE) based databases. For more information about SQL databases, please see
"Adding a SQL Server Configuration Database to a Project."
NOTES
For active Microsoft SQL Server configuration databases, information is stored inside the
ProjectWorX database and is not subject to continuous polling. If the active configuration is
changed from outside ProjectWorX you will have to refresh the view by right-clicking and
selecting Refresh from the pop-up menu. This updates ProjectWorX with the new database
status.
For complete information about creating and configuring Alarm Logger databases, please refer
to the Alarm Logger Configurator Help documentation.
Alarm Logger Configurator Subtree
Alarm Server Configurator
The Alarm Server Configurator subtree of the AlarmWorX tree in the ProjectWorX console, shown
in the figure below, includes all the AlarmWorX Server configuration database files available for a
project. From here you can right-click and create new configuration databases or add existing
configuration databases to the project. You can also activate the database. When you create a new
SQL Server database, ProjectWorX launches the Configuration Database Wizard, which will help
you create a new configuration database.
The Alarm Server Configurator supports both Microsoft Access (.mdb) databases and Microsoft
SQL Server (or MSDE) based databases. For more information about SQL databases, please see
"Adding a SQL Server Configuration Database to a Project."
NOTES
For active Microsoft SQL Server configuration databases, information is stored inside the
ProjectWorX database and is not subject to continuous polling. If the active configuration is
changed from outside ProjectWorX you will have to refresh the view by right-clicking and
selecting Refresh from the pop-up menu. This updates ProjectWorX with the new database
status.
For complete information about creating and configuring Alarm Server databases, please refer to
the Alarm Server Configurator Help documentation.
3.20
Managing Application Files
Alarm Server Configurator Subtree
Multimedia Configurator
The Multimedia Configurator tree in the ProjectWorX console, shown in the figure below,
manages AlarmWorX Multimedia configuration databases. The Multimedia Configurator uses
Microsoft SQL Server databases, and it uses Universal Data Link (.udl) files to connect to the
Microsoft SQL Server databases. These .udl files contain OLE database connection information that
allows the Configurator to create and manage connections to OLE databases. You can also activate
the database.
Multimedia Configurator Subtree
NOTE
For active Microsoft SQL Server configuration databases, information is stored inside the
ProjectWorX database and is not subject to continuous polling. If the active configuration is
changed from outside ProjectWorX you will have to refresh the view by right-clicking and
selecting Refresh from the pop-up menu. This updates ProjectWorX with the new database
status.
The following conditions apply to SQL Server configuration databases in ProjectWorX:
• ProjectWorX will not accept SQL Server configuration databases whose file names contain
spaces because Microsoft SQL Server 2000 is not able to bulk export such databases.
• If a SQL configuration has dependent files (e.g. image files, sound files, etc.), these files will be
packed along with the project automatically as referenced files.
• If ProjectWorX is used to perform certain operations on configurations while an instance of the
configurator is open, a dialog box will be shown asking the user to close the configurator.
ProjectWorX is blocked until the configurator is closed.
3.21
ProjectWorX – User’s Manual
• Difference unpacking of projects will not work for SQL-based configurations. When unpacking
SQL configuration files, all SQL configurations will not be overwritten even if the packed project
contains newer files of the same name.
• ProjectWorX does not support direct check-in/check-out SQL databases to Microsoft Visual
SourceSafe.
Adding a Multimedia Configuration Database
To add a Multimedia SQL configuration database to a project:
1. Right-click the configuration tree and select Add AlarmWorX MMX Configuration, as shown in
the figure below.
Adding a Multimedia SQL Server Configuration Database
2. In the Add UDL Files dialog box, select a .udl file and click Open to add the configuration
database to the current project.
3. The configuration database appears in the configurations subtree in the right-hand pane of the
•
•
•
•
ProjectWorX console. The details view lists the following properties for the configuration
database:
Configuration Database: Name of the database
On Server: Name of the SQL Server in which the database was created
Status: The status of the database (could be normal, offline, etc)
Linked UDL File: The path to the UDL file used to identify the database
4. The new file appears in the right-hand pane of the ProjectWorX console. If you right-click the
file, the Create UDL File option is normally grayed out, as shown in the figure below. If the link
to the .udl file is ever broken inside the ProjectWorX database, the Create UDL File option will
become available and you will be able to create a new .udl file for the configuration.
3.22
Managing Application Files
SQL Database File Added to AlarmWorX Multimedia Configuration
NOTE
Deleting a Microsoft SQL Server database configuration file from a project will delete it only from
the project, not from SQL Server. (The .udl file will not be deleted as well.)
Creating a New Multimedia SQL Configuration Database
To create a new Multimedia configuration database in the ProjectWorX console:
1. Right-click the Configurations subtree in the Multimedia Configurator tree and select New
AlarmWorX MMX Configuration from the pop-up menu, as shown in the figure below.
Creating a New Multimedia Configuration Database
2. ProjectWorX launches the Multimedia Configuration Database Wizard, which will help you
create a new configuration database.
NOTE
For complete information about creating and configuring Multimedia databases, please refer to
the AlarmWorX Multimedia Configurator Help documentation.
3.23
ProjectWorX – User’s Manual
Checking the Database Status
The Check Database Status option is useful for checking the status of all the Microsoft SQL Server
databases added to the project. ProjectWorX does not poll SQL Server regularly to get the database
status, so a “Normal” status will always be displayed even if the database is offline. By using the
check status option, the list of databases will be refreshed and any eventual problem will be
displayed.
To get the status of a SQL Server database, right-click and select Check Database Status from the
pop-up menu, as shown in the figure below.
Checking the Database Status
The status of the database is indicated as follows:
• Normal: The database is online and ready
• Missing: The database is no longer on the server.
• Offline: The database is still on the server but is currently offline.
• Recovering: The database is recovering.
• Loading: The database is currently loading and will be available soon.
• Suspect: The database may have become corrupt.
• Not Available: An unknown error has occurred and the database is not available.
AlarmWorX Viewer
ProjectWorX includes support for publishing AlarmWorX container files (.a32). Unlike publishing
GraphWorX displays, publishing alarm files has the side effect of creating intermediate .awv files. It
is actually these files, and not the container files, that are referenced by the created HTML page.
These files are contained in the AlarmWorX Viewer Configuration tree, shown in the figure below.
After the Web Publishing Wizard has been executed, these generated intermediate files are
automatically added to these two trees. This is critical for ProjectWorX’s ability to publish local
HTML files with the intention of later publishing the HTML files from the local folders to a Web Site.
The Viewer Configuration subtree of the AlarmWorX tree in the ProjectWorX console, shown in the
figure below, includes all the AlarmWorX Viewer files available for a project. From here you can also
right-click and add existing files to the project.
3.24
Managing Application Files
Alarm Viewer Configuration Subtree
TrendWorX Tree
The TrendWorX tree in the ProjectWorX console, shown in the figure below, manages files for the
following TrendWorX components:
• Trend Container
• Persistent Trending
• Reporting
• Logger Configurator
• Viewer Configuration
TrendWorX Tree in ProjectWorX Console
The Trend container, Persistent Trending, and Reporting files are handled with the basic operations
to create, add, duplicate, etc. The Logger supports both Microsoft Access (.mdb) databases and
Microsoft SQL Server (or MSDE) based databases.
TrendWorX Container
The Trend Container subtree of the TrendWorX tree in the ProjectWorX console, shown in the
figure below, includes all the TrendWorX container files available for a project. From here you can
right-click and create new files or add existing files to the project.
3.25
ProjectWorX – User’s Manual
Trend Container Subtree
TrendWorX Persistent Trending
The Persistent Trending subtree of the TrendWorX tree in the ProjectWorX console, shown in the
figure below, includes all the TrendWorX Persistent Trending files available for a project. From here
you can right-click and create new files or add existing files to the project.
TrendWorX Persistent Trending Subtree
TrendWorX Reporting
The Reporting subtree of the TrendWorX tree in the ProjectWorX console, shown in the figure
below, includes all the TrendWorX Reporting files available for a project. From here you can rightclick and create new files or add existing configuration files to the project.
3.26
Managing Application Files
TrendWorX Reporting Subtree
TrendWorX Logger Configurator
The Logger Configurator subtree of the TrendWorX tree in the ProjectWorX console, shown in the
figure below, includes all the TrendWorX Logger configuration database files available for a project.
From here you can right-click and create new configuration databases or add existing configuration
databases to the project. You can also activate the database.
The TrendWorX Logger Configurator supports both Microsoft Access (.mdb) databases and
Microsoft SQL Server (or MSDE) based databases. When you create a new SQL Server database,
ProjectWorX launches the Configuration Database Wizard, which will help you create a new
configuration database.
NOTE
For complete information about creating and configuring Alarm Logger databases, please refer
to the Trend Logger Configurator Help documentation.
TrendWorX Logger Configurator Subtree
Activating TrendWorX Logger Configuration Databases
To activate a TrendWorX Logger configuration database:
1. Right-click the file and select Make Configuration Active from the pop-up menu.
2. The icon next to the configuration file changes from the standard icon to a globe icon to indicate
that it is active, as shown in the figure below.
3.27
ProjectWorX – User’s Manual
Selecting a TrendWorX Database to Activate
TrendWorX Viewer
ProjectWorX includes support for publishing TrendWorX container files (.t32). Unlike publishing
GraphWorX displays, publishing trend files has the side effect of creating intermediate .v32 files. It
is actually these files, and not the container files, that are referenced by the created HTML page.
These files are contained in the TrendWorX Viewer Configuration tree, shown in the figure below.
After the Web Publishing Wizard has been executed, these generated intermediate files are
automatically added to these two trees. This is critical for ProjectWorX’s ability to publish local
HTML files with the intention of later publishing the HTML files from the local folders to a Web Site.
The Viewer Configuration subtree of the TrendWorX tree in the ProjectWorX console, shown in the
figure below, includes all the TrendWorX Viewer files available for a project. From here you can also
right-click and add existing files to the project.
Trend Viewer Configuration Subtree
DataWorX Tree
The DataWorX tree in the ProjectWorX console, shown in the figure below, includes all the
DataWorX files available for a project.
3.28
Managing Application Files
DataWorX Tree in ProjectWorX Console
DataWorX Projects
In the DataWorX Projects subtree of the DataWorX tree in the ProjectWorX console, you can rightclick and create new configuration databases or add existing configuration databases and binary
files to the project. You can also specify a startup project.
DataWorX Projects Subtree
Specifying a DataWorX Active Configuration
The MDB Configurations subtree of the DataWorX tree provides an option to specify an active
configuration database.
To activate a DataWorX configuration database, right-click the project file and select Make
Configuration Active from the pop-up menu, as shown in the figure below.
Activating a DataWorX Configuration Database
3.29
ProjectWorX – User’s Manual
ScriptWorX Tree
The ScriptWorX tree in the ProjectWorX console, shown in the figure below, manages files for the
following ScriptWorX components:
• Scripts
• VBA Files
Although you can view all the files that pertain to a script (i.e. the .swx files as well as the .vba files
with the same name that are automatically created when making a new script), the ScriptWorX
(.swx) files are the only files that you can really access through the ProjectWorX console. Each .swx
file has a corresponding .vba file. A .vba file without a .swx file would be of no use in this
environment, so in ProjectWorX these two file types are always connected to each other. This
prevents confusion and avoids deleting or creating .vba files not connected to any script (.swx) file.
ScriptWorX Tree in ProjectWorX Console
ScriptWorX Scripts
The Scripts Container subtree of the ScriptWorX tree in the ProjectWorX console, shown in the
figure below, includes all the ScriptWorX script (*.swx) files available for a project. From here you
can right-click and create new scripts or add existing scripts to the project.
NOTE
Each .swx file has a corresponding .vba file. The .vba files that correspond to .swx files are
stored in the VBA Files subtree. When you create, rename, delete, or activate a .swx script file,
the .vba file that corresponds to the .swx file will also be created, renamed, deleted, or activated.
Scripts Subtree
3.30
Managing Application Files
Specifying a ScriptWorX Startup Script
The Scripts subtree of the ScriptWorX tree provides an option to specify a startup script that
automatically opens when ScriptWorX is started from ProcessView Tray. To specify a ScriptWorX
file as the startup script in the ProjectWorX console:
1. Right-click the script file and select Make Startup Script from the pop-up menu, as shown in
the figure below.
Specifying a ScriptWorX Startup Script
2. The icon next to the project file changes from the standard ScriptWorX icon to a globe icon, as
shown in the figure below. The next time ScriptWorX is launched from the ProcessView Tray,
the startup script will automatically open in ScriptWorX.
Startup Project Indicated in Scripts Tree
ScriptWorX VBA Files
The VBA Files subtree of the ScriptWorX tree in the ProjectWorX console, shown in the figure
below, contains all VBA scripts that correspond to the ScriptWorX (.swx) script files in the Scripts
3.31
ProjectWorX – User’s Manual
subtree. Although you cannot directly modify the .vba files, any time a change is made to a .swx
script file, the change is reflected in the .vba file that corresponds to that .swx file.
VBA Files Subtree
MobileHMI Tree
The MobileHMI tree in the ProjectWorX console, shown in the figure below, manages MobileHMI
configuration databases. The MobileHMI Configurator uses Microsoft SQL Server databases, and it
uses Universal Data Link (.udl) files to connect to the Microsoft SQL Server database. These .udl
files contain OLE database connection information that allows the Configurator to create and
manage connections to OLE databases.
MobileHMI Tree in ProjectWorX Console
MobileHMI Configurations
The Configurations subtree of the MobileHMI tree in the ProjectWorX console, shown in the figure
below, includes all the MobileHMI configuration databases available for a project. From here you
can right-click and create new configurations or add existing configuration databases to the project.
You can also activate the database
NOTE
For active Microsoft SQL Server configuration databases, information is stored inside the
ProjectWorX database and is not subject to continuous polling. If the active configuration is
changed from outside ProjectWorX (e.g. with the MobileHMI Configurator) you will have to
refresh the view by right-clicking and selecting Refresh from the pop-up menu. This updates
ProjectWorX with the new database status.
3.32
Managing Application Files
MobileHMI Configurations Subtree
The following conditions apply to SQL Server configuration databases in ProjectWorX:
ProjectWorX will not accept SQL Server configuration databases whose file names contain
spaces because Microsoft SQL Server 2000 is not able to bulk export such databases.
• If a SQL configuration has dependent files (e.g. image files, sound files, etc.), these files will be
packed along with the project automatically as referenced files.
• If ProjectWorX is used to perform certain operations on configurations while an instance of the
configurator is open, a dialog box will be shown asking the user to close the configurator.
ProjectWorX is blocked until the configurator is closed.
• Difference unpacking of projects will not work for SQL-based configurations. When unpacking
SQL configuration files, all SQL configurations will not be overwritten even if the packed project
contains newer files of the same name.
• ProjectWorX does not support direct check-in/check-out SQL databases to Microsoft Visual
SourceSafe.
•
Adding a MobileHMI Configuration Database
To add a MobileHMI SQL configuration database to a project:
1. Right-click the configuration tree and select Add MobileHMI Configuration, as shown in the
figure below.
Adding a SQL Server Configuration Database
3.33
ProjectWorX – User’s Manual
2. In the Add UDL Files dialog box, select a .udl file and click Open to add the configuration
database to the current project.
3. The configuration database appears in the configurations subtree in the right-hand pane of the
•
•
•
•
ProjectWorX console. The details view lists the following properties for the configuration
database:
Configuration Database: Name of the database
On Server: Name of the SQL Server in which the database was created
Status: The status of the database (could be normal, offline, etc)
Linked UDL File: The path to the UDL file used to identify the database
Configuration File Added
4. The new file appears in the right-hand pane of the ProjectWorX console, as shown in the figure
below. If you right-click the file, the Create UDL File option is normally grayed out, as shown in
the figure below. If the link to the .udl file is ever broken inside the ProjectWorX database, the
Create UDL File option will become available and you will be able to create a new .udl file for
the configuration.
NOTE
Deleting a Microsoft SQL Server database configuration file from a project will delete it only from
the project, not from SQL Server. (The .udl file will not be deleted as well.)
Creating a New MobileHMI SQL Configuration Database
To create a new MobileHMI configuration database in the ProjectWorX console:
1. Right-click the Configurations subtree in the MobileHMI tree and select New MobileHMI
Configuration from the pop-up menu, as shown in the figure below.
Creating a New MobileHMI Configuration Database
2. ProjectWorX launches the MobileHMI Configuration Database Wizard, which will help you
create a new MobileHMI configuration database.
NOTE
For complete information about creating and configuring MobileHMI databases, please refer to
the MobileHMI Configurator Help documentation.
3.34
Managing Application Files
Checking the Database Status
The Check Database Status option is useful for checking the status of all the Microsoft SQL Server
databases added to the project. ProjectWorX does not poll SQL Server regularly to get the database
status, so a “Normal” status will always be displayed even if the database is offline. By using the
check status option, the list of databases will be refreshed and any eventual problem will be
displayed.
To get the status of a SQL Server database, right-click and select Check Database Status from the
pop-up menu, as shown in the figure below.
Checking the Database Status
The status of the database is indicated as follows:
• Normal: The database is online and ready
• Missing: The database is no longer on the server.
• Offline: The database is still on the server but is currently offline.
• Recovering: The database is recovering.
• Loading: The database is currently loading and will be available soon.
• Suspect: The database may have become corrupt.
• Not Available: An unknown error has occurred and the database is not available.
Screen Manager Tree
The Screen Manager tree in the ProjectWorX console, shown in the figure below, manages all the
Screen Manager layout files for ProcessView projects. The Screen Manager tree allows you to
specify an automatic startup layout for the machine running the project. ProjectWorX includes eight
default layout (.pwf) files as templates from which to create new Screen Manager layouts to include
in projects.
3.35
ProjectWorX – User’s Manual
Screen Manager Tree in ProjectWorX Console
Screen Manager Layout Files
The Layout Files subtree of the Screen Manager tree in the ProjectWorX console, shown in the
figure below, includes all the Screen Manager layout (.pwf) files available for a project. From here
you can right-click and create new files or add existing layout files to the project. You can also
specify a startup layout.
Screen Manager Layout Files Subtree
Creating a New Screen Manager Layout File
To create a new Screen Manager layout file in the ProjectWorX console:
1. Right-click Layout Files in the Screen Manager tree and select New Layout File from the popup menu, as shown in the figure below.
Creating a New Screen Manager Layout File
3.36
Managing Application Files
2. Choose one type of layout to create from the eight layout templates that are provided, as shown
in the figure below. Click OK.
Selecting a Layout
3. Give the new layout file a name, as shown in the figure below. Click OK.
Naming the Layout File
4. The new layout file appears in the Layout Files subtree in the right-hand pane of the
ProjectWorX console, as shown in the figure below.
New Layout File Added to Screen Manager Tree
5. ProjectWorX automatically launches the new layout file in the Screen Manager, as shown in the
figure below. As you can see, all layout files for the project appear in the Screen Manager
Command Bar. Now you can modify the layouts as needed in the Screen Manager.
3.37
ProjectWorX – User’s Manual
NOTE
For information about configuring layout files, please refer to the Screen Manager Help
documentation.
Screen Manager Launched With Project Layouts
Specifying a Screen Manager Startup Layout
The Layout Files subtree of the Screen Manager tree provides an option to specify a startup layout
that automatically opens when Screen Manager is launched from ProcessView Tray. To specify a
Screen Manager project file as the startup layout in the ProjectWorX console:
1. Right-click the layout file and select Make Startup Layout from the pop-up menu, as shown in
the figure below.
Specifying a Screen Manager Startup Layout
2. The icon next to the layout file changes from the standard Screen Manager layout icon to a
globe icon, as shown in the figure below. The next time Screen Manager is launched from
ProcessView Tray, the startup layout will automatically open in Screen Manager.
3.38
Managing Application Files
Startup Layout Indicated in Layout Files Tree
GenBroker Tree
The GenBroker tree in the ProjectWorX console, shown in the figure below, manages GenBroker
configuration files for each project. GenBroker allows you to specify OPC communication types for
networks.
GenBroker Tree in ProjectWorX Console
GenBroker Configurations
The GenBroker Configurations subtree of the GenBroker tree in the ProjectWorX console, shown
in the figure below, includes all the GenBroker configuration files available for a project. From here
you can right-click and create new files or add existing configuration files to the project. You can
also activate a GenBroker configuration.
A default OPC (OLExpress) Communication item is listed in the GenBroker configurations. When
no GenBroker configuration (.gbc or .gbx) files are present, the default method of communication is
OLExpress or COM\DCOM.
GenBroker Configurations Subtree
3.39
ProjectWorX – User’s Manual
Creating a New GenBroker Configuration
To create a new GenBroker configuration in the ProjectWorX console:
1. Right-click Configurations in the GenBroker tree and select New GenBroker Configuration
from the pop-up menu, as shown in the figure below.
Creating a New GenBroker Configuration
2. Give the new file a name, as shown in the figure below. Click OK.
Naming the GenBroker Configuration File
3. This opens the GenBroker Configurator, as shown in the figure below. Configure GenBroker
and then click the Save & Close button.
NOTE
For information about configuring GenBroker, please refer to the GenBroker Help
documentation.
3.40
Managing Application Files
Creating a New GenBroker Configuration
4. The new configuration file appears in the GenBroker Configurations subtree in the right-hand
pane of the ProjectWorX console, as shown in the figure below.
New GenBroker Configuration File Added to GenBroker Tree
Activating a GenBroker Configuration
The GenBroker Configurations subtree of the GenBroker tree provides an option to activate a
GenBroker configuration file that automatically opens when GenBroker is launched from
ProcessView Tray.
To specify a GenBroker configuration file as the active configuration in the ProjectWorX console:
1. Right-click the configuration file and select Make Configuration Active from the pop-up menu,
as shown in the figure below.
3.41
ProjectWorX – User’s Manual
Activating a GenBroker Configuration File
2. The icon next to the project file changes from the standard GenBroker icon to a globe icon, as
shown in the figure below. The next time GenBroker is launched from the ProcessView Tray,
the active configuration automatically opens in the GenBroker Configurator.
Activated GenBroker Configuration File Indicated in GenBroker Tree
ReportWorX Tree
The ReportWorX tree in the ProjectWorX console, shown in the figure below, manages
ReportWorX configuration databases. ReportWorX uses Microsoft SQL Server databases, and it
uses Universal Data Link (.udl) files to connect to the Microsoft SQL Server database. These .udl
files contain OLE database connection information that allows the Configurator to create and
manage connections to OLE databases.
3.42
Managing Application Files
ReportWorX Tree in ProjectWorX Console
ReportWorX Configurations
The Configurations subtree of the ReportWorX tree in the ProjectWorX console, shown in the
figure below, includes all the ReportWorX configuration databases available for a project. From here
you can right-click and create new configurations or add existing configuration databases to the
project. You can also activate the database.
NOTE
For active Microsoft SQL Server configuration databases, information is stored inside the
ProjectWorX database and is not subject to continuous polling. If the active configuration is
changed from outside ProjectWorX you will have to refresh the view by right-clicking and
selecting Refresh from the pop-up menu. This updates ProjectWorX with the new database
status.
ReportWorX Configurations Subtree
The following conditions apply to SQL Server configuration databases in ProjectWorX:
ProjectWorX will not accept SQL Server configuration databases whose file names contain
spaces because Microsoft SQL Server 2000 is not able to bulk export such databases.
• If a SQL configuration has dependent files (e.g. image files, sound files, etc.), these files will be
packed along with the project automatically as referenced files.
• If ProjectWorX is used to perform certain operations on configurations while an instance of the
configurator is open, a dialog box will be shown asking the user to close the configurator.
ProjectWorX is blocked until the configurator is closed.
• Difference unpacking of projects will not work for SQL-based configurations. When unpacking
SQL configuration files, all SQL configurations will not be overwritten even if the packed project
contains newer files of the same name.
•
3.43
ProjectWorX – User’s Manual
•
ProjectWorX does not support direct check-in/check-out SQL databases to Microsoft Visual
SourceSafe.
Adding a ReportWorX Configuration Database
To add a ReportWorX SQL configuration database to a project:
1. Right-click the configuration tree and select Add ReportWorX Configuration, as shown in the
figure below.
Adding a ReportWorX Configuration Database
2. In the Add UDL Files dialog box, select a .udl file and click Open to add the configuration
database to the current project.
3. The configuration database appears in the configurations subtree in the right-hand pane of the
ProjectWorX console. The details view lists the following properties for the configuration
database:
• Configuration Database: Name of the database
• On Server: Name of the SQL Server in which the database was created
• Status: The status of the database (could be normal, offline, etc)
• Linked UDL File: The path to the UDL file used to identify the database
4. The new file appears in the right-hand pane of the ProjectWorX console, as shown in the figure
below. If you right-click the file, the Create UDL File option is normally grayed out. If the link to
the .udl file is ever broken inside the ProjectWorX database, the Create UDL File option will
become available and you will be able to create a new .udl file for the configuration.
NOTE
Deleting a Microsoft SQL Server database configuration file from a project will delete it only from
the project, not from SQL Server. (The .udl file will not be deleted as well.)
Creating a New ReportWorX Configuration Database
To create a new ReportWorX configuration database in the ProjectWorX console:
1. Right-click the Configurations subtree and select New ReportWorX Configuration from the
pop-up menu, as shown in the figure below.
3.44
Managing Application Files
Creating a New ReportWorX Configuration Database
2. ProjectWorX launches the ReportWorX Configuration Database Wizard, which will help you
create a new configuration database.
Checking the Database Status
The Check Database Status option is useful for checking the status of all the Microsoft SQL Server
databases added to the project. ProjectWorX does not poll SQL Server regularly to get the database
status, so a “Normal” status will always be displayed even if the database is offline. By using the
check status option, the list of databases will be refreshed and any eventual problem will be
displayed.
To get the status of a SQL Server database, right-click and select Check Database Status from the
pop-up menu, as shown in the figure below.
Checking the Database Status
The status of the database is indicated as follows:
• Normal: The database is online and ready
• Missing: The database is no longer on the server.
• Offline: The database is still on the server but is currently offline.
• Recovering: The database is recovering.
• Loading: The database is currently loading and will be available soon.
• Suspect: The database may have become corrupt.
• Not Available: An unknown error has occurred and the database is not available.
WebHMI Tree
The WebHMI tree in the ProjectWorX console, shown in the figure below, manages Web publishing
for each project. From here you can right-click and publish files to a Web server. The WebHMI tree
includes the following categories of files for WebHMI users:
• GraphWorX-Based HTML
• AlarmWorX-Based HTML
3.45
ProjectWorX – User’s Manual
•
•
•
TrendWorX-Based HTML
Local HTML Files
Published Documents
For more information about these categories, please see Chapter 6.
WebHMI Tree in ProjectWorX Console
ProcessView Tray Tree
The ProcessView Tray tree of the ProjectWorX console, shown in the figure below, is a snap-in
that includes all the capabilities of the ProcessViewTray application. When the ProcessView Tray
tree is selected, a list of the ProcessView applications on the machine is provided, as shown in the
figure below. From this list you can check to see whether a server or an application is running and
browse their settings. For more information about ProcessView Tray, please see Chapter 4.
NOTE
The ProcessView Tray tree shows data for the active project only.
ProcessView Tray Tree in ProjectWorX Console
3.46
Managing Application Files
Language Aliasing Tree
The Language Aliasing tree in the ProjectWorX console, shown in the figure below, manages
language configuration databases for each project.
Language Aliasing Tree in ProjectWorX Console
Language Configurations
The Configurations subtrees of the Language Aliasing tree in the ProjectWorX console, shown in
the figure below, include all the Language Configurator databases available for a project. From here
you can right-click and create new databases or add existing configuration databases to the project.
You can also activate the database. When you create a new SQL Server database, ProjectWorX
launches the Configuration Database Wizard, which will help you create a new configuration
database.
The Language Aliasing Configurator supports both Microsoft Access (.mdb) databases and
Microsoft SQL Server (or MSDE) based databases. For more information about SQL databases,
please see "Adding a SQL Server Configuration Database to a Project."
NOTES
For active Microsoft SQL Server configuration databases, information is stored inside the
ProjectWorX database and is not subject to continuous polling. If the active configuration is
changed from outside ProjectWorX you will have to refresh the view by right-clicking and
selecting Refresh from the pop-up menu. This updates ProjectWorX with the new database
status.
For complete information about creating and configuring Language Server databases, please
refer to the Language Aliasing Configurator Help documentation.
Language Aliasing Configuration Subtree
3.47
ProjectWorX – User’s Manual
Global Aliasing Tree
Global Aliasing tree in the ProjectWorX console, shown in the figure below, includes all the Global
Aliasing Configurator databases available for a project.
Global Aliasing Tree
Global Aliasing Configurations
The Configurations subtrees of the Global Aliasing tree in the ProjectWorX console, shown in the
figure below, include all the Global Aliasing Configurator databases available for a project. From
here you can right-click and create new databases or add existing configuration databases to the
project. You can also activate the database. When you create a new SQL Server database,
ProjectWorX launches the Configuration Database Wizard, which will help you create a new
configuration database.
The Global Aliasing Configurator supports both Microsoft Access (.mdb) databases and Microsoft
SQL Server (or MSDE) based databases. For more information about SQL databases, please see
"Adding a SQL Server Configuration Database to a Project."
NOTES
For active Microsoft SQL Server configuration databases, information is stored inside the
ProjectWorX database and is not subject to continuous polling. If the active configuration is
changed from outside ProjectWorX you will have to refresh the view by right-clicking and
selecting Refresh from the pop-up menu. This updates ProjectWorX with the new database
status.
For complete information about creating and configuring Global Aliases, please refer to the
Global Aliasing Configurator Help documentation.
Global Aliasing Configurator Subtree
3.48
Managing Application Files
OPC DataSpy Tree
The OPC DataSpy tree in the ProjectWorX console, shown in the figure below, includes all the OPC
DataSpy files available for a project.
OPC DataSpy Tree in ProjectWorX Console
OPC DataSpy Configurations
In the Configurations subtree of the OPC DataSpy tree in the ProjectWorX console, you can rightclick and create new files or add existing files to the project.
OPC DataSpy Configurations Subtree
My Files Tree
The My Files tree in the ProjectWorX console, shown in the figure below, allows you to add any
type of file you wish to the project. The only difference here is that you will not see the packing,
unpacking, or Web publishing log files.
To add a file:
1. Right-click the My Files tree and select Add File from the pop-up menu, as shown in the figure
below.
2. Choose a file to add, and then click Open. The new file appears in the right-hand pane of the
ProjectWorX console.
3.49
ProjectWorX – User’s Manual
My Files Tree
Microsoft Office Tree
You have the option of displaying the (third-party) Microsoft (MS) Office tree in the ProjectWorX
console. This tree, shown in the figure below, manages files for Microsoft Word, Microsoft
PowerPoint, Microsoft Excel, and Microsoft Access, is hidden by default. When enabled in the
Show/Hide Applications dialog box, the MS Office tree is displayed under the project
Applications tree. The MS Office tree is similar to the other application trees in that you can create,
add, copy, delete, and open files. You can also generate reports.
NOTE
You can also perform global searches in Microsoft Excel spreadsheets. For more information,
please see Chapter 2.
Microsoft Office Tree
To display the MS Office tree:
1. Right-click the on the Applications tree and select Customize Applications from the pop-up
menu, as shown in the figure below.
2. This opens the Show/Hide Applications dialog box. Check MS Office, and then click OK.
OPC Servers Tree
The OPC Servers tree for each project, shown in the figure below, allows you to create and manage
OPC server configurations. Each time you create a new OPC server configuration inside a project in
the OPC Servers tree, the new file is saved to the project folder in the "Bin" directory. If you add an
existing configuration file, you have the option of copying the file to the project folder or running the
file from its current location.
NOTE
ProjectWorX currently supports configuration for the Simulator OPC Server only, which is
installed with ProcessView. All other OPC servers (e.g. DataStore OPC Server, etc.) must be
installed before you can configure them through ProjectWorX.
3.50
Managing Application Files
Project OPC Servers
OPC Simulator Tree
The OPC Simulator subtree component of the OPC Servers tree in the ProjectWorX console,
shown in the figure below, includes all the Simulator OPC server configuration files available for a
project. From here you can right-click and add existing configuration files to the project.
OPC Simulator Subtree
Creating a New Simulator OPC Server Configuration File
To create a new Simulator OPC Server configuration file in the ProjectWorX console:
1. Right-click OPC Simulator in the OPC Servers tree and select New OPC Simulator
configuration from the pop-up menu, as shown in the figure below.
Creating a New OPC Simulator Configuration File
3.51
ProjectWorX – User’s Manual
2. Give the new file a name, as shown in the figure below. Click OK.
Naming the New File
3. The new file appears in the OPC Simulator subtree in the right-hand pane of the ProjectWorX
console, as shown in the figure below. ProjectWorX automatically launches the new file in
Simulator OPC Server Configurator.
New File Added to OPC Simulator Tree
Activating a Simulator OPC Server Configuration
The OPC Simulator in the OPC Servers tree provides an option to activate a Simulator OPC
Server configuration file:
1. Right-click the configuration file and select Activate Configuration from the pop-up menu, as
shown in the figure below.
Activating a Simulator OPC Server Configuration
2. ProjectWorX automatically launches the new file in Simulator OPC Server Configurator.
3.52
Chapter 4
PROCESSVIEW TRAY, SYSTEM TOOLS
AND SECURITY
ProcessView Tray
The ProcessView Tray tree of the ProjectWorX console, shown in the figure below, includes all the
capabilities of the ProcessView Tray application. When the ProcessView Tray tree is selected, a list
of the ProcessView applications on the machine is provided, as shown in the figure below. From this
list you can check to see whether a server or an application is running and browse their settings.
NOTE
The ProcessView Tray tree shows data for the active project only.
ProcessView Tray Tree in ProjectWorX Console
Starting and Stopping Applications Using ProcessView Tray
ProcessView Tray provides a way to either manually or automatically start and/or stop applications
within ProcessView . In the ProcessView Tray tree for the active project in the ProjectWorX console,
you can specify which applications and servers to start and stop. You can also set up applications to
run auto start upon Windows startup, setting their timing and launching position parameters.
Note: An application can be detected as running only if the application is launched through the
ProcessView Tray.
Starting Applications From ProcessView Tray
To launch an application from ProcessView Tray:
1. Right-click the application in the details view and select All Tasks > Start from the pop-up
menu, as shown in the figure below.
Starting an Application in ProcessView Tray
4.1
ProjectWorX – User’s Manual
2. The application is launched and the Status changes to Running, as shown in the figure below.
Starting an Application in ProcessView Tray
Stopping Applications From ProcessView Tray
To shut down a running application from ProcessView Tray:
1. Right-click the application in the details view and select All Tasks > Stop from the pop-up
menu, as shown in the figure below.
Stopping an Application in ProcessView Tray
2. The application is stopped, and the status changes to Not Running, as shown in the figure
below.
Application Stopped in ProcessView Tray
Setting Application Properties From ProcessView Tray
From the ProcessView Tray tree of the ProjectWorX console, you can view application properties for
both clients and servers. Any changes that you make to the application properties settings are
reflected in the details list of the ProjectWorX ProcessView Tray tree. To change the properties for
an application, right-click the application in the details view and select Properties from the pop-up
menu, as shown in the figure below.
4.2
ProcessView Tray, System Tools and Security
Viewing Application Properties From the ProcessView Tray Tree
The Properties dialog box opens, as shown in the figure below. The properties indicate the current
status of the application (i.e. Running or Not Running).
The server properties are slightly different from the client properties. The server properties have Run
as a Service and Run at Startup options, while client properties instead have a Command Line
feature that indicates the designated startup file for the application (as specified in the active
project).
ProcessView Tray enables you register and run servers as an NT service. To convert a server to an
NT service, check the Run as a Service check box, as shown in the figure below. Once an
application is converted to an NT service, checking the Run at Startup check box makes it an
automatic service so that it will automatically start every time the computer is restarted.
Server Properties
The Auto Start and Auto Stop options enable a ProcessView system application to be opened and
shut down automatically and in an orderly fashion. Selecting these items puts the application in a
management list with other applications that are auto started and auto stopped. The order in which
these applications are started or stopped is determined by the relative start and stop positions
specified in the application properties. Both the server properties and client properties dialogs have
the following ProcessView Tray application startup and shutdown options, which set the start and
stop parameters for the application:
4.3
ProjectWorX – User’s Manual
•
•
•
•
•
•
Auto Start: When checked, ProcessView Tray automatically launches the application upon
ProcessView Tray startup.
Startup Position: Specifies the order in which the application will be started (if multiple
applications are auto started). For example, if both GraphWorX and AlarmWorX are to be auto
started but you want GraphWorX to start before AlarmWorX starts, set the startup position for
GraphWorX to "1" and the startup position for AlarmWorX to "2."
Startup Delay: Sets the delay (in seconds) before the application is launched.
Auto Stop: When checked, ProcessView Tray automatically stops the application upon
ProcessView Tray shutdown.
Shutdown Position: Specifies the order in which the application will be shut down (if multiple
applications are auto stopped).
Shutdown Delay: Sets the delay (in seconds) before the application is stopped.
Click the Apply button to set the parameters you have selected in the application properties.
Client Properties
Viewing Application Parameters in ProcessView Tray
The parameters that are set the application properties are displayed in the details view of the
ProcessView Tray, as shown in the figure below. The column headers indicate the following
properties:
•
Application: Name of the application.
•
Application ID: Name of the application's executable file.
•
Status: Current application status (i.e. Running or Not Running).
•
Start With Project: States whether auto start is enabled for the application (i.e. Yes or No).
•
Start Position: Specifies the order in which the application will be started (if multiple
applications are auto started).
•
Start Delay: Delay (in seconds) before the application is launched.
•
Stop With Project: States whether auto stop is enabled for the application (i.e. Yes or No).
•
Stop Position: Specifies the order in which the application will be shut down (if multiple
applications are auto stopped).
•
Stop Delay: Delay (in seconds) before the application is stopped.
•
Run as Service: States whether a server is run as an NT service (i.e. Yes or No).
•
Service Autorun: States whether a server run as an NT service will automatically start every
time the computer is restarted (i.e. Yes or No).
4.4
ProcessView Tray, System Tools and Security
•
Command Line: Indicates the designated startup file/database for the application (as specified
in the active project).
Application Parameters in ProcessView Tray Tree
System Tools
The System Tools tree of the ProjectWorX console is a snap-in from which you can conveniently
launch all of the available ProcessView tools, as shown in the figure below. To launch a tool,
double-click the tool in the right-hand pane of the ProjectWorX console. The tool's executable file is
opened.
System Tools Snap-in in ProjectWorX Console
Security Administration
Each of the ProjectWorX snap-ins has a toolbar button that provides direct access to the ICONICS
Security Server Login Utility, as shown in the figure below. You can also access the Security Login
Utility from the System Tools snap-in.
Security Login Button in Snap-in Toolbars
Clicking the Security Login button on the toolbar launches the security login screen, as shown in
the figure below.
4.5
ProjectWorX – User’s Manual
Logging Into the Security Server
Logging into the Security Server provides the necessary rights to handle all the project operations
with a proper security level. The actual access level is always shown in the bottom right-hand corner
of the ProjectWorX console status bar, as shown in the figure below. There are three possible
access levels:
•
Full Access
•
Read Only
•
<no rights>
Security Status Shown in ProjectWorX Status Bar
Upon startup, ProjectWorX checks for the default security level of the machine. It also checks the
ProcessView security settings using the DEFAULT Application Action user association list in the
Security Configurator to determine the startup access level to ProjectWorX. The security access
restrictions affect all the elements in ProjectWorX, so certain ProjectWorX elements are restricted
(e.g. menus are grayed out, options are unavailable, etc.) if a user has read-only rights or no rights
at all.
NOTE
For complete information about ProcessView security administration, please refer to the Security
Configurator and Security Login Help documentation.
4.6
Chapter 5
BACKING UP PROJECTS TO VISUAL
SOURCESAFE
Visual SourceSafe Integration
ProjectWorX provides a feature that allows you to back up projects and application files to
Microsoft® Visual SourceSafe. Microsoft Visual SourceSafe does not need to be installed on the
same node as ProjectWorX. Typically, SourceSafe is installed on a network server, and the clients
that check files in and check files out browse over the network to the "SrcSafe.ini" file on the remote
(server) node.
NOTE
ProjectWorX does not support direct check-in/check-out SQL databases to Microsoft Visual
SourceSafe.
Please refer to the Microsoft Visual Studio and Visual SourceSafe help documentation for
instructions on how to install and use Visual SourceSafe.
Setting up a User Profile in Visual SourceSafe
Before you can login to Visual SourceSafe through ProjectWorX and back up your projects, you
must configure a user profile in Visual SourceSafe:
1. From the Windows Start menu, select Programs > Microsoft Visual Studio > Microsoft
Visual SourceSafe > Visual SourceSafe Administrator, as shown in the figure below.
Starting Microsoft Visual SourceSafe
2. In the Visual SourceSafe Login, enter an administrator password, as shown in the figure
below. Click OK.
Visual SourceSafe Login
3. The Visual SourceSafe Administrator opens showing the user profiles, as shown in the figure
below.
5.1
ProjectWorX – User’s Manual
Visual SourceSafe Administrator
4. To add a new user profile, select Add User from the Users menu, as shown in the figure below.
Adding a New User Profile
5. Enter a name and password for the new user, as shown in the figure below. Click OK.
Entering a User Name and Password for the New User
6. The new user is added to the Visual SourceSafe Administrator, as shown in the figure below.
5.2
Configuring Projects
New User Added to Visual SourceSafe Administrator
Logging Into Visual SourceSafe From ProjectWorX
Once you have configured a user login profile in the Visual SourceSafe Administrator, you can back
up your ProjectWorX projects to Visual SourceSafe.
1. In the ProjectWorX console, select Login to SourceSafe from the Tools menu, as shown in the
figure below.
Logging Into Visual SourceSafe Through the ProjectWorX Console
2. Enter your Visual SourceSafe user name and password (specified in the Visual SourceSafe
Administrator settings), as shown in the figure below. The .ini file is the SourceSafe initialization
file found on the node where SourceSafe is installed. Select an .ini file by clicking the ... button
in the Visual SourceSafe Login dialog box and browsing (locally or over a network) for a file.
Click OK to login to Visual SourceSafe. If any of these parameters is incorrect, you will be
notified accordingly.
NOTE
It is recommended that you use the default .ini file provided by Visual SourceSafe.
5.3
ProjectWorX – User’s Manual
Visual SourceSafe Login in ProjectWorX
3. Once you login, the Source Control menu becomes available on the Action menu of the
ProjectWorX console when a project is selected, as shown in the figure below.
Source Control Menu Activated in ProjectWorX
Source Control Options
The Source Control menu on the Action menu of the ProjectWorX console provides options for
backing up files to and retrieving files from the Visual SourceSafe database, as shown in the figure
below.
Source Control Menu Activated in ProjectWorX
5.4
Configuring Projects
The following general options are available:
•
Add to Source Control: Makes a read-only copy of a file and backs up the file to the Visual
SourceSafe database.
•
Remove from Source Control: Removes or deletes the file from the Visual SourceSafe
database.
•
Check in: Backs up the latest version of a file to the Visual SourceSafe database.
•
Check out: Retrieves a version of a file from the Visual SourceSafe database.
•
Undo check-out: Nullifies the check-out of a file from the Visual SourceSafe database.
•
Get latest version: Retrieves the most recent version of a file from the Visual SourceSafe
database.
•
History: Provides information about when a file was created and last modified as well as any
comments or labels associated with each version of the file. Also specifies which version of the
file to retrieve from the Visual SourceSafe database.
The Source Control options in ProjectWorX can be applied to the following denominations of files:
•
Individual files
•
Groups of application files
•
Entire projects
NOTE
You must be logged into Visual SourceSafe in order to access the Source Control options. If you
are not logged in, the Source Control menu is not available in the ProjectWorX console.
Comments for Source Control Actions
For each Source Control action (e.g. add, check-out, check-in, etc.), ProjectWorX prompts you to
enter a comment to document the action because the Prompt for Comments option is selected by
default in the Source Control tab of the Application Preferences dialog box in the ProjectWorX
console, as shown in the figure below. This way you have a record of each action and a detailed
history for each file version in the Visual SourceSafe database.
NOTE
You can disable the Prompt for Comments in the Source Control tab, but this is not
recommended.
Prompt for Comments Option Enabled in Application Preferences
ProjectWorX provides a generic comment for each action, such as the example comment shown in
the figure below. You can use this comment or type a new comment to associate with the file.
5.5
ProjectWorX – User’s Manual
Adding a Comment for Source Control Actions
Adding Files to Visual SourceSafe
The Add to Source Control option on the Source Control menu allows you to add individual files,
groups of application files, and entire projects in the ProjectWorX console to the Visual SourceSafe
database.
When you add a file to source control, the icon for the file will change. An item under source control
that is checked in contains a yellow box in the lower-left corner. An item that is under source control
and checked out contains a checkmark in the yellow box, as shown below.
- Not under source control
- Checked into SourceSafe
- Checked out of SourceSafe
Adding Individual Files to Visual SourceSafe
To add a single file to Visual SourceSafe from ProjectWorX:
1. Right-click the file in the ProjectWorX console and select Source Control > Add to Source
Control, as shown in the figure below.
Adding a File to Visual SourceSafe
2. Type a comment to document the addition of the file to Visual SourceSafe, as shown in the
figure below, and then click OK.
5.6
Configuring Projects
Adding a Comment
3. Once the file is added to the Visual SourceSafe database, the icon next to the file name is
marked with a yellow tag, as shown in the figure below. The file automatically becomes readonly (it cannot be modified).
File Added to Visual SourceSafe
Adding Groups of Application Files to SourceSafe
Just as you can add individual files to SourceSafe, ProjectWorX also allows you to add groups of
application files to SourceSafe:
1. Right-click the file group (e.g. GraphWorX Displays) in the Applications tree in the ProjectWorX
console and select Source Control > Add All to Source Control, as shown in the figure
below.
Adding a Group of Files to SourceSafe
2. Type a comment to document the addition of the file group to Visual SourceSafe, as shown in
the figure below, and then click OK.
5.7
ProjectWorX – User’s Manual
Adding a Comment
3. The entire group of files is added to the Visual SourceSafe database. The icon next to each file
name is marked with a yellow tag, as shown in the figure below. The files automatically become
read-only (they cannot be modified).
Group of Files Added to Visual SourceSafe
Adding Projects to Visual SourceSafe
Just as you can add individual files and groups of files to Visual SourceSafe, ProjectWorX also
allows you to add all the files in a project to Visual SourceSafe at once:
1. Right-click the project (e.g. Power Plant) in the Applications tree in the ProjectWorX console
and select Source Control > Add All to Source Control, as shown in the figure below.
Adding a Project to SourceSafe
2. Type a comment to document the addition of the project to Visual SourceSafe, as shown in the
figure below, and then click OK.
5.8
Configuring Projects
Adding a Comment
3. All files in the project are added to the Visual SourceSafe database. The icon next to each file
name is marked with a yellow tag, as shown in the figure below. The files automatically become
read-only (they cannot be modified).
All Project Files Added to Visual SourceSafe
Viewing Files Added to Visual SourceSafe
To view your files in Visual SourceSafe:
1. From the Windows Start menu, select Programs > Microsoft Visual Studio > Microsoft
Visual SourceSafe > Microsoft Visual SourceSafe, as shown in the figure below.
Opening Microsoft Visual SourceSafe
2. In the Visual SourceSafe Login, enter a user name and password, as shown in the figure
below. Click OK.
Visual SourceSafe Login
3. The Visual SourceSafe Explorer opens, as shown in the figure below. As you can see, the
project directory structure of the ProjectWorX console is preserved in the Visual SourceSafe
Explorer so you can easily locate the files you have added to Visual SourceSafe.
5.9
ProjectWorX – User’s Manual
Viewing Files in the Visual SourceSafe Explorer
Checking Files out of Visual SourceSafe
Once a file is added to the Visual SourceSafe, the file becomes read-only. In order to modify the file,
you must check it out of Visual SourceSafe. Checking out a file does not remove the file from the
Visual SourceSafe database. Instead ProjectWorX retrieves a version of the file and removes the
read-only status from the file. You can check out both individual files and batches of files.
Checking Individual Files out of Visual SourceSafe
To check a single file out of Visual SourceSafe:
1. Right-click the file in the ProjectWorX console and select Source Control > Check Out, as
shown in the figure below.
Checking a File out of SourceSafe
5.10
Configuring Projects
2. Type a comment to document the file check-out, as shown in the figure below, and then click
OK.
Adding a Comment Upon File Check-out
3. Once the file is checked out of the Visual SourceSafe database, a red check mark is appears on
the icon next to the file name, as shown in the figure below. The file's read-only status is
temporarily removed so it can be modified. The read-only status is not restored until the file is
checked back into the Visual SourceSafe database.
File Checked out of Visual SourceSafe
Checking Batches of Files out of Visual SourceSafe
To check a batch of files (i.e. files for an entire group or project) out of Visual SourceSafe:
1. Right-click the group or project in the ProjectWorX console and select Source Control > Batch
Check Out, as shown in the figure below.
Checking a Batch of Files out of SourceSafe
5.11
ProjectWorX – User’s Manual
2. Type a comment to document the batch check-out, as shown in the figure below, and then click
OK.
Adding a Comment Upon Batch Check-out
3. Once files are checked out of the Visual SourceSafe database, a red check mark is appears on
the icon next to each file name, as shown in the figure below. Each file's read-only status is
temporarily removed so it can be modified. The read-only status is not restored until the file is
checked back into the Visual SourceSafe database.
Batch of Files Checked out of Visual SourceSafe
Undoing File Check Out From SourceSafe
If you check a file out of SourceSafe and later decide you do not want to check it out, you can nullify
the check out by right-clicking the file in the ProjectWorX console and selecting Source Control >
Undo Check Out, as shown in the figure below.
NOTE
Select Batch Undo Check Out to nullify check-out for a group of files.
Undoing File Check out From SourceSafe
5.12
Configuring Projects
Checking Files Into Visual SourceSafe
Once a file is checked out of Visual SourceSafe, the read-only status is temporarily removed so it
can be modified. To back up the recent changes to the file and to restore the file's read-only status,
you must check the file back into the Visual SourceSafe. You can check in both individual files and
batches of files.
Checking Individual Files Into Visual SourceSafe
To check a single file into Visual SourceSafe:
1. Right-click the file in the ProjectWorX console and select Source Control > Check In, as
shown in the figure below.
Checking a File Into SourceSafe
2. Type a comment to document the file check-in, as shown in the figure below, and then click OK.
Adding a Comment Upon File Check-in
3. Once the file is checked back into the Visual SourceSafe database, the red check mark is
removed from the icon next to the file name, as shown in the figure below. The file's read-only
status is restored so it cannot be modified.
5.13
ProjectWorX – User’s Manual
Project File Checked Into Visual SourceSafe
Checking Batches of Files Into Visual SourceSafe
To check a batch of files (i.e. files for an entire group or project) into Visual SourceSafe:
1. Right-click the group or project in the ProjectWorX console and select Source Control > Batch
Check In, as shown in the figure below.
Checking a Batch of Files Into SourceSafe
2. Type a comment to document the batch check-in, as shown in the figure below, and then click
OK.
Adding a Comment Upon File Check-in
3. Once the files are checked back into the Visual SourceSafe database, the red check mark is
removed from the icon next to each file name, as shown in the figure below. Each file's readonly status is restored so it cannot be modified.
5.14
Configuring Projects
Project Files Checked Into Visual SourceSafe
Retrieving File Versions From Visual SourceSafe
One of the major advantages of using Visual SourceSafe to back up your application files in
ProjectWorX is that Visual SourceSafe database maintains multiple versions of the same file. Every
version of a file has a version number with a date and time as well as any relevant comments or
labels. Each time the file is modified, resaved, and then checked back into SourceSafe, the previous
version of the file is not overwritten. Instead each version is stored separately so you can refer to
previous versions of the file as needed.
Two Source Control options in the ProjectWorX console allow you to specify which version of a file
to retrieve from the Visual SourceSafe database:
•
Get latest version: Retrieves the most recent version of a file from the Visual SourceSafe
database.
•
History: Provides information about when a file was created and last modified as well as any
comments associated with each version of the file. Also specifies which version of the file to
retrieve from the Visual SourceSafe database.
Getting the Latest File Version
To retrieve the most recent version of a file from the Visual SourceSafe database:
1. Right-click the group or project in the ProjectWorX console and select Source Control > Get
Latest Version, as shown in the figure below.
NOTE
To get the latest version for a batch of files, select Batch Get Latest Version from the Source
Control menu.
5.15
ProjectWorX – User’s Manual
Getting the Latest Version of a File From SourceSafe
2. As you can see in the figure below, the latest version is retrieved and the date of the file is
refreshed.
NOTE
Retrieving the latest file version is not the same as checking a file out of the Visual SourceSafe
database. When the latest version of the file is retrieved, the file maintains its read-only status.
Latest Version of File Retrieved From SourceSafe
Viewing File History
The History option in the ProjectWorX Source Control provides information about when a file was
created and last modified as well as any comments or labels associated with each version of the file.
To review the history for a file:
1. Right-click the file in the ProjectWorX console and select Source Control > History, as shown
in the figure below.
5.16
Configuring Projects
Viewing the History for a File
2. The history dialog box opens, as shown in the figure below, showing the following information
about the file:
•
Version Number: Lists all versions of the file from oldest to most recent (i.e. version "1" is the
oldest). To view the history of a different version of the file, click the up and down arrows. To
retrieve the currently selected version, click the Get button.
•
User: Name of the user currently logged into Visual SourceSafe.
•
Date: Shows the date and time of the currently selected file version.
•
Action: Documents the last type of modification to the file version.
•
Comment: Shows any comments entered for each version's (e.g. check-in, check-out, etc.)
•
Label: Shows a label for each version (if applicable).
NOTE
To make a version easier to identify, you can assign it a label in Visual SourceSafe (any string
up to 31 characters) and refer to the version by its label. Each time the Label command is used
in Visual SourceSafe, a new version of the selected file is created, and the label is associated
with that version.
•
Label Comment: Shows any additional comments added while creating a file version label in
Visual SourceSafe.
5.17
ProjectWorX – User’s Manual
Viewing File History and Version Information
Removing Files From Visual SourceSafe
To remove a file from Visual SourceSafe:
1. Right-click the file in the ProjectWorX console and select Source Control > Remove From
Source Control, as shown in the figure below.
Removing a File From SourceSafe
5.18
Configuring Projects
2. A message box appears asking you if you want to remove the file. If Remove SourceSafe
Copy is checked, the file is removed from the Visual SourceSafe Explorer but a copy of the file
remains in the Visual SourceSafe database. If Destroy SourceSafe copy permanently is
checked, file is permanently deleted from the SourceSafe database and cannot be retrieved.
Click Yes to proceed with the file removal.
Confirming File Removal
3. Once the file is removed from Visual SourceSafe, the yellow tag is removed from the file icon in
the ProjectWorX console, as shown in the figure below, and the file's read-only status is
removed.
File Removed From Visual SourceSafe
Creating a Project From Visual SourceSafe
The Create Project from SourceSafe command on the Action menu of the ProjectWorX console is
available only when you are logged into Visual SourceSafe. Selecting this menu command opens a
list of all project names residing in the “ProjectWorX” section of Visual SourceSafe, as shown in the
figure below, allowing you to choose which project to create.
5.19
ProjectWorX – User’s Manual
Dialog Showing Available SourceSafe Projects
Once you select a name, ProjectWorX will create the desired project, recursively get all the files
contained within the SourceSafe project, and then add the files to the newly created ProjectWorX
project. All added files are automatically marked as “under source control.”
NOTE
If the “ProjectWorX” root SourceSafe folder is changed in the Application Preferences, it will be
changed here as well, and ProjectWorX will look in the correctly modified root folder for any
projects.
5.20
Chapter 6
WEB PUBLISHING IN PROJECTWORX
Using the Web Publishing Wizard
The Web Publishing Wizard can be accessed through ProjectWorX console, allowing you to easily
export/publish one or more GraphWorX (.gdf), AlarmWorX container (.a32), and TrendWorX
container (.t32) display files within a project to a Web server. The following trees of each project
include an option to publish a single display or multiple displays in the project:
•
Applications/GraphWorX/Displays (as shown in the example figure below)
•
Applications/AlarmWorX/Alarm Container
•
Applications/TrendWorX/Trend Container
Publishing Displays From the ProjectWorX Console
The WebHMI tree under the Applications tree for each project in the ProjectWorX console, shown
in the figure below, manages Web publishing for the entire project. From here you can right-click
and publish HTML files to a Web server. The WebHMI tree includes the following categories:
•
GraphWorX-Based HTML
•
AlarmWorX-Based HTML
•
TrendWorX-Based HTML
•
Local HTML Files
•
Published Documents
6.1
ProjectWorX – User’s Manual
WebHMI Tree in ProjectWorX Console
Web Publishing From Alarm and Trend Viewer Files
ProjectWorX includes support for publishing TrendWorX container files (.t32) and AlarmWorX
container files (.a32). The Web Publishing Wizard that is executed is identical to the wizard used for
GraphWorX displays and identical to the wizard used when publishing directly form TrendWorX or
AlarmWorX.
Unlike publishing GraphWorX displays, publishing trend and alarm files has the side effect of
creating intermediate (.v32 and .awv) files. It is actually these files, and not the container files, that
are referenced by the created HTML page. These files are contained in the AlarmWorX Viewer
Configuration and TrendWorX Viewer Configuration trees, as shown in the figure below. After
the Web Publishing Wizard has been executed, these generated intermediate files are automatically
added to these two trees. This is critical for ProjectWorX’s ability to publish local HTML files with the
intention of later publishing the HTML files from the local folders to a Web Site.
Viewer Configuration File Sections of the AlarmWorX and TrendWorX Trees
6.2
Web Publishing in ProjectWorX
GraphWorX-Based HTML
The GraphWorX-Based HTML subtree of the WebHMI tree, shown in the figure below, contains
HTML files generated from exported GraphWorX displays. These HTML files have embedded code
for accommodating a GraphWorX Viewer ActiveX Control. Any requested local copy of a
GraphWorX-based HTML file generated from the Web Publishing Wizard is stored in this folder.
(See the “Web Publishing Wizard” section below for more information on exporting and publishing
HTML files from GraphWorX displays.) The ProjectWorX database maintains a record of which
local GraphWorX display (.gdf) files each of these HTML files depends on. Documents in this folder
can be added, removed, copied, pasted, opened, edited, added to Microsoft Visual SourceSafe,
searched, replaced, and packed the same way items from other categories can.
GraphWorX-Based HTML Subtree
AlarmWorX-Based HTML
The AlarmWorX-Based HTML subtree of the WebHMI tree, shown in the figure below, contains
HTML files generated from exported AlarmWorX container displays. These HTML files have
embedded code for accommodating an AlarmWorX Viewer ActiveX Control. Any requested local
copy of an AlarmWorX-based HTML file generated from the Web Publishing Wizard is stored in this
folder. (See the “Web Publishing Wizard” section below for more information on exporting and
publishing HTML files from AlarmWorX displays.) The ProjectWorX database maintains a record of
which local AlarmWorX container (.a32) files each of these HTML files depends on. Documents in
this folder can be added, removed, copied, pasted, opened, edited, added to Microsoft Visual
SourceSafe, searched, replaced, and packed the same way items from other categories can.
AlarmWorX-Based HTML Subtree
TrendWorX-Based HTML
The TrendWorX-Based HTML subtree of the WebHMI tree, shown in the figure below, contains
HTML files generated from exported TrendWorX container displays. These HTML files have
embedded code for accommodating a TrendWorX Viewer ActiveX Control. Any requested local
copy of an TrendWorX-based HTML file generated from the Web Publishing Wizard is stored in this
folder. (See the “Web Publishing Wizard” section below for more information on exporting and
publishing HTML files from TrendWorX displays.) The ProjectWorX database maintains a record of
which local TrendWorX container (.t32) files each of these HTML files depends on. Documents in
this folder can be added, removed, copied, pasted, opened, edited, added to Microsoft Visual
SourceSafe, searched, replaced, and packed the same way items from other categories can.
6.3
ProjectWorX – User’s Manual
TrendWorX-Based HTML Subtree
Local HTML Files
The Local HTML Files subtree of the WebHMI tree stores basic HTML files that were not generated
from the Web Publishing Wizard. Here you can add, delete, edit, and maintain various HTML files.
Local HTML Files Subtree
Published Documents
The Published Documents subtree of the WebHMI tree, shown in the figure below, maintains a list
of all HTML files that have been exported/published from ProjectWorX.
Published Documents Subtree
In the right-hand pane of the ProjectWorX Console, each item is listed as a URL with the date it was
published, as shown in the figure below. For information about publishing files from ProjectWorX,
please see "Using the Web Publishing Wizard."
6.4
Web Publishing in ProjectWorX
List of All Documents Published From ProjectWorX
Launching the Web Publishing Wizard in ProjectWorX
The Web Publishing Wizard in ProjectWorX performs two basic operations:
1. The Wizard creates HTML files based on user-specified GraphWorX display (.gdf) files,
AlarmWorX container (.a32) files, and TrendWorX container (.t32) files.
2. The Wizard then either "exports" (saves) the HTML files to a user-specified directory on the
local drive and/ or "publishes" (uploads) the HTML file to a user-specified Web server URL
address (i.e. over the Internet or an intranet).
Web Publishing Wizard in ProjectWorX Console
You can open the Web Publishing Wizard dialog from the ProjectWorX console in the following
ways:
•
Select the project root and then choose Publish Wizard from the Tools menu, as shown in the
figure below.
6.5
ProjectWorX – User’s Manual
Opening the Publishing Wizard From the Tools Menu
Choose the type of file to publish, as shown in the figure below. In this case, both the Publish Web
Page field and the Based on Source File field in the Web Publishing Wizard dialog are read-only
and contain the text “(Display Name).htm” and “(All [GraphWorX, AlarmWorX, or TrendWorX]
Displays in Project),” respectively. The browse (…) button is also disabled.
Choosing a File Type to Publish
•
6.6
Right-click on the GraphWorX/Displays (or the AlarmWorX/Alarm Container tree or the
TrendWorX/Trend Container) tree and select Publish All Displays, as shown in the figure
below. In this case, both the Publish Web Page field and the Based on Source File field in
the Web Publishing Wizard dialog are read-only and contain the text “(Display Name).htm” and
“(All [GraphWorX, AlarmWorX, or TrendWorX] Displays in Project),” respectively. The browse
(…) button is also disabled.
Web Publishing in ProjectWorX
Publishing All Displays in a Project
•
Right-click on a GraphWorX (.gdf), AlarmWorX (.a32), or TrendWorX (.t32) file and select
Publish to HTML, as shown in the figure below. In this case, the Based on Source File field in
the Web Publishing Wizard dialog is read-only and contains the name of the selected display
file. The browse (…) button is also disabled.
Publishing a Display File
•
Right-click on the Applications/WebHMI/GraphWorX-Based HTML (or AlarmWorX-Based
HTML or TrendWorX-Based HTML) tree and select New HTML Document, as shown in the
figure below. In this case, you need to specify a GraphWorX display file in the Based on
Source File field by browsing for the file or by typing in the file name. You also need to specify
the name of the new HTML file in the Publish Web Page field.
6.7
ProjectWorX – User’s Manual
Creating a New HTML File in a Project
Export and Publish Options in ProjectWorX
The Web Publishing Wizard in the ProjectWorX console, shown in the figure below, generates an
HTML file based on one or more user-specified GraphWorX display (.gdf) files, AlarmWorX
container (.a32) files, and TrendWorX container (.t32) files. Then the Wizard either "exports" (saves)
the HTML file to a user-specified directory on the local drive or "publishes" (uploads) the HTML file
to a user-specified Web server URL address (i.e. over the Internet or an intranet).
You have the following options when using the Web Publishing Wizard for a project:
•
Export and/or publish all files in the project.
•
Export and/or publish a single file in the project.
•
Export a file locally.
•
Publish a file to a Web server.
NOTE
Both the Publish to Web Server and Export Local Copy actions can be performed at the same
time.
Web Publishing Wizard in ProjectWorX Console
6.8
Web Publishing in ProjectWorX
Exporting and Publishing Multiple Display Files in ProjectWorX
In ProjectWorX, you can export and/or publish multiple files using the Web Publishing Wizard.
To export/publish all displays in a project:
1. Select the project root and then choose Publish Wizard from the Tools menu, or right-click on
the Applications/GraphWorX/Displays tree (or the AlarmWorX/Alarm Container tree or the
TrendWorX/Trend Container) and select Publish All Displays, as shown in the figure below.
Launching the Web Publishing Wizard
2. This launches the Web Publishing Wizard, as shown in the figure below. In this case, both the
Publish Web Page field and the Based on Source File field in the Web Publishing Wizard
dialog are read-only and contain the text “(Display Name).htm” and “(All [GraphWorX,
AlarmWorX, or TrendWorX] Displays in Project),” respectively. The browse (…) button is also
disabled.
6.9
ProjectWorX – User’s Manual
Publishing All Displays in a Project
Exporting and Publishing Individual Display Files in ProjectWorX
In ProjectWorX, you can export and/or publish individual files using the Web Publishing Wizard.
To export/publish a single display in a project:
1. Right-click on a GraphWorX (.gdf) file, an AlarmWorX container (.a32) file, or a TrendWorX
container (.t32) file and select Publish to HTML, as shown in the figure below.
Launching the Web Publishing Wizard
6.10
Web Publishing in ProjectWorX
2. This launches the Web Publishing Wizard, as shown in the figure below. In this case, the Based
on Source File field in the Web Publishing Wizard dialog is read-only and contains the name of
the selected display file. The browse (…) button is also disabled.
3. In the Publish Web Page field of the Web Publishing Wizard, specify the name of the HTML file
that will be created. The file name is filled in by default, but you can give the HTML file a
different name.
Publishing a Display in a Project
NOTE
You can also right-click on the Applications/WebHMI/GraphWorX-Based HTML tree (or the
AlarmWorX-Based HTML tree or the TrendWorX-Based HTML tree) and select New HTML
Document, as shown in the figure below, to export/publish a display. This launches the Web
Publishing Wizard. In this case, you need to specify a display file in the Based on Source File
field by browsing for the file or by typing in the file name. You also need to specify the name of
the new HTML file in the Publish Web Page field.
Creating a New HTML File in a Project
6.11
ProjectWorX – User’s Manual
Exporting a Display File Locally in ProjectWorX
To export a display file to a directory on the local drive:
1. Right-click on the Applications/WebHMI/GraphWorX-Based HTML tree (or the AlarmWorXBased HTML tree or the TrendWorX-Based HTML tree) and select New HTML Document, as
shown in the figure below.
Launching the Web Publishing Wizard
2. This launches the Web Publishing Wizard, as shown in the figure below. In the Based on
Source File field of the Web Publishing Wizard, you must specify the name of the display file to
be exported, as shown in the figure below. To choose a display, click the … button to the right
to browse for a file. Select a file and then click Open. The directory path and the file name are
shown in the text field.
Exporting a Display File Locally in ProjectWorX
3. In the Publish Web Page field of the Web Publishing Wizard, specify the name of the HTML file
that will be created.
6.12
Web Publishing in ProjectWorX
4. In the Publishing Options field, the Export Local Copy check box is checked by default.
Specify the local directory path name to which you want to export the HTML file. You can select
a recently used path from the drop-down list, or click the … button to browse for a destination
directory. Select the directory and click OK. The local directory pathway you selected appears
in the Export Local Copy field of the Web Publishing Wizard.
Note: By default, ProjectWorX saves the HTML file to the (local) Applications/WebHMI/GraphWorXBased HTML tree (or the AlarmWorX-Based HTML tree or the TrendWorX-Based HTML tree). From
there, the HTML file can be edited and published again in the future.
5. Click the OK button to generate the HTML file. The new HTML file is saved to the local directory
pathway specified in the Export Local Copy field.
NOTE
Both the Publish to Web Server and Export Local Copy actions can be performed at the same
time.
Publishing a Display File to a Web Server in ProjectWorX
To publish the HTML file to a directory on a Web server (i.e. over the Internet or an intranet):
1. Right-click on the Applications/WebHMI/GraphWorX-Based HTML tree (or the AlarmWorXBased HTML tree or the TrendWorX-Based HTML tree) and select New HTML Document, as
shown in the figure below.
Launching the Web Publishing Wizard
2. This launches the Web Publishing Wizard, as shown in the figure below. In the Based on
Source File field of the Web Publishing Wizard, you must specify the name of the file to be
published, as shown in the figure below. To choose a display, click the … button to the right to
browse for a file. Select a file and then click Open. The directory path and the file name are
shown in the text field.
6.13
ProjectWorX – User’s Manual
Publishing a Display File to a Web Server
3. In the Publish Web Page field of the Web Publishing Wizard, specify the name of the HTML file
that will be created.
4. In the Publishing Options field, check the Publish to Web Server check box and type in the
•
•
•
URL address of your Web server with the complete directory indicating where you want to
publish the HTML file, as shown in the figure above. In the sample Web server URL address
shown above ("http://www.myserver.com/WebHMI/Samples"), the various components are:
http://www.myserver.com: IP address (server name) of the WebHMI Server
WebHMI: Name of the WebHMI server root directory
Samples: Name of the directory on the server to which the HTML file will be saved
5. Click the OK button to generate the HTML file. The new HTML file is uploaded to the Web
server and then saved to the URL address path specified in the Publish to Web Server field.
NOTES
By
default,
ProjectWorX
also
saves
the
HTML
file
to
the
(local)
Applications/WebHMI/GraphWorX-Based HTML tree (or the AlarmWorX-Based HTML tree or
the TrendWorX-Based HTML tree). From there, the HTML file can be edited and published
again in the future.
Both the Publish to Web Server and Export Local Copy actions can be performed at the same
time.
Publishing Customization Options
The Web Publishing Wizard contains some customization options for exporting/publishing HTML
files. Clicking the Advanced button on the Web Publishing Wizard dialog opens the Web
Publishing Properties dialog box, which contains the following tabs:
•
General Settings
•
Server Switching Support
•
Screen Resolution Settings
6.14
Web Publishing in ProjectWorX
•
•
Publishing Options
Publishing Channel
General Settings
The General tab of the Web Publishing Properties dialog box, shown in the figure below, allows
you to specify the default URL address for the WebHMI Server. The General tab is visible only
when Export Local Copy is the sole option selected on the Web Publishing Wizard dialog box. If
Publish to Web Server is selected on the Web Publishing Wizard dialog box, then the General tab
is hidden and you won't need to configure it.
General Settings
Server Switching Support
The Server Switching Support tab of the Web Publishing Properties dialog box, shown in the
figure below, allows you to enable or disable GenBroker support for the exported/published HTML
file. Here you can specify which GenBroker configuration file (.gbx) will be activated. The GenBroker
configuration file establishes the settings for OPC data communications between the clients and the
Web server.
6.15
ProjectWorX – User’s Manual
Server Switching Support Settings
There are three available options for GenBroker support:
•
None: GenBroker support is disabled. If this option is selected, all the communication will
default to the local node. This option should be checked when the Web pages are meant to be
used only from the local node. If this option is checked, Web pages may not work on a remote
node, unless the remote node has ProcessView installed and GenBroker is properly configured
to communicate with the WebHMI server.
•
As Configured in WebHMI Settings: This setting uses the default URL address of the
GenBroker configuration (.gbx) file as specified in the WebHMI installation. This is the
recommended option for non-expert users.
•
User Defined: When this option is selected, the GenBroker Configuration File URL field
becomes available, allowing you to specify the URL address of the GenBroker configuration
(.gbx) file. This option gives the maximum flexibility and should be used by expert users only.
NOTE
For information about configuring GenBroker settings, please see the GenBroker Configurator
Help documentation.
Screen Resolution Settings
The Screen Resolution tab of the Web Publishing Properties dialog box, shown in the figure
below, determines the screen resolution and size of the GraphWorX Viewer ActiveX control, which
is referenced in the generated HTML file and then downloaded to a client PC when the HTML file is
viewed in the client's Web browser. You can specify the screen size in the Width and Height fields
in terms of pixels (px) or percentage (%). Click the Resolutions button to select from a list of
standard screen resolutions, as shown in the figure below.
6.16
Web Publishing in ProjectWorX
Screen Resolution Settings
Publishing Options
The Publishing Options tab of the Web Publishing Properties dialog box, shown in the figure
below, enhances the publishing process. By default, the Web Publishing Wizard provides support
for related files detection (for more details, see the Multiple Display Support section). The multiple
display detection could be a rather lengthy process. You can speed up the process by disabling the
Enable Multiple Display Support option. This is especially useful, if you have already published
your project files to the Web server, and now you want to update display you have changed.
The multiple display detection mechanism ensures that the Web page will be published properly for
the source file. Disabling the Multiple Display Support may cause publishing of an incomplete web
page, which may result in unexpected behavior. Therefore, it is suggested to disallow publishing of
the Web page. You can do so by enabling the Publish Display File Only option.
Publishing Options
6.17
ProjectWorX – User’s Manual
Publishing Channel
Because publishing via Microsoft Posting Acceptor is no longer supported on Windows Server 2003,
we were forced to find another way of transporting published files from a ProcessView development
machine to a WebHMI server. It appeared that FTP would be the best choice.
Changing the Communication Channel
By default, the method that uses Posting Acceptor services is used for publishing files to a Web
server. The Publishing Channel tab of the Web Publishing Properties dialog box, shown in the
figure below, enables you to change the way that files are uploaded to the Web server by selecting
FTP Channel. This tells the Web Publishing Wizard to use FTP communications for uploading files
instead of Posting Acceptor.
NOTE
Selecting FTP Channel does not affect the configuration of the main Web Publishing Wizard
dialog; the settings are the same if you were publishing files using the default method (i.e.
Posting Acceptor).
Publishing Channel
Configuring FTP Access
Just before uploading files to the Web server, you will be prompted to specify the FTP connection
settings, as shown in the figure below. Enter the correct FTP path, user name and password.
NOTE
For information about FTP site configuration, please see the application note called “Publishing
to Windows 2003 Server,” which is located on the ProcessView CD.
6.18
Web Publishing in ProjectWorX
Uploading Files Via FTP
Publishing Files at a Later Time
The Web Publishing Wizard, ProjectWorX saves the generated HTML file to the (local)
Applications/WebHMI/GraphWorX-Based HTML tree (or the AlarmWorX-Based HTML tree or
the TrendWorX-Based HTML tree). The advantage of storing a local copy of an exported HTML file
is that it can be edited, packed, moved, unpacked, and then published again at any time. This saves
you the burden of having to re-export the same file to a new HTML file. You can use this option in
any of the following ways:
•
Right-click on any HTML file in the Applications/WebHMI/GraphWorX-Based HTML tree (or
the AlarmWorX-Based HTML tree or the TrendWorX-Based HTML tree) and select Publish
to Web Server from the pop-up menu, as shown in the figure below.
• Right-click on any HTML file in the Applications/WebHMI/Local HTML Files tree and select
Publish to Web Server from the pop-up menu.
NOTE
Selecting Edit HTML from the pop-up menu opens the HTML file in the default HTML editor.
Publishing a Locally Stored HTML File
•
Right-click on the GraphWorX-Based HTML Files tree (or the AlarmWorX-Based HTML tree
or the TrendWorX-Based HTML tree) and select Publish All Files from the pop-up menu, as
shown in the figure below.
6.19
ProjectWorX – User’s Manual
•
•
Right-click on the Local HTML Files tree and select Publish All Files from the pop-up menu.
Right-click on the WebHMI tree and select Publish All Files from the pop-up menu. This
publishes all HTML files in the WebHMI tree.
Publishing All Locally Stored HTML Files
All of these actions open the Publish HTML File to Web Site dialog box, as shown in the figure
below. The Qualified WWW Folder field in this dialog is identical to the Publish to Web Server
field in the Web Publishing Wizard dialog and is stored in the same place in the registry if the action
is successful. This specifies the location of the Web server to which the HTML file will be published.
If the export/publish action is successful, a "publish” action on an HTML file in the Local HTML
Files tree simply uploads the HTML file to the Web server. A “publish” action on an HTML file in the
GraphWorX-Based HTML Files tree (or the AlarmWorX-Based HTML tree or the TrendWorXBased HTML tree) uploads both the HTML file and its attached display file to the Web server.
Specifying a Web Server Location for HTML Publishing
Web Publishing Log
When exporting/publishing only one file from a display to HTML, you are alerted if anything goes
wrong in the process. If, however, multiple files are being exported/published simultaneously, a log
is generated so the operation will not be halted with each file that cannot be exported/published.
After a batch publishing operation from the GraphWorX-Based HTML Files tree (or the
AlarmWorX-Based HTML tree or the TrendWorX-Based HTML tree), a log file appears showing
the success or failure of each attempt to publish the files. If this log file is needed at a later time, it
can be found in the project root, as shown in the figure below.
Location of Web Publishing Log File
6.20