1
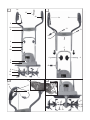
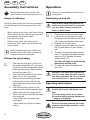
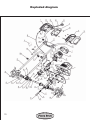
GARDEN
CULTIVATOR
FGH 700/9
GARDEN CULTIVATOR
Operation and Safety Notes
BK41803_GartenKultivator_Cover_LB6.indd 17
12.11.2008 15:43:46 Uhr
Before reading, unfold the page containing the illustrations and familiarise yourself with all functions of the
device.
GB / IE / CY
Operation and Safety Notes
BK41803_GartenKultivator_Cover_LB6.indd 18
Page
4
12.11.2008 15:43:47 Uhr
1a
12
1b
1a
1b
2
6a
3
13
13
6a
14
3
4
5
5
6b
4
4
7
8
6b
9
10
11
12
16
17
18
22
21
11
20
19
23 10
GB
IE
CY
User manual
Safety notes
FGH 700/9 Electric Tiller
This section deals with the basic safety regulations while working with the electric tiller.
Contents
Symbols
Safety notes ................................................. 4
Symbols .................................................... 4
General safety notes ................................. 5
Functional description ................................ 7
Functional parts........................................... 7
Intended purpose ....................................... 7
Assembly instructions ................................ 8
Scope of delivery ...................................... 8
Fitting the grip tubing ................................ 8
Operation...................................................... 8
Switching on and off .................................. 8
Operating instructions ............................... 8
Cleaning, maintenance, storage ................ 9
General cleaning and maintenance work ...9
Changing the tines .................................... 9
Storage ................................................... 10
Guarantee ................................................... 10
Replacement parts .................................... 11
Disposal, environmental protection ........ 11
Technical specifications ........................... 11
EC Declaration of Conformity .................. 12
Exploded diagram ..................................... 13
Grizzly Service-Center .............................. 14
Symbols on the tool
Before first using the machine, please
read this instruction manual carefully,
for your own safety and for the safety
of others. Keep the manual in a safe
place and pass it on to any subsequent owner to ensure that the information contained therein is available
at all times.
4
Warning!
Read the user manual
Warning! Protect from rain
and damp
Danger of injury from objects spinning off! Keep surrounding persons
away form the hazard area.
Warning! Switch off the tool and
disconnect it from the mains before
carrying out any cleaning or maintenance work.
Danger from damaged mains cable.
Keep mains cables away from tines!
Danger of injury from rotating parts.
The tines will continue to rotate after
the tool has been switched off. Wait
for them to stop moving.
93
Sound power level LWA in dB.
Safety class II
Do not dispose of electrical equipment
in household waste.
GB
Symbols in the manual
Warning symbols with information
on damage and injury prevention.
Instruction symbols (the instruction is
explained at the place of the exclamation mark) with information on preventing
damage.
Help symbols with information on improving tool handling.
General safety notes
Warning! Improper use of this tool
may lead to serious injury. Read this
instruction manual carefully before you
start working with the tool, and familiarise yourself with its controls. Keep
the manual in a safe place and pass it
on to any subsequent owner to ensure
that the information it contains is always available.
Please read the following safety guidelines in order to avoid risk of fire, electric
shock, personal injury and damage to
objects:
Preparation:
• For safety reasons, do not allow children
or young people under 16 or anyone not
familiarised with this instruction manual to
use the tool.
• Never use the tool while others, especially
children or pets, are close by.
• Familiarise yourself with handling the tool
and pay attention to all possible dangers
that may be overheard while working with
the tool.
• Check the terrain on which you will be using the tool, and remove stones, sticks,
wires or other foreign objects that may be
caught up and spun off.
• Wear proper working clothes, such as firm
•
•
•
•
IE
CY
footwear with non-slip soles and strong
long trousers. Do not use the tool barefoot
or wearing open-toed sandals.
To prevent injury from the tines, only
switch the tool on in its working position.
Examine the tool beforehand every time
you use it. Do not use the tool when the
safety components (such as the power
safety catch or guard), cutting parts or
bolts are missing, worn or damaged. In
particular, check the mains cable and
dead-man lever for damage.
Only replace damaged bolts or tines in
complete sets to prevent imbalance.
Only use replacement and accessory
parts delivered and recommended by the
manufacturer. Using foreign parts will immediately lead to loss of guarantee.
Working with the tool:
Keep your hands and feet away from
the tines while working, especially
when starting up the tool – injury hazard!
•
•
•
•
•
Observe any noise-prevention regulations
and local by-laws. Using the tool may be
limited or prohibited on certain days such
as Sundays or public holidays, or during
certain times of the day (midday, at night)
or in certain areas (such as at health spas
and hospitals).
Do not use the tool to chop up stones or
till lawn soil, as such use may damage the
tool.
Do not use the tool in rain, foul weather or
damp surroundings (such as near garden
ponds or swimming pools). Only use in
daylight or good lighting conditions.
Be sensible. Do not use the tool if you are
tired or easily distracted, or after the use
of alcohol or medicines. Take a break as
soon as you need one.
Make sure that you are standing firmly
when using the tool, especially on slopes.
5
GB
•
•
•
•
•
•
IE
CY
If working on a slope, work along the
slope, not upwards or downwards. Be
particularly careful when changing direction on the slope. Do not use the tool on
excessively steep slopes.
If there is any danger of slipping on
sloped ground, have a second person
secure the tool with a rod or cable. The
second person should stand up the slope
at a safe distance from the tool.
Always hold the tool securely in both
hands while working with it.
Make sure that the grips are dry and
clean. Be careful while moving backwards
– danger of tripping over!
Do not use the tool if it is damaged, incomplete or altered without the approval
of the manufacturer. In particular, do not
work with the tool if guards or protection
fittings are damaged or missing.
Do not overload the tool. Only work in the
performance range stated. Do not use
tools that do not have sufficient power for
heavy jobs. Do not use the tool for any
use other than that intended by the manufacturer.
Avoid damage to the tool. Do not apply
extra weight and do not drag the tool over
hard surfaces such as tiles or steps.
Stopping work:
Warning! The tines will continue to turn
for a few seconds after you switch the
tool off. Wait until they have stopped
moving – injury hazard!
•
•
•
6
Do not lift or transport the tool while the
motor is running. Turn the tool off and
wait for the tines to stop moving, then
disconnect the tool from the mains before
changing the area you are working on.
Never leave the tool unattended where
you were using it.
Switch the tool off, wait for the tines to
stop moving and disconnect the tool from
•
the mains under the following circumstances:
- Always before leaving the tool.
- Before removing remnants of soil and
plants
- When the tool is not in use
- Before you conduct maintenance or
cleaning work on the tool
- If the mains cable is damaged or
caught up
- If the tool collides with an obstacle or
starts to vibrate in an unusual manner.
In this case, examine the tool for damage, and have it repaired if necessary.
Use the tool away from flammable fluids
or gases. Failure to do so may result in
fire or explosion.
Maintenance and storage:
• Make sure that all nuts, bolts and screws
are tight and that the tool is in safe working order.
• Do not attempt to repair the tool yourself
unless you are qualified to do so. Return
the tool to our service centre to carry out
any work not listed in the user manual.
• Keep the tool in a dry place out of children’s reach.
• Be careful in handling the tool. Keep the
tines sharp and clean to improve its working safety and effectiveness.
• Follow the maintenance regulations.
Electrical safety:
Warning! Do not use the tool if the
mains or extension cable is damaged
– danger of electrical shock.
•
Keep the mains cable away from the
tines. Always trail the mains cable behind
you or the person operating the tool. If the
cable becomes damaged during use, immediately disconnect it from the mains.
Never touch the mains cable before un-
GB
•
•
•
•
•
•
plugging it from the mains.
Make sure that the mains voltage matches the data on the tool’s rating label.
If possible, connect the tool to a socket
with a residual-current (RC) trip switch at a
triggering current of not more than 30 mA.
Avoid skin contact with earthed objects
such as metal fences and posts.
Make sure that the connector on the extension cable is protected from splash
water, and is made of rubber or has a rubber covering. Only use extension cables
that are intended for outdoor use and are
labelled as such. Use extension cables
with a cable core diameter of at least one
square millimetre. Always completely unwind the cable reel before use. Check the
cable for damage.
Use the cable hanger fitted for the purpose when using an extension cable.
Do not carry the tool by the cable. Do not
unplug the cable by tugging on it. Keep
the cable away from heat, oil and sharp
edges.
Functional description
Your hand-operated garden tiller is equipped
with a maintenance free electric motor and a
gearbox with sump lubrication.
The tool is fitted with four rotating tine wheels
that automatically dig themselves into the
ground.
The aluminium frame can be folded to aid
storage.
Please refer to the following descriptions for
the function of the controls.
The major functional parts are
shown on the foldout page.
IE
CY
Functional parts
A
1a Right-hand fork grip with dead-man
lever, safety release catch and cable
tension relief
1b Left-hand fork grip
2 Mains cable
3 Plastic cross-plate
4 Wing-nuts and bolts for securing the
grips
5 Frame tubing
6a Large cable clip
6b Small cable clip
7 Vent
8 Motor housing
9 Gearbox
10 Driveshaft
11 Tines
12 Belt clip
Intended purpose
The tool is intended for breaking up and tilling
coarse soil for the purpose of mixing in fertiliser, peat and compost in domestic areas.
Any use other than that specifically named in
this manual may lead to damage to the tool
and represents a serious injury hazard for the
operator.
The operator or user of the tool is responsible
for any damage or injury caused to other persons or property.
This tool is intended for use by adults. Children and persons unfamiliar with the manual
must not be allowed to use the tool. Do not
use the tool in rain or damp surroundings.
The manufacturer shall not be held liable for
damage arising from improper use or incorrect operation of the tool.
7
GB
IE
CY
Assembly instructions
Operation
Always disconnect the tool from the
mains before conducting any work on it.
Scope of delivery
Observe noise-abatement laws and local by-laws.
Switching on and off
Carefully remove the tool from the packaging
and check that the following parts are complete:
•
•
•
•
•
•
Motor housing with tines and frame tubing
Right-hand fork with dead-man lever and
permanently fixed mains cable
Left-hand fork grip
Plastic cross-plate with cable guide
Assembly tools, cable clips and belt clip
User manual
While assembling the tool, make sure
that the mains cable does not become
caught and has enough slack.
Fitting the grip tubing
B
8
1. Push the two fork grips (1a/1b) into
the plastic cross-plate (3), and screw
the plate into the corresponding holes
in the grip tubing from behind using
the bolts provided (13).
2. Push the mains cable into the cable
guide (14) on the cross-plate.
3. Position the assembled grip frame
with the tube ends on the left and
right-hand sides at the lower frame
tubing (5).
4. Push the two finger bolts into the
holes from the outside inwards, and
tighten them with the wing nuts (4).
5. Fasten the mains cable with the cable
clips supplied:
- Large cable clip (6a) above the
cross-plate
- Small cable clip (6b) at the frame
tubing.
Note: Before switching the tool on,
make sure that the tool is not touching any other objects and hold it
firmly in both hands.
C
1. Plug the tool into the extension cable.
2. Loop the end of the extension cable
and hang it onto the cable tension relief
(16) to ease the tension on the cable.
3. Plug the tool into the mains.
4. Hang the extension cable onto the belt
clip (12) and fasten it to your trouser
belt.
5. To switch on, press the safety release
catch (17) and then squeeze the deadman lever (18). Release the safety
release catch (17).
The tines will begin to rotate and dig
themselves into the earth.
6. To switch off, release the dead-man
lever (18).
Warning! The tines will continue to
turn for a few seconds after the tool
has been switched off. Do not touch
the rotating tines – injury hazard!
Operating instructions
Always keep a firm grip on the tool
with booth hands and watch your
feet.
The tines may cause an accident.
Be careful while moving backwards
– danger of tripping!
Do not touch the gearbox, as it may
become hot during operation – danger of burns!
GB
To avoid damage to the tool:
• Never lift or drag the tool with the motor running.
• Lift the tool while moving it over hard
surfaces such as tiles or steps.
Switch the tool off after working with it
and for transport; disconnect from the
mains and wait for the tines to stop
moving.
• Walk the tool through the soil at normal pace and in a line as straight as
possible.
• Always work away from the mains
socket. Make sure that the cable
is kept well away from the working
area. Hanging the cable into the belt
clip included in the package will help.
• Overload protection: The motor will
cut out immediately if overloaded.
The tool cannot be used until it has
completely cooled down again.
Cleaning, maintenance,
storage
Warning! Always return the tool to the
service centre for work not described in
the manual. Only use original parts.
Switch the tool off, unplug it from the
mains, and wait for the tines to stop
moving before carrying out any maintenance or cleaning work on the tool.
Do not spray the tool down with water
(especially not under pressure), and do
not clean it under running water.
CY
Wear protective gloves when carrying
out maintenance and cleaning work on
the tool to avoid injury from cuts.
Always clean the tool thoroughly after
each use. Always keep the tool clean. Do
not use cleaning fluids or solvents.
•
•
•
•
•
Remove any soil and dirt residues stuck
to the tines, driveshaft, tool surface and
vents with a brush or dry cloth.
Spray or rub biodegradable oil into the
tines.
Clean soiled grips with a damp cloth.
Always check the tool for obvious damage
such as loose, worn or damaged parts
before using it. Check that all nuts, bolts,
and screws are tight.
Check the covers and guards for damage
and correct fit. Change them if necessary.
We shall not be held responsible for any damage caused in any of the following ways:
- Improper repair
- Use of non-original parts
- Use other than for the intended purpose
Changing the tines
The tool is fitted with four tine wheels that can
easily be changed in pairs. Both of the tinewheel pairs can be fitted on the left or right, as
required.
Always change both tine pairs at the
same time to avoid damage to the tool
from imbalance.
Perform regular maintenance and cleaning on
the tool. This will ensure long, reliable service.
General cleaning and maintenance
work
IE
Switch the tool off, unplug it and wait for
the tines to stop turning.
D
1. Lay the tool on the ground with the
rating label facing upwards.
2. Unscrew the hex bolt (19) and the
self-locking nut (20) on the tine-wheel
pair (11).
9
GB
IE
CY
3. Slide the tine-wheel pair off the shaft
(10).
4. Clean the driveshaft with biological
oil.
5. Slide the new tines onto the driveshaft with the holes on the axles
aligned to the holes on the driveshaft
(21).
Make sure that the tines are set to their
proper turning direction. The arrows on
the gearbox and tines should point the
same way ( D No. 22).
6. Slide the hex bolt through the hole
and tighten on the self-locking nut
(supplied with each new tine wheel
pair 23).
Storage
•
•
Guarantee
•
•
•
Leave the motor to cool down before you
put the tool into a closed space.
Keep the tool clean, dry and out of the
reach of children.
Unscrew the wing nuts
( A No. 4) and fold the
fork grips down to reduce
the space taken by the
tool.
Make sure that the cable does not become
jammed.
•
•
•
•
•
•
The frame tubing ( B No. 5) also serves
as a hook to hang up the tool at the place
of storage.
Do not cover the tool in plastic bags as
moisture may form.
Do not use the tool with the handle
folded closed.
10
This tool is subject to a guarantee period
of thirty-six months. A shorter guarantee
period of 12 months shall apply for commercially used and replacement tools according to statutory regulations.
If you have a justified guarantee claim,
please contact us at our service centre (see last page for our telephone
number, fax number, and e-mail address). We will then give you the details on the claims procedure.
Damage caused by natural wear, overload, or improper use is not covered by
guarantee. Certain components are subject to normal wear and are not covered
by guarantee. Such components particularly include: tines.
Guarantee service is also conditional
upon compliance with cleaning and maintenance instructions
Any damage caused by faults in materials
or manufacturing shall be remedied by
free repair or replacement.
You may have repairs not covered by
guarantee carried out for a charge at our
service centre. Our service centre will be
pleased to supply you with a cost estimate.
We can only process orders on tools sent
in with adequate postage and packing.
Tools sent in by express, measurement
cargo or other special forms of postage with freight collect will be refused.
We will dispose of tools free of charge.
GB
IE
CY
Replacement parts
Technical specifications
Use the service address or fax number supplied to order replacement parts. Make sure
you include the order number in your order.
FGH 700/9 Electric Tiller
Motor power input .................................710 W
Mains voltage ...................................230V AC
Mains frequency ....................................50 Hz
Working width ................................... 360 mm
Max working depth ............................ 180 mm
Number of tine wheels .................................. 4
Nominal rotation rate ............ Approx 230 rpm
Weight ............................................... 7.85 kg
Sound pressure level .....................69,3 dB(A)
Guaranteed sound power level.........93 dB(A)
Vibration at hand grip ...................... 2.66 m/s2
Set of tines
Right/left ........................ Order No. 30261000
Please contact our service address for all
other replacement part numbers.
Disposal, environmental
protection
Be environmentally friendly. Return the tool,
accessories and packaging to a recycling centre when you have finished with them.
Do not dispose of electrical appliances
in household waste.
Return the tool to a recycling centre. The
plastic and metal parts used can be separated
and sorted for recycling. Ask our service centre for details.
Noise and vibration values have been determined according to the standards and regulations named in the declaration of conformity.
Technical and optical alterations may be made
without notice for the purposes of improvement. No guarantee can be given for the accuracy of dimensions, notices and specifications stated in this manual. The manufacturer
shall therefore not accept liability for statutory
claims arising from the manual.
11
GB
IE
EU declaration
of conformity
CY
We hereby confirm that the
FGH 700/9 series electric tiller
conforms with the following applicable relevant version of the EU guidelines as of model year
2008:
98/37/EC • 2004/108/EC • 2006/95/EC • 2000/14EC
In order to guarantee consistency, the following harmonised standards as well as national
standards and stipulations have been applied:
EN 709/A1:1999 • EN 60335-1/A2:2006 • EN 50366/A1:2006
EN 55014-1/A2:2002 • EN 55014-2/A1:2001 • EN 61000-3-2/A2:2005 • EN 61000-3-3/A2:2005
We additionally confirm the following in accordance with the 2000/14/EC emissions guideline:
Guaranteed sound power level: 93,0 dB(A)
Measured sound power level: 89,3 dB(A)
Compliance evaluation process carried out in accordance with Appendix V, 2000/14/EC
Labelled with CE identification mark in 2008
Responsible for product manufacture
and technical documentation safekeeping:
Grizzly Gartengeräte GmbH & Co. KG
Am Gewerbepark 2
D-64823 Groß-Umstadt / 12.11.08
(Andreas Gröschl, Techn. director)
12
Exploded diagram
13
Grizzly Service-Center
GB
14
DES Ltd.
Unit 14-15
Bilston Industrial Estate
Oxford Street
Bilston, WV14 7EG
Tel.:
0870 787 6177
Fax:
0870 7876168
Email: [email protected]
From Ireland:
Tel.:
0044 870 787 6177
Fax:
0044 870 787 6168
IAN: 41803
Grizzly Gartengeräte GmbH & Co. KG
Am Gewerbepark 2
D - 64823 Groß-Umstadt
Last Information Update: 11 / 2008
Ident.-No.: 76005517 112008-6
BK41803_GartenKultivator_Cover_LB6.indd 16
12.11.2008 15:43:42 Uhr