1
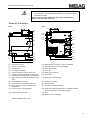
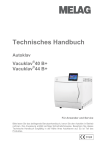
Operating Manual Autoclaves of the Premium-Plus-Class Vacuklav®41 B+ Vacuklav®43 B+ software version 3.0 Please read this Operating Manual before you start operation of the autoclave. The instructions include important safety information. Make sure to keep the Operating Manual near to the autoclave. It represents a component of the product. We reserve the right to technical alterations MELAG Medizintechnik oHG Geneststraße 6-10 10829 Berlin Germany E-Mail: [email protected] www.melag.de Rev.: 1 – 11/2535 Doc.: KBA_GB_41B+_43B+_v1.docx Safety Instructions To operate the autoclave, pay attention to the following safety instructions given below. Appropriate use ■ Do not sterilize any liquids with this autoclave. Power cable and mains socket ■ ■ ■ Never damage or alter the plug or mains cable. Never operate the autoclave if the mains cable or power plug are damaged. Never unplug by pulling on the power cable. Always take a grip on the plug. Double-jacket steam generator ■ Set-up installation and commissioning ■ When the device has been switched off, the double-jacket steam generator continues to be under pressure for some time. Check the pressure display of the manometer located on the autoclave lower front side. Only have the autoclave set up, installed, and commissioned by people authorised by MELAG. Only operate the autoclave in areas which are not subject to explosion hazards. The connections for electrical provision and water supply and discharge must be set-up by trained personnel. ■ ■ Preparation and sterilization of textiles and instruments ■ Program termination ■ ■ ■ Removal of the items to be sterilized ■ ■ ■ Maintenance Carrying the autoclave Malfunctions ■ ■ ■ ■ ■ ■ Follow the instructions of the textile and instrument manufacturers for preparing and sterilizing textiles and instruments. Only use wrapping materials and systems which are suitable for steam sterilization according to the manufacturer's information. Take heed that when opening the door after terminating a running program, hot water steam can escape out of the chamber, depending on when the program was terminated. Depending on the time of the program termination, the load might not be sterile. Observe the clear instructions shown on the display of the autoclave. If necessary, sterilize the affected objects after rewrapping. Never use force to open the door. Use a tray lifter to remove the tray. Never touch the sterilized items, the chamber or the interior of the door with unprotected hands. The parts are hot. Check the wrapping of the sterilized objects for damage when removing them from the autoclave. If a wrapping is damaged, wrap the object again and re-sterilize it. Have the maintenance done only by authorized persons. Maintain the specified servicing intervals. Two people are necessary to carry the autoclave. Use a suitable carrying strap to transport the autoclave. If repeated error messages occur while operating the autoclave, turn the device off. Only have the autoclave repaired by authorised persons. Proper use Application area Sterilisation tasks 2 The autoclave is intended for use in the medical field, e.g. in clinics, and in physician and dental practices. According to DIN EN 13060 this autoclave is considered a Class B sterilizer. It is suited as a universal autoclave for demanding sterilization tasks. For instance, you can sterilize narrow-bore instruments and transmission instruments – wrapped or unwrapped – and larger quantities of textiles. ® Operating Manual Vacuklav 41 B+/43 B+ Observe the following instructions for using the autoclave: Danger Do not sterilize any liquids with this autoclave. It is not approved for the sterilization of liquids. Failure to observe these instructions may lead to delayed boiling, damage to the autoclave and burns. Views of the device Front Rear (1) (2) (3) (4) (16) (12) (13) (14) (15) (17) (18) (5) (19) (20) (6) (21) (22) (23) (7) (8) (9) (10) (11) (24) (25) (1) Slot for the CF card (13) Ethernet-Data connection 3 (can be retrofitted) (2) Colour-Touch-Display (14) Optional connection of the Flex Display (3) LED status bar (15) Mains power cable (4) Door (opens to the left) Cap for emergency opening of the door (16) Tank cap (6) Protective cap for manometer to display the pressure of the double-jacket steam generator (18) Sterile filter (7) Mains switch (concealed, accessible from the side) (19) Safety valve, double-jacket (8) Ethernet-Data connection 1* (20) Emergency overflow (5) (9) (17) Safety valve, chamber Reset button for overheating protection* (10) Quick-fitting connection for emptying the storage tank* (21) One-way drain (11) Front foot of the unit (adjustable) (23) Feed water intake (for MELAdem , swivelling threaded fitting for hose Ø8x1, alternatively straight) (12) Ethernet-Data connection 2 (24) Fan (22) Connection pressure discharge ® (25) Rear foot of the unit (fixed) *hidden behind the white cover 3 ® Operating Manual Vacuklav 41 B+/43 B+ Pre-conditions for the set-up, installation and commissioning ■ Only have the autoclave set up, installed, and commissioned by people authorised by MELAG. Set up the autoclave in a dry and dustproof location. The air humidity should be 30% to 60% and the ambient temperature 16° to 26℃. ® Space requirements ® Vacuklav 41 B+ Vacuklav 43 B+ Width A= 47 cm A= 47 cm Height B= 56.5 cm* B= 56.5 cm* Depth C= 25 cm C= 36 cm D= 57.5 cm D= 69 cm E= 5 cm E= 5 cm F= 10 cm F= 10 cm * with Flex Display B=50 cm (dimensions to upper edge of the autoclave without display) The space requirements for the autoclave corresponds to its dimensions plus at least 5 cm on the side and 10 cm at the back side. The autoclave should be freely accessible from above, so that the built-in storage tank can be filled and a good ventilation is guaranteed. For a fault-free operation, the autoclave must be set up with a distinct tilt back. Starting from a horizontal position (check by using a water level at the chamber flange) the front feet of the unit must be screwed out by about three rotations for the Vacuklav®41 B+ and five rotations for the Vacuklav®43 B+ . Establishing connections Electronical connection Electric circuit with 220-240 V (max. voltage range 207 - 253 V) and 50/ 60 Hz; at least 13 A separate fuse protection; Protection from leakage current 30 mA. Waste-water drain You can optionally connect the autoclave via the pressure realease connection or via the one way drain directly to the outflow. Follow the instructions in the Technical Manual. NOTE The drain must be located at least 30 cm beneath the autoclave and be installed dip-free with continuous descent. Supply with feed water The autoclave works in the gentle yet effective one-steam way water system. This means that it uses fresh purified feed water for every sterilization run for the steam generation. For this purpose the autoclave gets the feed water either from the internal storage tank, which the practice team has refilled e.g. with distilled water from the ® ® MELAdest 65. Or it gets the feed water fully automatically from the water treatment unit MELAdem 40 or MELAdem 47. The feed water must have a quality at least to VDE 0510 or DIN EN 13060, appendix C. If you employ the internal storage tank for the feed water supply, you must fill it manually from time to time. At the given point in time, the autoclave outputs an appropriate message. Fill up the storage tank Fill up the internal storage tank with fresh purified feed water of the respective quality. You can use the removable funnel insert to conveniently fill fresh feed water into the right chamber of the storage tank up to the MAX mark. The internal storage tank holds maximum 5 litres. This quantity of feed water suffices for up to 7 sterilizations. 4 ® Operating Manual Vacuklav 41 B+/43 B+ According to whether the feed water supply comes from the internal storage tank or you have made the connection to a water treatment unit, choose the following settings on the display: Select Settings menu Water supply. Select INTERNAL if the supply is from the internal storage tank, or EXTERNAL, if you have made the connection to a water treatment unit. Emptying both chambers of the storage tank Attach the drain hose on a quick-fitting connection (left of the wastewater, to the right of the feed water), until this perceptibly engages. Drain off the water into a container with at least 5 litres holding capacity. To remove the drain again, press the grey release knob at the quick-fitting connection. The hose detaches itself automatically from the connection. (Warning spring tension! Please stand to the side of the connection when removing the hose). Preconditions for commissioning Trays and accessories must be removed from the chamber after switching on the autoclave and before initial start-up. The feed water supply must be secured. The power supply of the autoclave must be assured. Record of installation and setting up NOTE As documentation of proper setting up, installation and setting up as well as for your warranty claim, the record of installation must be filled out by the person responsible and a copy sent to MELAG. The control panel The control panel consists of a coloured 5 inch Touch Display. Status bar Menu bar Main display Action bar 5 ® Operating Manual Vacuklav 41 B+/43 B+ Symbols in the status bar Meaning Programs/Tests Immediate output indicates whether immediate output is activated/deactivated Additional drying indicates whether supplement drying is activated/deactivated Graphic logs Energy-saving mode Service area CF card status Symbols in the menu bar indicates whether recording of graphic logs is activated/deactivated indicates whether autoclave is in energy-saving mode indicates whether a service technician is logged in to the service area indicates whether a CF card is inserted and whether read or write access is in place Meaning Programs/Tests Log output Settings all sterilization programs and tests are found here, e.g. vacuum test, Bowie & Dick Test etc. the entire log list, logs from a defined time period, e.g. daily, monthly, etc. or specific log types can be found here such as the option to delete logs various settings can be made, e.g. date and time, brightness etc. In addition, standard log settings for log output can be set here Info-/ status window indicates information regarding software version and device dates, e.g. batch lot, maintenance counter, log settings, log memory and other technical values Service area only for technicians Help menu Symbols in the action bar depending on the selected window and control status, gives information for control or function of the actual window Meaning Door open Back Forward Terminate/go back without saving Zoom (+) Pre-selection start time Delete Find 6 indicates a program/test is running opens the autoclave door changes to the previous window changes to the next window returns to the superior menu, closes the window without saving indicates additional details, e.g. additional values after the end of a program run changes to the “pre-selection start time” menu deletes logs irretrievably finds the label printer(s)/log printer(s) ® Operating Manual Vacuklav 41 B+/43 B+ LED status bar The status bar located on the border of the display indicates colours for various situations, e.g. in Standby during the running of a program or for warning or malfunction messages. blue – Standby, program is running, drying has not yet begun green – drying is running, program completed successfully yellow – for warning messages, during access of the CF card red – for malfunction messages, program not completed successfully Prepare items to be sterilized A significant prerequisite for safe disinfection and sterilization of sterilizing materials is the appropriate preparation, i.e. cleaning and maintenance of the sterilizing materials according to the manufacturer's instructions. Furthermore the materials, cleaning agents and processing procedure employed are of significance. NOTE If possible, sterilize textiles and instruments separately from each other in separate sterilization containers or sterilization packages. This way you achieve improved drying results. Load the autoclave Only if the autoclave is properly loaded can the sterilization be effective and the drying deliver good results. NOTE Use perforated trays made of aluminium, such as the trays from MELAG. Only this way can condensate run off. If you use closed materials or shell halves to bear the items to be sterilized, you risk bad drying results. Please note that the use of tray insertions made of paper can perhaps likewise lead to worse drying results. Warning Employ only packaging materials and -systems (sterile barrier systems), which satisfy the DIN EN IS0 11607-1 Standard, e.g. Standard-tray-cassettes or transparently wrapped sterilization packages. Closed sterilization containers Preferably use sterilization containers made of aluminium. Aluminium conducts heat well and thus accelerates drying. Stack sterilization containers Stack on top of each other, if possible, only sterilization containers of the same size and with respectively identical spacer feet, where the condensate can run off on the side at the walls. Soft sterilization wrapping Soft sterilization packages can be sterilized both in sterilization containers on trays or standing when using a package holder – do not place several soft sterilization wrappings flat on top of each other on the trays or in a sterilization containers. Multiple wrapping The autoclave functions on the fractionated pre-vacuum method. This permits the use of multiple wrapping. Mixed loads For sterilizing mixed loads, observe the following instructions: Always place textiles on the top Sterilization containers at the bottom Unwrapped instruments at the bottom Transparently wrapped sterilization packages and paper packaging on the top – exception: in combination with textiles on the bottom Stack transparently wrapped sterilization packages if possible edgewise in such a way that alternately paper side lies on paper side and foil side on foil side; if this is not possible, then with the paper side facing downwards. 7 ® Operating Manual Vacuklav 41 B+/43 B+ Overview of sterilization programs Programs Sterilization temperature Sterilization time Program type as per DIN EN 13060 Universal-Program 134°C 5:30 min. Type B Quick-Program B 134°C 3:30 min. Type B max 1.5 kg single wrapped or max. 6 kg (41 B+) or 7 kg (43 B+) unwrapped Quick-Program S 134°C 3:30 min. Type S, only for unwrapped instruments Gentle-Program 121°C 20:30 min. Type B Prion-Program 134°C 20:30 min. Type B Selecting the program Select the sterilization program according to how the items to be sterilized are wrapped. Furthermore, consider the resistance to high temperature of the items to be sterilized. All sterilization programs are displayed in the menu Programs & Tests. Programs Wrapping Especially suitable for Operating Drying time* Universal-Program single and multiple wrapping mixed loads; long, narrow-bore hollow body instruments approx. 21 min. 15 min. 6 kg / 7 kg Prion-Program single and multiple wrapping instruments where a approx. danger of infection by 38 min. pathologically-modified proteins is suspected (e.g. Creutzfeld-Jacob, BSE) 15 min. 6 kg / 7 kg Gentle-Program single and multiple wrapping textiles; Thermo-instable goods (e.g. plastic, rubber articles) 15 min. Textiles 2 kg (41 B+), 2.5 kg (43 B+) approx. 36 min. Load 41 B+/43 B+ Thermoinstable Goods 6 kg/ 7 kg Quick-Program B single wrapped instruments (no textiles) Long, narrow-bore hollow body instruments approx. 12 min. 6 min single wrapped max. 1.5 kg unwrapped 6 kg / 7 kg Quick-Program S only unwrapped (no textiles) ® simple solid instruments, transmission instruments; simple hollow body instruments ® ca. 10 min. 2 min. 6 kg / 7 kg * without drying (full load in the Vacuklav 41 B+: 6 kg; Vacuklav 43 B+: 7 kg) and depending on the load and installation conditions (such as the cooling water temperature and supply voltage) 8 ® Operating Manual Vacuklav 41 B+/43 B+ Auxiliary programs Vacuum test For measuring leak rate, a test for dry and cold device (test without load) Bowie & Dick test Steam penetration test with special test package (available from your specialist dealer) Conductivity measurement For manually measuring the quality of the feed water Draining For draining and pressure release of the double-jacket steam generator, e.g. for service, for maintenance or before transport Starting the program If you have selected a program, it is displayed marked grey. You can now activate it by pressing the START key. Additional drying With correct loading, the program-specific drying times guarantee adequate drying of the sterile equipment. For difficult drying tasks you can extend the drying time of a program by 50% with the function Additional Drying in the menu Settings with the option Additional drying. Pre-selection start time The function start time pre-selection enables you to select any program and start it at a time of your choice. After selecting the program, touch the symbol in the action bar. The display changes to the “Pre-selection” window. For example, to change the time, tap the Hour or Minute symbol. The selected field will become light blue. You may now change the time by pressing the and buttons. Finally, press START. The display will remain in the pre-selection start time window. NOTE Please note that the function pre-selection start time is not possible with the Quick-Program S for safety reasons. After setting the program start time, no other menu can be selected other than the menu Info & Status. The start time pre-selection is only active for the unique time and program selection. That means that after completion of the program, the pre-selected start time is deleted. You may turn off the autoclave while the pre-selection start time is running. However, the autoclave must be turned on again in time for the timer to progress again. ■ Unsupervised operation of electrical devices, including this autoclave at the operator’s risk. MELAG accepts no liability what so ever for any damage resulting from unsupervised operation. Warning 9 ® Operating Manual Vacuklav 41 B+/43 B+ Manual program abort You manually terminate a running program in any of the phases. To terminate a running program, press the CANCEL button and confirm with YES. After a short time, as shown on the display, you can open the door by pressing the door symbol. ■ Warning Take heed that when opening the door after terminating a running program, hot water steam can escape out of the chamber, depending on when the program was terminated. ■ Use a tray lifter to remove the tray. Never touch the sterilized items, the chamber or the door with unprotected hands. The parts are hot. Failure to observe this requirement can result in burns. Manual termination before beginning of drying If you terminate a program before the beginning of drying, then the items to be sterilized are still unsterile. A cautionary note appears on the display. The log reports that the sterilization was NOT successful. Remove sterilized items ■ Danger Never use force to open the door. The autoclave could be damaged and/or hot steam could escape. ■ Use a tray lifter to remove the tray. ■ Never touch the sterilized items, the chamber or the interior of the door with unprotected hands. The parts are hot. Failure to observe this requirement can result in burns. ■ Danger Check the wrapping of the sterilized objects for damage when removing them from the autoclave. ■ If a wrapping is damaged, wrap the object again and re-sterilize it. Non-observance can result in unsterile instruments. This endangers the health of the patient and the practice team. If you remove the sterilized items from the autoclave directly after the end of the program, it can happen that slight quantities of condensate moisture are found on the sterilized items. Smaller quantities of water which may be are found on the upper side of the paper bags and clear plastic sterilization packages are unobjectionable if they dry out within 30 minutes after removal from the autoclave. Storage of sterilized items The maximum storage life depends on the packaging and the storage conditions. Please notice your national regulations of your country. In general keep the following conditions: ■ Sealed against dust e.g. in a closed instrument cabinet ■ Protected from damage on smooth surfaces ■ Protected from excessive fluctuations in temperature ■ Protected from moisture (e.g. alcohol, disinfectant) ■ Storage duration in accordance with the type of package wrapping 10 ® Operating Manual Vacuklav 41 B+/43 B+ Batch documentation The batch documentation is indispensable as documentation for the successfully completed sterilization process and as an obligatory measure of quality assurance. The capacity of the internal storage suffices for about 100 logs. If the internal log memory becomes full and at least one log has not been issued via an activated outmedium, the following warning will appear on the display: Internal program log is almost full. If this cautionary warning appears, you should prepare the output media determined in the Settings menu Logging and output the respective logs (menu Logs). You can store the logs of the completed programs on the following output media and archive them accordingly. MELAflash CF card A computer in a user network (LAN). ® Log printer MELAprint 42 Please learn from the operating manual of the respective device how to connect the additional devices and which settings you take at the autoclave. Setting the date and time Date and time of the autoclave must be correctly set for proper batch documentation. Ensure that you take into account the clock change in autumn and summer, as this is not adjusted automatically. Select Settings menu Date & Time. Directly select the parameters you wish to change (Day, month, year or hour, minute, second). The selected field will become light blue. Use the and buttons for each parameter value. Repeat the steps for all parameters which you want to change. Confirm the modification with SAVE. The display will restart after saving and then automatically return to the Program & Tests menu. User administration For reliable traceability of the release process following the end of a sterilization program, each user can be given a unique ID and PIN with which the user can authenticate before release of a batch. You can determine if authentification of the user with a PIN input is required in the User administration window by checking the box for Release process with PIN. If this option is activated, the user ID and the result of the release process are recorded in the log header. To set up/edit a new user To set up a new user, read the following: Select Settings menu User administration. To get to User administration and make the settings there, you must enter the Admin PIN. Enter the Admin PIN (Standard: 1000) and confirm by pressing LOGIN. The display changes to the User administration window. Press continue to user list, to see the user list. To set a new user, select an open ID and select EDIT. Note that the first ID is reserved for the Admin PIN. Enter a 4-digit PIN for the selected user ID in the right keypad and confirm with SAVE. With SAVE you apply all settings and leave the menu. By pressing the symbol you leave the menu. 11 ® Operating Manual Vacuklav 41 B+/43 B+ Changing the Admin PIN The Admin PIN (Standard: 1000) is used in the same manner as all other user PIN and should be changed on handing over. To delete a user from the list Select the User administration menu as described above and open the user list. Select the user ID that you wish to delete. Select the symbol to delete the user. A warning message follows. When you confirm with YES, the PIN for this ID is set to 0. At any time a new PIN can be set for this user ID. Release process According to RKI [Robert Koch Institute] - “Recommendations for hygiene in the preparation of medical products” the preparation of instruments ends with the documentation of release to storage and use of the sterilized products. The release process is comprised of the batch indication and the batch release and must take place by authorised and qualified personnel Batch indication This includes the review of the indications shown during the sterilization program, e.g. MELAcontro/®/ MELAcontro/® Pro. Only once the indicator stripe has completely changed colour can the release of the indicator occur. Batch release This includes the review of the process parameters with reference to the sterilization results in the autoclave and the sterilization log, as well as the review of the single wrapping for damage and residual moisture. The release of the batch and the potential indications shown during the process are documented on the sterilization log. Depending on the setting in the user administration, the release of the sterilized items requires a user PIN from the person who releases the batch and the indications. Reliable traceability by the output of labels The use of a label printer enables the traceability of the batch: with details of the serial number of the autoclave, sterilization date, storage duration, batch number, user ID for the person who released the instruments, the patients’ sterilized instruments and the sterilization batch can be easily be associated with the autoclave used and the file name (under barcode). Flawless packaging with the sterilized items is identified following sterilization with a raised sticker. In this way the requirements for a proper “release” are fulfilled by the person entrusted with the preparation. Thus all information about the correct sterilization of the used instruments is associated with the patient’s file. Additional information on the output of labels, please refer to the User Manual. 12 ® Operating Manual Vacuklav 41 B+/43 B+ Energy-saving mode If the autoclave is not be switched off during longer operating pauses, the energysaving mode can be set. Two waiting times can be set in energy-saving mode. Waiting time 1 (W1): After a pre-set waiting time of 15 minutes, the temperature of the double-jacket steam generator will sink to 103°C. The program run time becomes about 2 minutes longer upon the next start. Waiting time 1 (W2): After a pre-set waiting time of 60 minutes, the double-jacket steam generator is no longer heated. Accordingly, the length of the program run time increases by about 5 minutes upon the next start, depending on the length of the operating pause, as the double-jacket steam generator must first be pre-heated to the necessary start temperature. Set the energy saving mode as follows: Select Settings menu Energy-saving mode. Follow the same steps as in the section for the setting “Date and Time”. Pause times Pause times between individual programs are not required, since the sterilization chamber is permanently maintained at the required temperature. Longer operating pauses Keep the door closed in the pauses between the sterilizations if the autoclave is switched on. This requires less energy to maintain the double-jacket steam generator at the desired temperature. If the pauses between two sterilizations last longer than one hour, MELAG recommends that you switch off the autoclave. You can save energy this way. If the autoclave was switched off for one hour, then it requires about five minutes in order for the double-jacket steam generator to heat up again and be ready for operation. If the autoclave is not be switched off during longer operating pauses, the energy-saving mode can be set. After operating pauses which last longer than two weeks, carry out a vacuum test and thereafter an empty sterilization with the Quick-Program S. The following situations can occur after longer pauses: Incident Possible cause What you can do conductivity too high Bad feed water Change the feed water or the mixed-bed-resin pellets ® for a MELAdem unit. Despite running motor, the door does Door seal is sticking Switch the autoclave off and pull vigorously at the door not open to the sealing to open it. surface After pauses, carry out the tests described below depending on the pause duration. 13 ® Operating Manual Vacuklav 41 B+/43 B+ Checks in daily operation Vacuum test Use the vacuum test to check the autoclave for leaks in the steam system. Conduct a vacuum test weekly in routine operation, at initial start-up, after pauses longer than two weeks and in case of error. Bowie & Dick test With the Bowie & Dick test, you can verify the autoclave for sufficient steam penetration of porous sterilizing materials, e.g. textiles. For this purpose it is especially recommended when sterilizing larger quantities of textiles. Conductivity measurement The conductivity measurement is used for manually measuring the quality of the feed water. At the given point in time, the autoclave outputs an appropriate message automatically, if the permissible value was exceeded. Malfunctions Error messages are displayed if safe operation or sterilization security is not guaranteed. These can appear on the display shortly after switching on the autoclave or while a program is running. Follow the operating procedures shown in the connection with a warning text or an error message on the display. After that you can continue the operation of the autoclave. Only if the messages appear repeatedly turn to your specialist dealer or the authorised MELAG customer service centre in your vicinity. 14