1
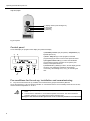
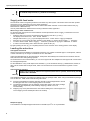
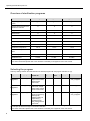
Operating Manual MELAquick®12+ Software version 4.12 Please read this Operating Manual before you start operation of the autoclave. The instructions include important safety information. Make sure to keep the Operating Manual near to the autoclave. It represents a component of the product. We reserve the right to technical alterations MELAG Medizintechnik oHG Geneststraße 6-10 10829 Berlin Germany E-Mail: [email protected] www.melag.de Rev.: 3 – 12/1003 Doc.-No.: KBA_GB_quick12+_v3.docx Safety Instructions Appropriate use Power cable and mains socket To operate the autoclave, pay attention to the following safety instructions given below and in the individual chapters of this Operating Manual. ■ Do not sterilize any liquids with this autoclave. ■ ■ ■ Setting up, installation, commissioning ■ ■ ■ Preparation and sterilization of instruments ■ ■ ■ ■ Program termination ■ ■ Removal of the items to be sterilized ■ ■ ■ ■ Maintenance ■ Carrying the autoclave ■ Malfunctions ■ ■ 2 Never damage or alter the plug or mains cable. Never operate the autoclave if the mains cable or power plug are damaged. Never unplug by pulling on the power cable. Always take a grip on the plug. Only have the autoclave set up, installed, and commissioned by people authorised by MELAG. Only operate the autoclave in areas which are not subject to explosion hazards. The connections for electrical provision and water supply and discharge must be set-up by trained personnel. Follow the instructions of the instrument manufacturers for preparing and sterilizing instruments. Observe the relevant standards and directives for the preparation and sterilization of instruments, e.g. in Germany RKI [Robert Koch Institute] and DGSV [German Society for Sterile Supply]. The sterilization of instruments with this autoclave, like the foregoing instrument preparation, is only to be done by competent personnel. Observe national provisions. Only use wrapping materials and systems which are suitable for steam sterilization according to the manufacturer's information. Take heed that when opening the door after terminating a running program, hot water steam can escape out of the chamber, depending on when the program was terminated. Depending on the time of the program termination, the load might not be sterile. Observe the clear instructions shown on the display of the autoclave. If necessary, sterilize the affected objects after rewrapping. Never use force to open the door. Use the basket lifter to remove the insert basket and the package holder. Never touch the sterilized items, the chamber or the door with unprotected hands: The elements are hot. After removal, place the insert basket and the package holder on a dry, disinfected surface or use the holder and the frame as an alternative. Check the wrapping of the sterilized objects for damage when removing them from the autoclave. If a wrapping is damaged, wrap the object again and re-sterilize it. Have the maintenance done only by authorized persons. Use the supplied carrying straps to transport the autoclave and attach them to the sides e.g. using package tape. If repeated error messages occur while operating the autoclave, turn the device off, unplug the power plug and notify your specialist dealer. Only have the autoclave repaired by authorised persons. ® Operating Manual MELAquick 12+ Proper use Application area Sterilisation tasks The autoclave is intended for use in every kind of general medical area where no Class B autoclave is required for the instruments used and their type of packaging. According to DIN EN 13060 this autoclave is considered a Class S sterilizer. As a universal autoclave, MELAquick®12+ is suited for sterilizing wrapped/unwrapped solid instruments, simple hollow body instruments (Hollow Body B) and dental transfer instruments. Large hollow bodies such as hoses or ® similar may not be sterilized in the MELAquick 12+. Observe the following instructions for using the autoclave: Danger ■ Do not sterilize any liquids with this autoclave. It is not licensed for the sterilization of liquids. Failure to observe these instructions may lead to delayed boiling, damage to the autoclave and burns. Device views Front side (1) Twist grip (2) Operating and display field (1) (3) Mains switch (2) (3) Back side (4) Device fuse – 16A gRL (5) Device fuse – 10 AT (6) Connection for water level monitoring in the feed water container (4) (7) Connection for water level monitoring in the waste water container (5) (8) Serial interface (RS232) (6) (7) (9) Compressed air connection (10) Mains supply for ICE plug (11) (12) (8) (9) (10 (13) (14) (11) Connection for external waste water container (12) Slot for emergency release (13) Safety valve (14) Connection for external feed water container Fig. 1: Device views 3 ® Operating Manual MELAquick 12+ Top view, open (1) (2) (3) (4) Wiping rubber (under sliding door) Door seal Chamber Filter tray Fig. 2: Top view Control panel 2-line LED display for program status display and parameter display A) Chamber pressure (bar) and (steam)- temperature (°C) A B B) Time (hh:min:ss) C) Start – Stop KEY (S) to start programs, terminate programs/drying as well as control of the special functions 12:27:12 0,02 bar 25°C D) Program selection KEY (P) to select the sterilization programs/test programs and select or set options (submenus) of the special functions E) Function KEY (-) and (+) to select, set and display special functions: print, date/time, preheating, total batches, conductivity, acknowledge error, KEY (+) for unlocking the door E D C Pre-conditions for the set-up, installation and commissioning ■ Only have the autoclave set up, installed, and commissioned by people authorised by MELAG. Set up the autoclave in a dry and dustproof location on a horizontal surface. The air humidity should be 30% to 60% and the ambient temperature 15° to 35 °C. ■ Danger 4 According to the currently valid VDE standards, this device is not suitable for use in explosive areas. ■ The autoclave is intended for use outside the patient environment. The device should be located a minimum of 1.5 m radius away from the treatment area. Damages to the autoclave and/or injuries can occur in case this precaution is not observed. ® Operating Manual MELAquick 12+ ® Space requirements MELAquick 12+ Width A= 20.5 cm Height B= 46 cm Depth C=47 cm D= 29 cm E= 9 cm F= 5 cm G= 10 cm The space requirements for the autoclave corresponds to its dimensions plus at least 5 cm on the side and 10 cm at the back side. The autoclave should be freely accessible from above, so that the autoclave can be filled and good ventilation is guaranteed. Establishing connections Electrical connection Electric circuit with 220-240 V (max. voltage range 207 - 253 V) and 50/ 60 Hz 10 A separate fuse protection – at least Automat Type B, separate FI-protection 30 mA Connection to the feed water container The feed water connection hose (Ø 6 mm) is inserted to the end into the feed water connector (Fig. 1/(15)) on the back side of the autoclave and secure with the union nut. In order to enquiry the water level in the container, the cinch cable is connected on the back side of the autoclave (Fig. 1/(7)) as well. Connection to the waste water container The waste water connection hose (Ø 8 mm) is inserted to the end into the waste water connector (Fig. 1/(12)) on the back side of the autoclave and secure with the union nut. In order to enquiry the water level in the container, the cinch cable is connected on the back side of the autoclave (Fig. 1/(8)) as well. If the connection at the feed and waste water container for the water level enquiry were mixed up by mistake, the information on the display for container filling and/or emptying will be incorrectly displayed. PLEASE NOTE The waste-water hose must be laid dip-free with continuous descent. Danger ■ It is absolutely necessary to insert both hoses to the end into the couplings. In case of non-observance there is danger of burns, as hot steam may escape on the back side and/or air may enter the lines when sucking feed water and impact the functionality of the autoclave. After the connection fill in tap water (approx. 10 cm high) into the waste water container in order to cool the condensate coil and add approx. 150 ml commercially available disinfection agent to prevent germ formation in the waste water container. This is required during initial commissioning and after every emptying of the waste water container. Use half of the amount recommended by the manufacturer in order to preserve the material of the condensate coil. Compressed air connection ® A compressed air connection is provided for MELAquick 12+. Connect the Ø 6x1 mm compressed air hose to the "Comp. air" connector (see Fig. 1/(10)) on the back side of the autoclave and secure it with the union nut. The externally provided compressed air must meet the following conditions: Dried, oil-free and filtered with a filter unit ≤ 2 µm Pressure range 3 ... 10 bar (43.5 ... 145 PSI) For hose lengths greater than 4 m the minimum pressure must be 4 bar (58 PSI). For the connection of the compressed air hose, different manifolds and coupling plugs are available as optional accessories (see Appendix A – Accessories in the user manual). 5 ® Operating Manual MELAquick 12+ According to DIN EN ISO 7396-1, the autoclave may not be connected to the supply network for medical compressed air, e.g. medical air technology. Warning Supply with feed water The autoclave works in the gentle yet effective one-steam way water system. This means that it uses fresh purified feed water for every sterilization run for the steam generation. The feed water supply is provided either with an external feed water container or with a water treatment unit (e.g. ® ® MELAdem 40 or MELAdem 47). Use only demineralised or distilled water according to DIN EN 13060, Appendix C. When using a water treatment unit: For the feed water supply from the water treatment unit the option Feed water supply in the Function menu must be set as follows: Select the Function menu by simultaneous brief pressing of the KEYS (+) and (-). The display shows Function: Last batch number.. Navigate with the KEY (+) or (-) up to the display Function: Feed water supply is displayed. Press KEY (P). The currently set option appears on the display, e.g. Feed water-supply – Internal. To set the value to Feed water-supply – external, press the KEY (P) again. External zu stellen. In order to save the setting and to leave the menu, press the KEY (S). By again pressing the KEY (S), you completely leave the menu and return to the starting position of the display. Loading the autoclave Unwrapped instruments Always use the universal basket for unwrapped instruments. It is possible to sterilize approx. 12 handpieces, turbines or other instruments up to a length of maximum 20 cm in this basket. Unless specified differently by the manufacturer, hand pieces should always be inserted into the autoclave with the shaft, hence the drive side, pointing upwards. As an alternative to the universal basket, you can use a support with ISO adapters and the support with round holders for unwrapped handpieces. For the sterilization of very small objects to be sterilized, e.g. in the endodontic area (e.g. Hedström files, Reamer, K files), use the semicircular small part insert, which can be hooked into the universal basket at a greater or lower height. Soft sterilization wrapping Employ only packaging materials and -systems (sterile barrier systems), which satisfy the DIN EN IS0 11607-1 Standard. Warning Soft sterilization wrapping must always be sterilized using the package holder. When using soft sterilization packages ® such as MELAfol 1002, observe the following instructions: ■ ■ ■ Arrange soft sterilization wrappings standing vertically in the package holder to ensure that the paper side of the outer wrapping points to the outside. The sterilizing wrappings must be clamped on both sides into the slots of the package holder. Only use respectively wide sterilizing wrapping (a width of 10 cm is recommended). Wrapping may not be jammed between door seal and sliding door. Fold the upper end of the wrapping overas needed (film side to the outside). Multiple wrapping ® The sterilization of multiple wrapped instruments in the MELAquick 12+ is not permissible. 6 ® Operating Manual MELAquick 12+ Closing the door Pull the sliding door on the twist grip forward to the end and lock the door by turning the twist grip 90° clockwise. In correctly locked condition, the groove in the door grip must be perpendicular to the longitudinal axis. Preconditions for commissioning The feed water supply must be connected and filled with fresh feed water of the appropriate quality and/or a water treatment unit must be connected as an alternative. The waste water container must be connected. The compressed air line must be connected. The power supply of the autoclave must be assured. Record of installation and setting up PLEASE NOTE As documentation of proper setting up, installation and commissioning as well as for your warranty claim, the record of installation must be filled out by the person responsible and a copy sent to MELAG. Prepare items to be sterilized A significant prerequisite for safe disinfection and sterilization of sterilizing materials is the appropriate preparation, i.e. cleaning and maintenance of the sterilizing materials according to the manufacturer's instructions. Furthermore the materials, cleaning agents and processing procedure employed are of significance. 7 ® Operating Manual MELAquick 12+ Overview of sterilization programs Type tests Universal-Program S Quick-Program S Prion-Program S Program type as per DIN EN 13060 Type S Type S Type S Dynamic pressure test of the sterilization chamber X X X Empty chamber test X X X Massive load X X X Hollow article B X X X X X X Single wrapping X --- X Drying solid load X X X Sterilization temperature 134°C 134°C 134°C Sterilization temperature band 134,5 ... 136.5 °C 134,5 ... 136.5 °C 134,5 ... 136.5 °C 2 bar 2 bar 2 bar Dental transfer instruments 1) Sterilization pressure Sterilization time 3.5 Min. 3.5 Min. 20.5 Min. X = Conformity with all applicable sections of the standard DIN EN 13060 1) For further information please refer to the certificate of suitability in the appendix of the user manual. Selecting the program Select by rotating between the initial state and the desired program with the program selection KEY (P). Program Wrapping Especially suitable for Sterilization Operating Drying at time* UniversalProgram S single wrapped Solid instruments, 134 ˚C simple hollow bodies, dental transfer 1) instruments QuickProgram S unwrapped only Simple solid 134 ˚C instruments, simple hollow bodies, dental 1) transfer instruments PrionProgram S single wrapped Instruments where a 134 ˚C danger of infection by pathologicallymodified proteins is suspected (e.g. Creutzfeld-Jacob, BSE), dental transfer 1) instruments 11-13 min. ca. 10 min. 6-8 min. ca. 1 min. 28-34 min. ca. 10 min. Load 1 kg unwrapped/ 270 g wrapped 1 kg 1 kg unwrapped/ 270 g wrapped *Without drying and dependent on loading and installation conditions such as mains voltage and air pressure, for example. We reserve the right to technical modification. 1) For further information please refer to the certificate of suitability in the appendix of the user manual. 8 ® Operating Manual MELAquick 12+ Starting the program Press the KEY (S), in order to start the program. Select additional drying: Press KEY (S) and KEY (+) simultaneously at the start of a program. If the Quick-Program S is started, the warning text Warning only unwrapped instruments is shown on the display. If the load exclusively contains unwrapped instruments, press the KEY (S) once again to confirm and start the program. At the end of a program run the chamber pressure is adapted to the ambient pressure. An appropiate display message Ventilate is shown. If the program was successfully finished, an appropriate notification appears on the display. Manual program termination You can manually terminate a running program in any of the phases with the KEY (S). If you terminate a program before the beginning of drying, then the items to be sterilized are still unsterile. In the drying phase, the expired drying time is shown in alternation with the message Immed. Removal Press "Stop" is displayed. By pressing the KEY (S) the program is cancelled during the drying. The termination is confirmed with Drying stopped on the display. If a printer or another output medium is connected to the autoclave and the Immediate output is set to YES, a reference to Drying stopped is issued to the logging output. Remove sterilized items After the request Quit with button ’+’ at the end of a program press the KEY (+). After unlocking the door you can open the door and remove the sterilized items. ■ Danger Check the wrapping of the sterilized objects for damage when removing them from the autoclave. ■ If a wrapping is damaged, wrap the object again and re-sterilize it. Non-observance can result in unsterile instruments. This endangers the health of the patients and the practice team. If you remove the sterilized items from the autoclave directly after the end of the program, it can happen that slight quantities of condensate moisture are found on the sterilized items. Smaller quantities of water which may be found on the upper side of the paper bags and clear plastic sterilization packages are unobjectionable if they dry out within 30 minutes after removal from the autoclave. Storage of sterilized items The maximum storage life depends on the packaging and the storage conditions. For sterilized items which have been wrapped in compliance with the standards (dust-protected storage is assumed) – this time period is up to six months. ■ Sealed against dust e.g. in a closed instrument cabinet ■ Protected from damage on smooth surfaces ■ Protected from excessive fluctuations in temperature ■ Protected from moisture (e.g. alcohol, disinfectant) ■ Storage duration in accordance with the type of package wrapping Batch documentation The batch documentation is indispensable as documentation for the successfully completed sterilization process and as an obligatory measure of quality assurance. The capacity of the internal storage suffices for about 40 logs. If the internal log memory is full, when starting the next program the respectively oldest log is automatically overwritten. 9 ® Operating Manual MELAquick 12+ You can store the logs of the completed programs on the following output media and archive them accordingly. ® MELAflash CF card printer on CF card, log printer MELAprint 42, MELAnet Box, Computer, e.g. with software MELAview Please learn from the operating manual of the respective device how to connect the additional devices and which settings you take at the autoclave. Setting the date and time Date and time of the autoclave must be correctly set for proper batch documentation. Observe the time re-settings in autumn and spring ("daylight saving time"), since this is not reset automatically Select the Menu Function by short simultaneous pressing of the keys (+) and (-). Navigate with the KEY (+), up to the display Function: Date/Time are displayed. Press the Key (P) in order to confirm. Select between the setting possibilities with the KEY (+) or (-) hour, minute, second, day, month or year. In order to adjust the hour, parameter, press the Key (P) for the confirmation. The current parameter flashes. The value can be increased or reduced with the KEYS (+) and (-). In order to store the value, confirm with the KEY (P). Press key (S) 2x, in order to leave the Menu Function. Pause times Pause times between individual programs are not necessary. After the expiration or termination of drying and removal of the items to be sterilized, you can immediately re-load the autoclave and start a program. Checks in daily operation Helix test body system We recommend testing functional reliability of the autoclave using a Helix test body system at least once a month. For this purpose, specialist dealers offer specific dental test body systems as indicator and batch monitoring systems, e.g. Dental BMS (batch monitoring system) by GKE. Prior to program start the door seal should be cleaned. Display water quality The water quality can be displayed on the display of the switched on autoclave at any time - even while a program is running. To do this keep the KEY (-) pressed. Malfunctions Error messages are displayed if safe operation or sterilization security is not guaranteed. These can appear on the display shortly after switching on the autoclave or while a program is running. Follow the operating procedures shown in the connection with a warning text or an error message on the display. After that you can continue the operation of the autoclave. Only if the messages appear repeatedly turn to your specialist dealer or the authorised MELAG customer service centre in your vicinity. 10