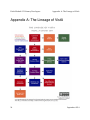
1
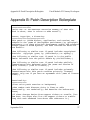
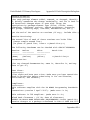
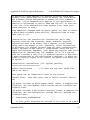
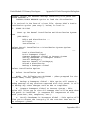
V
I
S
T
Patch Module 2.5
User Manual: Primary Developers
September 2014
prepared for
by
A
©Copyright 2014 by VISTA Expertise Network. Licensed under Creative
Commons Attribution-ShareAlike 4.0 International. Details are available at
http://creativecommons.org/licenses/by-sa/4.0/
Revision History
Date
September
2014
Description
Language
Authors
OSEHRA version English (US) Kathy Ice and Frederick
2.5 release
D.S. Marshall
Contents
Orientation...............................................................................................................1
Introduction.............................................................................................................2
Chapter 1: Overview..............................................................................................3
The Patch Process: Primary Development.....................................................4
Chapter 2: Creating and Editing Patches............................................................7
Add a Patch.........................................................................................................7
Edit a Patch.........................................................................................................9
Copy a Patch into a New Patch......................................................................17
Chapter 3: Workflow Management....................................................................18
Completed/Unverified Patch Report............................................................18
Display a Completed/Unverified Patch.......................................................18
Under Development Patch Report................................................................19
Extended Display of a Patch...........................................................................19
Create a Packman Message.............................................................................19
Delete an Unverified Patch.............................................................................20
Forward a Completed/Unverified Patch Message.....................................20
Chapter 4: Package Management.......................................................................21
Add Package to Patch Module.......................................................................21
Enter/Edit Authorized Users.........................................................................23
Key Allocation for Patch Functions...............................................................24
List of Package Users.......................................................................................25
Appendix A: The Lineage of VistA....................................................................26
Appendix B: Patch Description Boilerplate......................................................27
Glossary..................................................................................................................35
Orientation
Patch Module 2.5 Primary Developers
Orientation
This manual is one of four user manuals for version 2.5 of the Patch
Module. There is a different user manual for each essential role associated
with the Patch Module; this manual is for primary developers.
If you are the initiator of a patch, or patch stream, then you are a primary
developer. If you are taking patches issued by another organization,
altering them to work with your dialect of VistA, and re-releasing them to
your customers, you are a secondary developer.
Secondary developers have their own Patch Module user manual, which
can be found at www.osehra.org along with the rest of the Patch Module
documentation suite.
Verifiers and patch subscribers also have their own Patch Module user
manuals,which can be found at www.osehra.org along with the rest of the
Patch Module documentation suite.
The Patch Module documentation suite:
Release Notes
Value Proposition
Installation Guide
User Manual: Primary Developers
User Manual: Secondary Developers
User Manual: Verifiers
User Manual: Patch Subscribers
Technical Manual
Security and Privacy Manual
September 2014
1
Patch Module 2.5 Primary Developers
Introduction
Introduction
The Patch Module, as the name implies, is a software package that allows
users and developers to create, revise, distribute, review, and receive
software patches and updates for VistA. Options are provided for
systematic entry, revision, and review of patches by developers, review and
release of patches by verifiers, and display and distribution of the released
patches to the users.
But before we get to talking about all the things we can do with patches, it’s
probably best to take a moment and make sure we’re all on the same page
about what a patch is, and what it does. Patches began as a way of fixing
problems in an active VistA system, and many patches released today are
simple bug fixes. However, most patches include more than fixes.
Developers found that patches were the easiest way to add the
enhancements and new features that their users wanted without taking the
system offline or releasing a new version. Today, patches are the primary
method for making updates and improvements to VistA.
A patch, then, can include bug fixes, upgrades, enhancements, new
features, or all of the above. Its main feature is that it can be installed on an
active, running VistA system with minimal disruption.
Patches are created in KIDS (the Kernel Installation and Distribution
System), but are packaged and distributed via the Patch Module. Until
relatively recently, only the developers at the Department of Veterans
Affairs (VA) had access to the Patch Module. With this release, the Patch
Module becomes more widely available, and more developers have the
opportunity to create and release patches.
2
September 2014
Chapter 1: Overview
Patch Module 2.5 Primary Developers
Chapter 1: Overview
Medicine is in a constant state of change. This means that our customers,
the medical professionals at the facilities we support, are in a constant state
of needing new things. The best way to deliver those changes in a timely
manner is through patches. Patches are small, self-contained, and can be
installed without disrupting ongoing operations.
The patching process begins with the primary developers. They code the
required change into VistA, whether it be a bug fix, a new menu option, an
enhancement to an existing feature, or some other change. Once the new
code has been tested and finalized, it is prepared for distribution using
KIDS, the Kernel Installation and Distribution System. The primary
developers then use the Patch Module to create and distribute the actual
patch to their customers.
The patch created by the primary developers is compatible with their
dialect of VistA. For example, a patch created by VA developers is
compatible with VA VistA. It may not be compatible with other dialects of
VistA—even FOIA VistA—because VA VistA includes proprietary
components. This brings us to the secondary developers.
The process of secondary development for patches begins with a patch
reviewer. The patch reviewer assesses the patch as it was issued by the
primary developers, and makes a determination for their dialect of VistA.
The determination can be one of three results:
1. The patch can be installed as distributed (no changes necessary).
2. The patch will not be installed in our systems.
3. The patch needs modifications before it can be installed.
If the patch reviewer determines that modifications are needed, the
secondary developers go to work, making the necessary changes to make
the patch compatible with their dialect of VistA. Once the changes are
September 2014
3
Patch Module 2.5 Primary Developers
Chapter 1: Overview
complete and tested, the secondary developers use KIDS and the Patch
Module to create and distribute their modified patch to their customers.
Because each dialect of VistA is separate and distinct, each needs its own
team of secondary developers to evaluate and modify patches.
Now that we’ve seen how the overall process works, let’s take a closer look
at the specific steps performed by the primary developers.
The Patch Process: Primary Development
Step 0: Development Environment
The new code that will become the patch should be developed in a
development environment, not a production environment. Most
developers are aware of this rule, and most of them violate it from time to
time. However, that doesn’t make it a good idea. Develop the code in a
development environment, not a production environment. Even when
you’re in a hurry.
Step 1: KIDS
The process for creating a patch begins with KIDS. Using KIDS, developers
create a KIDS build and send a KIDS distribution to the destination of their
choice via email. Originally, VA Forum was the only place it could be sent.
When OSEHRA set up its own Forum for developers outside VA,
developers got a choice of where to send their KIDS distribution:
VA Forum: [email protected]
OSEHRA Forum: [email protected]
The email inbox for Forum provides a place to store code until the patch
can be created.
4
September 2014
Chapter 1: Overview
Patch Module 2.5 Primary Developers
Step 2: Patch Creation
The developer can then use the Patch Module to create a new patch, using
the Add a Patch option. Whichever developer initiates this step will be
listed as the patch developer in the Patch Module, regardless of how much
actual development work they do.
Once the new patch is created in the system, the development team can
write the necessary descriptions and load in the code, using the KIDS
distribution email sent in Step 1.
Step 3: Testing
Before it can be completed and sent to the verifiers, the new patch needs to
be tested. There are three sub-phases to this step:
Internal Testing
Alpha Testing
Beta Testing
In a fast-paced environment, it can be tempting to skip one of these phases,
but that is not a good idea. VistA customers depend on these patches
working as intended, without unforeseen problems, and the only way to
ensure that is with rigorous testing.
Step 4: Patch Completion
Once testing is complete, the patch completer performs a final review of the
patch and the code. Once the patch completer is satisfied that the patch is
ready for distribution, he or she uses the Patch Module to set the patch’s
status to “Completed.” This automatically triggers the verification process.
September 2014
5
Patch Module 2.5 Primary Developers
Chapter 1: Overview
Step 5: Corrections (If Needed)
If the verifier finds any problems with the patch, the primary development
team will need to address the problems. This may involve additional
coding and testing before the patch can be re-completed.
6
September 2014
Chapter 2: Creating and Editing Patches
Patch Module 2.5 Primary Developers
Chapter 2: Creating and Editing Patches
Much of the work that primary developers do in the Patch Module is done
using two menu options: Add a Patch and Edit a Patch. In this chapter, we
will go over each of these options and discuss how they are used in the
process of creating a patch.
Both of these options can be selected from the developer’s menu, which is
available to any user with developer access to VistA.
Developer's Menu [A1AE DEVELOPER]
DP
Display a Patch
IN
Routine Inquire
TS
Scan Patch for Discrepancies and Contents
Add a Patch
Completed/NotReleased Patches Report
Copy a patch into a new patch
Create a packman message
Delete an NotReleased Patch
Display a Completed/NotReleased Patch
Edit a Patch
Extended (DIQ) Display of a Patch
Forward a Completed/NotReleased Patch Message
Package Management ...
Package Menu ...
Routines that overlap in patches
Show a Patch's Relationships
Under Development Patches Report
Select Developer's Menu Option:
Add a Patch
When you choose the Add a Patch option, you are next prompted for the
package and version being patched. For our examples in this chapter, we’re
going to be adding a patch to an imaginary VistA package called
Exampleman.
Select Developer's Menu Option: ADD a Patch
September 2014
7
Patch Module 2.5 Primary Developers
Chapter 2: Creating and Editing Patches
Select PACKAGE: Exampleman
ZZ
Select VERSION: 4.3//
Date Verified: 06-30-10
Are you adding 'ZZ*4.3*10001' as a new DHCP PATCHES (the
99TH)? No// Y
(Yes)
DHCP PATCHES NUMBER: 99//
DHCP PATCHES PATCH SUBJECT: Fix undefined error at line 615
Patch Added: ZZ*22.2*10001
PATCH SUBJECT:
After choosing Add a Patch, we are prompted for the package name. When
we put it in, VistA echoes back the package namespace and prompts us for
the version. When we enter the version, VistA echoes the version’s date.
We are then asked to confirm that we are adding the patch. In our example,
the patch will be the 99th entry in the DHCP PATCHES file (in the real
DHCP PATCHES file, there are well over 100,000 patches!). When we
confirm that we are adding a patch, VistA asks us for the number in the
DHCP PATCHES file, and we accept the default. We are then prompted for
the patch’s subject.
Once we enter the subject, VistA responds with the patch ID. It consists of
the package namespace, the package version, and a system-assigned patch
number, all separated by asterisks. The patch number is numberspaced,
meaning that patches released by different organizations are easily
distinguished from one another. Our sample patch is clearly an OSEHRA
patch, because it begins with the OSEHRA numberspace, 10000. A similar
patch from IHS would be 1001.
Next, we are prompted again for the patch subject. This is not actually an
indication that VistA has gone senile and forgotten what we told it a
minute ago. Once the patch has been created, and the patch ID displayed,
VistA automatically moves us into the Edit a Patch option, where the first
prompt asks for the patch subject.
8
September 2014
Chapter 2: Creating and Editing Patches
Patch Module 2.5 Primary Developers
If all we wanted to do was create the patch, we could jump out at this point
by entering an up-arrow, then come back and edit the patch at a later time.
The person who creates a patch using the Add a Patch option will be listed
in the patch as the developer, regardless of how much actual code
development they do.
A Word About Patch Subjects
When you add a patch, you get to designate the patch’s subject. The field is
a free-text field; you can enter anything you want. However, there are some
practical considerations that should guide what you choose as the subject.
The patch subject field is indexed for lookup. If you don’t remember the
Patch ID, you can look up a patch by its subject—provided the developer
who created the patch gave some thought to what to put in the subject
field. “Bug fix” is not a helpful subject; many patches fix bugs, and without
more specifics it would be impossible to look up a patch by that
description. In our example, we listed the specific line of code where the
error occurs. This is not always possible, of course, but it is usually possible
to come up with a more complete description than “bug fix.”
If you are working on a package that has different routines, you might
want to start your subject with the name of the routine being patched. For
example, if our example patch was to fix and Exampleman routine called
DEMO, our subject could have been “DEMO: Fix undefined error at line
615.”
Edit a Patch
The Edit a Patch option can be reached in one of two ways. It is invoked
automatically after the Add a Patch option is successfully completed, or it
can be accessed from the developer’s menu. Since we just (theoretically)
September 2014
9
Patch Module 2.5 Primary Developers
Chapter 2: Creating and Editing Patches
jumped out of Add a Patch, let’s use the Edit a Patch option to complete the
information.
Select Developer's Menu Option: EDIT a Patch
Select PATCH: 615
As we discussed above, the patch subject is indexed. Therefore, if we can’t
remember the Patch ID, we can search for the patch using a word from the
subject (in this case, our “word” is 615). We could also search using the
package namespace.
PATCH SUBJECT: Fix undefined error at line 615
HOLDING DATE:
Replace
The next prompt asks for the patch subject, giving the current subject as the
default. We can change it if we need to, using Replace....With.
Next, we are prompted for a holding date. This field generally isn’t used,
although it is available if needed. It is a way of holding back the release of a
patch until a specific date. For example, you might have a situation where
multiple dialects of VistA are working together to fix a security
vulnerability, and they want the patches all to come out at the same time.
The holding date field is a way to make sure that happens.
PRIORITY: ?
Enter E for Emergency, M for Mandatory
Only Emergency or Mandatory Patches are allowed
Choose from:
p
PATCH FOR A PATCH
n
NOT URGENT
m
MANDATORY
i
INFORMATIONAL
e
EMERGENCY
PRIORITY: M MANDATORY
The next prompt asks about the patch’s priority. The vast majority of
patches are issued with Mandatory priority. The specific meaning of
Mandatory has evolved over time; originally it meant “must be installed
within 5 days,” and the Patch Module’s help text still says this. Actually,
10
September 2014
Chapter 2: Creating and Editing Patches
Patch Module 2.5 Primary Developers
the official period for installing a Mandatory patch is longer. And in
practical terms, Mandatory just means “should be installed the next time
your organization is installing patches,” which for many organizations is
every 30-90 days. And it’s not like there’s a Patch Police enforcing this; it
should be seen as a best practice rather than a hard requirement.
Another commonly used priority is Emergency, for a patch that should be
installed right away. As with Mandatory patches, the definition of “right
away” has evolved over time; the help text still says within a day, which is
often impractical.
Informational priority is for patches that contain no code; only updated
information. The Patch for a Patch priority is used when a patch is released
that contains errors or bugs, and must itself be patched. Finally, there is a
Not Urgent priority, which is used only rarely. It is unusual to release a
patch that is not intended to be installed as soon as is practical.
Select CATEGORY OF PATCH: ?
Choose from:
d
DATA DICTIONARY
i
INPUT TEMPLATE
p
PRINT TEMPLATE
r
ROUTINE
s
SORT TEMPLATE
o
OTHER
db
DATABASE
e
ENHANCEMENT
pp
PATCH FOR A PATCH
inf
INFORMATIONAL
Select CATEGORY OF PATCH: R
Select CATEGORY OF PATCH:
(r
ROUTINE)
The next prompt is for the patch’s category. This is a multiple field, and you
can select as many categories as you like to describe your patch. Our patch
will affect a routine in the imaginary Exampleman package, so we choose
Routine for our category. Other options include data dictionary, patch for a
patch, informational, and the ever-popular Other.
Do you want to copy lines from a message into the Patch
September 2014
11
Patch Module 2.5 Primary Developers
Chapter 2: Creating and Editing Patches
Description? No//
The next prompt asks about copying lines from a message into the Patch
Description. You can use this option to copy text you created in KIDS and
emailed to forum (see Chapter 1 for more information).
Do you want to copy lines from a message into the Patch
Description? No// yes
(1) Exampleman Routines
AUG 6,2014
(2) Exampleman Description
AUG 6,2014
Select Message to copy : 2//
When we answer “yes” at the prompt, the Patch Module checks the Forum
inbox to see what messages are there. We are then invited to pick our
message from the list.
Copy from line: 1
Copy through line: 1// 99999
1> There is an intermittent error at line 615 relating to
...
15> unless further revision is necessary.
Do you want to copy these 15 lines? No// yes
Once we choose the message, we are prompted for which lines to copy. We
chose to copy the entire message by choosing 99999 as the place to stop
copying. The Patch Module then displays the lines selected (we have
truncated the display for our demonstration), and asks whether we want to
copy the lines displayed.
PATCH DESCRIPTION:. . .
. . .
unless further revision is necessary.
Edit? NO//
12
September 2014
Chapter 2: Creating and Editing Patches
Patch Module 2.5 Primary Developers
Next, the Patch Module echoes back the complete description, without line
numbers, and asks if we want to edit what we just copied in.
If you choose to copy text into the Patch Description, you can then edit the
text you copied. Or, you can skip copying lines from an email message, and
use this edit prompt to enter text from another source, such as copying and
pasting from a text file.
Whether you choose to copy lines from an email message, or copy the
description from a text file, most patch descriptions use the same basic
format. This patch description boilerplate can be found in many places,
including Appendix B of this manual.
Do you want to copy a packman message into the Message Text?
No// yes
(1) Exampleman Routines
AUG 6,2014
(2) Exampleman Description
AUG 6,2014
Select Message to copy : 2// 1
Next, you have the opportunity to copy lines into the Message Text.
Although this looks like more of the same, this is actually where the code
goes. You can copy the code from your KIDS email (your Packman
message) into the “Message Text,” which, despite its name, is actually
where the Patch Module expects to find the code or software for the patch.
Unlike with the Patch Description, you cannot select certain lines for the
Message Text. The Patch Module assumes you want all the code, and not
just some of it.
As with the text for the description, you can edit your code once it’s copied
—or you can use the edit prompt to simply copy in your code from another
source such as a text file. Generally, developers use text files for the Patch
Description, but rely on Packman to transmit their code.
Select ROUTINE NAME: ZZDEMO
Copy routine lines from the routine directory into the
description? No//
September 2014
13
Patch Module 2.5 Primary Developers
Chapter 2: Creating and Editing Patches
Copy routine lines from a packman message into the description?
No//
The next prompts have to do with descriptions for individual routines. If
your patch affects more than one routine, you can describe the changes to
each routine so that patch subscribers know what they’ll be installing and
what it will do.
DESCRIPTION OF ROUTINE CHANGES:
THERE ARE NO LINES!
Edit? NO//
ROUTINE CHECKSUM:
THERE ARE NO LINES!
Edit? NO//
Select ROUTINE NAME:
Next, we have the option to enter a description of routine changes. Most
developers do not use this option, since the information can be included in
the Patch Description. However, if you want to have a separate description
of what specific changes are made in which routines, you have the option
to do so here.
Then we are asked about the checksum. This is a holdover from when
checksums had to be calculated manually. These days, KIDS and the Patch
Module calculate checksums automatically, and it’s best not to mess with
that process. Leave this field blank.
If our patch covered more than one routine, we could then select the next
routine to describe. Since our description is complete, we press Enter to
move to the next step.
Select ROUTINE NAME:
DISPLAY ROUTINE PATCH LIST: Yes//
Yes
editing comments only seen by releasers/developers
INTERNAL COMMENTS:
THERE ARE NO LINES!
Edit? NO//
Select PATCH RELEASE CHECK:
14
September 2014
Chapter 2: Creating and Editing Patches
Patch Module 2.5 Primary Developers
The next prompt asks about displaying the routine patch list. Choose Yes at
this prompt.
We are then asked about internal comments. These are a way for
developers and verifiers to communicate about the patch, and have their
comments attached to the patch itself. Internal comments are not displayed
in reports or in “Display a Completed/Unverified Patch;” the only way to
see them is in “Edit a Patch” or “Extended Display of a Patch.”
The next prompt asks about a patch release check. This field can be used for
two related purposes: to list patches that should be verified before your
patch is verified, and to list any patches that should be verified at the same
time as your patch. For each patch you list, you will be asked whether the
patch is required for verification. If the patch you list should be verified
before your patch, choose “yes” here. If your patch and the other patch
need to be verified at the same time, choose “no.”
STATUS OF PATCH: UNDER DEVELOPMENT// ?
Choose from:
c
COMPLETED/UNVERIFIED
e
ENTERED IN ERROR
u
UNDER DEVELOPMENT
v
VERIFIED
r
RETIRED
x
cancel
i2
IN REVIEW
d2
SEC DEVELOPMENT
s2
SEC COMPLETION
r2
SEC RELEASE
n2
NOT FOR SEC RELEASE
The next prompt asks about the patch’s status. When a patch is first
created, it is automatically assigned a status of “Under Development.”
Once your patch is ready for verification, you can change the status to
“Completed/unverified.” When this status is assigned to the patch, a
bulletin is sent to the verifiers of the package notifying them this patch is
ready for verification. A patch message is also sent to the verifiers.
September 2014
15
Patch Module 2.5 Primary Developers
Chapter 2: Creating and Editing Patches
NOTE: You can edit a patch after it is submitted for verification but the
status will change back to “Under Development.”
Once the verifiers receive this bulletin they can begin the verification
process of this patch. When the verifiers are ready to release the patch to
the field, they can change the status of the patch to “Verified.” When this
status is assigned to the patch, a bulletin is sent to all users who have
elected to be notified of patches for this package.
If, for whatever reason, you decide that your patch shouldn’t be released
after all, you can delete it if it s still “Under Development” or
“Completed/Unverified” (see Chapter 3 for more information). If the patch
was already verified, however, you can instead change the status to
“Entered in Error.” If you choose this option, remember to include an error
description to indicate why the patch is in error, and where the correct
patch can be found.
Certain patches may also be “Retired;” specifically, database or DBA
patches may be retired after a specific version. Additional comments about
the retired patch can be put in the retirement comment field.
Using “Edit a Patch” to Send Patches to Test Sites
Once your patch is ready for testing, you can use the Edit a Patch option to
send it to your test sites. After invoking the option, go through the prompts
to ensure that all the information has been entered correctly and the
parameters are set the way you want them. When you get to the last
prompt, “Status of Patch,” enter a U for “Under Development” rather than
accepting the default, as shown here.
STATUS OF PATCH: UNDER DEVELOPMENT// U
UNDER DEVELOPMENT
Option to create a Patch message to send to test sites.
TEST v1
will be added to the Patch message subject.
You may change the TEST v[#] if necessary.:
16
(1-99): 1//
September 2014
Chapter 2: Creating and Editing Patches
Patch Module 2.5 Primary Developers
By entering “Under Development” as the status, we trigger the process to
send a patch message to test sites. The Patch Module allows us to set the
version number of the test patch, with version 1 as the default. We can
change the version number if we choose.
Please add recipients for test message
Forward mail to: TESTY,TRACY
And Forward to: [email protected]
And Forward to:
message number [#24860]
NOTE: A message has been sent to the Test Site Users for
distribution.
Please use mailman if you need to forward this message
again.
We are then prompted to add recipients. These can be email addresses, or
people in the NEW PERSON file. Once we have finished adding recipients,
the Patch Module automatically generates an Patch message and sends it
out.
Copy a Patch into a New Patch
This function permits authorized developers of a package to copy
information from an existing patch into a new patch. The new patch must
be for the same package, but can be for a different version. You will be
prompted for a patch to copy, then the version number of the new patch
being created. The system assigns a patch designation to the new patch,
and you are asked if you want to add this patch. If you respond YES, you
will be prompted for the subject of the new patch. The new patch is
automatically assigned a status of "under development". The user entering
and date entered is set by the system. The priority, category(s), patch
description, and all routine information is copied over from the existing
patch into the new patch.
September 2014
17
Patch Module 2.5 Primary Developers
Chapter 3: Workflow Management
Chapter 3: Workflow Management
Completed/Unverified Patch Report
This print option generates a report of completed/unverified patches for a
selected package and version. You have the option of sorting the report by
patch designation, category, or priority. The report contains detailed
information about each patch including the patch subject, description,
category, priority, and status; information about the users who entered the
patch and completed the patch; and a routine information section showing
coding changes.
If you are currently developing a patch, the completed/unverified patch
report is an important tool for you. Your work needs to be consistent, not
only with existing code, but also with other patches set for release in the
same timeframe as yours. The best way to find out about other patches
currently in verification is through this patch report.
Display a Completed/Unverified Patch
This option permits display of a completed/unverified patch. Using this
option, you can look up a patch by patch designation, package, patch
subject, or routine. The display contains the patch subject, description,
category, priority, and status, as well as information about the users who
entered and completed the patch and a routine information section
showing coding changes.
As with the completed/unverified patch report, this option helps you track
patches that may affect how your patch works when it is released. It is
important to stay abreast of these developments, and if necessary,
communicate with developers of other patches to ensure that everybody’s
code works as expected.
18
September 2014
Chapter 3: Workflow Management
Patch Module 2.5 Primary Developers
Under Development Patch Report
This print option generates a report of under development patches for a
selected package and version. The user must be an authorized developer of
the package to use this option. The user has the option of sorting the report
by patch designation, category, or priority. The report contains detailed
information about each patch including the patch subject, description,
category, priority, and status; information about the users who entered the
patch and completed the patch; and a routine information section showing
coding changes.
Extended Display of a Patch
This is the option that lets you see all available information about a patch,
including information about who has printed the patch. You may display
when a selected user printed the patch or the entire patch with all users
who printed it. Note this option prints the fields as they exist in FileMan
and NOT the way they are displayed in the patch report.
Create a Packman Message
This option allows a developer to create a Packman message from a local
routine directory. Use this option to get a snapshot of what the routines
currently look like on Forum. Since Forum is always kept patched and upto-date, it is a good reference to use.
Of course we would be shocked—shocked!—to learn that a developer had
begun working in a routine before saving off a copy of the routine for
reference. On the off chance that this ever happened, however, the
developer could use the Create a Packman Message option to retrieve a
current copy of the routine from Forum.
September 2014
19
Patch Module 2.5 Primary Developers
Chapter 3: Workflow Management
Delete an Unverified Patch
This option allows you to delete an incorrect patch which has a status of
“under development” or “completed/unverified.” Patches with a status of
“verified” or “entered in error” cannot be deleted since these patches have
already been released, and may have been installed.
Once a patch is deleted, its patch number is re-issued by the system, so the
deletion is effectively invisible to users.
Forward a Completed/Unverified Patch Message
This option allows a user to forward an unverified patch message by patch
designation to selected users. You might use this option to send a patch to
test sites for further testing while it is undergoing verification.
20
September 2014
Chapter 4: Package Management
Patch Module 2.5 Primary Developers
Chapter 4: Package Management
Add Package to Patch Module
Before a developer can create a patch for a specific package, that package
has to be added to the patch module using this option. Because this option
is for more of a manager role, a user must hold the A1AE MGR security
key in order to use it.
Select Patch Module Management Option: ADD PACKage to Patch
Module
Select PACKAGE: EXAMPLEMAN
Are you adding 'EXAMPLEMAN' as
a new DHCP PATCH/PROBLEM PACKAGE (the 103RD)? No// Y
(Yes)
When we enter the Add Package to Patch Module option, we are first
prompted for the package to be added. In our example, we will again use
Exampleman (which isn’t a real package). We are asked to confirm that we
want to add it to the Patch Module.
USER SELECTION PERMITTED: NO//Y Yes
* PERMIT DEVELOPER TO COMPLETE: YES//
The “User Selection Permitted” flag should be set to Yes once you are
confident that the patch is ready to be seen and used by users. Next, we are
asked whether the developer will be permitted to complete the patch.
The asterisk at the beginning of this prompt is an indication that, at one
point, this field was slated for deletion. Of course, that point was in 1987, so
we’re not sure whether that’s actually going to happen or not. If this
prompt is still around, it should be set to “no.” Having a different
developer finish the patch is a good quality assurance practice, so allowing
a single developer to do the whole thing is generally not a good idea. This
is the reason the field was slated for deletion: it won’t even be an option.
September 2014
21
Patch Module 2.5 Primary Developers
Chapter 4: Package Management
* PERMIT DEVELOPER TO COMPLETE: YES//N
FOR TEST SITE ONLY?: NO//
(No)
The next prompt asks whether the patch is only intended for test sites. This
feature will be needed only rarely—for example, when an entirely new
package is being developed and only the test sites actually have it installed.
Most of the time, “no” is the correct answer here.
PERFORMANCE MEASURE FLAG:
This prompt was added back when there was a real mania for performance
data and benchmarking and other ways of measuring productivity in
software. Leave this field blank; there are better ways to relive the 1990s.
ASK PATCH DESCRIPTION COPY: YES
Speaking of nostalgia, there was a time when memory on computers was at
a premium, and a developer could crash an entire development
environment by copying a too-large block of text into a patch description.
This parameter was created to give managers the option of preventing their
developers from copying any description at all. Computer memory is not
an issue these days, and we certainly don’t want to give developers an
excuse not to document. Set this to “yes.”
Select SUPPORT PERSONNEL: VERITY,VIVIAN
The next prompt asks for support personnel, who are selected from the
NEW PERSON file using the usual search options for that file. Use this
prompt to select non-developers that will be working on the patch,
including any verifiers.
VERIFY PERSONNEL: ?
Choose from:
V
VERIFIER
N
NOT A VERIFIER
VERIFY PERSONNEL: V VERIFIER
The next prompt asks whether the identified support person is a verifier. In
22
September 2014
Chapter 4: Package Management
Patch Module 2.5 Primary Developers
our example, Vivian Verity is indeed a verifier (handy, that), so we enter V
at the prompt.
VERIFIER'S DOMAIN: OSEHRA.ORG
Select SUPPORT PERSONNEL:
The next prompt asks for the verifier’s mail domain for sending patch
messages. The domain needs to be a standard email domain, such as
va.gov, ihs.gov, or osehra.org. Patch messages can then be sent from our
development environment (because we’re not developing in a production
environment, right?) to Vivian Verity’s verification environment, provided
that Mailman has been configured in Vivian’s environment, and that
Vivian’s name appears in the NEW PERSON file in her environment,
exactly the same as it does in our environment.
Once we put in Vivian’s domain, we again see the “Select Support
Personnel” prompt; we could add additional support people if we needed
to.
Select DEVELOPMENT PERSONNEL:
The last prompt allows us to designate developers. As with support
personnel, we can add as many as we want, as long as they already exist in
the NEW PERSON file.
Enter/Edit Authorized Users
This function permits authorized developers of a package to add
development personnel, support personnel, and verifiers. The following
three keys are automatically allocated to the user when entered as a
developer, support person or verifier: A1AE DEVELOPER, A1AE
SUPPORT, and A1AE PHVER. These keys may be manually
allocated/deallocated using the Key Allocation for Patch Functions option.
For authorized developers to receive the Developer Menu, they must be
given the A1AE DEVELOPER key; for verifiers to receive the Verifier
September 2014
23
Patch Module 2.5 Primary Developers
Chapter 4: Package Management
Menu, they must be given the A1AE PHVER key. If the support person is
also a verifier of the package, then a V should be entered at the verifier
prompt. The developer can also specify whether or not user selection of a
package is permitted. If selection is permitted, any user can select this
package via the Select Packages for Notification option. This selection
causes 1) automatic notification of patches via MailMan and 2) printing of
new patches for this package whenever the user enters the New Patch
Report option.
Key Allocation for Patch Functions
This function allows the package developers and the Patch Module
coordinator to allocate patch module keys to other users. When a holder of
a key is edited, the user is informed for what other packages the holder
may need the key. The user is then asked if s/he wants to delete the holder.
The following keys are available.
1) A1AE PHVER - This key allows the user to have access to the Verifier
Menu of the Patch User Menu.
2) A1AE DEVELOPER - This key allows the user to have access to the
Developer's Menu of the Patch User Menu.
3) A1AE XUSEC - This key allows the user (usually a developer) to have
access to the Key Allocation of Patch Functions option of the Package
Management menu. If a user has this key s/he can give out the following
keys through this option: A1AE SUPPORT, A1AE DEVELOPER, and A1AE
PHVER.
4) A1AE SUPPORT - This key allows the holder access to the Support
Menu of the Patch User Menu. This menu has been removed in Version 2.0
of the Patch Module. The key is being left in the module for future
enhancements.
5) A1AE MGR - This key allows the user to have access to the Patch
24
September 2014
Chapter 4: Package Management
Patch Module 2.5 Primary Developers
Module Management Menu of the Patch User Menu. Also, the user will be
able to allocate all A1AE keys through this option.
List of Package Users
This function generates a report of user information about a selected
package. The user must be an authorized developer of the package to
utilize this option. The report contains the developers, support personnel,
and any selected users associated with the package.
September 2014
25
Patch Module 2.5 Primary Developers
Appendix A: The Lineage of VistA
Appendix A: The Lineage of VistA
26
September 2014
Appendix B: Patch Description Boilerplate
Patch Module 2.5 Primary Developers
Appendix B: Patch Description Boilerplate
Executive Summary:
==================
[write one- or two-sentence executive summary of what this
patch is about, what it solves or adds overall]
Source, Copyright, & Licensing:
===============================
This patch to [VISTA dialect, application, and version] was
produced in the [name of development environment] by [principal
developer(s)] on [date principal development ended] and released
through [name of Forum system]. See User Information below for
more details.
[Use following or similar text if patch includes copyrighted
materials: Copyright (year) by (individual(s) or agency).]
[Use following or similar text if patch is in the public
domain: Released into the public domain by (VA/IHS/other).]
[Use following or similar text if patch includes publicly
licensed materials: Released under the (name and version of
public license): (link to license).]
[Use following or similar text if patch includes privately
licensed materials: This patch contains privately licensed
content. Only use if you have an agreement with (name of license
holder).]
Functionality:
==============
[first write patch overview or background]
[then number each discrete thing it fixes or adds
(functionally, not technically) and describe the before-andafters]
[if these changes derive from support tickets or e-mails, list
them here. You might also list the support tickets or e-mails
along with each numbered item above that addresses it.]
September 2014
27
Patch Module 2.5 Primary Developers
Appendix B: Patch Description Boilerplate
Package Elements:
=================
[For each package element added, removed, or changed, identify
it, briefly summarize the change technically, and tie it back to
the functional changes above it goes with. Group the
descriptions by package-element type (files, fields, crossreferences, templates, options, remote procedures, protocols,
mail groups, security keys, routines, documentation, etc.)]
[at the end of the section on routines (if any), include this:]
Routine Versioning:
The second line of each of these routines now looks like:
[insert sample second line]
[in place of patch list, insert **[Patch List]**]
The following checksums can be checked with CHECK1^XTSUMBLD:
Routine
Before
After
-----------------------------------------------------------[Name]
[Before]
[After]
Patch List
**[Patch List]**
Documentation:
[for any changed documentation, name it, describe it, and say
where to get it]
Test Sites:
===========
[list alpha and beta test sites. Make sure you have tested the
patch in production before submitting it for verification,
certification, and release.]
Compliance:
===========
This software complies with the VA MUMPS Programming Standards
and
Conventions (version 3 April 2007). [make sure it is]
This software is 508 compliant. [make sure it is]
Blood Bank Clearance - [if VA, date of clearance]
EFFECT ON BLOOD BANK FUNCTIONAL REQUIREMENTS: Patch [patch ID]
contains changes to a package referenced in VHA OI SEPG SOP 19228
September 2014
Appendix B: Patch Description Boilerplate
Patch Module 2.5 Primary Developers
023 Review of VISTA Patches for Effects on VISTA Blood Bank
Software. This patch does not alter or modify any VistA Blood
Bank software design safeguards or safety critical elements
functions. [first sentence only applies if the application in
question is referenced in VHA OI SEPG SOP 192-023, so find out.
If not, cut first sentence but keep second. Also, make sure
second sentence is true.]
RISK ANALYSIS: Changes made by patch [patch ID] have no effect
on Blood Bank software functionality, therefore RISK is none.
[make sure it is]
[Custom tailor the installation instructions until they
precisely describe the necessary steps. Wherever atypical
instructions need to be added, add a capture of the actual
dialog users can expect to see. Generally, these instructions
are different for typical patches than for deep infrastructure
patches, because of the latter's invasiveness. Here are two
sample boilerplates. Remember, your patch may require some third
combination of instructions; for example, if it is a typical
patch but includes a long list of affected options or protocols,
or deep conversions of the application's database, it might be
better to inhibit logons or to install the patch with users off
the system.]
Installation Instructions: [for typical patches]
==========================
Before installation . . . [if there are any such tasks that
need to be done]
This patch can be loaded with users on the system.
Install Time - less than [max time to follow install, end to
end]
[if patch includes an Environment Check, insert & complete the
following:] The Environment Check routine XXX will perform the
following task:
[if patch includes a Pre-install Routine, insert & complete the
following:] The Pre-installation routine XXX will perform the
following tasks:
1.
LOAD PATCH DISTRIBUTION
If your patch distribution arrived in the form of an e-mail
September 2014
29
Patch Module 2.5 Primary Developers
Appendix B: Patch Description Boilerplate
message, choose the Packman message containing this patch and
invoke Packman's
INSTALL/CHECK MESSAGE option to load the distribution.
If it arrived in the form of a host file, choose KIDS's Load a
Distribution option (see step 2, below) to load it.
2.
Menu
START UP KIDS
Start up the Kernel Installation and Distribution System
[XPD MAIN]:
Edits and Distribution ...
Utilities ...
Installation ...
Select Kernel Installation & Distribution System Option:
INStallation
Load a Distribution
Print Transport Global
Compare Transport Global to Current System
Verify Checksums in Transport Global
Install Package(s)
Restart Install of Package(s)
Unload a Distribution
Backup a Transport Global
---
Select Installation Option:
3.
Select Installation Option:
NOTE: The following are OPTIONAL - (When prompted for the
INSTALL NAME, enter [patch ID]):
a. Backup a Transport Global - This option will create a
backup message of any routines exported with this patch. It will
not backup any other changes such as DDs or templates.
b. Compare Transport Global to Current System - This
option will allow you to view all changes that will be made when
this patch is installed. It compares all components of this
patch (routines, DDs, templates, etc.).
c. Verify Checksums in Transport Global - This option will
allow you to ensure the integrity of the routines that are in
the transport global.
30
September 2014
Appendix B: Patch Description Boilerplate
4.
Patch Module 2.5 Primary Developers
Select Installation Option: Install Package(s)
** This is the step to start the installation of this KIDS
patch **
a. Choose the Install Package(s) option to start the patch
install and enter [patch ID] at the INSTALL NAME prompt. As part
of the Environment Check routine, the message below will display
[if patch includes an Environment Check, insert the following:]
Will first run the Environment Check Routine, [routine name]
[if patch distributes options, include the following
instruction:]
b. When prompted 'Want KIDS to Rebuild Menu Trees Upon
Completion of Install? NO//' answer YES
c. When prompted 'Want KIDS to INHIBIT LOGONs during the
install? NO//' answer NO
d. When prompted 'Want to DISABLE Scheduled Options, Menu
Options, and Protocols? NO//' answer [YES if the package
elements that this patch changes will affect one or more options
or protocols; else NO. Include steps E and F below only if YES]
e. When prompted "Enter options you wish to mark as "Out of
Order":", enter the following option(s):
[list menu text and name of each option to disable. You
should disable any options affected by the package elements that
this patch changes. If none are affected, then instead of "enter
the following option(s):" above insert "press return."]
f. When prompted "Enter protocols you wish to mark as 'Out
of Order':", enter the following protocol(s):
[list menu text and name of each protocol to disable.
You should disable any protocols affected by the package
elements that this patch changes. If none are affected, then
instead of "enter the following protocol(s):" above insert
"press return."]
g. When prompted "Delay Install (Minutes): (0-60): 0//",
enter the number of minutes to delay installation.
[if patch includes a Pre-install Routine, insert & complete the
following:]
September 2014
31
Patch Module 2.5 Primary Developers
Appendix B: Patch Description Boilerplate
The Pre-installation routine [routine name] will perform the
following tasks:
<additional instructions, if needed>
[if patch includes a Post-install Routine, insert & complete
the following:] The Post-installation routine [routine name]
will perform the following tasks:
After installation, . . . [if there are any such tasks that
need doing]
Installation Instructions: [for deep infrastructure patches]
==========================
Before installation . . . [if there are any such tasks that
need to be done]
** Although queuing of this patch is allowed, it is HIGHLY
recommended that ALL users be off the system and VISTA
background jobs be STOPPED before this patch is installed.
Failure to do so may result in 'source routine edited' errors
during a database update. Edits may be lost and records may be
left in an inconsistent state. An error that occurs before a
cross-reference is executed, for example, may lead to corrupted
data or hard errors in the future. **
Also, please make sure that no other patches are installed
until installation for this patch has completed.
The following installation instructions are based upon the
premise that the installer has heeded the above warning.
Install Time - less than [max time to follow install, end to
end]
[if patch includes an Environment Check, insert & complete the
following:] The Environment Check routine XXX will perform the
following task:
[if patch includes a Pre-install Routine, insert & complete the
following:] The Pre-installation routine XXX will perform the
following tasks:
1.
LOAD PATCH DISTRIBUTION
If your patch distribution arrived in the form of an e-mail
32
September 2014
Appendix B: Patch Description Boilerplate
Patch Module 2.5 Primary Developers
message, choose the Packman message containing this patch and
invoke Packman's INSTALL/CHECK MESSAGE option to load the
distribution.
If it arrived in the form of a host file, choose KIDS's
Load a Distribution option (see step 2, below) to load it.
2.
Menu
START UP KIDS
Start up the Kernel Installation and Distribution System
[XPD MAIN]:
Edits and Distribution ...
Utilities ...
Installation ...
Select Kernel Installation & Distribution System Option:
INStallation
Load a Distribution
Print Transport Global
Compare Transport Global to Current System
Verify Checksums in Transport Global
Install Package(s)
Restart Install of Package(s)
Unload a Distribution
Backup a Transport Global
---
Select Installation Option:
3.
Select Installation Option:
NOTE: The following are OPTIONAL - (When prompted for the
INSTALL NAME, enter [patch ID]):
a. Backup a Transport Global - This option will create a
backup message of any routines exported with this patch. It will
not backup any other changes such as DDs or templates.
b. Compare Transport Global to Current System - This
option will allow you to view all changes that will be made when
this patch is installed. It compares all components of this
patch (routines, DDs, templates, etc.).
c. Verify Checksums in Transport Global - This option will
allow you to ensure the integrity of the routines that are in
the transport global.
September 2014
33
Patch Module 2.5 Primary Developers
4.
Appendix B: Patch Description Boilerplate
Select Installation Option: Install Package(s)
**This is the step to start the installation of this KIDS
patch:
a. Choose the Install Package(s) option to start the patch
install and enter [patch ID] at the INSTALL NAME prompt. As part
of the Environment Check routine, the message below will display
[if patch includes an Environment Check, insert the following:]
Will first run the Environment Check Routine, [routine name]
[if patch distributes options, include the following
instruction:]
b. When prompted 'Want KIDS to Rebuild Menu Trees Upon
Completion of Install? NO//' answer YES
c. When prompted 'Want KIDS to INHIBIT LOGONs during the
install? NO//' answer NO
d. When prompted 'Want to DISABLE Scheduled Options, Menu
Options, and Protocols? NO//' answer NO
[if patch includes a Pre-install Routine, insert & complete the
following:] The Pre-installation routine [routine name] will
perform the following tasks:
<additional instructions, if needed>
[if patch includes a Post-install Routine, insert & complete
the following:] The Post-installation routine [routine name]
will perform the following tasks:
After installation, . . . [if there are any such tasks that
need doing]
ASSOCIATED PATCHES:
===================
[list all required patches here, e.g.]
- [patch name]
34
September 2014
Glossary
Patch Module 2.5 Primary Developers
Glossary
Application
An administrative division of VistA that
automates part or all of one hospital or clinical
service. Pharmacy and Nursing are examples of
applications.
Application Version
A complete new release of an application.
Versions are numbered sequentially.
Build
See KIDS Build
Checksum
A number unique to any given version of a
software element. Even a small change to the
software will change the checksum, so checksums
are used to detect changes and verify a particular
version.
Dialect
See VistA Dialect
Distribution
See KIDS Distribution
FOIA
Freedom of Information Act. The term “FOIA”
can refer to the Act itself, or to a request sent to
the government under the auspices of the Act.
Forum
A VistA system used as the hub of an
organization’s VistA software lifecycle. VA and
OSEHRA each have their own Forums.
Gerrit
A code-review system for use with a repository
such as Github.
Git
A version-control system.
September 2014
35
Patch Module 2.5 Primary Developers
Glossary
Github
A platform that hosts repositories using the Git
system.
Host-File Format
A file-based format for a KIDS distribution. It
consists of two parts: the KIDS file and the text
file.
KIDS
The Kernel Installation and Distribution System.
KIDS is the primary method for preparing a
patch for the Patch Module, as well as the
mechanism for installing patches.
KIDS Build
The “manifest” of a KIDS distribution, which lists
all the components included in the distribution.
KIDS Distribution
A host file or Packman message containing a
software update and associated tools and
conversions for applying it.
KIDS File
In a host-file format, the portion of the file
containing the software.
KIDS Install
A record describing what happened during each
installation of a KIDS distribution at a specific
site.
Local Modification
A change to VistA made for a specific facility or
organization. Local modifications are necessary in
VistA, but result in changes to checksums that
make version control more challenging.
Mailman
VistA’s native email system. Patches can be
distributed using Mailman’s Packman module.
Namespace
A convention for naming VistA package elements.
Each developer or organization is assigned a
36
September 2014
Glossary
Patch Module 2.5 Primary Developers
namespace, which is a unique character string, to
be used use in naming routines, options, and
other package elements. Namespacing helps keep
similar elements from different developers
distinct and easily identifiable.
Numberspace
Similar to a namespace, a numberspace is a
unique numeric string assigned to a developer or
organization. Numberspaces are used for VistA
elements that have numbers rather than names.
Package
A distribution of a new version of an application.
Packman
A module of Mailman used to ship patches and
other software.
Packman Format
A format for a KIDS distribution designed for use
with Packman.
Packman Message
Any email message that contains a KIDS
distribution in Packman format.
Patch
Any small change or update intended for
installation in an active VistA system. Most
patches can be installed with minimal disruption
to the system or its users.
Patch Completer
The developer who reviews the patch developer’s
work, then updates the status of the patch in the
Patch Module to “completed.”
Patch Developer
Person who initially entered the information on
the patch into the Patch Module. That person will
be listed as the “developer” in the Patch Module,
whether they did any actual development work
or not.
September 2014
37
Patch Module 2.5 Primary Developers
Glossary
Patch ID
A multi-part identification number for a patch,
which includes the application namespace, the
application version number, and the patch
number.
Patch Message
An email message that contains a patch
description and a Packman-format KIDS
distribution. This is the default method for the
Patch Module to distribute patches.
Patch Number
Unique number given to a patch, as it relates to
the specific application and version. Patch
numbers are numberspaced, so patches from
different sources can be immediately
distinguished.
Patch Reviewer
In secondary development, the developer who
reviews the released patch to determine what
kind of secondary development might be needed.
Patch Stream
The series of patches developed and released for
a specific application or dialect.
Patch Subscriber
A person or organization who has signed up to
receive a particular patch stream.
Patch Verifier
Specialist who confirms that the patch is
functionally complete, and meets all standards.
Verifiers make the decision to release the patch.
Primary Developer
The person or team who initiates the patching
process and releases a new patch.
Primary Development
The actions involved in creating and distributing
a new patch.
38
September 2014
Glossary
Patch Module 2.5 Primary Developers
Repository
Online electronic storage which houses reference
versions of a specific software. Generally, one
version is designated as the “official” version.
OSEHRA provides repositories for OSEHRA
VistA and FOIA VistA.
Required Patch
A prerequisite patch. All patches should list their
required patches—that is, their prerequisites—for
installation.
Secondary Developer
The person or team who re-purposes a released
patch for their VistA dialect.
Secondary Development The actions involved in re-purposing a patch for a
different VistA dialect.
Sequence Number
Unique number assigned when a patch is
verified. It determines the default order in which
patches should be installed.
Text File
In host-file format, the portion of the file that
contains the patch description.
Version
See Application Version
Version Control
A system or methodology for ensuring that all
software within a given organization is the same
version.
Version Number
The sequential number of the current application
version. Each VistA application has its own
version number. For example, the current version
of Laboratory is 5.2, while the current version of
Fileman is 22.2.
VistA Dialect
A unique, stable version of VistA supported by a
September 2014
39
Patch Module 2.5 Primary Developers
Glossary
specific vendor. Popular VistA dialects include
OSEHRA VistA, vxVistA (Document Storage
Systems), Medsphere Open VistAand WorldVistA
EHR.
VistA Service Pack
A bundle of VistA packages and patches, which
can be used to upgrade an existing VistA system.
VistA Snapshot
A copy of an existing VistA system. A VistA
snapshot is most commonly used to clone a new
VistA instance.
40
September 2014