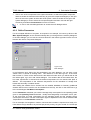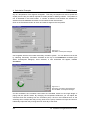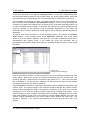
1
T*SOL Expert
®
Version 4.5
Design and Simulation
of thermal solar systems
User Manual
1
Disclaimer
Great care has been taken in compiling the texts and images. Nevertheless, the possibility of
errors cannot be completely eliminated. The handbook purely provides a product description and
is not to be understood as being of warranted quality under law. The publisher and authors can
accept neither legal responsibility nor any liability for incorrect information and its consequences.
No responsibility is assumed for the information contained in this handbook.
The software described in this handbook is supplied on the basis of the license agreement which
you accept on installing the program.
No liability claims may be derived from this.
Copyright and Trademark
T*SOL® is a registered trademark of Dr. Gerhard Valentin.
Windows Vista®, Windows XP®, and Windows 7® are registered trademarks of Microsoft Corp.
All program names and designations used in this handbook may also be registered trademarks of
their respective manufacturers and may not be used commercially or in any other way. Errors
excepted.
Berlin, Mär 2013
COPYRIGHT © 1993-2013 Dr.-Ing. Gerhard Valentin
Dr. Valentin EnergieSoftware GmbH
Stralauer Platz 34
10243 Berlin
Germany
Valentin Software, Inc.
31915 Rancho California Rd, #200-285
Temecula, CA 92591
USA
Tel.: +49 (0)30 588 439 - 0
Fax: +49 (0)30 588 439 - 11
Tel.: +001 951.530.3322
Fax: +001 858.777.5526 fax
[email protected]
www.valentin.de
[email protected]
http://valentin-software.com/
Management:: Dr. Gerhard Valentin
AG Berlin-Charlottenburg
HRB 84016
2
T*SOL Programme Manual
Contents
Contents
1 Programme Information..................................................................... 1
1.1 Why T*SOL®? ......................................................................................... 1
1.2 System Features..................................................................................... 1
1.2.1
Overview ...................................................................................................... 1
1.2.2
System Configuration................................................................................... 1
1.2.3
Simulation and Results ................................................................................ 2
1.2.4
Economic Efficiency Calculation .................................................................. 2
1.2.5
Comprehensive Database of Components .................................................. 2
2 Installation........................................................................................... 3
2.1 Hardware and Software Requirements ................................................... 3
2.2 Programme Installation ........................................................................... 3
2.3 Programme Activation............................................................................. 4
2.3.1
Enter the Serial Number............................................................................... 4
2.3.2
Request a Key Code .................................................................................... 5
2.3.3
Request a Key Code Online......................................................................... 5
2.3.4
Request a Key Code by Fax ........................................................................ 6
2.3.5
Request a Key Code by Telephone ............................................................. 6
2.3.6
Enter the Key Code...................................................................................... 6
3 Brief Instructions................................................................................ 7
3.1 General Information on Design ............................................................... 7
3.2 Set Up a New Project (File menu)........................................................... 7
3.3 Design Assistant (Calculations menu) .................................................... 8
3.4 Select a System (Systems menu) ........................................................... 8
3.5 Enter System Parameters (Parameters menu) ....................................... 9
3.6 Set Up a New Variant (File menu) ........................................................ 10
3.7 Simulation (Calculations menu) ............................................................ 10
3.8 Economic Efficiency Calculation (Calculations menu) .......................... 11
3.9 Evaluate Results (Results menu).......................................................... 12
4 Calculation Examples ...................................................................... 14
4.1 Use of the Design Assistant .................................................................. 14
Dr. Valentin EnergieSoftware GmbH
Contents
T*SOL Programme Manual
4.1.1
Set up a New Project ................................................................................. 14
4.1.2
System Selection ....................................................................................... 16
4.1.3
Define Consumption................................................................................... 17
4.1.4
Define Collector Array ................................................................................ 18
4.2 Configure a Solar System via the Main Menus ..................................... 21
4.2.1
Design a New Variant ................................................................................ 22
4.2.2
Define Parameters ..................................................................................... 23
4.2.3
Simulation .................................................................................................. 27
4.2.4
Evaluation .................................................................................................. 27
5 MeteoSyn........................................................................................... 30
5.1 Welcome ............................................................................................... 31
5.2 Location Data........................................................................................ 32
5.3 Monthly Values ..................................................................................... 34
5.4 Hourly Values........................................................................................ 35
Dr. Valentin EnergieSoftware GmbH
T*SOL Manual
1 Programme Information
1 Programme Information
1.1 Why T*SOL®?
T*SOL® is a programme for the design and simulation of solar thermal systems including hot
water preparation, the support of space heating and swimming pool heating.
The programme allows the planner to investigate the influence of individual system components
on the operating behaviour of a solar thermal system. All system parameters can be quickly
changed via the user-friendly interface.
Simulation results can be evaluated in graph or table format, making T*SOL® an excellent tool
for planning a solar thermal system.
1.2 System Features
1.2.1 Overview
•
Simulation of solar thermal systems supporting domestic hot water and space heating over
any period of time up to one year
•
Design (optimisation of collector array area and storage tank volume) of the system to reach
specific targets
•
Influence of partial shading by the horizon and other objects (buildings, trees etc)
•
Graphic and tabular entry of shade values
•
Design Assistant with automatic system optimisation
•
Comprehensive component database
•
Working on a number of system variants at any one time within a project is possible, making
it easy to compare systems
•
Domestic hot water consumption profiles included in the calculations
•
Both radiator and under-floor heating can be included
•
Investigation of energy use, pollutant emissions and costs
•
Calculation of standard evaluation values for solar thermal systems such as system
efficiency, solar fraction etc
•
Detailed presentation of results in reports and graphics
•
Economic efficiency calculation following simulation over a period of one year
•
Online Help facility
1.2.2 System Configuration
With the standard version you can select a system from the most common system
configurations.
Dr. Valentin EnergieSoftware GmbH
1
1 Programme Information
T*SOL Manual
With the swimming pool module, which is offered as an extra module to the standard
programme, you can add an indoor or outdoor swimming pool to the solar cycle.
SysCat, the other extra module that is available, enables you to select from a number of largescale solar systems (as tested during the Solarthermie 2000 programme).
The system components (collectors, boiler, storage tank, and also consumption profiles) are
loaded as units from the database.
The Design Assistant helps you to quickly produce a system variant, carrying out automatic
optimisation of the system.
With T*SOL® both shade from the horizon and from objects close to the system is calculated.
For the objects, you can take account of seasonal variations in shading (e.g. trees with and
without leaves).
1.2.3 Simulation and Results
The calculation is based on the investigation of energy flows and provides yield prognoses
according to the hourly meteorological data provided.
T*SOL® calculates the energy produced by the solar system in the production of hot water and
space heating and the corresponding solar fraction.
The results are saved and can be presented in graph format or in a results overview (Summary
Report). The graph maps the course of energy and other values, over any given period, and can
be saved as a table in text format, so that the results can be copied into other programmes for
further evaluation.
By varying individual system parameters, the optimal system configuration can be found.
1.2.4 Economic Efficiency Calculation
After running a simulation over a period of one year, you are able to carry out an economic
efficiency calculation for that variant.
Taking into account the system costs and any financial support (e.g. government grant), the
economic efficiency parameters, e.g. capital value, annuities and cost of heating, are calculated
and detailed in a report.
1.2.5 Comprehensive Database of Components
The programme comes with a comprehensive database of the following components:
•
Collectors
•
Boilers
•
Storage tanks
If you want to stay up to date, we would recommend a T*SOL® Service Agreement. You will
then be sent regular programme updates and revised component database units.
2
Dr. Valentin EnergieSoftware GmbH
T*SOL Manual
2 Installation
2 Installation
2.1 Hardware and Software Requirements
T*SOL® is a WINDOWS™ application. One of the following operating systems needs to be
installed on your computer before you can run the programme: Windows 98, Windows ME,
Windows NT, Windows 2000 or Windows XP.
T*SOL® requires a minimum of 256 MB RAM. With less memory there is no guarantee that the
programme will run.
Recommended system configuration:
500 MHz Pentium PC
256 MB RAM
400 MB hard disk drive
VGA colour monitor
CD drive
The fully installed programme uses approximately 120 MB of hard disk space. Each additional
weather data file requires 5 MB. You will require approximately 220 MB of free hard disk space
in order to run T*SOL® comfortably, complete with all available weather data. Please ensure
that you have enough space free on the hard disk before you install the programme.
In order to run T*SOL® you must have the full licence rights (full access) to the T*SOL®
installation folder.
The formats for currency, numbering, time and date that are defined within the country settings
of Windows‘ system control on your computer are automatically reproduced within T*SOL®.
These formats also appear in any T*SOL® documents that you print out. In order to run the
programme, it is important that the symbols separating thousands and decimals are different.
You should set your monitor display to Small Fonts via the Windows system control.
2.2 Programme Installation
Please close all programmes before commencing the installation procedure.
To install the programme put the programme CD into your computer’s CD drive. The installation
programme will start automatically and you will be taken through the installation procedure step
by step (unless the CD drive autorun function has been deactivated on your computer).
If the autorun function has been deactivated, you will need to start the “Setup.exe” file which is
on the CD. To do this you can start File Manager or Explorer and double click on the
“Setup.exe” file in the CD drive.
If you install T*SOL onto a computer with WinNT, WIN2000 or WinXP, you will need to have
administrator access to the operating system.
To run the programme, you will need to have full rights (read and write) to the T*SOL
programme directory (e.g. C:\Programme\TSOL).
Dr. Valentin EnergieSoftware GmbH
3
2 Installation
T*SOL Manual
2.3 Programme Activation
After installing and opening the programme, a small window appears asking whether you wish
to start the programme as a Demo Version or register the Full Programme. This dialogue
appears until you have activated the programme successfully.
Programme Activation is carried out by entering a Key Code. The Key Code is provided by the
programme manufacturer on request.
First you will need to make sure that:
•
You have a Serial Number
•
The programme has already been installed
•
When you start the programme, you click on the “License Full Version” button.
Programme Activation is carried out in four steps:
Activation
•
Enter Serial Number
•
Notify allocated programme ID by e-mail, fax or telephone
•
Receive Key Code
•
Enter Key Code
2.3.1 Enter the Serial Number
If you purchased the programme from us, you will already have a Serial Number. You will find
this on the CD case, on the invoice or we have sent it to you by e-mail. The Serial Number has
the following format:
30138-012P-250-CHWD-1-EHB8-PH-CEPR-AGU
It needs to be entered exactly as it appears, without any spaces. After the Serial Number has
been entered, the programme allocates a Programme ID, which is based on the Serial Number
and a code for your PC.
4
Dr. Valentin EnergieSoftware GmbH
T*SOL Manual
2 Installation
You Still Don’t Have a Serial Number?
This could be the case if, for example, you have installed the programme from the Demo CD or
you have downloaded it from the internet. You will need to purchase a full version of the
programme before you can receive a Serial Number.
Send us the Order Form which you can print within the programme under “Info/Registration”,
or you can purchase the programme direct from our website.
You’ve Purchased the Programme and Can’t Find Your Serial Number?
No problem. Send us the invoice for the programme with your contact details and we will send
you the Serial Number again.
2.3.2 Request a Key Code
After entering the Serial Number and automatic allocation of the Programme ID, you will need to
provide us with this information, so that we can send you your Key Code. You will see the
following window on your screen:
You can request the Key Code in three different ways.
2.3.3 Request a Key Code Online
This method requires that your computer has internet access.
Click on the “Online” button underneath “Programme ID” in the Registration window. A form
opens in which you enter the data required to obtain a Key Code. The fields marked: * have to
be completed to continue.
After completing the form, you can send it straight off – the recipient’s address is entered
automatically. After sending, you will receive the Key Code by return (allow up to 20 minutes for
this). It will be sent to the e-mail address entered on the form.
Dr. Valentin EnergieSoftware GmbH
5
2 Installation
T*SOL Manual
2.3.4 Request a Key Code by Fax
If you click on the “Fax“ button underneath “Programme ID” in the Registration window, a form
opens for you to complete and print off. Send the completed form by fax to: +49 30 588 439 11.
You will then receive the Key Code by fax within one working day. You can also enter an e-mail
address to which the Key Code should be sent.
2.3.5 Request a Key Code by Telephone
If you do not have a fax or an e-mail address, you can request a Key Code by telephone. In this
case, you will need to give your Programme ID over the phone.
2.3.6 Enter the Key Code
Once you receive the Key Code, you will need to enter it by hand or copy and paste it into the
field under “Enter Key Code” in the Registration window and then click on the “OK” button. This
completes the programme registration and activation procedure.
An information window appears with a message that registration has been completed and the
programme is now fully functional.
The logo illustrated here will be used as the programme icon. After installation it will
appear in the Windows Start menu.
The single licence version of T*SOL® can only be installed locally. However, since the database
and project files can be saved to any file paths required and these can then be set in the
programme as the standard file paths, it is therefore possible to move parts of the programme to
other hard drives.
If you wish to install the whole programme onto a network, you will require the network version
of T*SOL®.
6
Dr. Valentin EnergieSoftware GmbH
T*SOL Manual
3 Brief Instructions
3 Brief Instructions
The aim of this section is to introduce the user to the scope of the T*SOL® programme, drawing
on the most important and most frequent questions raised by users. The planning and design of
a solar thermal system using T*SOL® will be illustrated using the menus and following the
various steps that need to be carried out, in their recommended order. The corresponding
speed button symbols for direct access to the dialogues will be shown.
3.1 General Information on Design
There is no simple method of calculation which can be used to exactly determine the yields for a
solar system. The number of parameters required to determine the operating behaviour of a
system is too large. This is not only affected by the changeable, non-linear behaviour of the
weather, but also by the dynamic nature of the system itself.
Of course there are rules of thumb such as 1-2 m² collector surface per person and 50 litre
storage tank capacity per m² of collector surface, but these are only valid, if at all, for small
systems serving one or two households. Only calculation-based simulation makes it possible to
investigate larger systems in respect of the influence of the surrounding conditions,
consumption variations and different components on the operating conditions of the solar
system.
Solar systems can be used for heating purposes, above all, in areas where heating is also
required in summer. These systems will then, even during the transitional period, make a
considerable contribution to heating the building. However, something that should be avoided at
all costs is the design of a solar system for heating without the possibility of seasonal storage,
even in winter. This would lead to extremely large collector surfaces and at the same time
excess energy in summer, i.e. to systems with very poor efficiency and therefore very high
heating costs!
In order to design and optimise a solar system with T*SOL®, the following steps should be
followed:
3.2 Set Up a New Project (File menu)
To set up a new project you will need to open the General Project Data dialogue and enter at
least the reference or name of the project. This will also serve as the name of the project folder,
into which the project ‘variants’ worked on in the course of the project should be saved. All
other details can be entered at a later date, as and when required.
Dr. Valentin EnergieSoftware GmbH
7
3 Brief Instructions
T*SOL Manual
Figure 3.2.1:
Data entry dialogue for setting up a
new project
Exit the dialogue with OK to set up the project. You can then define and work on as many
project variants as you wish.
3.3 Design Assistant (Calculations menu)
If you do not have a firm idea of the design of your solar system, you should use the
Design Assistant to size your system, rather than manually entering every time.
Figure 3.3.1:
Design Assistant
The Design Assistant leads you through all the necessary stages, including the selection of a
suitable collector and storage tank. These components are determined, after entry of the target
solar fraction (i.e. the annual solar contribution percentage), by the calculation results of a mini
simulation.
By clicking on the Accept button, the parameters entered and determined in the Design
Assistant are transferred into the system.
3.4 Select a System (Systems menu)
If you already know which system components you want to use, you can select these
directly from the System | Select menu. This gives you an overview of all of the
8
Dr. Valentin EnergieSoftware GmbH
T*SOL Manual
3 Brief Instructions
component combinations available with your version of the programme.
Figure 3.4.1:
Standard Systems
Selection Dialogue
Select the system you want to use by double clicking on the image or on the list entry. The
system will take on the parameters of the currently active project variant. You can view the
selection as icons or in a list.
3.5 Enter System Parameters (Parameters menu)
This menu allows you to enter or change your solar system’s component parameters.
Figure 3.5.1:
Data entry dialogue for system components –
e.g. collector array
A number of parameter dialogues are displayed, onto which all the necessary data is entered.
Use the red arrow buttons in the bottom corner to move between each component’s dialogue
window.
Another possibility for entering the parameters is via the Main Dialogue. In the Main
Dialogue you can also use the red arrow buttons to move between the component
dialogue windows. You should also note that there may be a number of tabs for each
Dr. Valentin EnergieSoftware GmbH
9
3 Brief Instructions
T*SOL Manual
component.
A quick way of reaching the individual parameters for the individual components is via the
system schematic. Just position the mouse arrow over one of the components and double click
or click with the right mouse key to get to the corresponding dialogue (characteristics).
The Basic Data in respect of the climatic conditions and the hot water and
heating requirements for the actual variant can be modified via the
corresponding buttons allocated.
3.6 Set Up a New Variant (File menu)
Within each named project you have the possibility of setting up as many variants as you
wish, each containing different systems and components. You can open and work on up
to six variants at any one time. The variants allow easy comparison of parameter choices while
keeping the filing simple.
There are a number of options for setting up a new variant.
Figure 3.6.1:
Data entry dialogue for setting up a new variant
3.7 Simulation (Calculations menu)
The size of the simulation interval sample varies between one and six minutes.
decisive here is the system inertia resulting from the capacities and energy flows.
What is
For the evaluation of the simulation results, it is often enough to work with values resulting from
larger simulation intervals (hourly or daily).
Use the speed button at the top of the screen or the pull down menu to carry out a
simulation for the project variant that is currently active.
If you go to the simulation dialogue via the pull down Calculations menu, you are able to select
the simulation period and the recording interval. Depending on the selected simulation period, a
number of different recording intervals are offered.
10
Dr. Valentin EnergieSoftware GmbH
T*SOL Manual
3 Brief Instructions
Figure 3.7.1:
Data entry dialogue for simulation parameters
Clicking on the View button allows temperature conditions to be observed graphically
during the simulation. The exact time of each simulation step is shown in the status bar
for the variant in the bottom left corner.
At the end of the simulation a selection dialogue opens so that you can view the results (report
or graphics) or carry out an economic efficiency calculation.
3.8 Economic Efficiency Calculation (Calculations menu)
In order to carry out an economic efficiency calculation, the results of a simulation carried out
over a period of one year must be available.
Click on the button, or access the dialogue via the Calculations | Economic Efficiency
menu. The parameters required to carry out an economic efficiency calculation are
initially taken from the Default Data (Options menu), which can be changed as required for the
design of special systems. The simulation results are combined with the Default Data to carry
out the calculations.
Figure 3.8.1:
Data entry dialogue for economic efficiency
calculation
You are able to enter different values for each respective variant. If the changed values are to
be used in the simulation results, a warning will appear before saving.
The following values are entered onto the Parameters worksheet (each worksheet is indicated
by a dialogue tab):
The Lifespan is the period given by the manufacturer as being the estimated operating life of a
system. For the majority of solar systems this is between 10 to 20 years.
Dr. Valentin EnergieSoftware GmbH
11
3 Brief Instructions
T*SOL Manual
The Interest on Capital is the interest rate at which the capital for the investment is borrowed
from a bank, or the interest that might be charged on the capital used.
The Price Increase Rates of the Running Costs and Energy (fuel costs) are important in
calculating the Net Present Value.
Changes can be made to the Investment worksheet as follows:
The Investment can be entered as an absolute amount and as a specific investment cost in
€/m² of collector surface area.
The Subsidy can be entered as an absolute amount, as a percentage of the investment and as
a specific subsidy in €/m² of collector surface area. (Note: the currency used for the calculations
in the programme is dependent on the currency setting on your computer.)
The Running Costs worksheet includes the following parameters:
The Fixed Running Costs of the system can be entered as an annual amount or as a
percentage of the investment in percent per annum.
The Pump Running Costs are the product of the running time produced by the simulation, the
pump performance and the specific electricity costs.
From the Savings worksheet it is possible to change the Specific Fuel Price adopted from the
Options | Default Data menu, if you want to design a special system.
By changing the values produced by the simulation for the Solar Yield and the Fuel Savings (the
programme will warn you before the changes are saved), you can for example determine at
which values the system would be economically viable.
On the Loan worksheet up to three loans can be defined:
The Loan Capital is the amount of credit that is taken out.
The Term is the amount of years in which the loan has to be repaid.
In addition, either the Annual Installment or the Loan Interest Rate has to be entered. In each
case the other field is blocked and calculated by the programme.
The annual installment is the fixed annual amount with which the loan and interest are repaid
over the agreed term.
The loan interest rate is the percentage of interest that has to be paid on the loan. If the loan
interest rate if less than the capital interest rate, the loan takes on the function of a subsidy; if it
is more, the total costs increase. With identical interest rates they remain the same.
Finally, one all the data has been entered, the Economic Efficiency Calculation provides figures
for the Net Present Value of the system and the Cost of Solar Energy.
3.9 Evaluate Results (Results menu)
T*SOL® offers you a two ways of evaluating the simulation results: graphical display and the
Summary Report.
The graphical display allows you to select up to eight curves. A graphics window appears
with its own menu, so that you can format the graphs as you wish. You can change the
break-down of the values, the display interval (from 1 day up to 1 year), font type and
12
Dr. Valentin EnergieSoftware GmbH
T*SOL Manual
3 Brief Instructions
style, colour and presentation (line graph or bar chart) of the curves and the guide lines.
Figure 3.9.1:
Simulation results graph
The axes can be redefined and the graphic can be given a title. The values can be copied and
pasted into other programmes for further evaluation.
The Summary Report consists of a three-page overview including the system schematic,
the entry data and the simulation results. The summary report can be printed via the page
preview.
Dr. Valentin EnergieSoftware GmbH
13
Solar Local District Heating Systems
(only available in T*SOL Expert)
This programme module was developed with the support of the German Federal Ministry for the
Environment within the framework of the Solarthermie 2000plus (Solar Thermal 2000plus)
programme in partnership with the company ZfS-Rationelle Energietechnik GmbH.
The module contains the following features:
Up to six collector arrays can be defined in one Solar Loop that is connected to the power house
via a freely-definable Solar Network.
The Power House consists of a buffer tank and the boiler system.
The programme includes three power house types:
- Bivalent Buffer Tank with Integrated Auxiliary Heating as a Boiler Buffer
- Monovalent Buffer Tank with Serial Boiler Connection
- Monovalenter Buffer Tank with Secondary Boiler Buffer Tank.
Via a freely-definable Local District Heating Netowork, it is possible to connect the power house
with up to six heat transfer stations.
The types of Heat Transfer Stations are available:
- Heat Transfer Station System for DHW Stations
- Tank Loading System
- Tank Loading System with Recooling and Thermal Disinfection
All three transfer stations include central space heating supply.
In addition, the Ground Temperatures and the Indoor Reference Temperature are defined in the
system dialogue.
For the progression of the Ground Temperature, a sine curve is used, with its minimum in February
and maximum in August.
3
1
Solar loop
Variant menu System Definition > Solar Loop
In this window, you can define and edit up to six differently aligned collector loops.
Click on the Add button to add a new collector loop.
Click on the Remove button to delete the selected collector loop.
Click on the Edit button to access the dialog for the selected collector loop.
From this window, you can also access the input window for the solar network.
4
.2
Power station
Variant menu System Definition > Power Station
In this dialog, you can access the separate components of the power station, consisting of a boiler
system and the buffer tank.
By selecting Own Building, you can set a temperature change from February to August yourself.
In the Control window, you can enter the switch-on and switch-off temperatures of the buffer tank
bypass.
In the Network Flow Temperature window, you can define the heating curve of the local district
heating network based on the outside temperature.
You can also set the Storage Tank Installation here, with a choice of Installation Outside, Central
Boiler, and Own Building.
If you select Central Boiler, the reference temperature for the internal rooms from the system
dialog is used to calculate tank losses.
5
.3
Solar or Heating Network
Variant menu System Definition > Solar Network
This is where you define the network connection to the power station.
On the Pipes > Armatures page, use Material to define whether the pipes of local district heating
network are made of copper or steel.
You can also define the number of armatures in the network and the loss per armature in W/K.
On the Solar Network or Heating Network page, you define the piping of the local district heating
network.
If you deactivate the Return Identical to Flow checkbox, you can then define the return of the local
district heating network yourself. Otherwise, the program assumes that the return is identical to
the flow.
Click on the Add Pipe Section button to add a new pipe section to the local district heating
network. Then define its pipe length, wall thickness, the insulation thickness and the thermal
conductivity (Lambda) of the insulation as well as installation in ground, in building, or outside.
Click on the Delete Pipe Section button to remove the selected pipe section from the list.
6
4
Heat distribution
Variant menu System Definition > Heat Distribution
Image: Input dialog for heat
distribution in solar / heating
network
The consumption of the local district heating network is managed in this window. This is where
you define the type and number of heat transfer stations. This heat transfer station consists of up
to ten DHW stations and a central heating supply system.
You can add a maximum of six heat transfer stations.
There are three different types of heat transfer stations:
•
Tank loading system
•
DHW station
•
Tank loading system with return cooling
Click on the Add button to add further heat transfer stations.
Click on the Delete button to remove the selected station from the list of DHW stations.
4.1
Heat distribution network
Variant menu System Definition > Heat Distribution > Heat Distribution Network
Click the Define Heating Network button to specify the heating network in detail.
This is where you also define the maximum volume flow rate occuring in the distribution network.
If you click on the Calculate Volumetric Flow Rate button, the maximum volume flow rate is defined
from the individual heat transfer stations instead and entered in the input field.
7
4.2
Heat Transfer Station with Tank Loading System
4.3
Space heating requirement and loops
In the Space Heating Requirement and Loops section, you can access the input dialogs for
defining the central heating supply system via the symbol buttons.
The space heating requirements can be defined by clicking on the button with the
symbol.
The heating loops are specified via the button with the radiator symbol,
and the heat exchanger symbol is used to define the heat exchanger which couples the space
heating loops to the local district heating network.
In the DHW Transfer window, you can access the input dialogs for the DHW Standby Tank, the
Heat Exchanger which couples the tank to the local district heating network, and last but not
least the input window for defining the DHW Requirement..
8
1.1.4.4
Heat transfer station with DHW stations
Variant menu System Definition > Heat Distribution > Heat Transfer Station X > Edit
Image: Input dialog for the external
heat exchanger
A heat transfer station consists of up to ten DHW stations and a central heating supply system.
Click on the Add button to add a new DHW station.
The DHW stations are automatically numbered consecutively.
You can change the name of the DHW station.
Click on the Edit button to access the input dialog for defining the DHW station.
1.1.4.5
Space heating requirement and loops
In the Space Heating Requirement and Loops section, you can define the central heating supply
system.
Click on the house symbol
Click on the radiator symbol
to set the heating requirement.
to set the space heating loops.
to define the heat exchanger which couples the
Click on the heat exchanger symbol
space heating loops to the local district heating network.
9
1.1.4.6
Heat transfer station: Tank loading system (with return cooling)
Variant menu System Definition > Heat Distribution > Tank Loading System > DHW Transfer
Click on the DHW Transfer tab to access three further input dialogs:
•
DHW Requirement,
•
Heat Exchanger, which couples the tank to the local district heating network, and
•
DHW Standby Tank.
Select the With Thermal Disinfection checkbox to activate the Thermal Disinfection tab.
There, you can define the temperature, time, and period of thermal disinfection.
1.1.4.7
Space heating requirement and loops
In the Space Heating Requirement and Loops section, you can access the input dialogs for
defining the central heating supply system via the symbol buttons.
Click on the house symbol
Click on the radiator symbol
to set the heating requirement.
to set the space heating loops.
to define the heat exchanger which couples the
Click on the heat exchanger symbol
space heating loops to the local district heating network.
10
4 Calculation Examples
T*SOL Manual
4 Calculation Examples
Read the following two project examples and at the same time carry out the individual steps in
the T*SOL® programme.
You will find further project examples in the project folder, which is reached via the menu
File | Open Project or by clicking on the button.
4.1 Use of the Design Assistant
The Design Assistant is there to help you establish the dimensions of a solar system. It should
therefore be used if you are not sure of the size of the collector array and/or the size of the
storage tank to be installed. The Design Assistant is an independent part of T*SOL®
Professional and the results it produces can be accepted into the main part of T*SOL® - the
system screen.
Project Example:
A renovated block of 6 flats in Augsburg, Germany requires a solar system for hot water
supply and the support of space heating. The building has a pitched roof with a 35
degree inclination facing south east and an area of 40 m².
Is this area large enough to provide the target 20% solar fraction of the total energy
consumption?
This question is most easily answered by using the Design Assistant.
You are able to use the Design Assistant at any time when working on an existing project
– either use the Calculations | Assistant menu, or (the faster option) click on the button
in the upper button bar. You can then select to replace the dimensions of the currently active
project variant with one of the sets of values calculated by the Design Assistant. If you want to
design a new variant, use the File | New variant menu and click on the command Open T*SOL
Design Assistant.
For our calculation example, however, we want to design a new project, as the questions
regarding collector area and size of storage tank need to be answered right at the beginning of
a project.
4.1.1 Set up a New Project
When you start T*SOL®, the first dialogue window will prompt you to select the project you want
to start with.
14
Dr. Valentin EnergieSoftware GmbH
T*SOL Manual
4 Calculation Examples
Figure 4.1.1:
Project selection dialogue.
Click on the New Project button in the dialogue. If, however, you have already started T*SOL®,
you can reach the same stage via the File | New Project menu or by clicking on the button in
the upper button bar:
Figure 4.1.2:
General Project Data entry
dialogue.
The project name that you enter in the first field is saved as the file name for the project, so you
won’t have any trouble finding it later on. On this Project Data dialogue worksheet, you are
already able to define a weather data record by clicking on Select. The selected weather data
record will then be automatically loaded within this project for each new variant selected.
After confirming the project data with OK, a standard system is loaded and the system screen
for Variant 1 appears with a diagram of the system.
From here you can start the Design Assistant by clicking on the button in the upper button
bar. The system schematic diagram is now of secondary importance.
Dr. Valentin EnergieSoftware GmbH
15
4 Calculation Examples
T*SOL Manual
Figure 4.1.3:
Design Assistant first sheet.
On the first sheet of the Design Assistant, you start by giving the planned solar system a name.
The word Variant is used, as it is possible to calculate a number of different system variants
within a project.
The weather data record for Augsburg has already been entered, as this was selected in the
General Project Data dialogue. However, this can be changed by clicking on the button
Weather. Independent of the weather data record, the location of the building can also be
entered, e.g. the street address where the solar system will be installed.
In order to reach a result, we now have to go through the individual worksheets of the Design
Assistant, entering the information required. Use the buttons Continue, Back and Cancel at the
bottom of the dialogue to do this. You can also click on the icons on the left of the dialogue to
access the individual sheets direct.
4.1.2 System Selection
The next two sheets contain details on system selection. This depends on the planned use of
the system. You will have to select whether the system is to be used to supply hot water and/or
space heating. For the Project Example above, therefore, you should click on the circle to
select Space Heating. Depending on the selections made on this worksheet, the following
sheet offers a selection of system configurations and types. The selection of the various
systems is divided into small-scale, combination tank and buffer tank systems. Click on the tabs
to view the systems available under each category.
To define the amount of collector area required, the Design Assistant makes use of a shortened
simulation procedure on an hourly basis. This procedure is restricted to the use of simple
system configurations. Design Assistant does not therefore contain all of the system
configurations that you can access from the system screen via the System | Select menu.
Back to our Project Example: the requirement is for a solar system to provide hot water and
support of space heating for a block of flats. We decide on the DHW System (2 tanks) with
Space Heating Buffer Tank (Small-Scale Systems – A4, three tank system) and click on the
corresponding diagram. This highlights the system and we click on Continue.
16
Dr. Valentin EnergieSoftware GmbH
T*SOL Manual
4 Calculation Examples
4.1.3 Define Consumption
Two worksheets need to be completed here: hot water and heating consumption.
You have a choice of two ways of entering the hot water consumption. If you know what the
average daily consumption will be, you can click on the circle and then enter the amount direct.
If you do not know, then you can enter the estimated or actual number of people that will be
using the system. A figure for the absolute consumption will then be calculated based on the
number of people via a pre-set specific consumption figure. The specific consumption per
person can be entered and changed from the system screen via the menu Options | Default
Data | Design Assistant.
Figure 4.1.4:
Definition of hot water
requirement in the Design
Assistant.
Our building contains 6 flats. If the calculation is based on 2.5 occupants per flat, this gives a
total figure of 15 occupants for the block (enter 15 in answer to the question No. of people to be
supplied?). As hot water secondary circulation is usual in many blocks of flats we should click
on the corresponding circle, so that circulation losses depending on total consumption will be
included in the calculation. The desired hot water temperature and the cold water temperature
should be entered here and can also be pre-set under Options.
Click on the tab labelled Space Heating to get to the worksheet for the space heating
requirements.
Our building has a floor space of 480 m², which we enter as the area to be heated in the first
entry field. We also have the possibility here to enter the heating energy requirement (e.g.
according to DIN 4701) or, as this value is often not known, to let the programme calculate it via
internal codes, after entering the building heating standard (this calculated value can then be
seen from the system screen). In our case we need to remove the tick (by clicking on it) for Is
the space heating energy requirement known? and then make the selections illustrated below.
Dr. Valentin EnergieSoftware GmbH
17
4 Calculation Examples
T*SOL Manual
Figure 4.1.5:
Definition of the space
heating requirement in
the Design Assistant.
To provide a figure for the annual space heating requirement, which T*SOL® calculates for
every hour of the year, you will need to enter the standard external temperature.
4.1.4 Define Collector Array
To start with, the Design Assistant uses the standard flat-plate collector from the T*SOL®
database. This corresponds to a simple collector with an area of 1 m². You can, however, select
any collector of your choice from the database by clicking on the collector button or, from the
system screen, select your preferred standard collector under Options | Default Data.
18
Dr. Valentin EnergieSoftware GmbH
T*SOL Manual
4 Calculation Examples
Figure 4.1.6:
Definition of the collector array
in the Design Assistant.
The tilt angle and orientation of the collector array need to be entered next. The values for the
piping are based exclusively on the collector loop. The single length of piping should be
entered. The heating losses and hydraulic resistance of the piping are calculated from these
values.
After clicking on the Continue button, the Design Target needs to be entered. In our Project
Example a solar fraction of 20% of the total energy consumption (hot water and space heating)
is required. We have selected natural gas as our fuel for auxiliary heating.
By clicking on Continue, we are provided with a selection of storage tanks that the Design
Assistant recommends for our system. Each of the recommended tanks can be changed by
opening the database and making a new selection. For each of the three buffer tanks
recommended, we can carry out a variation calculation by clicking on Variation.
Figure 4.1.7:
Graph of simulation results in the Design
Assistant.
This takes you to a graph of the simulation results, showing the number of collectors required
for the three different buffer tank sizes. The collector number with which the target of a 20%
solar fraction is reached is shown by a white symbol.
Dr. Valentin EnergieSoftware GmbH
19
4 Calculation Examples
T*SOL Manual
It can clearly be seen that with a 1000 litre tank the target of a 20% total solar fraction will not be
reached. On the other hand, the difference between a 2000 litre and a 5000 litre tank is minimal.
The result is clearer still after clicking on Continue and the results are then shown in three bar
charts.
Figure 4.1.8:
Graphical display of simulation
results in the Design Assistant.
Included in these charts, in addition to the solar fraction, is a further important evaluation figure,
the system efficiency. With an increase in the tank volume, the system efficiency increases and
the collector area reduces, with the solar fraction remaining constant.
Since in our Project Example a maximum roof area of 40 m² is available, the collector area even
with a large tank volume is too large to fit onto the roof. What can be done?
Let us try again with better quality collectors – evacuated tube collectors.
We therefore click on the collector icon on the left hand side of the Design Assistant screen and
this takes us back to the collector selection sheet (Set Collector Array). There we click on
Collector and select the Standard Evacuated Tube collector from the T*SOL database, and
otherwise change nothing, and then click on the icon with the steps on the bottom left of the
screen. The results are now completely different.
20
Dr. Valentin EnergieSoftware GmbH
T*SOL Manual
4 Calculation Examples
Figure 4.1.9:
Graphical display of simulation results
in the Design Assistant after selecting
a different type of collector.
With a much improved figure of 29% system efficiency, less than 30 collectors are required. We
decide on the variant with the 2000 litre tank and click on Accept into Project to return to the
system schematic screen. The data that has been entered in the Design Assistant has been
transferred into the system on the system screen.
Figure 4.1.10:
Diagram of the system
configuration designed with the
help of the Design Assistant.
Back in the system screen it is now possible to carry out an immediate simulation (click
on the Start Simulation button), or to enter new or change existing parameters.
4.2 Configure a Solar System via the Main Menus
Project Example:
A solar system for the supply of hot water is required for a newly built bungalow in Aachen. The
bungalow is to be home to a family of five.
•
What size should the collector area be?
•
At which tilt angle should the collectors be installed on the flat roof?
Dr. Valentin EnergieSoftware GmbH
21
4 Calculation Examples
T*SOL Manual
•
How often does the temperature drop below 35 degrees centigrade in the storage tank?
•
How much heating oil can we expect to save?
•
Which other measures should be taken into account when building the house?
The following additional details are provided with the house plans:
•
The bungalow’s longitudinal axis is oriented from the south east to the north west.
•
240 m² floor space.
This type of solar system is frequently used for one and two family houses. As a rule, preconfigured systems are used here, as offered by many collector manufacturers. The
configuration of number of collectors, storage tank and other components should then be
entered into T*SOL®. For frequently used systems, you can save these as a standard project
and then copy into a new project as required and simply change the pre-set data, such as
location, collector tilt angle and orientation.
In this case, the calculations using T*SOL® mainly serve to determine the expected primary
energy savings, as well as the system’s solar fraction. An important result is also the proof that
the system is not oversized. When a system is oversized this is shown by the maximum tank
temperature frequently being reached, thus leading to high collector temperatures.
4.2.1 Design a New Variant
We have already set up a project via the File | New Project menu (in this case it is the project
named “Examples”). For the above Project Example you will need to set up a new variant of
“Examples” via the File | New Variant menu. A dialogue appears into which you can enter a
Variant Reference and in which you can select the method for design. We name our variant
TYPE A1 and select …New System Hydraulics.
Figure 4.2.1:
Dialogue for setting up a new variant.
After confirming with OK, the Load System screen opens. The amount and types of systems
available for selection and simulation depends upon which of the T*SOL modules you have
installed on your computer (Standard, Swimming Pool, SysCat). You can change between icons
of the systems and a listing, in order to get an overview. We select the system labelled A1 and
load it into our variant with a double click, or a single click and a click on OK, and we are then
back in the system screen.
We now need to enter the specific parameters for the location, consumption and system
components into the system we have selected. There are a number of ways of doing this:
•
22
individual components can be accessed via the menu commands of the Parameters menu;
Dr. Valentin EnergieSoftware GmbH
T*SOL Manual
•
4 Calculation Examples
click on one of the components in the system schematic, to select the system component,
and then double click with the left mouse key to get to the component dialogue (or click just
above or below the system to select the whole system, and then double click to get to the
system dialogue) or click to select the component/system and then click with the right
mouse key and select Characteristics from the mini-menu;
•
or click on the main dialogue button to access the main dialogue direct.
4.2.2 Define Parameters
For the complete definition of a system, as required in our example, it is best to go direct to the
Main System Dialogue, as this will automatically take you through all the necessary dialogues.
In the main dialogue you can use the red arrow buttons in the bottom right hand corner to move
between the various component dialogues.
Figure 4.2.2:
Main Dialogue
In the Reference entry field of the first worksheet in the main dialogue, you can enter a new
variant name, or amend an existing name. This reference, in this case Type A1, is the name
that is shown in T*SOL’s® blue title bar and is the reference under which you will be able to find
the variant again, eg in the Load Variant dialogue. The weather data is also loaded here, the
hot water requirement is entered and the ambient temperature for the central boiler plant is
defined. This temperature is the reference temperature for the calculation of storage tank
losses and secondary circulation losses.
After loading the weather file for Aachen from the weather database for Germany (additional
weather data for other countries can be installed from the CD), we click on the red arrow to go
to the next dialogue: Hot Water Consumption.
On the Parameters worksheet you enter the average daily consumption for the operating period
given on the Operating Times worksheet - usually the average daily consumption over a year.
At the same time, the total consumption for the operating period and the resulting energy
consumption are shown. The total consumption figure is dependent on the values entered under
Temperatures on the Parameters worksheet.
For our example of a bungalow in Aachen, we know that hot water is required for a family of 5.
If we assume a high standard, say 35 litres per person per day, we get to a total of 175 litres per
Dr. Valentin EnergieSoftware GmbH
23
4 Calculation Examples
T*SOL Manual
day at a temperature of 50 degrees centigrade. This daily consumption will not be spread out
equally over the day, but will be required at certain periods in differing volumes. This pattern of
use is illustrated in the Load Profiles. A number of different Load Profiles are available for
selection from the database and these can be loaded via the Select button.
Click on the Parameters button to check and make changes to the load profile.
Figure 4.2.3:
Hot Water Consumption dialogue
Our bungalow will have a hot water secondary circulation system. You can take account of this
by selecting Secondary Circulation Available at the top of the Parameters worksheet (Hot
Water Consumption dialogue). Once selected, a new worksheet will appear, labelled
Circulation.
Figure 4.2.4:
Secondary Circulation worksheet from
the Hot Water Consumption dialogue
On this worksheet, the circulation heat losses are calculated, based on the single length of
piping and the specific losses. By changing the temperature difference you can adjust the
volumetric flow rate resulting from the circulation pump. Click on the individual hours of the
switching timer to adjust the daily running times for the pump. Deselect All Days the Same to
individually adjust the daily running times for each day of the week.
24
Dr. Valentin EnergieSoftware GmbH
T*SOL Manual
4 Calculation Examples
On the final worksheet of this dialogue, Operating Times, you can enter (independently from
the Load Profile settings) breaks in the hot water supply, e.g. during holiday periods. During the
operating times that are deselected here, the consumption and circulation will be set at zero.
This completes the entries for hot water consumption and we click on the red arrow again to
take us forward to the Collector Loop Connection dialogue. From here you can change the
Volumetric Flow Rate in the collector loop, as well as the mix of the heat conducting medium, eg
in order to simulate a low flow system. In this case, the volumetric flow rate in the collector loop
would be between 10 and 20 l/m²/h. From the Control worksheet you can define the
parameters for the collector loop pump control, which is set according to specified temperature
differences.
By clicking again on the red arrow, or on the Parameters button, you come to the Collector
Array dialogue. In the Collector section of the Parameters worksheet, click on the Select
button to go to the collector database, from which you can make a selection from the list of
manufacturers and collector types. In the header bar, there are drop-down lists of
manufacturers and collector types, which assist you in finding the product of your choice quickly
and easily.
Figure 4.2.5:
Collector selection dialogue
Click on the preferred collector, or select and click on OK, to incorporate the collector into your
project design. Entering the number of collectors automatically gives the collector area. We
decide to start with 7 collectors with a total active solar surface of 7 m². This is the active area
that is available to convert the sun’s radiation and which forms the basis of test institute
calculations to determine the collector coefficient.
On the Inclination worksheet you will find the parameters for the orientation and tilt angle of the
collector array. The Azimuth Angle is the horizontal deviation between the collector surface
vertical and the geographical south in the northern hemisphere (or the north in the southern
hemisphere). It is 0° when the surface is facing toward the sun’s highest point (zenith). In our
case the building is in the northern hemisphere and the building’s longitudinal axis runs from
south east towards the north west. If the collectors are also installed parallel to this axis, the
collector vertical (perpendicular to the active surface) points towards the south west. The
azimuth is, therefore, in our case the angle between the south and south west, that is +45
degrees.
Dr. Valentin EnergieSoftware GmbH
25
4 Calculation Examples
T*SOL Manual
As our example deals purely with hot water supply, we can install the collectors at a tilt angle to
gain the maximum possible irradiation. The absolute values for irradiation are given at the
bottom of the dialogue. For a south west orientation, a tilt angle of 30 to 35 degrees results in
maximum irradiation values. For the time being, it is however more effective to select the
steeper angle. Thus you can answer the architects question regarding the tilt angle – 35
degrees from the horizontal. At a later stage, we will be able to optimise this angle by carrying
out a number of simulations with different angles and then comparing the results.
In the case that you already have information regarding the length of piping from the water
heating system to the roof, the single length should be entered on the Piping worksheet. If this
value is not known, the pre-set values can be adopted.
Click on the red arrow to go to the next dialogue, the Bivalent Domestic Hot Water Tank. As
our calculation will be based on hot water consumption of 175 litres, we select a storage tank of
double size, i.e. 350 litres, which you can load from the database by clicking on the Select
button. If you want to use a storage tank that is not included in the database, you are able to
change the tank volume after loading. The tank will then be saved in the project with the data as
amended.
We do not need to make any further entries for the storage tank, and the Control settings also
remain unchanged. The pre-set value for the Desired Temperature of Tank of 0 K (Kelvin) on
the Control worksheet, means that the upper-tank temperature corresponds to the desired
temperature of hot water, which, in this case, we set at 50 °C.
A further click on the red arrow brings us to the Boiler dialogue. The architect’s plans show a
floor space of 240 m². As we need to define a heating boiler, but a calculation of the heating
requirement is not available, we can estimate the required power at 240 m² * 50 W/m² = 12 kW
and load a correspondingly sized heating oil boiler from the database (via the Select button).
We leave the pre-set value for the boiler’s Nominal Output unchanged.
Figure 4.2.6:
Dialogue for the definition of the boiler.
As we want the solar system to provide hot water in summer without the use of a boiler, we click
on the months of June, July and August under Operating Times, (they change from green to
white), so that boiler operation is halted during these months.
We have now reached the end of the dialogue chain and can exit the main dialogue by clicking
on OK.
26
Dr. Valentin EnergieSoftware GmbH
T*SOL Manual
4 Calculation Examples
4.2.3 Simulation
After entering the parameters for your solar system, you are now in a position to calculate the
system operating conditions over a period of a year by running a simulation. The simulation can
be started in two ways: either click on the Start Simulation button in the button bar (calculator
symbol) or via the main menu Calculations | Simulation (which will open the Simulation
Period dialogue prior to simulation).
On the Simulation Period dialogue, the Simulation Period is pre-set at 1 whole year, and the
results Recording Interval at 1 day. Both settings will suffice for our first simulation. The Prerun of 3 days means that the simulation runs for 3 days before the first data is recorded (on 1
January).
Simulation, with the pre-set values, can be started direct by clicking on the Start
Simulation button in the button bar.
From the Simulation Period dialogue, the simulation is started by clicking on OK. Once the
simulation has started you are able to click on the View button and observe the system’s
temperature fluctuations. Click on the button again to return to fast mode and once the
simulation has been successfully completed, the following dialogue will appear:
Figure 4.2.7:
Selection dialogue at end of simulation.
4.2.4 Evaluation
An initial evaluation of the system is always possible via the Project Report. If you create this
report, the first page will show a summary of the most important dimensions, the solar fraction
and the system efficiency. On this page we are also given the answer to the question of heating
oil savings: the solar system makes annual savings of approx. 400 litres of heating oil.
On the second page, the values for the basic parameters are given and on the third page there
are two graphics to assist in evaluation of the system.
The first graphic shows the course of the solar contribution over a period of 1 year in weekly
intervals. The second graphic shows the maximum temperatures that the collectors reach on
every day of the year. If you experience difficulties in printing these graphics with your printer,
you can produce the report in PDF format using Acrobat Reader® via the Options | Default
Data | Project Report menu. Once a report has been created it can be accessed via the
Results | Project Report menu.
Dr. Valentin EnergieSoftware GmbH
27
4 Calculation Examples
T*SOL Manual
In order to answer the question regarding daily storage tank temperature, click on the
Create Graph button or go to the Results | Graphics menu.
Figure 4.2.8:
Selection dialogue to produce a
results graph
First of all, you are able to make a selection from the results that are available for each
component listed in the project tree in the left-hand section. With the Bivalent DHW Tank,
information on the upper-tank temperature is given if Sensor: Auxiliary Heating On is selected.
On clicking OK, a graph is produced plotting the mean monthly temperatures. Daily
temperature values can be set by double-clicking on the x-axis or, via the Axes | X-Axis menu.
Figure 4.2.9:
Sizing the x-axis for a daily temperatures graph
You can select the Display Interval and the value for the Column Width here. With a setting of
Month, Days and Display from: 1.6, as illustrated above, the daily tank temperature is shown
from 1st June. You can change the display interval with the red arrow button and jump to the
next month.
28
Dr. Valentin EnergieSoftware GmbH
T*SOL Manual
4 Calculation Examples
Figure 4.2.10:
Daily temperature
graph
The graph therefore gives the answer to the question of the number of days that the tank
reaches a temperature of 35 degrees. The evaluation is even simpler if you convert the graph
into a table via the Table menu.
A more precise measure of the temperature course can be gained if the temperature breakdown is shown in hourly intervals. However, in order to do this it is necessary to record the
values in hourly intervals during simulation. Go back to the Calculations | Simulation menu
and set the Recording Interval at 1 hour. Carry out a new simulation and then you will be able to
study temperature changes by the hour! To do this, select a Display Interval of 1 day for the xaxis.
Continue with this example and consider how the number of days can be reduced in which the
temperature falls below 35°C. Change individual parameters, such as storage tank size, tilt
angle and collector area! Run another simulation and evaluate the results.
Finally, the architect is asking you about additional building requirements. Recommend that hot
water connections for a washing machine and dishwasher be built into the system. With these
machines the hot water consumption is increased by 20-40 litres daily, which can be supplied
by the solar system, and therefore save valuable energy.
Dr. Valentin EnergieSoftware GmbH
29
5 MeteoSyn
T*SOL Manual
5 MeteoSyn
(Not available with all programme versions.)
With the MeteoSyn (meteorological synthesis) climate generator you can produce the hourly
data required to simulate a solar system in T*SOL from monthly mean values for radiation and
temperature.
You can open the four dialogue windows in succession using the Continue and Back buttons,
or you can click on the corresponding icon in the navigation bar.
Start
Location Data
Monthly Values
Hourly Values
30
Dr. Valentin EnergieSoftware GmbH
T*SOL Manual
5 MeteoSyn
5.1 Welcome
(MeteoSyn is not available with all programme versions.)
A detailed description of MeteoSyn and how it is used with T*SOL is given in the dialogue
window, which also contains a link to a website where you can obtain additional weather data.
Dr. Valentin EnergieSoftware GmbH
31
5 MeteoSyn
T*SOL Manual
5.2 Location Data
(MeteoSyn is not available with all programme versions.)
This is where you select the location you want to generate weather data for. You can:
•
load a location from the database delivered with the programme
•
or you can create a new location.
You are only able to save a location in hourly format for use in the MeteoSyn database if you
select Define New Location. If you select Location from Database, you will need to select the
country and location from the lists provided. The weather data record generated for T*SOL is
then created in either case in the Hourly Values dialogue. The database delivered with the
programme contains monthly values for approximately 2,000 locations worldwide.
Location names that appear in green are user-defined locations, which can be amended and
deleted.
You should always enter the county/state and postal/zip code, as these will be helpful when you
want to use the sort facility in T*SOL’s load weather data file dialogue.
32
Dr. Valentin EnergieSoftware GmbH
T*SOL Manual
5 MeteoSyn
You will also need to enter the Lowest Outside Temperature. This value is required to
calculate the annual heating energy requirement. In Germany the DIN 4701 standard ambient
temperature should be entered. Otherwise the lowest daily average temperature, e.g. as used in
sizing the heating system.
The Temperature Range is the Difference between the highest monthly average value for the
highest hourly daily temperature and the lowest monthly average value for the lowest hourly
daily temperature. The monthly mean values for the highest hourly daily temperature - or the
monthly mean values for the lowest hourly daily temperature - is calculated from the hourly
temperature values, where the lowest or highest hourly temperature is determined for each day
and the average for each month is then calculated.
Temperature Range
=
Monthly max( Σj (Daily max (Ti,j,k)) / (Days per month) )
Monthly min( Σj (Daily min (Ti,j,k))/ (Days per month) )
with i as the hourly, j as the daily and k as the monthly running index.
A Time Zone is an area in the world where the same time is valid. Ideally, they run along the
degrees of longitude from the North/South Poles. For political reasons, however, the time zones
for many countries deviate from the ideal time zone. The actual time zone for the location needs
to be entered.
In MeteoSyn, time zones are counted from 0 westwards up to 23.
Greenwich Mean Time (GMT) = time zone 0
Central European Time (CET) = time zone 23
Click on i (next to the Time Zone field) for a map showing the world’s time zones.
Dr. Valentin EnergieSoftware GmbH
33
5 MeteoSyn
T*SOL Manual
5.3 Monthly Values
(MeteoSyn is not available with all programme versions.)
The monthly values are shown here, if the locations come from a database.
If you want to define a New Weather Data Record you should enter the values here and then
save the location.
Only user-defined locations can be deleted or overwritten.
If you have selected Define New Location in the previous dialogue window, you can enter the
Data Source in the input field provided. This entry then appears in the project report.
If known, you can enter the Measured Period (Years), which should be input in whole years.
This period is also shown in T*SOL’s load weather data file dialogue and appears in the project
report.
Monthly mean values should be entered in W/m² under Global Radiation.
Continue to the Hourly Values dialogue to create a T*SOL weather data record.
34
Dr. Valentin EnergieSoftware GmbH
T*SOL Manual
5 MeteoSyn
5.4 Hourly Values
(MeteoSyn is not available with all programme versions.)
In this dialogue you will need to save the weather location that you have created. When you
confirm by clicking on Save, hourly weather data is generated in file format with the ending
.wbv, and this is saved into T*SOL’s standard weather directory.
If you then go back into T*SOL, you can load the newly created weather file directly from
T*SOL’s load weather data file dialogue.
This file, containing the hourly values required to carry out a simulation with T*SOL or PV*SOL,
remains permanently in the Meteo directory. The file appears in the Select Weather File
dialogue, automatically under the country name that is selected in the MeteoSyn Location Data
(5.2) dialogue.
Dr. Valentin EnergieSoftware GmbH
35