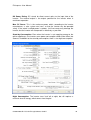
1
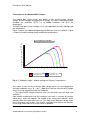
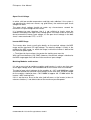
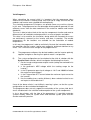
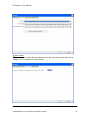
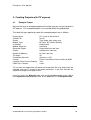
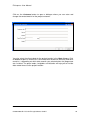
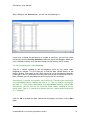
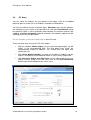
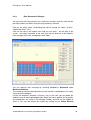
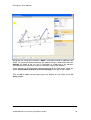
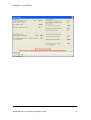
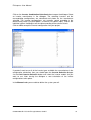
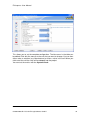
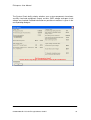
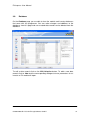
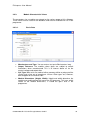
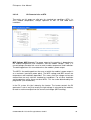
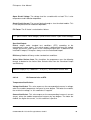
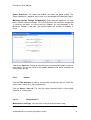
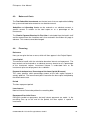
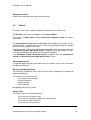
PV*express
Simulation programme for the quick design
and calculation of photovoltaic systems
User Manual
The information contained in this manual is without warranty. The programme developers assume
no responsibility for its contents. The software described in this manual is distributed in
accordance with the terms of the licence agreement which are accepted on installation of the
programme. Liability claims are excluded. The reproduction of any part of this manual is
prohibited.
COPYRIGHT © 2004-2006: Dr.-Ing. Gerhard Valentin
Dr. Valentin EnergieSoftware GmbH
Stralauer Platz 34
10243 Berlin
Germany
Tel:
Fax:
E-Mail:
Internet:
+49 (0)30 588 439 – 0
+49 (0)30 588 439 – 11
[email protected]
www.valentin.de
PV*express User Manual
Contents
1.
Introduction .......................................................................................... 4
1.1. Programme Information ................................................................ 4
1.2. System Basics .............................................................................. 5
1.3. Computer System Requirements .................................................. 9
1.4. Programme Installation ............................................................... 10
1.5. Programme Activation ................................................................. 10
1.5.3. Enter the Serial Number ...................................................... 11
1.5.4. Request a Key Code ............................................................ 12
1.5.4.1.
Request a Key Code Online ......................................... 13
1.5.4.2.
Request a Key Code by E-Mail ..................................... 13
1.5.4.3.
Request a Key Code by Fax ......................................... 13
1.5.4.4.
Request a Key Code by Telephone .............................. 13
1.5.5. Enter the Key Code.............................................................. 13
2. General Programme Structure ........................................................... 15
2.1. Welcome Page ............................................................................ 15
2.2. Moving Around the Programme .................................................. 16
2.2.3. Navigation Area ................................................................... 16
2.2.4. Programme Control Area ..................................................... 16
3. Creating Projects with PV*express ..................................................... 20
3.1. Example Project .......................................................................... 20
3.2. Start ............................................................................................ 21
3.3. PV Array...................................................................................... 25
3.3.3. Module Selection Dialogue .................................................. 27
3.3.4. Roof Parameters Dialogue ................................................... 28
3.4. Inverter ........................................................................................ 32
3.5. Results ........................................................................................ 36
3.6. Database..................................................................................... 37
3.6.3. Module Characteristic Values .............................................. 38
3.6.3.1.
Basic Data .................................................................... 38
3.6.3.2.
UI Characteristics at STC ............................................. 39
3.6.3.3.
UI Characteristics at STC ............................................. 40
3.6.4. Inverter ................................................................................. 41
3.6.4.1.
Characteristics .............................................................. 41
3.6.4.2.
Efficiency Characteristic Curve ..................................... 44
4. Economic Efficiency Prognosis .......................................................... 45
4.1. Calculation Basis......................................................................... 45
4.2. Basic Parameters ........................................................................ 46
4.3. Balance of Costs ......................................................................... 47
4.4. Financing .................................................................................... 47
4.5. Results ........................................................................................ 48
© 2004-2006 Dr. Valentin EnergieSoftware GmbH
2
PV*express User Manual
5.
Attachments ....................................................................................... 50
5.1. Definitions ................................................................................... 50
5.2. Information on Planning Solar Electric Systems ......................... 53
5.3. Safety Instructions....................................................................... 53
© 2004-2006 Dr. Valentin EnergieSoftware GmbH
3
PV*express User Manual
1. Introduction
1.1.
Programme Information
PV*express is the quick and easy design programme for grid connected
photovoltaic systems. PV*express has been developed for use by sales staff and
skilled technicians who need a reliable tool to design grid connected systems
quickly and precisely. The programme is user-friendly, with just a few clearly laidout dialogues, allowing each project to be completed quickly, easily and reliably.
PV*express ensures reliability in the planning process by testing the interaction of
modules and inverters, plus the cabling cross-sections, and recognising sizing
errors. The selection of modules and inverters is supported by an extensive
database. The number of modules required, after selection of a module type from
the database list, is determined either by entering the power output or by
sketching the module layout in a diagram of the roof surface. With PV*express
you are able to determine the generator output through a diagram of the available
roof surface.
With PV*express you can also select from a number of pre-defined shade
scenarios, so that this will be accounted for in the calculation of output.
The programme has a large selection of climate data for locations in Europe and
worldwide.
By entering the tilt angle and orientation, a detailed calculation of the output is
carried out for the system components selected. The calculation is based on
PV*SOL Professional's calculation algorithms and the yield provides the basis for
the programme’s economic efficiency calculation.
PV*express produces a simple project report, with clear presentation of all system
data and results, as well as a system overview, that you can present to your
customers. The project report can be printed out and can also be saved in PDF
format and sent out by e-mail.
PV*express is thus a valuable tool for the planning and design of solar electric
systems.
© 2004-2006 Dr. Valentin EnergieSoftware GmbH
4
PV*express User Manual
1.2.
System Basics
Yield Optimisation with Simulation and Calculation
Output voltage and current are strongly dependent on both solar radiation and cell
temperature. The maximum power point (MPP) is therefore not to be found in a
fixed voltage, but in strongly fluctuating voltages. The yield of a PV system
depends on the extent that the inverter is able to adapt to these changing
conditions, find each MPP (tracking) and thus operate the solar generator at its
maximum power.
If a system has lower yields than expected (or calculated), this is often because
the range of fluctuation for the generator’s MPP voltage is not optimally matched
to the inverter’s tracking range. A further reduction in yield occurs if multiple
strings are connected to the inverter, which have different voltages, for example
due to tolerances, different module sizes or shade. The inverter is only able to
operate one of the strings at optimum power (with the exception of multi-string
inverters).
P-U-Kennlinien bei 25 °C
W
120
110
100
90
80
70
60
50
40
30
20
10
0
-10
2,0
4,0
6,0
8,0
10,0
14,0
18,0
22,0
V
P-U-Kennlinie 100 W/m²
P-U-Kennlinie 200 W/m²
P-U-Kennlinie 500 W/m²
P-U-Kennlinie 800 W/m²
P-U-Kennlinie 1.000 W/m²
Fig.1: PV Module Output – Module Voltage for Different Levels of Irradiation
© 2004-2006 Dr. Valentin EnergieSoftware GmbH
5
PV*express User Manual
Fluctuations in the Module MPP Voltages
The module data sheets usually give details on the nominal output, nominal
voltage (or MPP voltage) and open circuit voltage. This data is determined under
standard test conditions (STC), i.e. at 1000W irradiation and 25°C cell
temperature.
The MPP and open circuit voltages are in fact dependent on the irradiation and
cell temperature.
Figure 1 shows the module voltage output for different levels of irradiation. Figure
2 shows the module voltage output for different temperatures.
P-U-Kennlinien bei 1.000 W/m²
W
130
120
110
100
90
80
70
60
50
40
30
20
10
0
2,0
4,0
6,0
8,0
12,0
V
16,0
20,0
P-U-Kennlinie 0 °C
P-U-Kennlinie 25 °C
P-U-Kennlinie 50 °C
P-U-Kennlinie 75 °C
24,0
Fig. 2: PV Module Output – Module Voltage for Different Temperatures
This makes it clear that the maximum MPP voltage occurs at a low temperature
and high irradiation (e.g. z. B. –10°C / 1000 W/m²) and the minimum MPP voltage
occurs at a high temperature and low irradiation.
The highest MPP voltages therefore occur on cold winter days with high solar
radiation.
High module temperatures and low irradiation can occur in summer on partially
cloudy days, when the modules are heated up by strong solar radiation, which
reduces when the clouds cover the sun. This leads to an additional voltage range
with a fluctuation zone of 50%. The inverter should be fit for both of the extremes
in the range and of course for all the values in between.
© 2004-2006 Dr. Valentin EnergieSoftware GmbH
6
PV*express User Manual
Open Circuit Voltage
In winter, with low outside temperatures and high solar radiation, if the system is
not operating (for what ever reason, e.g. grid failure), the maximum open circuit
voltage can occur.
The open circuit voltage should not under any circumstances exceed the
maximum DC input voltage for the inverter.
It is important to note, therefore, that it is not sufficient to simply select the
modules according to the open circuit voltage given in the data sheet so that they
do not exceed the inverter input voltage, as the open circuit voltage in the data
sheet is measured under STC, i.e. 25°C.
Inverter MPP Range
The inverter data sheets usually give details on the nominal voltage, the MPP
range and the maximum DC input voltage. The nominal voltage is usually in the
middle of the MPP range, i.e. within the range, in which the inverter is able to find
the maximum power point.
The higher the input voltage, the greater the tracking area must be.
With some manufacturers (e.g. SMA), however, the nominal voltage is identical to
the MPP range upper limit and also to the maximum input voltage.
Matching Modules and Inverters
It is not an easy task to configure modules and inverters in such a way that none
of the upper voltage levels are exceeded and all of the lower levels are reached.
The total of open circuit voltages for the modules at –10°C und 1000W per string
should not exceed the maximum input voltage. At the same time, the MPP voltage
for the modules should be from –10°C/1000W to approx. 60 °C/100W within the
inverter’s MPP tracking limits.
If this is not the case, losses to the solar yield will occur, as the inverter (at least in
extreme situations) is not able to take on the maximum possible power.
© 2004-2006 Dr. Valentin EnergieSoftware GmbH
7
PV*express User Manual
Yield Prognosis
When calculating the annual yield it is important that the programme takes
account of the inverter’s tracking range limits and not to simply assume that the
modules and inverter were selected to match optimally.
The simulation programme PV*express can provide some very useful assistance
in this area. The programme has the advantage of being able to generate U/I and
efficiency curves from the data contained in the extensive module and inverter
databases.
The user is able to take at look at the way the components function and react to
different levels of irradiation and temperature in a series of graphs and tables.
This data is also used for the simulation, during which the characteristic curves
are continuously scanned (as the inverter also does in practice). The outside
temperatures for the locations are available for the calculation of module
temperatures.
In this way, the programme is able to realistically illustrate the interaction between
the generator and the inverter, and to even recognise and draw attention to any
errors. This is where the true strength of the programme lies.
A)
The programme configures the desired modules and the inverter optimally
together and gives a warning if an optimal match is not possible.
B)
The system configuration can be checked at the click of a button with the
System Check function, which investigates the following five criteria:
1. Do the inverter and generator outputs match (taking the overload limits
into account)?
2. Is the generator’s MPP voltage within the tracking range for the
inverter?
3. Is the PV generator open circuit voltage at –10°C and 1000W/m² below
the maximum input voltage?
4. Is the PV generator STC current below the maximum input current for
the inverter?
5. Has the cabling (cross-section thickness) been selected so that losses
are kept at a reasonable level?
If one of the above criteria is not fulfilled, a warning is given, so that the system
configuration can be re-checked and optimised.
The programme does not only support the calculation of the system yield, but is
also a valuable tool in the selection and conception of the system components.
In just a few minutes, with the help of the programme, it is possible to design
systems reliably, check for system errors and calculate system yields that can
also be reached in practice.
© 2004-2006 Dr. Valentin EnergieSoftware GmbH
8
PV*express User Manual
1.3.
Computer System Requirements
Hardware
•
•
•
•
•
•
Pentium II 266 MHz
128 MB RAM
24 MB free on your hard disk drive
Additional space on your hard disk drive for the meteorological data
- up to 94MB for full installation
CD-ROM drive
1024x768 screen resolution
Operating System (with the latest service pack)
•
•
Windows 2000
Windows XP
System Requirements
•
•
Internet Explorer 5.01 or higher
Data Access Components (MDAC) 2.8
© 2004-2006 Dr. Valentin EnergieSoftware GmbH
9
PV*express User Manual
1.4.
Programme Installation
To install the programme put the programme CD into your computer’s CD drive.
The installation programme will start automatically and you will be taken through
the installation procedure step by step (unless the CD drive autorun function has
been deactivated on your computer).
If the autorun function has been deactivated, you will need to start the “Setup.exe”
file which is on the CD. To do this you can start File Manager or Explorer and
double click on the “Setup.exe” file in the CD drive.
If you install T*SOL express onto a computer with WIN2000 or WinXP, you will
need to have administrator access to the operating system.
To run the programme, you will need to have full rights (read and write) to the
T*SOL
express
programme
directory
(e.g.
C:\Programme\Valentin
EnergieSoftware\TSOLexpress 1.0).
1.5.
Programme Activation
After installing and opening the programme, a small window appears asking
whether you wish to start the programme as a Demo Version or Register the Full
Programme. This dialogue appears every time the programme is started, until you
have activated the programme successfully.
The Demo Version gives you the opportunity to test and familiarise yourself with
the programme. However, you are not able to save any projects or print the
results. Once you have activated/registered the software, all programme functions
will be fully available to you.
You can also carry out the registration procedure from within the programme. To
do this, click on the Info button in the lower programme control bar and then on
the Registration tab. You can also use this option after you have already
registered T*SOL express and want to activate an update.
© 2004-2006 Dr. Valentin EnergieSoftware GmbH
10
PV*express User Manual
Programme Activation is carried out by following the instructions, requesting a
Key Code and then entering it in the programme. The Key Code is provided by
the programme manufacturer on request.
First you will need to make sure that:
• You have a Serial Number
• The programme has already been installed
• When you start the programme, you click on the License Full Version
button
Programme Activation is carried out in four steps:
• Enter Serial Number
• Programme ID is Allocated
• Request Key Code
• Enter Key Code
The corresponding dialogue introduces the registration procedure.
Click on Continue to start the registration procedure.
1.5.3.
Enter the Serial Number
If you purchased the programme from the manufacturer, you will already have a
Serial Number. You will find this on the CD cover, on the invoice or we will have
sent it to you by e-mail. The Serial Number has the following format:
12345-123T-123-1NN-1-VW2R-RY-Z62-AGNH1
It needs to be entered exactly as it appears, including all character and without
any spaces. After the Serial Number has been entered, the programme allocates
a Programme ID, which is based on the Serial Number and a code for your PC.
© 2004-2006 Dr. Valentin EnergieSoftware GmbH
11
PV*express User Manual
You Still Don’t Have a Serial Number?
This could be the case if, for example, you have installed the programme from the
Demo CD or you have downloaded it from the internet. You will need to purchase
a full version of the programme before you can receive a Serial Number.
Send us the Order Form which you can print within the programme under
Info/Registration, or you can purchase the programme direct from the
OnlineShop on our website.
You’ve Purchased the Programme and Can’t Find Your Serial Number?
No problem. Send us the invoice for the programme with your contact details and
we will send you the Serial Number again.
1.5.4.
Request a Key Code
After entering the Serial Number and automatic allocation of the Programme ID,
you will need to provide us with this information, so that we can send you your
Key Code. You will see the following window on your screen:
© 2004-2006 Dr. Valentin EnergieSoftware GmbH
12
PV*express User Manual
You can request the Key Code in a number of different ways, but the quickest
way to do this is online.
1.5.4.1.
Request a Key Code Online
This is the simplest and quickest method, requiring that your computer has
internet access.
Click on the Online button underneath Programme ID in the Registration
window. A form opens in which you enter the data required to obtain a Key Code.
The fields marked: * have to be completed to continue. The serial number and
programme ID are included automatically.
After completing the form, you can send it straight off to the programme
manufacturer via the internet. You will receive the Key Code in just a few minutes.
It will be sent to the e-mail address entered on the form.
1.5.4.2.
Request a Key Code by E-Mail
If, on the other hand, you click on the E-Mail button in the Registration window,
this will open your e-mail programme. The text in the e-mail is almost complete –
you just need to enter your customer details and send the e-mail.
You will then receive the Key Code by e-mail, normally within a day. The code will
be sent to the e-mail address entered on the form.
1.5.4.3.
Request a Key Code by Fax
If you click on the Fax button underneath Programme ID in the Registration
window, a form opens for you to complete and print off. Send the completed form
by fax to: +49 30 588 439 11.
You will then receive the Key Code by fax within one working day. You can also
enter an e-mail address to which the Key Code should be sent.
1.5.4.4.
Request a Key Code by Telephone
If you do not have a fax or e-mail/internet access, you can request a Key Code by
telephone. In this case, you will need to give the Serial Number and the
Programme ID over the phone.
1.5.5.
Enter the Key Code
Once you receive the Key Code, you will need to enter it by hand or copy and
paste it into the field under “Enter Key Code” in the Registration window and then
click on the “OK” button. This completes the programme registration and
activation procedure. An information window appears with a message that
registration has been completed and the programme is now fully functional.
© 2004-2006 Dr. Valentin EnergieSoftware GmbH
13
PV*express User Manual
© 2004-2006 Dr. Valentin EnergieSoftware GmbH
14
PV*express User Manual
2. General Programme Structure
2.1.
Welcome Page
The Welcome page opens automatically when you start the programme.
This page contains a general description of the programme. Click on the User
Manual link to open the manual (pdf file).
You can click on the corresponding icon to find out more about the extensive solar
thermal simulation programme PV*SOL Professional. The link will take you to
the detailed information on the Valentin Energy Software website.
© 2004-2006 Dr. Valentin EnergieSoftware GmbH
15
PV*express User Manual
2.2.
Moving Around the Programme
The programme window is divided into different areas, to help you move around
the programme quickly and easily.
2.2.3.
Navigation Area
The left-hand side of the programme window contains the active icons, so that
you can move directly to a particular page. This part of the programme window is
the Navigation Area. Click on the icons to go to the page selected from any part
of the programme, whether before or after the page you are currently on.
2.2.4.
Programme Control Area
There are a number of other buttons at the bottom of the programme window in
the Programme Control Area to help you use the programme. Click on
Continue and Back to move to the next or previous page. This allows you to
work systematically through each page of the programme, without missing any
entries.
Click on Settings to open a window where you can enter and change the settings
for your company and project data. These details then appear automatically when
you print your project results. You only need to enter these details once and they
are adopted for all the projects that you work on, as long as the data is not
changed. The details appear in the project report header.
In addition to your company name and address, you can also include your
company logo. Click on the Load Logo button to select the logo you want to use,
as you are accustomed to in Windows. The logo must be in bitmap file format
(*.bmp).
To select the Programme Language, use the drop-down menu towards the
bottom of the dialogue to select one of the languages available.
© 2004-2006 Dr. Valentin EnergieSoftware GmbH
16
PV*express User Manual
Update Check
PV*SOL is able to check via the internet, when the programme is first started,
whether a new release or an updated database is available and, if required,
download and install. You can switch off this function if you do not have an
internet connection or if you want to regularly check manually for updates by
using the Check Now button. Here you are also able to set the directories where
a PV*express database (pvsol.mdb) is kept. Instead of via the internet, the
database will then be checked for new entries. A check for new releases does not
take place with this option.
Directory
On this tab sheet you set the directories where PV*express searches for projects,
climate data and database data.
© 2004-2006 Dr. Valentin EnergieSoftware GmbH
17
PV*express User Manual
System Check
This is where you set the design temperature for the calculation of the open circuit
voltage. This is used for the system check.
© 2004-2006 Dr. Valentin EnergieSoftware GmbH
18
PV*express User Manual
Click on the Info button at the bottom of the main PV*express screen to take a
look at the general information on your programme, such as the version number,
and details on your hardware and operating system. You can also register your
software from here. Select the tabs at the top of the Info window to get to the
corresponding sheet.
On the Further Information tab sheet you will find a Mail button, which you can
use to send a query to the Valentin hotline. When you click on this button, your email programme will open automatically. All the information that we require in
addition to your hotline query are already entered in the text area.
Your serial number and key code are included on the Registration tab sheet,
provided that the programme has been activated. You can also change or renew
the registration by clicking on the Change Registration button.
Click on the Help button to open the help text for the programme page that you
are currently on. You can use the navigation area in the help window to go direct
to other help texts, or you can use the Index or Search tabs to search for
particular texts.
Click on the Exit button to close the programme. A message window usually
appears asking whether you want to save the current project.
© 2004-2006 Dr. Valentin EnergieSoftware GmbH
19
PV*express User Manual
3. Creating Projects with PV*express
3.1.
Example Project
Here we will use an example project to illustrate how you set up a project in
PV*express. This example project is also saved within the programme.
The data that you require to create the example project are as follows:
Project Name:
Climate File:
Shade:
Module Type:
Installation:
Module Alignment:
Generator Output:
Output:
Number of Modules:
Tilt Angle:
Orientation (Azimuth):
Inverter:
Length of Direct Current Cabling:
Cable Cross Section:
PV system in Sonnenheim
Kassel
Tree shade, west, whole year
BP Solar, BP 3150S 150 Watt
Roof-parallel
Horizontal
Determined from roof area
9,9 kWp from roof area
66, from roof area
45°
South east (-45°)
Fronius International Sunrise Micro; 0,85kW
10 m
4 mm²
To start with, the programme will determine the possible PV array output from the
available roof area in respect of the above parameters. It will then calculate the
expected average annual yield in kWh.
If you are still on the Welcome page, click on the Continue button to the right of
the Programme Control Area, or click on the Start icon in the Navigation Area.
© 2004-2006 Dr. Valentin EnergieSoftware GmbH
20
PV*express User Manual
3.2.
Start
You can either create a new project or open an existing project on this page.
You should enter an easily recognisable name for the project that you wish to
create, so that you can easily find the project later on, when you want to work on
the project again or make any changes. The name that you enter will be
automatically saved as the file name. Projects are either saved to the default
directory called projects, or to another directory if you prefer.
All projects saved should have the file ending *.tva and are normally saved in the
following programme directory: C:\ Documents and Settings\ <USER> \ Own
Files\ Valentin EnergieSoftware\ PVexpress 2.0\ projects\.
Type in a name, e.g. PV System in Sonnenheim.
If you select Work on Existing Project, you can open a project that has been
previously created and saved. Click on Search to get to the directory where your
files are saved and look at the list of existing projects.
Select the project that has been saved under the file name: Example.
© 2004-2006 Dr. Valentin EnergieSoftware GmbH
21
PV*express User Manual
Click on the Customer button to open a dialogue where you can enter and
change the contact details for the project customer.
You also select the climate data for the project location in the Start dialogue. Click
on Select to open an extensive list of climate data records for Germany and other
countries – depending on which data records you selected when the programme
was installed. The postal codes, longitudes and latitudes will help you to find the
data record closest to the project location.
© 2004-2006 Dr. Valentin EnergieSoftware GmbH
22
PV*express User Manual
After clicking on the Select button, you will see the following list:
If you have installed climate data for a number of countries, you can first select
the country from the Country Selection field at the top of the dialogue. When you
have selected a country, only the data records for that country will be shown.
For our example project, select Germany.
Click on a column heading to sort the database either by city, postal code,
longitude or latitude. This will help you to find the data record closest to the
project location. Click again on the same column to sort in the opposite direction.
If you type in the first character of the text you want to find in the column that has
been selected, you will jump direct to the first entry with this character.
Sonnenheim is located, for example, close to Kassel. Therefore you should click
on the Location column heading and enter a “k”. The first location starting with
the letter “k” is then shown. Move down and select Kassel and then click on OK.
Alternatively, you can click on the Postal/Zip Code column heading to sort by
postal code. Type in “3” and the first location that has a postal code starting with
“3” is selected.
Click on OK to accept the data record into the project and return to the Start
page.
© 2004-2006 Dr. Valentin EnergieSoftware GmbH
23
PV*express User Manual
In the Shade drop-down menu you will find a number of predefined shade
scenarios. You should load the scenario which most closely matches your project
location. If there is no shade at the project location, then you should select Clear
Horizon. A percentage figure for the estimated reduction in irradiation for each
shade scenario is shown in the field below the Shade menu. This parameter is
reached for the location Kassel with an orientation to the south and a module
inclination of 30 degrees. Different locations, orientations and inclinations will
produce different reductions for the selected scenario. The actual situation, with a
pre-set shade scenario, the selected location, the orientation and the tilt angle, is
precisely taken account of during simulation.
For example, for the location Sonnenheim the following selection is made: Tree
Shade, West, Whole Year.
To go on to the next stage, click on Continue or use the next icon in the
Navigation Area on the left.
© 2004-2006 Dr. Valentin EnergieSoftware GmbH
24
PV*express User Manual
3.3.
PV Array
You can select the modules for your project on this page. Click on the Select
button to open an extensive list of modules available in the database.
You have the choice of three installation types. Mounted means that the modules
are mounted, e.g. on a frame on the ground or on a flat roof. Roof-Parallel should
be selected if there is some ventilation space between the modules and the roof
cladding. And Roof-Integrated should be selected if the modules replace the roof
cladding where they are positioned.
For this example system you should click on Roof-Parallel.
There are three ways to enter the PV array output:
• With the selection Define Output, you can enter the target output, e.g. 9.9
(kWp), in the corresponding field. The field below then shows the
corresponding number of modules. You should enter the figure only
without the unit.
• With Define Module Number, you enter the number of modules and the
output is immediately calculated and shown in the PV Array Output field.
• With Determine Output from Roof Area, you are able to define the array
output using an image of the roof area. Click on the Roof Parameters
button to get to the dialogue of the same name.
© 2004-2006 Dr. Valentin EnergieSoftware GmbH
25
PV*express User Manual
In the lower area you enter the target tilt angle and orientation for the modules. 0°
corresponds to hoziontal installation, 90° to vertical installation. The azimuth angle
is given as the deviation from due south: 0° corresponds to due south, -90°
corresponds to the east, 90° corresponds to the west – in respect of the northern
hemisphere.
For a system on a pitched roof facing 45° to the south east, 45° is entered for the
tilt angle and -45° for the orientation.
The images help to make your entries clearer, as they show the corresponding tilt
angle and orientation.
Click on the Select button in the top part of the window to open the Module
Selection dialogue.
Select Determine Output from Roof Area and then click on the Roof
Parameters button to open the Roof Parameters dialogue.
© 2004-2006 Dr. Valentin EnergieSoftware GmbH
26
PV*express User Manual
3.3.3.
Module Selection Dialogue
This is how you select a module:
Click on the corresponding column header to sort the database by Manufacturer,
Type, Output or Voltage. Click again on the same column heading to change the
sort direction. If you type in the first character of the text you want to find in the
column that has been selected, you will jump direct to the first entry with this
character.
If you only want to show modules from a particular manufacturer, you can select a
manufacturer in the Show Manufacturer drop down menu at the top of the
dialogue.
Otherwise you can click on the column heading Manufacturer and, for example,
enter a “B”, so that modules from BP are shown. The module you want to use can
then be quickly found and selected.
The highlighted module is adopted into your project with OK or a double click.
You then go back to the PV Array page.
Note:
If you want to use a module that is not in the database, you can enter and save
the parameters on the Database page so that it will be available for future use in
the Module Selection dialogue.
© 2004-2006 Dr. Valentin EnergieSoftware GmbH
27
PV*express User Manual
3.3.4.
Roof Parameters Dialogue
You can enter the measurements for a roof here, and then cover the roof with the
possible number of modules that you have previously selected.
Click on the white space surrounding the roof to change the labels (“Eaves”,
“Gable End, West”, etc.).
Click on the roof or the module area and you can enter – on the right of the
screen - the height and width of the roof area and the distance of the modules
from the edge of the roof, and between each other.
You can optimise roof coverage by selecting Vertical or Horizontal under
Module Installation.
The number of modules positioned on the roof and the installed power are shown
at the top of the dialogue.
If there are obstacles (windows, chimneys, etc.) on the roof, you can delete the
modules from the corresponding position. Move the mouse pointer to the position
(the coordinates are shown in the dialogue header) and click on the module to
select it. You can now delete the module by clicking on the Delete Element
© 2004-2006 Dr. Valentin EnergieSoftware GmbH
28
PV*express User Manual
button (in the top right hand corner of the dialogue) or click with the right-hand
mouse key and select Delete from the pop up menu.
You can select a number of modules with the following key combinations:
CTRL+Left mouse key
SHIFT+ Left mouse key
ALT+ Left mouse key
Select a number modules anywhere on
the roof
Select a column
Select a row
In this way, you can free up areas that cannot be covered. With Cover Roof you
can then close all of the gaps again.
For our example, you should enter a roof area 7.5 m high and 18 m wide. The
edge distances should be approx. two roof tiles, so enter 0.5 m for left and right.
The distance between modules should be 0.1 m. Under Module Installation, if
Horizontal is selected the area can be covered with 70 modules (10.51kWp) and
if Vertical is selected the area can be covered with 57 modules (8.55kWp). You
should therefore select Horizontal. For our example, there is a chimney 8m from
the right edge of the roof and 2m from the eaves. Move the mouse pointer, with
the assistance of the values displayed for the X and Y Coordinates, to this
position, click on the corresponding modules and delete the modules, so that the
system has 66 modules and 9.9kWp.
If you selected Mounted under the heading Installation in the PV Array window,
the following additional window will appear:
© 2004-2006 Dr. Valentin EnergieSoftware GmbH
29
PV*express User Manual
Along with the sizing of the modules, Alpha is entered to record an additional roof
angle. The minimum distance between the module strings is determined from the
Gamma, the angle of the sun (on 21 December at 12.00 noon in the northern
hemisphere) to the horizontal, and the installation angle of the modules.
If you want to use the calculated minimum distance for the roof layout, select the
option Use Minimum Distance for Roof Mounting on the right of the window.
Click on OK to adopt the roof layout you have worked on and return to the PV
Array window.
© 2004-2006 Dr. Valentin EnergieSoftware GmbH
30
PV*express User Manual
© 2004-2006 Dr. Valentin EnergieSoftware GmbH
31
PV*express User Manual
3.4.
Inverter
The inverter configuration for the project is defined on this page. You are able to
select up to three inverter types.
The inverter selection offers two modes: Automatic and Manual. In the
Automatic mode you select an inverter configuration from a list.
© 2004-2006 Dr. Valentin EnergieSoftware GmbH
32
PV*express User Manual
Click on the Inverter Combination Selection button to open the dialogue. Select
an inverter manufacturer in the dialogue. The matching inverters and the
corresponding configurations are calculated and shown for the manufacturer
selected. The inverter configurations are normally sorted according to the
dimensioning factor (PV peak power / maximum DC power input). Click on the
individual column heading to sort the table according to the column criteria.
Click on OK to accept the inverter configuration into your project.
If you don’t want to use all of the inverter types available for a manufacturer in the
configuration calculation, then you should open the Inverter Selection dialogue
via the Limit Inverter Selection button and select the inverter models that you
want to use. After closing the dialogue a new calculation of the inverter
configurations takes place.
In the Manual mode you are able to define the system yourself.
© 2004-2006 Dr. Valentin EnergieSoftware GmbH
33
PV*express User Manual
This allows you to set the complete configuration. The blue areas in the table can
be edited. Click with the mouse on the cell that you want to change. You can then
either make a selection (e.g. Manufacturer) or enter a value in the cell. When you
click out of the cell the value will be adopted into the project.
You can test the entries with the System Check.
© 2004-2006 Dr. Valentin EnergieSoftware GmbH
34
PV*express User Manual
The System Check facility checks whether your system components have been
sensibly sized and configured. Output, currents, MPP voltage and open circuit
voltage are checked. Detailed information on possible mismatches is given in the
corresponding dialogue.
© 2004-2006 Dr. Valentin EnergieSoftware GmbH
35
PV*express User Manual
3.5.
Results
The yields of the solar system are shown on the Results page. The individual
parameters are explained under Definitions in the Help facility.
Click on the Project Report button to open the Print Preview of the report.
Click on the Start button to start the Economic Efficiency Prognosis.
Click on the Save button to save the project you are working on.
© 2004-2006 Dr. Valentin EnergieSoftware GmbH
36
PV*express User Manual
3.6.
Database
On the Database page you are able to view the module and inverter databases
that come with the programme. You can make changes and additions to the
databases from this page and user-created data records can be deleted from the
database.
To edit a data record, click on the Edit Selection button. To add a new data
record, click on New and the corresponding dialogue to enter parameters for an
inverter or PV module will open.
© 2004-2006 Dr. Valentin EnergieSoftware GmbH
37
PV*express User Manual
3.6.3.
Module Characteristic Values
The parameters for a module are entered on the various pages of this dialogue.
These values can be saved in the database and are then available for use in the
programme.
3.6.3.1.
Basic Data
Manufacturer and Type: You can enter a text up to 50 characters long.
Output Tolerance: The module values given are subject to certain
fluctuations when manufactured. This is of interest above all for the
current, voltage and output data.
Cell Type: Most cells are made of either monocrystalline or polycrystalline
silicium and a few are of amorphous silicium. Other types are, however,
due to appear on the market soon.
Module Dimensions (Height, Width): Height and width determine the
module area and therefore the area of the PV generator. This area, which
relates to the module dimensions, is called the gross area in the
programme.
© 2004-2006 Dr. Valentin EnergieSoftware GmbH
38
PV*express User Manual
3.6.3.2.
UI Characteristics at STC
The entries on this page are valid only for standard test conditions (STC), i.e.
25°C module temperature, sunlight spectrum of AM 1.5 and 1000 W/m²
irradiation.
MPP Voltage, MPP Current: The power output of the modules is dependent on
the module temperature and irradiation, and the module voltage. There is a
current/voltage characteristic curve for each module temperature and irradiation.
The working point on this curve determines the module’s power output.
The MPP is the working point on the curve at which the module’s power output is
at a maximum (maximum power point). The MPP voltage and MPP current are
temperature and irradiation dependent. This means that the voltage and current
entered here are only valid for standard test conditions. For all other irradiation
and temperature values there are other MPPs. This has to be determined by the
programme (see Introduction).
In the PV system, this job is done by the inverter. The inverter controls the PV
generator in such a way that exactly the right voltage is released to the modules,
to reach a maximum output from the current and voltage (MPP tracking).
© 2004-2006 Dr. Valentin EnergieSoftware GmbH
39
PV*express User Manual
Open Circuit Voltage: The voltage level for a module with no load. This is also
temperature and irradiation dependent.
Short Circuit Current: The current flowing through a short circuited module. This
is also temperature and irradiation dependent.
Fill Factor: The fill factor is calculated as follows:
FF = (MPP Current * MPP Voltage) / (Short Circuit Current * Open Circuit Voltage)
Specified Output:
Module output under standard test conditions (STC) according to the
manufacturer’s data sheets. The actual output is determined from the module
voltage and current, and is given in the Calculated Output field. To determine the
installed PV output, PV*express always uses the Calculated Output!
Efficiency: Module efficiency under standard test conditions.
Active Solar Surface Area: For simulation, the programme uses the following
formula to determine the Active Solar Surface Area from the Calculated Output
and Efficiency:
Nominal Output(STC)= 1000 W/m² * ETA(STC) * Active Solar Surface Area
3.6.3.3.
UI Characteristics at STC
Temperature Coefficients:
Voltage Coefficient: This value expresses the corresponding increase in voltage,
when the module temperature increases by one degree. The hotter the module,
the smaller the voltage, i.e. this coefficient is negative.
Current Coefficient: This value expresses the corresponding increase in current
(amps), when the module temperature increases by one degree. The hotter the
module, the higher the current, i.e. this coefficient is positive.
© 2004-2006 Dr. Valentin EnergieSoftware GmbH
40
PV*express User Manual
Power Coefficient: The hotter the module, the lower the power output. The
Power Coefficient is negative and is given as a percentage of the Nominal Output.
Maximum System Voltage for Module[V]: Each electrical appliance can only
bear a certain maximum voltage. This value expresses the maximum voltage that
a sub-array can bear, to ensure that the modules are not damaged. If the
Maximum Voltage is too high, you should reduce the number of modules in
series.
Click on the Save As… button to save the newly created module under a name of
your choice. This will be saved in the module database and will be available for
future project design.
3.6.4.
Inverter
Click on Edit Selection to load an inverter data record from the list, check the
values and, if necessary, make amendments.
Click on Save or Save As… to save the values entered, either in the existing
record or in a new record.
3.6.4.1.
Characteristics
Manufacturer and Type: You can enter a text up to 50 characters long.
© 2004-2006 Dr. Valentin EnergieSoftware GmbH
41
PV*express User Manual
DC Power Rating: DC stands for direct current refers to the input side of the
inverter. The nominal output is the output specified for the inverter when in
continuous operation.
Max. PV Power: This is the maximum power which, according to the inverter
manufacturer, a solar system can have, so that the inverter can be operated
safely. If the actual installed power is greater, it will not necessarily damage the
inverter, but the inverter will not operate as effectively as possible.
Stand-by Consumption: Even when the inverter is not supplying energy to the
grid or appliances, the inverters own power consumption needs to be taken into
account. In addition to the stand-by consumption, there is also night consumption.
Night Consumption: The inverter turns itself off at night, but still requires a
minimum level of energy, which comes from the grid.
© 2004-2006 Dr. Valentin EnergieSoftware GmbH
42
PV*express User Manual
Feed-in from: There is a minimum output which has to be supplied by the input
side (PV generator) before the inverter can operate.
Nominal DC Voltage, Nominal DC Current: The inverter input voltage or input
current, when the inverter supplies the nominal output.
Max. Input Voltage, Max. Input Current : This voltage threshold or current
threshold must not be exceeded. If it is, the inverter will be destroyed.
Upper and Lower Voltage Thresholds for MPP Range: The inverter can control
the MPP tracking within this voltage range. This means that the inverter searches
for the optimum voltage for the PV array within this voltage range, so that the
array produces the maximum power output.
MPP Matching Efficiency: The MPP Matching Efficiency is a measure of how
precisely the inverter sets its working point for the PV array’s maximum power
point (MPP). We differentiate between the power ranges < 20% and > 20% of the
nominal output. The MPP Matching Efficiency values are taken into account
during simulation to determine the Inverter Efficiency.
The inverter efficiency curve is given for the nominal voltage. If the inverter is not
operated at the nominal voltage, the inverter efficiency curve changes
accordingly.
Whether the efficiency curve goes up or down depends on whether the inverter
has a transformer or not.
As a rule of thumb, the following applies:
•
•
With an increase in input voltage, the efficiency of an inverter with a
transformer decreases by approx. 1% per 100 V.
With an increase in input voltage, the efficiency of an inverter without a
transformer increases by approx. 1% per 100 V.
© 2004-2006 Dr. Valentin EnergieSoftware GmbH
43
PV*express User Manual
3.6.4.2.
Efficiency Characteristic Curve
The Efficiency Characteristic Curve tab opens the Inverter
Characteristic Curve dialogue, so that the conversion efficiency,
dependent on the input power, can be entered.
The conversion efficiency is the ratio between the output power and the input
power, and is dependent on the momentary output of the inverter.
In the datasheets, the figure for the efficiency is related to the nominal output,
although, for most of the year, this is not delivered by the PV system. The partload operation is therefore very important for the simulation results.
To determine the characteristic curve, the programme requires 7 points of
support, i.e. the efficiency at 0, 5, 10, 20, 30, 50 and 100% of the nominal output.
From these points of support, the European efficiency is then determined
and shown. If any changes are made, the efficiency is recalculated only
after you exit the dialogue.
© 2004-2006 Dr. Valentin EnergieSoftware GmbH
44
PV*express User Manual
4. Economic Efficiency Prognosis
The Economic Efficiency Prognosis is started from the Results page by clicking
on the Start button.
The capital value (net present value) method is used for the economic efficiency
calculation, i.e. the cash value of the costs and yields are determined and
compared. A positive capital value means that the investment can be evaluated
positively in economic terms.
Note:
PV*express uses the currency that is set as the standard currency in your
computer’s operating system. If, for example, you want to calculate in pounds
sterling and the euro sign appears on your screen, you simply need to change the
currency from € to £ in the Country Settings.
4.1.
Calculation Basis
On the Calculation Basis page the PV Peak Power and the Electricity Supplied
to Grid for the PV system being calculated are automatically adopted. The values
cannot be changed. With the Set Feed-in Payment, the period of validity is 20
full years plus the first incomplete year. The value entered for the Start Date (the
date the system started operating) therefore has a direct influence on the
© 2004-2006 Dr. Valentin EnergieSoftware GmbH
45
PV*express User Manual
calculation. If the Start Date is in the second half of the year, the amount that you
are able to offset against tax in that year could be reduced by 50%. The annual
costs are proportionally allocated for the year the system started operating.
Select Calculate Feed-in Payment from Tariff and click on the Load button, you
can load or amend an existing tariff.
Click on Degradation to define the reduction in power for the modules during the
calculation period (20 years).
Degradation is the reduction in power for the modules resulting from the age of
the modules. Manufacturers usually guarantee 80% of the specified output after
20 years. The actual power reduction for high-quality modules is, however, less –
e.g. 10% after 20 years.
4.2.
Basic Parameters
Assessment Period
Only complete years, not including the year in which the system starts operation,
should be entered for the Assessment Period.
According to German standard VDI 6025, the Assessment Period is the time
period of the planning base for the calculation of economic efficiency (planning
horizon).
The Assessment Period should be based on the investment with the shortest
Service Life.
If the Service Life of an investment is less than the Assessment Period, the
investment will have to be repurchased.
If the Service Life of an investment is greater than the Assessment Period, the
investment will have a residual value at the end of the Assessment Period, which
is included in the capital value calculation.
Interest on Capital
The Interest on Capital can be entered as the Rotating Net Yield. The
Rotating Net Yield is the average yield from fixed interest bonds/securities. The
German Federal Bank determines this from the average yields on outstanding
debt securities. The Rotating Net Yield is therefore a measure of the interest
level on the bond/securities market.
Sales Tax
This entry field does not influence the calculation, but is there to make clear that
all amounts should be entered either with or without Sales Tax. As a rule, all
amounts should be entered as net sums. However, if you enter a gross amount,
you should make sure that all entries are gross.
© 2004-2006 Dr. Valentin EnergieSoftware GmbH
46
PV*express User Manual
4.3.
Balance of Costs
The Tax Deductible Investments are the total costs that are required for building
the system and need to be entered as an absolute amount.
Subsidies and Operating Costs can be entered as an absolute amount, a
specific amount in relation to the total output or as a percentage of the
investments.
The Feed-in Payment Received in First Year is calculated from the feed-in tariff
and the amount from the simulation and is then entered in the field on this page in
advance. This amount cannot be changed.
4.4.
Financing
Reference
Here you can give the loan a name, which will then appear in the Project Report.
Loan Capital
The amount of credit, with the calculation based on interest and repayment. The
loan amount can be entered as an absolute currency amount or as a percentage
of the investment volume. Investment Volume is understood here as the
investments plus one-off payments less subsidies.
Payment Instalment as a Percentage of the Loan Capital (Discount)
This value specifies which percentage amount of the loan capital entered is
actually paid out. The loan amount paid is based on the loan capital multiplied by
the disbursement rate.
Period
The loan repayment period.
Loan Interest
Nominal Interest Rate to be paid on the remaining debt.
Repayment-Free Initial Years
During this period no repayments, but only interest payments are made. In the
remaining time up to the end of the period, the loan capital is repaid in
instalments.
© 2004-2006 Dr. Valentin EnergieSoftware GmbH
47
PV*express User Manual
Repayment Interval
Interest and instalments are paid at these intervals.
4.5.
Results
The main results of the economic efficiency calculation are shown here.
The Results shown here also appear in the Project Report.
The system’s Capital Value and the Electricity Production Costs are always
calculated.
The Amortization Period and the Net Yield are related to the amount of selffinancing used. Therefore these results can only be calculated when the amount
of self-financing is greater than zero.
If the investment is partly financed by borrowed capital, the programme calculates
a Minimum System Operating Period, following which the amount of selffinancing used and the loan payments have been recouped.
f the Minimum System Operating Period is greater than the Amortization
Period, the Minimum System Operating Period is given.
Amortization Period
The period required to get to the point when the capital value of the investment
first becomes positive.
Electricity Production Costs
The Electricity Production Costs are the annual costs divided by the amount of
electricity produced.
The annual costs result from the:
Cash value of annual costs,
One-off Payments,
Loan Payments
Self-Financing
Multiplied by the Annuity Factor.
Capital Value
The Capital Value is calculated from the:
·
Cash Value of all Annual Costs
·
Cash Value of all Annual Lodgements and Savings
·
Cash Value of Loan Payments
·
Cash Value of Tax Payments
© 2004-2006 Dr. Valentin EnergieSoftware GmbH
48
PV*express User Manual
·
·
·
One-off Payments
Subsidies
Self-Financing
Net Yield
The Net Yield is calculated according to the “internal interest rate method”.
Capital interest is increased up to the point at which the Capital Value of the
investment becomes less than zero.
The result can be interpreted as follows:
Providing one’s own capital (self-financing) for the investment is as good as
investing one’s own capital in a bank at the interest rate of the net yield.
© 2004-2006 Dr. Valentin EnergieSoftware GmbH
49
PV*express User Manual
5. Attachments
5.1.
Definitions
Azimuth Angle (Orientation)
The orientation or azimuth angle describes the angle of deviation of the module
surface from the south, in the northern hemisphere (and from the north, in the
southern hemisphere). It is 0° when the surface is facing due south. The azimuth
is positive when facing west and negative when facing east. East = -90°, south
east = -45°, south west = 45°, and west = 90°.
Grid Feed-in
The solar energy fed into a (public) electricity grid.
Inclination (Tilt Angle)
Describes the angle between the horizontal and the module surface. It is 90° if the
modules are façade-mounted.
Installed Output
The installed output of a solar system is the peak output that would be produced
by the system with vertical irradiation and 1000 W/m². It is therefore shown as Wp
or kWp (the “p” stands for “peak”).
Mounted
Mounted systems are those with modules installed on a mounting system, either
free-standing on the ground or on a flat roof.
MPP (Maximum Power Point)
The module’s power output is dependent on the irradiation, temperature and also
the voltage rate it is operated at. The MPP is the point on the current/voltage
diagram at which the module produces its maximum output.
MPP Tracker
The MPP tracker automatically sets the solar array’s working point at its
maximum.
Open Circuit Voltage
A module’s open circuit voltage UL is usually given by the manufacturer for
standard test conditions (STC). Since the module voltage is also temperature
dependent, the maximum open circuit voltage occurs both with very low
temperatures, e.g. –10°C, and maximum irradiation.
Orientation
See Azimuth Angle.
© 2004-2006 Dr. Valentin EnergieSoftware GmbH
50
PV*express User Manual
Performance Ratio
The performance ratio is a measurement of the energy losses that occur within
the system in comparison with the system’s optimal operating conditions. The
actual solar energy produced is measured against the nominal output. The
nominal output is calculated from the irradiation onto the tilted PV surface
multiplied by the module efficiency under standard test conditions (25 C,
1000W/m²).
PV Array – Generated Energy (alternating current side)
The energy generated on the AC side of the PV array is the energy produced by
the inverter and, with full feed-in, is supplied to the grid. Module, cabline and
inverter losses are taken into account.
PV Array - Irradiation
The irradiation onto the tilted PV array surface is the solar energy that remains
available after subtraction of shade.
Roof-Integrated
Roof-integrated means that the roof cladding has been partially removed and
replaced with the modules themselves.
Roof-Parallel
Roof parallel means that the modules are mounted a distance above the roof
cladding, but are parallel to it.
Short Circuit Current
A module’s short circuit current IK is usually given by the manufacturer for
standard test conditions (STC). Since the module current is also temperature
dependent, the maximum short circuit current occurs both with very low
temperatures, e.g. –10°C, and maximum irradiation.
Specific Annual Yield
To calculate the specific annual yield of a PV system, the annual energy
generated on the alternating current side is measured against the PV area or
output of the system.
STC (Standard Test Conditions)
Standard test conditions were introduced to make it possible to compare module
outputs. They represent the conditions under which the parameters on the data
sheets were determined. These are a temperature of 25°C, 1000 W/m² irradiation
and an AM factor von 1.5. The AM (air mass) describes the entrance route of the
irradiation through the atmosphere and thus the spectral composition of light.
System Efficiency
The system efficiency is the quotient of the electrical energy produced on the
alternating current side and the solar energy irradiated onto the PV array surface.
© 2004-2006 Dr. Valentin EnergieSoftware GmbH
51
PV*express User Manual
Tilt Angle
See Inclination.
© 2004-2006 Dr. Valentin EnergieSoftware GmbH
52
PV*express User Manual
5.2.
Information on Planning Solar Electric Systems
Solar electric systems are conceived for a lifespan of over 20 years. In order to
guarantee such a length of time in operation, the design of the system must be
carried out very carefully. Only high-quality weather and UV resistant materials
should be used. The system can only produce optimum yields if the components,
modules, inverter/s and cabling are correctly configured.
The following points therefore need to be taken into consideration:
•
•
•
•
•
•
•
•
5.3.
•
The module or module string voltages should on no account exceed the
inverter’s maximum input voltage. It should be noted that the maximum
open circuit voltage occurs with low temperatures (e.g. –10°C) and
maximum solar radiation.
The modules produce maximum power, dependent on irradiation and
temperature, at a particular voltage level. This point is know as the
Maximum Power Point (MPP), as per the U/I diagram. The inverter has the
task of tracking this point and operating the modules at the MPP. Optimum
system operation is, however, only possible if the fluctuation range for the
modules or module strings is within the inverter’s tracking range.
Since the modules only rarely reach their maximum power (with low
temperatures and maximum solar radiation), the inverters are usually only
configured for 90% of the module output.
The optimum tilt angle and orientation of a grid connected solar electric
system is 30° facing south. Minor deviations only produce a minor
reduction to the yield.
Module output reduces when the module temperature increases. The
modules should therefore have enough ventilation space to allow the
modules to cool down. This should be taken into consideration, particularly
for roof-integrated modules.
Shade onto a single cell causes a collapse in the output for the whole
module. Small areas of partial shading caused by antennae, branches,
etc. can therefore have a disproportionate effect on system yield.
With tilt angles below 15° the self-cleaning effect caused by rainwater is
poor. This can lead to reduced yields caused by a permanent layer of dirt
on the module surface.
In order to avoid planning errors and miscalculations, it is necessary to
carry out a detailed check of the system’s location as part of a site visit.
Safety Instructions
The function of the roof as a shelter against rain should not be affected by
the system. Otherwise long-term damage can occur. Particularly for flat
rooves, it is important to ensure that the fixing elements and cable inlets
© 2004-2006 Dr. Valentin EnergieSoftware GmbH
53
PV*express User Manual
•
•
•
are carefully sealed. Waterproofing foil, for example, must be carefully
sealed. During the installation work, damage to the roof cladding should
also be avoided.
The mounting system must also stand up to extreme weather conditions
and heavy storms. Only tested fixing elements should therefore be used.
If the PV modules are going to be installed on a roof, it is important to
check before installation whether the roof construction will be able to
support the extra load. If necessary, a structural engineer should be
consulted.
If the cable insulation is damaged, it is possible that an electric arc can
form between the wires, which can possibly cause a fire. Please therefore
note that the use of special cabling is required, as per the current
regulations.
DANGER! PROCEED WITH CAUTION
Solar modules cannot be switched off. They produce direct current voltage when
exposed to light. If a number of modules are connected together an extremely
high and dangerous current of many hundred volts is produced. The
corresponding safety class must be adhered to. Contact with the live parts of the
system can therefore cause serious injury or even death! If necessary, system
connection should be carried out at night.
For roof installation the current safety standards must be adhered to. Scaffolding
should be used with a system to protect installers from falling, the site should be
cordoned off and measures taken to protect against falling materials!
© 2004-2006 Dr. Valentin EnergieSoftware GmbH
54