1
Network Guide
NPD4874-02 EN
Network Guide
Contents
Contents
Scanning Problems. . . . . . . . . . . . . . . . . . . . . . .
Connecting to Wi-Fi or Ethernet. . . . . . . . . . .
Problems Specific to the Operating System. . . . . .
IPv4/IPv6 function table. . . . . . . . . . . . . . . . .
Mac OS X. . . . . . . . . . . . . . . . . . . . . . . . . . . .
iOS. . . . . . . . . . . . . . . . . . . . . . . . . . . . . . . . .
Android. . . . . . . . . . . . . . . . . . . . . . . . . . . . .
Software Problems. . . . . . . . . . . . . . . . . . . . . . .
A dial-up connection dialog box appears when
printing with EpsonNet Print. . . . . . . . . . . . .
Unblocking Epson software. . . . . . . . . . . . . . .
Other Problems. . . . . . . . . . . . . . . . . . . . . . . . .
The product cannot set up network services or
suddenly cannot use network services. . . . . . .
Introduction
Notices. . . . . . . . . . . . . . . . . . . . . . . . . . . . . . . . .
About this manual. . . . . . . . . . . . . . . . . . . . . .
Caution, Important and Note. . . . . . . . . . . . . .
Operating System Versions. . . . . . . . . . . . . . . .
Network Basics. . . . . . . . . . . . . . . . . . . . . . . . . . .
Wi-Fi (wireless) network. . . . . . . . . . . . . . . . . .
Ethernet (wired) network. . . . . . . . . . . . . . . . .
.3
.3
.3
.3
.4
.4
.6
Using Product via Network
From Network Devices. . . . . . . . . . . . . . . . . . . . . . 7
Windows. . . . . . . . . . . . . . . . . . . . . . . . . . . . . . 7
Mac OS X. . . . . . . . . . . . . . . . . . . . . . . . . . . . . . 9
Smartphone or tablet. . . . . . . . . . . . . . . . . . . . . 11
From the Product’s Control Panel. . . . . . . . . . . . . 12
Wi-Fi setup wizard. . . . . . . . . . . . . . . . . . . . . . 12
Wi-Fi Protected Setup (WPS). . . . . . . . . . . . . . 13
Direct Connection. . . . . . . . . . . . . . . . . . . . . . . . 13
Wi-Fi Direct. . . . . . . . . . . . . . . . . . . . . . . . . . . 14
Ad Hoc mode. . . . . . . . . . . . . . . . . . . . . . . . . . 15
Epson Connect Service. . . . . . . . . . . . . . . . . . . . . 20
Web Page Embedded in the Product. . . . . . . . . . . 21
Web Config. . . . . . . . . . . . . . . . . . . . . . . . . . . 21
Accessing a Web Config. . . . . . . . . . . . . . . . . . 21
. 35
. 35
. 36
. 36
Copyrights and Licenses for Network
Features
Copyrights, Trademarks, and Licenses. . . . . . . . . . 37
Info-ZIP copyright and license. . . . . . . . . . . . . . 37
OPEN SOURCE SOFTWARE LICENSE. . . . . . . . 38
Troubleshooting
Tips for Solving Network Problems. . . . . . . . . . .
Printing a network connection check report. . .
Displaying the network status and printing a
network status sheet. . . . . . . . . . . . . . . . . . . .
Disabling and initializing the Wi-Fi settings. . .
Updating product firmware. . . . . . . . . . . . . . .
Checking the communication using the Ping
command. . . . . . . . . . . . . . . . . . . . . . . . . . . .
Setup Problems. . . . . . . . . . . . . . . . . . . . . . . . . .
Connecting to Wi-Fi. . . . . . . . . . . . . . . . . . . .
Connecting to Wi-Fi Direct. . . . . . . . . . . . . . .
Connecting to Ethernet. . . . . . . . . . . . . . . . . .
Connecting to Wi-Fi or Ethernet. . . . . . . . . . .
Printing Problems. . . . . . . . . . . . . . . . . . . . . . . .
Computer Connected to Wi-Fi. . . . . . . . . . . .
Computer Connected to Ethernet. . . . . . . . . .
Computer Connected to Wi-Fi or Ethernet. . .
Smartphone or tablet. . . . . . . . . . . . . . . . . . . .
. 32
. 32
. 32
. 32
. 33
. 34
. 34
. 35
. 23
. 23
. 23
. 24
. 24
. 25
. 26
. 26
. 27
. 28
. 29
. 29
. 29
. 30
. 31
. 31
2
Network Guide
Introduction
Introduction
Notices
About this manual
This Network Guide is a common manual for products equipped with network functions. Note the following when
using this manual.
❏ Available functions and devices, such as an LCD screen, Wi-Fi/Ethernet functions, and scanner functions may
differ depending on your product.
❏ The screenshots of the LCD screen and software used in this manual are general examples. The menus, button
names, and screenshots may differ depending on your product.
❏ The contents of this manual and the product's specifications are subject to change without notice.
Caution, Important and Note
Caution, Important, and Note in this manual are indicated as below and have the following meaning.
!Caution
must be followed carefully to avoid bodily injury.
Important
c must
be observed to avoid damage to your equipment.
Note
contain useful tips and restrictions on product operation.
Operating System Versions
In this manual, the following abbreviations are used.
❏ Windows 8 refers to Windows 8 and Windows 8 Pro.
❏ Windows 7 refers to Windows 7 Home Basic, Windows 7 Home Premium, Windows 7 Professional, and
Windows 7 Ultimate.
❏ Windows Vista refers to Windows Vista Home Basic Edition, Windows Vista Home Premium Edition, Windows
Vista Business Edition, Windows Vista Enterprise Edition, and Windows Vista Ultimate Edition.
❏ Windows XP refers to Windows XP Home Edition, Windows XP Professional x64 Edition, and Windows XP
Professional.
3
Network Guide
Introduction
❏ Mac OS X refers to Mac OS X 10.5.8, 10.6.x, 10.7.x, 10.8.x.
Network Basics
The types of network connections mentioned in this manual are defined as follows. Not all connection types may be
available depending on your product.
Wi-Fi (wireless) network
There are three types of Wi-Fi connection; Infrastructure mode (communicating through a router or access point),
Wi-Fi Direct (communicating directly with devices without using an access point), and Ad Hoc.
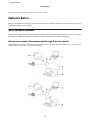
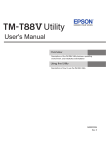
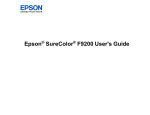
Infrastructure mode (To communicate through the access point)
In the Infrastructure mode, both wireless and wired computers can communicate through an access point (such as
wireless router) to send data to the network interface.
4
Network Guide
Introduction
a. product
b. Wireless router (or access point)
c. Computer with Wi-Fi interface (built-in or added via USB/PC card and so on)
d. Computer with LAN port or Wi-Fi interface
e. Ethernet cable (if you connect the computer and the wireless router directly)
(f. Internet access)
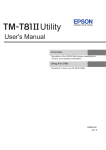
Wi-Fi Direct (To communicate without using an access point)
To use the product in a wireless environment without an access point is to use a Wi-Fi Direct connection.
If the product has a Wi-Fi Direct function, you can connect the product wirelessly without using an access point.
For more details, see “Wi-Fi Direct” on page 14.
a. product (built-in Wi-Fi Direct function)
b. Computer (with a Wi-Fi interface) or a Wi-Fi device
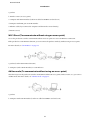
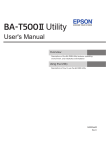
Ad Hoc mode (To communicate without using an access point)
The other way to use the product in a wireless environment without an access point (wireless router, etc.), you can use
Ad Hoc mode. For more details, see “Ad Hoc mode” on page 15.
a. product
b. Computer with a Wi-Fi interface (built-in or added via USB/PC card and so on)
5
Network Guide
Introduction
Ethernet (wired) network
For a wired network connection, connect the hub/router to the product using the Ethernet cable.
Hardware necessary for a wired network
a. product
b. Ethernet cable
c. Ethernet HUB
d. Computer with LAN port
e. Router
(f. Internet access)
6
Network Guide
Using Product via Network
Using Product via Network
From Network Devices
This section describes how to operate your product from network devices running Windows, Mac OS X, iOS, and
Android. The following outlines the recommended network settings for each device.
❏ Windows: Using the software disc or installer from the Epson Web site.
❏ Mac OS X: Using EpsonNet Printer Setup from the Epson Web site.
❏ iOS and Android: Using the product’s control panel.
See the following sections for more details on each operating system.
Windows
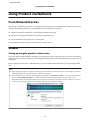
Setting up using the product’s software disc
To use your product from a Windows computer, set up using the product’s software disc. You can also use the software
disc if you want to use the product from a second computer or change the product from a USB connection to a network
connection.
If your computer does not have a CD/DVD drive, you can download the installer from your regional Epson Web
site.
Note:
❏ Before beginning setup for a computer, check that your network devices such as the router, wireless adapter, or hub are
working properly and remove the memory card from the product.
❏
If the security alert screen for your OS or the application appears, click Unblock or Allow to create a Firewall exception.
Do not click Keep Blocking, Block, or similar command on commercially available security software screen.
Depending on the commercially available security software used, the above procedure may not establish a connection.
In this case, temporarily exit the security software and then use the product’s software.
7
Network Guide
Using Product via Network
A
Turn on the product and make sure that your Wi-Fi/Ethernet is working normally.
B
Insert the software disc into the CD-ROM/DVD drive.
Note:
If the installation screen does not automatically appear in Windows, double-click the Disk icon in Computer (or My
Computer).
C
Follow the on-screen instructions.
Setting up using WSD (for Windows 8/7/Vista)
The product supports Web Services on Devices (WSD). WSD is useful when you want to add a second computer to the
network to which the product is connected, or to set up multiple computers at the same time.
Note:
❏ To set up a printer/scanner with WSD, the computer and product must be connected to the network.
For details on setting up a network connection from a product’s control panel, see “From the Product’s Control Panel”
on page 12.
❏
A
You must install the driver before setting up the printer/scanner with WSD.
Verify that the product is turned on.
Note:
Because Windows 8 installs the WSD driver automatically, you can skip steps 2 to 5.
B
For Windows 7: Click Start, Computer, and then Network.
C
Right-click the product icon, then click Install.
For Windows Vista: Click Start and then Network.
Click Continue in the User Account Control dialog box.
Note:
❏ The icon shows the network product name (e.g., EPSONXXXXXX (your product name)). The product name can
be confirmed on the product’s control panel or a network status sheet. For details on confirming on the control
panel or printing a network status sheet, see “Displaying the network status and printing a network status sheet”
on page 23.
❏
If Uninstall appears instead of Install, click Uninstall once and retry (for Windows 7 and Vista).
D
Click Your devices are ready to use (Your device is ready to use).
E
Check the screen and click Close.
8
Network Guide
Using Product via Network
F
For Windows 8: Select Desktop > Settings charm > Control Panel, and then select View devices and printers.
For Windows 7: Click Start and then Devices and Printers.
For Windows Vista: Click the Start button, and then Network.
Note for Windows 8 users:
Follow the steps below if you cannot find the product icon.
1. Select Add a device.
2. Select your product, and then select Next.
3. Follow the on-screen instructions.
G
Verify that an icon with the network product name (e.g., EPSONXXXXXX (your product name)) is added.
To print using WSD, select the product by its network product name.
Note:
❏ To use the scanner function with WSD, use Windows Fax and Scan or Paint in Windows Vista.
❏
The scanner name selected with Windows Fax and Scan or Paint in Windows 8/7/Vista is the same as the
network product name.
❏
When using commercially available software, see the User’s Guide that came with the software for the scanning
procedure.
Mac OS X
For Mac OS X, download the software from the Epson Web site.
Note:
❏ Complete initial settings such as charging ink cartridges and setting the language before starting the network setup.
❏
Check that your network devices such as the router, wireless adapter, or hub are working properly and remove memory
cards from the product before starting the computer setup.
Connecting the product to a network
Follow the steps below to use the product from the computer.
A
If you want to connect to an Ethernet network, connect the product to a hub using a LAN cable.
B
Download EpsonNet Setup from the following link. http://support.epson.net/setupnavi/
C
Launch EpsonNet Setup. Follow the on-screen instructions to set up the product’s network connection.
Note for Mac OS X 10.5.x users:
Before continuing with the following steps, install your product’s printer driver from the Epson Web site.
For European users: http://www.epson.eu/Support
For Asian, Oceanian users: http://support.epson.net/
9
Network Guide
Using Product via Network
D
Select System Preferences from the Apple Menu.
E
Click the Print & Fax (10.5.x, 10.6.x) or Print & Scan (10.7.x or later) icon.
F
Click + under the Printers list.
G
For Mac OS X 10.5.x/10.6.x: Select the product name that you want to connect.
For Mac OS X 10.7.x or later: Select the product name that you want to connect, and then select the Epson
product name on the Use menu.
H
Click Add.
Note for Mac OS X 10.6.x or later users:
The printer driver is automatically downloaded by the Apple Software Updater.
I
Make sure your product is in the Printers list.
You can now use the product from your computer. If your product is a multifunctional printer equipped with a
scanner, follow the steps in the next section to connect the scanner to a network.
Connecting a scanner to a network
Follow the steps below to use a scanner from a computer by using EPSON Scan.
Note:
This feature is not available for all products or may not be enabled.
A
Download “EPSON Software Updater” from the following link.
http://support.epson.net/dnavi/
B
Launch “EPSON Software Updater”.
C
Select EPSON Scan, and then click Install.
D
Double-click Macintosh HD, Applications, Epson Software and then EPSON Scan Settings.
Available software is displayed as a list.
Epson Scan is downloaded and installed.
Note:
If the scanner is listed but cannot be selected immediately after the EPSON Scan Settings screen appears, wait for the
search to end.
E
Verify that the scanner is selected, select Network and then click Add.
10
Network Guide
Using Product via Network
F
Enter the Scanner Name, and wait for the search to end.
G
Select the scanner’s IP address, then click OK.
Note:
If the address does not appear, check the connection and click Retry, or click Enter address and directly enter the IP
address. Entering the IP address directly disables the IP address auto-follow function.
H
Select the scanner, then click Test.
I
Verify that The connection test was successful and the scanner name are displayed, then click OK.
Smartphone or tablet
Follow the steps below to use the product from an iOS or Android smartphone or tablet.
Note:
❏ The following features are not available for all products or may not be enabled. For details on available functions, see
your regional Epson Web site.
❏
Check that your smartphone or tablet is connected to the network before connecting to the product.
❏
If you want to use a product that only has an Ethernet function from a smartphone or tablet, connect the product to the
wireless router (access point) using a LAN cable.
Using Epson iPrint
Epson iPrint allows you to wirelessly print and scan to your product from your smartphone or tablet (iOS/Android).
A
Set up your product for wireless printing as described on the Start Here sheet, and then connect the product to a
Wi-Fi network manually by using the product’s control panel. For more information on using the product’s
control panel, see “From the Product’s Control Panel” on page 12.
B
Download “Epson iPrint” from the App Store (iOS) or Google Play (Android) to your smartphone or tablet.
You can also download Epson iPrint from the following Epson Web site.
http://ipr.to
11
Network Guide
Using Product via Network
C
Launch Epson iPrint, and then search for and set up the product you want to use.
Note:
For more information on Epson iPrint settings, see the Help provided with Epson iPrint, or the Epson Connect portal
Web site.
https://www.epsonconnect.com/ (Epson Connect portal site)
http://www.epsonconnect.eu/ (Europe only)
D
Print and scan from your smartphone or tablet.
Using AirPrint
AirPrint allows you to wirelessly print to your AirPrint-enabled product from iPhone, iPad, and iPod touch running
the latest version of iOS.
A
Set up your product for wireless printing as described on the Start Here sheet.
B
Connect your Apple device to the same wireless network that your product is using.
C
Print from your iPad, iPhone, or iPod touch to your product.
From the Product’s Control Panel
Follow the steps below to use the product from Wi-Fi enabled devices other than a computer, such as a smartphone,
tablet or digital television, or to connect the printer to a network.
Note:
❏ Complete initial settings such as charging ink cartridges and setting the language before starting the network setup.
❏
Check that your Wi-Fi network is enabled before connecting to the product.
Wi-Fi setup wizard
If your product has an LCD screen, you can use the Wi-Fi Setup Wizard to simplify manual setup. You can set up by
entering the SSID and password of your Wi-Fi network to the product’s LCD screen. This feature is only available for
products that have an LCD screen.
Note:
❏ This setting is not available for all products or may not be enabled.
❏
Check the SSID and password for your network as these are required during Wi-Fi setup. If you do not know the SSID
and password, check with your network administrator.
12
Network Guide
Using Product via Network
For information on setting up a Wi-Fi connection using the Wi-Fi Setup Wizard, click the following link. This feature
is not available for all products or may not be enabled.
html/wizard.htm
Wi-Fi Protected Setup (WPS)
There are two types of Wi-Fi Protected Setup (WPS); the WPS push button method, and the WPS PIN code method.
These methods are available for products that do not have an LCD screen.
Note:
❏ This setting is not available for all products or may not be enabled.
❏
Before connecting the product to the network, check that the access point supports the WPS function.
❏
If the access point (wireless router) is not discovered within approximately two minutes, an error message is displayed.
In that case, make sure the access point is operating, and then make the WPS settings again from the beginning.
❏
For details on the access point WPS function or troubleshooting, see the access point’s user’s guide.
WPS push button
You can setup by pushing the WPS button on a wireless router (access point). Use this method if you have already
connected other Wi-Fi enabled devices using WPS.
For information on setting up a Wi-Fi connection using the WPS setup, click the following link. This feature is not
available for all products or may not be enabled.
html/wps_b.htm
WPS PIN code
You can setup by entering eight numbers to a wireless router (access point). The eight numbers are displayed on the
product’s LCD screen or printed on the product’s network status sheet.
For information on setting up a Wi-Fi connection using the WPS setup, click the following link. This feature is not
available for all products or may not be enabled.
html/wps_p.htm
Direct Connection
You can connect a product directly to a computer, smartphone, or tablet without a wireless router (access point). The
following methods are available depending on your product and device.
Wi-Fi Direct connection: You can connect directly to the product using a Wi-Fi Direct compatible device. Even if
your device does not support Wi-Fi Direct, you can connect the product to a device by using the product as an access
point. This method uses the WPA2-PSK(AES) security method which is the same as infrastructure mode.
“Wi-Fi Direct” on page 14
Ad Hoc connection: You can connect directly to the product using Ad Hoc compatible devices. This method only uses
the WEP security method.
“Ad Hoc mode” on page 15
13
Network Guide
Using Product via Network
Note:
❏ This feature is not available for all products or the feature may not be enabled.
❏
Windows computers can set up a direct connection by using the installer on the software disc. If the product supports
Wi-Fi Direct, the product connects using Wi-Fi Direct.
Wi-Fi Direct
One of the following modes is selected automatically depending on your product’s network environment.
Access point mode: If your product is not connected to any available wireless networks, the product enters access
point mode and then connects to your device by using a device that has a Wi-Fi function. In access point mode, the
product acts as an access point.
Peer-to-peer mode: If your product is already connected to an available wireless network, the product enters
peer-to-peer mode and then connects to your device. The product connects to a device in peer-to-peer mode if your
device is compatible with Wi-Fi Direct. If your product does not support Wi-Fi Direct, the product connects using this
mode but you need to enter a password.
Note:
❏ By using Web Config, you can limit connections in peer-to-peer mode to Wi-Fi Direct compatible devices only.
However, you may not be able to print from devices running Windows 8.
For more details on making Web Config settings, see “Web Page Embedded in the Product” on page 21 or refer to your
product’s documentation.
❏
This feature is not available for all products or the feature may not be enabled.
Modes are selected automatically according to your product network environment. For more details on using Wi-Fi
Direct, click the following link. This feature is not available for all products.
html/wifid.htm
Access point mode
When the product is running in access point mode (Simple AP mode), the Wi-Fi Direct access point mode icon is
displayed on the product's screen. The shape and location of the icon varies depending on the model. For more details,
see the product's on-screen Help or documentation.
The connection specifications are as follows:
❏ Number of concurrent connections: 4
❏ Security: WPA2-PSK (AES)
❏ Standard: 802.11g
14
Network Guide
Using Product via Network
Note:
❏ The access point mode does not provide a communication function between devices that are connected to the product
using this feature.
❏
If you want to release access point mode, disable Wi-Fi or Wi-Fi Direct from the printer's control panel.
❏
If you cannot connect to the product because the maximum number of connectable devices has been exceeded,
disconnect one of the devices from your product’s SSID (DIRECT-xxxxxxxx). If you do not know which devices are
currently connected, you can disconnect all devices from your product by changing the password from the product’s
control panel. Note that this will disconnect all devices. To reconnect a device that was disconnected using this
procedure, make network settings again.
Peer-to-peer mode
When the product is running in peer-to-peer mode (Wi-Fi Direct mode), the Wi-Fi Direct peer-to-peer mode icon is
displayed on the product's screen. The shape and location of the icon varies depending on the model. For more details,
see the product's on-screen Help or documentation.
The connection specifications are as follows:
❏ Number of concurrent connections: 1
❏ Security: WPA2-PSK (AES)
❏ Standard: 802.11g
Note:
❏ While a network is connected using peer-to-peer mode, any other network connections are disconnected. As a result,
Epson Connect and other functions to access the product using the Internet are disabled too.
❏
When the product is connected with peer-to-peer mode, product firmware update is not available.
❏
If you want to release connection, disconnect the product from your device. The product reconnects previous network.
Ad Hoc mode
In Ad Hoc mode, the product and computer communicate wirelessly without using an access point. First, set the
computer’s Ad Hoc settings (SSID) to connect using Ad Hoc mode.
For Windows:
Insert your product’s software disc into your computer, and then follow the on-screen instructions.
“Windows” on page 7.
For Mac OS X:
Make the network settings using EpsonNet Setup.
“Mac OS X” on page 9
15
Network Guide
Using Product via Network
Note:
❏ Even if you have a Wi-Fi connection, the product and the computer may not be able to communicate in your
environment. You should still be able to set up an Ad Hoc connection. This is a direct connection between product and
computer. This will allow only one PC to connect. Other PCs will not be able to make a Wi-Fi connection to the product.
❏
The procedure to set up Ad Hoc by computer depends on your OS, computer, and the manufacturer of your wireless
devices. For details, refer to the documentation of the wireless devices or contact the manufacturer’s customer support.
The following section describes setup for Windows 7, Vista, XP or Mac OS X standard settings.
For Windows 7/Vista
A
Select Start > Control Panel > View network status and tasks.
B
Click Change adapter settings (for 7) or Manage network connections (for Vista).
C
Double-click the Wireless Network Connection icon.
D
For Windows 7: Click Open Network and Sharing Center, and then click Set up a new connection or
network.
For Windows Vista: Click Set up a connection or network.
E
Select Set up a wireless ad hoc (computer-to-computer) network, and then click Next.
F
Click Next.
16
Network Guide
Using Product via Network
G
a
See the following table to make your settings, and then click Next.
Network name (SSID): enter a name using any of the following characters.
0123456789
!”#$%&’()*+,-./:;
ABCDEFGHIJKLMNOPQRSTUVWXYZ
abcdefghijklmnopqrstuvwxyz
[\]^_`{|}~<=>?@
b
Security type: select WEP.
c
Security key: enter a word using 5 or 13 ASCII characters (e.g., epson), or 10 or 26 hexadecimal characters.
d
(Windows 7/Vista)
Save this network: select this check box.
H
Click Close.
I
Double-click the Wireless Network Connection icon.
J
Make sure the Ad Hoc connection has been registered, and then click appropriate place on the Desktop (for 7)
or Cancel (for Vista).
Note:
If the Connect button is displayed when you select the network name (SSID), click Connect.
For Windows XP
A
Select Start > Control Panel > Network and Internet Connections.
B
Click Network Connections.
17
Network Guide
Using Product via Network
C
Right-click Wireless Network Connection, select Properties, and then click the Wireless Networks tab.
Note:
If you are using a utility that was supplied with your wireless device, the Wireless Networks tab may not be displayed.
For more details, see the documentation supplied with your wireless device.
D
Select Use Windows to configure my wireless network settings and then click Advanced.
E
Select Computer-to-computer (ad hoc) networks only.
F
Clear Automatically connect to non-preferred networks and then click Close.
G
Click Add.
H
See the following table to make your settings, and then click OK.
a
Network name (SSID): enter a name using any of the following characters.
0123456789
!”#$%&’()*+,-./:;
ABCDEFGHIJKLMNOPQRSTUVWXYZ
abcdefghijklmnopqrstuvwxyz
[\]^_`{|}~<=>?@
18
Network Guide
Using Product via Network
b
Security type: select WEP.
c
Security key: enter a word using 5 or 13 ASCII characters (e.g., epson), or 10 or 26 hexadecimal characters.
d
(Windows XP)
The key is provided for me automatically: clear this box to enter the security key.
e
(Windows XP SP3)
Connect even if this network is not broadcasting: select this check box.
I
Click the Connection tab.
J
Select Connect when this network is in range, and then click OK.
K
Right-click Wireless Network Connection, select Properties., and then click the Wireless Networks tab again.
L
Check that the icon has a blue circle, and then click OK.
For Mac OS X
A
Select System Preferences from the Apple Menu.
B
Click Network icon.
19
Network Guide
Using Product via Network
C
Select AirPort, and then click Turn AirPort On.
D
From the Network Name list, select Create Network.
E
Enter a network name, and then select the Require Password check box.
F
Enter a password, and then click OK.
G
Click Advanced.
H
Click TCP/IP.
I
Check Using DHCP from the Configure IPv4 list, and then click OK.
J
Click Apply.
Epson Connect Service
Epson Connect allows you to create a link between your network device (such as a smartphone, tablet PC, portable
computer, and so on) and a network-connected product. You can easily print anywhere, use network scanning, use a
Web site storage service, and so on.
The available Epson Connect services and functions vary depending on the model.
You can confirm information, such as the products that are compatible with the services, available functions, the status
of firmware updates, and so on, through the Epson Connect Web site.
For more details, visit the Epson Connect Web site:
https://www.epsonconnect.com/ (Epson Connect portal site)
http://www.epsonconnect.eu/ (Europe only)
20
Network Guide
Using Product via Network
Web Page Embedded in the Product
Web Config
The product has an embedded Web page (Web Config). By accessing the Web Config using a Web browser from a
computer or digital device that is connected to the same network as the product, you can confirm the product or
network status and make network service settings, and so on. The available functions vary depending on the model.
❏ Confirming the product status
You can confirm the product ink cartridge status or network connection status.
❏ Updating the product firmware
New functions may be available for your product after it was sold. In order to use the new functions, you need to
update the product’s firmware with the latest version of the firmware provided by Epson.
❏ Making network service settings
If your product supports network services, such as Epson Connect, AirPrint or Google Cloud Print, you can make
or change the settings.
Note:
This feature is not available for all products or may not be enabled.
Accessing a Web Config
A
Enter the product’s IP address to a Web browser from a computer or digital device, and then search for the
product.
The input format for IPv4 is ‘http://<product IP address>’. (without the < >)
The input format for IPv6 is ‘http://[product IPv6 address]/’ (with the [])
21
Network Guide
Using Product via Network
Note:
You can also open Web Config by using the following method.
Windows 8/7/Vista:
1. Select Desktop > Settings charm > Control Panel, and then select View devices and printers (for Windows 8).
Click start > Control Panel > Hardware and Sound > Devices and Printers (for Windows 7).
Click start > Control Panel > Hardware and Sound > Printers (for Windows Vista).
2. Right-click your product icon, and then select Properties.
3. Select the Web Services tab, and then click the URL.
Mac OS X (10.6.x or later):
1. Select System Preferences > Print & Scan.
2. Select your product, and then click Options & Supplies.
3. Click Show Printer Webpage.
iOS/Android:
1. Launch Epson iPrint.
2. Tap Maintenance > Printer Settings.
B
Check your product’s status and configure the settings.
22
Network Guide
Troubleshooting
Troubleshooting
Tips for Solving Network Problems
Network problems may be caused by the network environment, computer, and product. To help resolve problems,
you can check and confirm the network status using the following methods.
Note:
When changes are made to the network settings, it takes about 30 to 60 seconds to reflect the setup changes.
(The time until the changes are reflected varies depending on the setting method, wireless router, access point, and so on.)
Printing a network connection check report
If you make changes to the network settings, such as changing the network environment, you can check the network
connection and print a network connection check report.
If the network connection fails, the check report helps you to find a solution to the problem.
For more details about how to check the network connection and print the check report, refer to the documentation of
your product.
Note:
This feature is not available for products that do not have an LCD panel.
For information on using the network connection check report, click the following link.
This feature is not available for all products or the feature may not be enabled.
html/_files/nwchk.htm
Displaying the network status and printing a network status sheet
You can display the network status on the LCD and print a network status sheet. In the network status, you can confirm
information such as the connection method, connection speed (transmission speed), IP address, security method, and
Epson Connect status.
If your product has an LCD panel, you can display simplified status information and print detailed status information.
This feature is not available for all products.
If your product does not have an LCD panel, you can print detailed status information using the buttons on the control
panel.
For more details about displaying the network status and printing the network status sheet, refer to the documentation
of your product.
23
Network Guide
Troubleshooting
Disabling and initializing the Wi-Fi settings
Network problems may be resolved by disabling or initializing the Wi-Fi settings, and then making the settings again.
These operations vary depending on the model. For more details, refer to the documentation of your product.
Note:
Before you disable or initialize the Wi-Fi settings, it is recommended that you confirm and write down the SSID and
password first.
Disabling the Wi-Fi function:
If your product has an LCD panel, you can disable the Wi-Fi function using the LCD panel.
If your product does not have an LCD panel, you can disable the Wi-Fi function by connecting an Ethernet cable that is
connected to an active network.
If your product does not have an LCD panel or an Ethernet interface, you can disable the Wi-Fi function by initializing
the network settings using the buttons on the control panel.
Note:
If your product has the Ethernet and Wi-Fi function, the Ethernet function is enabled when the Wi-Fi function is disabled.
Initializing the network settings:
If your product has an LCD panel, you can initialize the network settings using the LCD panel.
If your product does not have an LCD panel, you can initialize the network settings using the buttons on the control
panel.
Note:
If you initialize the network settings, the Epson Connect settings and the settings for the network print services provided by
other companies will be initialized too.
Updating product firmware
Network problems may be resolved by updating the product firmware. Confirm that you are using the latest version of
the product firmware.
Use a Web browser to open a Web page embedded in the product, and then carry out the firmware update in the top
menu.
Note:
This feature is not available for all products or may not be enabled.
For more details about opening a Web page embedded in the product, refer to “Web Page Embedded in the Product”
on page 21.
24
Network Guide
Troubleshooting
Checking the communication using the Ping command
If you cannot access the Web page embedded in the product, the product does not respond even though you sent a
print job to the product, or other problems occur, you can use this feature to confirm whether communication is
established between the computer and the product.
Before using the Ping command, you need to confirm the IP addresses set on the computer and product.
For more details about operating the computer, refer to “Ping command” on page 25.
Ping command
In the TCP/IP network environment, confirm the IP addresses set on the computer and product, then check whether
communication is established between the computer and product.
Confirming in Windows 8/7/Vista/XP
A
Check the product’s IP address.
The IP address can be checked on a network status sheet, check report, or LCD screen.
To check on a network status sheet, see “Displaying the network status and printing a network status sheet” on
page 23.
B
For Windows 8: Select All apps, and then select Command Prompt.
C
Type ‘ping’, a space, and ‘<the product’s IP address>’, then press the Enter key.
D
If a communication is established, Reply from <the product’s IP address> is displayed.
For Windows 7/Vista/XP: Click the Start button or start, All Programs or Programs, Accessories, and then
Command Prompt.
If communication is not established, Destination host unreachable or Request timed out is displayed. Check
the device’s network settings on the computer.
Confirming in Mac OS X
A
Confirm the product’s IP address.
B
Double-click Macintosh HD, Applications, Utilities, and then Network Utility.
C
Click the Ping tab.
D
Enter the product’s IP address in the network address field.
The IP address can be checked on a network status sheet. See “Displaying the network status and printing a
network status sheet” on page 23.
25
Network Guide
Troubleshooting
E
Click Ping.
F
If communication is established, all signals are returned and 0% packet loss is displayed.
If communication is not established, no signal is returned, and 100% packet loss is displayed. Check the
device’s network settings on the computer.
Setup Problems
Connecting to Wi-Fi
Cannot find SSID
❏ Is the wireless router/access point connectable?
Use your computer or other devices to confirm whether it can be connected wirelessly.
❏ Is the product far from the access point, or is there an obstacle between them?
Move the product close to the access point, or remove the obstacle.
❏ Is the SSID (network name) hidden according to the access point settings?
If the access point stealth function, etc. is turned on to hide the SSID, enter the SSID on the control panel. See
“From the Product’s Control Panel” on page 12.
❏ Does the SSID (network name) contain Non-ASCII characters?
Check if the SSID (network name) contains Non-ASCII characters. The product cannot display Non-ASCII
characters.
Cannot connect to access point
❏ Is the product far from the access point, or is there an obstacle between them?
Move the product close to the access point, or remove the obstacle.
❏ Is the password correct?
The password is case-sensitive. Verify that the entered password is correct. A password may be called a “WEP
key”, a “WPA passphrase”, a “Pre-Shared Key”, and so on according to the access point or security system being
used.
❏ Are access restrictions set on the access point?
If access restrictions are set on the access point (wireless router, etc.), register the product’s MAC address or IP
address on the access point to allow communication. For details, see the access point user’s guide.
❏ Are usable wireless channels restricted on the WLAN-equipped computer?
Usable wireless channels may be restricted on a wireless-equipped computer. See the computer’s or wireless card’s
user’s guide to confirm usable wireless channels. Verify that wireless channels confirmed above include channels
set to the access point. If not, change the access point wireless channels.
❏ Is the network adapter compatible with this product’s standards?
There are different standards such as 802.11a, 802.11b, 802.11g and 802.11n for Wi-Fi devices, and
electromagnetic waves of different frequencies are also used.
26
Network Guide
Troubleshooting
Connecting to Wi-Fi Direct
Cannot access the internet when connecting a product to a computer which has
multiple network interfaces by using Wi-Fi Direct
❏ Is the network adapter connected to the Internet set to low priority?
If you connect a computer to the product by using Wi-Fi Direct (access point mode) while using a low-speed
Internet connection, you may not be able to access the internet.
A
Display the Windows Network Connections screen.
For Windows 8: Select Desktop > Settings charm > Control Panel, and then select View network status and
tasks > Change adapter settings
For Windows 7: Click Start > Control Panel > Network and Internet > Network and Sharing Center > View
network status and tasks > Change adapter settings
For Windows Vista: Click Start > Control Panel > Network and Internet > Network and Sharing Center >
View network status and tasks > Manage network connections
For Windows XP: Start > Control Panel > Network and Internet Connections > Network Connections
B
Right-click Wireless Network Connection (DIRECT-xxxxxxxx), and then select Properties.
C
Select Internet Protocol Version 4 (TCP/IPv4), and then click Properties.
D
Click Advanced.
E
Clear Automatic metric, enter "100" in Internet metric, and then click OK.
Note:
If you still cannot connect to the Internet, perform the same operations from step 3 for Internet Protocol Version 6
(TCP/IPv6).
Wi-Fi Direct suddenly disconnects
❏ Has the Wi-Fi Direct password (access point mode) been changed?
Delete the connection settings in "DIRECT-xxxxxxxx" registered to your device, select "DIRECT-xxxxxxxx"
again, and then enter a new password. For more details on deleting settings, see the documentation provided with
your device.
❏ Have the product’s network settings been changed?
Check the product’s network settings. The network connection method may have been changed to a mode other
than access point mode. To change the connection method back to access point mode from another mode,
initialize the product’s network settings, and then reconnect the device to the product using Wi-Fi Direct. You can
check the product’s network settings from the product’s LCD screen or network status sheet.
27
Network Guide
Troubleshooting
Connecting to Ethernet
Cannot connect to Ethernet
❏ Is Wi-Fi Setup set to Disable on the control panel?
If set to Enable, communication cannot be established on an Ethernet network. Set it to Disable.
❏ Does your computer have more than one network interface?
The scanner may not be able to communicate with computers that have multiple network interfaces. To
communicate with the scanner, disable all network interfaces on your computer except for the interface
connected to the scanner.
❏ Are the hub, Ethernet cable, etc. working properly on an Ethernet network connection?
Verify that the product is turned on, and that the link LED of the product-connected hub port lights/flashes. If the
link LED is off, try the following.
1. Connect to another port.
2. Connect to another hub.
3. Replace the Ethernet cable.
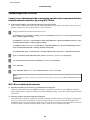
❏ Does the product’s communication mode correspond to the hub or router?
Confirm whether the product’s communication mode is appropriate for the hub or router.
See the following table to appropriately match up the communication modes of the product and hub/router. (The
product’s default communication mode is Auto).
For the procedure on confirming/setting the communication mode of the hub/router, see the user’s guide.
For details your product’s compatible communication mode, see the user’s guide.
Hub/Router Settings
Auto
Product
Settings
1000
Base-T
Full
Duplex
1000
Base-T
Half
Duplex
100
Base-TX
Full
Duplex
100
Base-TX
Half
Duplex
10Base
-TX Full
Duplex
10Base
-TX Half
Duplex
Auto
Y
Y
Y
N
Y
N
Y
100Base-TX
Full Duplex
N
N
N
Y
N
N
N
100Base-TX
Half Duplex
Y
N
N
N
Y
N
N
10Base-TX
Full Duplex
N
N
N
N
N
Y
N
10Base-TX
Half Duplex
Y
N
N
N
N
N
Y
Y: Enable N: Disable
28
Network Guide
Troubleshooting
Connecting to Wi-Fi or Ethernet
Cannot connect to network
❏ Is the message “The combination of IP address and subnet mask is invalid.” displayed?
Solution 1: If your broadband router (or access point) uses a DHCP function, set the TCP/IP setting so that the
product acquires an IP address automatically.
Solution 2: If you want to set the product’s IP address manually, see the following to set the IP address and subnet
mask.
1. Check the IP address for the broadband router (or access point) connected to your computer. See the broadband
router’s (or access point’s) user’s guide.
2. All IP addresses are written in segments of four numerical values. In the final segment, set a unique numerical
value for your product within a range of 1 to 254. (When the router is a DHCP server or when there is another
DHCP server in the network, set a value that does not conflict with the ID address range allocated by the DHCP
server.)
Setting example:
IP address for the broadband router: 192.168.1.1
Example setting on the product: 192.168.1.3
For the subnet mask, 255.255.255.0 is normally set for small-scale networks and all devices in the network use this
value. Also, when a gateway value is set, use the same value as the IP address for the wireless router.
❏ Does your computer have more than one network interface?
The scanner may not be able to communicate with computers that have multiple network interfaces. To
communicate with the scanner, disable all network interfaces on your computer except for the interface
connected to the scanner.
❏ When using TCP/IP, can the computer and product communicate?
Verify that a connection is established. See “Ping command” on page 25.
❏ When using TCP/IP, is the IP address set correctly for your environment?
The factory setting is not available as is. To use this IP address, delete it once and reenter the same address. Change
the product’s IP address as appropriate for your environment.
The IP address changes
❏ Is the TCP/IP setting on the control panel set to acquire an IP address automatically?
If the setting is auto, the IP address changes each time the product is turned on. When using the auto setting,
determine the power-on order, or always keep the product turned on. The auto setting is available when setting the
product port using EpsonNet Print (in Windows) or Bonjour printing (in Mac OS X).
Printing Problems
Computer Connected to Wi-Fi
Cannot perform network printing
❏ Are the network connection settings correct?
See “Setup Problems” on page 26 for more details on problems with network connection settings.
29
Network Guide
Troubleshooting
❏ Is the product correctly connected to the access point (wireless router, etc.)?
If disconnected, check the following.
The access point (wireless router, etc.) is turned on.
The Wi-Fi settings correspond to those on the target access point (wireless router, etc.).
❏ Is wireless communication interrupted or disconnected?
If disconnected, restart the product. For details on the control panel, see “From the Product’s Control Panel” on
page 12.
❏ Is a Privacy Separator function enabled on your access point (or wireless router)?
If a Privacy Separator function is enabled, you cannot print from a computer, smartphone, or tablet over a
network because this function blocks communication with these devices. Disable the Privacy Separator function
on the access point (or wireless router). For more information on making settings or checking the settings, see the
manual supplied with your access point (or wireless router).
Computer Connected to Ethernet
Cannot perform network printing
❏ Is wireless communication interrupted or disconnected?
If disconnected, restart the product. For details on the control panel, see “From the Product’s Control Panel” on
page 12.
Printing is slow or the data end is truncated
❏ Do the communication modes (full duplex/half duplex) of the product and connected hub match?
The product’s factory default communication line speed mode is auto. If the hub’s communication mode is fixed,
a mismatch occurs between the communication modes of the product and hub, and the printing speed becomes
extremely slow or the data end is truncated due to timeout.
30
Network Guide
Troubleshooting
Computer Connected to Wi-Fi or Ethernet
Cannot stop printing even though the print job was cancelled from the
computer
❏ Was the print job sent from a network computer running Mac OS X ( 10.5.x or 10.6.x)?
If all of the following conditions apply to your environment, you cannot stop printing from the computer.
- The product supports AirPrint.
- The print job was sent from a connected network computer running Mac OS X (10.5.x or 10.6.x).
- In the Bonjour settings of the Web page embedded in the product, Top Priority Protocol is set to IPP.
In this case, press the cancel button on the product’s control panel to stop printing.
If you want to be able to stop printing using the computer, make the following settings.
1. Open the Web page embedded in the product. Refer to “Web Page Embedded in the Product” on page 21.
2. Click AirPrint Setup.
3. Select Port9100 in the Top Priority Protocol pull-down menu, and then click OK.
4. If Top Priority Protocol:Port9100 is displayed, click OK.
5. Close the browser.
6. Select System Preferences from the Apple Menu.
7. Click the Print & Fax icon.
8. Select the product that you want to set from the product list, and then click - to delete the product.
9. Click + under the Printers list, and then select the product that you want to set from the network printer list.
10. When your product name is displayed in the Name box, click the Add button.
If you print from the re-registered product, you can stop printing from the computer.
Printing is slow or the data end is truncated
❏ Is the printer port setup correctly?
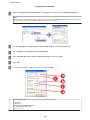
Follow the steps below to check the printer port (for Windows).
1. Select Desktop > Settings charm > Control Panel, and then select View devices and printers (for Windows 8).
Click start - Control Panel - Hardware and Sound - Devices and Printers (for Windows 7).
Click start - Control Panel - Hardware and Sound - Printers (for Windows Vista).
Click Start - Control Panel - Printers and Other Hardware - Printers and Faxes (for Windows XP).
2. Right-click your product icon.
3. Select Printer properties (Windows 8/7) or Properties (Windows Vista/XP).
4. Select the Ports tab.
5. Check that the correct protocol is selected in the descriptions column for your product.
Smartphone or tablet
Even though the device sends a multiple-page print job using AirPrint, the
printer prints only the last page
❏ Is the device running iOS 4.x?
AirPrint-compatible printers support devices running iOS 5.x or later. When using AirPrint to print, use iOS 5.x
or later. The printer may not print normally with iOS 4.x. If you are using iOS 4.x, upgrade the operating system to
iOS 5.x or later. To upgrade the operating system, visit the Apple Web site.
31
Network Guide
Troubleshooting
Scanning Problems
Connecting to Wi-Fi or Ethernet
Cannot start, set or scan with EPSON Scan
❏ Was the connection test successful?
If it fails, verify that there are no problems with the network.
❏ Is the IP address set correctly on the computer?
For details on network settings such as the IP address, see “Setup Problems” on page 26.
❏ Was the communication disconnected?
If the communication was disconnected during EPSON Scan startup, exit EPSON Scan, and restart after a while. If
EPSON Scan cannot restart, turn the product off and back on, then retry.
Check the Timeout Setting in EPSON Scan Settings. For details, see the EPSON Scan Help.
❏ Is the Firewall function active in Windows XP or later, or commercially available security software?
If the Firewall function is active, the search may not work in EPSON Scan Settings. In this case, click EPSON Scan
Settings - Add - Enter address, and directly enter the IP address.
❏ Are you scanning a wide range in high resolution?
If a wide range is scanned in high resolution, a communication error may occur. If the scan did not work, lower the
resolution.
Cannot operate Scan to PC (WSD)
❏ Is a WSD compatible computer connected to the network?
The Scan to PC (WSD) function is only available for Windows 8/7/Vista English version computers. Make sure
that a computer running Windows 8/7/Vista English version is connected to the scanner on the same network.
Problems Specific to the Operating System
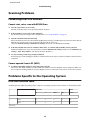
IPv4/IPv6 function table
Available functions differ depending on the computer’s operating system. For more details, see the following table.
Function
Windows
Mac
8
7
Vista
XP
OS X
IPv4
Y
Y
Y
Y
Y
IPv6
Y
Y
Y
-
Y
Compatible
Print port
32
Network Guide
Troubleshooting
Standard TCP/IP Port
v4/v6
v4/v6
v4/v6
v4
-
EpsonNet Print Port
v4
v4
v4
v4
-
WSD Port
v4/v6
v4/v6
v4/v6
-
-
Bonjour Printing
-
-
-
-
v4/v6
EPSON Scan
v4
v4
v4
v4
v4
Event Manager
v4
v4
v4
v4
v4
WSD Scan
v4/v6
v4/v6
v4/v6
-
-
v4
v4
v4
v4
v4
v4
v4
v4
v4
v4
Scanning
File shared (Memory card, external device)
Sending/receiving Fax
v4=IPv4, v6=IPv6
Mac OS X
The printer does not appear in Add Printer
❏ Is the printer driver installed?
Install the printer driver. For details about software setup, see “Mac OS X” on page 9.
❏ Is the network service at the top of the network list?
If both wired and wireless network services are enabled on your computer, it may not be able to find the printer.
In this case, follow the instructions below to set the network service you want to use at the top of the list.
1. Open System Preferences - Network.
2. Click the
icon to select Set Service Order.
3. Drag the network service type that you use the most to the top of the list.
4. Click OK.
5. Click Apply to apply the settings.
❏ Are the network settings configured on the computer?
The settings vary depending on the protocol. Try the following:
EPSON TCP/IP: Open System Preferences - Network - Advanced - TCP/IP and check whether the addresses
are set or if the correct IP address different from the factory setting is set on the product’s network interface. See
“Setup Problems” on page 26.
33
Network Guide
Troubleshooting
Cannot stop printing even though the print job was cancelled from the
computer
❏ Was the print job sent from a network computer running Mac OS X ( 10.5.x or 10.6.x)?
If all of the following conditions apply to your environment, you cannot stop printing from the computer.
- The printer supports AirPrint.
- The print job was sent from a connected network computer running Mac OS X (10.5.x or 10.6.x).
- In the Bonjour settings of the Web page embedded in the printer, Top Priority Protocol is set to IPP.
In this case, press the cancel button on the printer’s control panel to stop printing.
If you want to be able to stop printing using the computer, make the following settings.
1. Open the Web page embedded in the printer. Refer to “Accessing a Web Config” on page 21.
2. Click AirPrint Setup.
3. Select Port9100 in the Top Priority Protocol pull-down menu, and then click OK.
4. If Top Priority Protocol:Port9100 is displayed, click OK.
5. Close the browser.
6. Select System Preferences from the Apple Menu.
7. Click the Print & Fax icon.
8. Select the printer that you want to set from the printer list, and then click - to delete the printer.
9. Click + under the Printers list, and then select the printer that you want to set from the network printer list.
10. When your printer name is displayed in the Name box, click the Add button.
If you print from the re-registered printer, you can stop printing from the computer.
Cannot print a CD/DVD label from Epson application
❏ Did you select an Epson product name on the Use menu?
If you connect your product to a network using the Bonjour protocol, select your Epson product name on the Use
menu in the driver. Otherwise some functions in Epson applications will not be available.
iOS
Even though the device sends a multiple-page print job using AirPrint, the
printer prints only the last page
❏ Is the device running iOS 4.x?
AirPrint-compatible printers support devices running iOS 5.x or later. When using AirPrint to print, use iOS 5.x
or later. The printer may not print normally with iOS 4.x. If you are using iOS 4.x, upgrade the operating system to
iOS 5.x or later. To upgrade the operating system, visit the Apple Web site.
Android
Cannot access the internet when connecting to a product using the Wi-Fi Direct
access point mode
❏ Are you using an older version of Epson iPrint?
When printing from an Android device using the Wi-Fi Direct access point mode, use the latest version of Epson
iPrint.
34
Network Guide
Troubleshooting
Software Problems
A dial-up connection dialog box appears when printing with
EpsonNet Print
❏ Is the Internet connection set to dial-up connection?
Printing ends normally after you close this dialog box, but the message appears every time you print after starting
Windows. Connect to the Internet using a LAN or start a dial-up network manually.
Unblocking Epson software
❏ Did you click the Keep Blocking button on the Firewall screen?
If you clicked the Keep Blocking button on the Windows Security Alert window during or after installation of the
Epson software, follow the steps below to unblock Epson software.
A
For Windows 8: Select Desktop > Settings charm > Control Panel, and then select System and Security.
For Windows 7: Click Start > Control Panel, and then click System and Security.
For Windows Vista: Click Start > Control Panel, and then click Security.
For Windows XP: Click start > Control Panel, and then click Security Center.
B
For Windows 8: Select Allow an app through Windows Firewall.
For Windows 7: Click Allow a program through Windows Firewall.
For Windows Vista: Click Allow a program through Windows Firewall.
For Windows XP: Click Windows Firewall.
C
For Windows 8: Select Change settings, and then select Allow another app.
For Windows 7: Click Allow another program.
For Windows Vista: Click the Exceptions tab, and then click Add Program.
For Windows XP: Click the Exceptions tab, and then click Add Program.
Note for Windows Vista users:
Click Change settings if you cannot find the Exceptions tab.
D
Select Epson software from the list, and then select Add (for 8/7) or OK (for Vista/XP).
E
Confirm that the Epson software check box is selected in Allow apps and features (for 8), Allowed programs
and features (for 7), Programs or port (for Vista), or Programs and Services (for XP), and then select OK.
35
Network Guide
Troubleshooting
Other Problems
The product cannot set up network services or suddenly cannot use
network services
❏ Has the product's root certificate expired?
If the product's root certificate has expired, a message indicating that you need to renew the root certificate is
displayed in Web Config or on the product's screen. Use a browser to access the product's Web Config from your
computer or smartphone on the same network as the product, and then update the root certificate.
For details of how to access the product's Web Config, see “Accessing a Web Config” on page 21.
36
Network Guide
Copyrights and Licenses for Network Features
Copyrights and Licenses for Network Features
Copyrights, Trademarks, and Licenses
®
®
®
Microsoft , Windows , and Windows Vista are registered trademarks of Microsoft Corporation.
Apple, Mac OS, Bonjour, and Macintosh are trademarks of Apple Inc., registered in the U.S. and other countries.
AirPrint is a trademark of Apple Inc.
™ and Google Cloud Print™ are trademarks of Google Inc.
Wi-Fi , Wi-Fi Alliance , and Wi-Fi Protected Access (WPA) are registered trademarks of the Wi-Fi Alliance. Wi-Fi
®
®
®
Direct™, Wi-Fi Protected Setup™, and WPA2™ are trademarks of the Wi-Fi Alliance.
Android
Copyright 2013 Seiko Epson Corporation. All rights reserved.
Info-ZIP copyright and license
This is version 2007-Mar-4 of the Info-ZIP license. The definitive version of this document should be available at
ftp://ftp.info-zip.org/pub/infozip/license.html indefinitely and a copy at http://www.info-zip.org/pub/infozip/li‐
cense.html.
Copyright © 1990-2007 Info-ZIP. All rights reserved.
For the purposes of this copyright and license, “Info-ZIP” is defined as the following set of individuals:
Mark Adler, John Bush, Karl Davis, Harald Denker, Jean-Michel Dubois, Jean-loup Gailly, Hunter Goatley,
Ed Gordon, Ian Gorman, Chris Herborth, Dirk Haase, Greg Hartwig, Robert Heath, Jonathan Hudson, Paul
Kienitz, David Kirschbaum, Johnny Lee, Onno van der Linden, Igor Mandrichenko, Steve P. Miller, Sergio
Monesi, Keith Owens, George Petrov, Greg Roelofs, Kai Uwe Rommel, Steve Salisbury, Dave Smith, Steven
M. Schweda, Christian Spieler, Cosmin Truta, Antoine Verheijen, Paul von Behren, Rich Wales, Mike White.
This software is provided "as is," without warranty of any kind, express or implied. In no event shall Info-ZIP or its
contributors be held liable for any direct, indirect, incidental, special or consequential damages arising out of the use
of or inability to use this software.
Permission is granted to anyone to use this software for any purpose, including commercial applications, and to alter
it and redistribute it freely, subject to the above disclaimer and the following restrictions:
1. Redistributions of source code (in whole or in part) must retain the above copyright notice, definition,
disclaimer, and this list of conditions.
2. Redistributions in binary form (compiled executables and libraries) must reproduce the above copyright
notice, definition, disclaimer, and this list of conditions in documentation and/or other materials provided
with the distribution. The sole exception to this condition is redistribution of a standard UnZipSFX binary
(including SFXWiz) as part of a self-extracting archive; that is permitted without inclusion of this license, as
long as the normal SFX banner has not been removed from the binary or disabled.
37
Network Guide
Copyrights and Licenses for Network Features
3. Altered versions--including, but not limited to, ports to new operating systems, existing ports with new
graphical interfaces, versions with modified or added functionality, and dynamic, shared, or static library
versions not from Info-ZIP--must be plainly marked as such and must not be misrepresented as being the
original source or, if binaries, compiled from the original source. Such altered versions also must not be
misrepresented as being Info-ZIP releases--including, but not limited to, labeling of the altered versions with
the names "Info-ZIP" (or any variation thereof, including, but not limited to, different capitalizations),
"Pocket UnZip," "WiZ" or "MacZip" without the explicit permission of Info-ZIP. Such altered versions are
further prohibited from misrepresentative use of the Zip-Bugs or Info-ZIP e-mail addresses or the Info-ZIP
URL(s), such as to imply Info-ZIP will provide support for the altered versions.
4. Info-ZIP retains the right to use the names "Info-ZIP," "Zip," "UnZip," "UnZipSFX," "WiZ," "Pocket UnZip,"
"Pocket Zip," and "MacZip" for its own source and binary releases.
OPEN SOURCE SOFTWARE LICENSE
This printer product includes open source software programs. The detailed explanation about the open source
software license please click the following link.
html/oss_info.htm
38