1
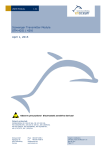
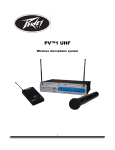
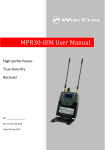
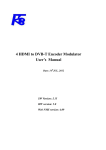
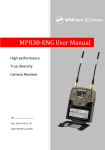
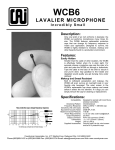
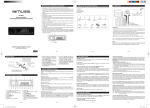
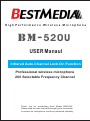
High Performance Wireless Microphone
BM-520U
USER Manaul
Infrared Auto-Channel Lock-On Function
Professional wireless microphone
200 Selectable Frequency Channel
Thank you for purchasing Best Media BM-520U.
Please read the user manual thoroughly prior to operate,
to ensure the microphone could be performed optimally
Features:
Best Media BM-520U is a well engineered,
high performance & high quality UHF wireless
microphone system. With its built-in infrared autochannel lock function and 200 frequency channel
to select from, the on-air radio interference will no
longer exist while operating BM-520U.
BM-520U comes with 2 handheld microphones,
an optional belt pack lapel with headset or
lavalier mic can be purchase separate.
For further information, please visit:
http://www.bestmediausa.com
-1-
.
WARNING! RISK OF ELECTRIC SHOCK DO NOT OPEN
ALWAYS KEEP THE MACHINE AWAY FROM WATER OR LIQUID
Cautions
Please do not open the system.
There are no user serviceable parts inside.
Refer all servicing to qualified personnel.
1.
Keep the manipulation instruction - please keep this manual for further need of
safety and manipulation requests .
2. Humidity Cautions - keep the machine away from humid conditions.
3. Heat Source - keep the devices away from heat sources, such as radiators,
heaters & stoves.
4.
Aeration - keep the machine in well ventilated conditions at all time, there
should be at least 5cm clearance around the device.
5.
Power Supply- use only the corresponded voltage as power source.
6 . No exposed fire should be on the device (e. g. flaming candles).
7 . No liquid or weights should be on the device, no water dripping or splashing onto
the device.
Protect the machine from being damaged as the pictures shown above.
-2-
Package Includes:
Dual-Channel Wireless RF Receiver x 1
Handheld Microphone x 2
User Manual, Microphone Cable, Rack Mounted Kits x 1
Antennas, Battery Set, Anti-Rolling Plastic Rings x 2
System configuration:
Two Handheld Microphones
One Handheld Mic + One Belt-Pack Lapel (the lapel can be a headset or a lavalier)
Lapels, headset mics & lavaliers are optional item, purchase seperate.
Two Belt-Pack Lapels (each lapel can be a headset or a lavalier)
Lapels, headset mics & Lavaliers are optional item, purchase seperate
UP
UP
SET
POWER
SET
Sync
DOWN
DOWN
VOLUME A
5
1
CHANNEL A
4
VOLUME A
CHANNEL B
2
3
2
4
1
12V 600mA
ANT B
SENSITIVITY B
7
BAL B OUT
MIX OUT
BAL A OUT
8
9
8
SENSITIVITY A
ANT A
DC INPUT
7
6
1﹜ Volume knob
2﹜ LED display: channel ,mute, receive-channel frequency, radio frequency, etc.
3﹜ Infrared channel-select window: send the channel parameter to the transmitter.
working in "SET" button
4﹜ Three function keys: Press “SET”, go to circular selection menu, press
to change
menu state, press "SET" again to activate the setting.
5﹜ Power button: To turn on, hold and press the on-off button until the LCD screen shows on.
To Turn off, Hold and press the on-off button for 3 second until the LCD screen shows off.
-3-
6﹜ Power socket :DC 15V 500m. A power inputs socket, central electrode of the socket connects
to positive pole.
7﹜ Antenna jack
8﹜ Noise elimination control: counter clockwise ,to turn down receive-sensitivlty, zoom in
receive-distance, but strengthen anti-jamming function, rice versa.
9﹜ Audio balance out: suitable for long-distance connection, capable to knock down the noise
caused by line-connection.
10﹜ Audio mix out: send out one mixed signal by two.
Introduction for the LCD of the receiver
1﹜ 8-level RF display: signal strength of the receiving frequency
2﹜ 8-level AF display: signal strength of the audio frequency
3﹜ Frequency menu display: when the indicator is on, current service frequency is
show by the last 6 digits
4﹜ Channel menu display: when the indicator is on, current service channel is shown
5﹜ Mute display: when the indicator is on, frequency signal is not received.
6﹜ Channel display:dynamic display for the current auto-selected atenna channel,
shows channelA,
means channel B.
-4-
Specifications
Handheld Microphone
1
5
2 4
1﹜ Sound receiver: steel netting and sound head module
2﹜ LCD: service channel and battery
3﹜ Infrared channel selecting window: send the channel parameter to transmitter, working in
the "SET" key of the receiver
4﹜ 3-step on-off: turned-off goes downwards, mute stays middle, turned-on goes upward.
Caution: if you want the microphone works mute during in use, you can set
the switch at middle rather than turning on. Switch downwards to
turn off after use.
6
3
7 8
5﹜ Pipe body: built-in transmitting antenna inside
6﹜ Battery cage: 2x1.5V alkaline batteries(please remove the batteries if not in use for a long
time)
7﹜ High-Low RF switch(located inside the battery cage)
Tips: While running several BM-520U in KTV rooms, low frequency strength is
recommended. Longer battery life & less frequency conflict will be benefitted.
-5-
Specifications of the handmike
8﹜ Lock key (located in battery cage): used to lock the power on-off switch upwards
go to "ON" at the time outside power switch off, the microphone is still
working at mute, but the transmitting mike remains transmitting state.
Caution: This switch is available to keeping non-professional from
shutting down the mike by mistake channing in use (because
unexpected turned-off causes 2-3 sec delay)
Introduction of hand mike LCD
1﹜ Channel display: current service channel
2﹜ 8-level battery volume display: when the last 2-level starts displaying, full battery
is required.
3﹜ Please put on full-changed battery when display,as pic 2.
4﹜ When lock key is on with power switch off, display as pic 3,which means
transmitter is locked, mute function is on while power off
-6-
Specifications of the handmike
manual for handheld transmitter
channel battery volume. If service channel needs to change, receiver's channel
should be changed first. Then aim up the infrared windows of transmitter and
receiver, and then operate channel-selecting by hitting "SET" in receiver, klew
channel para meters will be sent to the transmitter.
manual for handheld transmitter
1﹜ hold the column on upside, press the battery cover on upside, which is found
right below the sphere protect-net slide down the battery cover,the battery cage
will open.
IR PORT
SWITCH
INDICATOR
CH 36
FREQUENCY
774.000MHz
2﹜Put two new 1. 5V alkaline battery on. Make sure polarities are well set.
Caution: do not misset polarities, it may alamage internal electronic
components of transmitter
3﹜ Put on the battery cover again
-7-
Channel-selecting and other special functions of the receiver
select channel autometically with infrared
1﹜ Turn on the receiver: press the power on-off and hold on until LCD lights up.
2﹜ Select channel(or frequency)by pressing "
" or "
" t hen p ress "S E T" to ensure
the selection.
3﹜ Turn on the mike, press "SET" , LCD will display like pic
selecting window of the mike of ACT
1, then aim the channel-
window of the receiver,till LCD displays
like pic 2,channel is well-selected.
4﹜ Display like pic 3, which means infrared is sent but not yet selected by any
channel,so press "
" to select channel one more time.
Swich channel display to frequency display
1﹜ Turn on the receiver: press the power on -off and hold on until LCD lights up.
2﹜ Press "SET" twice,display like pic 4.
3﹜ Press " ", sparkle like pic 5.
4﹜ Press "SET" to ensure, press again, go back to frequency display state, like pic
-8-
6.
Receiving machine channel-selecting and other special
functions of the the receiver.
* switch frequency display to channel display
1﹜ Turn on the power of the receiving machine: press the power button the LCD
light is bright.
2﹜ Press "SET" continuously for tuile. Show it picture 4
3﹜ Press "
" button,apper "picture 3" and flash
4﹜ Press "SET" to ensure. Press it again and than it will let to the situation of frequency
display.
* lock the choosen channel
This locked function can be used when the receiving machine is adjusted.
When the locked function is on, the three function button in the receiving
machine panel would be locked, in order to prevent nonprofessional person(s)
accidentally use.
Operortion steps below:
1﹜ Turn on the power of receiving machine:press the power button,LCD light is bright.
2﹜ Press "SET" continuously for three time, appear like picture 7
3﹜ Press the"
" button to ensure and finish the function of locked channel.
* turn off the locked funcation
1﹜ turn on the power of the receiving machine: press the power button and LCD
light is bright
2﹜Press "SET" button for once, appear picture 8
3﹜ Press"
"button, appear picture T and flash
4﹜Press "SET" to ensure, finish the function of unlocking.
-9-
functions of the lapel mic
Introduction of the lapel mic
2
4
1
6
8
1﹜ input socket
2﹜ power on-off: "ON" means power on,"OFF" means power off
3﹜ indicator: when the switch goes to "ON",the indicator sparkles for once, which means
the battery works well. if it has no flare, the battery is empty, or not yet well-setted.
if the indicator is on at all time, the battery is running out.
4﹜ transmitting antenna:1/4 wave lengh flagelliform antenna.
5﹜ clip: fix the mini mike some where on waist-side, can be revolved by 180
6﹜ LCD: current service channel and battery volume.
- 10-
Lapel transmitter funcation
7﹜ infrared channel-selecting window; work in the "SET" button of the receiving machine, set
the channel number to the transmitter.
8﹜ battery holder:2x1.5V alkaline batteries
9﹜ function setting button: induding two "up" "down" chosing buttons and one menu
selection.
10﹜ "high/low" frequency emission changing button.
* Lapel transmitter operational guidance
operation method is the same as the handheld transmitter's. lt also has "high" and "low"
frequency changing function.
* The batteries installation of lapel transmitter
1﹜ Press both sides of the battery cover lightly and slide out, than you can open the battery
cage as below.
upside of the battery cover
2﹜ Put into 2x1.5V alkaline battery please ensure the battery polarities
are well-set following the polarity guidance in the battery holder
3﹜ Put on the battery cage cover.
(caution:please take out the batteries in the transmitter,if you will not use the system
for long time)
- 11-
Operation method and attentions
Operation method:
1﹜ Connect the audio system well;
2﹜ Set the volume of the receiving machine and the loudspeaker to mix;
3﹜ Turn on the power of the audio system from backing stage to backward stage;
4﹜ Turn on the power of the transmitter;
5﹜ Adjust the audio effect of the audio system: first, adjust the volume of the receiving
machine to the middle point, turn on the microphone, talk directly toward the microphone,
adjust appropriate volume, adjust tone, volume controller carefully to ensure the voice is
clear and the volume is suitable. Hdd the phone and hare the "on show" proless;
6﹜ If the wireless receiving machine system has some problems. Please note that this function
has troubleshooting to solve the problem. If the problem is not indicated in the troubleshooting.
Please ask for the professional to solve it or negotiate with the franchiser;
7﹜ After using, please turn off the power of the transmitter rather than turn off the power of all the
audio system from the backstage.
Attentions:
1﹜The locaton of the antenna effect the receiving of the receiving machine directly.
so pay close attention to the installation method. It is important to keep the distance
between the microphone and the receiving machine as short as possible.
2﹜Avoid putting the receiving machine near the computer or other equipment which can
produce RF signal.
3﹜Avoid placing the receiving machine in the orlop of the DB, excluding the installation antenna
from distance.
4﹜This receiving machine system can fill 200 microphone at the same time, and it would not
disturb each other. If need, please let professional to adjusted different channels.
5﹜When some wireless systems are used at the same time ,please pay attention to the setting
of "SQ" of the receiving machine. The lower the sensitive, and the shorter the capacity
of disturbance. It is better that the transmit phone is short because it can save the electricity and
decrease jamming at the same time.
- 12-
BM-520U Trouble Shoot
Questions
Solutions
No voice; (situation: the receiving machine
RF display does not turn on)
Check the transmitter and the receiving machine, see
whether it displays "ON"
Check whether the "negativre" and the "positive" pole
of the battery is mistaking installed.
Check the connection of the receiving machine
and the aerial.
Make sure that there is no block between the aerial and
the transmitter.
No voice;(situation:RF display is nomal;AF
display is nomal)
Check whether the voice re-knob of the receiving machine
is on the lowest place.
Check whether the connecting between the loudspeakers
of the receiving machine are nomal.
No voice;(situation:RF display is nomal;AF
display is un-nomal)
Check whether the power of the transmitter is open
Exchange the mike of the transmitter when it is necessary
Put through the transmitter,there is some noise
or some interruption noise in the receiving signal
Check whether the battery is tight enough.
Eliminate the RF source of the disturbance nearby.
Check the connection, if using guitar or other
musical instrument.
If both of the transmitters are using the same frequency,
check and close one of them off.
Maybe the signal is too weak, adjust the place of the
antenna until it close to the transmitter as possible.
Replace other channel.
There is some noise, after closing the transmitter.
Adjust the sensitivity button of the transmitter; the"SQ"
button.
Eliminate source of noise of RF.
Adjust the place of the receiving machine or the place
of the antenna over again
While the showplace is moving. the voice from
the transmitter may get lost sometimes.
Adjust the sensitivity button of the transmitter; the"SQ"
button.
Locate the receiving machine over again and have the
"on-show" experiment,oberve the RF display.
If you find some voice lost, tag the point and avoid this
point when performing.
Can not open the transmitter
Change the battery of the transmitter.
- 13-
Technology speification
System Parameter:
work frequency:
modulation mode:
channels
channel frequency:
frequency stability:
dynamic bound:
max excursion:
frequency response:
S/N
T.H.D
operation distarce:
working environment
temperature:
690-740﹜ 740-790﹜ 800-850MHz
broadband FM
200
200KHz
+ 0.005%
100dB
+ 45KHz
60Hz-18KHz(3 + dB)
> 105dB
≒ 0.5%
about 100m (under the situation of no interruption)
-10
C-- +50
C
Receiving machine index:
receiving machine mode:
IF
antenna receive:
sensitivitire:
sensitivitive adjustable rang:
erratic control:
max output frequency
superheterodyhe
110MHz,10.7MHz
BNC/50次
12dBuV(80dB S/N)
12-32dBuV
≡75dB
+10dBV
Transmitter index:
antenna:
output frequency:
erratic control:
power supply:
battery vitality:
hand microphone has on in built helix
antenna transmitter 1/4 ware-lergh
flagelliform antenna
max frequency 30mw;min frequency 3mw
-60dB
2x1.5V alkaline batteries
about 10 hours under normal frequency
transmittion,about 15 hours under low
frequency transmittion.
- 14-
F
UH
http://www.bestmediausa.com
1(800)507-5203