1
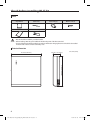
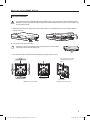
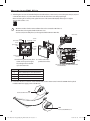
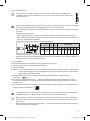
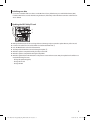
QUESTIONS OR COMMENTS? COUNTRY CALL OR VISIT US ONLINE AT U.S.A - Consumer Electronics 1-800-SAMSUNG(726-7864) www.samsung.com/us/support U.S.A 1-800-SAMSUNG(726-7864) www.samsung.com/us/support 1-800-SAMSUNG(726-7864) www.samsung.com/ca/support (English) www.samsung.com/ca_fr/support (French) CANADA CAC Wifi APP-NA_IBIIM_EN_DB68-05417A-00.indd 24 2015-03-16 오후 2:21:50 Smart AC application MIM-H03UN Multi Wi-Fi kit user & installation manual imagine the possibilities EN FR DB68-05417A-00 CAC Wifi APP-NA_IBIIM_EN_DB68-05417A-00.indd 25 2015-03-16 오후 2:21:50 Contents Safety precautions . . . . . . . . . . . . . . . . . . . . . . . . . . . . . . . . . . . . . . . . . . . . . . . . . . . . . . . . . . . . . . . . . . . . . . . . . . . . . . . . . . . . . . . . . . . . . . . . 3 Check before installing Wi-Fi kit . . . . . . . . . . . . . . . . . . . . . . . . . . . . . . . . . . . . . . . . . . . . . . . . . . . . . . . . . . . . . . . . . . . . . . . . . . . . . . . . . . . 4 Parts . . . . . . . . . . . . . . . . . . . . . . . . . . . . . . . . . . . . . . . . . . . . . . . . . . . . . . . . . . . . . . . . . . . . . . . . . . . . . . . . . . . . . . . . . . . . . . . . . . . . . . . . . . . . . . . . . . . . . 4 Exterior dimension . . . . . . . . . . . . . . . . . . . . . . . . . . . . . . . . . . . . . . . . . . . . . . . . . . . . . . . . . . . . . . . . . . . . . . . . . . . . . . . . . . . . . . . . . . . . . . . . . . . . . . . 4 How to install Wi-Fi kit . . . . . . . . . . . . . . . . . . . . . . . . . . . . . . . . . . . . . . . . . . . . . . . . . . . . . . . . . . . . . . . . . . . . . . . . . . . . . . . . . . . . . . . . . . . . 5 Wi-Fi kit installation . . . . . . . . . . . . . . . . . . . . . . . . . . . . . . . . . . . . . . . . . . . . . . . . . . . . . . . . . . . . . . . . . . . . . . . . . . . . . . . . . . . . . . . . . . . . . . . . . . . . . . 5 Checking the Wi-Fi kit . . . . . . . . . . . . . . . . . . . . . . . . . . . . . . . . . . . . . . . . . . . . . . . . . . . . . . . . . . . . . . . . . . . . . . . . . . . . . . . . . . . . . . . . . . . . . . . . . . . . 8 Initializing user data . . . . . . . . . . . . . . . . . . . . . . . . . . . . . . . . . . . . . . . . . . . . . . . . . . . . . . . . . . . . . . . . . . . . . . . . . . . . . . . . . . . . . . . . . . . . . . . . . . . . . . 9 Updating the Wi-Fi kit by SD card . . . . . . . . . . . . . . . . . . . . . . . . . . . . . . . . . . . . . . . . . . . . . . . . . . . . . . . . . . . . . . . . . . . . . . . . . . . . . . . . . . . . . . . . . 9 Setting the network . . . . . . . . . . . . . . . . . . . . . . . . . . . . . . . . . . . . . . . . . . . . . . . . . . . . . . . . . . . . . . . . . . . . . . . . . . . . . . . . . . . . . . . . . . . . . 10 Specification of wired/wireless router for Samsung Smart Air conditioner . . . . . . . . . . . . . . . . . . . . . . . . . . . . . . . . . . . . . . . . . . . . . . . . 10 Starting Samsung Smart Home App . . . . . . . . . . . . . . . . . . . . . . . . . . . . . . . . . . . . . . . . . . . . . . . . . . . . . . . . . . . . . . . . . . . . . . . . . . . . . . 11 Downloading Samsung Smart Home App . . . . . . . . . . . . . . . . . . . . . . . . . . . . . . . . . . . . . . . . . . . . . . . . . . . . . . . . . . . . . . . . . . . . . . . . . . . . . . . 11 Running the Samsung Smart Home App . . . . . . . . . . . . . . . . . . . . . . . . . . . . . . . . . . . . . . . . . . . . . . . . . . . . . . . . . . . . . . . . . . . . . . . . . . . . . . . . 12 Registering the product . . . . . . . . . . . . . . . . . . . . . . . . . . . . . . . . . . . . . . . . . . . . . . . . . . . . . . . . . . . . . . . . . . . . . . . . . . . . . . . . . . . . . . . . . . . . . . . . . 13 Description of screens and main functions . . . . . . . . . . . . . . . . . . . . . . . . . . . . . . . . . . . . . . . . . . . . . . . . . . . . . . . . . . . . . . . . . . . . . . . . . . . . . . . 15 Main screen . . . . . . . . . . . . . . . . . . . . . . . . . . . . . . . . . . . . . . . . . . . . . . . . . . . . . . . . . . . . . . . . . . . . . . . . . . . . . . . . . . . . . . . . . . . . . . . . . . . . . . . . . . . . . 16 Menu screen . . . . . . . . . . . . . . . . . . . . . . . . . . . . . . . . . . . . . . . . . . . . . . . . . . . . . . . . . . . . . . . . . . . . . . . . . . . . . . . . . . . . . . . . . . . . . . . . . . . . . . . . . . . . 16 Starting System Air conditioner App . . . . . . . . . . . . . . . . . . . . . . . . . . . . . . . . . . . . . . . . . . . . . . . . . . . . . . . . . . . . . . . . . . . . . . . . . . . . . 17 Smart home device control . . . . . . . . . . . . . . . . . . . . . . . . . . . . . . . . . . . . . . . . . . . . . . . . . . . . . . . . . . . . . . . . . . . . . . . . . . . . . . . . . . . . . . . . . . . . . 17 Indoor unit list screen . . . . . . . . . . . . . . . . . . . . . . . . . . . . . . . . . . . . . . . . . . . . . . . . . . . . . . . . . . . . . . . . . . . . . . . . . . . . . . . . . . . . . . . . . . . . . . . . . . . 18 Control screen . . . . . . . . . . . . . . . . . . . . . . . . . . . . . . . . . . . . . . . . . . . . . . . . . . . . . . . . . . . . . . . . . . . . . . . . . . . . . . . . . . . . . . . . . . . . . . . . . . . . . . . . . . . 18 Editing the indoor unit list . . . . . . . . . . . . . . . . . . . . . . . . . . . . . . . . . . . . . . . . . . . . . . . . . . . . . . . . . . . . . . . . . . . . . . . . . . . . . . . . . . . . . . . . . . . . . . . 19 Electric Power . . . . . . . . . . . . . . . . . . . . . . . . . . . . . . . . . . . . . . . . . . . . . . . . . . . . . . . . . . . . . . . . . . . . . . . . . . . . . . . . . . . . . . . . . . . . . . . . . . . . . . . . . . . 19 Settings . . . . . . . . . . . . . . . . . . . . . . . . . . . . . . . . . . . . . . . . . . . . . . . . . . . . . . . . . . . . . . . . . . . . . . . . . . . . . . . . . . . . . . . . . . . . . . . . . . . . . . . . . . . . . . . . . 20 Updating the Wi-Fi kit . . . . . . . . . . . . . . . . . . . . . . . . . . . . . . . . . . . . . . . . . . . . . . . . . . . . . . . . . . . . . . . . . . . . . . . . . . . . . . . . . . . . . . . . . . . . . . . . . . . 21 Troubleshooting . . . . . . . . . . . . . . . . . . . . . . . . . . . . . . . . . . . . . . . . . . . . . . . . . . . . . . . . . . . . . . . . . . . . . . . . . . . . . . . . . . . . . . . . . . . . . . . . . 22 Open Source Announcement . . . . . . . . . . . . . . . . . . . . . . . . . . . . . . . . . . . . . . . . . . . . . . . . . . . . . . . . . . . . . . . . . . . . . . . . . . . . . . . . . . . . 23 2 CAC Wifi APP-NA_IBIIM_EN_DB68-05417A-00.indd 2 2015-03-16 오후 2:21:44 Safety precautions This installation manual explains how to install a Wi-Fi kit to an indoor unit of Samsung system air conditioners Read the installation manual thoroughly before installing the Wi-Fi kit. (Refer to the appropriate manual for installing product or other optional parts.) WARNING Hazards or unsafe practices that may result in severe personal injury or death. CAUTION Hazards or unsafe practices that may result in minor personal injury or property damage. WARNING ffContact service center for installation. -- There is a risk of product malfunction, water leakage, electric shock or fire. ffInstall the Wi-Fi kit securely in a place that can withstand the weight of the product. -- If the installation location is not strong enough, remote controller may fall and be damaged. ffConnect the power with rated voltage when installing. -- If not, there is risk of fire or damage to the Wi-Fi kit. ffDo not attempt to move or re-install the Wi-Fi kit that is already installed. -- There is risk of electric shock and fire. ffDo not attempt to modify or repair the Wi-Fi kit on your own. -- There is potential risk of product damage, electric shock or fire. When repair is needed, consult service center. ffCheck if the installation was done properly according to the installation manual. -- If the Wi-Fi kit is installed incorrectly, there is risk of electric shock or fire. ffMake sure that all wiring work is done by a qualified person complying with regional standards and instructions in this manual. -- If the installation is done by unqualified person, there is risk of product malfunction, electric shock or fire caused by incorrect installation. ffContact the service center if you need to dispose the Wi-Fi kit. CAUTION ffDo not install the product in a place where it is or might be exposed to inflammable gas leakage. -- There is risk of fire or explosion. ffDo not install the product in a place where it will be exposed to oil or vapor etc. -- If the product is used in a place where it is exposed to oil, vapor or sulphur dioxide, parts of the product may get damaged or product may function abnormally. ffMake sure that water does not get into the Wi-Fi kit. -- There is risk of electric shock and fire. ffMake sure there is no tension to the cable during installation. -- Cable may get cut and cause fire. ffInstall the product in a place with temperature between 0 °C~39 °C (32 °F~102 °F) with no direct sunlight. -- If not, there is risk of electric shock or abnormal operation. ffDo not install the product in a place where special spray or acid/alkali solution is used. -- There is risk of electric shock or abnormal operation. ffDo not press the button with sharp object. -- There is risk of electric shock or damaging the parts. ffDo not connect the power cable to the communication cable terminal. -- There is risk of fire. ffWhen installing the product in hospitals or other places, make sure that the product does not interrupt with other products. -- Abnormal operation may occur. CAC Wifi APP-NA_IBIIM_EN_DB68-05417A-00.indd 3 3 2015-03-16 오후 2:21:44 Check before installing Wi-Fi kit Parts Assy Wi-Fi kit Cable tie (2) User & Installation manual U- terminal (6) CAUTION Cable clamp (3) M4×16 screw (5) • Wi-Fi kit should be installed by a certified installer. • Before installing a Wi-Fi kit, you should check whether the power of the kit is turned off. • The wire of Wi-Fi kit should be installed in accordance with electric wiring regulation and should also be installed inside the wall so that it cannot be touched by users. Exterior dimension Unit : mm (inches) 27.7 mm (1 1/8" inches) 124 mm (4 7/8 inches) 120 mm (4 3/4 inches) 4 CAC Wifi APP-NA_IBIIM_EN_DB68-05417A-00.indd 4 2015-03-16 오후 2:21:44 How to install Wi-Fi kit Wi-Fi kit installation CAUTION • For smooth operation, install the Wi-Fi kit and the wireless router in open space with no obstacles between them. Operation may not be possible if the distance between the Wi-Fi kit and the wireless router is too far or if there's any obstacle between them. 1. After pushing the two hooks on the bottom of the Wi-Fi kit at the same time, lift the front cover up and then detach it from the rear cover. ❋❋ Push the two hooks at the same time. NOTE • It might be easier to disassemble the Wi-Fi kit if you put a flat-head screw driver into the square hole above the fixing hook. 2. Place the power wire and communication wire through openings in the rear cover. The opening can be cut and removed if you need more space. 15 cm (5 7/8 inches) <When the cover is recessed> 10 cm (3 15/16 inches) <When the cover is recessed> 5 CAC Wifi APP-NA_IBIIM_EN_DB68-05417A-00.indd 5 2015-03-16 오후 2:21:45 How to install Wi-Fi kit 3. After fixing the rear cover of a Wi-Fi kit firmly into the wall with two or more screws, connect the power wire (V1, V2) and communication wire (F1, F2) to the terminal at the back side of the front cover with proper length. When connecting the V1 and V2 power, tighten the screw of the terminal block (CN5) with torque 5 ±2 Kgf·cm. The size of the screws is 3 x 6. • Maximum number of indoor unit installation that can be connected to Wi-Fi kit is 16. • One Wi-Fi kit can be registered with maximum 5 users. • Each account (one mobile phone) can be registered with maximum 2 Wi-Fi kits. NOTE Indoor unit 10 mm (9/16 inch) or more 10 mm (9/16 inch) or more 10 mm (9/16 inch) or more 50 mm (2 inches) or more Screw fixing hole Ⓒ Ⓐ Rear cover ❋❋ Before fixing the rear cover, allow ❋❋ Fix the screws in the 10mm or more space for upper, provided screw holes. left, and right sides and 50mm space for bottom side. Item Ⓑ Wi-Fi kit Ⓓ V1 V2 F1 F2 PCB terminal ❋❋ Do not tighten the PCB terminal with too much force. Contents Ⓐ Power/communication connection terminal Ⓑ Tracknig/Initializing button Ⓒ SD Card Slot Ⓓ LED ❋❋ If an indoor unit does not have V1 and V2 terminal block, use the exterior control 2-wire for SUB PBA which is placed inside the Wi-Fi kit to supply power to the Wi-Fi kit. BLK Connect the BLK wire to V2. 6 CAC Wifi APP-NA_IBIIM_EN_DB68-05417A-00.indd 6 ORG Connect the ORG wire to V1. 2015-03-16 오후 2:21:45 4. Reassemble the Wi-Fi kit. NOTE CAUTION • Put the front cover of the kit into the upper grooves first and then fit it as shown in the picture. After assembling the Wi-Fi kit, please check if there is any gap because of the connection cable between front cover and rear cover. • When installing a Wi-Fi kit with 10 m (32.8 feet) or more wire, the communication wire and power wire of a Wi-Fi kit should be installed separately. (The Wi-Fi kit will malfunction because of electrical fault. ) • When installing a Wi-Fi kit on the wall, select proper thickness of wires in the consideration of the hole size for wire on the wall. • Wire for Wi-Fi kit PCB connection -- When installing a Wi-Fi kit in a buried way, install the kit in accordance with U-terminal wiring Specification. -- When installing a Wi-Fi kit with 4-line PVC wires, peel 30 cm (0.98 feet) of the sheath for the PVC wire and use only 4-line wires. (Recommnendation: AWG22) • Specification of compressed U-terminal for connecting Wi-Fi kit PCB Wire range for Rated Stud connection size size E W Stud D F G Basic size(mm) AWG mm2 mm2 mm t 22~16 0.25~ 1.65 1.5 3 0.7 ΦD G E F W L L t 3.8 10.0 4.5 6.5 6.0 21.2 The maximum wiring length for communication and power : 50 m (164 feet) • Tighten the fixing screws to the PCB terminal with less than 6Nm torque. When the screws are tightened with more than 6Nm torque, the screw thread will be damaged. 5. Start the Wi-Fi kit. ffWhen the Wi-Fi kit is turned on, all the lamps are turned on until system operates. ffAfter the system operates, tracking is performed automatically. 6. Perform the tracking. ❋❋ Tracking :You can search the devices connected to the Wi-Fi kit with the tracking function. The devices connected to WiFi kit recognize that they are connected to the Wi-Fi kit. To monitor or control the system air conditioner with Wi-Fi kit, tracking should be performed. ffWhen the Wi-Fi kit is turned on, the tracking is performed automatically. During the tracking, the lamp of the Wi-Fi kit ( ) ( ) blinks. ffIf the tracking is completed but the lamp ( ) blinks, it means the Wi-Fi kit does not find connected indoor units. In this case, check whether the connection of communication cable between indoor unit and outdoor unit is correct or is affected by noise. ffIf the configuration of indoor unit or outdoor unit is changed, tracking should be performed again manually by pressing the button (SW3) inside the Wi-Fi kit. (Ⓑ- CAUTION NOTE ) • Set the OnOff controller of indoor units to 'Use' in the option setting to control indoor units through the Wi-Fi kit. If the OnOff controller is set to 'Disuse', the indoor units cannot be controlled with the Wi-Fi kit. • When the tracking is completed correctly, the process which connects the wired/wireless router to the Wi-Fi kit is required to control indoor units by a mobile phone. For this process, refer to the 'Starting Samsung Smart Home App' in Page 11. • When the tracking is completed correctly, the lamp ( ) is turned on until the process which connects the wired/ wireless router to Wi-Fi kit is completed. 7 CAC Wifi APP-NA_IBIIM_EN_DB68-05417A-00.indd 7 2015-03-16 오후 2:21:46 How to install Wi-Fi kit Checking the Wi-Fi kit Power LED Wi-Fi Connect LED Wi-Fi Configure LED AP Button Reset <Wi-Fi kit front view> LED status information NO LED Status Power Wi-Fi Connect 1 Initialized ON ON Wi-Fi Configure ON 2 Normal ON ON OFF 3 AP Connection OK. But, Internet is not Connected ON Blinking OFF 4 Air conditioner searching OK. but AP connection is not completed. ON OFF OFF 5 Wi-Fi Modem is in Malfunction Blinking Blinking Blinking 6 Searching AP (AP mode) ON OFF ON 7 Searching Air conditioner Blinking Blinking OFF 8 No Air Conditioner Information Blinking OFF OFF 8 CAC Wifi APP-NA_IBIIM_EN_DB68-05417A-00.indd 8 2015-03-16 오후 2:21:46 Initializing user data ffIf you want to initialize all the user data to set the Wi-Fi kit as factory default status, press and hold the button (SW3) inside the Wi-Fi kit for 5 seconds. After releasing the button, all the lamps on the Wi-Fi kit are turned on and all the user data is deleted. Updating the Wi-Fi kit by SD card Ⓓ Ⓒ ffMake update directory in the SD card. Copy the latest S/W image and paste it into the update directory of the SD card. ffInsert the SD card into the SD card slot which is located inside the Wi-Fi kit. Ⓒ ffPress the Reset button on the side of the Wi-Fi kit. ffThe lamp inside the Wi-Fi kit is turned on during the update. Ⓓ ffWhen the update is completed correctly, the lamp is turned off. ffWhen the update is completed incorrectly, the lamp blinks. ffWhen the update fails, the Wi-Fi kit returns to the previous version when it restarts. Retry the update but if it still does not work, take following measures. -- Change the update image(file) -- Change the SD card -- Change the PBA 9 CAC Wifi APP-NA_IBIIM_EN_DB68-05417A-00.indd 9 2015-03-16 오후 2:21:46 Setting the network NOTE • This product supports DHCP (Dynamic Host Configuration Protocol) only. Before connecting the router to the Wi-Fi kit, check whether the DHCP server option function of your wired/wireless router is activated. • Select a channel for wired/wireless router. The channel should be currently not in use. • The cipher mode of wired/wireless router supports Open, WPA/TKIP or WPA2/AES. Except for the above modes, the Wi-Fi kit may not be connected to wired/wireless router. In case of 802.11n, WPA2/AES mode is recommended. • The quality of wireless network connection can be affected by surrounding wireless circumstance. • If an internet service provider permanently registered the user's PC or MAC address (Identification number) of the modem, the Wi-Fi kit may not be connected to the internet. Please contact the internet service provider and inquire about the internet connection process to connect a device (e.g. air conditioner) to the internet. • If the internet service provider requires ID or password to be connected to the internet, the Wi-Fi kit may not be connected to the internet. In this case, you need to enter ID or password every time you connect the internet. • Internet may not be available due to the firewall. Please contact the internet service provider and request the solution. • Since some wired/wireless router can send abnormal DNS (Domain Name Server) even though internet is connected, the Wi-Fi kit may not be connected to internet. In this case, contact the suppliers of wired/wireless router or internet service provider. • If you followed what the internet service provider directed but cannot be still connected to the internet, contact Quietside/Samsung Tech support 888-699-6067. • If the wired/wireless router is connected to the Wi-Fi kit but the router is not connected to the internet, the lamp of Wi-Fi kit( ) blinks. Specification of wired/wireless router for Samsung Smart Air conditioner ffPlease refer to the user manual for installation of your wired/wireless router. ffWi-Fi kit supports Wi-Fi 2.4 GHz only. ffWi-Fi kit supports the IEEE802.11 b/g/n communication protocol. (Samsung Electronics recommends use of IEEE802.11n.) ffIf the wired/wireless router is not Wi-Fi certified product, it may not be connected to the Wi-Fi kit. ffThe certified wired/wireless router has Wi-Fi CERTIFIED logo on the product package or in the user manual. Wireless router (The router that supports DHCP server) Wall LAN terminal LAN cable 10 CAC Wifi APP-NA_IBIIM_EN_DB68-05417A-00.indd 10 2015-03-16 오후 2:21:47 Starting Samsung Smart Home App Downloading Samsung Smart Home App ffYou can download the Samsung Smart Home App by searching "Samsung Smart Home" on Play store, Galaxy Apps and iPhone App Store. For android phone ffKorean key word : 삼성 스마트 홈 ffEnglish key word : Samsung Smart Home For iPhone ffKorean key word : 스마트 홈 ffEnglish key word : Smart Home NOTE • Samsung Smart Home App supports android operating system 4.0(ICS) or higher and is optimized with Samsung Smart phones (Galaxy S or Note series). If you run the App using a Smart phone manufactured by other companies, some functions may operate differently. • For iPhone users, the App supports iOS7 or higher. • For iPhone users, the App is available as of July, 2015. • The UI of Samsung Smart Home App can be changed for improvement of usability and performance without advanced notice and may differ from images in this manual. 11 CAC Wifi APP-NA_IBIIM_EN_DB68-05417A-00.indd 11 2015-03-16 오후 2:21:47 Starting Samsung Smart Home App Running the Samsung Smart Home App Before using the Samsung Smart Home App, register the Samsung account. ffIf you are a Samsung Smart phone user, you can automatically log on to the App with the Samsung account. ffIf you are not a Samsung Smart phone user, the login page appears every time you use the Samsung Smart Home App. NOTE • If you are a Samsung Smart phone user but don’t have Samsung account, the Samsung account registration page appears every time you run the Samsung Smart Home App. • If you don’t have Samsung account, press the ‘Create account’ button. 12 CAC Wifi APP-NA_IBIIM_EN_DB68-05417A-00.indd 12 2015-03-16 오후 2:21:47 ffSearch the country where the product will be used and press the Save button. It appears only one time at the first operation. Registering the product Register the Wi-Fi kit on the Samsung Smart Home App. 1. Select the ‘Add new’. 2. Select the ‘System AC’. 3. Enter the information of wireless router which will be connected and then press the Next button. -- If you want to change the connected router, press the ( ) icon and select the AP name of the wireless router. 13 CAC Wifi APP-NA_IBIIM_EN_DB68-05417A-00.indd 13 2015-03-16 오후 2:21:47 Starting Samsung Smart Home App 4. Press the AP button on the side of the Wi-Fi kit according to the guidance on the screen. Check that the AP lamp is turned on on the Wi-Fi kit. 4-1. For an android phone 4-2. For an iPhone -- Press the Home button on the iPhone to exit the Samsung Smart Home App. -- Press Settings Wi-Fi and select the DIRECT-SMARTDVM on the list of the wireless routers and enter 1111122222. -- Check that the iPhone is connected to the DIRECT-SMARTDVM wireless router. -- Press the Home button on the iPhone to exit the Settings. -- Select the Samsung Smart Home App and select the Next on the Set AP mode screen. 14 CAC Wifi APP-NA_IBIIM_EN_DB68-05417A-00.indd 14 2015-03-16 오후 2:21:48 5. Network setting is automatically performed. 6. Screen lock function setting for Samsung Smart Home App appears NOTE • When the lock function is set, the authentication process is required every time you run the App. 7. When the product registration is completed, the main screen of the Samsung Smart Home App appears. -- System AC icon is added on the device list. • If the wired/wireless router is not Wi-Fi certified product, it may not be connected to Wi-Fi kit. CAUTION • If the router is installed near a microwave oven or a product (washing machine), smart control function may not work correctly due to electronic interference. • If you fail to register during the registration process, retry the process from the first step. (Refer to the 'Registering the product' P.13) Description of screens and main functions Device screen ffAfter registering Samsung smart appliances to the Samsung Smart Home Service, you can control all of them remotely. Currently registered devices are displayed and you can register a device 15 CAC Wifi APP-NA_IBIIM_EN_DB68-05417A-00.indd 15 2015-03-16 오후 2:21:48 Starting Samsung Smart Home App Main screen ①Select the icon of smart appliance (System AC) on the main screen to move to the screen of Smart Home Device Control. ②You can perform integrated control of Samsung smart appliances by 4 types such as Going out, Coming home, Good night, and Good morning. ③You can check indoor view with the Home view function. -- Wi-Fi kit does not support the Home view function. ① ② ③ Menu screen ffYou can control Samsung smart appliances with 5 menus. Chat control You can control smart appliances easily or check the status of the appliances. Home view You can check indoor view from outside by using the camera installed on the smart appliances. Wi-Fi kit does not support the Home view function. Master key You can control multiple smart appliances at the same time using the master keys such as Going out, Coming home, Good night, and Good morning. Customer service FAQ manual and Help Desk function are provided. When the product has a problem, you can request after sales service after consulting about the problem. Quietside/Samsung Tech Support 888-699-6067 Settings You can control or check the service (device addition, country selection, etc.) and information (version information, open source). 16 CAC Wifi APP-NA_IBIIM_EN_DB68-05417A-00.indd 16 2015-03-16 오후 2:21:48 Starting System Air conditioner App Smart home device control The Smart home device control functions of air conditioner such as Operation, Additional options, On/Off timer, Electric Power, Settings etc. 1. Select the System AC icon on the devices screen of Samsung Smart Home App. 2. The loading screen of System Air Conditioner App appears. 3. The list of indoor units installed with the Wi-Fi kit appears. -- If there are no indoor units connected to Wi-Fi kit, "No Indoor Units" appears and you cannot enter the System Air Conditioner App. 17 CAC Wifi APP-NA_IBIIM_EN_DB68-05417A-00.indd 17 2015-03-16 오후 2:21:48 Starting System Air conditioner App Indoor unit list screen ⑥ ⑧ ① ffList of indoor units installed on the Wi-Fi kit is displayed on the screen. Classification ① ② ③ ④ ⑤ ⑦ Item Device status Description When the air conditioner is turned on, ( when it is turned off, ( ) is displayed. ) is displayed, ② Error status When the air conditioner has error, ( ③ Communication error When the air conditioner has communication error, ( ) is displayed. ④ Temperature Displays current or set temperature. ⑤ Power Turns on or off the air conditioner. ⑥ Power for all air conditioners Turns on or off all the air conditioners. ⑦ Defrost When the air conditioner is in defrost mode, ( displayed. ⑧ Menu Moves to the Settings or Customer service menu. ) is displayed. ) is • The icon of the air conditioner can be different depending on the models. CAUTION Control screen ⑧ ① ② ③ ④ ⑦ ⑥ NOTE ⑤ Classification Item Description ① Name The name of the selected air conditioner is displayed. ② Power Turns on or off the air conditioner. ③ Mode Selects the desired operation. ④ Fan speed Sets desired fan speed. ⑤ Fan direction Sets desired fan direction. ⑥ Current temperature / Set temperature Displays current and set temperature. ⑦ Temperature control Controls indoor set temperature. ⑧ Back Moves to the indoor unit list screen. • Some control and monitoring can be delayed by network condition. 18 CAC Wifi APP-NA_IBIIM_EN_DB68-05417A-00.indd 18 2015-03-16 오후 2:21:48 Editing the indoor unit list ① ② ③ 1. Press the Menu Edit button to edit the name and order of indoor units. The name of indoor unit should be within 30 characters. 2. Select the name of indoor unit to edit the name. 3. Select the( ) button and drag and drop the indoor units to change the order. Electric Power This function works only with the indoor units that provide electric power information. ffPress the Menu Current Electric Power button to check current electric power of outdoor units connected with Wi-Fi kit. NOTE • Displayed value of the electric power is instantaneous power, so the value is not going to be same on your electric bill. 19 CAC Wifi APP-NA_IBIIM_EN_DB68-05417A-00.indd 19 2015-03-16 오후 2:21:49 Starting System Air conditioner App Settings ffPress the Menu Settings to check and set the version information of Wi-Fi kit. ffPress the Temp. numerical values to set adjustment unit of set temperature. ffPress the Temp. unit to set display unit of temperature. • If the temperature unit is set as °F, the Temp. numerical values can be set by 1 °C only. CAUTION 20 CAC Wifi APP-NA_IBIIM_EN_DB68-05417A-00.indd 20 2015-03-16 오후 2:21:49 Updating the Wi-Fi kit ffWhen a new program is released with the update of the Wi-Fi program, update notice is delivered through the mobile App. ffIf a user agrees with the update, Wi-Fi kit starts the update. ffWhen the update is completed, the Wi-Fi kit is restarted automatically. 21 CAC Wifi APP-NA_IBIIM_EN_DB68-05417A-00.indd 21 2015-03-16 오후 2:21:50 Troubleshooting Before you call a service center, please check the items in the table below. Problem Solution Samsung Smart Home App cannot be searched on Play store, GALAXY Apps or iPhone App Store. ffSamsung Smart Home App supports android operating system 4.0(ICS) or higher. For iPhone, the App supports iOS 7 or higher. After installing Samsung Smart Home App, the air conditioner Connect the air conditioner to wireless router by referring to cannot be connected to the App. "Registering the product" section in the user manual. Samsung account cannot be accessed. Check your ID and password on Samsung account screen. A failure message appears when the device is being added. ffThe failure might be temporary due to the distance between the wired or wireless router and the air conditioner or other problems. Try again later. ffDisconnect power to the air conditioner for 30 seconds. Reconnect power and try the setting again. Check that all the 3 Wi-Fi kit lamps are turned on. Reset the Wi-Fi kit and check the kit again. Check whether only the Wi-Fi kit is turned on. Check whether you have entered correct password for the wired/ wireless router when adding the device. Check the status of wired/wireless router. lamp of The control function of Samsung Smart Check whether the lamp of the Home App does not lamp of Wi-Fi kit blinks. work. Check that the internet is correctly connected by using the wired/ wireless router. Check whether all the lamps of the Wi-Fi kit blinks. The Wi-Fi kit has a problem. Contact Quietside/Samsung Tech Support 888-699-6067. Check whether the lamp kit blinks. The Wi-Fi kit is not correctly connected to the indoor unit. Contact Quietside/ Samsung Tech Support 888-699-6067. of Wi-Fi The indoor unit mode of multi product model that supports heating/cooling is displayed only one between heating and cooling. LED Status is still Initialized. (LED status should be changed within one minute) ffHP model is displayed automatically restrictively to be able to select only the operating mode on outdoorunit, in order to prevent the mixed control(phenomenon that error occurs because cooling/heating mode is designated differently in each of the indoor units). 1. If you turn off the other indoor unit when you want to select the current working operation mode and the other operation mode, all operable modes are displayed. 2. If the master indoor unit is set up, change the operating mode of master indoor unit. 1. Check whether the Communication cable is correctly connected between NETWORK PBA and ASSY PCB SUB-SOLUTION. 2. Replace the Wi-Fi Kit if the problem is still same, even though connection is exactly correct. 22 CAC Wifi APP-NA_IBIIM_EN_DB68-05417A-00.indd 22 2015-03-16 오후 2:21:50 Open Source Announcement The software included in this product contains open source software. You may obtain the complete corresponding source code for a period of three years after the last shipment of this product by sending an email to mailto:[email protected]. It is also possible to obtain the complete corresponding source code in a physical medium such as a CD-ROM; a minimal charge will be required. The following URL http://opensource.samsung.com/opensource/WIFIKIT/seq/0 leads to the download page of the source code made available and open source license information as related to this product. This offer is valid to anyone in receipt of this information. 23 CAC Wifi APP-NA_IBIIM_EN_DB68-05417A-00.indd 23 2015-03-16 오후 2:21:50