1
http://www.CompeGPS.com
http://Support.CompeGPS.com
1
LAND/AIR 7.6
User manual
1
Starting up with Land/Air ___________________________________________________ 7
1.1
How to install Land/Air ________________________________________________________ 7
1.1.1
1.1.2
2
1.2
Land/Air activation ____________________________________________________________ 7
1.3
Setting folders of objects ______________________________________________________ 8
1.4
Open an object (map, track, route, waypoints) ___________________________________ 8
1.5
Create an object (track, route, waypoint) ________________________________________ 8
1.6
Data tree______________________________________________________________________ 8
1.7
Comunications between other devices __________________________________________ 9
1.8
3D View _____________________________________________________________________ 10
Activation ________________________________________________________________ 11
2.1
Land/Air software activation __________________________________________________ 11
2.1.1
2.2
Advanced and basic functions _______________________________________________________ 11
Maps activation ______________________________________________________________ 12
2.2.1
2.2.2
2.2.3
2.2.4
3
Installing Land/Air CD-ROM __________________________________________________________ 7
Installing the version downloaded from the internet______________________________________ 7
Activate the map when opened ______________________________________________________
Activate the map from the ‘Activation info’ window _____________________________________
Activate the map from data tree (storage files) _________________________________________
Activation without Internet (manually) _________________________________________________
12
12
12
13
2.3
Formatting hard drive ________________________________________________________ 13
2.4
General update from the data tree _____________________________________________ 13
View _____________________________________________________________________ 14
3.1
Main window _________________________________________________________________ 14
3.1.1
3.1.2
3.1.3
3.1.4
3.1.5
View buttons bar ___________________________________________________________________
View menu ________________________________________________________________________
Map viewing _______________________________________________________________________
Track viewing______________________________________________________________________
Routes and waypoints visualizations _________________________________________________
14
15
16
16
17
3.2
Secondary Windows__________________________________________________________ 17
3.3
3D viewing ___________________________________________________________________ 17
3.3.1
Activate 3D view ___________________________________________________________________
3.3.2
3D controls and movements _________________________________________________________
3.3.3
The track simulator _________________________________________________________________
3.3.3.1 Choosing the type of simulator mode _______________________________________________
3.3.3.2 Simulator controls ________________________________________________________________
3.3.3.3 Use of the track simulator’s joystick ________________________________________________
3.4
17
18
18
18
19
19
Viewing graphics _____________________________________________________________ 20
3.4.1
Open the graphics window __________________________________________________________ 20
http://www.CompeGPS.com
3.4.2
3.4.3
4
6
2
Working with the coordinates axels ___________________________________________________ 21
Operations to handle graphics _______________________________________________________ 21
Communication___________________________________________________________ 23
4.1
Open files of a device_________________________________________________________ 23
4.2
Transfer files between computer and device____________________________________ 23
4.2.1
4.2.2
4.2.3
4.2.4
5
http://Support.CompeGPS.com
Transfer by the context menu________________________________________________________
Transfer by dragging through the data tree ____________________________________________
Transfer protected files (only TwoNav GPS) ___________________________________________
Synchronize tracklog from GPS ______________________________________________________
24
24
24
24
4.3
Activate maps in a device (only TwoNav GPS) __________________________________ 25
4.4
Update the software of a device (only TwoNav GPS) ____________________________ 25
4.5
Update speedcams of a device ________________________________________________ 25
4.6
Devices with direct communication ____________________________________________ 25
4.7
Communication with iPhone/iPad _____________________________________________ 26
Options __________________________________________________________________ 27
5.1
General configuration ________________________________________________________ 27
5.2
Display configuration _________________________________________________________ 27
5.3
3D configuration _____________________________________________________________ 30
5.4
Map configuration ____________________________________________________________ 31
5.5
Track configuration __________________________________________________________ 31
5.6
Waypoint configuration _______________________________________________________ 32
5.7
Photo configuration __________________________________________________________ 32
5.8
Folder configuration __________________________________________________________ 33
5.9
International configuration ____________________________________________________ 33
5.10
Coordinates configuration __________________________________________________ 33
5.11
GPS configuration __________________________________________________________ 34
5.12
Navegation configuration ___________________________________________________ 34
5.13
Keys and buttons configuration _____________________________________________ 35
5.14
Joystick configuration ______________________________________________________ 35
5.15
Video configuration ________________________________________________________ 36
5.16
Credentials configuration ___________________________________________________ 36
Data Tree_________________________________________________________________ 37
6.1
Position of the data tree ______________________________________________________ 37
6.1.1
6.1.2
6.2
Floating tree _______________________________________________________________________ 37
Anchored tree _____________________________________________________________________ 38
Management _________________________________________________________________ 38
6.2.1
Open Files ________________________________________________________________________ 39
6.2.1.1 'Amigos' ________________________________________________________________________ 39
6.2.2
Storage files _______________________________________________________________________ 40
http://www.CompeGPS.com
6.2.3
6.3
7
41
42
42
44
General track operations ____________________________________________________________ 44
Working with a specific track ________________________________________________________ 44
Move wayponts about the tree _______________________________________________________
General waypoint operations ________________________________________________________
Working with a specific waypoint file __________________________________________________
Working with a specific waypoint _____________________________________________________
46
46
47
47
Working with routes __________________________________________________________ 47
6.6.1
6.6.2
6.6.3
6.6.4
6.7
Move map to a different layer ________________________________________________________
General map operations ____________________________________________________________
Working with a specific map _________________________________________________________
Working with a specific landscape ___________________________________________________
Working with waypoints ______________________________________________________ 46
6.5.1
6.5.2
6.5.3
6.5.4
6.6
On-line files _______________________________________________________________________ 40
Working with tracks __________________________________________________________ 44
6.4.1
6.4.2
6.5
3
Working with maps ___________________________________________________________ 41
6.3.1
6.3.2
6.3.3
6.3.4
6.4
http://Support.CompeGPS.com
Move a waypoint about a route ______________________________________________________
General route operations ___________________________________________________________
Working with a specific route ________________________________________________________
Working with a specific waypoint _____________________________________________________
48
48
48
49
Working with profiles _________________________________________________________ 49
Working with maps _______________________________________________________ 50
7.1
Definitions ___________________________________________________________________ 50
7.1.1
What is a map? ____________________________________________________________________
7.1.2
Compatible formats ________________________________________________________________
7.1.3
Calibration ________________________________________________________________________
7.1.3.1 What is an index map? ___________________________________________________________
7.2
Operations with maps ________________________________________________________ 51
7.2.1
Open a map _______________________________________________________________________
7.2.1.1 Open map ______________________________________________________________________
7.2.1.2 Open a map by selecting its border ________________________________________________
7.2.1.3 Define and open an Index Map ____________________________________________________
7.2.1.4 Seek best map here ______________________________________________________________
7.2.1.5 See list of maps for this point ______________________________________________________
7.2.1.6 Download Internet map for this area ________________________________________________
7.2.1.7 Open a map from an Internet URL _________________________________________________
7.2.2
Close maps _______________________________________________________________________
7.2.3
Map viewing options ________________________________________________________________
7.2.4
Anchor position as virtual location ____________________________________________________
7.2.5
Calibrate and Import maps __________________________________________________________
7.2.5.1 Calibrate a bitmap _______________________________________________________________
7.2.5.2 Revise Calibration _______________________________________________________________
7.2.5.3 Import Maps _____________________________________________________________________
7.2.5.4 Import landscapes _______________________________________________________________
7.2.6
Maps via Internet __________________________________________________________________
7.2.7
Join maps _________________________________________________________________________
7.3
50
51
51
51
51
52
52
52
52
53
53
53
54
54
55
56
56
57
58
59
59
59
Vectorial maps _______________________________________________________________ 60
7.3.1
7.3.2
7.3.3
7.3.4
Introduction _______________________________________________________________________
Create a vectorial map______________________________________________________________
Edit a vectorial map ________________________________________________________________
Properties of layers ________________________________________________________________
60
60
61
62
http://www.CompeGPS.com
http://Support.CompeGPS.com
4
7.3.4.1 Night mode______________________________________________________________________ 63
8
7.4
List of open maps ____________________________________________________________ 63
7.5
Properties of a map __________________________________________________________ 64
7.6
Context menu of a map _______________________________________________________ 65
Working with tracks _______________________________________________________ 68
8.1
Definitions ___________________________________________________________________ 68
8.1.1
8.1.2
8.1.3
8.1.4
8.2
What is a track? ___________________________________________________________________
Track formats______________________________________________________________________
2 and 3 dimensional tracks. _________________________________________________________
What is a subtrack? ________________________________________________________________
Working with tracks __________________________________________________________ 68
8.2.1
Open a track ______________________________________________________________________
8.2.2
Open the Track Properties window ___________________________________________________
8.2.3
Save a track _______________________________________________________________________
8.2.4
Import track _______________________________________________________________________
8.2.5
Close a track ______________________________________________________________________
8.2.6
List of tracks window _______________________________________________________________
8.2.7
Share your tracks __________________________________________________________________
8.2.8
Track animation ___________________________________________________________________
8.2.9
Create and edit a tracks ____________________________________________________________
8.2.9.1 Create a new track _______________________________________________________________
8.2.9.2 Edit a track ______________________________________________________________________
8.2.10 Join tracks ________________________________________________________________________
8.3
68
68
68
68
68
69
69
70
70
70
71
72
73
74
74
76
Working with subtracks_______________________________________________________ 76
8.3.1
8.3.2
8.3.3
8.3.4
8.3.5
Select a subtrack __________________________________________________________________
Analyse a subtrack _________________________________________________________________
Save a subtrack ___________________________________________________________________
Eliminate a subtrack ________________________________________________________________
Graph of a subtrack ________________________________________________________________
76
76
77
77
77
8.4
Operations with track’s legs __________________________________________________ 78
8.5
Roadbook ___________________________________________________________________ 79
8.5.1
8.5.2
8.5.3
8.5.4
8.5.5
8.6
79
79
79
80
80
Track Book __________________________________________________________________ 81
8.6.1
8.6.2
8.6.3
8.6.4
8.6.5
8.6.6
8.7
Definition _________________________________________________________________________
Images edition _____________________________________________________________________
Roadbook creation _________________________________________________________________
Save a roadbook ___________________________________________________________________
Navigate a roadbook in TwoNav _____________________________________________________
What is a Track Book?______________________________________________________________
Create a Track Book _______________________________________________________________
Open a Track Book ________________________________________________________________
Open another track book ____________________________________________________________
Store a track in a track book _________________________________________________________
Context menu of a track book _______________________________________________________
81
81
81
81
82
82
Properties of a track __________________________________________________________ 82
8.7.1
8.7.2
8.7.3
8.7.4
8.7.5
Open track properties window _______________________________________________________
General ___________________________________________________________________________
Date and time _____________________________________________________________________
Track points _______________________________________________________________________
See ______________________________________________________________________________
83
83
83
83
83
http://www.CompeGPS.com
8.7.6
8.7.7
8.7.8
8.7.9
8.7.10
http://Support.CompeGPS.com
5
GPS ______________________________________________________________________________
Distances _________________________________________________________________________
Altitudes __________________________________________________________________________
Speeds ___________________________________________________________________________
Energy____________________________________________________________________________
83
84
84
84
84
Track’s contextual menu ______________________________________________________ 84
8.8
Working with waypoints ___________________________________________________ 87
9
Definitions ___________________________________________________________________ 87
9.1
9.1.1
9.1.2
What is a waypoint? ________________________________________________________________ 87
Waypoint formats __________________________________________________________________ 87
Operating with waypoints _____________________________________________________ 87
9.2
9.2.1
Open a waypoint file ________________________________________________________________
9.2.2
Create and edit a waypoint __________________________________________________________
9.2.3
Move and copy a waypoint __________________________________________________________
9.2.4
Associate a file to a waypoint ________________________________________________________
9.2.4.1 Associate any existing file _________________________________________________________
9.2.4.2 Associate a self-created *.HTML file with Land/Air ___________________________________
9.2.5
Create and edit a waypoint file _______________________________________________________
9.2.6
Store a waypoint file ________________________________________________________________
9.2.7
Close a waypoint file _______________________________________________________________
9.2.8
Import waypoint file ________________________________________________________________
9.2.9
Waypoint viewing options ___________________________________________________________
List of open waypoints _______________________________________________________ 90
9.3
9.3.1
9.3.2
List of open waypoints context menu _________________________________________________ 91
Select fields _______________________________________________________________________ 91
Waypoint properties __________________________________________________________ 92
9.4
9.4.1
9.4.2
Properties of a waypoints file ________________________________________________________ 92
Properties of a concrete waypoint ____________________________________________________ 92
Context menu of a waypoint __________________________________________________ 93
9.5
10
87
87
88
88
88
88
89
89
90
90
90
Working with routes _____________________________________________________ 95
10.1
10.1.1
10.2
Definitions _________________________________________________________________ 95
What is a route? ___________________________________________________________________ 95
Working with routes ________________________________________________________ 95
10.2.1 Open a route ______________________________________________________________________
10.2.2 List of routes ______________________________________________________________________
10.2.3 Create a route _____________________________________________________________________
10.2.4 Edit a route ________________________________________________________________________
10.2.4.1 Route edition window ___________________________________________________________
10.2.4.2 Route edition board ____________________________________________________________
10.2.4.3 Move waypoints in a route ______________________________________________________
95
95
96
97
97
97
98
10.3
Properties of a route ________________________________________________________ 99
10.4
Context menu of a route ____________________________________________________ 99
11
Groups: joining objects_________________________________________________ 101
11.1
11.1.1
11.2
Definitions ________________________________________________________________ 101
What is a group file? ______________________________________________________________ 101
Working with group files ___________________________________________________ 101
http://www.CompeGPS.com
11.2.1
11.2.2
11.2.3
11.2.4
12
6
Open a group file _________________________________________________________________
Create a group file ________________________________________________________________
Save a group file __________________________________________________________________
Save as web page ________________________________________________________________
101
101
101
101
Navigation _____________________________________________________________ 102
12.1.1
12.1.2
12.1.3
12.1.4
13
http://Support.CompeGPS.com
Activate a route ___________________________________________________________________
Data window _____________________________________________________________________
Program an alarm _________________________________________________________________
Navigation button bar ______________________________________________________________
102
102
103
103
Geocaching____________________________________________________________ 105
13.1
Compatible Geocaching files _______________________________________________ 105
13.2
Search for geocaches at your current position _______________________________ 105
13.3
Geocache’s specific properties _____________________________________________ 106
13.4
Add spoiler photos to your geocaches ______________________________________ 106
14
Support _______________________________________________________________ 107
14.1
Create status report _______________________________________________________ 107
15
Appendix: Data fields ___________________________________________________ 107
16
Appendix: Air __________________________________________________________ 111
16.1
16.1.1
16.1.2
Configuration options (default values and flight) _____________________________ 111
Default values ____________________________________________________________________ 111
Flight ____________________________________________________________________________ 111
16.2
Thermals and transitions___________________________________________________ 111
16.3
‘On-line Contest’ __________________________________________________________ 112
16.3.1
16.3.2
What is ‘On-line Contest’? _________________________________________________________ 112
Send a flight to ‘On-line Contest’ ____________________________________________________ 112
16.4
3D Differences ____________________________________________________________ 113
16.5
Track properties___________________________________________________________ 113
16.6
Track editor _______________________________________________________________ 114
16.7
Minor differences __________________________________________________________ 114
http://www.CompeGPS.com
http://Support.CompeGPS.com
7
1 Starting up with Land/Air
1.1 How to install Land/Air
1.1.1 Installing Land/Air CD-ROM
The Land/Air CD-ROM is an auto-run CD-ROM. Proceed as follows to install Land/Air:
1. Insert the CD-ROM in your CD-ROM reader and wait the autorun to start.
2. Choose language.
3. Follow on-screen instructions until installation is completed.
You will have to start the installation file manually if the CD-ROM does not auto-run. Double click at:
Windows: Setup.exe
Mac: Land/Air file
Note: Land/Air for Mac platform includes most functions of Windows version, while missing features and
plugins will be progressively added once they have been adapted and tested for Mac.
1.1.2 Installing the version downloaded from the internet
Download the latest version of Land/Air from: http://www.compegps.com
1. Run the installation:
Windows: Setup.exe
Mac: Land/Air file
2. Follow the instructions that will appear on the screen and introduce all the necessary information that
the Land/Air installation program will ask you for.
Note: Land/Air for Mac platform includes most functions of Windows version, while missing features and
plugins will be progressively added once they have been adapted and tested for Mac.
1.2 Land/Air activation
You need to activate the program to work with it. When starting the program for first time, you will be asked
to introduce a register code (license) for Land/Air or for one of the maps included in the extensive catalogue
of CompeGPS.
If you have a Land/Air register code, enter it and follow instructions to complete the activation of the
program.
If the code entered belongs to a map, the program will be activated in basic mode and you will be able to
work with the map using the basic functions. If you do not have a register code (license), press 'Free
activation' and, after entering your personal data, you will be able to work with the basic functions of the
software.
Important: Basic mode will also allow you to try advanced functions in that computer for 30 days. After
these 30 days, the user will see a message stating that the trial period has expired. Check ‘Activation’
section for more information.
http://www.CompeGPS.com
http://Support.CompeGPS.com
8
1.3 Setting folders of objects
Land/Air works with different objects: maps, tracks, routes, waypoints and profiles. The default location for
these items is:
Windows: Documents\CompeGPS
Mac: Documents\CompeGPS
These objects can be stored in one or more locations in your computer. When the software needs to access
objects, it will use the folders configured for such use.
If data folders are not configured properly, lists of objects will not be correctly generated, for example in
‘Storage Files' at the data tree or when using the 'Search' function. You can modify this setting from 'Menu >
File > Options > Folders'.
1.4 Open an object (map, track, route, waypoints)
You can open files quickly by pressing the appropriate button on the buttons bar:
‘Open a map’: You can open raster maps (for example *.RMAP, *.ECW...), vectorials (for
example *.VMAP, *.SHP, etc.) or digital elevation models (*.CDEM). In case of a non-registered
map, at the opening window you will see a lock indicating the lack of registration.
‘Open a track’: You can open tracks in different formats (*.TRK, *.GPX, *.KMZ...). To see the
track graph press
‘Open a waypoints file’: A waypoints file contains individual waypoints. If you create new
waypoints, they will be added to the loaded file.
‘Open a route’: Routes are sequences of waypoints. To see the route graph press
1.5 Create an object (track, route, waypoint)
The easiest way to create a new object is by right clicking on the map and selecting 'New...’. Follow next
steps:
1. Open a reference map on which to create the object.
2. Make a right click on the place you want to create the object and select 'New'.
3. You can choose 3 options:
Create a waypoint.
Create a route: This will create the first point of the route.
Create a track: This will create the first point of the track.
To add points to the route or track, then check off successively on the map. Press ‘Esc’ to exit edit mode. To
take up again editing of the route or track, make right click on the object and select 'Edit'.
1.6 Data tree
The data tree is a handy tool that allows you to quickly see the files you have open at that time. You can
also manage the files that you have stored on your computer or in connected devices.
http://www.CompeGPS.com
Press the button
http://Support.CompeGPS.com
9
to make appear the data tree.
Right-clicking on elements of the data tree you can access many functions. For example, if you do right click
on an open file and select 'Zoom here', it will focus the selected object on the main window.
Another option to have in mind are the checkboxs that accompany the maps, tracks, waypoints, routes and
photos on the data tree. This instrument is useful if you want to hide one or several elements. Thus, by
clicking on each checkbox the user will hide the layer (not delete).
The user can also 'Hide all' the listed items at once. ‘Hide all’ can be used in reverse when all the elements
are hidden to become all visible.
1.7 Comunications between other devices
Communication with devices that have TwoNav software (TwoNav GPS, Smartphones, Evadeo…) does not
require any previous configuration. Just connect the device to the USB port of your computer and see how it
appears in the data tree, from which you can transfer all the necessary information.
To communicate with GPS from other brands you should take into account the ‘Communication’ options and
use the option 'Communications' in the main menu.
If the communication between the device and Land/Air fails, you can try to manage files directly using folder
explorer to copy/paste the files you want.
http://www.CompeGPS.com
http://Support.CompeGPS.com
10
1.8 3D View
Press the button ‘3D viewer’ in the toolbar for a three-dimensional perspective of loaded objects. If you have
a digital elevation model in your map folder, the program will load it automatically to display the terrain
elevations. If not available, the 3D view will be flat.
Use the mouse to control movement in 3D. By holding down each mouse button and moving it you will get
different effects:
Move map: Left mouse button + drag
Rotate map: Right mouse button + drag
Ascent/Descent: Press wheel + drag
Zoom: Turn wheel
If you have a track loaded, press
to animate it.
http://www.CompeGPS.com
http://Support.CompeGPS.com
11
Activation
2
CompeGPS Team offers software and contents protected by copyright.
To protect the intellectual property of these products, we have developed an activation system that ensures
the legitimacy of the material used.
This system has been developed trying to facilitate steps to take and reduce the inconvenience to the user.
Thus, you can perform product activation simply following the instructions that appear on the program.
However, you should know certain aspects of protection system to avoid confusion and ensure proper
functioning of the program.
Although the internal process is identical, for practical reasons we can distinguish two types of activation:
Software
Maps
2.1 Land/Air software activation
Software must be activated to work with it, either in basic mode (free) or advanced mode (license).
When starting the software for first time you will be asked if you have a registrer code (license) for Land/Air
to activate it. If you do not have any, click on 'free activation' and after entering your data, you will be able to
work with the basic functions of the software.
Register codes can be used at any time by going to 'Help> Activation Info> Enter Register Code'.
2.1.1 Advanced and basic functions
The functions of Land/Air can be divided into:
Basic functions (free): These functions are always available in the software, although you have not
purchased a license. Just register as a user of Land/Air.
Advanced functions (licenses): Are not free, but they can be ested for free during 30 days.
The 'basic' activation (free) will allow you to access the basic functions without limit of time and the
advanced functions, for a trial period of 30 days.
You can access the advanced functions, with no time limit, using a Land/Air standard license, which unlocks
all the advanced functions (except AutoCAD module).
You can also unlock the advanced features by blocks (modules), so that you only purchase the set of
functions of interest. Modules of Advanced functions available:
Communication: Module that allows the connection with a GPS to send and receive information:
Waypoints, routes and tracks.
Map tools: Allows to manage all types of raster maps (topographic, orthophotos) or elevation
(*.CDEM) to provide maps that best fits the needs of the user (Calibrate, import, merge, split
maps...).
Track manager: Module that allows working with tracks through multiple tools. Create tracks, apply
all sorts of changes, and store them in a trackbook.
http://www.CompeGPS.com
http://Support.CompeGPS.com
12
3D: To prepare (creating waypoints and routes, simulator...) or revive (animation) your experiences
using our latest generation 3D engine.
Navigation: This module lets you use the navigation functions live (before called ‘Moving map’) to
see our position on the map, see the movement variables, save the track done, etc.
FotoGPS: Synchronize, by the hour, the photos from a digital camera to track points, made during
the same outdoor activity, georeferencing *.JPEG files and placing them on the map.
Vector map ddit: You can create your own vector maps and edit them in the most comfortable and
fast way. Land/Air is one of the best vector maps editors on the market.
AutoCAD: Add compatibility to Vector map edit module for read the *.DXF and *.DWG formats. This
plugin is already installed. No download is required.
2.2 Maps activation
Land/Air can work with maps from very diverse origins. In ‘Working with maps’ section you will find a
description of the different ways you can get maps for use with the system.
Some maps (for example most of the available in the CompeGPS maps catalogue) are protected to prevent
illegal copying. You need to activate the protected maps before using them.
To activate a map is easy. You just have to use the register code that comes with the product.
You have different options to enter the code and activate the map:
Activate the map when opened
Activate the map from the ‘Activation info’ window
Activate the map from data tree (storage files)
Activation without Internet (manually)
2.2.1 Activate the map when opened
If you have Internet on your PC, activation is very simple, just open the map and start the activation process.
Enter the register code that comes with the product and activation will beperformed automatically. You can
also activate maps without having to open them.
2.2.2 Activate the map from the ‘Activation info’ window
You can enter any register code from the 'Activation info’ window. Doing so, the activation will be
automatically done and you will be able to use the product on that computer.
The 'Activation info’ window appears at the beginning of the software if it is in ‘basic’ mode. You can also
access to this window from the main menu 'Main menu > Help > Activation info’.
2.2.3 Activate the map from data tree (storage files)
You can activate a map without opening it:
http://www.CompeGPS.com
http://Support.CompeGPS.com
13
1. Find the map in ‘Storage files’ (inside the device in which you want to activate it).
2. Right click on the map and select ‘Activate for this device’.
3. Enter register code of the map and it will be activated in that device.
4. Next time device starts, map will be available.
In addition to its simplicity, this way of activation lets you activate the map in a device without consuming an
activation attempt in the computer. That is, you can activate the map in TwoNav even it is not activate in
Land.
2.2.4 Activation without Internet (manually)
If you don’t have Internet in the computer, you can make activation manuallly. You will have to download a
key file and sabe it in Land/Air’s installation folder so it is used when application starts. Follow next steps to
make a manual activation:
1. Note next data:
Register code: Number provided with a license is purchased.
Device ID: You can see it ‘Activation info’ window at ‘Main menu > Help > Activation info’.
2. Go to a computer where there is Internet and access to http://www.compegps.com/activate
3. Follow instructions until you download the key file (with *.MKEYB format).
4. You will have to save that file and place it in Land/Air’s installation folder, normally ‘Program files >
CompeGPS’.
5. Next time application is launched, this file will be read and product will be unblocked.
Note: By using ‘Read file *.MKEYB’ option from Menu > Help', the user will have an extra function to search
*.mkeyb files. This option can be very useful to valídate products when the Internet connection is not
possible. By doing this the user won’t need to save the file at 'CompeGPS' folder where it will be
automatically read.
2.3 Formatting hard drive
Device ID stays unaltered after hard drive format, so you can activate all CompeGPS products again in
without losing activation attemps. Just make activation process using the same register code you received
when purchased the product.
2.4 General update from the data tree
In order to update the software, make a right click at storage elements of Land/Air and press ‘Update
Land/Air software’ command.
http://www.CompeGPS.com
http://Support.CompeGPS.com
14
3 View
3.1 Main window
The main screen opens when you execute the software. The main screen is where you will be working most
of the time because it is easy and clearly understood. The main screen allows you to view the elements that
Land/Air works with (maps, tracks, waypoints and routes). Several handy tools will help you to achieve the
optimum viewing quality to help you work comfortably with Land/Air.
The most common access options are available by default in the view buttons bar.
Other options are found under 'View' option from main menu or '2D view' options from the options window.
Each object type (maps, tracks, routes and waypoints) have special viewing options.
Both buttons bars and menu are configurable to have the functions you are most interested.
3.1.1
View buttons bar
Here is a list of the default tools:
100% Zoom
Move
Rotation
: Click on this button to view the map at its maximum resolution.
: By clicking on this button you will be able to move about on the viewing screen.
: if instead of 'Move' (panning) you want to give rotation to the map while dragging the
mouse, select this tool. If after rotate the map you want to orientate to North again, press
Map orientation: The icon indicates the current status. Press to change it.
o
Current direction
: While animating, the map will rotate to follow the direction of the track
always up. When you rotate the map manually, automatically activates this mode. Click the
button to return to the North.
o
North
: The map is always facing the North.
3D Viewer
Reduce zoom
: Zoom out to reduce the view of the elements you have loaded on the screen. You
can also increase or reduce the zoom using the wheel on the mouse.
Increase zoom
: Zoom in to increase the view of the elements you have loaded on the screen.
You can also increase or reduce the zoom using the wheel on the mouse.
Previous zoom
: Return to the zoom you were using before the last change. This option is useful
if you have changed the zoom using the option map scale.
Map scale
: To modify the zoom by choosing an increase or reduction percentage value
from a pre-established list or you can write a percentage or m/pixel value yourself.
: To go to the 3D viewing window.
http://www.CompeGPS.com
http://Support.CompeGPS.com
15
See all
: When you click on this button all the objects you have loaded will be centred on the
screen. If you click on the lateral extension you will be able to choose which elements you want to be
centred (tracks, waypoints, maps). This function is useful when you cannot locate the objects you
have loaded.
Miniature view
: This function activates a small window in which all the elements you have loaded
are represented. A red rectangle marks the area that is currently in view on the main screen. This
function is very useful to orient yourself when you are working with large zoom values.
Zoom window
Selection mode
: When you activate this tool you will be able to mark an area on the screen by
holding down the left button of the mouse and dragging it to create a rectangle over the area you
want.
Measure distance
: First click on the point of origin and then on the final point to calculate the
lineal distance between these two points. Land/Air will give you the coordinates of the two points, the
lineal distance and the real deviation.
: This option allows you to create a zoom window with the distance you want.
Note: If you do not click on a final point, Land/Air will give you the distance between the initial point
and the actual position of the pointer. This information will be given in a label that will automatically
open as soon as you move the pointer away from the initial point.
Screenshot
New window
items.
Identify: This function allows the user to check the proprieties and characteristics of each and every
single element of Land/Air. At tool bar, when ‘Identify’ button is pressed, the mouse is replaced for a
dartboard. Every element clicked by this dartboard is described in a lateral pop-up window with
detailed information.
: Creates an image file of the current content of the window.
: Open a secondary window in order to have an alternative vision of the loaded
Some buttons are disabled in 3D mode and next ones are added:
Quick up/down
Altitude over sizing bar: You will be able to oversize the real altitude (1X, 1,5X, 2X, etc.) to
emphasize the height differences of the terrain and other elements.
Track simulator
: When you activate the track simulator, you will be able to move around the
scenery as if you were piloting a helicopter.
Film a video
: When you click on this button you will start a video recording of all the movements
that you will make with the 3D viewer. First choose where you want to store the file and write its
name. Then choose the resolution you want to record the film with (the greater the resolution, the
bigger the file), and the type of compression you want to use. When you have done this, the viewer
will adjust to the resolution you have chosen and the filming will begin. To stop the recording, click
again on the Film a video button.
3.1.2
View menu
: Equivalent to drag up and down while mouse wheel is pressed.
http://www.CompeGPS.com
http://Support.CompeGPS.com
16
The tools we will now detail are not default values on the button bar (although you can program them to be
so using configurating keys and buttons but they are available at ‘View’ section of the main menu:
2D Shaded Relief: If you have loaded a 3D relief (*.CDEM) under a raster map, draw the map
shading along the heights of the relief information. It’s also possible to apply 2D shading relief from
other different directions (above, down, left and right).
Activate shadows
Gyrate continuously
: When you activate this button, the focus point will gently and constantly be
changed. The result is that, without having to touch any other button, you will be fully viewing the
area from different points of view.
Transparencies: Choose the level of transparency of a particular map or the tracks loaded. To define
the map implementing the transparency, access to the function of 'transparency' from the contextual
menu on the map.
Drawing maps with extra quality: This feature will make the pixels of the maps smoother. This
process can cause a slowdown of the software on some systems.
See projection grid
See degrees grid
Night vision
: This function darkens the screen so that viewing becomes more comfortable in
situations with poor lighting.
Full screen
3.1.3
: Activate this button to create an effect equivalent to real-life light and shadow.
: To view the UTM projection grid.
: To view the Latitude/Longitude grid.
Map viewing
View frames of all maps: This option allows you to view the outlines of all the maps that you have
stored in the folders you configured at ‘Folder’ section of the options window.
Note: At least one object has to be open in order to be able to use this function (a map, a track, a
landscape or a waypoint). Whenever you select or un-select this option, your chose will be
established as a default value within the configuration of Land/Air.
Transparencies: Choose the level of transparency of a particular map. To define the map
implementing the transparency, access to the function 'Transparency' from the contextual menu on
the map. You can adjust the tolerance depending on the colour from properties of a map.
3D relief view: You can set various parameters in this kind of maps.
3.1.4
Track viewing
Track properties: You can change track’s visualization variables like its color, thickness or drawing
from track properties window.
Degrade colour of the track
: You can choose to vary the colour of the track depending on a
series of parameters that you will establish (altitude, speed, temperature…). You can also choose
the values between which the track will be degraded; to do this right click on the reference bar that
appears when you degrade the track and then choose the option ‘Select range for this value’. You
can access this function from track’s context menu on map or from ‘Main menu > Tracks’.
http://www.CompeGPS.com
http://Support.CompeGPS.com
17
Graph window
See object’s reference notes on screen: The default value for this option is that it is activated. In this
way, any reference notes recorded will appear whenever you pass over an element on the screen.
For example, when you pass the pointer over a point of a track, a small window will inform you of the
day, time, altitude and number of the point.
: See a representation of the loaded tracks.
You can select the information that is contained in this window by accessing it from the Fields
function at ‘Track’ section, read, ‘Configurating tracks’. This option cannot be reached from the main
menu of the button bar, although you can add it to be button bar using ‘Configurating keys and
buttons’.
3.1.5
Routes and waypoints visualizations
You can select the default font for waypoints from 'Menu > File > Options > Waypoints'.
From ‘Properties’, you can also change the font for a single waypoint as well as the display mode in
which will be presented on screen (text position, icon...).
Note: You can change properties of all waypoints from the general waypoint file which contains all
the waypoints inside. To do this, open file’s properties and change the variables from ‘Modify all
waypoints’ section.
Graph window
: See a representation of the loaded routes.
3.2 Secondary Windows
Press
button to open a secondary window. Secondary windows allow same functions as main window,
giving the possibility to have different perspectives at the same time.
Secondary windows (like other windows like ‘Data tree’, ‘Graphic’ and ‘3D Viewer’) can be anchored on the
screen (they will not superpose the main window) or they can be floating windows (independent windows
that do superpose the main window). To interchange between these two modes, right click on the title bar
(top section of a window or left part of the graphic) and select ‘Anchor in the main window’ or ‘See floating’.
You can also un-anchor a window by dragging it by the title bar.
3.3 3D viewing
3.3.1 Activate 3D view
Press the button ‘3D viewer’ in the toolbar for a three-dimensional perspective of loaded objects. If you have
a digital elevation model in your map folder, the software will load it automatically to display the terrain
elevations.
If not available, the 3D view will be flat. Use the mouse to control movement in 3D. By holding down each
mouse button and moving it you will get different effects:
Move map: Left mouse button + drag
Rotate map: Right mouse button + drag
Ascent/Descent: Press wheel + drag
Zoom: Turn wheel
If you have a track loaded, press
to animate it.
http://www.CompeGPS.com
http://Support.CompeGPS.com
18
3.3.2 3D controls and movements
Land/Air allows you a wide control on the 3D viewing so that you can gain a perfect perspective that will
allow you to work comfortably and make you enjoy viewing your excursions in the best possible way.
To aid your orientation when you are moving around the 3 dimensions, Land/Air features a compass that is
parallel to the top part of the map and it indicates the direction, as would a normal compass. The edge of
this compass (which appears when the view of the map is not perfectly vertical) indicates the cardinal point
that the map is pointing to at that time. Therefore, if we see an ‘N’ in this edge, we know we are facing north.
You can move around in the 3D environment using the mouse (the most comfortable method) or by using
the buttons on the tool bar.
The mouse’s movements are:
Right button: Holding down the right button and moving the mouse you will be able to draw circles
around the same point, producing a dipping and rocking effect. In other words, the effect you get
while moving the mouse with the right hand button held down is equivalent to moving your head
around to view your surroundings.
Left button: Holding down the left button and moving the mouse you will be able to move horizontally
and vertically. This effect is equivalent to getting hold of the map and moving it while you maintain
the direction of your eyes.
Wheel: if your mouse includes a wheel, you will be able to move forwards and backward over the 3D
view. If you hold down the wheel and you move the mouse, you will modify your altitude.
The tool bar offers another way to reach these functions. From ‘Keys & Buttons’ options, you can add
buttons to perform any movement.
3.3.3
The track simulator
Land/Air places the track simulator at your disposal so you can move around the scenery as if you were
flying a helicopter (car version, too). This option allows you to reproduce a characteristic travelling
movement which will help you to view the terrain in the way that is best adapted to your needs.
To enter the simulator mode click on the
simulator mode click again on the same button.
3.3.3.1
button on the tool bar. When you want to abandon the
Choosing the type of simulator mode
When you enter the simulator mode, look at the lower part of the window to see a field you can select with
the label Car simulator. If this field is activated, you will be working with the car mode and the vehicle you
will be using will travel on the surface of the landscape. If you assign an altitude value, your vehicle will sink
as if attracted by gravity. Furthermore, you will not be able to assign a vertical acceleration to the vehicle.
http://www.CompeGPS.com
3.3.3.2
http://Support.CompeGPS.com
19
Simulator controls
These are the controls that are available when you are using the simulator mode:
Flight direction of the helicopter: To turn the vehicle around hold down the left or the right-hand
button of the mouse and move it to the right or the left. You can also turn around using the
button on the tool bar. However, if you are using an external view, it will not follow the helicopter’s
movement so you will be shown a view of the side of the helicopter.
Note: An up or down movement of the mouse will not result in a change of direction; instead you will
be offered a change of view.
View from inside the helicopter: If you click on the right or left hand button of the mouse and you
move it up or down or left or right you will be moving your view in these directions. You can also
move your viewpoint using the
buttons on the tool bar (look up or down).
Note: right and left movements will change the flight direction of your vehicle.
View of the helicopter: When you activate the simulator, the initial position of the camera will be
inside the helicopter. To get out of the helicopter and obtain an external view, turn the wheel of your
mouse forward. The distance between you and the helicopter will depend on how much you turn the
wheel. If you do not have a wheel on your mouse you can use the
buttons on the tool bar.
You will be able to move your view in the same was as if you were inside the helicopter.
Speed: To increase or reduce the helicopter’s speed, hold down the left hand button of the mouse on
the speed marker (lower left hand section of the window) and move up or down, depending on if you
want to accelerate or reduce speed, respectively.
Altitude of the track: To increase or reduce the altitude of the helicopter, hold down the left hand
button of the mouse on the altitude marker (lower left hand section of the window) and move it up or
down, depending on if you want to ascend or descend, respectively. You can also carry out this
function using the
buttons on the tool bar.
Vertical speed: To increase or reduce the vertical speed of the helicopter, hold down the left hand
button of the mouse on the altitude marker (lower left hand section of the window) and move it up or
down to establish the vehicle’s constant vertical movement.
Create an artificial track: If you activate this option (see the lower left hand section of the window),
the software will create and draw a track that will follow the directions taken by the helicopter. You
will be able to carry out all the normal track functions with this artificial track. When you want to finish
creating the artificial track, click again on Create an artificial track. These tracks will have a different
colour to the other tracks so you do not confuse them.
3.3.3.3
Use of the track simulator’s joystick
Land/Air also allows you to pilot the simulator using a joystick. This tool allows you to travel around the 3D
scenery in a more intuitive and realistic way.
Several joystick commands are available. In order to assign these commands to the joystick’s buttons and
axels, go to the Joystick section of the 3D option window.
These are available commands that you can assign to the joysticks axels:
Course-View: When you assign this function to an axel, the axel will then allow you to turn the
helicopter right or left, therefore also changing the course that the helicopter is flying.
http://www.CompeGPS.com
http://Support.CompeGPS.com
20
Engine: This function establishes the power assigned to the vehicle. If you situate the axel at the
negative end, the speed will go dropping down to zero. If you situate it at the positive end, the speed
will increase up to its maximum (about 300 km/h). If you situate it at an intermediate point, the
speed will be proportional to its position.
Note: you can move quicker than this maximum speed if you deactivate this option and you directly
increase the speed in the speed marker in the lower left hand section of the window (hold down the
left hand button of the mouse and move it upwards).
Breaks: If you assign this function to an axel, it will apply a negative force on the helicopter in a
similar but contrary way as the Engine works. You can also assign this function to a button, leaving
an axel free for other functions.
Dipping-view: To lift or tip the nose of the helicopter, use this function. When you tip the nose of the
helicopter, it will fly towards the ground (loosing altitude) and if you lift the nose the helicopter will
gain height.
These are available commands that you can assign to the joysticks buttons:
New waypoint: When you click on a button that has been assigned this function, you will create a
waypoint exactly where you clicked on the button. If you create a waypoint while you are flying, the
waypoint will not fall to the ground; it will remain suspended at the altitude where you created it.
Shoot a waypoint: If you click and you do not let go of the button that has this command assigned to
it, a front sight will appear. When you let the button go, a waypoint will shoot out forwards and it will
stop when it reaches the ground in the direction you were facing with the front sight.
Shooting sound only: If you want to make a noise for no apparent reason, assign this function to a
button and you can make noise as sounding a hooter.
Breaks: You can assign a breaking function to a simple button instead of using an axel; in this way
you will leave an axel free for other functions.
Quick rise: If you assign this function to a button, when you click and hold down this button a
continuous positive vertical speed will be applied.
Quick descent: This function has the opposite effect but works in the same way as the previously
described function. It applies a negative vertical speed.
3.4 Viewing graphics
Land/Air features a complete graphic viewing system which will allows you to clearly and easily appreciate
the variations in the different parameters of your tracks, routes or roadbooks (altitude, speed,
temperature…).
3.4.1 Open the graphics window
You can open tracks/routes/roadbooks graphic window by carry out any of the following operations:
Click on the
button (view graphic at foot of page) on the tool bar. As a result a window will open
in the lower part of the graphics window with a representation of the element you have loaded at the
time.
Select the menu option ‘View graphic at foot of page’ in the tracks/routes/roadbooks section of the
main menu.
http://www.CompeGPS.com
http://Support.CompeGPS.com
21
Open the context menu of a tracks/routes/roadbooks (right click on the drawing) and select the
Graphics option. As a result a window will open in the lower part of the graphics window with a
representation of the element you have loaded at the time.
You can also open the context menu from the data tree by right clicking on the name of any of the
tracks/routes/roadbooks. Then choose the option graphics window.
Open the List of tracks/routes/roadbooks (section of the main menu) and click on the ‘Graphics‘
option. The graphic of the element will be opened. In this case, the graphic will appear in the old
format.
3.4.2 Working with the coordinates axels
Coordinates of a point: To know the exact location of a point represented on the graphic, place the
pointer on top of it and read the values that appearat the ‘X’ and ‘Y’: fields. These values are
expressed in the measurement units that you have predetermined for these axels.
Modify variables on the Y axel: To change or add a variable on the on the Y axel, follow these
instructions:
1. Open the graphic’s context menu (right click anywhere on the graphic).
2. Click on the option Value of Y axel. The window that will open gives you a list of the
variables you can choose from.
3. Choose the variable that you want from the list in the available fields column and click on >
(right pointing arrow).
4. Choose the variable that you want to remove from the list in the selected fields column and
click on < (left pointing arrow).
5. Click on OK and the representation of the variable will be shown.
Modify variables on the X axel: To change or add a variable on the on the X axel, follow these
instructions:
1. Open the graphic’s context menu (right click anywhere on the graphic).
2. Go to the Value of the X axel chapter and select Distance or Time.
3. The variable will change automatically.
3.4.3 Operations to handle graphics
The buttons that allow you to operate with a graphic are situated in the top part of the graphics window.
These are the tools available:
3D Viewer
: Click on this button for a tri-dimensional representation of the graphic. This option
allows you to view the graphic from different perspectives. To do this you will have to activate the
Movement tool, and then you will be able to move the graphic around using any of these processes:
When you hold down the left button of the mouse and move it at the same time, you will be able to
move the graphic up, down, left or right. When you hold down the right button of the mouse and
move it at the same time, you will be turning the graphic around on it’s own axel so you will obtain
different perspectives of it.
Zoom: When you click on the
button you will move nearer to the graphic; when you click on the
button you will move away from it.
http://www.CompeGPS.com
http://Support.CompeGPS.com
22
Zoom X
: Only horizontal axis is zoomed. This zoom mode has no effect on vertical axis (Y).
Zoom Y
: Only vertical axis is zoomed. This zoom mode has no effect on horizontal axis (X).
Zoom XY
Zoom window
: Activate this tool if you want to zoom in on a certain area of the graphic then,
while you hold down the left button of the mouse, select the area you want to zoom in on. When you
let go of the left button, the area you had marked will enlarge and occupy the available space of the
graphic.
See all
: This tool allows you to re-establish the original zoom. In this way the entire graphic will
again be in view on the screen.
Movement
: When you activate this button you will be able to move the graphic in any direction
while you hold down the left hand button of the mouse and you move it at the same time.
: Both axes are zoomed proportionally.
Note: The 3D Viewer mode also allows you to change the perspective of the graphic if you click the
right hand button of the mouse and move it at the same time.
Activate selection mode
: Activate this mode and you will be able to select a part of the track
(hold down the left hand button and drag the mouse) and create a subtrack with this selection. You
can carry out several operations with the subtrack, with independence of the rest of the original track
(analysis, eliminate, save or zoom on screen). Read the chapter Context menu of a graphic for full
information.
Legend
: A new window will appear to the right of the graphic when you activate this option. This
window will explain to you what are the elements that appear on the screen.
Print
: Click on this button and select the printing option in order to print the graphic. Sometimes,
due to copyright, is not possible to print a map, in that case the user will get a message telling him
which map caused the infraction.
Two more tools will be available if you have more than one active item:
Choose track to be represented: You can choose if you want to represent all the active
tracks/routes/roadbooks or only the element you have selected at the time.
Separate graphics
: If more than one element being represented at the same time, you can
choose if you want to view them in the same graphic or in different graphics.
Note: Once you are navigating a track/route/roadbook you will see the difference between an active element
and the non-active elements. The active one has a different on-screen display. Usually, the active item has a
notable thickness and a different colour to make it different from the rest.
http://www.CompeGPS.com
http://Support.CompeGPS.com
23
4 Communication
Land/Air let you to manage information in relation to other devices.
The possibilities of these communications and steps to start working with them will vary depending on the
type of device you want to connect. There are two types of communication:
Direct: It is not required to configure, just plug USB and device will be autodetected (TwoNav GPS,
Smartphones…)
Indirect: You need to configure a communications port and protocol (for example USB port and
Garmin protocol) to establish communication and press ‘Connect to other GPS’ to detect your
device. You can perform these operations from ‘Menu > Communications’.
Note: Communication with iPhone can also be considered indirect. Check the ‘Communcation with
iPhone’ for more details
After establishing communication (direct or indirect), device will be displayed under ‘Storage files' branch in
the data tree.
Under the name of the device you can view its contents classified by type of item (tracks, routes, waypoints,
maps). In the data tree will also appear, as one device more, Land/Air, showing the data stored in the default
folders. Once connected, you can perform various operations with the device:
Open files
Transfer files
Activate protected contents (only TwoNav GPS)
Update the software of the device (only TwoNav GPS)
Important: Communications between Land/Air (Mac version) and Sportiva.
In some cases Land/Air version for Mac might not detect Sportiva when plugged to computer, nevertheless
SD card can work as a bridge for some functions. Connect your SD card to the computer and it will
automatically appear at ‘Storage files’ section of the data tree. Once displayed, you will be able to start
working with it: send files/receive files, repair TwoNav, update TwoNav…
4.1 Open files of a device
Open a file from a connected device is as easy as double clicking its name in the tree data. Once opened,
the file appears in the branch 'open files' of the data tree and you will be able to work with it as with any
open item. Remember that the file is still stored in the memory of the device. If you want to save it on the
PC, you should do 'right click> Save as' or transfer as shown in the following paragraph.
4.2 Transfer files between computer and device
File transfer ‘Computer <-> Device’ can be done basically in several ways:
http://www.CompeGPS.com
With the context menu.
By dragging the file directly in the data tree.
http://Support.CompeGPS.com
24
If a file is protected (requires license), when transferring it will ask for the register code to activate the target
device. If the activation is not done, you will not be able to use that file in the device. You can transfer more
than one file at a time. Simply hold down the ‘Control’ key while selecting. You can also use the ‘Shift’ key to
select multiple files that are listed consecutively.
Note: Overwriting maps when sending them to device used to create useless waits, especially when
working with mosaic maps. A new message box has been defined where the easy selection is ‘Not to
overwrite’ maps.
4.2.1 Transfer by the context menu
You can open the context menu for an element, either in the data tree or on the map, by right-clicking on it.
To transfer the file to another location just select the option 'Send to...' and choose the destination. You will
find the available devices as destination options. In addition there is the option 'Select Folder' to place the
file anywhere in the system via computer explorer (Windows: Windows explorer / Mac: Finder).
4.2.2 Transfer by dragging through the data tree
You can move files from the data tree by holding left mouse button and moving the file from its origin to its
destination.
For example, if you want to move a track from the memory of a TwoNav GPS to the computer, locate it and
drag it from the tracks folder of the device to the branch ‘Land/Air'. Release the element on the name of the
target device and it will be automatically placed in the default folder for that kind of files.
You can also drag files you have open (listed in the branch 'open files' of data tree) to devices listed in
'Storage files'.
4.2.3 Transfer protected files (only TwoNav GPS)
Some files (usually maps) are protected to prevent illegal copying. When you try to transfer a protected file
to a new device, it will alert you of its condition and will ask you a register code (license) to activate the file
on the target device. If you transfer more than one protected file at a time (using the ‘Control’ or ‘Shift’ key),
it will ask successively the necessary codes.You can also transfer protected files without activating them and
then activate them using any of the available methods.
4.2.4 Synchronize tracklog from GPS
In order to transfer your recorded tracks from GPS to computer, you can do it automatically:
'Storage files > Contextual menu of the GPS > Synchronize now': It synchronizes the full content
inside 'Tracklog' folder from TwoNav to your computer.
'Main Menu > File > GPS > Synchronization': Automatic synchonization is done each time Land/Air
is launched.
http://www.CompeGPS.com
http://Support.CompeGPS.com
25
Note: The content of tracklog is copied inside the folder 'Track > your GPS device'.
4.3 Activate maps in a device (only TwoNav GPS)
You can activate maps in a device in different ways.The easiest way is right clicking on the map in the data
tree and select 'Activate for this device'. You can also activate the map when transferring from computer to
the device.
4.4 Update the software of a device (only TwoNav GPS)
Land/Air can automatically update the software on different TwoNav platforms (TwoNav GPS, Smartphones,
Evadeo…). To access to the updates:
1. Connect the device through direct communication (USB plug and check that appears in the data
tree)
2. Do right click on its label in 'storage files' and select 'Update TwoNav Software‘.
3. If there is a more recent version than the one installed in the device, it will offer a download. Accept
it. The download and installation process will take several minutes.
4. When finished, you can boot the device normally.
Important: Update Sportiva’s software from Land/Air (Mac version)
1. Connect your SD card to the computer.
2. Do right click on its label in 'storage files' and select 'Update TwoNav Software‘.
3. Copy transfer to SD card will start. Wait a few seconds.
4. Once transfer has finished, plug SD card to your Sportiva.
5. Switch on the device to finish TwoNav update. Wait a few minutes until the process is finished.
4.5 Update speedcams of a device
Land/Air offers you the possibility to automatically update to your device the latest speedcams: 'Data tree >
Storage files > Select your device > Update Speedcams'.:
4.6 Devices with direct communication
Listed
way:
below are the GPS devices with which the current version of Land/Air can communicate on a 'direct'
TwoNav GPS
Evadeo M
Evadeo X
http://www.CompeGPS.com
http://Support.CompeGPS.com
26
You can also connect generic devices (phones, PDAs...) that have TwoNav software:
TwoNav Android
TwoNav Pocket
TwoNav iPhone/iPad*
Important: To use the direct communication functions with an iPhone/iPad, follow the instructions under
'Communication with iPhone/iPad’.
4.7 Communication with iPhone/iPad
Land/Air can perform and direct communication with an iPhone/iPad. Follow next steps to do it:
1. Launch TwoNav in your iPhone/iPad.
Important: Be sure that your iPhone/iPad is connected to Wifi net where computer can also access.
It is also required that iTunes is installed in the computer.
2. Activate FTP in TwoNav iPhone/iPad: Go to ‘Main menu > Settings > FTP’ in TwoNav iPhone/iPad.
You will see the properties of your iPhone/iPad as FTP server. FTP is now activated.
3. In Land/Air, go to ‘Communications > Connect to iPhone/iPad’ and choose one of these options:
Let Land/Air use 'Bonjour' to detect iPhone/iPad: Land/Air will try to find the iPhone/iPad.
I will write the IP of my iPhone/iPad: Search iPhone/iPad manually.
Enter the requested fields with the properties shown in your iPhone/iPad.
Host (specific to each connection)
Port
User
Password.
4. Once connected, you will be able to see the content of TwoNav iPhone/iPad’s data folders in
Land/Air data tree and transfer data by right click on element to transfer.
http://www.CompeGPS.com
http://Support.CompeGPS.com
27
5 Options
5.1 General configuration
In this section (‘File > Options > General’) the user can configure several general options:
Reload data when restarting: The user will be able to work directly with the elements that left open
last time he used Land/Air.
Run program in…: If selected, Land/Air is displayed as full screen at startup.
Check for new versions at start
Mouse wheel direction: Depending on the software, mouse wheel’s direction may be different. In
Land/Air the user has the option to choose the direction that he wants to use: forward or reverse
direction.
Return to default: In case you want to return to the initial configuration.
Configure status bar: In order to display different information such as: time, track speed,
coordinates, track altitude, course... Follow these instructions to display the different function fields
on the bar:
1. Open the configuration window by clicking on config. Lower bar, or otherwise click directly on
the lower status bar with the right-hand button of the mouse and select the option config.
Lower bar (selecting the option type of coordinates you will be able to chose the type of
coordinates you want).
2. To choose the fields that will be displayed, carry out any of the following operations:
In the Select fields window, choose the function that you want to include (from the
column Choose fields) or choose the function that you want to remove (from the
column Fields available). Between these two columns there are two arrows, click on
the arrow pointing right to add the field to the bar or click on the arrow pointing left to
remove a field.
In the Select fields window, choose a function and drag it (click the left button of the
mouse and hold it down while you move) to Available fields (to discard the field) or to
Selected fields (to include the field)
5.2 Display configuration
Display configuration allows you to modify properties within these five areas:
Map elements
-
By default the scale will always appear on the maps, but if you do not want to see it, you can
remove if this option is not selected.
-
If you choose to ‘use mouse scroll arrows in the windows borders’, when approaching to the
edge of the screen an arrow will appear. By pressing mouse’s left button, the view will move to
the arrow’s direction.
-
If you select ‘Show scroll bars’ two scroll bars will appear on screen, these bars will allow you to
scroll horizontally and vertically.
-
When working with your maps, you can customize the map inertia in which is scrolled. The
inertia map option also allows you to move the map without any inertia at all.
http://www.CompeGPS.com
http://Support.CompeGPS.com
28
-
If you select ‘See hints for objects on screen’, when the cursor is resting on any object (map,
waypoint, route, track, relief, etc.) an information box will appear next to cursor. That box will
provide information about the selected object (names, altitudes, latitudes, longitudes,
distances…).
-
The user can also decide if he want the compass to be always shown, just on rotations or even
not showing the compass at all.
-
Selecting the option Draw map corners you will see the edges of all the maps simultaneously on
view on the main window with their corresponding coordinates.
-
Show POIs on the map lets you display at the very same map all points of interest.
-
User can change the background colour of the maps to suit their own tastes.
3D reliefs
-
Draw relief. When this option activated the borders of the available landscapes will be drawn on
top of the available reliefs. This option works in the same way as the other option available when
you work with maps: view borders of all maps.
-
With ‘Draw landscape in the 3D view even if raster map is loaded’ option selected, the best 3D
relief for that view will be shown once the 3D viewer is on.
-
The option draw landscape with shadows makes viewing any landscape clearer and more
attractive because it incorporates artificial shadows to the view.
-
A landscape can be drawn with scaled colouring determined by the altitude. In this way it is
easier to establish the altitude of each point. To activate this option, select Scaled altitude colour
change. You can choose the separation of the altitude lines by opening the fold-down window
below this option and choosing from the four available separations: (100, 200, 500 o 1000
metros).
-
As well as the scaled altitude colour changes, you can make altitude reading even more clearer
by drawing in the altitude lines if you activate the option Draw level lines.
-
At colours relief option the user can choose between three different color scales.
-
At customize, the user can apply a more personal touch to the colour scale.
Animation
-
Click on the function Animation speed to increase the speed of the 2D animation of a track in
relation with the track’s real speed.
-
Click on the function Animation mode to choose between the different movements of the icons.
You have the following options:
o
Move icon on top of the track: when in movement, the icon will move along the drawn track.
o
Move icon without drawing the track: when in movement, the icon with move along the path
of the track, but the track is not drawn.
o
Simultaneously move icon and draw track: the movement of the icon will simultaneously
draw track as the icon travels along the path of the track.
http://www.CompeGPS.com
o
http://Support.CompeGPS.com
29
Move icon and hide the track: when in movement, the icon will rubout the track it is travelling
along.
-
Animation pointer: Allows you to chance the mouse symbol.
-
Change icon: Click on this button to change the icon and choose between the different
possibilities. Icons for 2D and 3D are configured separately.
-
You can also change size of the 3D icon.
Grids
-
Some users prefer to see the projection grid while working with maps because this tool guides
them.
-
If you want to see the projection grid, you can also choose the color of their lines.
-
Another parameter that can be configured is the spacing interval (km) between each line of the
grids. The user can choose the distance between them.
-
If you select ‘Show labels’ Land/Air will show you the value of each of the grid lines.
-
At ‘View the degrees grid’ the user can change the colour and the degrees of the grid.
-
As in the past example, the user can change also the colour of the minutes.
-
Modify the range of separation degrees.
-
You can also change the font size of the labels.
-
If you select ‘Show labels’ Land/Air will show the value of each of the UTM grid lines.
-
If you select ‘Use the datum of primary map’, Land/Air will use the datum that has the primary
map.
Graphs
-
In X-axis values you can choose between distance or time as parameters for display on the
horizontal axis of the graph.
-
In Y-axis values you can choose the parameter you want to be shown on the vertical axis of the
graph. For that, you must click on Set the Y-axis fields. This opens a dialog box that allows you
to add or remove fields to act as variables in the Y-axis. You can choose more than one field to
display based on the parameter X. If this is the case, each parameter will draw a different
graphic, non-overlapping: The Y axis will be divided into as many parts as parameters selected.
-
‘To take account the day': Show a graph of several tracks with different times starting from
origin.
Data tree
-
Land/Air allows the possibility to present on waypoints and tracks lists extra information related
to these elements such as date, distance, height, relative bearing arrow, track color.... The
information is presented in a 2nd line right after the name of the item and it can be customized
showing multi-selectable data fields.
http://www.CompeGPS.com
http://Support.CompeGPS.com
30
Note: The data contained in the 2nd line is only available for tracks and waypoints which have
been saved using TwoNav 2.5 or Land/Air 7.3 (or higher).
-
-
Display elements listed in the data tree using two different modes:
o
Classify open files in branches: If option is checked, show elements in classification
branches grouped by types of files.
o
Don't classify open files in branches: If option is unchecked, show elements without
classification branches.
Animated data tree: When loading elements from the data tree, Land/Air will display an
animation effect in order to easily see in which elements are you working in.
5.3 3D configuration
By clicking at ‘3D configuration’ the user will be able to apply changes to these options:
-
-
General
-
Land/Air allows you to customize the depth of the 3D quality of your maps from a list of different
degrees.
-
You can also set the maximum number of tiles to display.
-
Altitude exaggeration can be changed by the user. In case map reliefs aren’t very divers by
exaggerating the altitude you may intensify it.
-
When using 3D maps, rendering mode can be modify by selecting a certain mode: map
(texture), hypsometric surface, smooth surface, wire, wire + surface, or wire + map.
-
If you want to apply shading to your maps, you just have to select this option.
-
Certain field vision degree can be altered by the user.
-
Depending on the user's taste, 'Foggy horizon' can be enabled or disabled.
-
If you want Land/Air to search for landscape when starting 3D view, just select this option.
-
When the height is under the sea level, 3D mode can also represent the situation by fixing the
current value of the sea level (*.CDEM elevation map required). By default, the level of the sea
is set at 0 meters.
'Simulator' option allows you to customize the type of simulation you want to use with your maps.
These are the configurable parameters:
o
o
o
o
-
Sort of simulator
Minimum distance to land
Wind Speed
Sensor Speed
Another different type of simulator is 'Turn continuously 3D', this parameters can be configured:
o
o
o
o
o
Horizontal rotation speed
Vertical rotation speed
Displacement speed
Maximum distance
Minimum distance
http://www.CompeGPS.com
http://Support.CompeGPS.com
31
5.4 Map configuration
To change map default settings:
When setting the maximum number of loaded maps that can change the number of maps that can
be displayed simultaneously on the screen.
User can also set the maps’ maximum cache memory of from the 'Options' menu. So you can
graduate the ability for remote memory.
The section maximum memory for maps you can limit the amount of memory that you computer will
use to manage maps. The default value of this section is 0, meaning that there is no limit established
to memory used for maps.
Note: Situate the maximum memory for maps to a value lower than the RAM installed in your
computer (128, 256, 512…) if you do notice that the systems is working too slowly.
Remote maps: When using remote maps (through Internet), you can choose to save downloaded
sections in local hard drive so they can be accessed faster or even when there is not Internet
connection. You can choose the folder to save those sections and limit the size of the folder. When
limit size is reached, older files will be deleted.
It is very important to select the right location to store map’s cache. The user can define the folder
where the maps will be saved.
You can also set a maximum size for map’s cache folder.
The user can decide whether to display maps at the data tree keeping their original agruptations in
folder structures, or not. If ‘Show folder structure’ is not enabled, maps will be presented at the same
structure level with no folder agrupations: all maps will be listed together.
An antialiasing system has been developed so vectorial map lines are can be presented much
smoother improving their visual aspect.
IMG/MP import: XML files with layer configuration information can be used. In case to be used in
TwoNav, map needs to be saved as *.MPVF file.
5.5 Track configuration
In order to change the default settings of tracks, follow these operations:
If you click on Hint Fields you will be able to determine what information will appear whenever you
pose the pointer on any part of the track (without clicking anywhere). To do this, select the
information you want from the left hand column (available fields) and click on the arrow pointing
right. To remove an information field, mark it in the selected fields column and click on the arrow
pointing left
If you activate the option paint arrows on the track the track will be marked with arrows indicating in
which direction the track was made.
There are three ways to represent the value of altitude within 'altitude representation': draw the track
with its own altitude, draw the track with its own altitude + projected one or projected track drawn on
the floor.
The user can set minimum difference to accumulate altitude, so under values won’t be taken into
consideration. This function prevents mistaken climb datas.
http://www.CompeGPS.com
http://Support.CompeGPS.com
32
‘Distance to assimilate waypoint': Fix the distance to consider a waypoint as 'near' the track. When a
waypoint is 'near' the track: It is displayed in track's graph and it can be dragged to track,
automatically creating a new roadbook point.
It can be very interesting to set a minimum moving speed to avoid small movement errors during
recording.
Land/Air offers you two different template styles to print the track report.
5.6 Waypoint configuration
In order to change the default settings of waypoints, follow these operations:
Active waypoint mode can be set as 'basic' (WPT fixed assets + load at startup) or ‘advanced’ (The
first-opened WPT is the active one).
Click on the option waypoint fonts to choose the font you prefer for your waypoints (type, size,
colour, effects…).
Click on the fold-down window set of symbols for waypoints to choose from a variety of different
GPS marks whichever best suits your needs.
If your GPS allows for only one field for the waypoint name, this option allows you to choose the
configuration you prefer to use when you load waypoints onto your GPS. The short name refers to
the waypoint’s main name and the long name refers to the waypoint description. You can choose
between the following options: the long and short names together, only the short name or only the
long name.
If you want to change the font color, text size and radius of new WPTs, you only need to change the
default color for another.
The same can be done for background color of new WPTs.
Transparent background of new WPTs is also possible.
Waypoint icon position
5.7 Photo configuration
http://www.CompeGPS.com
http://Support.CompeGPS.com
33
The user can insert images at the main window of a map, track, waypoint or even for a route. These images
are very useful to customize your own trip.
Once the photo folder where the photos are stored is selected (‘Main menu > Photos > Open photo folder’),
there are two different ways to import pictures to the main window: by dragging them from the 'photo list', or,
doing the same from the data tree (‘Photo' section).
In order to change pictures settings, here you have the configurable parameters:
Draw thumbnail on map
If ‘draw thumbnail on map’ is fixed as ‘yes’, now you will be able to change the thumbnail size.
Image always visible during animation: Image window will remain open.
Show image (seconds)
Write name of the photo
Open photos in subdirectories
5.8 Folder configuration
The software automatically assigns certain default folders (inside the ‘CompeGPS’ folder) to store the
different information you work with (Tracks, Waypoints, Routes, Landscapes and Competitions). You will be
able to apply configuration changes to the following folders: Map, Track, Waypoint, Route, Profile and Photo.
To modify the configuration of the working folders, proceed as follows:
Write the directory address directly in the text window.
Click on the button located on the right hand of each section to examine and select the directory
you want to use.
Land/Air also allows you to do an automatic scanning for every time you start the software. This parameter
can also be changed to less frequent intervals.
5.9 International configuration
In 'Language' the user will be able to select the language he wants to work with. Indicative voice can also be
defined: man voice or woman voice. Measurement units are also configurable:
Distances in ... allows you to choose between the list of: km, Mi, nm, m or ft.
Speed in ... allows you to choose between the list of: km/h, MPH or Kt.
Height in ... allows you to choose between the list of: m, ft or brazas.
Short distances in ... allows you to choose between the list of: km, Mi, nm, m or ft.
Acceleration in… allows you to choose between the list of: m/s2, g or km/h/s.
Vertical speed allows you to choose between the list of: m/s, ft/min, m/min or m/h..
Surface area in… allows you to choose between the list of: m2, Hect. or Km2.
Energy Unit in... allows you to choose between the list of: J, KJ, MJ, cal, Kcal or KWh.
5.10 Coordinates configuration
Inside ‘coordinates’ submenu these changes can be done:
Clicking on Type of Coordinates you will be able to view and select the most suitable type of
coordinates for your maps. You will be able to choose between 16 different types of coordinates,
most used in Europe.
Degrees format.
http://www.CompeGPS.com
http://Support.CompeGPS.com
34
Clicking on Datum you will be able to choose the most suitable datum for the map that you will be
working with.
Primary map mode options are: ‘Last loaded map will be the primary map’, ‘First loaded map will be
the primary map’ or ‘Use a fixed projection, not a primary map’.
By clicking at ‘primary projection’ the user will be able to choose a specific projection from a short
list.
5.11 GPS configuration
Inside ‘GPS’ submenu you will be able to apply changes for:
General
-
'GPS Auto-search' button will help you to connect your GPS to your software in a very easy way.
-
The user can preset the GPS connection when starting Land/Air. You just have to select
‘Connect GPS at start’.
-
Communications Port: You can choose the port of the GPS-computer connection. If you have a
Garmin GPS is quite likely to have USB option available (that one would be more appropriate).
-
Protocol: Choose the protocol used by GPS. If you do not know the protocol to choose, just click
at Auto-Detect and Land/Air will identify the original protocol of the GPS (with an exception of
these two instruments: Top Navigator and Brauniger Comp / IQ).
-
If you click 'Speed' after selecting the right protocol of the GPS, you will be able to choose data’s
transfer speed. Note that at high speeds can cause errors when transferring information.
Advanced communication options
-
You can select the GPS datum at the first submenu option.
-
In case ellipsoidal heights are being used by the GPS, this option should be applied.
-
If you want to use GPS bearing, this option should be applied.
-
Separate tracks if you download a file.
-
Delete the stopped points at the beginning and at the end of the track.
A 2nd GPS
-
First you select the protocol.
-
Then, set the speed.
-
Finally, select from two options, the communications port.
Synchronization
-
Synchronize automatically your recorded tracks from GPS device to computer. Automatic
synchonization is done each time Land/Air is launched. The content of tracklog is copied inside
the folder 'Track > your GPS device'
5.12 Navegation configuration
http://www.CompeGPS.com
http://Support.CompeGPS.com
35
To modify the predetermined configuration of the navigation, proceed as follows:
‘Track log’ submenu:
-
At recording interval, you can decide if your track is recorded by time (fixing an interval in
seconds), by distance (interval in meters or selected units at the international section) or by
allowing Land/Air to decide: automatic mode.
-
You can also fix ‘Hold time when shutdown’.
-
File format.
-
Default track name
-
Weak signal filter
-
Track colour
-
Thickness
-
Modify the shown points w/o reduction
-
Change reduction for previous points according to %.
By clicking at 'Pointer' submenu you can modify certain aspects of type, shape, rotation...
By clicking at 'Re-center' submenu you can modify certain aspects of the mouse.
By clicking at 'Next WPT' submenu you can modify the default WPTs radius and the transition to
following WPTs.
All related options to alert sounds can be found at 'Alert WPT’.
5.13 Keys and buttons configuration
This option allows you to configure the buttons on the different bars, the quick access keys and Land/Air
menus. To do this, follow these instructions:
To add a button to the bar, mark it in the left hand column (Available commands) y click on the
arrow between the two columns that points right.
To remove a button from the bar, mark it in the right-hand column and click on the arrow pointing
left.
To make a certain function available using the keyboard, select the function you want from the
column Available commands and click on the arrow pointing right. The next window allows you to
choose the key (or combination of keys) that will be associated to the function. When you have done
this, the key and function will be added to the list.
To Remove a key from the list, select it from the list in the right-hand column and click on the arrow
pointing left.
If you want to restore the initial configuration established by Land/Air click on the button ‘Predetermine’.
5.14 Joystick configuration
In this section you can assign a function to each button and axis on your joystick, configuring it to be
comfortable to use.
http://www.CompeGPS.com
http://Support.CompeGPS.com
36
Before you begin you must connect the joystick as it requires. Once you have done this it will show an
exclamation in this window informing you that the joystick has been detected and will appear the
configuration options. These options consist of one line for each axis or button available on your joystick, up
to four axes and four buttons.
To know which axes of your joystick are the axes 1, 2, 3... move those axes and see which of the bars to the
right moves with each. With the buttons can perform a similar operation, pressing a button will select the
small square on the right of the number of button and when released is deselected.
Once you know what are your axes and buttons, choose the one which corresponds to assign.
5.15 Video configuration
Video recording functions:
If you have any video device, video capturer will detect it.
The next step will be video channel’s signal detection.
If you have any connected audio device, audio capturer will also detect it.
Audio and video codecs can be selected.
During the capturing process, the user has several compression modes to edit his own contents.
The quality of compression can be set by the user.
Frame rate can be changed by the user.
If you select fields to overlay it will ensure you that these fields will be displayed on screen during
the video capture.
You can also preview the capture in real time.
5.16 Credentials configuration
This section centralizes all the on-line accounts in which you are currently logged in, making much easier for
you to control your registrations:
Dropbox: Accessible from ‘Data tree > On-line files > Dropbox’.
Amigos (either e-mail or telephone number): Accessible from ‘Main menu > Amigos’.
myTwoNav.com: The customer area of CompeGPS allowing you to: Edit customer profile
Manage and install your products on devices (CompeGPS Downloader)
Validate products included in promotional codes
Manage uploaded tracks to myTwoNav
Note: In order to unlink any of your personal accounts, all you have to do is press the cross button.
http://www.CompeGPS.com
http://Support.CompeGPS.com
37
6 Data Tree
The data tree is a very practical tool that will make working with the elements you have opened. It allows you
quick access to the most important operations that can be carried out on the different elements (maps,
landscapes, tracks, waypoint and routes). It also allows you to view at a glance which elements you have
loaded on the screen at a given moment in time.
To activate the data tree, click on the
button that you will find on the tool bar.
6.1 Position of the data tree
You can make certain adjustments to the Data tree window to view it in the way best suited to your needs.
Two basic viewing options are available: in an independent floating window or in a window anchored to the
main window.
6.1.1 Floating tree
We consider this the most versatile and recommendable way to set up the data tree. This is the mode in
which the tree will normally open but if the anchored mode is activated, you can deactivate it by right clicking
on the top part of the window and selecting the option View floating.
These are the operations you can carry out to adjust viewing while the window is in the floating mode:
Transparent view: Right click on the top part of the window and choose the option See transparent.
The window will become semi-transparent so you will be able to also see the elements on the
window underneath the data tree.
http://www.CompeGPS.com
http://Support.CompeGPS.com
38
Move: You can move the window as you wish by left clicking in the title bar (the blue strip at the top
of the window) and the drag it to it’s new position.
Size: To adjust the size of the window, move the pointer to any of the corners of the window and,
while you hold down the left button, move the mouse to modify the size of the window.
6.1.2 Anchored tree
To anchor the data tree in the main window, right click on the title bar and select the option ‘Anchor in main
window’.
These are the operations you can carry out to adjust viewing while the window is in the anchored mode:
Change position of the window: right click on the top of the window to choose if you want it on the left
or on the right or horizontally positioned.
Change size: Hold down the left button of the mouse on the inside of the frame of the window and
drag to increase or reduce the space taken up by the data tree.
6.2 Management
The data tree is a powerful tool to facilitate communication between Land/Air and portable devices you may
use during your trips (TwoNav GPS, Evadeo...).
When connecting a device that supports direct communication, Land/Air will automatically detect and display
it on the branch 'Storage files’ of the data tree. Under the name of the device you can see its contents
classified by type of item (tracks, routes, waypoints, maps).
In the data tree will also appear as a device more, Land/Air, showing the data stored in the default
folders.Once connected, you can perform various operations with the device. See the section 'Direct
communication' for a full description of these functions.
Important: Display of lists
Closed list
http://www.CompeGPS.com
http://Support.CompeGPS.com
39
Opened list with no more than 10 elements displayed: expand the list by clicking at...
> Upper arrow of the category group
> Bottom bar of the list
Fully opened list: showing all its elements
6.2.1 Open Files
Currently open files will be shown here, classified by type of object (map, track, route or waypoint)
6.2.1.1
'Amigos'
‘Amigos’ is a location-aware function developed by CompeGPS allowing you to view the current location of
your contacts on the map in real time (and viceversa). This social network section is included by default in
Land/Air. In order to enable this function select:
‘Main bar > Amigos (button)’
‘Data tree > Amigos’
With 'Amigos' you will get the chance to interact with friends while using your favourite application:
Add contacts to your list of friends: Add your friends to your list of contacts using either their e-mail
address or mobile phone number.
http://www.CompeGPS.com
http://Support.CompeGPS.com
40
Visualization of your contacts on the map : See on the map the actual position of your contacts in
real time as they move.
Chat with your contacts.
Send a general message to all your contacts.
Set the interval of data refreshing automatically (movements on the map will be more constant as
interval refresh is lower).
Follow in real time the exact location of your friends on the map (contextual menu at friend's profile
and select 'Anchor here').
Set the information displayed to your contacts (see position on the map, distance from each of your
contacts...).
Customize your own profile: Set your nickname, a short description about yourself, a photo... all this
information will be displayed at the list of contacts of users.
Launch ‘‘Amigos’ every time you start Land/Air.
In order to disconnect ‘Amigos’ open the contextual menu on your profile name and press ‘Unregister’:
Select 'Unlink this device' if you want to log out the session on your current device.
Select 'Delete user account' if you want to completely eliminate your ‘Amigos’ account.
To start using ‘Amigos’, the you won't need to pay any extra complement, by default this tool is included as
part of any Land/Air license (as from 7.4). Users having an older version not supporting ‘Amigos’ can update
Land/Air at http://www.compegps.com
Note: ‘Amigos’ function for Land/Air has been conceived as a platform to specially check the current location
of those contacts that use ‘Amigos’ in their mobile phones (usually, users who use ‘Amigos’ in Land/Air are
said to be in a fixed position although Land/Air can also transmit current position in movement).
6.2.2 Storage files
Here you can manage data stored in the computer and connected devices.
6.2.3 On-line files
The section 'On-line files' contains data available not in computer nor in connected devices but in the
internet allowing you to open and work with on-line contents (maps, tracks...) located on external online
servers such as CompeGPS servers, Dropbox and on-line providers.
http://www.CompeGPS.com
http://Support.CompeGPS.com
41
In order to use this function, reproduce the following steps:
Center the map where you want to get elements.
Select 'Data tree > On-line files' (Land/Air will look for available content near to your current position)
In case any element near your position is found, basic information related to these element will be
presented in the 2nd line right after the name of the item.
o
'Properties' button: To check basic properties of the item before downloading the file (file
name, short description, file size, author, duration, total distance...).
o
'Open item' button: To download and center the element (element can also be automatically
centered by double-clicking on it from 'on-line files').
Note: Remember that you can easily send the downloaded elements to any device (TwoNav GPS,
Android...) by doing: right click on the element > Send to > your device.
Important: Attached files can be dragged directly from PC’s folders to the data tree of Land/Air. As a result,
these files will be attached to the data tree. You can also drag images directly from Internet browse (by now
only Firefox).
6.3 Working with maps
6.3.1 Move map to a different layer
http://www.CompeGPS.com
http://Support.CompeGPS.com
42
If you have loaded several maps covering the same area and these map overlap totally or partially, you can
establish a certain viewing order. The map situated at the top of the list will overlay all the other maps. The
next on the list will have preference on all the other maps except the first map, and so on.
To change the position of a map on the list, mark it (left click on it) and while you hold down the ‘Alt’ key,
click on the arrow pointing up to move the map up a position, or click on the arrow pointing down to move
the map a position down.
6.3.2 General map operations
Right click on the maps label to access these options:
Properties: The window that will open when you select this option will tell you how many maps you
have loaded at that time, the projection you are working with (the projection is established by the
primary map, read list of open maps) and the total memory resources taken up by the open maps.
Open map: Choose the map you are interested in from the list that will appear, and click on open.
Close maps: This option closes all the open maps, leaving only one blank map open on which all the
other elements will be displayed.
Open index map: This option opens the map you have named as the index map.
Download Internet map for this area: This option opens the Internet map download window. Read
Download Internet map for this area.
Create hypermaps: To create hypermaps just drag and drop the right map using the data tree.
6.3.3 Working with a specific map
When you right click on the name of a map that you have already opened, you can carry out the following
operations:
Close map: To close the map associated to this context menu.
View borders of all maps: This option shows you the borders of all the maps that you have available
in your PC.
Note: Land/Air will only contemplate the maps you have stored in the folder you predetermined in
the folders section when programming the Configuration options.
Select active folder for map borders: This option allows you to choose which is the folder you want to
use to draw the map borders. This option can be used when the previous option is activated.
The initial folder will be the folder at the top of the list in the Map folder field, which you will find in the
Folder section of the Configuration options. You will be able to choose between all the folders in the
list.
Send map to Pocket: This option allows you to transfer the selected map to the sister program.
Multimaps, advanced…: This section gives you access to the following options:
o
Transparent view: A smaller window will open when you activate this option. This window
allows you to specify the degree of transparency of the data tree with respect to the window
underneath it.
o
Establish as primary: This option allows you to establish a certain map as the primary map.
As a result, if a calibration conflict arises, the other maps will adapt themselves to the
primary map. (this only affects very large or very distant maps).
http://www.CompeGPS.com
http://Support.CompeGPS.com
43
o
Bring forward: This option moves the selected map on top of all the other maps, so it is not
covered by any of them.
o
Send behind: This option lowers the selected map to the next layer down.
o
List of maps in the memory: To access the list of maps.
o
Revise map calibration: The access to this option even when other maps are open.
o
Edit vectorial map: To open the vectorial edition bar.
o
Save map as: This option allows you to save the map choosing the name and the folder.
o
Layer administrator: To access this vectorial map tool.
o
Move map calibration: Introduce an x and a y value to alter the map’s calibration.
Zoom here: To place the selected map on the screen.
Map properties: To open the properties window of the selected map.
Tiles layout (mosaic maps): The grid which displays the layout of a mosaic map made up of tiles can
be enabled from:
o
o
o
o
Toolbar: 'Show tiles layout' button
Map window: 'Contextual menu > Show tiles layout'
Data tree: 'Map > IMP map file > Contextual menu > Show tiles layout'
Data tree: 'Map > IMP map file > List of tiles > Contextual menu > Show tiles layout'
The user can also multiselect tiles on map, and even send them to device.
http://www.CompeGPS.com
http://Support.CompeGPS.com
44
Note: In a map made up of tiles (mosaic), only the availabe tiles are drawn on the grid. Instead of
having all tiles mixed, they can be organized in subfolders inside RTMAP general directory.
6.3.4 Working with a specific landscape
When you right click on the name of a landscape that you have already opened, you can carry out the
following operations:
Landscape properties: To open the properties window of the selected landscape.
Close landscape: To close the landscape that the context menu refers to.
Save landscape as: This option allows you to store a landscape using a format, name or location
different to the original ones.
Draw 3D landscapes: When you select this option you will be able to view a 2D representation of a
3D landscape in the main window.
3D viewing options: To direct access the 3D landscape section of the options window.
6.4 Working with tracks
6.4.1 General track operations
Right click on the tracks label to access these options:
Open track: Select the track from the list that will be displayed and click on open to load the track.
Close tracks: To close all the tracks you have loaded at that time.
Create and edit a new track: To open the track edition bar.
Foot of the page graphic: To view the foot of the page graphic with all the loaded tracks.
Join tracks: This option joins all the open tracks into one single track.
Properties: The window that opens when you select this option will tell you how many tracks you
have loaded at that time.
Note: Land/Air allows the possibility to present on track list extra information related to these elements such
as date, distance, height, relative bearing arrow, track color.... The information is presented in a 2nd line
right after the name of the item and it can be customized showing multi-selectable data fields ('File > Options
> Display > Data tree'). The data contained in the 2nd line is only available for tracks which have been
saved using TwoNav 2.5 or Land/Air 7.3 (or higher).
6.4.2 Working with a specific track
When you right click on the name of a track that you have already opened, you can carry out the following
operations:
Track properties: To open the properties window of the selected track.
List of points: This option opens a smaller window at the bottom of the screen, naming all the points
that make up the track, giving details of each of the day, time, latitude, longitude, altitude and speed
for each o these points. These fields can be edited by double clicking on the point you want to work
with.
http://www.CompeGPS.com
http://Support.CompeGPS.com
45
Close track: To close the selected track.
Save track: This option saves track with the modifications you have made to it using the same name,
so you will loose the information stored as the original track.
Save in track book: This option saves the selected track in the track book that you have open at the
time.
Save track in trackbook: To save the track in the track book.
Send to:
o Send track to a GPS: To load the track onto your GPS.
o
Send to Pocket: To send the track to Pocket.
o
Send by E-mail: This option opens an e-mail message, using your predetermined e-mail
software, and includes the track file as an attachment.
Graphics window: This option opens the graphics window with a representation of all the loaded
tracks. Only the selected tracks of the data tree will be represented in the graph. Non-selected tracks
won’t appear.
Zoom here: This option adjusts the focus so that the course is clearly in view on the screen.
Tools:
o Close all except this one: To close all the open tracks except the track you have selected.
o
Move a track: This option allows you to move a track by modifying its coordinates and time
values.
o
Calculate altitude to surface for each point: If you also have a 3D landscape loaded, this
function will assign the corresponding altitude reading to each of the track’s points. Once the
operation is completed you will be informed that “Surface altitude readings for this track have
been imported”.
o
Incorporate pulsometer data from another file: This option allows you to incorporate the
pulse readings, obtained by another instrument, to the track’s properties.
o
Divide track into several tracks: This option allows you to separate into different tracks a
group of tracks that you have downloaded from your GPS. This operation is normally carried
out when you download tracks from a GPS but, using this tool, it can be carried out at any
time.
o
Eliminate stationary points at beginning and end: To remove the repetitive points at the
beginning and end of the track.
o
Reduce number of points: You will be asked to indicate a number of points and then the
track will be re-drawn maintaining the same form as best possible but using only the number
of points you have written.
o
Assign time and speed: To assign a departure time and a constant speed to a track so that
Land/Air can calculate the time to be assigned to each point of the track.
o
Eliminate abnormal points: To remove any point that is situated too far away from the rest of
the track, in which case it is considered to be an error.
o
Another operation you can carry out on a track using the data tree is to Convert a track into a
route. To carry out this operation drag the track (holding down the left button of the mouse)
from the track section to the route section of the tree. The new route will be made up of 10
http://www.CompeGPS.com
http://Support.CompeGPS.com
46
points that will maintain the same course as the track. However, you will not be able to load
this route onto the GPS.
o
Modify the starting point of the track
o
Reverse the track: reverse the track to start from its end.
Track report: The user is able to print track templates with the most interesting data fields: day,
departure time, duration, accumulated climb, mean speed, distance with height... It also includes two
graphics: the general track map and the altitude graph during the trip. Depending on the device, it
can also show data for heart beating rate, speed sensor rating and cadence’s revolutions per minute.
Before printing the report, the user is also able to choose between two different styles for template
presentation: ‘File > Options > Tracks’. In order to print the report, follow these steps: ‘Contextual
menu of the track > Tools > Track report’. Make a *.PDF file from it is also possible if the right PDF
plug-in is installed.
6.5 Working with waypoints
6.5.1 Move wayponts about the tree
Individual waypoints can be moved about the tree within the same file or to another waypoint or routes file.
These are the operations you can carry out related to these movements:
To move a waypoint from one file to another (eliminating the waypoint from the original file), drag it
while you hold down the left hand button of the mouse and move it to the new file. You have to let
the waypoint go right on top of the name of the destination file.
To copy a waypoint into another file (thus also keeping the original waypoint) follow these
instructions:
1. Click and hold down the ‘Control’ key.
2. Select the waypoint and drag it (click and hold down the left hand button while you move the
mouse) to the destination file. You have to let the waypoint go right on top of the name of
the destination file.
To change the order of the waypoints within a file, follow these steps:
1. Select the waypoint that you want to change place (left click on it).
2. Hold down the ‘Alt’ key, click on the arrow pointing up or on the arrow pointing down to
move the waypoint towards the beginning or the left of the list, respectively.
6.5.2 General waypoint operations
Right click on the tracks label to access these options:
Open track: Select the file from the list that will be displayed and click on open.
Create a new waypoint file: This option creates a new empty .wpt file. You can change the name of
this file using the Save waypoint as function.
Close all waypoint files: To close all the waypoint files.
Properties: This option allows you to choose if you want to be able to open several waypoint files at
the same time or just one. If you choose to be able to only one file, when you ask to open a second
file the first file will automatically be closed.
http://www.CompeGPS.com
http://Support.CompeGPS.com
47
Note: Land/Air allows the possibility to present on waypoint list extra information related to these elements
such as date, distance, height, relative bearing arrow, track color,.... The information is presented in a 2nd
line right after the name of the item and it can be customized showing multi-selectable data fields ('File >
Options > Display > Data tree'). The data contained in the 2nd line is only available for waypoints which
have been saved using TwoNav 2.5 or Land/Air 7.3 (or higher).
6.5.3 Working with a specific waypoint file
When you right click on the name of a waypoint file that you have already opened, you can carry out the
following operations:
Close waypoints: To close that waypoint file.
Print list of waypoints: This option opens the printer window to be able to carry out printing
operations using the waypoint list.
List of waypoints: To open the list of waypoints that belong to that file.
Save waypoints: This option over-writes the original waypoints with the modifications you have
made.
Save waypoints as: This option allows you to give a new name and storing route to the waypoints
file, thus keeping the original file intact.
New waypoint: This option allows you to add a new waypoint to the file; introduce the coordinates
and other required information in the waypoint property window.
Send to:
o Send waypoints to a GPS: To load a waypoint file onto your GPS.
o Send to Pocket: To send the waypoint file to Pocket.
o Send by Email: This option opens and e-mail including the waypoint file as an attachment.
Properties: This option opens a new window that gives you details about the name of the file, the
number of waypoints that it contains and it allows you to choose if you want to view the waypoints on
the screen or not (double click on this field to modify it).
Sort by: Shortest name, description, name, icon or proximity.
6.5.4 Working with a specific waypoint
When you right click on a specific waypoint inside a waypoint file, you can carry out the following operations:
Properties: To open the properties window for the specific waypoint.
Eliminate waypoint: To remove that waypoint from the list.
GOTO this waypoint: Specify that certain waypoint as your destination when you are working with
navigation.
Send this waypoint to the GPS: To load that waypoint on to your GPS.
Zoom here: To situate that specific waypoint in the centre of the screen.
6.6 Working with routes
http://www.CompeGPS.com
http://Support.CompeGPS.com
48
6.6.1 Move a waypoint about a route
Individual waypoints can be moved about the tree within the same file or to another route or waypoint file.
These are the operations you can carry out related to these movements:
To move a waypoint from one route to another (eliminating the waypoint from the original route),
drag it while you hold down the left hand button of the mouse and move it to the new file. You have
to let the waypoint go right on top of the name of the destination file.
To copy a waypoint into another route (thus also keeping the original route) follow these instructions:
1. Click and hold down the Ctrl key.
2. Select the waypoint and drag it (click and hold down the left hand button while you move the
mouse) to the destination route. You have to let the waypoint go right on top of the name of
the route.
To change the order of the waypoints within a route, follow these steps:
1. Select the waypoint that you want to change place (left click on it)
2. Hold down the Alt key, click on the arrow pointing up or on the arrow pointing down to move
the waypoint towards the beginning or the left of the list, respectively.
6.6.2
General route operations
Right click on the routes label to access these options:
Properties
Foot of the page graphic.
Close routes: To close all the routes you have opened.
6.6.3 Working with a specific route
When you right click on the name of a route that you have already opened, you can carry out the following
operations:
Properties of a route: This option opens the properties of a route window.
Save route: This option over-writes the original file.
Save route as: This option allows you to give the route a new name so you also keep the original file.
Close route: To remove the route from the screen.
Invert the route: This option inverts the order of the waypoints that make up a route.
Graphics: This option opens the window with the graphic of the route.
Send to: To send the route to different destinations.
o
Send route to a GPS: To load the route onto your GPS
o
Send to Pocket: To send the route to Pocket.
o
Send by Email: This option opens and e-mail including the route as an attachment.
http://www.CompeGPS.com
http://Support.CompeGPS.com
49
Convert route into a track: This option creates a new route file in TRK format. This allows you to
handle a route as if it were a track in which the waypoints become points of the track. You can also
carry out this operation by dragging the route to the track branch of the tree.
Activate a route: This option allows you to insert the route at the navigation, so you can follow it
using this feature.
Zoom here: This option focuses the route in the main window.
6.6.4
Working with a specific waypoint
When you right click on a specific waypoint inside a route, you can carry out the following operations:
Properties: To open the properties window for the specific waypoint.
Eliminate waypoint: To remove that waypoint from the list.
GOTO this waypoint: Specify that certain waypoint as your destination when you are working with
navigation.
Send this waypoint to the GPS: To load that waypoint on to your GPS.
6.7 Working with profiles
This section presents profile elements which have position data inside them (gpx, kml/kmz, not CJT). Only
profile files with more than one type of file (waypoints, tracks, routes) will be shown at this section. If profile
file has only one type of file (for example track), it will not be shown in ‘profiles’ section but in the section of
the type (for example Tracks).
http://www.CompeGPS.com
http://Support.CompeGPS.com
50
7 Working with maps
7.1 Definitions
7.1.1 What is a map?
A map is the key element for Land/Air, they allow you to geographically and visually situate the tracks you
download.
Characteristics
A map is a flat graphical representation of a portion of the earth’s surface. A map presents several
characteristics, the main ones:
System of coordinates: This is a table of latitude and longitude readings, based on the meridians and
parallels that indicate the relative situation of a point on the earth’s surface.
Scale: The relation between the dimensions of the elements drawn on the map and their real value,
measured on the earth’s surface.
Cartographic projections: All maps are approximate representations of the earth’s surface. They are
only approximate representations because the earth’s round surface has been drawn on a flat
surface. The creation of map employs a method that associates each point on the earth’s surface
with a point drawn on a map. Different types of cartographic systems are used to make this
association between the earth and map’s points.
There are several different types of cartographic projection that are classified depending on the
areas they cover. Land/Air allows you to choose the most adequate system for your un-calibrated
map, such as: U.T.M., Lat > Long, Mercator, France Lambert I... You can also choose the automatic
calibration, which will leave Land/Air to decide which is the best cartographic system for the map you
want to calibrate.
Datums: Any line or point on the surface used as a reference unit to measure another unit. Basic and
reference point on the surface that is used as the origin of all the coordinates of the network.
Land/Air allows you to choose the adequate datum for your un-calibrated map, i.e. WGS 84,
European 79...
Types
The maps used by Land/Air can be divided into two different types: raster maps and vectorial maps.
Raster maps: A raster map is a picture that contains all the map’s information. When these maps are
digitalized (bit map .bmp format) each pixel represents a set of adjacent coordinates that have to be
defined (calibrated). To be able to use these maps with Land/Air you have to make sure that they
have been calibrated.
Vectorial maps: These maps contain precise information about position, longitude and size all
geographical entities. This normally consists in a list of 2D coordinates (lines) that marks the
boundaries of the different elements. A vectorial map is the most adequate method to identify objects
that can be individually identified whenever you need greater precision.
3D map (relief *.CDEM): Digital elevation models, consisting of a grid of points that make up the
orography of the terrain. Depending on the distances between these points, the emphasis is more or
less accurate.
Download and map scanning
Land/Air uses with maps downloaded from the Internet or scanned from somewhere:
http://www.CompeGPS.com
http://Support.CompeGPS.com
51
Internet download: Land/Air features direct links so that you can download public and free maps from
the Internet.
Scanning maps: The other possibility you have is to scan a map. This map will have to be calibrated
before you use it.
7.1.2 Compatible formats
Land/Air can open maps in a variety of digital formats: *.ECW, *.BMP, *.JPG, *.TIF, *.TIFF, *.PNG, *.MAP,
*.SID, *.GEO, *.KAP, *.E00, *.JP2, *.MAPPOINT, *.SIGPAC, *.DBX, *.SHP, *.DGN, *.MIF, *.TAB, *.DRG,
*.APRS, *.WGOM, *.CWMS, *.SIGPAC, *.IMP, *.RMAP, *.MPV, *.MPVF, *.HMAP, *.DXF, *.DWG (the latter
two require AutoCAD plugin). If you have maps in any of these formats, you can open either directly or by
using the ‘Import maps’ option.
Although image formats such as JPG or BMP are compatible with Land/Air, it is recommended not to use
these kinds of files, due to management of files too big can make Land/Air slow down the process and may
even close the maps that were previously opened. The solution is to convert these images with calibration to
*.RMAP format, which allows you to work only with the area you are viewing and then save memory.
3D maps (relief) have their own formats. Land/Air is compatible with the following: *.DEM (Digital Elevation
Model), *.CDEM (this is a CompeGPS own format, similar to *.DEM but with higher compression ratios), *.
3DR (a CompeGPS custom format composed of contour lines of topographic maps), *.3DR, *.HDR, *.DAT
and *.HGT.
7.1.3 Calibration
When you calibrate a map you are situating it in the global space, in other words, you are situating it on the
earth’s surface. To do this you have to know the exact coordinates of at least 2 or 3 points of the map. The
bitmap image will be tallied to the coordinate system so that the information contained in the map coincides
with the software’s reference system.
All maps used by Land/Air must have a calibration system incorporated so that they can best adjust the
GPS’ indications to the coordinates of the map in view.
7.1.3.1
What is an index map?
An index map is chosen by you to act as a reference when you work with Land/Air. Preferably you should
turn the map you most frequently use into the index map so you can easily situate yourself on the terrain
were you usually work.
The index map can be open with a single click thus making it accessible at all times so that positioning
yourself when you work with Land/Air will be easier and quicker.
7.2 Operations with maps
7.2.1 Open a map
Land/Air offers you several methods of opening a map. Some of these methods (Seek best map here, See
list of maps for this point and Download internet map for this area) take into account the area where you are
currently working to guide you when you want to open a map. Other methods (open map, open index map
and open map from an internet URL) open a new map in spite of whatever you may currently have loaded.
An easy and convenient way to open a map is to do it from its frame; to make the frameworks of the maps
available on your computer screen you should have this option activated.
http://www.CompeGPS.com
7.2.1.1
http://Support.CompeGPS.com
52
Open map
To open a map with this tool, carry out any of the following operations:
1. Click on the button
(open map) on the tool bar.
2. Select the menu option ‘Maps > Open Map’.
3. Select the map from the list in the window and click on the button ‘Open’.
7.2.1.2
Open a map by selecting its border
If you have activated the option ‘View borders of all maps’, Land/Air will be showing you the borders of the
maps you have stored on you computer for your current position. To open any one of these maps, carry out
any of the following operations:
Double click on the border of the map you want to open.
Click with the right-hand button on the border of the map you want to open. A small window will
ask for confirmation that you want to open this map ‘Nameofmap’.
Note: Remember if you have not opened any element (track, waypoint, map, etc) the maps’ borders will not
be visible.
7.2.1.3
Define and open an Index Map
To make opening the same map time and time again, Land/Air offers the possibility of programming a direct
access to gain manoeuvrability and agility. You have to choose which map you want to assign to this button.
To define and open an Index Map, proceed as follows:
1. To define the Index Map, click on the button
(open index map) situated on the tool bar.
2. Click on the option Define new Index Map from the fold-down and select the map from the list.
3. You have just defined the Index Map and you can now open it directly by clicking on the button
(open index map).
7.2.1.4
Seek best map here
This tool allows you to open a map whenever you already have a reference point on the screen (a track, a
waypoint, another map, etc). Read chapter Configurating working folders to establish where you want
Land/Air to look for the available maps. To use this option, proceed as follows:
1. Open any reference (track, map, waypoint, etc) you want on the empty screen.
2. Click with right-hand button of the mouse on the point where you want to open the map. This point
can be located on the track, on the map or on the empty screen.
3. In the open window, click on the function ‘Seek best map here’. Land/Air will automatically open the
map with best resolution for the point you are situated on.
Note: Same option can be used by opening the contextual menu on the main application window.
Important: If you click with the right-hand button of the mouse anywhere on the screen you will be given the
option to draw borders of all maps. Land/Air will show you the borders of the available maps.
http://www.CompeGPS.com
http://Support.CompeGPS.com
53
7.2.1.5 See list of maps for this point
This tool is similar the previous one but instead of the software automatically opening the map with the best
resolution, Land/Air offers you the possibility of choosing the map amongst the maps available in your map
file. Read chapter ‘Configurating working folders’ to establish where Land/Air will seek for the maps available
for use.
To open a map using this method, follow these steps:
1. Open any reference (track, map, waypoint, etc) you like onto the empty screen.
2. Right click with the mouse on the point where you want the map; you can click on the track, on the
map or even on the empty screen.
3. In the window that opens, click on the function ‘See list of maps for this point’. Land/Air will show you
all the maps loaded for the point you have chosen, ordered in meters > pixels.
Note: If you click with the right-hand button of the mouse anywhere on the screen you will be given the
option to draw borders of all maps. Land/Air will show you the borders of the available maps.
7.2.1.6
Download Internet map for this area
This option allows you to look on the Internet for the best map for the area you are working with. To do this,
follow these instructions: Open any reference (track, map, waypoint, etc) you like onto the empty screen.
1. Click on the button
that you will find on the tool bar. You can also do this by opening the label
maps on the main menu and then selecting the option ‘Download Internet map for this area’. The
window that opens will show you all the maps available on the webs consulted by Land/Air
(remember that you must be connected to the Internet for this tool to work). A window will open
showing you a series of links (sorted by supplier, resolution, map, map type, geographic location,
etc.) on which you must click to get the product (remember that you must have an Internet
connection to work with this tool).
Note: Please note that some links are ‘Buy’ products and others are ‘open’ products. The first ones
are payable maps. Look at the ‘Price’ column of the window to find out the cost. The latter ones are
free maps.
2. Select the map you want to use and download it directly (click on the button Download map) or
through the suppliers’ website (click on the button Go to web-site and follow the steps given there).
The option that you will have to take depends on the map you choose and the button that appears in
the bottom left corner (Download map or Go to web-site), this button will change automatically
depending on the option available according to the map you have chosen.
7.2.1.7
Open a map from an Internet URL
If you are familiar with the URL address of the site where you will find the map you want, you can download
it directly with this option. To do so, follow these steps:
1. Go to ‘Maps > Download map from an Internet URL’ on the main menu. A new window will open up.
2. Write the URL address of the web site where you’ll find the map.
3. Click on ‘OK’ and the map will be automatically downloaded.
The URL where you’ll find maps usually start with ecwp:// instead of http://. Write these initials in any Internet
browser (Goggle AltaVista…) and you will find loads of maps, although you will have to be patient to find
exactly what you are looking fore. Another way of finding URL’s is to visit http://www.compegps.com.
http://www.CompeGPS.com
http://Support.CompeGPS.com
54
7.2.2 Close maps
There are several ways of closing a map or the maps that are open. To close only one map, there are
several possible methods:
Using the context menu, proceed as follows:
1. Right click on the map that you want to close.
2. Select the context menu option Close Map.
Using the List of Maps, proceed as follows:
1. Open the List of maps window by selecting Maps>List of loaded maps.
2. Select the map that you want to close and click on the button Close map.
If you do not want to carry out any other operation, close this window by clicking on the cross in the top righthand corner.
To close all the maps loaded on the screen:
1. Select the menu option Maps.
2. Click on Close Maps to close all the maps loaded on the screen.
To close a map as well as the other items you may have loaded on the screen (other maps, tracks, routes,
waypoints and landscapes):
1. Select the menu option File.
2. Click on Close all to close all elements loaded on the screen.
7.2.3 Map viewing options
The chief map viewing options are present as predetermined values on the tool bar. They are:
Zoom 100%
Movement
: Allows you to move the map around the viewing screen. To do this, after you have
clicked on this button, click and hold down the left hand button of the mouse and move the mouse
around as you wish.
: Graduates the zoom so the map returns to its initial resolution.
Note: whenever you do not have any tool selected and you click on any point of the map, this tool
will automatically be activated.
Zoom window
: Allows you to create a zoom in window of the portion you want. Select this tool
and holding the left-hand button down, draw a rectangle on the area of the map you want. When you
let go of the button on the mouse, the area you marked will be enlarged.
Selection tool
: Allows you to select different elements or areas on a map by selecting them by
drawing a rectangle holding and dragging the left-hand button of the mouse.
Zoom Out
: Allows you to create a negative zoom to view the data loaded on the screen from a
greater distance. Using the mouse wheel you can also increase or reduce the zoom.
Zoom In
: Allows you to zoom in on the data loaded on the screen. Using the mouse wheel you
can also increase or reduce the zoom.
http://www.CompeGPS.com
http://Support.CompeGPS.com
55
See all
: Click on this button for all the open elements (tracks, waypoints and maps) to be
centred on the screen, to place them all in view. If you click on the fold-down you can choose what
elements you want to be centred (tracks, waypoints, maps). This function is really useful when you
cannot locate the data you know you have loaded.
Map scaling
: Allows you to choose the percentage of increase or reduction. To do so
click on the icon and select the percentage you want for the fold-down or select the option another
zoom %. You can also introduce another scale in mts per pixel; this will allow you to introduce a
number that will represent the number of meters that each pixel will represent.
Miniature view
: Activate this tool and a window will open with a general view of all the open
elements (maps, tracks, waypoints…). The red frame that appears represents the area in focus on
the general window. This tool is very useful when you work with zooms.
Zoom window
: Select this tool for instant 2X zoom on the area marked you mark with the
pointer. This 2X zoom will be given to you in a new window that will open.
Projection grid
: If you activate this option the projection grid (using the default values you have
programmed) will be superposed on the elements you have stored.
Degrees grid
Measure distance
: This option allows you measure the exact distance between any two points.
To do this activate this tool then left click with the mouse on the point of origin and then move the
pointer to the next point. While you move the mouse you can view the measurement reading in a
small window that will appear beside the pointer. If you want to set the measurement and free the
mouse, left click on the point that you are interested in. Apart from the distance between the first and
second point, you will also be told the delay reading, de deviation from the North, written in degrees.
Turn map
: This tool allows you to turn the map around however you want, situating the north in
a new place. Click on this button and fill in the number of degrees that you want to turn the map.
Transparency: This option allows you to adjust the transparency of any map in comparison with
another adjacent map. The more transparent a map is the more you will see the map below it.
Moving the bar, the effect is immediate and you can regulate it as you want. Once you have obtained
the correct amount of transparency click on the button OK.
: This option activates the latitude and longitude lines.
Note: This is not a default option on the button bar. You can access this option through the menu
option Multimaps, advanced…, that you will find on the map’s context menu (right click on the map).
7.2.4 Anchor position as virtual location
Fix a virtual location somewhere is to virtually replace the current position of the user for a new position in
the map. In order to anchor a position apply any of these options:
'Main Window > Contextual menu > Anchor here'
'Data tree > Item > Contextual menu of a waypoint > Anchor here'
http://www.CompeGPS.com
http://Support.CompeGPS.com
56
Once fixed, the information displayed on data fields as well as in 2nd information line (list of elements) is
based according to the new anchored position, and not on the real position of the user (for example:
proximity data field). Moreover, if 'Anchor here' is pinned, options such as 'Recenter map' are applied to the
anchored waypoint instead of the current position of the user (to recenter the map press
're-center'
button at the toolbar). In order to restore the current position as the default one, apply the same option to
unpin the fixation.
7.2.5 Calibrate and Import maps
When you calibrate a bitmap you are really positioning it on the earth’s surface. To be able to do this we
have to know the exact coordinates of at least 2 or 3 points on the map. This will allow Land/Air to couple
and join together the information given by bitmap map together with the system of coordinates in use.
All maps to be used by Land/Air should be calibrated in a way that the necessary adjustments can be
achieved and so that equivalences with the greatest precision possible can be made between the software’s
data, the GPS’ data and the map in view.
Depending on how you obtained a map, you will have to face different types of calibration needs:
Maps downloaded from the Internet via Land/Air (Orthomap and Mr.Sid formats) are already
calibrated.
Maps that you have scanned (images of maps) will have to be calibrated using the function Calibrate
a bitmap. Read chapter ‘Calibrate a bitmap’.
If errors, like discrepancies between waypoints or tracks and the information on the map, appear you will
probably have to Revise the calibration of your map. Read chapter ‘Revise calibration’.
Maps made by other manufacturers often lack vital information necessary for a correct calibration. In these
cases you will have to use the option Import maps. Read chapter ‘Import maps’.
7.2.5.1
Calibrate a bitmap
Land/Air allows you to use images or bitmaps as valid maps. In this way you can complement your maps
downloaded from the Internet with other paper maps you have scanned yourself.
Scanning a map can often be a long and tiresome affair; the size of a map usually implies that you have to
scan it bit by bit or take it to a specialized establishment. This is why we recommend that, whenever
possible, you obtain your maps from the Internet or the CompeGPS CD maps.
Nevertheless, if you do have a scanned map, once you have digitalized it you will have to calibrate it for use
with Land/Air. As we have already mentioned, you do need to know the exact coordinates of at least 2 or 3
points on the map. To calibrate a map, follow these steps:
1. Select the menu option ‘Maps > Calibrate a Bitmap’. A new window will open.
http://www.CompeGPS.com
http://Support.CompeGPS.com
57
2. Select the map you want to calibrate and Click on the button ‘Open’. Land/Air allows you to work with
these formats: *.JPG, *.PNG and *.BMP.
Land/Air opens the file on the main window. You can zoom, scroll etc on this map but you will not be
able to do anything else because it is not a calibrated map. On the lower part of the screen you will
find a new section with four labels. Each label will have to be filled in with real information about the
map you have opened.
3. In the first label: fill in the information about projection and datum and click on the button ‘Next’.
Note: If you do not know the projection of your map, establish the automatic option. Land/Air will use
the U.T.M. projection system, most adequate since it is one of the most extensively used.
4. Click on Next or Frame and select the area of the map that you want to appear on screen if you have
more than one map loaded. This operation is useful to adjust the map in the best way to make
working with other maps easier. In a general way, this operation is used to eliminate the frame that
surrounds a map so that it fit perfectly alongside another map.
5. Click on ‘Next’ or on the Point1 label and write the coordinates of this point, its area and its
projection:
o
X, Y: click on the first point of the map that you want to act as calibration point 1. The images
coordinates will be established (data in pixels).
o
Type of coordinates: Select the type of coordinates that are used by the point and write it (X
Y, Lat/Long, etc.)
If you introduce a point in a written in a different projection to the projection that you selected for your
map (you did this in the first label), then these coordinates will automatically be converted into the
selected projection the moment you change the label. Using the different window functions, you will
be able to move a point from one place to another, to view a point (centre it on the screen), eliminate
a point, or use a waypoint as a calibration point.
6. Click on ‘Next’ or on the point 2 label to fill in the necessary information about this point.
We recommend that you use a minimum of three calibration points in order to obtain an accurate
calibration of the map. To include the third calibration point click on Add addition point and a new
label will appear, called Point 3; fill in the necessary information in the same way as with the other
points. You can introduce as many points as you wish, although only 3 are really necessary.
7. Lastly, you have to store the calibrated map in the predetermined directory, in *.IMP format. You can
name it as you wish, or you can keep the original name, and then click on ’Save’.
7.2.5.2
Revise Calibration
If you do not get a correct adjustment when you superpose a track, a route or a waypoint onto a calibrated
map, it is quite probably that the map’s calibration has not been carried out correctly. Use the revise
calibration function to solve these errors:
1. Open the map that you want to revise.
2. Select the menu option ‘Maps > Revise calibration of a map’. You can also choose the option Revise
calibration of a map in the section Multimapas, advanced… that you will find in the context menu of
the map.
3. In either case, the calibration window will open. Check that all the information you have written is
correct (projection, datum, points…) or you can introduce new calibration points, replacing old ones.
Adding new points will not solve the problem because the old points may not be correct.
http://www.CompeGPS.com
http://Support.CompeGPS.com
58
4. If you do not know the projection data, establish an Automatic projection. The characteristics of the
Automatic option are adequate for almost all maps.
7.2.5.3
Import Maps
This function allows you to import maps made by other manufacturers that are not sufficiently well calibrated
because they do not contain correct information about the map’s datum and/or the map’s projection.
If you want to import a map and correct the errors, proceed as follows:
1. Select the menu option ‘Maps > Import Maps’.
2. Select the drawing of the map that you want to open. Land/Air allows you to open these formats:
o
o
o
o
o
o
o
o
o
Raster Maps
DRG file extensions: *.BMP, *.TIF, *.JPG, *.TFW, *.JGW
Sid file extensions: *.SID
ECW file extensions: *.ECW
APRS file extensions: *.GIJ, *.BMP, *.INF
AutoCAD vectorial maps: *.DWC, *.DFX
Arc View vectorial maps: *.E00, *.SHP
Micro station vectorial maps: *.DGN
MapInfo: *.MIF, *.TAB
3. With the map open a new window will open, the data correction window. This window gives you
details that exist about the map. These are presented as four points that can help you to assign the
map’s projection. You will find them in the top right hand part of the window. Here are the operations
that you can carry out in the data correction window:
o
Select a projection: To choose the type of projection that you think corresponds to the map.
o
Select datum: Choose the most probably datum for the map.
o
Zone and hemisphere: Select the UTM zone and indicate if the map is located within the
north or south hemisphere.
o
Units advanced options: Click here to choose the units that you want and to write the
deviation of the location of the map on the X, Y and Z axels.
These are the questions that will appear in the lower part of the window:
o
Do you want to import all the maps in the folder? : If you activate this option, you will also
import all the maps stored in the same folder as the map you have imported. The same
adjustments will be applied to all of these maps. This can save a lot of time if all of the maps
need the same adjustments.
o
Do you want to store all the folder’s maps in the same file?: This option appears when you
work with vectorial maps. This option allows you to join together several maps that were
original stored individually but in the same folder.
o
Place each file in a different layer?: If you did choose the previous option, you will also be
able to choose if you want each of the original maps to be stored on different layers in the
new single vectorial map.
4. Once all is correct, click on the button OK and store the map with a new name in the folder:
Windows: Documents\CompeGPS\Maps
Mac: Documents\CompeGPS\Maps
http://www.CompeGPS.com
7.2.5.4
http://Support.CompeGPS.com
59
Import landscapes
The function allows you to import landscapes made by other manufacturers that are not calibrated well
enough, with incorrect datum information or a faulty projection. If you want to import these landscapes and
correct their errors, proceed as follows:
1. Select the menu option ‘Landscapes > Import 3D landscape’.
2. In the new window, choose the landscape that you want to open. Land/Air allows you to open *.TXT,
*.DTM y *.FIL formats (all *.CDEM formats).
3. The data correction window will open, here you will find the option ‘Coordinates & Datum’, and you
can choose if you want to correct the projection and/or the datum.
4. When the correction has been made click ‘OK’ and ‘Save it’ with a new name in the folder:
Windows: Documents\CompeGPS\Maps
Mac: Documents\CompeGPS\Maps
7.2.6 Maps via Internet
Land/Air offers the possibility of downloading public and free maps from the Internet. To learn how to
download a map from the internet read chapter ‘Download Internet map for this area’ or chapter ‘Open map
from an Internet URL’.
7.2.7 Join maps
This function allows you to join several maps into one. Land/Air will automatically carry out the equalling of
scales and projection for the newly created map. In this way, you will not have to calibrate it yourself.
Prepare and join maps:
1. Open all the maps that you want to join together.
2. On the map scale option of the tool bar, establish a 100% to obtain the maximum visual quality of the
new map. If you view the maps at a scale value lower than 100% the new map will have less details
than the originals; you will get less details when you zoom in on the new map.
3. Select the menu option ‘Maps > Join Maps’. A new window will give you information about the newly
joined map. You will find information about the pixel size, the scale and the projection that Land/Air
will use to generate the map.
4. Click on the button ‘Yes’ if you want to proceed with joining the maps. You will be asked to assign a
name for the new file.
5. In the window to Select name for the bitmap we recommend that you save the map as an *.ECW file.
This type of format allows you to store the image and the calibration in the same file.
6. If you want to store the map in two separate files (image and calibration) first save the image file in
the window Select name for the bitmap, and then, in the window that appears Introduce name of
map, save the map as a .IMP file but using the same name as the bitmap image.
7. Once you have stored the new map you will be able to view the final result.
Our recommendation is that the maps you want to join together do not have frames around them; frames
break up the continuity between the different maps. A frame is a border, varying in thickness, drawn around
the perimeter of a map.
http://www.CompeGPS.com
http://Support.CompeGPS.com
60
To adjust frames so that you can join maps together, use the adjust frames tool; you will find this tool in the
calibration menu. Follow these instructions:
1. Open the framed map you want to adjust to make it joinable.
2. Open the calibration window by choosing the Revise map calibration option in the Multimaps,
advanced… section. You can also reach this option using maps>revise map calibration.
3. Select the Frames label and click on the Modify map frames option. The frames adjustment tool
window will open.
4. A red line with grey points on it will border the drawing of the map. Click on any of the grey points to
move it and adequately adjust the frame to your wish.
5. When you have made all the adjustments you consider necessary, click on the Save button. If you
want to save a new copy of the map (recommended), give it a new name. The operation will
conclude when you click on Save.
Note: The next time you adjust the same map you will not be able to un-cover the areas you cut out in
previous adjustment operations. This is why we recommend that you to be careful when you adjust a map
and to always store a copy of the original map. 3D maps can anso be unified, but option to do it is in the list
of open landscapes.
7.3 Vectorial maps
7.3.1
Introduction
Land/Air allows you to view, edit and create vectorial maps. These maps offer a precise definition of all
positions, longitudes and sizes of the different geographical objects. These usually consist of a list of 2D
coordinates (lines) that shape things. Vectorial representation is the most adequate to identify objects that
have to be viewed individually on the terrain with a certain level of precision.
7.3.2
Create a vectorial map
To create a new vectorial, follow these instructions:
1. Open the vectorial map edition bar (vectorial editor) using the main menu option ‘Maps > Create new
vectorial map’ and write the name you want to give the new map.
Note: This option will not be available if you have not opened any type of file (a map, a landscape,
waypoints, etc) Load any of these items to make this option available.
2. You can create polygons or polylines. You can choose between two ways of starting to create any of
these two objects:
o
Click on the button
(polygon) or
(polyline). When you do this will, the new window
that appears will allow you to configure the different elements.
o
Once you have done this, left click on the point where you want to start drawing the polygon
or the polyline. Once you have created the first point, continue creating points until you have
drawn the shape you want.
o
Right click on the point where you want to start the drawing, choose between
Create
polygon and
Create polyline and the first point is automatically created. Continue
creating points by left clicking with the mouse.
http://www.CompeGPS.com
http://Support.CompeGPS.com
61
You can also create lines and polygons drawing them ‘free hand’. If you prefer to use this method
you will first have to draw at least two points using the method just explained. You can now select
the tool draw by dragging, hold down the left button of the mouse over the last point you have drawn
and move and draw the shape you want. When you leave the left hand button you will be asked if
you agree to the drawing, when you answer yes the shape will be added onto the line formed by the
two initial points.
3. If you are satisfied with the elements you have just created, close the vectorial map edition bar
(vectorial editor) and save the map. Open the context menu on the data tree and select the option
‘Multimaps, advanced… > Save as…’ You can give the map a new name or keep the one you wrote
when you started the edition.
7.3.3
Edit a vectorial map
Land/Air allows you to modify the polygons and polylines that make up a vectorial map.
To open the vectorial map edition bar (vectorial editor) use the context menu (right click) on the name of the
map in the data tree or on any place on the map and select the option ‘Multimaps, advanced… > Edit the
vectorial map’.
The tools available to edit vectorial maps are:
Undo
: Click on this button to cancel the last change you have made. You can un-do all the
changes you have made but be careful because once you have un-done them you cannot
automatically re-do them, you will have to re-edit them again.
Insert intermediate points
: This tool automatically detects the two points nearest to the pointer
and it will allow you to insert an intermediate point between them. When you have decided where
you want to insert the new point, left click to create it.
Add points
: This tool allows you to add more points to the line, starting off from which ever point
you want. Left click on the point you want to start off from and then select the add points tool. You
can now add a point at the beginning r at the end (if the point you had selected was one of these) or
you can add an intermediary point (if the selected point was in the middle of the track). There is a
quicker way of adding points to a track; once you have decided where you want to start from, click
and hold down the ‘Control’ key and then click on the place where you want to add the new point.
Confirm this point by clicking the left button of the mouse. Continue holding down the ‘Control’ key if
you want to add more points and repeat the same operation as before.
Note: Although the add points tool, when used to add points in the middle of a track, may seem very
similar to the insert intermediary points tool, the insert intermediary points tool is much less versatile
since it is only intended to refine the course of a track.
Draw by dragging the mouse
: When you use this tool to edit the course of a track, you will be
able to add new points as if you were free hand drawing the new course. First select the first point
from where you want to start adding new points, and then select this tool. Click on the left button of
the mouse and hold it down while you draw the new points. If the point you chose as the starting
point is situated at the beginning or the end of a track, the new points you draw will lengthen the
track. If the starting point was situated in the middle of the track, the new points will be joined up to
what originally was the next point after the starting point you chose.
Recommendation: the most practical option is to edit a track in the same direction as it is run, in
other words, from the beginning of the track towards the end of it.
Create a new line
: Although you can access this tool using the button on the button bar, the
most practical option is to right click on the point where you want to start the new line and select this
http://www.CompeGPS.com
http://Support.CompeGPS.com
62
option in the context menu. You will have to fill in the required information about the new line you are
creating in the new window that will appear.
From here you, create the line while you hold down the ‘Control’ button and left clicking on the points
were you want to create the line.
You can also create a new line using the Draw by dragging the mouse tool. In this case, once you
have selected this tool, select the initial point using the New altitude line tool that you will find in the
context menu. Then hold down the left button of the mouse while you draw the line starting from the
initial point. You can move the initial point whenever you wish by simply dragging it to its new
position. If you have activated this tool using the button on the button bar, you can start the new line
anywhere on the map.
Eliminate a line
: Select the line that you want to eliminate and click on this button to carry out
the operation. You can also eliminate a line by right clicking on it and choosing ‘Eliminate line’ option.
Eliminate a point
: Select the point that you want to eliminate and click on this button to carry out
the operation. When you do this, the two parts left of the line will be join together with a simple
straight line. You can also eliminate a line by right clicking on it and choosing ‘Eliminate line’ option.
Edit a line
: Select an altitude or cliff line or a river and click on this button (on the button bar or in
the context menu). The new window that opens will ask you what type of line you want it to become
and what will be its altitude. To move the points that make up the line, you just have to drag them
while you hold down the left button of the mouse.
Edit a point
: Select the point that you want to edit and click on this button (on the button bar or in
the context menu). The new window that opens will ask you to fill in all the necessary information
about the point.
Insert a track
: When you click on this button you will be able to open a track, view it on the
screen and edit it as if it were just another line on the landscape.
Layer administrator
: The window that opens when you click on this button gives you all the
information regarding the layers of a vectorial map.
Activate/Deactivate magnet
: When you activate the magnet, the first and last point of a line will
be joined together carried out automatically to perfection.
Re-center while creating new points
: This option re-centers automatically the window position
each time the user creates a new point when transforming vector maps. The same option can be
enabled during the creation of tracks and routes (Contextual menu > New > Start track/route here). If
this option is disabled, the main window will not be automatically refreshed, so the user will need to
move scrollbars manually at the same time that creates new vector points.
This tool also allows you to move any point already created to any new position by holding down the left
button of the mouse, moving it to its new position and then letting the button go.
7.3.4
Properties of layers
Vectorial maps can be made up of several different layers that represent different types of information. You
can consult and modify the properties of these layers using the properties of the layers window. There are
two ways to reach this window:
In the data tree, right click on the layer you are interested in and select the Properties option. If you
have activated the vectorial edition bar, click on the Layers administrator button
and then double
http://www.CompeGPS.com
http://Support.CompeGPS.com
63
click on the layer that you want to see. The option window allows you to move about the different
layers by using the small arrows that you will find in the top left hand corner.
The properties that are detailed in the window are: Type and name of the layer, colour and colour of
the filling, activated (referring to whether the layer is or is not visible), zoom level (referring to the
minimum scale at which the layer is visible), thickness of the pixel and real thickness, texture of the
filling and transparency (double click on this one to adjust the opacity of the layer).
All of these properties can be edited when you double click on them.
Another method to edit the layers of a vectorial map is to use the layers administrator. This option is
available by clicking on the
button when the vectorial editor bar is activated. The layers
administrator quickly gives you information about the different layers; you can also activate or
deactivate a layer by double clicking on this field of the layer you want to work with. To access the
properties of a layer window, double click on any other field or chose the properties option in the
context menu of the layer (right click on it).
7.3.4.1
Night mode
Color and fill color fields are set for day mode and night mode. Any change you make using 'night mode' will
be stored in the map, so that data will be displayed when Land/Air / Air or TwoNav are in 'Night mode' again.
To switch between modes you just have to go to 'Menu > View > night mode’.
7.4 List of open maps
The List of open maps function allows you to see a list of all the maps that you currently have loaded on the
screen and see all their names, scales, calibration priority (marked with an asterisk) and memory in use.
You can also open another map, close the map you have selected, store the map in an .ecw format, view
the properties of the selected map or send it to CompePocket. To open this list, select the menu option
‘Maps > List of open maps’.
From here you can:
Open a map: Open another map from your map file.
Close a map: Close one of the maps loaded on the screen, once you have selected it from the list.
Properties of the map: To view the properties of the map you have selected from the list.
Establish as primary map: Select a map as primary map. If a calibration conflict arises, the other
maps will adapt themselves to this map (only applies in very large or very distant maps)
Note: When you open a new map it will automatically be designated as the primary map.
Save as *.ECW format: To create a new copy of the map in ECW format. ECW is a data
compression system that allows for a quicker access to maps that use a lot of memory.
Close: To close the List of open maps window.
Send to CompePocket: To send the map to CompePocket.
Bring to front / Send behind: The buttons representing these operations are located in the centre of
the screen (an arrow pointing up and another pointing down).
If you choose a map from the list and you click on the arrow pointing upwards, the map will raise one layer
up, laying on top of the other maps lower down on the list. In this way, the map at the top of the list will not
be covered by any other map. The arrow pointing downwards has the opposite function. 3D maps have their
own list: ‘Main menu > 3D Landscapes > List of Open Landscapes’.
http://www.CompeGPS.com
http://Support.CompeGPS.com
64
This window allows you to carry out several operations by clicking on the corresponding buttons:
Open Landscape: to load or add a new landscape to the screen.
Join these *.CDEM: if you have more than one landscape open at the same time and you want to
work with them as if they were just one landscape, click on this button and give the joined landscape
file a name. (Note: both landscapes have to have the same projection and resolution).
7.5 Properties of a map
To see the properties of a map window, carry out any of the following operations:
Select the menu option ‘Maps > Properties of a Map’. You will view the properties of the last map
you loaded. To view the properties of any other map that you have loaded, click on the arrows in the
top right-hand corner of the window. The numbers indicated on these arrows tell you the number of
maps you have open.
Open the map’s context menu (right click anywhere on the map) and select the option ‘Properties of
the map’ to view the properties of the map you have clicked on. To view the properties of other maps
you have loaded, click on the arrows in the top right-hand corner.
Select the menu option ‘Maps > List of open maps’ to open the list of open maps window. Select the
map that you want to see the properties of and click on the button ‘Properties of the map’.
The properties detailed in this new window are the following:
Name of the map: Location and name of the file.
Type of map: Raster or vectorial.
Scales: Meters of Land/Air per each pixel of the map.
Primary: This field indicates if in the case of conflict, the other maps will adapt to this one.
Projection: Indicates the projection used to calibrate the map.
Extension of the map: Width x height of the area covered by the map.
Original datum: Datum used to calibrate the map.
Memory in use: Indicates the RAM memory used by the un-compressed map. Some maps (for
example *.ECW or *.SID) use a variable access to memory system, so a fixed quantity of memory in
use cannot be calculated. In these cases a 0.0 value will be shown although there will be memory in
use.
Name of the bitmap: Name of the image that the map comes from.
Size of the bitmap: Size of the image that the map comes from.
Colour bits: The map’s colour quality.
Number of calibration points: The number of points that were used to calibrate the map.
3D picture using vectors: Indicates (and allows to select this option by double clicking) if the vectors
will be used for the 3D mode.
Number of vectors: Number of vectors composing the map.
http://www.CompeGPS.com
http://Support.CompeGPS.com
65
Number of points: Total amount of points composing the map.
Map with Routing information
Number of entities: Stores the number of polygons.
Icons file: Select the file where you will be able to select the icon for vector map’s elements.
This zip must contain .png or .bmp which should be placed at ‘symbols’ folder of the software’s
installation directory. You will be able to select those icons already provided by default or the ones
that you created.
Some of the maps properties don’t have application in Algunas propiedades de los mapas no tienen
aplicación en relieves, mientras que las siguientes son específicas de este tipo de mapas:
Resolution: indicates how many meters fit into the rectangles that make up the landscape. When
more meters fit into a square the landscape will be more detailed (greater resolution).
Lines: tells you the number of lines that the landscape is made up of (the altitude).
Columns: tells you the number of columns that the landscape is made up of (the width).
7.6 Context menu of a map
The context menu of a map appears whenever you double click on any point of the map. The context menu
offers you the possibility of operating the following functions:
Create a waypoint here: create a waypoint on the chosen point of the map.
Start a new route here: allows you to create a new route starting on this waypoint. To add new
waypoints, hold down the Ctrl key.
Search: By selecting this option, a dialog box will be opened in which you will be able to perform
various actions.
Map coordinates of the exact point that you just pressed are presented.
Selectable elements (remote and local maps, reliefs, tracks, routes and waypoints) are
presented at ‘What to search...’ section. The user is able to filter the search according to
several preferences.
Results for the selected point will be searched inside default folders (‘File > Options >
Folders’). Among other information, results will be presented with name, location, scale as
well as a preview picture of the map.
Internet maps for this zone can be downloaded by clicking at ‘Download internet a map for
this area’.
By clicking OK, you will open the selected item from the list. Click ‘Cancel’ to exit the
research.
Seek best map here: Automatically looks for the map with best definition for the point you have
chosen on the present map.
View list of maps for this point: Shows you the list of maps that you have available for the point you
have chosen.
Close map: Closes the map belonging to the context menu.
http://www.CompeGPS.com
http://Support.CompeGPS.com
66
View frames of all maps: this option allow you to view the outlines of all the maps that you have
stored in the folder situated in first place in the field “Map Folder” in the Folder section of the options
windows.
Note: At least one object has to be open in order to be able to use this function (a map, a track, a
landscape or a waypoint). Whenever you select or un-select this option, your choose will be
established as a default value within the configuration of Land/Air.
Send a map to CompePocket: Send a map to the related program CompePocket.
‘Multimaps, advanced…’: This section allows you to access the following options:
Transparencies: the window that appears when you select this option will allow you to regulate the
level of transparency of the map you are working with.
Establish as primary map.
Bring forward: This option places the map in the foreground so it is not covered by any other map.
Send behind: This option moves the map to the lowest position underneath the other maps that you
have loaded at the time.
List of maps in the memory: Access a list of these maps.
Revise calibration of the map: You can access to this function even if you have other maps open at
the same time.
Edit a vectorial map: Open the vectorial map edition bar.
Store map as: This option allows you to store the map choosing the folder and the name of the map.
Layer administrator: Access this vectorial map tool.
Move the calibration of the map: Write an X value (abscissas) and a Y value (ordinates) to touch up
the calibration of the map
Note: For further detailed information about these options read the relevant chapters.
Properties of a map: To see the properties of the map window.
Draw 3D landscapes: if you activate this option you will be able to see the 3D landscapes in 2D on
the main screen (as if they were a map). If you un-select this option, you will have to go to the 3D
viewer to see a landscape.
3D landscape viewing options: to open the window with the landscape’s options.
Tools:
Create a 2D map: Pulsando este botón se podrá guardar una copia del relieve pero en
formato 2D (como un mapa normal sin alturas). Clicking this button you can save a copy of
the relief but in 2D format (like a normal map without heights).
Repair *.CDEM holes
Move the relief: Entering a value in X (abscissa) and one in Y (coordinates) it retouches the
calibration of the map.
http://www.CompeGPS.com
Create Outlines
http://Support.CompeGPS.com
67
http://www.CompeGPS.com
http://Support.CompeGPS.com
68
8 Working with tracks
8.1 Definitions
8.1.1 What is a track?
A track is a set of points that are ordered according to time. Each point contains information about its
coordinates, time, and date and, in most cases, altitude.
Important: certain models of GPS do not store the date of realisation of track points.
There are tracks in 2 and 3 dimensions, depending on whether the altitude is part of the information stored
for each point. For further detailed information, read chapter 2 and 3 dimensional tracks.
Whenever you store a track in any of the Land/Air compatible formats, apart from storing the points that
make up the track, you are also storing a whole load of other information that can be modified or inserted
from Land/Air such as: name of the track, comments, name of town of departure, amongst others.
8.1.2 Track formats
There are a lot of track formats and extensions. Land/Air allows to work with many of them:
*.TRK (CompeGPS own track format),
*.BTRK (binary *.TRK, which can include attachments, compress more the data and have quicker
access)
*.IGC (International Gliding Comission format),
*.FIT (Garmin Edge GPS)
*.GPX (GPS Exchange File),
*.TCX
*.KMZ (Google Earth Track File),
*.PLT (formato de OZI),
*.CMP (Brauniger format)
*.LOG (Magellan Tracklogs),
*.NMEA (NMEA logs)
It is also possible to import tracks in *.TXT or *.CSV format.
8.1.3 2 and 3 dimensional tracks.
We can work with tracks in 2 or 3 dimensions. The difference between them is that, as well as the usual
details on coordinates, time and date, a 3 dimensional track also includes details on the altitude of each
track point.
Land/Air’s 3D viewing window allows you to view both types of tracks but a 2D track will have a flat
appearance or, if you have loaded a landscape, it will appear glued to the landscape.
8.1.4 What is a subtrack?
Land/Air allows you to select a certain part of a track so that you can work on it with greater precision, and
also to view data and statistics about that area. In this way, you can sub-divide a track into several
independent sub-tracks adapted to your needs.
8.2 Working with tracks
8.2.1 Open a track
http://www.CompeGPS.com
http://Support.CompeGPS.com
69
1. To open a track, carry out any of the following operations:
2.
Click on the button
(open track).
Select the menu option ‘Tracks > Open track’.
Select the track that you want to open.
3. Click on the button ‘Open’.
Remember that you can view the track drawn in just one single colour or with changing colours according to
different variables such as altitude, speed… To activate this option select Gradate colour of a track that you
will find in the Track section of the main menu or in the context menu of the track (click with right-hand
mouse button on the track).
8.2.2 Open the Track Properties window
To open the Track Properties window, proceed as follows:
1. Using the right-hand button of the mouse, click on any part of the track.
2. Select the context menu option Track Properties.
The Properties window contains the following sections: General, Date and time, Track points, See, GPS,
Distances, Speed and Altitude. Click on the + sign of each section to view their contents.
Each section contains several sub-sections, but you can only edit those that have a small pencil symbol on
the right-hand side. To edit any one of these, double click on top of the pencil symbol and proceed as you
like.
8.2.3 Save a track
There are two ways of saving a track:
Save a track: This the fast way to save a track. You will not be asked for the name or format of the
track and it will overwrite the previous track.
Save track as: This option also allows you to choose the format in which you want to save the track.
To ‘Save’ a track, proceed as follows:
1. Click on any part of the track with the right-hand button of the mouse. The context menu that
appears offers you several different options.
2. Select the option: ‘Save track’. If it is the first time that you are saving this track, Land/Air will ask you
the name you want to assign to the file you are about to save.
3. Write the name of the file and select the folder where you want to store it.
4. Click on the button ‘Save’.
To use the ‘Save as’ option, proceed as follows:
1. Click on any part of the track with the right-hand button of the mouse. The context menu that
appears offers you several different options.
2. Select the option ‘Save track as’.
3. Write the name of the file and select the folder where you want to store the track.
http://www.CompeGPS.com
http://Support.CompeGPS.com
70
4. Select the format that you want to use for the track choosing from the option Type: *.TRK or *.IGC.
5. Click on the button ‘Save’.
If you want establish a predetermined format for Land/Air to store all your tracks.
8.2.4 Import track
Standard track formats are opened directly from ‘Open track’. If you have a *.TXT or *.CSV file with track
points, you can import it from ‘Main menu > Tracks > Import track in *.TXT format’.
To complete the import process you will have to specify the projection and datum with which those points
where taken so Land/Air can correctly locate them.
8.2.5 Close a track
There are several ways in which you can close a track or tracks that are currently on screen.
To individually Close a track, follow these steps:
1. Click on any part of the track using the right-hand button of the mouse. The fold-down
window offers several different options.
Note: You can also carry out this action on the name of the track in the Data Tree.
2. Select the option ‘Close track’.
To close all the tracks currently on screen, Select the menu option: ‘Tracks > Close all tracks’.
You can also close the tracks from the List of tracks window.
8.2.6 List of tracks window
The List of Tracks window shows you a list of all the tracks that are currently open and from here you can
carry out several different operations with these tracks.
To open the List of tracks window, proceed as follows: Select the menu option ‘Tracks > List of
loaded tracks’.
To carry out any of the operations available on the List of tracks window, proceed as follows:
1. Select the track you want to work with from the list.
2. Click on the button that corresponds to the operation to want to carry out:
Add track: Click on this button to open a new track and add it to the list (in this case you
do not have to first select the track).
Close track: Click on this button to close the track you have previously selected.
Properties: Click on this button to open the properties window of the track you have
selected.
Save track: Click on this button to save the selected track.
Save track as: This option allows you to save the track in the *.TRK or *.IGC format.
Click on the button to save the track.
http://www.CompeGPS.com
http://Support.CompeGPS.com
71
Send a track to the GPS: when you click on this button, the selected track will be loaded
onto the GPS.
Graphs: Click on this button to view the track’s graphs.
Save track in the track book: Click on this button to save the selected track in the track
book.
Close all except this one: Click on this button to close all the other tracks open except
the track you have selected.
Zoom here: Click on this button to zoom in on the selected track with the 2D viewer.
Waypoints can be ordered in different ways. Open context menu on waypoints file name and select
‘Sort by’ to choose the rule to order waypoints (name, proximity, etc).
Note: If an anchored position has been fixed, that one will be taken as reference point.
8.2.7 Share your tracks
Get the chance to share tracks with your contacts. Steps to reproduce:
Open your track: 'Main bar > Tracks > Open track’.
‘Open the contextual menu on the track > Share > MyTwoNav’.
To share your tracks, you must be registered.
Fill in the form with the most relevant data of the track and click ‘Send’ to see the track report of this
track.
With the track report opened, you will be able to:
Share it on social networks (Facebook and Twitter)
Print the track report
Send it by e-mail to any contact
http://www.CompeGPS.com
http://Support.CompeGPS.com
72
Download the file
At the same time that you share the track report with your contacts, the file is also uploaded
to http://www.myTwoNav.com. MyTwoNav allows you to manage all your tracks previously uploaded (check
their track report with detailed information, download files...), but also to easily manage and install your
product licenses. MyTwoNav is accessible:
From the main bar of Land/Air:
From internet: http://www.myTwoNav.com
(embedded
web
browser
in
Land/Air)
8.2.8 Track animation
Land/Air can animate one or several tracks at the same time. The animation can be done at the same speed
the track was recorded at or it can be accelerated. The animations can be viewed on the 2D or the 3D
window. In both cases the functioning of the windows are the same.
The animation tool bar will also automatically displayed if you save a track as web page. Remember! If you
are working with a track that you have created artificially, it possibly will not have stored time data. This
means that this track cannot be animated unless to assign a time reading for each point of the track. To do
this, use the tool ‘Assign time and speed’ that you will find in the track’s context menu.
Land/Air features 7 buttons to control animations, 3 of them appear as default values on the tool bar:
Play: Starts up the animation.
Stop: Stops the animation.
Pause: Freezes the animation without stopping it.
The other 4 buttons can be added onto the bar using the options available in the section ‘Keys & Buttons’ of
the configuration window. These buttons allow you to:
Rewind
: Runs the track quickly in the other direction. To exit the Rewind Mode, click again on
the button Play.
Fast forward
Rew to previous sector
FF to next sector
: Accelerates the animation. Click again on Play to return to the normal speed
Once you are navigating a track you will see the difference between an active track and the other tracks.
The active one has a different on-screen display. Usually, the active track has a notable thickness and a
different colour to make it different from the rest.
http://www.CompeGPS.com
http://Support.CompeGPS.com
73
Note: You can also access these buttons from the section Animation from the Tracks menu, which you will
find on the main menu.
If you want to animate one or several tracks from the beginning, proceed as follows:
1. Open the track or tracks that you want to animate.
2. Click on the button
of the track .
that you will find on the tool bar. The animation will start from the beginning
To animate a track from a certain point, proceed as follows:
1. Use the right-hand button of the mouse to click on the point from where you want to start the
animation.
2. Select the context menu option ‘Play here’. The animation will start up from the point you have
selected .
If you open a track as a web page, the animation tool bar will also open up but, in this case, a few more
buttons will be available:
Play
: Starts up the animation.
Stop
: Stops the animation.
Pause
Move to start
: The animation goes to the start point.
Move to end
: The animation moves to the last point.
Rewind
: One click on this button and the animation will jump one step back. To go further back,
click on this button several times.
Forward
: One click on this button and the animation will jump one step forward. To go further
forward, click on this button several times.
Loop mode
: if you select this mode, the animation will automatically start again when it reaches
the end of the track.
Speed: this window will allow you to choose the speed at which you want the animation to move at.
The bracket goes from +50 (50 times quicker than the speed at which the track was recorded) to –50
(reverse viewing of the track at 50 times the speed it was recorded). The speed 1 is the speed at
which the track was recorded.
: Freezes the animation without stopping it.
Also, the right-hand part of the bar gives you the date and UTC time (which is always the same regardless of
the time of each time zone).
8.2.9 Create and edit a tracks
Land/Air allows you to create a track as you wish and then load it onto your GPS so you can follow it. You
can also edit any track that you have loaded so you can adapt it to your preferences and needs.
We recommend that, before you edit a track, load a 3D landscape for the area where you have created your
track so that altitude information is also stored. If you forget to load a 3D landscape, you can assign altitude
values to all the points of your track “a posteriori” using the tool Calculate altitude over ground-level for each
point.
The tracks that you are creating will not contain information about time because the track is artificial (all the
points will indicate the time they were created). Because of this, you will not be able to run the animation
mode unless you use the option Assign time and speed (which you can reach through the tools option of the
track context menu in the main window or on the Data Tree).
http://www.CompeGPS.com
8.2.9.1
http://Support.CompeGPS.com
74
Create a new track
To create a new track, follow these instructions:
1. Open the track edition bar (vectorial editor) and select the main menu option Tracks>Create and edit
new track.
Note: If you have not loaded a file (a map, a landscape, waypoints, etc) the software will warn you
that you cannot create a track without information about the coordinates you want to work with. If this
is the case, you will have to load some type of file (preferably a map and a relief) that will supply the
software with information about the area where you are working in.
2. Using the edition bar, choose one of the following option to draw the course of the track:
Add points
: With this option activated, left click with the mouse to mark the point that will be
the start of the track, then move the mouse to the next point of the track. Now left click again to
mark this new point. Keep on carry out these steps until you have added all the points you need.
When you have finished drawing the track, click with the right-hand button of the mouse to exist
the add points tool.
Draw by dragging the mouse
: When you have activated this option, you can draw the
course of the track free hand. To do this, click and hold down the left-hand button of the mouse
and move it on the map while you draw your track.
When you let go of the left button, the software will ask you if you agree to the track you have
drawn and if you want it to be a track. If you do, click on Yes, if no click on No or Cancel and the
drawing will disappear.
3. If you are pleased with your track, close the track edition bar (vectorial editor) by clicking on the
cross on the left. You can now carry out any of the usual operations with track such as consult and
edit the track’s properties or view it’s graphics (remember, the track will not include altitude readings
if you did not load a 3D landscape before you created it).
4. If you want to assign time values to each of the track’s points (these are necessary if you want to
view the animation of the track) you will have to use the option Assign time and speed (accessible
from the tool section of the track context menu in the main window or the Data Tree). The window
that opens will allow you to introduce a starting time and a constant speed value. Land/Air will then
calculate the time prognostic for each point of the track.
Note: You can also create a track using a route. To do this, go to the Data Tree, select the route you want to
convert and drag it (using the left button of the mouse) to the Tracks branch.
8.2.9.2
Edit a track
To edit a track that has already been created, follow these instructions:
1. Use the right-hand button of the mouse to click on any part of the track and select the option ‘Edit’
the track. The edition bar will open (vectorial editor).
2. Use the following tools to modify the course of the track:
Insert intermediary point
: this tool automatically detects the two points nearest to the pointer
and it will allow you to insert an intermediary point between them. To do this, once you have
decided where you want to insert this intermediary point, use the left-hand button to create the
new point.
Add points
: this tool allows you to add new points onto the track starting from wherever you
want. To do this, select the point (left click on it) and then select the tool add points. You can add
http://www.CompeGPS.com
http://Support.CompeGPS.com
75
points to the beginning and the end of the track (if that is where you are) or an intermediary point
(if you are somewhere in the middle of the track).
There is a quicker way of adding new points. This is how to do it: once you have situated
yourself on the point from where you want to add new points, hold the ‘Control’ key down. While
you hold this key down, move the pointer to where you want to add the new point and click on it
with the left-hand button of the mouse. Continue holding the ‘Control’ key down and continue
clicking on new points with the left button until you have finished adding all the points you want.
Note: Although the tool ‘Add points’, if you use it to add points in the middle of the track, could
seem to be similar to the other tool insert intermediary points, the insert intermediary points tool
is less versatile because it is only designed to refine the course of a track.
Draw by dragging the mouse
: If you use this option to edit a track, it will be like free drawing
it. To use this option, first select the point where you want to start adding points from and then
click on the tool. Now hold down the left-hand button on the mouse and move it while you draw
the new points. If you have chosen to start adding points at the beginning or the end of the
existing track, you will be lengthening these sections. If you have started adding points in the
middle of the track, they will be joined up with the next point of the track.
Important: it is more practical to edit a track in the same direction as the track was created, from
the beginning to arrival.
Eliminate a point
: Select the point that you want to eliminate and click on this button to
eliminate it. When you do this, a straight line will joint together the two points situated either side
of the point that has been eliminated.
Undo
: Click on this button to undo the last operation you made on the track. You can undo all
the modifications you have made even after you have saved the track and re-loaded it onto the
screen. Take care because once you have undone the changes you cannot re-do them so you
will have to re-edit the track again. As well as all these tools you can also move any point that
has been already been created by clicking with the left button on it, situating it where you want it
to be and letting the button go so the point is fixed.
3. If you are now satisfied with the course of your track close the track edition tool bar (vectorial editor)
by clicking on the cross on the left of the bar. You can now carry out the normal operations to do with
a track such as consult and edit the properties of the track or view graphs associated with it.
4. If you want to assign a time to each point of the track (this is necessary to view an animation) you
will have to choose the option Assign time and speed (you will find this option in the tools of the
context menu of the track on the main screen or on the Data Tree). The window that appears will ask
you to assign a departure time and steady speed. This will allow Land/Air to calculate a time
prognostic for each point of the track.
5. If you have created a track without having first loaded a 3D landscape, the track will not record any
altitude readings. To include them, with the track already loaded, now also load a landscape and
select the option Calculate altitude over ground-level for each point. You can access this option in
two ways:
Open the context menu of the track and select this option from the tools section.
Open the context menu of the track on the Data Tree and select this option from the tools
section.
6. Save the track if you want to use it or modify it later on. You can save it by clicking with the righthand button on any part of the track or using the name on the Data Tree.
http://www.CompeGPS.com
http://Support.CompeGPS.com
76
If you choose to ’Save’ the track, it will automatically be stored on top of the old track, so you will
loose the old one (the un-modified track).
If you want to keep the original track, you will have to select the option ‘Save as’ and give the
track you have been working with a new name. The next time you want to use the edited track
you will have to look for it wit the new name you have given it.
8.2.10 Join tracks
This option allows you to join two tracks together. The last point of the first track will be joined to the first
point of the second track. This will allow you to join together tracks that are separate but really belong to the
same excursion.
To do this all you have to do is load the tracks that you want to join (two or more) and select the option join
tracks. You will find this option in the tracks section of the main menu or by using the context menu of the
Data Tree, accessing the option using the label Tracks.
8.3 Working with subtracks
8.3.1 Select a subtrack
There are several ways to select a certain section of a track. You can select it using the altitude graph or
indicating the beginning and the end of the subtrack. To select a subtrack using the altitude graph:
1. Open the altitude graph of the track.
Click on the button
Select the track context menu option Graphs.
(at the foot of the page) on the tool bar.
2. Use the left-hand button to click on the point of the track that you want to be the beginning of the
subtrack, and continue holding the button while you drag the mouse to the last point of the subtrack.
To select a subtrack using the track context menu:
1. Use the right-hand button of the mouse to click on the departure point of the subtrack that you want
to analyse. The track context menu will appear.
2. Select the menu option ‘Subtrack > Situate here start of subtrack’ from the track context menu.
3. Use the right-hand button to click on the last point of the subtrack that you are selecting.
4. Select the menu option ‘Subtrack > Situate here end of subtrack’ from the track context menu.
You will see how the subtrack is marked and selected.
To select a subtrack by clicking on the track:
Select the initial and final point of the subtrack by clicking with the left hand button of the mouse and
with the ‘Shift’ button on the keyboard held down.
8.3.2 Analyse a subtrack
Land/Air will analyse the section of the track that you have selected.
The subtrack analysis option creates several statistics referred to the subtrack such as maximum and
minimum speeds, horizontal and vertical speeds, slopes, time schedules, duration of the trail, length of the
trail… amongst other information.
http://www.CompeGPS.com
http://Support.CompeGPS.com
77
You can select the section of track to be analysed in two ways, from the altitude graph or by indicating the
initial and final point of the track.
To analyse a track, carry out any of the following operations:
1. Select the subtrack that you want to analyse using the graph at the foot of the screen or by clicking
directly on the track.
2. Right click with your mouse on the selected part of the track on the graph at the foot of the page or
on the map. The context menu will appear.
3. Select the option ‘Analysis of subtrack’ (from the context menu in the subtrack section).
A new window with the results of the analysis will appear. This new window also allows you to save the
analysis in an *.HTML format (as a web page).
8.3.3 Save a subtrack
You can store the subtrack you have selected independently from the track you selected it from. If you do
not do this, the track will be lost as soon as you select a new subtrack or as soon as you close the original
track. To store a subtrack, proceed as follows:
1. Right click on the graph of the subtrack or on the track. The context menu will open.
2. Select the menu option ‘Save subtrack as’ (using the context menu, you will find this option in the
subtrack section).
3. Select the folder where you want to save the subtrack (default value for this option is the tracks
folder of Land/Air) and give the subtrack a name.
4. Click on save and the subtrack will be stored in the folder you have chosen and available for use
whenever you need it.
8.3.4 Eliminate a subtrack
If you carry out this operation, all the points of the subtrack you have selected will be eliminated. The two
points adjacent to the subtrack will be joined together in a straight line but this straight line will not contain
any track points. To eliminate a subtrack:
1. Double click on the subtrack in the altitude graph at the foot of the page or on the track. The context
menu will appear.
2. Select the option ‘Eliminate subtrack’ (using the context menu, you will find this option in the
subtrack section).
8.3.5 Graph of a subtrack
The contents of a subtrack can be independently viewed on a graph separate from the rest of the track. To
carry out this operation, follow these steps:
1. Right click on the course of the subtrack in the 2D window. The track context menu will appear.
2. Open the subtrack menu and Select the option graph of the subtrack.
Two graphs will be shown. One of them shows you the altitude in respect to time and the other one shows
you the speed in respect to time. This allows you to view the values of these two parameters during the
excursion. You can choose between these two views by clicking with the right-hand button on the graph and
choosing the value for the x-axis.
http://www.CompeGPS.com
http://Support.CompeGPS.com
78
You can work with these graphs as you work with the graph at the foot of the page. This means that you can
again select new subtracks and analyse them (by selecting analysis of the subtrack from the context menu
that you can access by right clicking on the graph).
Note: If you select a section of the subtrack for which you have created the graph and you zoom in on this
new subtrack (do this using the context menu of the graph), the previous subtrack will be eliminated and a
new one will be created with the section you have just chosen.
8.4
Operations with track’s legs
Land/Air allows dividing a track in several legs which can be edited individually.
Original legs (default)
Legs by distance
Legs by time
‘Leg analyse’, at the contextual menu of the track, allows the user to analyse legs of the same track by
comparing several fields such as distance, accumulated altitude, mean speed, pace, duration, slope...
At ‘Track menu > Leg analyse’ you will be able to display legs according to some values as well as return to
the original presentation mode (no sections made).
From ‘File menu > Options > Tracks’, the user can set interval values for some of these legs, for example, fix
distance of legs in meters or set time intervals in seconds.
Right clicking on a track you can access next ‘Leg’ functions such as:
http://www.CompeGPS.com
http://Support.CompeGPS.com
79
Change leg here: Right click on a track point and choose ‘Legs > change leg here’ to divide a track
in two legs by that track point. You can divide the track in as many legs as you want.
Leg properties: see the specific properties of that section of the track. Legs can be edited
individually, changing color, thickness or line type. You can also add comments for each leg or
create associations, like a video or images.
Delete leg: Choose ‘Legs > Delete this leg’ in context menu of the leg to remove that section of the
track.
Copy leg: Using this option you will be able to transfer a leg to another compatible software with
Land/Air, for example, an other Land/Air which is opened at the same time. Right click on the leg
and choose ‘Legs > Copy leg’. Then in the second application choose ‘Paste’ from the context menu
to add the copied leg. ‘Paste’ is not inside ‘legs’ submenu but in general context menu.
Save leg as: You can save a leg as an independent track.
Unify all legs: All leg information will disappear and just an undivided track will remain.
Unify continuous legs: This option unifies all the legs with don’t have any space between them. So if
two legs are not joined, the will remain different legs.
Delete ignored points
8.5 Roadbook
8.5.1
Definition
A roadbook diagram is a tool commonly used by rally co-drivers and walkers to navigate the uncertain
terrain. Generally, the roadbook contains several pages of charts, GPS coordinates and written instructions
to help your navigation.
To make a roadbook you need several essential tools:
A track
The book where items are stored with the images and descriptions of each
Land/Air software
8.5.2 Images edition
To associate the images to the file *.BTRK (roadbook format), we should edit, cut, etc. using any image
editor. When we have images with the appropriate cut made, we can proceed to save them. We recommend
you to save the image with a simple name and any distinguishing number indicating the order to be used).
Save them in *.BMP format.
When using advanced image editors, you should resize the image to 128x128 pix size before saving them. If
the image editor used does not allow resizing of images, we can achieve the suitable size with software
such as JPG Resizer. Once saved all the images we will use in the suitable format and size, we can start
with the roadbook edition.
8.5.3 Roadbook creation
Start Land/Air and then load the track from 'Track > Open Track' Once opened the track, do right-click and
select ‘Edit Roadbook’. At the bottom we will see a menu, and at the left, an image list. Now place you on
the Waypoint where you know there is a fork or maneuver we want to highlight. Click on this point of the
track with the right button and select the option 'Create Roadbook point here’.
http://www.CompeGPS.com
http://Support.CompeGPS.com
80
Do double-click inside the field 'Sketch' and look for the image on the folder where you have saved it in
128x128 pix. Now repeat the same action in the 'Description' field, but this time describing the
characteristics of the item to perform the maneuver with words. You must repeat this process until the end of
the roadbook, describing each item and linking the image it represents.
Note: Associated files (images, text documents, sound alarms, *.HTML files…) can be added on any
waypoint by opening the contextual menu of the track and select 'Edit track point' at the right location where
the associated file will be attached.
8.5.4 Save a roadbook
Once done, save the file format in *.TRK format. Close everything and restart Land/Air, loading the file you
just saved. Do right click on the Track and select the option 'Save as...' changing the format from *.TRK to
*.BTRK format. You have completed the roadbook.
Note: You must try not to lose/delete never the file *.TRK, as the *.BTRK is not editable. So if you want to
change some parameter of the roadbook, you must modify the file *.TRK and then save it back to *.BTRK,
so that it links the track with the associated files.
8.5.5 Navigate a roadbook in TwoNav
Once the *.BTRK is saved, you can open it with our navigation software TwoNav. You can load a map
behind, display in 3D and much more.
http://www.CompeGPS.com
http://Support.CompeGPS.com
81
8.6 Track Book
8.6.1 What is a Track Book?
Land/Air includes a book where you can store all your tracks. A track book is a database in which you can
store and organize all your tracks, access them at any time, and keep the most important information about
the tracks in view.
8.6.2 Create a Track Book
The fist time you try to store a track, if you have not already created a track book, Land/Air will ask you if you
want to create a track book right then. To create a track book, proceed as follows: Select the menu option
‘Tracks > Track book > Create new track book’.
Write the name of the file and indicate the folder where you want to store it. Land/Air will create an *.MDB
file where it will store all your tracks.
Important: We strongly recommend that you create this *.MDB file outside the ‘CompeGPS’ folder. Store it
in a safe folder that you know you will not eliminate. We make this recommendation so that you do not
accidentally eliminate this file if you remove the ‘CompeGPS’ folder.
Note: When you install a new version of Land/Air on top of a previous version, this Track Book file will not be
eliminated. You can update Land/Air at any time without worrying about the Track Book file being eliminated.
8.6.3 Open a Track Book
To re-open the last track book you had open, proceed as follows:
1. Click on the button
‘Open track book’.
2. Select the menu option ‘Tracks > Track book > Open track book: xxx.MDB’
This operation tells Land/Air to open the last book open or created. If you want to open a different track
book, read chapter ‘Open another Track Book’.
8.6.4 Open another track book
Land/Air automatically opens the last track book you used or created. If you want to open another book,
carry out any of the following operations: Click on the arrow situated beside the button
and select the
option open another track book. Select the menu option ‘Tracks > Track book > Open another Track Book’.
Select the track book that you want to open and click on the button ‘Open’.
http://www.CompeGPS.com
http://Support.CompeGPS.com
82
8.6.5 Store a track in a track book
Once you have opened a track book you can store the tracks you are currently working with in it. To do so,
proceed as follows:
1. Use the right-hand button of the mouse to click on any part of the track (or on the track’s name in the
data tree). Now select the option ‘Store in track book’ from the down-folding menu. Land/Air will ask
you if you want to store the track in the track book that you currently have open.
Note: Land/Air will store the track in the track book you last used or created. If you want to store the
track in a different track book you will have to cancel this operation and open the track book that you
want (read Open another track book) and repeat the operation Store a track in a track book.
2. Reply ‘Yes’ to this question. A new window will tell you that Land/Air the track has been correctly
stored in the track book.
8.6.6 Context menu of a track book
Right click on the track book to access these functions:
Open track: Right click on any track and select this option to open it.
Properties of track: To open the window to view the properties of the track.
Eliminate track: To remove a track from the track book.
Add track: To select a track that you have stored in your computer and include it in the track book.
Add an excursion without track: To create a section without tracks in the track book.
Select fields: To choose the information about each track that you will be able to see when you open
a track book. To do this select a field and use the arrows pointing right or left to add it or remove it
from the selected fields. Click on the arrows pointing up or down to change the order in which you
will see the fields.
Export the table to a web page: To introduce name and address to store the file in *.HTML format
with information on the track book.
Statistics graph bar: This option allows you to view information about the tracks in the book in a bar
graph. Select the information that you want to see from the window that will open. To modify the
information without leaving this window, click on the button
.
8.7 Properties of a track
This window allows you to view and modify different characteristics of a track. Some aspects (such as
colour, thickness and type) can be different in different section of the same track. However, to be able to do
this the track has to be divided into different sections.
You can divide it using the tool ‘Change section here’ that you can access from the label ‘Section’ in the
track’s context menu (right click on the track). Select the option ‘Properties of this section’, also in ‘Section’
in the context menu, to see or modify the characteristics of the section.
Note: Land/Air allows the possibility to present on track lists extra information related to these elements
such as date, distance, height, relative bearing arrow, track color.... The information is presented in a 2nd
line right after the name of the item and it can be customized showing multi-selectable data fields ('File >
http://www.CompeGPS.com
http://Support.CompeGPS.com
83
Options > Display > Data tree'). The data contained in the 2nd line is only available for tracks which have
been saved using TwoNav 2.5 or Land/Air 7.3 (or higher).
8.7.1 Open track properties window
To open the track properties window, proceed as follows:
1. Right click on any part of the track.
2. Select the context menu option ‘Track properties’.
The ‘Properties’ window contains the following departments: General, Date and time, Track points, See,
GPS, Distances, Speeds and Altitudes. Click on the + sign of each department to see the full contents of the
department.
Each department consists of several sub-departments. The sub-departments marked with a pencil icon can
be edited, to do so just double click on the pencil icon and modify as you wish.
8.7.2 General
General contains the written information of the track. Only some of these fields can be modified:
Pilot’s name: To create or modify the name of who realised the track (pilot, excursionist, etc)
Name of departure point: To write the name you want to give to the departure point.
Comments: To write any other comments about the track that you consider necessary.
8.7.3 Date and time
This section details different track statistics: Day, Time of departure, Time of arrival, Duration, Difference
between Time, Time stationary, Time in movement. Only Difference between time can be edited.
8.7.4 Track points
Here you will find the total number of points that form the track and the recording interval (which is
determined by the GPS and is normally express in seconds).
8.7.5 See
Here you can configure the mode in which you can view the track. Click on the pencil icon on the right of
each option. The parameters you can modify are:
Thickness: This number determines the thickness of the line.
Colour: Choose the colour you want.
Icon: Select the icon you want to use (double click on the small pencil).
3D Icon: Select the icon you want for 3D viewing.
8.7.6 GPS
This label shows you the following information about your GPS:
GPS Model
GPS Serial number
http://www.CompeGPS.com
http://Support.CompeGPS.com
84
IGC digital signature track
8.7.7 Distances
This window shows you the different distances covered (not altitudes):
Projected distance: This figure is the result of calculating the horizontal projection of the distance
covered (without taking into account the distances covered due to ascending or descending).
Distance with altitudes: This figure is the real distance covered. Ascents and descents are taken into
account. The result is a figure slightly higher that the projected distance.
Lineal distance: This is the straight-line distance between the departure and arrival points.
Area: This figure is the result of calculating the area that you have covered in the excursion. If your
arrival point is different from your departure point the area is considered to be the straight line
between the departure and arrival.
8.7.8 Altitudes
Here you will find details of all the statistics related to altitudes, such as Track with altitude (informs you if the
track contains information about altitudes), Maximum altitude, Minimum altitude, Altitude at departure,
Altitude ate arrival, Altitude gain (difference between maximum altitude and departure altitude), Difference
departure-arrival (difference between attitude at departure and arrival), Maximum difference (difference
between maximum and minimum altitude), Accumulated ascent (adds up the different ascents climbed),
Maximum vertical speed, Minimum vertical speed, Maximum slope, Minimum slope.
8.7.9 Speeds
Here you will find the average speed, maximum speed and the average lineal speed. The average lineal
speed is the calculated average speed based on the lineal distance, that is the straight-line distance
between departure and arrival. Therefore, if arrival coincides with departure the average lineal speed will be
zero.
8.7.10
Energy
You can estimate the energy that has consumed while performing tracks and routes. At ‘Weight’ you must
enter your body weight in kg. While the other parameters are calculated from this value. ‘Energy’ field will
present to you the needed energy to perform the track. If power is P=E/t, the software will be able to
calculate mean power and mean power during uphills. The second value is more reliable for cyclists since
they usually ride up at constant power.
8.8 Track’s contextual menu
The track context menu appears when you click anywhere on the track with the right hand button of the
mouse. The context menu gives you quick access to many functions you can work with:
Create waypoint here: Creates a waypoint on the point you are.
Open best map here: Opens the map with best resolution for that area.
Track properties: Opens the track properties window for the open track.
List of points: Opens a list of all the points that make up the track.
Edit track: Opens the track edition bar.
http://www.CompeGPS.com
http://Support.CompeGPS.com
85
Edit track point: Opens the point edition window.
Close track: Removes the track from the screen.
Save track: Saves the track.
Save track as: This option allows you to store the track with a new name and also to choose the
format in which you want to store it: *.TRK or *.IGC.
Store track in track book: Stores the track in the track book.
Send to:
o
Send track to GPS: load the track onto you GPS.
o
Send to Pocket: sends the track to the competition program for Pocket.
o
Send via Email: This option opens an E-mail with your predetermined mail account and
attaches the track file.
Sections:
o
Properties of this section: this section allows you to define different aspects such as: colour,
thickness and style and you can add a comment.
o
Change section here: defines a new separation point between sections. You can create a
new section by splitting in two an existing section or a whole track.
o
Eliminate this section: eliminate the track points you have marked. As a result the remaining
points will be joined together with a straight line without track points.
Subtrack:
o
Eliminate a point: Eliminates the track point that you have clicked on.
o
Situate start of Subtrack here: Situates the start point of a Subtrack.
o
Situate end of Subtrack here: Situates the final point of a Subtrack.
o
Analysis of a Subtrack: Analyses the Subtrack you have selected.
o
Eliminate Subtrack: Eliminates the selected Subtrack.
o
Save Subtrack as: Stores the selected Subtrack as if it were an independent track.
o
Subtrack graph: Opens the graph window and shows the Subtracks graphs.
Gradate colour of track: This option allows you to choose the type of gradate according to your
needs. You can choose the measurement variation range by right clicking on the reference bar and
selecting Select range from this value. You can re-introduce the maximum and/or minimum marking
the correct box.
Play here: To start the animation at this point.
http://www.CompeGPS.com
Graph window: To open the track’s graph window.
Tools:
http://Support.CompeGPS.com
86
o
Close all except this one: To close all tracks except the track you have selected.
o
Move the track: To move the track changing its coordinates and time.
o
Calculate altitude over ground level for each point: If you have loaded a 3D landscape, you
can assign an altitude value to each point of the track. Once you have done this you will
receive the message ‘Altitude readings for this track have been imported’.
o
Import pulsometer data from another file: To include pulse readings, obtained by a different
instrument, to the track’s properties.
o
Divide track into several tracks: To divide the track you have downloaded as a single track
from your GPS into several independent tracks.
o
Eliminate stationary points at the beginning and end: To remove the repetitive points at the
beginning and end of the track.
o
Reduce number of points: You will be asked to indicate a number of points and then the
track will be re-drawn maintaining the same form as best possible but using only the number
of points you have written.
o
Assign time and speed: To assign a departure time and a constant speed to a track so that
Land/Air can calculate the time to be assigned to each point of the track.
o
Eliminate abnormal points: To remove any point that is situated too far away from the rest of
the track, in which case it is considered to be an error.
o
Modify the starting point of a track: The user is able to choose the starting point of a track,
this point will be fixed as the origin of the track.
http://www.CompeGPS.com
http://Support.CompeGPS.com
87
9 Working with waypoints
9.1 Definitions
9.1.1 What is a waypoint?
A waypoint is a point defined by a geographical position, latitude and longitude coordinates and, in most
cases, by an altitude reading. A waypoint is a reading used by GPS navigation instruments. Land/Air allows
you to create waypoints as reference points within a certain area so you can create routes and competition
tasks.
Land/Air offers the possibility to exchange waypoints between GPS / loggers and a computer. This allows
the user to easily and comfortably create and work with waypoints on a computer. To learn how to work with
waypoints. One or several waypoints are stored together in waypoint files (*.WPT format).
9.1.2 Waypoint formats
Land/Air allows you to work with the waypoint format *.WPT. This format is universally used by all GPS on
the market and by other computer software.
Land/Air can open any waypoint file (storing with one or more waypoints) with *.WPT format that you can
find on the Internet.
9.2 Operating with waypoints
9.2.1 Open a waypoint file
To open a waypoint file, carry out any of the following operations:
1. Click on the button
(open waypoints). Select the file you want and click on ‘OK’.
2. Select the menu option ‘Waypoints > Open waypoint file’. Select the file you want and click on ‘OK’.
9.2.2 Create and edit a waypoint
The easiest way to create a waypoint is using the context menu; follow these instructions:
1. Open a map, track or another reference.
2. Right click on the point where you want to create the waypoint. The context menu will open.
3. Choose the option ‘Create a waypoint here’. The properties window will open. The relevant
information about the coordinates of the new waypoint will already be filled in (including the altitude
reading, if you also have a landscape loaded).
4. Fill in the other properties fields as you wish. Read the chapter waypoint properties for an
explanation about these fields.
You can also create a waypoint from the main menu selecting the menu option ‘Waypoints > New waypoint’.
The properties window will open now as well, but the coordinates that are given belong to the coordinates of
the centre of the screen, so you will have to manually introduce the exact coordinates of the waypoint you
want to create. If you have selected the menu option without any element open on the screen, the
coordinate’s fields will be blank.
http://www.CompeGPS.com
http://Support.CompeGPS.com
88
To edit a waypoint open the properties window and double click on the field that you want to modify and
carry out the modification. If you want to keep these modifications available for future work, you will have to
store the waypoint file.
9.2.3 Move and copy a waypoint
The easiest way to move a waypoint is to drag it over the map. To do this, hold down the ‘Alt’ key, now left
click on the waypoint and hold this button down while you move the waypoint to its new position.
You can also change the position of a waypoint by changing the coordinates in the properties window,
although this method is more complicated than the previous one.
To copy a waypoint to another place on the map (keeping the original waypoint) first hold down the ‘Control’
key then left click on the waypoint and, holding down the ‘Control’ key and the left button, drag the mouse to
the point where you want to create the new waypoint. A copy of original waypoint will be created at the new
coordinates.
9.2.4 Associate a file to a waypoint
To open an associated file from the association’s window, right click on it and select ‘Open’. To open it from
the main window, double click on the waypoint. Note that when you associate an object to a waypoint a new
option will appear in the context menu of the waypoint: ‘Open associated file’.
9.2.4.1
Associate any existing file
You can associate any type of file (normally icons, images or sounds) to a waypoint. To do so, proceed as
follows:
1. Open the properties window of the waypoint. To do this, select the options Properties from the
context menu in the main window or the data tree.
2. Open the association’s window by double clicking on this field of the properties window.
3. Click on ‘Add’, select the type of file you want to add and then select the actual file so it is associated
to the waypoint.
9.2.4.2
Associate a self-created *.HTML file with Land/Air
Land/Air offers you the possibility to create and associate your self-created *.HTML files to waypoints. These
text indications can be associated to individual waypoints, as well as waypoints contained in roadbooks,
geochaches and routes. Select the waypoint were you want to associate a HTML-formatted document and
press: 'Contextual menu > Associated > Create enriched description'.
Once the editor is launched, you will be able to create your HTML document: insert pictures and write text
using certain HTML-formatted styles.
http://www.CompeGPS.com
http://Support.CompeGPS.com
89
Land/Air also offers you the possibility to edit an associated *.HTML file, from the data tree select the
*.HTML document and press: 'Contextual menu > Edit enriched description'.
9.2.5 Create and edit a waypoint file
You can create a waypoint file in three different ways:
Right click on the waypoint label in the data tree and choose the option ‘Create new waypoint file’.
Add waypoints to the empty file that will open. These waypoints can come from other open waypoint
files or they can be created in the main window. Newly created waypoints will be stored in the first
waypoint file open so you will have to move them to the file that you are interested in if it is not this
one (read moving waypoints up and down the tree to learn how to do this). To change the name of
the new file use the option ‘Save waypoint as’ by right clicking on the name of the new file in the data
tree.
Create the new waypoints in the main window; they will automatically be stored in a new file unless
you already have opened another waypoint file in which case the new waypoints will be stored in this
file and not in a new one. To change the name of the new file use the option ‘Save waypoint as’ by
right clicking on the name of the new file in the data tree.
If you want to create a new waypoint file with certain waypoint that is already stored in other
waypoint files, you can do this very easily. First go to the list of waypoints and select the waypoints
you want to include in the new file (select the first one and, holding down the shift key, then click on
the last one). Now right click on the waypoints that you have marked and select the option ‘Save
selected waypoints as…’ write the name and address of the new file and click on save to create the
new file.
You can edit a waypoint file; you can change the order of the waypoints that make up the file. To do this,
select the waypoint that you want to move and, while you hold down the ‘Alt’ key, click on the arrow pointing
up or on the arrow pointing down to move the selected waypoint nearer to the beginning or the end of the
file, respectively.
9.2.6 Store a waypoint file
After you have created, downloaded or modified a waypoint you have to store the changes. To do this, carry
out any of the following operations:
http://www.CompeGPS.com
http://Support.CompeGPS.com
90
Select the menu option ‘Waypoint > Save waypoint’. This operation over-writes the original file, so
you will loose the information previous to the changes.
Select the menu option ‘Waypoint > Save waypoint as’. The difference between this option and the
previous option is that with this option you will be able to change the name of the file and, at the
same time, keep the original file.
You can also save a waypoint file from the List of open waypoints window or from the waypoint file context
menu in the data tree.
9.2.7 Close a waypoint file
If you want to eliminate a waypoint (not a whole waypoint file) right click on the specific waypoint (on the
map or the data tree) and select ‘Eliminate waypoint’. If you have opened just one waypoint file, you can
close it selecting ‘Waypoints > Close waypoints’.
If you have opened more than one waypoint file, select ‘Waypoints > Close waypoints’ and you will close the
first file you opened. If you have opened more than one waypoint file and you want to choose a file to close
it, you will have to go to the data tree. Right click on the name of the waypoint file you want to close and
select close waypoints.
If you want to close all the open waypoint files and all the open elements, select ‘File > Close all’ in the main
menu.
9.2.8 Import waypoint file
Standard waypoints formats are opened directly from ‘Open waypoints file’. If you have a *.TXT or *.CSV file
with waypoints, you can import it from ‘Main menu > Waypoints > Import waypoints in *.TXT format’. To
complete the import process you will have to specify the projection and datum with which those points where
taken so Land/Air can correctly locate them.
9.2.9 Waypoint viewing options
Land/Air features several options to view a waypoint:
To view the landscape from a certain waypoint.
In the properties window of the waypoint, you can choose the zoom level you want.
Using the List of waypoints window you can locate a waypoint on the map and click on zoom here.
You can also reach this option from the context menu of the waypoint menu (right click) in the data
tree.
9.3 List of open waypoints
The list of open waypoints shows you a list of all the waypoints that you have loaded on the screen together
will a few of their basic properties: Icon, short name, description, coordinates (UTM and Latitude/Longitude),
altitude. These properties can be modified by opening the list of open waypoints context menu and by
selecting the option ‘Select fields’.
To reach the list of open waypoints select the menu option ‘Waypoints > List of Waypoints’. The List of open
waypoints window allows you to carry out any of these operations:
New: opens the properties window to create a new waypoint. Read Properties of a waypoint
Edit: allows you to view and modify information regarding a waypoint.
http://www.CompeGPS.com
http://Support.CompeGPS.com
91
Eliminate: to eliminate any waypoint you do not want.
Print: to print the waypoints list.
Zoom here: when you click on this option, Land/Air will look for and view the waypoint you have
chosen.
Save: to save the changes you have made, over-writing the original file.
Save as: to save the changes you have made in a new file that you will have give a name to.
9.3.1 List of open waypoints context menu
To reach this menu, right click on the white part of the window (where the waypoints are), these are the
options you will find:
Edit: to view and modify information about a waypoint on the list.
Eliminate: to eliminate any waypoint you do not want.
Save selected waypoints as: to save the changes you have made to a file giving it a new name so
that the old waypoint file will not be over-written.
Send waypoints to a GPS: to transfer a waypoint file to your GPS.
Select fields: to decide which information you want to appear in this window and the order in which it
should appear. Read Select fields, further down.
Import waypoints from another file: this option allows you to open waypoints stored in another file,
adding them to the file already open. Select them from the window that will open and click on ‘Open’.
Save as a web page: to store the list of waypoints in *.HTML format. This includes the information
you have chosen in the order you want. Write the name you want to give this *.HTML file and click
on ‘Save’.
Calculate all altitudes: if you have a landscape open, this option will assign the altitude reading to all
the waypoints based on this landscape.
9.3.2 Select fields
To change the information available about each waypoint in the List of open waypoints window, select the
option select fields from the list of open waypoints context menu and then proceed as follows:
To remove fields from the window, select the field from the list in the column of selected fields and
click on the arrow on the left (in the centre of the window). As a norm, all fields will be visible.
To add fields that you had previously removed, select the field from available fields column and click
on the arrow on the right.
If you want a field to appear more to the left of the window, click on the field in the selected fields
column and then click on the arrow pointing up (which you will find in the right hand area of the
window).
If you want a field to appear more to the left of the window, click on the field in the selected fields
column and then click on the arrow pointing down (which you will find in the right hand area of the
window).
http://www.CompeGPS.com
http://Support.CompeGPS.com
92
Once you are happy with the new configuration click on ‘OK’ or, if you decide not to make any changes, click
on ‘Cancel’ to maintain the previous configuration.
9.4 Waypoint properties
9.4.1 Properties of a waypoints file
When opening properties of a waypoints’ file (right click on the name of the file in data tree) you can see
name of the file and number of waypoints inside it. In addition to this, you can also make modifications which
are applied to all the waypoints of the file. Under ‘modify all waypoints’ label you will be able to change next
properties of all the waypoints of that file:
Font
Icon
Color of the text
Color of the background
Radius
Show name
Show description
Show altitude
Show icon
Draw radius
See URL
Important: If waypoints in that waypoints file had information about these fields, it will be lost when applying
modifications to all waypoints. This that happens, you can use
button to ‘undo’ operation.
9.4.2 Properties of a concrete waypoint
When you open the ‘Properties of a waypoint’ window you will be able to see the different characteristics of
your waypoints. To reach the Properties window open the context window, to do this right click on the
waypoint in the main window or in the data tree and select ‘Properties’.
From you can also view the properties of the other waypoints inside that file by clicking on the arrows in the
top right hand part of the window. The two figures located between the arrows indicate the waypoints
position with respect to the total number of waypoints.
All the waypoints properties can be edited by double click on top of them. These are the properties that you
will be shown:
Short name: This is the waypoint’s reference name.
Description: You can introduce a brief description or commentary about the waypoint. This
description will appear on the screen below the name of the waypoint.
Type of font: Choose the font you want to use for the name and the description.
Icon: Allows you to choose the type of icon you want to represent the waypoint from the options
given in the fold-down window.
Coordinates: You can view and change the waypoint’s coordinates.
Place name: A geoposition is displayed showing the exact address of the waypoint location (vectorial
map needed).
http://www.CompeGPS.com
http://Support.CompeGPS.com
93
Zoom level: This option allows you to set the zoom point from when on you will no longer see the
waypoint when you zoom out on the image. For example, if you fix the zoom level value at 500
m/pixel, your waypoint will stop being visible whenever we zoom out on the map further than
500m/pixel. In brackets along side each scale reading there is an indication telling you if the
waypoint will be visible or invisible for that scale zoom reading on the main screen.
If you choose the option ‘Always visible’ that waypoint will always be visible regardless of the scale
you are using on the map.
This option is very useful to avoid crowding the screen with waypoint names when you view a large
extension of terrain, program only one waypoint to act as a reference waypoint to a larger group by
making it ‘Always visible’.
Altitude: Indicates the waypoint’s altitude over sea level.
Colour of the text: Allows you to choose the colour of the name and description of the waypoint.
Colour of the background: Allows you to choose the colour of the background of the name and
description. You can choose ‘Transparent’ if you do not want a background.
Position of the text: This option allows you to choose on which side of the waypoint you want the
name and description to appear.
Proximity: If you are navigating, this value will indicate the distance between your present position
and the waypoint.
Radius: This value establishes the width of the radius you want to apply around the waypoint to
consider that you have actually reached it.
Associations: You can associate any type of file (normally icons, images or sounds) to a waypoint.
To do this, open the association’s window by double clicking on this property option and then click on
‘Add’. Now just choose the type of file you want to add and then the file in question. To open an
associated file just right click on it in the Associations window then select ‘Open’. Whenever you
associate a file to a waypoint a new option will be included in the waypoint context menu: ‘Open
associated file: nameoftheassociatedfile’. You can also open it by double clicking on the waypoint.
Note: Land/Air allows the possibility to present on waypoints lists extra information related to these elements
such as date, distance, height, relative bearing arrow, track color.... The information is presented in a 2nd
line right after the name of the item and it can be customized showing multi-selectable data fields ('File >
Options > Display > Data tree'). The data contained in the 2nd line is only available for waypoints which
have been saved using TwoNav 2.5 or Land/Air 7.3 (or higher).
9.5 Context menu of a waypoint
The context menu of a waypoint appears when we right click on any waypoint. The context menu offers you
the possibility of using the following functions:
Seek best map here: This option automatically looks for the map with best definition for the chosen
point.
Properties: To open the properties window of the waypoint. Read Waypoint properties window.
Eliminate a waypoint: To eliminate the selected waypoint .
GOTO this waypoint: This option allows you to establish a certain waypoint as the destination point
when we are working with navigation.
http://www.CompeGPS.com
http://Support.CompeGPS.com
94
Send this waypoint to a GPS: To send the selected waypoint to a GPS you have connected to the
computer. A window will appear to keep you informed of the status of the waypoint transfer.
Start new route here: Allows you to create a new route starting from this waypoint. To add new
waypoints, hold down the Ctrl key.
Open associated file:nameoftheassociatedfile: This option will only be available if you have
associated a file to the waypoint. In this is the case the associated file (normally an image) will open
in a small window when you click on this option.
http://www.CompeGPS.com
http://Support.CompeGPS.com
95
10 Working with routes
10.1 Definitions
10.1.1 What is a route?
A route is a group of waypoints ordered in a predetermined fashion. A route is a navigation method that
allows you to plan your course from one place to another passing by several waypoints. Use a route when
you cannot get from one place to another directly (in a straight line).
Land/Air allows you to create routes on your computer and then load them onto your GPS. You can also
download routes from your GPS to you computer and then make all the changes you wish to them.
The routes created using Land/Air are stored in a routes file (*..RTE format), where all the waypoints that
make up the route are stored in the order you established. Land/Air can also open routes stored in Garmin
map source *.TXT format.
10.2 Working with routes
10.2.1 Open a route
To open an already created route, carry out any of the following operations:
Click on the button
that you will find on the tool bar, choose the folder and the *.RTE file that
you want to open and click on ‘Open’.
Select the menu option ‘Routes > Open route’, choose the folder and the *.RTE file that you want to
open and click on ‘Open’.
You can also open a route from the ‘List of routes’ window, by clicking on the button ‘Open route’.
10.2.2 List of routes
One of Land/Air windows tells you which routes you have open, in the same way as tracks, waypoints,
landscapes and maps. From this window you can carry out different operations with the routes and the
waypoints that make up a route.
To open the list of routes window Select the menu option ‘Routes > List of routes’. The buttons located on
the right hand side of the new window that has opened will allow you to carry out several functions:
Create a new route: This option opens the route edition window with all the fields blank, ready to
create a new route. Read Create a route.
Modify a route: To open the route edition window with the route you have chosen. Read Create a
route.
Send a route to a GPS: To send the selected route to a GPS.
Close a route: To close the selected route.
Save: To save the selected route, re-writing the original file’s information.
Save as: To save the selected route with a new name so that you keep the old file just as it was and
you create a new file with the changes you have made.
Graphics: Opens the selected route’s graphics window. Read Route graphics window.
http://www.CompeGPS.com
http://Support.CompeGPS.com
Open a route file: To open a route file.
Download route from a GPS: To download a route from your GPS.
Zoom here: To zoom in on the selected route.
Activate route: To activate the selected route.
96
10.2.3 Create a route
Normally you will have to first load a map and/or a landscape to orient yourself while you create the new
route. We highly recommend that you do also open a landscape (as well as a map) so you can have altitude
readings at your disposal. If you have a track, a map or a waypoint open, the open best landscape here
option is automatically activated when you open the route creation window so that the software knows which
area you are working in.
You can create a route in two different ways: numerically and graphically. To create a new route introducing
the waypoints numerically, proceed as follows:
1. Open the route edition window.
o
Select the menu option ‘Routes > Create a new route’.
o
Click on the button ‘Create new route’ in the ‘List of routes window’.
2. Introduce the waypoints that you want to include in the route, in the same order that you want to
complete them. To do this, carry out any of the following operations:
o
Click on the button ‘Add waypoint from the list’. This button allows you to add a waypoint that
already exists and that is stored in a waypoint file that you have open.
o
Click on the button ‘Add new waypoint’. This button allows you to create a new waypoint by
writing its coordinates. When you click on this button the waypoint properties window will
open so you can fill in the fields as you wish.
3. Save the route by clicking on the button ‘Save’ or ‘Save as’; write the name of the file and click on
‘Save’.
To graphically create a route, proceed as follows:
1. Open the route edition window by carry out any of the following operations:
o
Select the menu option ‘Routes > Create a new route’.
o
Click on the button ‘Create new route’ in the ‘List of routes’ window. The route edition
window will open with several buttons allowing youto carry out several operations.
2. Click on the map where you want to start the route. When you click you will create a waypoint. To be
able to continue creating the route, you have to select the first waypoint so click on it.
3. Carry on clicking on the next waypoints that you want to include in the route.
Note: If you move the mouse near to a waypoint that is open, it will automatically be selected. Click
on it if you want to include it in the route. If you do not have a waypoint open, Land/Air will
automatically create it, assigning a predetermined name that you can modify later on.
4. Save the route by clicking on the ‘Save’ button in the route edition window and give the route a
name.
http://www.CompeGPS.com
http://Support.CompeGPS.com
97
Note: You can also create a route from a track. To do this you have to go to the data tree. Select a track and
drag it to the routes branch (holding down the left button of the mouse). When you do this, Land/Air will
automatically create a new route with 10 waypoints that will, as best possible, follow the same itinerary as
the original track.
10.2.4 Edit a route
10.2.4.1 Route edition window
The route edition window allows you to modify any aspect related to a route. To open the route edition
window, when you have opened the route you want to edit, right click anywhere on it and select the option
‘Edit a route’. This window is divided in three basic areas:
List of waypoints: on the left hand side there is an ordered list of the route’s waypoints with the
following information:
o
Partial dist.: Calculates the distance between this waypoint and the previous one (this value
is given in the measurement units you established during the basic configuration).
o
Dist. to: Indicates the distance that separates this waypoint from the beginning of the route
(to change the measurements units read International Configuration).
o
Course (º): Indicates in degrees the course between the previous waypoint to this one.
The arrows pointing up and down on the right of this list allow you to move the waypoint up and
down the list, thus modifying the order in which it appears. To move the waypoint nearer to the
beginning of the route, in front of other waypoint, click o the arrow pointing up. If you want to move it
further back in the route, behind other waypoints, click on the arrow pointing down.
Graphic: The graphic in the centre of the window details the distance (on the x axel) with respect to
the altitude (on the y axel). The units used will be those you predetermined during the initial
configuration. If you right click on the graphic you can choose if you want the x axel to give time
values instead of distance values. If you have not loaded a landscape the route will be drawn as a
straight line between the waypoints. If you have loaded a landscape, the lines between the
waypoints we will be drawn on the surface of the landscape and the graphic will show the different
altitude differences that you will encounter along the route.
Edition board: The several buttons on the right hand side of the window allow you to modify the route
at your convenience.
10.2.4.2 Route edition board
The button on the right hand side of the route edition window makes up the route edition board. To open it
you just have to right click anywhere on the route and select the option ‘Edit route’. The route edition board
give access to the following functions:
Add a waypoint to the list: This button allows you to add a waypoint from the open waypoint file.
Follow these steps:
1. Firstly decide at which point, in list of waypoints of the open route, you want to include the
new waypoint. Now click on the next existing waypoint on that route. In other words, decide
between which two existing waypoints you want to place the new waypoint and click on the
further ahead waypoint.
2. Click on the button ‘Add a waypoint’. A window will open showing you a list of the waypoints
you have loaded at that time.
http://www.CompeGPS.com
http://Support.CompeGPS.com
98
3. Now select the waypoint you want from this list and click on ‘OK’ or just double click on the
waypoint.
This waypoint will be inserted just in front of the waypoint you first marked in the list of waypoints (on
the left of the waypoint edition window). You can, at any time, change the position of the waypoint by
using the arrows (pointing up or down) that are situated between the list of waypoints and the
graphic. This operation can also be carried out in a quicker and more intuitive way using the data
tree.
Add a new waypoint: Create a new waypoint by writing its coordinates. To do this, follow these
instructions:
1. Firstly decide at which point, in list of waypoints of the open route, you want to include the
new waypoint. Now click on the next existing waypoint on that route. In other words, decide
between which two existing waypoints you want to place the new waypoint and click on the
further ahead waypoint.
2. Click on the button ‘Add a new waypoint’. The waypoint properties window will open.
3. Fill in all the necessary information and close this window.
This new waypoint will be inserted just in front of the waypoint you first marked in the list of
waypoints (on the left of the waypoint edition window). You can, at any time, change the position of
the waypoint by using the arrows (pointing up or down) that are situated between the list of
waypoints and the graphic.
Modify a waypoint:
of the route edition
modify any aspect
window and carry
waypoint list.
Select the waypoint that you want to modify from the list of waypoints on the left
window. Click on this button to reach the waypoint properties window so you can
of the waypoint that you want to. You can also reach the waypoint properties
out any modifications you want by double clicking on the waypoint from the
To modify the position of a waypoint in a route, select the waypoint you want to move (click on it) and
click on the arrows situated between the waypoints list and the graphic. To move the waypoint
nearer to the beginning of the route, click on the arrow pointing upwards. To move the waypoint
nearer to the end of the route, click on the arrow pointing downwards.
You can also carry out this operation using the data tree, hold down the ‘Alt’ key and click on the
arrows to modify the position of the waypoints.
Remove a waypoint: Click on this button to remove the selected waypoint from the list of waypoints
(on the left hand side of the route edition window).
Save: To store the changes that you have made. You will over-write the original file.
Save as: This option allows you to give a new name to the file that you are working with. Therefore,
the original file will be kept and will not be over-written.
Colour: Click on this button to choose which colour you want to paint the line that draws the route.
Thickness: Click on this button to write the width value that you want to assign to the line that draws
the route.
10.2.4.3 Move waypoints in a route
The easiest way to move a waypoint is to drag it over the map. To do this, hold down the ‘Alt’ key, on top of
the waypoint you want to move you now have to click and hold down the left button of the mouse and now
move the waypoint to its new position.
http://www.CompeGPS.com
http://Support.CompeGPS.com
99
You can also carry out this operation by re-writing the coordinates of the waypoint in the properties window.
However, this method is much more tedious.
To copy a waypoint to another place on the map (maintaining the original waypoint) you have to hold down
the ‘Control’ key, on top of the waypoint you want to copy you now have to click and hold down the left
button of the mouse and now move the waypoint to the new position. A new waypoint will be created and the
old one will remain un-touched.
This newly created waypoint will automatically be added to the end of the route. To change it’s position go to
the data tree, select the waypoint and, while you hold down the ‘Alt’ key, click on the arrows pointing up or
down on the keyboard to change the position of the waypoint.
10.3 Properties of a route
In the ‘Properties of a route’ window you can consult and edit (in some cases) the characteristics of the route
you have loaded. To open the properties of a route window, carry out any of the following operations:
Right click on any point of the route and select the context menu option ‘Properties of a route’.
Right click on the name of the route in the data tree and select the context menu option ‘Properties
of a route’.
The properties of a route window give you the following information:
Name of the route: You will see the route’s name and the extension (normally *.RTE).
Distance: The length of the route, measuring the straight-line distances between the waypoint that
make up the route.
Area: This field gives you measurement of the area covered inside the route. If the route does not
start and finish in the same point (drawing a closed circuit) Land/Air will draw and imaginary line
between these two points to be able to calculate the area.
Colour: The colour of the line representing the route can be changed if you double click on this field
and choose a new colour from the options available.
Pixel width: Double click on this field to introduce a new value that will establish the width of the line
that represents the route.
10.4 Context menu of a route
The context menu of a route is reached by double clicking on any point of the route. The context menu
allows you to carry out several different operations that will modify the route.
If you open the context menu from the data tree you will find an addition option: ‘Zoom here’, to situate the
route on screen, and three options missing ‘Create waypoint here’, ‘Seek best map here’ and ‘Edit a route’.
The operations you can work with from the context menu are:
Create waypoint here: To create a waypoint on the point you are currently situated.
Seek best map here: To open the map with best resolution for the area where you are currently
situated.
Edit a route: To open the route edition window from which you can modify any of the routes
parameters.
Properties of a route: To open the properties of a route window.
http://www.CompeGPS.com
http://Support.CompeGPS.com
100
Save a route: To save a route, overwriting the original file.
Save a route as: To create a new file, introducing a new name and location.
Close a route: To remove a route from the screen.
Reverse a route: To reverse the order of the route’s waypoints.
Graphics: To open the routes graphics window. You can modify the type of graphic that will appear
in this window by clicking on the
button.
Send to: To send a route to different destinations.
Send route to a GPS: To load a route onto your GPS.
Send route to Pocket: To send a route to this system.
Send by E-mail: This option opens an e-mail message with the route.
Convert a route into a track: To convert a route file into a new file in *.TRK format, so you can treat
the route as if it were a track in which the waypoints become the points of the track.
Activate a route: This option allows you to introduce the route onto ‘Navigation’ so you can follow it
using this application.
http://www.CompeGPS.com
http://Support.CompeGPS.com
101
11 Groups: joining objects
11.1 Definitions
11.1.1 What is a group file?
A group is a folder where you can store different objects such as maps, tracks, landscapes, waypoints and
routes. All these objects are stored in a sole folder in a CompeGPS *.CJT format.
This Land/Air feature is very useful when you often open the same maps, tracks, landscapes and routes.
Use a group file to avoid having to open them one by one.
11.2 Working with group files
11.2.1 Open a group file
To open group files proceed as follows:
1. Select the menu option ‘Groups > Open group’.
2. Select the *.CJT folder that you are interested in and click on the ‘Open’ button.
11.2.2 Create a group file
To create group files proceed as follows:
1. Open all the objects that you want to store in the group file (maps, tracks, landscapes, waypoints
and routes).
2. Select the menu option ‘Groups > Store a group’.
3. Write the name of the file and choose the folder where you want to save it.
4. Click on the ‘Save’ button.
11.2.3 Save a group file
When you open a group file, all the elements that make it up will automatically be loaded. When you want to
store it, you will have to write the new name that you want to give the file (if you write the same name, the
original file will be over written). If you have modified any aspect of the group, you will be asked if you want
to save the changes. Remember, if you store this modified group with the same name, the original file will be
over written.
To store a group file, follow the same steps you took to create the group:
1. Select the menu option ‘Groups > Store a group’.
2. Write the name of the file and select the folder where you want to save it.
3. Click on the ‘Save’ button.
11.2.4 Save as web page
A concrete scene can he saved as web page to he easily shared with other users and published in the net.
To create this kind of files you just have to go to ‘Main menu > File > Save as web page’.
http://www.CompeGPS.com
http://Support.CompeGPS.com
102
12 Navigation
‘Navigation’ is a Land/Air working mode that allows you to continue working with the software at the same
time you move around (normally in a car with a laptop). Simultaneously you will be able to integrate the
information given by your GPS regarding your position. In this way you will have full information about your
movements and the route, track or waypoint that you are following. There are several ways to activate
‘Navigation’ mode:
Click on the
Select the menu option ‘Activate navigation’ in the ‘Communication’ section of the main menu.
button on the tool bar.
When you open ‘Navigation’, the data window will appear at the bottom or the side of the screen and the
‘Navigation’ button bar will appear at the top of the screen with the other buttons.
‘Navigation’ section of the main menu has the same tools as the button bar as well as a few more specific
tools:
‘Activate navigation’: To active this mode.
Horizontal-Vertical views
: To change the position of the data window from the bottom of the
screen to the side of the screen. You can also activate or deactivate this window by using the ‘See
navigation’ window
option.
Navigate towards a waypoint: When you select this option you will be asked to choose from the list
of waypoints loaded at the time, towards which waypoint you want to navigate. You will then be told
which direction you have to go in to reach the waypoint.
Note: If you want to navigate following a route you will have to activate it following the instructions
given in the section ‘Activate a route’.
12.1.1 Activate a route
To be able to follow a route with navigation, first you have to activate it. To do this you can three options:
Right click on the route and select ‘Activate route’.
Using the Data Tree, open the context menu of the route that you want to activate (right click) and
select ‘Activate a route’.
Click on the button ‘Activate a route’ from the list of routes, and then click on the route that you want
to activate.
Once you have activated a route the Land/Air will automatically establish the first waypoint as you
destination point. Once you have reached this waypoint, the next one will become your new destination, and
so on.
12.1.2 Data window
You can move the data window from the bottom of the screen to the side of the screen. To do so, use the
option Horizontal-Vertical views in ‘Navigation’ section of the main menu.
This window allows you to view several statistics (speed, altitude, time to next point, course, etc). They can
be configured by right clicking in the window and choosing the option ‘Select fields’. The next window to
open allows you to remove or add fields to the data Window. To remove a field, select it from the list in the
selected fields’ window (left click) and click on the arrow pointing left. To add a field, select it from the list in
http://www.CompeGPS.com
http://Support.CompeGPS.com
103
the available fields’ window and click on the arrow pointing right. You can also order the fields by clicking on
the arrows pointing up and down.
The default values of navigation data window are:
Speed: Your current speed is calculated using the information supplied by the GPS.
Tangential acceleration: This value indicates the grade in which you are increasing your speed. A
high figure indicates that you are quickly gaining speed.
Normal acceleration: This value indicates the intensity with which you are being taken into the centre
of the circumference that you draw while you turn. A high figure in this field indicates a great
centrifugal force that will push the contents of the vehicle in the opposite direction to the centre of the
circumference.
Turn radius: The more open the curve you are moving along, the larger the turn radius will be, since
this figure represents the distance between you and the centre of the circumference.
Real delay: When you situate the pointer on any point of the map, this figure represents the angle
that is formed between the line that joins the point you are marking and your present position and
another line that joins your present position and the north.
Distance to the pointer: This figure represents the distance between your present position and a
position that you mark on the map with the pointer.
12.1.3 Program an alarm
Land/Air allows you to program an alarm that will ring when you reach a certain point related to any of the
variables represented on the data window of the navigation. For example, you can program an alarm to ring
when you reach 100 km/h, or when you reach a certain altitude. To do so, right click on the field that you
wish to associate the alarm to (i.e. Speed) and select the option ‘Program an alarm’. The next window to
open allows you to configure the following information:
Maximum: Select this option if you want to alarm to ring when you reach a maximum value of the
chosen variable. Then introduce the maximum value in the box on the right.
Minimum: Select this option if you want to alarm to ring when you reach a minimum value of the
chosen variable. Then introduce the maximum value in the box on the right.
Ringing alarm: If you want to here the alarm, select this option and click on ‘Select sound’ to choose
between the sounds available on your computer.
12.1.4 Navigation button bar
These are the tools that you will find on the tool bar that opens when you activate the navigation:
Save navigation track
want to store it.
: Click on this button to give your track a name and decide where you
Create a waypoint here
: Click on this button to create a waypoint using your current coordinates.
Seek for larger scaled maps
: This tool will look for a map where each pixel represents fewer
meters; so the map will be more detailed.
Variable ring
: When you select this option, you will be asked to write the size of the radius of the
ring that will appear around your present position, and also the number of equidistant rings.
http://www.CompeGPS.com
http://Support.CompeGPS.com
104
Fixed ring and parallel lines
: This tool will draw a ring around your present position (you will have
to write the radius you want to use) and it will also draw two lines running parallel to your course.
These two lines start from the circumference of the ring, so you will be able to foresee how much
space will be taken up by the fixed ring in it’s future location.
Note: The fixed ring can, for example, symbolise your car. In this case you will have to introduce a
radius of less than 1 m.
View speed and acceleration vectors
: Three vectors will appear on the screen when you activate
this tool. The three vectors will indicate your speed, your tangential and normal acceleration. The
larger the vector the greater these values will be.
Elastic GPS line-Pointer
: When you select this tool, a line will be drawn from your present
position and the position where you move the pointer.
View turn radius
: This tool will show you a drawing of the circumference that you are currently
following. This circumference represents the course that you will follow if you continue with the same
turn radius.
Centre map on present position
: When you click on this button the map will be re-situated so
that your present position will become the centre of it.
Show more map on front
: Your position will not be in the center of the screen but you will have
80 % of the map on front, so you can see a bigger part of zone you are going to.
Centre map at 10% move
: When you activate this option your position will only move 10% away
from the centre of the screen because when that happen the map will automatically centre on your
present position.
No automatic map movement
follow your movements.
Position map according to course
: When you activate this option, the map will automatically
move to follow your course so the arrow will always point towards the top of the screen. This makes
it easier to follow the indications. It also means that the map will no longer face north if you are not
following a northern course.
Head towards previous waypoint
: When following a route, click on this button to go to the
waypoint positioned before the one you were going to until then.
Head towards next waypoint
: When following a route, click on this button to go to the waypoint
positioned after the one you were going to until then.
The following tools are not default values at ‘Navigation’ button bar, but they can be included using
the Keys and button window of the ‘Configuration’ options.
View ‘Naviation’ window
: This tools allows you to activate and deactivate the data window
situated at the foot of the screen.
Change section
section.
: Activate this option if you do not want the map to automatically
: Click on this button to end this section of the track and start with a new
http://www.CompeGPS.com
http://Support.CompeGPS.com
105
Eliminate last section
Create waypoint here–Questions
: The waypoint property window will open when you click on
this button. The details therein correspond to your current coordinates. To create the waypoint, fill in
the information you want.
Increase colouring
: To give the track more colouring to make it more visible.
Increase thickness
: To make the track’s line thicker.
View bowline
course.
: This button eliminates the last section of the track.
: A line will be drawn, when you activate this option, to indicate your current
13 Geocaching
Land/Air provides all the necessary tools to practice ‘paperless’ Geocaching, from reading GPX files with
Groundspeak extensions to the generation of field notes which can be uploaded to Geocaching.com.
13.1 Compatible Geocaching files
In order to be fully compatible with paperless Geocaching, a waypoints’ file needs to have ‘geocaching
extensions’ which provide information about geocache (description, difficulty, terrain...).
These files are typically available in *.GPX format from Geocaching.com. Land/Air can read directly these
GPX files, but they can also be converted to *.WPT or *.BWPT format keeping their ‘geocaching extensions’.
13.2 Search for geocaches at your current position
To easily find geocaches near your current position Land/Air offers the possibility to search for them inside
the huge database of http://www.geocaching.com (external on-line provider).
In order to use this function, reproduce the following steps:
Center the map where you want to get geocaches.
Select 'Main bar > Search geocaches for current position' (Land/Air will look for available content
near to your current position)
http://www.geocaching.com will be launched and available geocaches near your position will be
listed.
http://www.CompeGPS.com
http://Support.CompeGPS.com
106
Note: Remember that you can easily send the downloaded elements to any device (TwoNav GPS,
Android...) by doing: right click on the element ‘Send to > Your device’.
13.3 Geocache’s specific properties
Geocaches normally include extra information comparing to normal waypoints. When looking at properties of
a geocache, specific information will be found in 3 sections:
General: Next properties can be found in addition to standard waypoint properties:
o
o
o
o
o
o
o
o
o
Descriptions
o
o
o
o
Difficulty
Terrain
Type
Container
Country
State
Placed by
Owner
Link
Short description
Long description
Encoded hints
Travel bugs
Field notes: You can see notes from other users or create your own notes.
o
o
o
o
Logs: Check the field notes from users who previously attempted that geocache.
Status: The current state of that geocache for you.
Comment: Extending information about status.
Date: Of the latest field note for that geocache.
13.4 Add spoiler photos to your geocaches
*.WPT format accepts associated files for each waypoint, allowing to have spoiler images available for
geocache.
http://www.CompeGPS.com
http://Support.CompeGPS.com
107
14 Support
If you have any kind of doubt or problem with the system, you may check the support section of
http://www.compegps.com
To make personalized enquiries you may use the ‘on-line’ CompeGPS support system by entering the
http://support.compegps.com space.
14.1 Create status report
The user can automate the mailing of Land/Air‘s relevant data to our support department (‘Help > Create
status report’). Data which will be collected in a zip file: gps.ini, compegps.log, reginfo.ini and prints of
installation folder and ‘Maps’ folder. After that, the user will have to send the automatic-created zip to our
team to http://support.compegps.com
15 Appendix: Data fields
Next is a list of the items that you can find in the Data page or in the Data bar if it has been set. By default,
only fields of frequent use will be shown:
Accumulated climb: Total amount climbed from the begining of itinerary up to the current position.
Accumulated descent: Total amount descended from the begining of itinerary up to the current
position.
Air pressure: Current air pressure.
Altitude at next: Predicted altitude to next waypoint if current trajectory is maintained.
Altitude ground level: Altitude from the ground level.
Altitude: Altitude from the sea level.
Ascent to destination: Difference between the altitude of destination and current altitude.
Ascent to next: Difference between the altitude of current waypoint and the next waypoint.
Atmospheric pressure: Present atmospheric pressure provided by the barometric altimeter.
Barometric altitude: Altitude provided by the barometric altimeter.
Battery: Remaining energy in your device.
Bearing to next: Course towards to the next waypoint.
Bearing: Current course.
Chronometer: Starts counting when started.
City: Current city.
Compass: Compass representation.
Coordinates: Coordinates of the current position
http://www.CompeGPS.com
http://Support.CompeGPS.com
108
Croquis: Image displaying manoeuvres.
Current depth: Current depth value taking as reference the nautical chart.
Current pace: Speed in minute/kilometer.
Current power: Current power at this moment.
Depth at next: Depth value at next waypoint
Depth at prow line: Current depth value at prow line.
Deviation from route: Distance to active route.
Differential GPS: GPS gives differential signal (submetric accuracy).
Distance to destination: Distance to destination (last waypoint of the route).
Distance to next radar: Distance to next radar point.
Distance to next: Distance to the next waypoint.
Distance to virtual coach: Distance between your current position and the position of the ‘Virtual
Coach’.
Estimated hour at destination: Estimated time of arrival to destination (last waypoint of the route) at
present speed.
Estimated hour at next: Estimated time of arrival to the next waypoint (at present speed).
Estimated time to destination (cruise): Estimated time to reach destination (last waypoint of the
route) at cruise speed.
Estimated time to destination: Estimated time to reach destination (last waypoint of the route) at
current speed.
Estimated time to next (cruise): Estimated time to reach next waypoint at cruise speed.
Estimated timeto next: Estimated time to reach next waypoint at current speed.
Free memory: Remaining memory in your device.
GOTO arrow: Arrow that indicates the course towards to the next waypoint.
GPS altitude: Present altitude provided by GPS rerceives via satellites.
GPS bearing: Direction followed according to the GPS system.
Graph: Representation of the track being covered.
HDOP: Horizontal Dilution Of Precision (estimated current accuracy of the GPS).
%HRR: Heart Rate Reserve.
Heart rate zone (% Max.): Predefined heart rate intensity zones.
Heart rate zone (% Max-Rest): Predefined heart rate intensity zones (Cardiac frequency in reserve).
http://www.CompeGPS.com
http://Support.CompeGPS.com
109
L/D (instant glide ratio): Glide ratio dividing horizontal distance by vertical (descending).
L/D goal: Minimum glide ratio required to reach your goal (going through all intermediate waypoints).
L/D req.: Minimum glide ratio required to reach next waypoint (distance to waypoint divided by
waypoint’s altitude over ground level).
Land altitude: Altitude of the land provided by the 3D relief map (*.CDEM).
Magnetic bearing: Course followed according to the inner device compass.
Maximum altitude: Reached during your itinerary.
Maximum power: Maximum power achieved from the begining of itinerary.
Maximum speed: Maximum speed in current flight.
Mean moving pace: Average of all pace values above the minimum speed movement.
Mean moving speed: Average of all speeds values above the minimum speed movement.
Mean pace: Average of all pace values.
Mean power: Average of all power values.
Mean speed: Average of all speeds values.
Moving pace: Average of all pace values avoiding stopped points.
Next radar speed: Displays maximum speed allowed by the next radar.
Next slope: Slope till the distance set at 'Next slope distance'.
Next waypoint name: Name of the following waypoint.
Normal acceleration: Perpendicular to movement in circular movements.
Number of points: Track points saved up to current position.
Partial CO2 emission: CO2 emission from the beginning of itinerary. Value reseted every time
TwoNav is turned off.
Partial energy: Partial odometer energy.
Partial mean speed: Average of all speeds values from the beginning of itinerary up to this moment.
PDOP: Position Dilution Of Precision (estimated current position accuracy of the GPS).
Place name: Name of the element of your current position.
Precision: Error margin of the GPS.
Radar icon: Displays an icon when entering the radius of a radar.
Radius turn: Radius of the turn that you are taking at the moment.
Route graph: Representation of the route being covered.
http://www.CompeGPS.com
http://Support.CompeGPS.com
110
Route percentage: Percentage of the route that has been already done.
Signpost: If available, road indications are displayed.
Slope to destination: Remaining slope till destination is reached.
Slope to next kilometer: Remaining slope from your current position to 1 kilometer.
Slope to next waypoint: Slope from your current position to next waypoint.
Slope: Slope of your current movement.
Speed limit: Speed limit established for the current road.
Speed: Current speed.
Stopped time: Total amount of time without moving.
Sunrise: Sunrise time.
Sunset: Sunset time.
Tangential acceleration: Component of linear acceleration tangent to the path.
Temperature: Current temperature.
Time in movement: Total amount of time moving.
Time to virtual coach: Time difference between you and the ‘Virtual Coach’.
Time without paquet: Elapsed time since last time GPS signal was received.
Time: Current time according to the selected time zone.
Total CO2 emission: CO2 emission of all your trips. Value not automatically reseted every time
TwoNav is turned off.
Total energy: Total odometer energy.
Total odometer: Accumulated distance of all your trips. Value not automatically reseted every time
TwoNav is turned off. (TwoNav can calculate the total distance using different data calculations).
Track file name: Name of the current track.
Trip odometer: Distance covered from the beginning of itinerary. Value reseted every time TwoNav
is turned off.
Used satellites: Satellites fixed in current position.
VDOP: Vertical Dilution Of Precision (estimated current vertical accuracy of the GPS).
Velocity made good: Right direction’s velocity component to the following waypoint.
Vertical speed: Descending speed (vertical component of speed value).
Virtual free memory: Virtual free memory in your device.
http://www.CompeGPS.com
http://Support.CompeGPS.com
111
16 Appendix: Air
Air has some specific characteristics that will be explained in the following text.
16.1 Configuration options (default values and flight)
In the options window (‘File > Options’) you can find some extra configuration possibilites.
16.1.1 Default values
In this window you can configure the next values:
Pilot’s name
Take-off name
IGC Glider type
IGC Glider ID
IGC Competition Class
Competition ID
Birth date
16.1.2 Flight
In this section you can configure, in addition to the Air options, these extra ones:
Instrument IGC name: Here you can introduce the characters that will identify you, inside the IGC
file.
Value for altitudes: You can choose the GPS altitude or barometric altitude to provide this important
data of your flights.
16.2 Thermals and transitions
Air allows the visualization and analysis of the thermals and transitions that you performed during your flight.
For a good visualization use de 3D viewer and press the
button to see the thermals.
You can make a detailed analysis of the variables that define your thermals and transitions going to the
Thermals and transitions window. To open it, select Thermals and transitions at the context menu of that
flight (right click on it). In this window you can find the next information:
Icon: Graphic representation of the element type (thermal or transition) for its fast identification.
Type: Thermal or transition. This clasification is made by an algorithm that, basically, separates the
climbing stages from the descending ones. When calculating this statistic, some errors may happen.
We recommend verifying, with numeric and graphic data (3D viewer), the accuracy of this
classification.
Mean vario: Shows the mean vertical speed in this section. A negative value indicates a loss of
altitude while a positive one indicates a climb.
Number of turns: It only apperars with the thermals, when you are usually drawing circles.
Glide ratio (linear): This value indicates the covered distance, with the actual descending angle, to
go one meter down. Therefore, a high glide ratio value means a light descent while a small one
indicates that you plummet.
Duration: Time between the start and the end of the section (thermal or transition).
http://www.CompeGPS.com
http://Support.CompeGPS.com
112
Projected distance: Distance projected to a flat ground, that is not counting with altitude variations.
Therefore, a completely vertical climb would have Projected distance = 0.
Mean speed: Arithmetic mean of the speeds of that stage.
Maximum height difference: Substracts the lower point of that stage to the higher one.
Track bearing: Mean bearing in that stage.
Thermal radium average: The radium that would have a circle that was a mean of all the turns made
in that thermal.
Drift direction: Orientation where you have been moved during the thermal.
Drift speed: Velocity with wich you have been moved away from the vertical line when making that
thermal.
Drift angle: Detected inclination in that thermal. A 0 value would indicate a completely vertical climb.
If this angle rises, the ascention is smoother.
Max. Vario: Maximum climbing vertical speed.
Min. Vario: Maximum descending vertical speed.
Number of right turns: Right turns during this thermal.
Number of left turns: Left turns during this thermal.
16.3 ‘On-line Contest’
16.3.1 What is ‘On-line Contest’?
‘On-line Contest’ is an Internet meeting point where pilots of around the World can compare their flights and
compete to be the best of their category. To upload your flights to OLC, they have to be in a specific format
(IGC track + embedded route). This format has been set as a standard to make an easier and reliable flight
comparison. With Air you can easily make the OLC conversion operation and send the file to OLC web
page. See next section.
16.3.2 Send a flight to ‘On-line Contest’
Land/Air lets you save a flight for ‘On-line Contest’, creating a track .IGC with an embedded route and an
*.OLC file and sending it to the OLC website. To save a track in *.OLC format and send it to the ‘On-line
Contest’ follow next steps:
1. Load the flight which you want to send to *.OLC executing one of these operations:
Click the
Select the menu option ‘Tracks > Open track’.
button (open track).
2. Right click in any point of the track. The context menu of the track will appear.
3. Select ‘Optimization’. You will be asked for a name and location to save the optimizated track. It is
important to preserve the original format of the file name.
http://www.CompeGPS.com
http://Support.CompeGPS.com
113
4. Press ‘Save’ and Land/Air will automatically make the necessary operations to include your track in
‘On-line Contest’.
5. A window with statistic information about your flight will appear. Select the competition and route
type. Then ‘Send to OLC server’.
6. A new window with two labels will open: Flight and Pilot. In the first one you have to set a zone and
a name to your flight. In the second, you should fill up all the fields with several informations about
the pilot.
7. In the lower part of the window you can directly ‘Send to OLC’ or ‘Save as…’ the IGC and OLC files
in your computer to consult or send it later.
8. When ‘Send to OLC’ Land/Air will connect to OLC web page. Follow the instructions from there.
16.4 3D Differences
Air’s 3D viewer has some added functions:
Draw the virtual shadow: If this option is activated, a projection of the flight will be drawn over the
ground.
View the flight thermals: This option lets you clearly distinguish the thermals and see an ilustrative
representation of its way.
View flights: With this option disabled you won’t see the current track but, if they are activated, the
thermals and flight parameters will be drawn.
View flight parameters: This tool will make the flight analysis easier creating a graphic representation
of the parameters that define it.
16.5 Track properties
The track (or flight) window has several differences with the Air version:
In the ‘General’ section there is a field to write the name of a passenger.
In ‘GPS’ we have included the possibility to specify the barograph model.
In the ‘Altitudes’ section, the maximum and minimum slope data have been eliminated and the
vertical velocity is called ‘Vario’.
We have included an ‘IGC’ section where you can find and modify the following information (useful
for IGC files, required format to accede to ‘On-line Contest’):
IGC Glider Type: Your flying way.
IGC Glider ID: Glider identification.
Competition ID: Competition identificator.
IGC Competition class: Competition category.
http://www.CompeGPS.com
http://Support.CompeGPS.com
114
The section ‘Number of thermals’ have been included. There you can find, in addition to the number
of them, the following statistics:
Time in thermal: Elapsed time in thermals.
% of time in thermals: This percentage expresses the Time in thermal with respect to the
total time.
Thermal set radium: This is a mean of the radius of all turns of all thermals.
% Turning left: Percentage of right turns.
% Turning right: Percentage of left turns.
16.6 Track editor
Track editor has been deleted from Air because it has no utility when travelling through the air, this option is
covered by the route editor which is more used by air displacements.
16.7 Minor differences
In addition to the previously mentioned ones, you can find the following modifications in Air:
Navigation: In the AIR version, ‘navigation’ section of the main menu does not exist, but you can
activate ‘navigation’ pressing the
button.
Color track: You can color your track by some Air-specific parameters (in addition to the Land/Air
ones):
Air speed: If wind speed data is available, this parameter will express our relative speed with
respect to that wind (this way, an opposite 10 km/h wind will add 10 km/h to the track speed,
resulting the Air speed).
Track Land/Air Altitude: Altitude of the ground we are flying over.
Track Altitude over land: Distance between the pilot and the ground (this statistic is
calculated substracting the Track Land/Air Altitude to the Track Altitude or over sea altitude).
Waypoints made: Waypoints that you have reached.
Competition distance: Distance that you have covered in the straight line that links the
waypoints. For example: If you take off and go in a 90 degrees direction with respect to the
line to the second waypoint, you will have a 0 Competition distance.
Wind speed: If you have anemometer data available, here you will see the wind speed.
Wind direction: This complements the previous information about the wind. .
Graphics: In the Air version, the Graph window has a representation of the landscape that we are
flying over, so you can see the track alitude over the ground.
Import altidudes from other tracks (barograph): This option is only accessible from the Tools section
of the context menu of the track in the AIR version and is used to fit altitude data (taken from another
GPS or Vario) to a track saved without it.


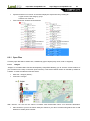


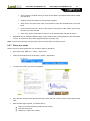


![TwoNav [platform][version]](http://vs1.manualzilla.com/store/data/006156663_1-5deaa8d48af303b2cc7eaad52ecbf272-150x150.png)

![TwoNav [platform][version]](http://vs1.manualzilla.com/store/data/006156188_1-a63caa055913f53929d6d89e582ab489-150x150.png)


![TwoNav [platform][version]](http://vs1.manualzilla.com/store/data/006163237_1-2ed879c8b9cb83b9cbc3a5d3760a7be6-150x150.png)