1
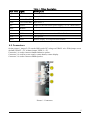
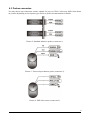
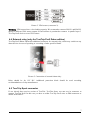
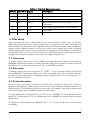
TVERTRIP PROFI
USER MANUAL
TverTrip model:
Profi
Firmware version:
3.4
Manual edition:
1.0
1
TverTrip Profi v 3.4
User manual
www.tvertrip.com
All product information may be changed without prior notice. All statements, information and
recommendations in this guide are assumed correct but given without warranty of any kind, express
or implied. Users must assume full responsibility for their use.
Developers, manufactures and distributors of TverTrip devices are not liable for any indirect,
special or consequential damages, including, without limitation, lost profits, loss of or damage any
cars equipment and any property arising from the use of or inability to use this guide, even if
developers, manufactures of TverTrip devices, its suppliers, partners or distributors have been
advised of the possibility of such damages.
© TverTrip, 2011
2
Contents
1 Introduction......................................................................................................................................4
2 Technical specifications....................................................................................................................4
3 Warranty...........................................................................................................................................4
4 Installation of the device..................................................................................................................4
4.1 Wires description......................................................................................................................4
4.2 Connectors................................................................................................................................5
4.3 Probes connecton......................................................................................................................6
4.4 External relay (only for TverTrip Profi Dakar edition)............................................................7
4.5 TverTrip Sport connector..........................................................................................................7
5 First setup.........................................................................................................................................8
5.1 Time setup.................................................................................................................................8
5.2 Date setup.................................................................................................................................8
5.3 Choose the probe......................................................................................................................8
5.4 Calibration number setup..........................................................................................................9
5.4.1 Known calibration number................................................................................................9
5.4.2 Calibration kilometer........................................................................................................9
5.4.3 Known distance.................................................................................................................9
5.4.4 Using GPS receiver...........................................................................................................9
6 User interface....................................................................................................................................9
6.1 Commands list........................................................................................................................10
6.2 Remote display control...........................................................................................................12
7 Additional information...................................................................................................................12
3
1 Introduction
TverTrip Profi is a rally computer purposed to help in the navigation in a difficult environment of
any auto-sports competitions, which use roadbook's navigation such as rally, rally-raids, trophyraids, car-orienteering.
It's already been used in famous rally-raids such Dakar, Africa Race, Silk Way. It is very reliable,
lightweight and easy to use device. If you are beginner in navigation, you will need only few
buttons to control it during the race. For skillful navigators it will help to control many parameters
like speeding or average speed or distance limits.
2 Technical specifications
Operating temperature range
-30 .. +50 ºС
Voltage
10..15V DC
Current consumption
less than 270mA
Current consumption, power save mode
less than 40mA
Nonvolatile memory battery
CR2032
Battery resource
more than one year
Car's power network malfunction protection
Yes
Wrong polarity protection
Yes
Overvoltage protection
Yes
Device stores all current values in nonvolatile memory, it allows to use TverTrip Profy after its
disconnection from power supply.
3 Warranty
The manufacturer guarantees fault-free operation of the TverTrip Profi within 12 months period
from the date of manufacture. Date of manufacture is determined by electronic mark stored inside
the unit. During warranty period repairing of TverTrip Profi is free of charge in the case of
manufacturing defects.
In the case of physical damage claims for quality are not accepted.
Warranty does not apply to the battery.
4 Installation of the device
To use TverTrip Profi you have to install a device on car's dashboard at easy accessible to the
navigator place, then connect it to probes and car's electric network.
4.1 Wires description
Connect TverTrip Profi wires as decribed in the table 1. Power supply may be connected via a
switch to power down the device when it's not used.
4
Wire color Signal
Table 1. Wires description
Description
Grey
Not used
Yellow
SW2
Brown
HALL1/PROBE1- Input Probe 1
Violet
HALL2/PROBE2- Input Probe 2
Blue
UHALL
White
PROBE+
Pink
External CLR2 button
Output for the Hall sensor power supply (+5/+9V 100mA max)
Not used
Red
+12V
Power supply, connect to car's +12V via 5A fuse
Black
Gnd
Car's ground
Green
DISP2
Remote display TverTrip Pilot data channel
4.2 Connectors
On the picture 1 jumper 5-9V sets the Hall's probe DC voltage on UHALL wire. With jumper set on
(default) UHALL = 5V, without jumper UHALL = 9V.
Connector 1 is used to connect standard inductive probes.
Connector 2 is used for power supply, remote button, remote display.
Connector 3 is used to connect standard probes.
Picture 1. Connectors.
5
4.3 Probes connecton
You may choose any connection variant, suitable for your car. Wires' colors may differ from shown
on pictures depending on used probe types. Refer to probe's documentation for details.
Picture 2. Standard inductive probes (connector 1).
Picture 3. Universal speedometer probe (connector 2).
Picture 4. Hall effect sensor (connector 2).
6
Picture 5. VDO sensor (connector 2).
Warning: VDO sensors have a low loading capacity. We recomend to connect HALL1 and HALL2
inputs to different VDO sensor outputs. In such scheme is permitted to connect in parallel up to 3
TverTrip Profi devices to one VDO sensor.
4.4 External relay (only for TverTrip Profi Dakar edition)
TverTrip Profi Dakar edition has additional connector for external relay, which may switch on any
alarm devices in cases of speeding or exceeding of other specified limits.
Picture 5. Connection of external alarm relay.
Relay should be for 12V DC. Additional protection diode should be used according
recommendations of relay manufacturer.
4.5 TverTrip Sport connector
If you already have previos version of TverTrip, TverTrip Sport, you may use its connector to
connect TverTrip Profi. In this case you have to solder TverTrip Profi wires to DB9 connector as
shown in the table 2.
7
Table 2. TverTrip Sport connector
DB9 pin Wire color Signal
Description
1
Yellow
SW2
External CLR2 button
4
Brown
HALL1/PROBE1- Input Probe 1
3
Violet
HALL2/PROBE2- Input Probe 2
6
Blue
UHALL
Output for the Hall sensor power supply (+5/+9V
100mA max)
9
Red
+12V
Power supply, connect to car's +12V via 5A fuse
7
Black
Gnd
Car's ground
8
Green
DISP2
Remote display TverTrip Pilot data channel
5 First setup
After connecting the device, check again all wires and connectors. Switch power on, all three
display lines should show zeros. Time and date setup is not necessary for simple navigation, but
they are helpful in competitions where time limits are used. Calibration number setup is mandatory,
without correct calibration number TverTrip can't show correct distance and speed. Calibration
number depends on the probe's type, car's transmission parameters, wheels diameter, and should be
checked before an every race. TverTrip Profi has two calibration numbers which may be swap or
changed very quickly for example, in case of the tires change during the race.
5.1 Time setup
To change a current time press “F” then “TIME” keys. After that enter 6 digits of current time in
HHMMSS format (hours, minutes, seconds). Enter the leading zeros if hours or minutes values are
less than 10. To save the time value press “F” key or CLR(STR1) to cancel.
5.2 Date setup
To change a current date press in sequence "F", "STR3", "7" keys, and enter 6 digits of the current
date in DDMMYY format (day, month, year). Enter the leading zeros if day or month values are
less then 10, for example, 080311 combination means 8 March of 2011. To save the date press "F"
key or CLR(STR1) to cancel.
5.3 Choose the probe
In case you have two probes, connected to TverTrip Profi, you have to choose one of them to
operation. Depending on probes types you may need to have different calibration numbers for
different probes. If both probes measure the same value (for example , they both installed on the
one wheel) you may use one calibration number for both probes.
To check which probe is being used now, you have to press "PROBE" key. In the third line will be
shown "P1" for first probe or "P2" for second probe. Press "PROBE" key again to return to normal
display mode.
To change the current probe press "PROBE" and "1" or "2" keys for the first or second probe
accordingly.
8
5.4 Calibration number setup
Calibration number is a distance in millimeters which car passes from one pulse of probe to the next
one. To choose which calibration number will be used as active, press "CAS" key and "1" key for
the first or "2" for the second calibration number. Its current value will be shown. To exit of this
mode press any key.
5.4.1 Known calibration number
If calibration number is known, press "F", "CAS" keys, and enter 5 digits of calibration number
(with leading zeros), and press "F" key to store this number or CLR(STR1) to cancel.
In case of unknown calibration number it may be measured by different methods, described below.
5.4.2 Calibration kilometer
In some races roadbooks are made by using so called calibration kilometer, which may differ from
the real one. To setup TverTrip in such case you have to drive to the beginning of calibration
kilometer (some sign, chosen by race organizer). Stop the car, press "F", "CAL" keys, on third
display line will be shown "C00000". Drive car smoothly to the end of calibration kilometer, stop
the car and press "F", "CAL" keys. Calibration number is fixed at the moment of pressing on
"CAL" key. New calibration number will be shown on third line. To save it press "F" key or
"CLR(STR1)" to cancel.
5.4.3 Known distance
If there is a some known distance you may calibrate TverTrip Profy by this method. Drive to the
beginning of the distance, reset local distance counter in the second line by pressing "CLR(STR2)"
key, drive smoothly known distance and stop. Press "CAL" key, values on the first and second
distance lines will be frozen, now you may change calibration number by pressing "+/-" key to
increase it, and "PROBE" key to decrease it. Distances will be recounted with new calibration
number. When you will get exact distance on second line, press "F" key to store calibration number
or "CLR(STR1)" to cancel any changes.
When you will have some experience in this method, you may drive without stops through known
distance. You just have to press "CLR(STR2)" and "CAL" keys in exact road points and adjust
calibration number. You even don't have to reset distance counter if you know distance value at the
end of the road.
5.4.4 Using GPS receiver
This method suitable for both setup and check of the calibration number. On a smooth and straight
road drive a car with constant speed and set calibration number by any previously discussed ways
thus both speeds on GPS receiver and TverTrip were equal.
6 User interface
TverTrip Profi has digit LED display with three lines and two keyboard sections. Left keyboard
section has ten keys, which work as function keys to change device's parameters, display values and
as numpad to enter numbers. Right keyboard section consists of three clearing keys to zero different
counters and "F" key used as "Function" key to change function keys behavior and as "Enter" key to
finish commands.
9
6.1 Commands list
Some commands demands only one key, some demands keys combination. To enter keys
combination you should press one key after another, as described in a commands list. For example,
"F", "DST" command means you should press "F" key, release it, then press "DST" key and release
it. You should not press several keys simultaneously, only one by one.
If command demands some additional numbers input, it is usually finished by "F(ENTER)" key or
you may cancel command by "CLR(STR1)" key.
Table 3 contains full commands descriptions listed by function keys numbers.
Table 3. Commands list
Command Action
1
FRZ
Freeze/Unfreeze values on the first and second display lines.
Reset local distance interval in the second line.
2
F, FRZ
3
CAL
Start known distance calibration mode. Freezes the first and second lines.
To change current calibration number press "+/-" key to raise its value or
"PROBE" to lower its value.
Frozen distance values recounted by the new calibration number.
To store new calibration number press "F" key or "CLR(STR1)" to cancel.
4
F, CAL
Start calibration kilometer calibration mode.
At the begining of calibration kilometer press "F", "CAL", in the third line
C00000 will be shown. After passing calibration kilometer press "F", "CAL", in
the third line new calibration number will be shown.
To store new calibration number press "F" key or "CLR(STR1)" to cancel.
5
TSD
6
F, TSD
7
CAS
Show and change the current calibration number.
Press key "1" for the first calibration number, key "2" for the second one.
To exit from this mode press any key.
8
F, CAS
Set calibration number. Enter 5 digits with leading zeros.
To store new calibration number press "F" key or "CLR(STR1)" to cancel.
9
DST
10
F, DST
11
DSS
12
F, DSS
Switch off the display for power saving. Only one point stays visible.
To turn on the display press any button besides "F".
Show in the third line speed / average speed / deviation from the mean speed.
Setup the mean speed. Enter 3 digits of mean speed value with leading zero in
kilometers per hour. To store the mean speed press "F" key or "CLR(STR1)" to
cancel.
Show in the first line total distance / current date / current time.
Set the total distance counter in the first line in tens meters. Local distance from
the second line will be added to this value. Enter 5 digits with leading zeros.
For example, 05023 means 50 km 230 m.
To store distance press "F" key or "CLR(STR1)" to cancel.
Show in the second line local distance / stopwatch.
Set the total distance counter in the first line in tens meters. Enter 5 digits with
leading zeros. For example, 05023 means 50 km 230 m.
10
13
TIME
14
F, TIME
15
TIS
16
F, TIS
17
+/-
18
F, +/-
19
PROBE
Show in the third line deviation from the mean speed in seconds / speed. Value
of the deviation may be positive or negaite.
Set current time in 6 digit HHMMSS format (hours, minutes, seconds).
To store time press "F" key or "CLR(STR1)" to cancel.
Start / Stop stopwatch.
Reset stopwatch.
Switch the direct or reverse distance count. If a distance is displayed minus sign
in its line will be shown.
Change display brightness (3 values).
Show the active probe in the third line. P1 means first probe, P2 means second
probe is used. Press "PROBE" again to leave this mode.
To change active probe press "1" or "2" key accordingly.
20 F, PROBE Show in the third line stored mean speed / speed.
21
CLR
STR1
In different setup modes is used to escape from value setting or exit to standard
mode: first line – total distance, second line – interval distance, third line –
current speed.
To reset total distance counter in the first line press and hold this key more than
3 seconds.
22
CLR
STR2
Reset local distance counter in the second line.
23
F, STR2
24
F, STR2, Change remote display brightness (3 values).
+/-
25
CLR
STR3
Remote display TverTrip Pilot control. See section 6.2 for more details.
Reset mean speed.
To reset all counters press and hold this key more than 5 seconds. After reset
the first probe and the first calibration number will be used as active.
26
F,STR3,0 Set and turn on the distance limit. Enter 5 digits with leading zeros. To store
this value press "F" key or "CLR(STR1)" to cancel.
If distance limit is set, in the first digit in the third line symbol ¬ will be shown.
If this limit is reached external relay will be switched on.
To turn off alarm press CLR(STR1) key.
To turn off distance limit press "F", "CLR(STR3)","0", if distance limit is on.
27
F,STR3,1 Set the maximum speed limit. In case of exceeding of this speed limit external
relay will be switched on continuously.
Enter 3 digits of speed limit value with leading zero in kilometers per hour. To
store it press "F" key or "CLR(STR1)" to cancel.
28
F,STR3,2 Set the medium speed limit. In case of exceeding of this speed limit external
relay will be switched in a pulse mode.
Enter 3 digits of speed limit value with leading zero in kilometers per hour. To
store it press "F" key or "CLR(STR1)" to cancel.
11
29
F,STR3,3 Set the low speed limit. In case of exceeding of this speed limit external relay
will be switched in a pulse mode with a long period between pulses.
Enter 3 digits of speed limit value with leading zero in kilometers per hour. To
store it press "F" key or "CLR(STR1)" to cancel.
30
F,STR3,4 Switch on speeding alarm via external relay. Speed limits are set as described
above. In the first digit of the third line symbol 'L' will be shown.
31
F,STR3,5 Switch off speeding alarm via external relay.
32
F,STR3,7 Set the current date. Enter 6 digits of the current date in DDMMYY format
(day, month, year). Enter the leading zeros if day or month values are less then
10, for example, 090511 combination means 9 May of 2011. To save the date
press "F" key or CLR(STR1) to cancel.
33
F,STR3,9 Show the device firmware version. Press any key to return back.
6.2 Remote display control
TverTrip Profi may be used with additional display for drivers TverTrip Pilot. It helps to a driver to
control current speed and local distance interval or any other parameters described in the table 4. To
setup TverTrip Pilot you should do next steps on the TvetTrip Profi control panel:
1) Press "F", "CLR(STR2)" keys to set remote display control mode. In the third line of
TverTrip Profi "E1 X" will be shown, where "X" is a parameter's number shown on the first
line of remote display.
2) Enter parameter number by pressing according number key. On the third line "E2 X" will be
shown, where "X" is a number of parameter, shown on the second line of remote display.
3) Enter second parameter's number by numpad. Device will return back from this mode
automaticaly.
Table 4. Remote display parameters
Number Remote display parameter
0
Time
1
Speed
2
Mean speed
3
Standard mode: first line – speed, second line – total distance
4
Deviation from the mean speed in km/h
5
Stopwatch
6
Deviation from the mean speed in seconds
7
Total distance
8
Local distance interval
7 Additional information
Latest news, documentation and additional information about TverTrip products you can get on the
web-site www.tvertrip.com.
Feel free to ask any questions via e-mail by address [email protected].
12