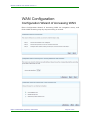
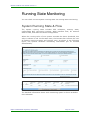
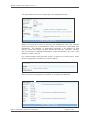
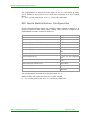
1
MP2000-104B-AC User Manual Version 1.0 Maipu Communication Technology Co., Ltd No. 16, JiuXing Avenue Hi-Tech Park Chengdu, Sichuan Province P. R. China 610041 Tel: (86) 28-85148850, 85148041 Fax: (86) 28-85148948, 85148139 URL: http:// www.maipu.com Mail: [email protected] Maipu Confidential & Proprietary Information Page 1 of 257 MP2000-104B-AC User Manual Version 1.0 All rights reserved. Printed in the People’s Republic of China. No part of this document may be reproduced, transmitted, transcribed, stored in a retrieval system, or translated into any language or computer language, in any form or by any means, electronic, mechanical, magnetic, optical, chemical, manual or otherwise without the prior written consent of Maipu Communication Technology Co., Ltd. Maipu makes no representations or warranties with respect to this document contents and specifically disclaims any implied warranties of merchantability or fitness for any specific purpose. Further, Maipu reserves the right to revise this document and to make changes from time to time in its content without being obligated to notify any person of such revisions or changes. Maipu values and appreciates comments you may have concerning our products or this document. Please address comments to: Maipu Communication Technology Co., Ltd No. 16, JiuXing Avenue, Hi-Tech Park Chengdu, Sichuan Province P. R. China 610041 Tel: (86) 28-85148850, 85148041 Fax: (86) 28-85148948, 85148139 URL: http:// www.maipu.com Mail: [email protected] All other products or services mentioned herein may be registered trademarks, trademarks, or service marks of their respective manufacturers, companies, or organizations. Document History Date Revision No. Description 11/07/2008 R1.0 The MP2000-104B-AC User Manual V1.0 provides all information about the router designed and developed by Maipu Communication Technology Co., Ltd Maipu Confidential & Proprietary Information Page 2 of 257 MP2000-104B-AC User Manual Version 1.0 Maipu Feedback Form Your opinion helps us improve the quality of our product documentation and offer better services. Please fax your comments and suggestions to (86) 28-85148948, 85148139 or email to [email protected]. Document Title MP2000-104B-AC USER MANUAL VERSION 1.0 Product Version Evaluate this document Document Revision Number 2.0 Presentation: (Introductions, procedures, illustrations, completeness, arrangement, appearance) Good Fair Average Poor Accessibility: (Contents, index, headings, numbering) Good Fair Average Poor Editorial: (Language, vocabulary, readability, clarity, technical accuracy, content) Good Fair Average Poor Your suggestions to improve the document Please check suggestions to improve this document: Improve introduction Make more concise Improve Contents Add more step-by-step procedures/tutorials Improve arrangement Add more technical information Include images Make it less technical Add more detail Improve index If you wish to be contacted, complete the following: Name Company Postcode Address Telephone Maipu Confidential & Proprietary Information E-mail Page 3 of 257 MP2000-104B-AC User Manual Version 1.0 Contents About User Manual.....................................................................................7 Purpose .................................................................................................................7 How to Get in Touch ...............................................................................................7 Customer Support...................................................................................................................7 Documentation Support...........................................................................................................7 MP2000-104B-AC User Manual .................................................................8 Hardware...............................................................................................................8 MP2000-104B Appearance.......................................................................................................8 MP2000-104B Front Panel .......................................................................................................9 MP2000-104B Back Panel ......................................................................................................10 Installation Preparations........................................................................................ 10 Security ................................................................................................................................10 Environment .........................................................................................................................11 Check Equipment & Accessories.............................................................................................12 Tools & Equipment ................................................................................................................12 System Installation ............................................................................................... 13 Equipment Placement............................................................................................................13 Interface Connection .............................................................................................................13 Power Connection..................................................................................................................15 Immediate Configuration........................................................................ 16 Preparation .......................................................................................................... 16 Configuration ....................................................................................................... 17 LAN Configuration .................................................................................................................18 DHCP Service Configuration...................................................................................................18 Voice Default Configuration.................................................................................... 23 WEB Configuration Guide........................................................................ 24 Overview ............................................................................................................. 24 WAN Configuration ............................................................................................... 26 Fixed Address Line.................................................................................................................27 PPPOE Dial-up Line................................................................................................................28 Ethernet Dynamic Address Line..............................................................................................28 WAN Interface Information ....................................................................................................29 DNS Server Configuration......................................................................................................29 QoS Service Configuration .....................................................................................................29 System Running State & Flow................................................................................................35 Maipu Confidential & Proprietary Information Page 4 of 257 MP2000-104B-AC User Manual Version 1.0 PC Connections & Flow Monitor ..............................................................................................38 LAN Configuration................................................................................................. 40 LAN Interface Configuration ...................................................................................................40 Voice Data Separation Configuration ......................................................................................41 VLAN Configuration ...............................................................................................................42 Port Mirror ............................................................................................................................43 Switch Port Configuration.......................................................................................................44 Voice Configuration............................................................................................... 45 Protocol Configuration............................................................................................................45 Advanced Configuration.........................................................................................................52 NAT Traversing Configuration.................................................................................................52 Voice Port Configuration.........................................................................................................53 Number Transform Configuration ...........................................................................................57 Call Route Configuration ........................................................................................................59 Black-white List Configuration ................................................................................................63 Call Service Configuration ......................................................................................................65 Call Pickup Configuration .......................................................................................................71 Group Ring Configuration.......................................................................................................73 IVR System Configuration......................................................................................................75 Accounting Authentication Configuration.................................................................................77 Fax Service Configuration ......................................................................................................80 Other Configurations .............................................................................................................82 VPN Configuration................................................................................................. 85 VPN Initial Configuration ........................................................................................................85 Tunnel Configuration .............................................................................................................85 Policy Configuration ...............................................................................................................88 Certificate Configuration ........................................................................................................91 View Status Information ........................................................................................................93 Configuration Examples .........................................................................................................94 Route Configuration .............................................................................................. 99 Static Route Configuration .....................................................................................................99 Access List Configuration .....................................................................................................100 DHCP Service Configuration.................................................................................................102 Static Address Translation Configuration...............................................................................104 Dynamic Address Translation Configuration ..........................................................................107 NAT Translation Parameter Configuration .............................................................................108 Flux Dynamic & L3 Throughput Limit Configuration ...............................................................108 Sub-Interface Configuration................................................................................. 109 System Management .......................................................................................... 110 Basic Information Configuration ...........................................................................................110 Administrator Settings .........................................................................................................111 Navigation from MasterPlan to WEB Network Management ...................................................112 Maipu Confidential & Proprietary Information Page 5 of 257 MP2000-104B-AC User Manual Version 1.0 User Name & Password Management of Web NMS in Masterplan...........................................113 Configuration File Management............................................................................................115 Log Management ................................................................................................................115 SNMP Parameter Configuration ............................................................................................116 Save Configuration ............................................................................................. 117 Reset Button ...................................................................................................... 117 Shell Configuration Guide ..................................................................... 119 Configure Router via Telnet ................................................................................. 119 RIP Dynamic Routing Configuration...................................................................... 121 RIP Basic Commands ..........................................................................................................122 Description of Related Commands for Configuring RIP...........................................................123 Examples of Configuring RIP ................................................................................................136 Monitoring and Debugging of RIP .........................................................................................150 OSPF Dynamic Routing Configuration ................................................................... 150 Brief Introduction to OSPF Protocol.......................................................................................150 Description of OSPF Basic Commands ..................................................................................151 Description of Commands for Configuring OSPF....................................................................154 Monitor & Debug OSPF ........................................................................................................181 Configure BGP Dynamic Route............................................................................. 182 BGP Configuration Commands .............................................................................................183 BGP Configuration Examples................................................................................................214 BGP Monitoring & Debugging ...............................................................................................223 Upgrade Device Software ..................................................................... 227 Upgrade Via shell................................................................................................ 227 Upgrade bin Files of Monitor Program via sysupdate..............................................................227 Upgrade the bin Files of Application Program via sysupdate...................................................229 Upgrade bin Files of Application Program via live-update (Breakpoint Transmission) ...............231 Upgrade Program via Web................................................................................... 233 Upgrade Program via Masterplan ......................................................................... 234 Update Troubleshooting Methods for Irregular System........................................... 240 Typical Applications .............................................................................. 242 Environment ...................................................................................................... 242 Configuration Steps ............................................................................................ 243 Configure Communication between Local and H323..............................................................244 Configure WAN....................................................................................................................244 Configure Communication between FXS and PSTN................................................................250 Configure IP Fax..................................................................................................................255 Maipu Confidential & Proprietary Information Page 6 of 257 MP2000-104B-AC User Manual Version 1.0 About User Manual Purpose The MP2000-104B-AC User Manual Version 1.0 provides basic information you need to get going with the router designed and developed by Maipu. The document provides right answers to your technical queries about the routers. How to Get in Touch The following sections provide information on how to obtain support for the Maipu English documentation and Maipu products. Customer Support If you have problems or questions regarding your product, please contact us by e-mail at [email protected]. You can call our Overseas Business Division over +86–28-85148850, 85148041, 85148050, 85148750, and 85148997. Documentation Support Maipu Communication Technology Co., Ltd welcomes comments and suggestions on the document usefulness. For further queries or suggestions, contact us by e-mail [email protected] or fax comments to +86-28-85148948 or 85148139. You can visit our website at http://www.maipu.com, which comprises interesting subjects such as product knowledge base, sales & support, and the Maipu news. Maipu Confidential & Proprietary Information Page 7 of 257 MP2000-104B-AC User Manual Version 1.0 MP2000-104B-AC User Manual Hardware MP2000-104B router includes five Ethernet interfaces, four FXS ports and one FXO port. The appearance and the front/back panel are: MP2000-104B Appearance MP2000-104B hardware features: Fixed configurations 5 4 1 1 Dimension (W×D×H) 245 mm × 200 mm × 65 mm Working temperature 0~45 Working humidity 10~90%. Non-condensing Power supply AC power supply: 100-240V~ 0.5A 50-60Hz Maipu Confidential & Proprietary Information 10/100M fast Ethernet ports FXS ports FXO port reset button Page 8 of 257 MP2000-104B-AC User Manual Version 1.0 MP2000-104B Front Panel The indicators from left to right: SYS Flickering: The system is started or works normally. IN USE On: At least one phone at the FXS and FXO ports is in use. Off: No voice ports are in use. Flickering for one minute: Two IOS are unavailable. WAN On: WAN channel is connected. Flickering: WAN channel is connected and can send/receive data normally. Off: WAN channel is not connected. LAN0 On: LAN0 channel is connected. Flickering: LAN0 channel is connected and can send/receive data normally. Off: LAN0 channel is not connected. LAN1 On: LAN1 channel is connected. Flickering: LAN1 channel is connected and can send/receive data normally. Off: LAN1 channel is not connected. LAN2 On: LAN2 channel is connected. Flickering: LAN21 channel is connected and can send/receive data normally. Off: LAN2 channel is not connected. LAN3 On: LAN3 channel is connected. Flickering: LAN31 channel is connected and can send/receive data normally. Off: LAN3 channel is not connected. Maipu Confidential & Proprietary Information Page 9 of 257 MP2000-104B-AC User Manual Version 1.0 MP2000-104B Back Panel The interfaces on the back panel: Port Description IN: 100-240V~ 0.5A AC power supply, input voltage range: AC 100-240V, 5060Hz LAN3~0 10/100M LAN Ethernet port 3-0 WAN 10/100M WAN Ethernet interface FXS3~0 FXS port 3-0 FXO FXO port RESET Multi-functional reset switch Installation Preparations Security Before and during MP2000-104B Router installation, please abide by following rules so as to avoid casualty or damages resulting from various accidents: • Read this manual carefully. • Place MP2000-104B Router properly to avoid serious damage downwards. • Wiring should be performed properly. Don’t weigh on any weight on power line or tread on connecting line. • Don’t plug in or out cables when power is still on. • Strongly recommend users to use UPS (Uninterrupted Power Supply) to avoid network system interruption resulting from electricity fault or to eliminate power interference. • Strongly recommend users to ensure ground connection during operation (N to G Voltage<5V), so as to avoid equipment burning. Maipu Confidential & Proprietary Information Page 10 of 257 MP2000-104B-AC User Manual Version 1.0 Environment Running Environment To ensure efficient operation and stable performance of MP2000-104B Router, the equipment room should be kept at certain temperature and humidity. It is good for circuit protection and MP2000-104B service life extension. MP2000-104B Router should run indoors. Recommended Temperature and Humidity Indoors: Temperature Permanent Condition 15°C ~30°C Relative Humidity Operating Short-term Condition Operating 0°C ~40°C Permanent Condition 40%~65% Operating Short-term Condition Operating 0%~90% Note 1. For measuring points of MP2000-104B Router indoor operation temperature and humidity, it refers to values retrieved from a point 1.5m from floor and 0.4m forehand from MP2000-104B Router. 2. Short-term operation condition refers to not exceeding 48h continuous operating time and annual 15 operating days. Anti-dust Requirement Dust threats operating safety of MP2000-104B Router. It causes static absorption to result in unsound contact of metal connector or metal joint. In low humidity indoor environment especially, it is easier to cause static absorption, which may shorten equipment service life and result in communication fault. Anti-static Requirement MP2000-104B has attached great importance to anti-static via various measures, but the circuit and the equipment may still be damaged when static is beyond tolerance. In MP2000-104B Router communication network, electrostatic induction mainly originates from outdoor high-pressure transmission line or external electric fields such as thunderbolt; internal systems such as indoor environment, flooring, equipment frame. To eliminate static damages, we should ensure: good grounding of equipment and floor; indoor dust proofing; proper temperature and humidity; wearing anti-static wrist strap in circuit board operation. Maipu Confidential & Proprietary Information Page 11 of 257 MP2000-104B-AC User Manual Version 1.0 Anti-interference Requirement For any interference source from equipment or application externally, or internally, it has influence on equipment in manner of capacitive coupling conduction , inductance coupled conduction, electromagnetic radiation conduction, common impedance conduction (including grounding system) and lead conduction (power supply line, signal line and output line etc. ) • Take effective anti-interference network measures for power supply system • Keep grounding fitting of power equipment or anti-thunder grounding fitting far away from operating site of MP2000-104B Router. • Keep it away from high-power wireless launch pad, radar launch pad and high-frequency heavy-current equipment. • Adopt electromagnet shielding method etc. if necessary. Check Equipment & Accessories After confirming that installation environment conforms to the standards, you can un-wrap the packing box. Before standard installation, you should check first MP2000-104B Router and its accessories carefully according to the purchase order. Tools & Equipment (1) Required tools Cross recessed screwdriver Glove, anti-static wrist (2) Cable in connecting cable fitting package (3) Required equipment Configuration Terminal (Common PC is acceptable.) Maipu Confidential & Proprietary Information Page 12 of 257 MP2000-104B-AC User Manual Version 1.0 System Installation Equipment Placement MP2000-104B Router can be placed directly on smooth and stable desk or other planes. Overlapping is unhallowed. Keep it away from sundries and fluid. Leave MP2000-104B Router placed alone to guarantee immediate cooling and avoid fire disaster. Interface Connection Finish equipment installation according to items mentioned above. Confirm power supply is off. Connect LAN & WAN Ethernet Interfaces MP2000-104B Router provides 4 LAN ports and 1 WAN port. They are 10/100Mbps auto-sensing Ethernet ports, providing RJ45 interface. Without indicator light, RJ45 has corresponding LINK/SYS light in the front panel. 10/100MbaseT cable (twisted pair) can be applied to connect Ethernet port and other network equipments such as routers. The tailpiece pin order of RJ45 is shown as below: The pin definition of the twisted pair interface: Maipu Confidential & Proprietary Information Page 13 of 257 MP2000-104B-AC User Manual Version 1.0 Straight-through Ethernet Cable Connection Relation Table Model: C1212-1002 RJ45 Interface Signal Direction RJ45 Interface 1 (Green) TX+ —> 1 (Green) 2 (White green) TX- —> 2 (White green) 3 (Orange) RX+ <— 3 (Orange) 6 (White Orange) RX- <— 6 (White Orange) 4 (Blue) --- --- 4 (Blue) 5 (White blue) --- --- 5 (White blue) 7 (Brown) --- --- 7 (Brown) 8 (White brown) --- --- 8 (White brown) Note: The color paring of twisted pairs in the diagram should conform to EIA/TIA 568A standard. LANx interface allows auto-sensing interleaving and straight-through, while WAN refuses self-adaptation. Connect Voice Interface MP2000-104B Router provides 4 FXS interfaces and 1 FXO interface, featuring in RJ11 interface. Namely, connect the line with RJ11 interface to corresponding port. MP2000-104B Router provides 4 voice processing channels and FXO interface occupies 1 access fixedly. Thus, FXS interface enables 3 accesses at most for calling. When the user occupies access for call waiting or call transfer, less accesses are left for FXS. When power fails, FXS0 connects to FXO port automatically. In such case, phone of FXS0 interface can get via by PSTN exterior line connected to FX0 interface, so as to ensure regular communication. Maipu Confidential & Proprietary Information Page 14 of 257 MP2000-104B-AC User Manual Version 1.0 Power Connection MP2000-104B adopts stable power system, with low requirement for input AC mains. It is recommended to use following power sockets or multifunction microcomputer power socket. Lead ground wire of power supply to ground accurately. For common buildings, the ground wires are buried during initial cable laying, but the customers should make conformation once more or take corresponding measures. Common power socket diagrams: Please make connection and turn on power according to following steps: Step 1: Please connect one end of power line to power input port in back panel of MP2000-104B Router. Step 2: Plug the other end of power line in power socket. (AC power 220V 50Hz/60Hz ) Step 3: Please check whether power light in front panel of MP2000-104B Router is on. If not, repeat step 1 and step 2. Please contact agent if power indicator light is still off. Maipu Confidential & Proprietary Information Page 15 of 257 MP2000-104B-AC User Manual Version 1.0 Immediate Configuration The chapter explains how to configure MP2000-104B Router immediately. Preparation The default IP address of MP2000-104B Router internal interface is 192.168.0.1, with 255.255.255.0 as subnet mask. ‘Admin’ is adopted both as log-in username and password for administrator, while ‘guest’ is as login username and password for guest. All defaults can be modified in ‘System Administration > Administrator Settings’. Please connect directly the administrator computer to any internal interface (LAN0-LAN3) of MP2000-104B Router via connecting line. Enter Local Connection Properties - 》 Internet Protocol (TCP/IP) and display properties page of Internet Protocol(TCP/IP). Then set computer IP address as any one within range from 192.168.0.2 to 192.168.0.254, with subnet mask as 255.255.255.0 and default Router as 192.168.0.1. Details are displayed as below: Maipu Confidential & Proprietary Information Page 16 of 257 MP2000-104B-AC User Manual Version 1.0 Test whether it is connected to MP2000-104B normally via ping command. C:\>ping 192.168.0.1 Pinging 192.168.0.1 with 32 bytes of data: Reply from 192.168.0.1: bytes=32 time<1ms TTL=255 Reply from 192.168.0.1: bytes=32 time<1ms TTL=255 The prompts mentioned above imply successful communication between computer and MP2000-104B Router. C:\>ping 192.168.0.1 Pinging 192.168.0.1 with 32 bytes of data: Request timed out. Request timed out. The prompts mentioned above indicate failed connection between computer and MP2000-104B Router. Please check first the connection of MP2000-104B Router (The interface indicator is on in normal state.), and then check IP address according to setting in step(2). Configuration Open Internet Explorer and input MP2000-104B Router administration address: HTTP://192.168.0.1 in address bar. default A log-in dialogue box pops up after MP2000-104B connection. Maipu Confidential & Proprietary Information Page 17 of 257 MP2000-104B-AC User Manual Version 1.0 Input user name and password to enter MP2000-104B Router web management page. Perform configuration according to figures below: LAN Configuration Enter LAN interface configuration from navigation menu. Generally speaking, internal IP address is the same as LAN Router address. The system default is 192.168.0.1, and subnet mask default is 255.255.255.0. In this page, the user can modify intranet IP address, subnet mask and intranet MAC address of MP2000-104B. DHCP Service Configuration In this page, the user can choose to start DHCP service or not via DHCP service configuration. When DHCP service is started, the system will calculate assignable address range for LAN. The user can modify start address and end address personally. Press Apply button to start DHCP server finally. Maipu Confidential & Proprietary Information Page 18 of 257 MP2000-104B-AC User Manual Version 1.0 WAN Accessing Configuration Guide Enter WAN Accessing Configuration Guide from navigation menu and configure parameters step by step according to guide. Generally speaking, there are 3 ways to connect to Internet for MP2000104B Router external network: • • • Fixed Address Line PPPoE Dial-up Line Ethernet Dynamic Address Line Please choose corresponding WAN Connection Type according to internet accessing type provided by ISP. Maipu Confidential & Proprietary Information Page 19 of 257 MP2000-104B-AC User Manual Version 1.0 Fill in the blanks according to internet accessing type. For fixed line type, fill in the blanks with parameters of IP address, subnet mask, default gateway and DNS server. The following interface provides the fixed address line configurations of WAN port (that is fastethernet0) and its ten sub-interfaces. For PPPoE Dial-up Line, fill in the blanks with account and password. Contact ISP to get account and password. Maipu Confidential & Proprietary Information Page 20 of 257 MP2000-104B-AC User Manual Version 1.0 If Ethernet Dynamic Address Line is selected, the device automatically sends DHCP packets to search DHCP server from the network. If there is DHCP server on the network, DHCP server distributes an IP address for the device. Select appropriate Internet access line, input the desired configuration parameters, select Next to enter the Configuration Wizard of Accessing WAN-Finish interface. If fixed address line is selected, the Finish interface is. Click Done to finish external network configuration. To confirm whether Internet access configuration is successful, click WAN Interface Information and you can see whether the WAN interface gets the IP address successfully. If the WAN interface is configured as Fixed Access Line, the WAN Interface Information interface is. Maipu Confidential & Proprietary Information Page 21 of 257 MP2000-104B-AC User Manual Version 1.0 Through the above steps, you configure the Internet connection of MP2000-104B router successfully. For more details, refer to the next chapter. Set Administrator Password Enter System Administration > Administrator Settings from navigation menu to modify administrator username and password. Input new password and click Apply. System informs the user of successful modification by a prompt. If the user enters into other pages or refreshes this page, the system requires the user to enter new password to perform normal configuration. With protection function, PC refuses to enter equipment page within 3 minutes provided the user fails to input accurate password for 3 times continuously. IE informs the user of ‘Access Denied, invalid user login so quickly, please try later’. It is strongly recommended to modify and keep the password before you use this equipment, so as to avoid unnecessary trouble. Maipu Confidential & Proprietary Information Page 22 of 257 MP2000-104B-AC User Manual Version 1.0 Voice Default Configuration For convenient use, MP2000-104B router performs default configurations for voice function in the factory, which simplifies configuration steps. The basic voice functions are already available when equipment is powered on for the first time. The following items are brief-introduction of various default configurations: • All voice ports are in ENABLE state. The port numbers of FXS0, FXS1, FXS2, FXS3, and FXS4 are 401,402,403,404. The users can query the configured port numbers via #33#. • When connecting phone exterior line to FX0 port, the user can get via PSTN (Speed up accessing by finishing dialing with # ) by previous dial-up type. If exterior line dials in, the secondary dialing tone indicates operation once more. • For IP phone dialing by gatekeeper, only gatekeeper client-side configuration is required, so steps for calling router configuration can be omitted. If the dialed number already registers to the gatekeeper, it can automatically dial according to IP network or turn to PSTN network. Without gatekeeper, it is necessary to configure call route according to peer number and address information. • For IP dialing by SIP, it is required to configure SIP protocol interface and call router. Maipu Confidential & Proprietary Information Page 23 of 257 MP2000-104B-AC User Manual Version 1.0 WEB Configuration Guide Overview The chapter explains in details the configuration information about MP2000-104B Router functions, including WAN configuration, DDNS configuration, running state monitoring, LAN configuration, Voice configuration, VPN configuration, route configuration, system management and save configuration. The user interface of WEB system is divided into two parts: navigation bar and configuration interface. The navigation menu model is based on log-in user’s authority and current running state of the device. The following interface shows an example when the user logs in MP2000-104B Router as the administrator in route mode. The left part of the interface is the navigation bar of the web management system. Click the configuration module in the navigation bar, the corresponding configuration interface is displayed at the right part of the interface. Maipu Confidential & Proprietary Information Page 24 of 257 MP2000-104B-AC User Manual Version 1.0 System Information View current system information via Navigation->Product Information. The system information includes system ID, Monitor version, IOS version, IOS file name, compiled time of ISO, WEB system version, compiled time of WEB system and current running mode of the gateway (The user can switch the mode here and take new mode into effect by restarting equipment.) Route Mode & Switch Mode The user is required to choose the running mode of the device when logging in to the homepage of the configuration page. MP2000-104B Router can work in route mode or switch mode. The device generally runs in router mode. WAN interface of the device refers to Wide Area Network interface which connects the device to WAN. The device connecting to the LAN interface has access to WAN via WAN interface. In some networking modes, it needs to choose switch mode when the user adopts WAN port as one LAN port. In switch mode, WAN port of equipment is transferred to LAN port, similar to other four LAN ports. Nevertheless, it has one more function when compared to other four LAN ports: it prints voice streams and data streams sent from this port with VLAN tags. In switch mode, we usually connect WAN interface to upper switch to form the networking mode. At the same time, we can set different VLAN tag for voice and data sent from this port. Some switches perform special operations according to different tag messages, such as flow limit. Maipu Confidential & Proprietary Information Page 25 of 257 MP2000-104B-AC User Manual Version 1.0 WAN Configuration Configuration Wizard of Accessing WAN Enter Configuration Wizard of Accessing WAN via navigation menu, and finish WAN accessing step by step according to wizard. Maipu Confidential & Proprietary Information Page 26 of 257 MP2000-104B-AC User Manual Version 1.0 WAN Accessing Line types: there are 3 main ways to connect to Internet for MP2000-104A Router: Fixed Address Line It means that fixed IP address is provided by ISP (such as China Telecom). Interface: The MP2000-104B router provides WAN port (that is fastethernet0) and the fixed line access configuration of its 10 sub interfaces. IP Address: The WAN IP address of MP2000-104B Router is provided by ISP. Subnet: The WAN subnet mask of MP2000-104B Router is provided by ISP. The user can get if from ISP. Default Gateway: It is provided by ISP. The user can get if from ISP. Preferred/Alternate DNS server: It is provided by ISP. The user can get if from ISP. Gateway checking interval: After the function is enabled, the device sends packets regularly to check normal state of WAN link. Line PRI: It realizes route forwarding by configuring management distance of default route. The combination application realizes line backup. Maipu Confidential & Proprietary Information Page 27 of 257 MP2000-104B-AC User Manual Version 1.0 PPPOE Dial-up Line This option indicates PPPOE dial-up to internet. Username: It is provided by ISP. The user can get if from ISP. Password: It is provided by ISP. The user can get if from ISP. PPPOE takes default auto dial mode. Before using this function, the user has to apply for ADSL service from Telecommunication Office, so as to get username and password for accessing WAN. To provide PC under LAN port with access to internet, the user needs to set PC address as the one in the same network segment of MP2000-104B Router intranet port. At the same time, the address of intranet should be the default gateway of PC. Ethernet Dynamic Address Line This option indicates that the user should get and configure the IP address, subnet mask, NDS and default gateway of MP2000-104B Router external network port via DHCP Client. Maipu Confidential & Proprietary Information Page 28 of 257 MP2000-104B-AC User Manual Version 1.0 WAN Interface Information The user can check current WAN configuration and connection information of MP2000-104B via this interface. DNS Server Configuration The user can set global DNS server address for gateway via this interface. QoS Service Configuration The QoS Configuration interface provides a configuration guide to help you finish the QoS service configuration of VoIP data priority transmission. Click it to enter the first configuration interface. Maipu Confidential & Proprietary Information Page 29 of 257 MP2000-104B-AC User Manual Version 1.0 Choose the interface: Select the WAN interface on which the QoS service is based on. The WAN access mode of the interface can be fixed address line or PPPoE dial-up line. Currently, only WAN port can be selected. VOIP data first QoS: Enable/disable VoIP data first transmission function. By default, it is disabled. Click Next to enter the following configuration interface or select Exit to return to the homepage. The above bandwidth settings interface provides two configuration items: Max output bandwidth: It is the maximum output bandwidth of the interface. The actual valid value is the multiple of 480. Therefore, after configuration, you can find that the actual valid value becomes the multiple of 480 smaller than the input value. For example, the input is 48001 and the value becomes 48000 after configuration. The maximum output bandwidth should not be configured too small. Otherwise, the communication speed becomes too low, which affects the normal use. It is recommended that the maximum output bandwidth is no less than 524288bps. Burst transmission bytes: It is the burst transmitted bytes allowed within 1/60s. The burst transmitted bytes should be larger than or equal to 1/480 of the maximum output bandwidth. You can de-select the Configure Bandwidth Management Parameters check box to cancel or not configure the bandwidth management items. The configuration can be used only after enabling VoIP data first QoS. Click Back to return to the previous configuration interface; click Exit to cancel all the configurations and return to the web homepage; or click Next to enter the following configuration interface. Maipu Confidential & Proprietary Information Page 30 of 257 MP2000-104B-AC User Manual Version 1.0 On the interface, divide the sub interface of the WAN port to two VLANs. One sub interface is used to transmit VoIP data and bind VoIP protocol (such as SIP protocol); the other is used to transmit the user data except for voice data. Sub-interface of VoIP data: It is used to transmit VoIP data and bind VoIP protocol. Sub-interface of user data: It is used to transmit the user data except voice data. VLAN ID: They are the IDs of the VLANs to which the voice data interface and user data interface are divided. You can de-select Divide VoIP data and user data with VLAN check box to cancel the VLAN division of the VoIP and user data sub interfaces. Click Back to return to the previous configuration interface; click Exit to cancel all the configurations and return to the web homepage; or click Next to enter the following configuration interface. Maipu Confidential & Proprietary Information Page 31 of 257 MP2000-104B-AC User Manual Version 1.0 Select the Use bridge between LAN and WAN check box to choose to use bridge technology between LAN port and WAN port. Otherwise, do not use the bridge technology. If the sub interfaces are divided, the LAN port is connected to the data sub interface. Click Next to enter the Finished interface; click Back to return to the previous interface; or click Exit to drop all operations. The above figure is Finished interface, which displays the configuration data of the performed operations. Confirm that the configurations comply with your requirements and then click Done to validate all the configurations. If you want to make some changes, click Previous to return to the previous interfaces to modify the configurations. Or click Exit to drop all the configurations. If performing sub interface bridging, WAN address needs to be configured on the VoIP sub interface and the VoIP protocol stack needs to be configured on the VoIP sub interface. If you need to delete f0 and sw0 addresses, perform the deletions in shell. Before the deletion, confirm that you can log in to the device via other address. Maipu Confidential & Proprietary Information Page 32 of 257 MP2000-104B-AC User Manual Version 1.0 VLAN Configuration VLAN configuration interface in WAN: Click New to create a new interface and VLAN configuration information. The configuration interface is: Vlan-ID: It is the ID of a VLAN. Configure the interface: The sub interface receiving the data of the above defined VLAN Local VLAN: If the data received by a physical interface does not have tag, give it to the sub interface configured with native (local VLAN) to process. icon after an Click Set to create a configuration. You can click the existing VLAN to enter the VLAN configuration interface for editing the to delete a configuration. configuration. Click DDNS Configuration DDNS is short for Dynamic Domain Name Server. DDNS maps the dynamic IP address of the user to a fixed domain name analysis server. Every time the user connects to the network, the client program sends the dynamic IP address of the host to the server program on the service supplier’s host via information. The server program is responsible for providing DNS service and realizing dynamic domain name analysis. Click the DDNS Settings node on the navigation. If DDNS modules are not uploaded to the device, the system prompts whether to upload DDNS modules via a dialog box: Maipu Confidential & Proprietary Information Page 33 of 257 MP2000-104B-AC User Manual Version 1.0 Click OK to upload DDNS modules. After uploading successfully, the DDNS configurations can be used normally; if you click Cancel, the DDNS modules are not uploaded, but every time you click the DDNS Settings node on the navigation, the system prompts whether to upload DDNS modules via a dialog box until the DDNS modules are uploaded successfully. After confirming that the DDNS modules are uploaded successfully, click the DDNS Settings link on the navigation to enter the following configuration interface. If you want to create a DDNS instance, click Add to display following configuration interface. Input the related configuration information, and click Apply to add a DDNS instance successfully. Maipu Confidential & Proprietary Information Page 34 of 257 MP2000-104B-AC User Manual Version 1.0 Running State Monitoring You can check current system running state via running state monitoring. System Running State & Flow The system running state includes CPU utilization, memory state, configurable NAT connection number, WAN interface flow, PC network state of LAN, and alarm threshold configuration. When the running value of one system exceeds the alarm threshold, this value is shown in red. At the same time, the browser bar informs the user of flashing warning prompt and warning tone. As shown in the following figure, the system refreshes monitoring information per 30 seconds automatically. The detailed information about each monitoring option is shown as below: CPU Utilization Maipu Confidential & Proprietary Information Page 35 of 257 MP2000-104B-AC User Manual Version 1.0 Tick Enable CPU utilization monitor and you can check CPU utilizations in recent 5 seconds, 1 minute and 5 minutes. When CPU monitoring is running, the task tCheckCPU continues (with 2 second default interval) to collect CPU data, occupying certain CPU space. Thus, it is better to keep it off unless the user aims to check cpu utilization of each task. This function is disabled by default. Memory Running State You can check memory running state on this interface, including current memory utilization, current used memory, current free memory, and total memory. NAT connection number On this interface, you can check current NAT application information, including configurable NAT and used NAT. For LAN with N equipments, NAT connection number built in router should be less than 20N. If it exceeds NAT connection number for a long time, the system is in abnormal state. The possible explanation is that PC is infected with computer virus or Trojan program. WAN Interface Flow On this interface, you can check current WAN interface flow information, including rate of receiving packet, rate of receiving byte, rate of sending packet, rate of sending byte and total rate. Maipu Confidential & Proprietary Information Page 36 of 257 MP2000-104B-AC User Manual Version 1.0 LAN PC Network Running State On this interface, you can check current PC network running state in LAN, including PC name, IP address, rate of sending packet, rate of sending byte, rate of receiving packet, rate of receiving byte and total rate, and TCP/UDP/other sessions connections. At the same time, the user can choose Sort by total connections and Sort by total rate. Alarm Threshold Value configuration: On this interface, you can perform alarm threshold configuration for monitoring equipment running. The system warms the user when current performance parameters exceed the thresholds. Utilization: The alarm threshold of current memory utilization rate. Range: (1%-100%), Default: 90%. Number of NAT used currently: the threshold of current used NATs, Range :( 1-53000), Default: 4000 The flow of WAN: The threshold of current WAN flow. It is 2000kbps by default. The PC connections (TCP/UDP/other session) total number: the threshold of the current PC connections (TCP/UDP/other session), it is 1000 by default. Maipu Confidential & Proprietary Information Page 37 of 257 MP2000-104B-AC User Manual Version 1.0 PC Connections & Flow Monitor On this interface, you can monitor current accessed PC network state. Please refer to next section for parameter limit of PC. Connections Limit of Single PC IP address: fixed IP address Subnet Mask: fixed subnet mask. Type of Max Connections Limit: it includes Default limit, Custom limit and Not limit. Max Connections: In not limited mode, the max connections should be input. The value range is 100-20000. Maipu Confidential & Proprietary Information Page 38 of 257 MP2000-104B-AC User Manual Version 1.0 Enable max connections limit of single PC: The max connections limit of single PC cannot take effect unless the user enables this option. Default connections limit of single PC: The default connections of a single PC. Flow Limit of Single PC Single PC’s receiving flow limit: If this option is configured, the receiving flow of all the PCs on the device is controlled. Single PC’s sending flow limit: If this option is configured, the sending flow of all the PCs on the device is controlled. The Single PC’s flow limit in the above figure lists the flow limit configuration information of a specified PC. IP Address: The IP address of the host to be configured with flow limit Sending Flow Limit: sending flow limit of single PC Receiving Flow Limit: receiving flow limit of single PC Note Single PC receiving flow limit and Single PC sending flow limit are configured globally. They are for all PCs connected to the device. If the single PC flow is not configured for a specified PC, use the global configuration by default. Otherwise, adopt the specified configuration first. Maipu Confidential & Proprietary Information Page 39 of 257 MP2000-104B-AC User Manual Version 1.0 LAN Configuration LAN Interface Configuration The section explains IP address configuration of intranet interface. Generally speaking, IP address of intranet should be the gateway address of LAN. The default value is 192.168.0.1. On this interface, you can check configured IP address, mask and MAC address of intranet interface. IP Address: The IP address of intranet interface (it is the gateway address of LAN. The default value is 192.168.0.1). You can modify it according to your requirement. Then the user can log in only with new IP address. Subnet Mask: Tt is 255.255.255.0 by default. MAC Address: The MAC address of the intranet interface. If it is null, it means to recover the default value. The user can log in only with new IP address after modifying local IP address. The default gateway addresses of all computers in LAN should be the new IP address. Maipu Confidential & Proprietary Information Page 40 of 257 MP2000-104B-AC User Manual Version 1.0 Voice Data Separation Configuration This function takes effect only in switch mode. It is used to: print voice data and user data with two different VLAN tags for programming upper network conveniently. Its setting interface is shown as below: User data maker: It is used to mark user data with Arabic numbers. The value range is 1-4094. Voice data marker: It is used to mark voice data with Arabic numbers. The value range is 1-4094. Once this function is enabled, voice data and user data flow sent by WAN interface are printed with different VLAN tags. It takes effect in some networking mode In this network, VLAN ID 2 is added to VoIP data on MP2000-104B router, while VLAN ID 3 is added to user data. For the switch that MP2000-104B router is connected to, port 1 belongs to VLAN3 and 2, port 2 to VLAN2, and port 3 to VLAN 3. The voice data from MP2000-104B is only transmitted to port 2, while user data is only transmitted to port 3. In such case, voice data and user data have separated accesses to network. It should be in switch mode. Once voice data separation configuration takes effect, PC has access to the gateway directly via LAN interface, but PC should be voice VLAN for WAN interface accessing. MP2000-104B Router supports 16 VLAN settings, with VLAN ID range from 1-4094. If low four digits of two VLAN IDs are the same, the system regards it as ID conflict. Maipu Confidential & Proprietary Information Page 41 of 257 MP2000-104B-AC User Manual Version 1.0 VLAN Configuration MP2000-104B router can perform VLAN configuration only in route mode. The VLAN configuration interface is: By default, the port Switchethernet0 is bound to VLAN1, so MP2000-104B has the VLAN with ID as 1 at first. VLAN 1 can be edited, but cannot be deleted. Click Add to create a new VLAN. The configuration interface is: Vlan-ID: It is the ID of a VLAN. Vlan member: The VLAN port member in a VLAN. For MP2000-104B, the range of VLAN member is LAN0-LAN3. When adding the port members of a VLAN, you can select whether the port is with tag. The purpose of adding tag is to carry VLAN information in the packets transmitted on the port, which indicates to which VLAN data frames belong to determine the attributes of the data frames. Description: The description information of the VLAN, indicating the function or meaning of the VLAN. icon after After clicking Add, you can create a VLAN. You can click the an existing VLAN to enter the VLAN configuration interface to edit the VLAN information. Because of the system limitations, the device can be configured with only 16 VLANs. The VLAN ID conflict may appear when you configure the VLAN ID. Here, please select other VLAN ID. Maipu Confidential & Proprietary Information Page 42 of 257 MP2000-104B-AC User Manual Version 1.0 Port Mirror The section explains the port mirror configuration in two aspects: mirror port and mirrored port. When you monitor input and output data of some ports by some monitoring equipment or software, these ports monitored are called mirrored ports, while the ports connect to monitoring equipment are called mirror ports. Any port can be adopted as mirror port, but only one mirror port is allowed. On the other hand, the user can set one mirrored port or several mirrored ports. A port cannot be mirror port and mirrored port at the same time. The input and output data of mirrored port can be sent to mirror port, so as to realize the function that equipments in mirror port can monitor input and output data of mirrored port. Mirror Port: port connected to monitoring equipment Mirrored Port: port monitored by monitoring equipment Input: tick it to monitor input data of mirrored port Output: tick it to monitor output data of mirrored port Check All/Cancel: tick it to perform monitoring or cancel monitoring of input and output data of mirrored port. When port mirror function is disabled, please click Enable Port Mirror displayed on the interface to start port mirror function; when port mirror function is enabled, click Disable Port Mirror to cancel port mirror function. When the user performs configuration for some mirror port and its corresponding mirrored port, the relative configuration detail is displayed in this page. In addition, the configured mirrored port will be displayed by ticking original mirror port. When some port is adopted as mirror port, it is disabled in mirrored port configuration. The terms mentioned above are subject to router mode. Maipu Confidential & Proprietary Information Page 43 of 257 MP2000-104B-AC User Manual Version 1.0 Switch Port Configuration The section explains port configuration and port configuration status. In route mode: Port: The device port in switch mode, such as LAN0. Connected: ‘Connected’ indicates that port is in normal running state; ‘Disconnected’ indicates that port is not in normal running state. Not in normal running state refers to temporary abnormality (fail to connect to port or there is something wrong with line). Once all requirements are met (successful connection and no fault), the state is ‘Connected’. With constant refresh function, the system displays ‘Disconnected’ when the user plugs off lines. Contrarily, ‘Connected’ is displayed when lines are plugged in normal state (after troubleshooting). Status: Enable refers to application of corresponding port; Disable refers to unused status of port. It is enabled by default. Priority: Range: 0-7; default:0 PVID: VLAN number of certain VLAN port. It is 1 by default. Duplex: Duplex status of port can be auto-negotiate, full-duplex or halfduplex. It is auto-negotiate by default. Rate (Mbps): port rate. It can be 10, 100 or auto-negotiate. It is autonegotiate by default. Storm Control: Suppression function of port broadcast storm. It can be high, low, highest, lowest or uncontrolled. It is lowest by default. Low allows storm by 20%, lowest by 10%, high by 30% and highest by 40%. Edit: perform configuration for port by clicking port. Maipu Confidential & Proprietary Information icon of corresponding Page 44 of 257 MP2000-104B-AC User Manual Version 1.0 Set PVID correctly according to network VLAN program, or result in failed accessing to equipment after modification. Click Restore Default to restore port value to factory set value. In switch mode: Edit port: Voice Configuration MP2000-104B router integrates VoIP function and can provide complete VoIP services for users. Protocol Configuration H323 Protocol Configuration Gateway can carry out only one protocol in one interface: H.323 protocol or SIP protocol. When the user aims to replace H.323 protocol with SIP protocol for configured interface, he has to delete all H.323 protocol configurations according to following steps: first, switch H.323 protocol to blank in Protocol bar. This step cancels all H.323 protocol settings. Then switch blank to SIP protocol. In SIP protocol configuration page, choose a binding interface, or the configuration will not take effect. After filling all the other blanks, click Apply to switch to SIP protocol successfully. The user can follow the similar steps to switch SIP protocol to H323 protocol. Maipu Confidential & Proprietary Information Page 45 of 257 MP2000-104B-AC User Manual Version 1.0 The following figure takes H.323 protocol configuration as an example: Binding interface: Define this interface as H323 protocol interface of MP2000-104B. Generally speaking, dialer0 interface should be adopted when connecting to internet via PPPoE protocol. When start VPN voice data protection function, select the interface according to source address of data streams in VPN configuration. (Mandatory configuration; Adopt this interface reasonably according to VOIP application environment even without gatekeeper) H323-ID: It is used by the gatekeeper to identify the gateway interface (optional). Password: The authentication password between gateway and gatekeeper. Fill in this option according to username and password authorized by gatekeeper when authentication between gateway and gatekeeper is necessary. (Optional) Keep-alive time: Interval of sending keep-alive packets from gateway to gatekeeper. Range: <30~3600> seconds, Default: 60s Maipu Confidential & Proprietary Information Page 46 of 257 MP2000-104B-AC User Manual Version 1.0 Number Transition Rule: During gatekeeper calling, the called number is switched according to selected number transition rule. Please refer to Voice Configuration — — 〉 Number Transition Configuration (Optional configuration is used for irregular voice number design. Leave it unused, or result in failed calling. For application, please make confirmation about it with Tech Service Department of Maipu Communication Co., Ltd) PSTN Prefix of gateway: Register this prefix to gatekeeper, and then gatekeeper can route matched call to this gateway. You can configure two prefixes. They comprise numbers, * and # and are separated by ‘,’ (Optional configuration. If the gateway doesn’t provide other gateways with PSTN, this option should not be configured.) Local-terminal-type: The type of H.323 terminal. It reflects the terminal performance. Priority definitions of H.323 terminal type from highest level to grass-root are: MCU, gatekeeper, Router, terminal, MC+MP, MC unit and Non-MC&Non-MP unit (optional configuration) H.225 signal port: The signal address port number of local H.225 call. The default value is 1720. Master/Backup Keeper: fill in blanks with master gatekeeper IP, domain name or * (* indicates multicast applied in gatekeeper seeking.) (Optional configuration; Leave it unused if the user doesn’t adopt gatekeeper network composite. Initiate IP call via VOIP call port of router.) GK-ID: It refers to the domain where the gatekeeper is located (necessary information for gatekeeper registration. Get it from gatekeeper administrator properly). You can input -, which means to register to the first domain of the gatekeeper by default. Port: The port discovering the gatekeeper. The default value is 1718. Register to Gatekeeper: Start registering to realize keeper calling function. After registered, gatekeeper performs function management on all terminals in H.323 network system, such as bandwidth management, load balancing, authentication management, shift between active and passive. The letters in yellow on the right of option indicates whether Router registers to gatekeeper successfully. Click to delete this gatekeeper configuration Click Advanced configuration to Configuration of H.323 Protocol: Maipu Confidential & Proprietary Information enter the interface of Advanced Page 47 of 257 MP2000-104B-AC User Manual Version 1.0 Call mode: select H323 call mode, fast or slow. Authentication Type of H323: the authentication type of H323 includes h235CAT, h235AuthProcedure1, h235AuthSimpleMD5 and Maipu private authentication. It is disabled by default. Combine equipment authentication setting with gatekeeper authentication function to improve safety of H323 network, so as to realize gatekeeper’s authorization and limit on Router equipment. It can enhance gatekeeper’s management of each H323 terminal across H323 network. Moreover, the user can configure SNTP server to endow all equipment involved in authorization and authentication with unified network time. Time stamp authentication is an essential link in authentication. Bear capability: select one value for bear capability. It is used to enhance compatibility with equipments provided by other manufacturers. Call Divert Mode: there are two divert mode: one is to mix call divert mode in 450 messages, and the other is to take call divert mode in facility messages. The latter is defined by default. DTMF Mode: there are two signal sending modes: H.245-string- DTMF signals are transmitted via H245 connection; Q931-keypad-DTMF signals are transmitted via H225 connection. Adopt H245-string indicates DTMF signal sent by H245 connection. H245string(don’t judge capability set of opposite terminal ) allows DTMF signal sending in H245 connection on the basis of this configuration even if terminal capability set of opposite terminal excludes H245-string capability. H245-string (judge capability set of opposite terminal) allows DTMF signal sending in H245 connection on the basis of this configuration unless terminal capability set of opposite terminal excludes H245-string capability. Maipu Confidential & Proprietary Information Page 48 of 257 MP2000-104B-AC User Manual Version 1.0 GRQ Interval: It refers to GRQ sending interval when Router registers to gatekeeper. Start H245 Tunnel Mode: Choose to build calling via tunnel mode or not. It refers to envelop H245 message in H225 message and then send it. It is always applied in fast connection or faxing. Send ARQ to Gatekeeper When Receive IP Call: Send ARQ message to gatekeeper or not when Router is called. Send BRQ to Gatekeeper: send BRQ to gatekeeper or not provided encoding mode has changed. Start it when use it with gatekeeper bandwidth management. SIP Protocol Configuration To switch to SIP protocol, click Back to enter the Protocol Config interface and choose Protocol as null. Click OK to stop the current H323 protocol, and then select SIP to display SIP protocol configuration interface. Binding Interface: it is specified as SIP protocol running interface of MP2000-104B router (optional configuration. Adopt proper interface according to VOIP application environment). Register IP Address: IP Address of SIP server (optional). Maipu Confidential & Proprietary Information Page 49 of 257 MP2000-104B-AC User Manual Version 1.0 Register Domain-name: Domain name of SIP server (optional. Ensure that this domain name can be analyzed in DNS server configured. ) Register Expires Time: Range: <200 ~ 3600> second, Default: 3600 (optional) Username/Password: username/password for SIP server log-in (optional. They are provided by SIP server administrator when SIP server performs authentication for SIP terminal.) SIP Proxy IP Address: SIP signals of equipment are transmitted via this server. Proxy Domain-name: domain name of proxy server (optional. Ensure that this domain name can be analyzed in DNS server configured.) Proxy server port: The port of the remote proxy server. The default value is 5060. Register server port: The port of the remote register server. The default value is 5060. It can use the same port with the proxy server. Local port: The local port used by the SIP protocol. Retry-invite times: The times of retransmitting INVITE messages when the peer end is unreachable after initiating a call. Start Register to SIP Server: Tick check box to start register to SIP server. The phone number registered by local gateway is registered to SIP server. Click Current Status of Register to display register number of equipment in SIP server. See details in the figure below: Maipu Confidential & Proprietary Information Page 50 of 257 MP2000-104B-AC User Manual Version 1.0 Click SIP local-area config to enter the interface of configuring SIP local domain. When using STUN traversing NAT, the configuration needs to realize intranet communication. The local domain matching rule: In fact, the local domain refers to the local segment number, such as 128.255.16.0. The remote IP address (such as 128.255.16.90) “multiplies” the subnet mask (such as 255.255.252.0) by bit. If the result is equal to the local domain 128.255.16.0, regard that the remote IP address belongs to the local domain. When dialing the phone of the gateway where the IP is located via SIP, do not use STUN. Click Advanced configuration to enter the configuration interface of SIP advanced options. Maipu Confidential & Proprietary Information Page 51 of 257 MP2000-104B-AC User Manual Version 1.0 Advanced Configuration DTMF sending mode: Use the INFO mode of SIP protocol to send DTMF messages; RTP-NTE mode adopts the RTP packets complying with RFC2833 protocol to send DTMP massages. You can Set dynamic payload type, which is 101 by default. The dynamic payload type cannot be the same as the payload type of T38 RTP fax mode. NAT Traversing Configuration Enable STUN client: Tick the Enable STUN client check box. Otherwise, it is disabled. Enabling STUN client requires selecting the interface bound by STUN protocol from the Current binding interface drop-down list. Primary STUN server status: The current running status of primary STUN server, including Active and Blocked. Primary STUN server domain name: The domain name of primary STUN server. Primary STUN server IP address: The IP address of primary STUN server. Primary STUN server port: The port of primary STUN server. Backup STUN server status: The current running status of the standby STUN server, including Active and Blocked. Backup STUN server domain name: The domain name of standby STUN server. Backup STUN server IP address: The IP address of standby STUN server. Backup STUN server port: The port of standby STUN server. NAT type auto-detect period: The period of STUN client automatically detecting NAT type. NAT keep alive time: Mapping updating time. Set time of the local updating the public network mapping address type. Current type of NAT: The current NAT type. You can use the detect NAT type button to detect NAT type manually. When using the detect NAT type button to detect NAT type manually, ensure that the previous mapping on NAT is deleted. Otherwise, the detect result may be wrong. If NAT type auto-detect period is smaller than the timeout of NAT mapping on NAT, the detect type may be wrong, but do not affect the function of DUP packets traversing NAT. Maipu Confidential & Proprietary Information Page 52 of 257 MP2000-104B-AC User Manual Version 1.0 Voice Port Configuration On this interface, you can check or edit the numbers and port states configured on all voice ports. Click to add phone number for a specified port. Click Edit to modify phone number or click Delete to delete phone number. Click Call route config to enter the call route configuration interface. The interface for adding and editing port phone number is: Edit number in form of wildcard X. X stands for any number, single digit or multi-digit, e.g.: edit FXO number as 9xxxxxxxx, which indicates 9-digit number whose name started with 9 perform calling via FXO interface. Please refer to POST dial-up port page in call router configuration for further information about number strategies, number modification, gatekeeper register, encoding mode etc. to display Click configurations of the port Maipu Confidential & Proprietary Information physical features and other advanced Page 53 of 257 MP2000-104B-AC User Manual Version 1.0 Port: select one voice port to be configured. Disable: Disable the port. DSP input volume and DSP output volume: set DSP volume within range from -10db to 10db, with default as 0 db. The negative value stands for decrease and positive value stands for increase. Max Jitter Buffer delay: set max buffer time for buffer area. (Default: 150 ms) Min Jitter Buffer delay: set minbuffer time for buffer area. (Default: 35 ms) In unstable network state, it may result in packet drop or voice packet sending low and fast, or voice bouncing. In such case, the user has to set JitterBuffer parameters of DSP to eliminate bouncing by buffer. There are two parameters, unit: ms. One parameter is used to set max buffer time of buffer area, and the other is used to define mode: DSP will send the voice data to corresponding receiver or other play terminal via relevant interface only if buffer time equals to setting time. Payload: each coding voice packet payload is subject to a standard basically. Based on this standard packet “unit”,’ payload=n’ indicates that current packet capacity equals to n*unit. Fill the blank with certain value to adjust voice packet flow in network. The larger payload you set, the fewer voice packets exist in network. The standard unit is 1 by default, and the user can modify it. VAD: Configure VAD function. Disable: disable VAD function; SID mode: send SID; PT13 mode: send PT13 (only applicable to g711 code). Note: Disable VAD in faxing mode, or it may affect fax. Reverse Polarity: Enable reverse-polarity. FXS port sends reverse polarity signals to the peer terminal line after off-hook by the called end. Maipu Confidential & Proprietary Information Page 54 of 257 MP2000-104B-AC User Manual Version 1.0 Display Calling Number: decide whether send fsk calling number signals to called phone via FXS access. Enable direct outward dial: Whether to Enable function of dialing external line directly. This function can be configured only when the corresponding port is enabled. Direct outward dial delay: The interval from picking up phone to dialing, which is detected from FXS Hotline Dial Time: if fxs port phone user always dials one called number(e.g.: reception), he can set this number as hotline dial number in fxs port, and set hotline dial wait time(e.g.:2 seconds).Then it performs automatic dialing 2-second later after off-hook by fxs port user. It simplifies repeated dialing. If the user wants to dial other numbers, he can dial it before wait time. Otherwise, system will automatically dial hotline number as the user sets. The range of wait time is: 2-5 seconds. Hotline Dial Number: please refer to Hotline Dial Time for setting hotline dial number. The following figure illustrates ‘Advanced configurations of voice port’. Maipu Confidential & Proprietary Information Page 55 of 257 MP2000-104B-AC User Manual Version 1.0 Delay Dial String: start with umbers and end with commas; each commas represents signal sending interval of one character. When the user sets delay dial string as 17909, , , , , , , , for example, 1790902888888888 The gateway sends first 17909 to PSTN and then sends 02888888888 a while later. It is used to transfer second dial to direct dial. Delay ring: set delay ring time. Range: 0-15, unit: second, default: 0 s. Delay Dial Tone: set time of wait dial tone. Range: 20-120 ticks, default: 30. Type of Dial Tone: configure type of dial tone. The options are 450HZ (default), 600HZ, and 500HZ. DTMF silent: set interval of dial time. Range:4-100, unit:20 ms, default: 5 ms. DTMF Loud: set dtmf-lounds. Range: 4-100, unit: 20 ms, default:5 ms. Connection-plar: set phone number of connection-plar in FXO port. The call from FXO connects to connection-plar directly, so as to simplify second dial. The connection-plar refers to corresponding number in FXS port of this Router, or refers to IVR accessing number of gateway, or other numbers reached by gateway. The number dialing from FXO port equals to connection-plar dialing. With IVR configured, FXO will be connected to IVR number automatically and directly. For FXO number dialing, perform dial for the second time after IVR tone. Bound number or voice port: Set caller number bound to the FXO port or a FXS port. When FXO port bounded is unavailable, calling fails, not seeking for other routers. When FXO is bounded with caller number, other numbers have no access to FXO port for calling. The caller number bounded here refers to the one with wildcard x. Support FXOFXS linkage: When the number connected to the FXO port is one number of the FXS port on the gateway and dials in from FXO port, the FXS port is connected. If the FXS port is making a call with other user and there is a user dialing in from FXO port, the call cannot be forwarded to the corresponding FXS port, so the call hears busy tone as long as being connected. This makes the caller pay a call by mistake. To solve the problem, when the FXS port picks up the phone, control the FXO port to pick up the phone, which make the external line cannot dial in from FXO port, but other user can dial out from the FXO port. Reverse Polarity: Enable reverse-polarity function. Then FXO port checks reverse-polarity signals sent by peer FXS port. If FXO exterior line is not equipped with reverse-polarity function and gateway initiates this function at the same time, it results in 1 minute disconnection. For other configurations that are same with that of FXS port, pleases refer to former parts All gain configuration parameters are divided into negative ones and positive ones by ODB. The volume is lower with more negative parameters, and vice versa. Please adjust DSP gain cautiously or it causes echo. Adjust input gain for high or low volume in the peer terminal, and adjust output gain for high or low volume of local call. Maipu Confidential & Proprietary Information Page 56 of 257 MP2000-104B-AC User Manual Version 1.0 Number Transform Configuration Number transform is to transform caller number or called number according to rules set previously. The called gateway performs caller identification according to transformed caller number or performs routing according to transformed called number. It is convenient for number programming that dial number can be different from calling number. There are two transform types: Caller Number Transform: transform caller number according to rules set previously. Called Number Transform: transform called number according to rules set previously. It doesn’t take effect if number transform rule of gateway is not applied to some dial port. Namely, it takes effect only when number transform rule is bounded with dial port. Number transform configuration interface contains two parts: number transform list and number transform configuration: Click Add to display interface of number transform configuration: There are two ways for number transform configuration: 1. single number configuration by clicking Add; 2. configuration in batch. As the figure illustrates above, there are three options for single number configuration: transform rule index, number before transform and number after transform. Maipu Confidential & Proprietary Information Page 57 of 257 MP2000-104B-AC User Manual Version 1.0 Fill the blanks according to range implied in bracket and then click Apply to add new number transform rule in Number Transform List. The user can cancel the new transform rule by clicking Cancel, or delete the wrong configuration rule directly by clicking Delete on the right of list. To configure rules in batch, tick Configure rule in batch to display interface of number transform configuration: Edit relevant configuration options according to suggestive range and finish it by clicking Apply. Then the new configure rules are added to list. The user can cancel the new transform rules by clicking Cancel, or delete the wrong configuration rules directly by clicking Delete. For example, number transform and call router are configured as the figure shown below: Number Transform Configuration: Call Route Configuration: It means the call route with dialing end as 2. When the caller number or called number begins with 9, replace the first number ‘9’ by ‘028’ .If caller number is 945678 and called number is 912345, they are transformed to 02845678 and 02812345. Maipu Confidential & Proprietary Information Page 58 of 257 MP2000-104B-AC User Manual Version 1.0 Call Route Configuration On this interface, the user can edit dial route configuration. Click VOIP Config or POTS Config to perform the switch between VoIP config and POTS config. On this interface, the user can check, edit, delete VOIP configuration and POTS configuration. VOIP dial port configuration is in accordance with remote IP phone or gateway via IP network. POST dial port is used to configure local communication. Re-registration is required provide the user adds or modifies phone number(Re-register gatekeeper for using H323 protocol or re-register SIP server for using SIP protocol).It is recommended to leave phone unused since communication should be interrupted during registration. The symbol of completing dialing: After the user inputs the phone number, input the ending symbol to end the input. At the same time, the gateway uses the received number to discover call quickly. You can configured * or # as the ending symbol and you can keep it null. Timeout value of receiving phone number: The timeout between two dials. If the user does not dial within the timeout, the gateway automatically ends the receiving number and uses the received number to initiate a call. The default value is 2s. Maipu Confidential & Proprietary Information Page 59 of 257 MP2000-104B-AC User Manual Version 1.0 Perform VOIP configuration by click Add in VOIP Config. Index: series number of this dial rule. Phone Number: configure the called number in peer terminal. Target: peer gateway: configure IP address of peer gateway (address of called gateway); gatekeeper: target address is that of gateway; SIP server: target address is that of SIP server. Route Priority: configuration priority (1-20). Priority decreases as the digit increase.Default:10. The gateway is disabled when digit is 20. Encode: configure voice encode type. Called: Apply number transform rule to called number. Calling: Apply number transform rule to calling number. Fax: configure the fax function of the dial-peer. If global fax protocol configuration comes into conflict with fax protocol of dial-peer, give priority to fax protocol configuration of dial-peer. When global fax capability is configured as T.38: When fax capability of dial-peer is configured as T.38, current fax protocol is T.38. When fax capability of dial-peer is configured disabled, current fax capability is disabled. When fax capability of dial-peer is configured as transparent transmission, current fax protocol is transparent transmission. When there is no fax capability configured for dial-peer, current fax protocol is T.38. Maipu Confidential & Proprietary Information Page 60 of 257 MP2000-104B-AC User Manual Version 1.0 When global fax capability has not been configured: When fax capability of dial-peer is configured as T.38, current fax protocol is T.38. When fax capability of dial-peer is configured disabled, current fax capability is disabled. When fax capability of dial-peer is configured as transparent transmission, current fax protocol is transparent transmission. When there is no fax capability configured for dial-peer, current fax protocol has no fax capability. Note: When fax capability of dial-peer is disabled and communication code type is G.711, fax data transmission can be performed via voice access. Backup Switch: configure IPSWICH switch function to realize switch of IPTO-PSTN or IP-TO-IP and enable re-routing from backup dial-peer when current IP link is faulty. IP: switch to another IP dial-peer of different configuration and re-route with original called number. Prefix: switch to another IP dial-peer of different configuration and re-router with new called number which is created by adding prefix to the original called number. PSTN: switch to PSTN dial-peer of different configuration (including POTS of FXO port) and re-route with original called number. Prefix: switch to PSTN dial-peer of different configuration (including POTS of FXO port) and re-router with new called number which is created by adding prefix to the original called number. Perform POTS configuration by clicking Add in POTS Configuration. Index: digit of this dial rule Maipu Confidential & Proprietary Information Page 61 of 257 MP2000-104B-AC User Manual Version 1.0 Phone Number: FXS-interface oriented refers to configuration of phone number connected to FXS; FXO-interface oriented refers to configuration of dial prefix from FXO to PSTN. Start voice port: configure corresponding start voice port of POST port. End voice port: configure corresponding end voice port of POST port. Number increase: If the item is ticked, the phone numbers from the start voice port to the end voice port increase by 1 with the above phone number as the start phone number. Route priority: configure priority (1-20). Priority decreases as the digit increase. Default: 10. Router is disabled when digit is 20. Encode: configure voice encode type. Called: Apply index of transform rule to called number. Calling: Apply number transform to calling number. Username: username for connecting to SIP server when use SIP protocol. Password: password for connecting to SIP server when use SIP protocol. Register: register to gatekeeper or not when use H323 protocol. Maipu Confidential & Proprietary Information Page 62 of 257 MP2000-104B-AC User Manual Version 1.0 Black-white List Configuration First, see the model of black-white list: The rules are shown below as arrows indicate: Numbers in Calling Black List are feasible to call numbers in Called White List. Numbers in Calling White List are feasible to call any called numbers. Numbers in Calling Undefined is recognized as White List Numbers. Black-white List Configuration interface is shown as below: it is the configured black-white list bar with four buttons: Add, Index Conversion, Clear, and Refresh. Click Add to add new black-white list configuration. Edit it as figure shown below: Maipu Confidential & Proprietary Information Page 63 of 257 MP2000-104B-AC User Manual Version 1.0 Index: The index of black-white list. Range: 0-49 Number to be configured: number to be added in black-white list Increment: The range of increment: 0-100 Add: add number to be configured to black list or white list (it can be the one with wildcard X.). Click Index Conversion to change current index. The system shows you the figure as below: Current Index: Source index of Black-white list index conversion. Destination Index: Destination index of Black-white list index conversion. Click Clear to clear current black-white list configuration. For example: Configuration information of black-white list: If calling number is 001 (in calling black list), it can be used to call called number 004(in called white list) only; if calling number is 002(in calling white list), it can be used to call any number; if calling number is 005(undefined in black-white list), it is recognized as white list number that can call any called number. For called number not to be restrained, it is suggested that it should be added to called white list by default (namely, add called number xx. to white list), or number in calling black list cannot call undefined called number. The rule validity sequence of the black-white list is subjective to index, so calling number is matched with small index rule by priority. When the user matches one rule, don’t try to match other rules. The user can adjust index order via index conversion. Under current sequence, the called number is 003 if calling number is 001. The rules with index as 1 are all valid in black-white list inquiry. At this time, call building is disabled for calling number and called number are all contained in black list. Make index conversion: Maipu Confidential & Proprietary Information Page 64 of 257 MP2000-104B-AC User Manual Version 1.0 Index sequence changes like this: Adjust the original rules with index as 1 to the position of rules with index as 3, and then shift back rules with index as 3 and other rules in sequence. In current sequence, the called number is 003 if the calling number is 001. In black-white list matching, the rules with index as 2 are valid. At this time, call building is enabled for calling number and called number are all contained in white list. Call Service Configuration On this interface, the user can configure call service configuration services, including Enable/Disable call transfer service, call divert service and call wait service. Maipu Confidential & Proprietary Information Page 65 of 257 MP2000-104B-AC User Manual Version 1.0 Click Call Divert Service or Call Wait Service to perform the switch between call divert service and call wait service. Brief-introduction of Call transfer service: (B - calling, A - called, C - transfer) User A is the one that has right to use call transfer service. During communication between user A(called user)and user B(calling user), user A can transfer current calling between A and B to new calling between user B and user C. User C plays a role as the one to be transferred. Once call transfer is completed, user B and user C can communicate with each other, while user A will no longer communicate with user B or user C. This mode can be applied to such situation: user A contacts user C and recognizes that user C can better solve problems offered by user B, and then it is transferred to communication between user B and user C. Call transfer configuration: Click Enable call transfer to start call transfer service. It is enabled only if the Routers of A and B are both initiated such configuration. Call Transfer Application: There are two call transfer services in specific application: one is direct transfer, and the other is call transfer after inquiry. Direct transfer: Calling B calls called A, and called A transfers to user C. If user A does not communicate with user C, it is called direct transfer. For direct transfer, there is no requirement of user’s position. If calling user and called user are not in the same gateway, the calling user is required to support H450 protocol or SIP transfer procedure. For failed transfer, the original communication of calling user and called user is kept interrupted. Maipu Confidential & Proprietary Information Page 66 of 257 MP2000-104B-AC User Manual Version 1.0 Call transfer after inquiry: Calling B calls called A, and called A transfers to user C. User A has communication with user C first, and user B and user C can realize communication between each other only if user A hangs up. User A can return to communication with user B if user C hangs up or when transfer fails. Call transfer after inquiry requires that user A, user B and user C can be in the same gateway or different gateways. Operation steps of various transfer services: Direct transfer: User A which initiates the service asks user B to be transferred to wait for a moment When user A performs hook-switch operation, user B is kept. When informed of tone ‘please dial transfer number and end with #’ , user A dials call transfer number XX#(number of user C). Then user B will be transferred to user C. User A hangs up when system prompts with busy tone. If user B dials via XX (number of user C) and hears ring back tone, the communication will be initiated after off hook by user C. Call transfer after inquiry: User A which initiates the service asks user B to be transferred to wait for a moment When user A performs hook-switch operation, user B is kept. When informed of tone ‘please dial transfer number and end with #’ , user A dials call transfer number XX#(number of user C); When dialing via user C and confirming transfer, user A hangs up directly to realize communication between user B and C. If user C rejects to communicate with B by hanging up directly or user c doesn’t answer the call, it will be transferred back to communication between B and A. The transferred user B only needs to keep original call; user C only needs to wait for user B transfer when communication between A and C is finished. Go to transfer process by pressing hook-switch, or press it again and reenter the number if the former one is wrong. If transfer user will like to return to communication with calling user during ringing, please press hook-switch. If the user wants to return to communication from transfer process, he should not press # button and just wait for timeout, or he can press hook-switch and # button to return to communication directly. Maipu Confidential & Proprietary Information Page 67 of 257 MP2000-104B-AC User Manual Version 1.0 Brief-introduction of transfer divert: Call forwarding additional services includes Call Forwarding Unconditional, Call Forwarding Busy and Call Forwarding No Reply. They are all used during call building or used to transfer call to another destination when no user answers the call. Characteristics of three call forwarding additional services: (1) Call Forwarding Unconditional (CFU) It can transfer the received call to another number. CFU service has no effect on call capability of user. Once CFU is started, the call will be forwarded independently, not restrained by stated of service port. (2) Call Forwarding Busy (CFB) It can transfer the received call to another number when user is busy. It is applicable to all calls, or to those limited by specific conditions. It has no effect on original calling capability of user. (3) Call Forwarding No Reply (CFNR) The user is provided with such functions if using CFNR service: if a call to one port cannot be built successfully during certain period, the call will be directed to another port. Call Divert Configuration: Click config the no answer divert time hyperlink under Call divert config to configure no answer divert time: Click Enable call divert service checkbox to start call divert service. Click Add to add a call divert service: Maipu Confidential & Proprietary Information Page 68 of 257 MP2000-104B-AC User Manual Version 1.0 Called Number: choose a feasible local number Divert to: the number divert to. The router number match rule allows complete number match or prefix match. Call Divert Mode: configure divert conditions. Application of Call Divert 1. Call divert takes effect automatically after configuration rather than manual application. 2. When the calling and the called are not in the same gateway, divert will not succeed only if the calling user supports H450.3 or Q.931 Facility call forwarding mode when using H.323 protocol, or supports SIP protocol standard divert procedure when using SIP protocol. For call divert based on H323 protocol or SIP protocol, the calling Router can perform calling without router configuration if the message received by Router contains IP address of user diverted. Otherwise, router configuration is necessary. Call divert configuration can be realized by connecting to phone on equipment. See details in the following table: Call Divert Service Code Description *40* + number + # Set number to be diverted for Call Forwarding Busy(CFB) *41* + number + # Set number to be diverted for Call Forwarding No Reply (CFNR) *57* + number+ # Set number to be diverted for Call Forwarding Unconditional (CFU) #40* + number + # Inquire whether number to be diverted has been set for Call Forwarding Busy(CFB) #41* + number + # Inquire whether number to be diverted has been set for Call Forwarding No Reply (CFNR) #57* + number + # Inquire whether number to be diverted has been set for Call Forwarding Unconditional (CFU) #40# Cancel Call Forwarding Busy(CFB) #41# Cancel Call Forwarding No Reply (CFNR) #57# Cancel Call Forwarding Unconditional (CFU) Maipu Confidential & Proprietary Information Page 69 of 257 MP2000-104B-AC User Manual Version 1.0 For example: Provided that user has right to use ‘Call Divert’, the user can set CFB number as 123456 in ‘Call Divert’ by dialing ‘*40*123456#’. System will inform the user of successful operation with tone ‘beep, beep, beep’ or failed operation with busy tone. Provided that user has right to use ‘Call Divert’, the user can inquire whether 123456 has been set as CFB number in ‘Call Divert’ by dialing ‘#40*123456#’. If the number has been set before, system will inform the user with tone ‘beep, beep, beep’; if the number does not conform to the original one or has not been set, the user will hear busy tone. Provided that user has right to use ‘Call Divert’, the user can cancel CFB in ‘Call Divert’ by dialing ‘#40#’. System will inform the user of successful operation with tone ‘beep, beep, beep’ or failed operation with busy tone. Note: For divert refers to several diverts in complicated network environment, the fault will displayed by busy tone directly in common divert. Brief-introduction of Call Waiting: Call Waiting informs the user of new call for user to accept, reject or leave it unanswered. For example, user A is communicating with user B that has registered call waiting service. At the same time, user C tries to call busy B. The Router will send user B a prompt, namely, ‘beep, beep, beep’ tone, which indicates a call waiting. User B can choose to accept, reject or leave it unanswered If user B does not make choice during call waiting, the user C hears ringing back tone. Call Wait Configuration: Click Enable call wait checkbox in Call Wait configuration to initiate call wait business. Click Add to add a new wait service: Maipu Confidential & Proprietary Information Page 70 of 257 MP2000-104B-AC User Manual Version 1.0 Choose a telephone number from Local telephone numbers and press to add it to the number which needs to register call wait service. Finally, press Apply to set it as the number which needs to register call wait to delete the chose number from ‘The number which service. Press needs to register call wait service’. Note: The voice port corresponding to local number should be in enable state, and this number has not registered other call services. System filters automatically the local numbers that have registered other call services, as well as the disabled numbers of voice port. Application of Call Wait: Follow the instructions below to choose, reject or leave unanswered the new call: Press hook-switch and then press ‘1’ to reject new call. Press hook-switch and then press ‘2’ to receive new call. No action indicates to leave it unanswered. After receiving new call, the user can switch between two communications at any time. Follow the steps below: Press hook-switch and then press ‘1’ to switch to original communication. Press hook-switch and then press ‘2’ to switch to new communication. Note If a number is configured with Call Divert service, first delete it from the Call Divert service and then you can configure Call Wait service. If a number is configured with the Call Wait service first, you do not need to delete the Call Wait service before configuring the Call Divert service. The gateway can use Call Divert service first according to the service priority. Call Pickup Configuration Call pickup means that when the phone of the called user A rings, user B hopes to answer the call of user A by performing some operation on its own phone; when user B answers the call, the phone of user A stops ringing. The gateway can configure call pickup group. The dialing mode for call pickup of users in the group is different from that of the users that are not in the group. Maipu Confidential & Proprietary Information Page 71 of 257 MP2000-104B-AC User Manual Version 1.0 1. User A and user B belong to a call pickup group. User B picks up the phone and dials *71*# or dialing*71* times out, that is, user B does not need to dial the phone number of user A to answer the call of user A. 2. User A and User B do not belong to a call pickup group. User B picks up the phone and dials *71* the phone number of user A # or dialing *71* the phone number of user A times out. Note In the above two points, if you want to use # to end the dialing, you need to configure the ending symbol of receiving number on the Call route configuration interface as #. If you do not want to use #, the gateway waits for the timeout of receiving number. The gateway performs the call pickup operation according to the received number. By default, the gateway enables the call pickup function that is not in the group, but if you want to perform the call pickup in the group, you need to do the corresponding configuration. In a call pickup group, you can only configure the FXS port. The call pickup configuration interface is: On the interface, you can add, edit and delete the call pickup group. Note • One device allows to be configured with up to 10 call pickup groups. • Only the FXS port of the device can be configured with the port of the call pickup group. • The call pickup group does not allow the number of the ports as 0. When adding a call pickup group, you need to add at least one port. Otherwise, adding a call pickup group fails. Contrarily, if you delete the last valid port in the call pickup group, the call pickup group is deleted at the same time. Maipu Confidential & Proprietary Information Page 72 of 257 MP2000-104B-AC User Manual Version 1.0 Click Add Group to enter the following configuration interface. Input the information of the new call pickup group on the interface, and click Set. Click Back to return to the interface of displaying call pickup groups. Enable Group: Enable/disable call pickup group. Tick Enable Group check box to Enable call pickup group. Group ID: The serial number of the call pickup group. The value range is 1-10. Port: The port of the call pickup group. Group Ring Configuration Group ring is one service of local gateway FXS/FXO card. When there is incoming call and if the called number matches the number of the group ring, the phones of all FXS ports in the group ring at the same time. The FXO in the group initiates the call to the corresponding configured number via the port. But as long as one port is connected, the other ports stop ringing and recover the original status. The group ring configuration interface is: On the interface, you can add, edit and delete the ring group. Maipu Confidential & Proprietary Information Page 73 of 257 MP2000-104B-AC User Manual Version 1.0 Note • One device can be configured with up to 50 ring groups. • The FXS and FXO ports of the device allow to be configured as the ports of the ring group. When configuring FXO port, you should specify the corresponding phone number. • Each ring group allows to be configured with up to two ports. • If the group contains the FXO port, the external line connected to the FXO port needs to provide the reverse polarity signals and the FXO port needs to Enable configuration of checking reverse polarity signals. Click Add Group to enter the following configuration interface. Input the information of the new ring group on the interface, and click Set. Enable Group: Enable/disable the ring group. ID: The serial number of the ring group. Group Phone Number: The group ring number matched with the called number. Register to gatekeeper or SIP server: Enable/disable group ring number register to SIP register server or gatekeeper. By default, it is enabled. Set username and password: Whether to configure the user name and password of the group number for registering SIP server. The username and password can be configured only when the SIP protocol is not in the register state. Username and password: The username and password of the group number, used for registering SIP server. Port: The port of the group ring. Maipu Confidential & Proprietary Information Page 74 of 257 MP2000-104B-AC User Manual Version 1.0 The Add Port button is in the active state only after the group ring is added successfully or editing the existing group ring. Click it to enter the following port configuration interface. On the interface, you can select the member ports to be added to the ring group. If FXO port is selected, the phone number of the FXO port should be configured. One ring group can be configured with up to two member ports. IVR System Configuration IVR (Interactive Voice Response) user can realize second dial-up by dialing called number according to tone after dialing a number to gateway. IVR system configuration includes IVR basic configuration and config information of IVR play options. IVR configuration is shown below: Enable IVR: Tick the Enable IVR check box. Otherwise, disable the IVR service. IVR record number: Configure the IVR record number. After the user dials the IVR access number, dial the IVR record number. After hearing the prompt tone, press * to begin recording, Press # or hang up to end the recording. The recorded file is restricted by the IVR record time and code. Null means not to configure. IVR Record Time: Range: 5-60, Default: 60. IVR record codec: There are three codes, including G.729, G.723 and G.711. The default value is G.729. Maipu Confidential & Proprietary Information Page 75 of 257 MP2000-104B-AC User Manual Version 1.0 Register IVR access numbers to gatekeeper or SIP server: After ticking the item, the IVR access number is registered to the gatekeeper or SIP server. Otherwise, do not register. Enable IVR authentication: when IVR authentication is enabled, the system requires the user to input username and password during access number dialing. The user is able to use IVR service only if he gets successful authentication in server. (For this function, it should be in accordance with Maipu NetSmart server. At the same time, the user should configure AAA authentication in gateway.) IVR access number: You can configure multiple IVR access numbers. The IVR access number comprises numbers with a length of 1-25 digits. Null means not to configure. Click Add and you can configure more IVR access numbers. In the access number text box as shown in the above figure, you can input multiple IVR access numbers at the same time. The IVR system provides abundant voice prompts to guide the operation of secondary dialing service. The following is the configuration of the voice prompt. As the figure illustrates, the terms on the left are the voice files to play, while terms on the right are play times of voice files. The user should choose one proper parameter according to requirements from four types: 1, 2, 3 or cycle. IVR system application: Dial extension number: Maipu Confidential & Proprietary Information Page 76 of 257 MP2000-104B-AC User Manual Version 1.0 If the user sets IVR access number as 111111, system will inform the user with prompt’ please dial extension number and end it with #’ (it is a prompt by default, or the user can make record according to real situation.). The IVR system begins to build call connection from the caller to the extension. IVR Record: If the user sets IVR access number as 111111 and record number as 222, he should first dial 111111 according to prompt and then dial record number 222. At this time, system will inform the user with prompt’ please make record by pressing * and end it with #’ . Press * to start record and press # to save record. IVR record voice file is welcome.729/711/723. When the user dials IVR access number, Router plays corresponding welcome files according to code mode provided by line negotiation, so as to inform the user of the second dial-up or other actions. A voice play file by default is welcome.729. IVR call or IVR record cannot be performed at the same time. IVR record function can be used to modify voice file welcome.729/711/723. It is suggested that system administrator should delete record number after applying such function, so as to avoid voice file modification resulted from wrong record number when the user dials IVR access number. IVR authentication: After IVR authentication is started, the user will hear prompt ‘Please input your username and end it with #.’ after dialing access number 111111. Then it comes another prompt ’Please enter your password and end it with #.’ Based on successful authentication, the user is required to dial extension number, or system will inform the user of prompt’ please reenter username and password.’ This function should be in accordance with NetSmart accounting authentication server. Note 1. When the called user hangs up or connection is failed, the calling user can dial other extension numbers for 5 times at most. 2. IVR authentication function should be in accordance with AAA authentication function. The wrong username and password entering should be limited within 3 times, or system will leave busy tone to the user directly after then. Accounting Authentication Configuration The accounting authentication server matched with Maipu voice gateway is NetSmart accounting authentication server. If you want to account or authenticate the calls of the gateway, install NetSmart accounting authentication server on a PC in the network and Set IP address of the PC on the VoIP gateway as Radius server address. The following is the configuration interface of enabling VoIP gateway NetSmart server program. Maipu Confidential & Proprietary Information Page 77 of 257 MP2000-104B-AC User Manual Version 1.0 Since accounting should be in accordance with AAA, so configure AAA before starting accounting authentication. See configuration details in the follow figure: Radius Address of Master Server: The IP address of Radius protocol accounting authentication server preferred by gateway. Authentication Port: authentication communication port of gateway and Radius accounting authentication server. Default: 1645 Accounting Port: Accounting communication port of gateway and Radius accounting authentication server. Default: 1646 Radius Address of Backup Server: Accounting authenticator is performed by backup server when Radius master server is disabled. Public Key of Server: Network access server (NAS; it is a Router, such as MP2000-104B Router) share the same key with Radius accounting authentication server. Configure public key of Radius server port in NAS configuration of Radius server. The accounting authentication is feasible only if the public key of network access server has the same configuration with that of Radius accounting authentication server. Interface to send or receive packets: Network communication interface for packet sending and receiving by gateway and Radius accounting server. See details of authentication accounting in the following figure: Maipu Confidential & Proprietary Information Page 78 of 257 MP2000-104B-AC User Manual Version 1.0 PSTN Call Accounting Prefix: configure accounting prefix of device. For communication from FXO port, the device adds accounting prefix to the called number in accounting message, and then send the called number with accounting prefix to accounting server. The type of communication source port and that of destination port are fixed, so the user only needs to configure authentication function and accounting direction for each type. There are three authentication configure and forbid calling. functions: start authentication, not Start Authentication: the communication between source interface and destination interface should get authentication from Radius protocol accounting authentication server (or other protocol authentication server). Communication should be based on successful authentication. For example, the communications from VOIP to FXS, from VOIP to FXO, from FXS to FXS should get authentication in the figure above. Not Configuration: communication between source interface and destination interface is permitted without authentication from authentication accounting server. In the figure above, ‘not configure’ is set for communications from VOIP to FXS, from VOIP to FXO, from FXS to FXS, which means that no authentication is required for communication. Forbid Calling: forbid calling between source interface and destination interface. In the figure above, we set ‘forbid calling’ for configuration of FXS to FXS. Accounting function has two types: Configure or Not Configuration. Configuration: perform accounting for communication between source interface and destination interface. Not Configure: not to perform accounting for communication between source interface and destination interface. Maipu Confidential & Proprietary Information Page 79 of 257 MP2000-104B-AC User Manual Version 1.0 The user can configure authentication accounting option for ports according to specific requirements. There is no configuration option for authentication accounting configuration for communication from VOIP to VOIP. Click Clear all authentication configurations, and not configure is set automatically for Authentication Function. Click Clear all accounting configurations, and not configure is set automatically for Accounting Function. Fax Service Configuration Currently, two kinds of fax modes are supported, that is, T38 fax mode and transparent transmission mode. The T38 fax mode is divided to UDPTL mode and RTP mode. The configuration interface of the fax service is: Enable global T.38 capability of this gateway: To enable T.38 capability of Router aims at the global Router. Once T38 capability configuration is started, the global Router supports T38 fax capability, or the user can configure T38 fax capability under some dial port or disable T38 capability for some dial port. When gateway is configured as the caller, it decides whether to support T38 fax by detecting backwards according to the calling number. Attention: it is feasible under VOIP dial port only. Note The user can configure fax capability under VOIP port only. It is invalid under other dial ports. Only if gateway is configured as enable Router T38 fax and VOIP dial port has corresponding fax capability (such as T38 or Maipu Confidential & Proprietary Information Page 80 of 257 MP2000-104B-AC User Manual Version 1.0 transparent fax), the gateway gives priority to fax capability under dial port. T38 Fax Mode: On the premise of T38 capability, encapsulation mode of T38 ASN.1 IFP packet includes UDPTL mode and RTP mode; For RTP encapsulation, the user is required to configure the same parameter for PT(payload type)field(default is 98) in RTP heads of two ends. The payload type used by RTP fax mode cannot be the same as the dynamic payload type used by 2833 protocol. Maximal Speed: Unit: kbps, default: 14.4kbps. The fax speed is used to control maximal speed of fax, that is, the fax negotiates from the configured maximum speed. High Redundancy: It is the number of the redundant packets in T38 highspeed data. When the fax is seriously distorted, it is the times of retransmitting fax packets. The fax quality can be improved by increasing the value when the network is in the bad state and there is packet loss. Low Redundancy: It is the number of the redundant packets in T38 lowspeed data. When the fax is cannot be connected, it is the times of retransmitting T38 connection messages. The fax quality can be improved by increasing the value when the network is in the bad state and there is packet loss. Fax pass-through Code: transparent transmission mode is required for encrypted fax. Transparent transmission indicated that gateway encapsulate and transmit signaling and data to opposite gateway transparently by lossless compression coding rather than understands thoroughly the signaling and data of fax. The losses code modes supported by gateways are: G.711A, G.711U and G.726. Transparent transmission should be based on same gateway code mode set in two gateways. Enable Error Check Mode of T38 fax: It takes effect only when the electrographs of the two sides have the ECM function. Maipu Confidential & Proprietary Information Page 81 of 257 MP2000-104B-AC User Manual Version 1.0 Other Configurations The following figure illustrates other VoIP service configurations: FSK Mode: v23-mode or bell202-mode. These two modes differ from each other by different mark (1) and space (0) frequency. DTMF Signal Gain: range: -31dbm~-1dbm, default: -9dbm. Do not change this if not necessary (e.g.: DTMF signals sent from FXO port cannot be identified by exterior port because of too low volume). Voice Data TOS: There are two modes: preference sending mode and normal sending mode. To improve sending performance of IP voice packet in IP network, set TOS field of IP head in a higher priority level in IP package via preference sending mode. Thus, system will give priority to IP data processing in network sending as long as IP transfer points in IP voice packet access support IP TOS prosperity. Area Code: If the calling number starts with a header as the same as this code, the header is discarded before displaying onto the FXS. FXO Line Detect Interval: configure interval of FXO line detection. Default: 10 minutes. FXO line diction is enabled by default. The detection will be performed regularly to check whether FXO port has been connected to Maipu Confidential & Proprietary Information Page 82 of 257 MP2000-104B-AC User Manual Version 1.0 phone line. The call router can transfer to the FXO port by calling only if there is line connection. FXO Dial-out Flash hook Time: configure FXO dial-out flash hook time. Set a larger value for bad connection in FXO dial-out. Echo Cancellation Length: 32ms, 64ms or 128ms Check UDP Checksum: whether perform UDP check on voice packet and fax packet in IP calling. Play Ring back to Caller: enable or disable ring back function of gateway in IP calling. Assume that A is calling user and B is called user. GW1 of user A (A can be other terminals such as IAD which is connected via soft-switch plate) cannot play ring back to A. When user A calls B, B is ringing. Assume that GW2 starts FXS remote ring back function, when GW2 rings B, it will send similar ring back tone to user A after connecting AB medium access via negotiation with GW1. In such case, user A can hear ring back tone. Individual ring: Whether to enable individual ring function. After enabling the function, the gateway distinguishes the IP calls and non-IP calls via ring modes. By default, the function is disabled. IP callout indicate: Whether to Enable IP callout prompt. By default, it is disabled. When it is enabled, there are two parameters: IP callout indicate interval and continue: Maipu Confidential & Proprietary Information Page 83 of 257 MP2000-104B-AC User Manual Version 1.0 IP callout indicate continue: The unit is ms; value range is 100-500; the default value is 200. IP callout indicate interval: The unit is ms; value range is 30-120; the default value is 60. Total IP call: IP calls include incoming IP call and outgoing IP calls. 0 means prohibiting IP calls. Playing music when the third party is held: After enabling the function, the local gateway plays music to the held party after the gateway phone receives the holding signals. Otherwise, the remote gateway or soft terminal plays the music. System prompt language type: Currently, English and Chinese voice prompts are provided. By default, it is Chinese. Before selecting the language type, please confirm whether the corresponding voice file is downloaded to the gateway FLASH. If not, please download it. Otherwise, it cannot be played after configuration. FXS global configuration: Configure the global attributes of call FXS cards on the gatway. There are three itmes: Dial Space: range: 10-100, unite: 10ms, default: 30ms Flash-hook Length Lower Limit: range: 4-100, unite: 10ms, default: 13ms Flash-hook Length Upper Limit: range: 4-100, unite: 10ms, default: 60ms Maipu Confidential & Proprietary Information Page 84 of 257 MP2000-104B-AC User Manual Version 1.0 VPN Configuration VPN Initial Configuration The user can perform VPN initial configuration in central server on this interface: Central gateway: address of VPN initial parameter Local IP/Interface: choose IP or interface for device to connect to external network. To choose an interface is recommended. User: username assigned to device Password: password assigned to device Get the initiation configuration automatically when the device started: tick it to get the initiation configuration automatically when the device started. Click Get configuration to gain VPN initial configuration from central server configured. Tunnel Configuration Check the basic information of the tunnel on the following interface. Maipu Confidential & Proprietary Information Page 85 of 257 MP2000-104B-AC User Manual Version 1.0 System only displays a table titled Create a Tunnel if there is not tunnel. One table stands for one tunnel, with a header to display basic information of tunnel. The body of table displays basic information of tunnel policy. or to unfold or fold the table. It is fold mode if no policy in Press tunnel. Click to configure corresponding tunnel and press in header to delete all configuration of corresponding tunnel, including all policies in body to delete corresponding policy. Please that use this tunnel. Press refer to section 3.6.3 for policy configuration. Click to create a tunnel: Name of Tunnel: it is given by system automatically by default. The user can modify it according to requirement. Level of Security: default security levels: high, normal and low. Authentication Mode: choose share previously or certificate to enter configuration interfaces. It is share previously by default. Secret Key: configure public key previously. It will be displayed in share previously mode. IP address or Domain Name: configure IP address or domain of Routerpeer. It is any by default. Sign: it refers to identity sign of peer gateway in peer gateway configuration, or it refers to identity sign of local gateway in local gateway configuration. Fill it according to requirement, or leave it as default. Attention: local gateway signal should be filled in when local IP is dynamic. Local Out Interface: it refers to out interface of local data. The user should choose one interface for configuration. Maipu Confidential & Proprietary Information Page 86 of 257 MP2000-104B-AC User Manual Version 1.0 When selecting the authentication mode as certificate, the configuration interface is: Click View the Information of Certificates to view the information of the selected certificates. Click to configure IKE proposition used by tunnel: Maipu Confidential & Proprietary Information Page 87 of 257 MP2000-104B-AC User Manual Version 1.0 When using the default IKE proposition, the advanced user can choose existing IKE proposition or add new IKE proposition. 1-4 IKE propositions are available for each tunnel and the user cannot edit or delete default IKE proposition. For IKE proposition defined by user, it cannot delete but edit if it has been applied to some tunnel. hyperlink to add new IKE proposition. Click IKE proposition configuration is similar to New IKE Proposition. Policy Configuration On this interface, the user can inquire basic information of policy. System will display ‘Create a policy’ table if there is no policy. All policies are to configure some policy and click to displayed in one table. Click delete it. Click to create a policy. Maipu Confidential & Proprietary Information Page 88 of 257 MP2000-104B-AC User Manual Version 1.0 Policy Name: system will fill in with default automatically, or the user can modify it according to requirement. Protocol: protocol types of policy: IP, TCP, UDP, ICMP and IGMP. Input port numbers of source interface and destination interface when apply TCP and UDP protocols. The port number can be any or an arbitrary value adopted from 1 to 65535, or a range from 1 to 65535. Local Subnet/Host: types of target to be protected by local port. It can one of ‘subnet’, ‘host’ or ‘any’. When the user chooses ‘subnet’, the system will display configuration dialog of ‘IP address’ and ‘mask’ for user to fill in. When the user choose ‘host’, the user only needs to configure the specified IP address. hen the user choose ‘any’ , system will not display configuration dialog of ‘ IP address’ and ‘mask’ , which indicates that the protection range is any. Destination Subnet/Host: it similar to that of Local Subnet/Host. Maipu Confidential & Proprietary Information Page 89 of 257 MP2000-104B-AC User Manual Version 1.0 Apply to Tunnel: choose not use or choose an existing tunnel. Choose not use indicates that the policy should not be applied to tunnel. System displays a checkbox of transmit or refuse policy for the user to choose. In such case, Advance is disabled. When the user chooses a tunnel, the check box of transmit or refuse policy is hidden. If the selected tunnel can be backup tunnel, system displays Select backup tunnel checkbox for user to apply this function or not. Tick Select backup tunnel checkbox, and system will list all backup tunnels by default for user to select, leaving aside the tunnels which have been selected. The user can choose three tunnels to be the backup tunnel at most. Certainly, the user can choose one tunnel as master tunnel, or the tunnel in Apply to tunnel is selected as master tunnel by default. Click Advance to configure IPSEC proposition adopted by policy for this tunnel. The configuration of IPsec proposition is similar to that of IKE proposition. If the user wants to alter position of some policy, he can put some tunnel to another tunnel’s front or back. Forward/Refuse Policy: it refers to application mode of policy. Forward means that all messages that conform to such policy will be forwarded. Refuse means that all messages that conform to such policy will be refused for forwarding. Maipu Confidential & Proprietary Information Page 90 of 257 MP2000-104B-AC User Manual Version 1.0 Certificate Configuration On this interface, the user can view the information of existing CA trustdomain, CA root certificate and Local certificate. System shows the user configuration certificate table if there is no CA trust-domain. Click to configure a new CA trust-domain. CA Name: name of a CA trust-domain. Certification Server Address: address of certification service Select Certificate Server: currently, the CA servers that support on-line certificate application are: MPSec-CMS, CA (CTCA) and Windows server 2000/2003. CRL Auto-update Period: on the premise of accurate system clock (configured with ‘period-of-validity confirm‘), system performs update automatically according to next publication time included in CRL, update period of local configuration. It is 0 by default, which indicates not update automatically. Maipu Confidential & Proprietary Information Page 91 of 257 MP2000-104B-AC User Manual Version 1.0 Cancel Validating: it is used to check certificate cancellation strictly in certificate authentication each time or not. Without valid CRL, authentication is failed. But such guarantee on security will degrade application. Generally speaking, certificate cancellation resulted from private key release occurs very seldom and private key release can be prevented effectively by accessing and controlling certificate user so the user is subjected to leave it disabled. Period-of-validity Confirm: whether to check period of validity in certificate authentication each time. Since different system period will result in failed authentication because of check fault, this option is always neglected. With high security of certificate, it is impossible to take long period of time to decode private key of certificate, so it will not have great effect on security if the user neglects this option. After configuring CA trust-domain successfully, the user can get CA root hyperlink in table of CA trust- certificate by clicking domain. Click to apply certificate: Selectable CA: name of existing CA trust-domain. The user is required to input password if CA server belongs to Maipu certificate server. Username: name of certificate user. Length of Private Key: set length of private key. hyperlink in table of After successful application, click certificate information to get certificate from certificate administrator. Maipu Confidential & Proprietary Information Page 92 of 257 MP2000-104B-AC User Manual Version 1.0 View Status Information On this interface, the user can view information of existing policy and tunnel configuration, including information of the first stage and the second stage of policy negotiation. Maipu Confidential & Proprietary Information Page 93 of 257 MP2000-104B-AC User Manual Version 1.0 The user can choose to view configuration information of some policy or tunnel. Once one policy is selected, the information of the first stage and the second stage of negotiation will be displayed. The information is refreshing automatically and constantly. For failed negotiation, system marks key information in bright color for user to view and modify. Configuration Examples Based on integrated VPN function, MP2000-104B Router can extend original data private network of user, extending business, MIS and voice business to extension grassroots’ units. The typical examples are shown below: A business center adopts data private network composite mode originally. It will adopt internet network composite mode when the user needs to extend data and VOIP business to each network site. Each site connects directly the phone and PC to MP2000-104B Router and performs ADSL dial-up. In such case, VPN function should be configured in MP2000-104B Router at the same time. Maipu Confidential & Proprietary Information Page 94 of 257 MP2000-104B-AC User Manual Version 1.0 Via H323 voice protocol, MP2000-104B Router 1 and 2 register to gatekeeper which is in private network internally. The user needs to create a tunnel from MP2000-104B Router 1 to VON Server and apply two policies to adapt to connections to gatekeeper and MP2000-104B Router 2. By such network composite mode, data and voice business are extended to each site effectively. On the other hand, it slashes high cost of private network composite. VPN function of MP2000-104B Router ensures security of data and voice transmission in public network. Take MP2000-104B Router 1 as an example: First, configure PPPOE dial-up line. In WAN configuration, choose configuration wizard of accessing WAN and click Next. Choose a port connecting to internet. Take WAN port as example: Click Next to choose the type for your internet connection. We choose PPPOE dial-up line here: Click Next. Input username and password. Generally speaking, they are provided by telecom operators. Click Next to complete PPPOE dial-up line. Maipu Confidential & Proprietary Information Page 95 of 257 MP2000-104B-AC User Manual Version 1.0 Then it needs to configure VPN. It needs to create a tunnel first between device and upstream VPN Server. Choose Create a Tunnel in tunnel configuration page of VPN configuration: Maipu Confidential & Proprietary Information Page 96 of 257 MP2000-104B-AC User Manual Version 1.0 The parameters of tunnel configuration are displayed below: Name of Tunnel and level of security are defined by the user. Choose share previously for authentication mode. Fill secret key negotiated with destination. The address of destination gateway is IP address of VPN Server. Leave sign blank. Choose dialer0 as local out interface, namely, the out interface in PPPOE configuration. Sign is defined by the user. Click Apply to create a tunnel. For communication with business center, it requires to create policy. Enter policy configuration interface to create a policy: Enter the policy configuration interface to configure parameters: Maipu Confidential & Proprietary Information Page 97 of 257 MP2000-104B-AC User Manual Version 1.0 Policy name is defined by user. Choose IP as protocol and subnet for local. Namely, the users in MP2000-104B Router 1 LAN can apply such tunnel and policy. IP address and mask should be local address and mask. Choose subnet for destination as well. IP address and mask should be LAN address and mask of VGK voice gatekeeper. Based on tunnel0 we create previously, click Apply to apply this policy to tunnel0. Thus, VPN communication has been built between MP2000-104B Router 1 and LAN of gatekeeper. Similarly, another policy should be created for VPN communication between MP2000-104B Router 1 and MP2000-104B Router 2. The name is defined by user. The configurations of protocol and local are similar to that of policy 1. Fill destination IP address and mask with LAN address and mask of MP2000-104B Router 2, and then apply to tunnel0. Maipu Confidential & Proprietary Information Page 98 of 257 MP2000-104B-AC User Manual Version 1.0 Thus, VPN configuration in MP2000-104B Router 1 is completed. Take similar steps to configure MP2000-104B Router 2. For voice data protection, the interface registering to gatekeeper in H323/SIP protocol configuration should be in accordance with interface configuration of 192.168.16.0. For example, if LAN is in this segment, configure the protocol to LAN interface. See the figure below: Since configured VPN policy is used to protect data in source address, any data sent by H323/SIP from this interface (source address) IS encrypted in VPN tunnel. In this example, the user needs to configure VPN tunnel and policy in VPN Server, so as to build VPN communication between MP2000-104B Routers. Route Configuration Static Route Configuration Static route is defined by user, which enables transmit packet from source to destination to use defined path. In The section, we introduce how to configure static route in MP2000-104B Router to perform network connection. On this configuration interface, view the information of configured static to delete route information. For creating a static route, route. Click input accurate destination address, subnet mask and Router address and then click Apply. Destination Address: address of remote network. For Class C address, the first three fields form the network address, leaving the last filed as 0. Maipu Confidential & Proprietary Information Page 99 of 257 MP2000-104B-AC User Manual Version 1.0 Subnet Mask: subnet mask of destination address. For Class C address, it should be 255.255.255.0. Gateway: The data delivery gateway address matched with the destination network. Distance metric: That is metric value. The number of passed route nodes before reaching the destination address. Access List Configuration In this page, the user can view and configure access control list(ACL).ACL consists of one or several filter rules that allow or refuse messages by matching message information and ACL parameters. Filtration of access list is a processing course from top to bottom. If one packet is matched by some rule, the corresponding operation of this rule is performed (allow or refuse). Otherwise, this packet will be processed by next filter rule. If no rule matches the packet, it is processed by default finally. This table displays information of current access list configuration. Add a rule (the newly created list rule will be added to bottom of list to delete the automatically) in corresponding list by clicking . Delete whole access list (if this list has been referenced before, all configurations referenced to this list are disabled. The user can create a new access list of the same name to recover it. ). behind some rule directly to delete this rule (For the access list Click bound to interface, to delete this list means deleting all bindings of this list in all interfaces.). Click New List to configure a new access list (the user can bind this access list to a interface inwardly or outwardly to filter data packet when creating access list.). Maipu Confidential & Proprietary Information Page 100 of 257 MP2000-104B-AC User Manual Version 1.0 List Name: It is the name of the access list. The first character cannot be numbers. The name had better be related with the function of the access list. List Description: It is the access list comment. It is used to describe the function and meaning of the access list. Included rules: Action: It is the operation performed after a packet matches with a rule, including permit and deny. Protocol: The protocol type to which the packets belong. Source Address: The network or host from which the packets are from, that is the source address in the IP head of the packet. Source Port: Specify the source port matching the sent packet. It can be a value or range. Destination address: It is the destination network or host of the packets, that is, the destination IP address of the packets. Destination Port: Specify the destination port number matching the received packet. It can be a value or range. Binding to interface: Apply the configured access list to an interface and specify the inwards or outwards packets matching the interface Click Bind List to enter to following page. In this page, the user can view binding information of access list in current device inwardly and outwardly. At the same time, the user can modify defined interface or remove access list binding. Maipu Confidential & Proprietary Information Page 101 of 257 MP2000-104B-AC User Manual Version 1.0 Access control list is a powerful tool for firewall to filter packet. After definition, apply the list to designated direction to control access. DHCP Service Configuration The section explains DHCP (Dynamic Host Configuration Protocol) configuration. It is difficult to control a wide network, so the most common problem is IP address conflict when IP address is allocate manually. The only solution is to allocate IP address manually for client. DHCP allocates IP address to client from address pool. DHCP can provide other information, such as Router IP, DNS server address. DHCP is not designed to provide diskless workstation with guide information, but lighten the burden of administrator who allocates IP address manually. DHCP server is able to complete address distribution. Maipu Confidential & Proprietary Information Page 102 of 257 MP2000-104B-AC User Manual Version 1.0 IP Address: IP address of internal network interface (it is always gateway address of LAN, or it is 192.168.0.1 by default.) Subnet Mask: it is 255.255.255.0 by default. The configurations of two options can be modified in LAN configure>LAN interface address page. They are default in this page to display configuration information of current internal network address only. Tick Enable DHCP service to allocate LAN address via DHCP service. System shows you start address and end address input box, which indicates address range of distribution by DHCP server. System calculates the maximal address range automatically according to current internal network interface, and the user can set address range by modifying relevant fields. Generally speaking, it is better to use address range generated by system automatically. Advanced: tick checkbox to pop up advanced configuration of DHCP service. Default gateway: default Router address that provides DHCP configuration to LAN. Generally speaking, it is IP address (192.168.0.1) of internal network interface. DNS Server Address: configuration to LAN. DNS WINS Server Address: configuration to LAN WINS server server address address that that provides DHCP provides DHCP Lease: rent period of address distribution. DHCP server reallocates address when it is beyond time limit. After completing relevant parameter setting, click Apply. Then DHCP server allocates address for LAN which gets location automatically. If LAN features in fixed IP address, invert enable DHCP service and click Apply to disable DHCP service. Click Refresh to refresh configuration of DHCP service. Enter DHCP server status by clicking details button: Maipu Confidential & Proprietary Information Page 103 of 257 MP2000-104B-AC User Manual Version 1.0 On this interface, the user can view allocable addresses, allocated addresses and remain addresses of DHCP server. In the second table, it displays allocated information of address and used time. If there is a binding existed in user binding, system will find out binding user name accorded with MAC according to MAC address. Otherwise, MAC address bar displays ‘-’. DHCP service enabling or disabling, or parameter modification will only take effect after the user clicks the Apply button. Static Address Translation Configuration NAT allows unregistered IP address to access Internet network. NAT is configured in a MP2000-104B Router which connects a internal network and a external network that is similar to Internet. Before sending grouping data to external network, NAT translates local address internally to the only IP address of external network. To better understand NAT configuration, define some relevant terms beforehand: Local Address: IP address that is allocated to internal network. It may not be legal address allocated by NIC or ISP. Global Address: legal address (allocated by NIC or ISP) that displays one or several internally local IP addresses to external network. Static translation is to build a one-to-one mapping between internal local address and internal global address. When a fixed address has to visit a internal address externally, the static translation is valid. The following table displays static addresses translation settings of current device. to delete relevant settings. Click Maipu Confidential & Proprietary Information Page 104 of 257 MP2000-104B-AC User Manual Version 1.0 Click Add to pop up setting interface: Local Address: input internal IP address (such as 192.168.0.2) or input internal network address or subnet mask for internal network (such as 192.168.0.0/255.255.255.0) Global Address: input legal IP address (allocated by NIC or ISP) Protocol: it is None by default, namely, only perform one-to-one translation between internal network to external network. Choose TCP or UDP can realize port mapping function. See settings in the following figure: Port mapping enables PC in internal network to provide network service for external network. After setting, the internet user can use services provided by LAN PC via global address accessing. In such case, the local address should be IP address of the host which provides services in internal network, while the global address should be IP of external network interface or IP provided by ISP. Maipu Confidential & Proprietary Information Page 105 of 257 MP2000-104B-AC User Manual Version 1.0 Local Port: The port of the service that is provided by the host in the LAN. Please refer to Port-to-Service Table. Global Port: designate a port as public port Port-to-Service Table: Network Services Protocol Port www Webpage Viewing TCP www telnet Remote Management TCP telnet smtp Mail Transmission Protocol TCP smtp pop2 Post office protocol 2 TCP pop2 pop3 Post office protocol 3 TCP pop3 domain domain service UDP domain bgp Border Router protocol TCP bgp ftp File Transfer Protocol TCP ftp ftp-data File data connection TCP ftp-data time Time synchronization TCP time snmp Simple network management protocol UDP snmp chargen CharSYSer generator TCP chargen daytime Daytime TCP daytime discard Discard TCP discard echo Echo TCP echo exec Exec TCP exec finger Finger TCP finger gopher Gopher TCP gopher hostname NIC hostname server TCP hostname ident Ident Protocol TCP ident irc Internet Relay Chat TCP irc klogin Kerberos login TCP klogin kshell Kerberos shell TCP kshell login Login TCP login lpd Printer service TCP lpd nntp Network Protocol TCP nntp pim-auto-rp PIM Auto-RP TCP pim-auto-rp sunrpc Sun Remote Procedure Call TCP sunrpc syslog Syslog TCP syslog tacacs TAC Access Control System TCP tacacs talk Talk TCP talk uucp Unix-to-Unix Copy Program TCP uucp whois Nickname TCP whois SIP SIP signal protocol UDP SIP H323 H.323 signal protocol TCP H323 RAS RAS UDP RAS RTP Real-time Transfer Protocol UDP RTP Maipu Confidential & Proprietary Information News Transport Page 106 of 257 MP2000-104B-AC User Manual Version 1.0 Dynamic Address Translation Configuration On this interface, the user can view and configure dynamic address translation. Dynamic translation is to build a one-to-one mapping between to delete internal local address and internal global address pool. Click relevant dynamic address translation configuration. Click Add to pop up configuration interface: Access List: the terms in pull-down list are defined available access lists. The source address of data packet filtered by access list will be translated. Specify global address by two ways: Specify Interface: choose an external network port from pull-down as global address. The source address of data packet filtered by access list is translated to IP address of external network. If there are several successive global IP addresses, you can define a global address pool. The internal address uses the address in the address pool to communicate with the external network. Custom Global Address Pool: input start address, end address and mask of global address pool. The data packet source address filtered by access list will be transferred to a address in address pool for sending. The access list only gives access to addresses that have been transferred. An access list that allows too many address accessing will result in unexpected fault. System will prevent some viruses or Trojan data packet from accessing by defining access list port. Maipu Confidential & Proprietary Information Page 107 of 257 MP2000-104B-AC User Manual Version 1.0 NAT Translation Parameter Configuration On this interface, the user can Set maximum number of translated NATs. Flux Dynamic & L3 Throughput Limit Configuration On this interface, the user can configure flux dynamic and Lay-3 via put limit, including Max receive flux dynamic limit, max send flux dynamic limit, (TCP/UDP/ICMP/other) layer-3(forward) via put limit, (TCP/UDP/ICMP/other) layer-3(to upper) via put limit. Maipu Confidential & Proprietary Information Page 108 of 257 MP2000-104B-AC User Manual Version 1.0 Sub-Interface Configuration MP2000-104B adds the service configurations of sub interfaces. For example, to make the data flow with VLAN ID as 1 received by fastethernet0.1, do as follows: In the second step of the WAN configuration guide, one WAN port and ten sub interfaces are listed by default (the number of configured sub interfaces can be more than ten, but considering we should not use s many sub interfaces, so only ten sub interfaces are listed for users to configure). Select fastethernet0.1 from the listed interfaces. After selecting the interface, click Next to enter the interface for selecting the access line type. Select the desired access type and continue to click Next until finishing the configuration. Here, fastethernet0.1 is added successfully. Add a VLAN via the VLAN configuration in WAN. Maipu Confidential & Proprietary Information Page 109 of 257 MP2000-104B-AC User Manual Version 1.0 After adding the sub interface fastethernet0.1 successfully, enter WAN configuration- 〉 VLAN configuration to find that the configured sub interface fastethernet0.1 exists in the Configure the interface drop-down list. Input 1 in the Vlan-ID box, select fastethernet0.1 as the configured interface, and click Set to add a VLAN. System Management Basic Information Configuration Basic information configuration shows configuration of some basic information: system name, system time, username, telephone, physical location and system uptime etc. In this configuration page, you can view some configured information. System Name: name of MP2000-104B Router. Enable it immediately by modifying configuration, without system restart. System Time: system clock time of MP2000-104B Router. Username: name of user. Telephone: phone number of user. Maipu Confidential & Proprietary Information Page 110 of 257 MP2000-104B-AC User Manual Version 1.0 Physical Location: address of user. System Uptime: regular running period from MP2000-104B Router startup to web page opening. Administrator Settings MP2000-104B Router features in two users by default, with one as admin and another as guest. Administrator has maximal authority, so the user can modify passwords of admin, guest and customize user, or enable passwords, or enable or disable guest in admin page. If the user logs in as guest, this page will not display admin user but guest user. The guest under only can modify password here rather than view relevant content of voice configuration. After ‘Applying’ password modification, the user will required to input new password for opening other pages. The username and password of default administrator are: admin; the username and password of common administrator are: guest. Maipu Confidential & Proprietary Information Page 111 of 257 MP2000-104B-AC User Manual Version 1.0 Navigation from MasterPlan to WEB Network Management Select MP2000-104B device from the topology view and right-click to display menus. Choose Use WEB NMS from the right-click menus. If the current device is configured with the user name and password for logging in to the web network management, the user name and password are introduced as the parameters for logging in to the web NMS. After passing the authentication, enter the homepage of web NMS directly and login dialog box is not displayed again. If the current device is not configured with user name and password for logging in to the web network management, but MP5 sets the default user name and password for logging in to the web network management, the default user name and password are introduced as the parameters for logging in to web network management. After passing the authentication, enter the homepage of web NMS directly and login dialog box is not displayed again. Maipu Confidential & Proprietary Information Page 112 of 257 MP2000-104B-AC User Manual Version 1.0 If the current device is not configured with user name and password for logging in to the web network management, and MP5 does not Set default user name and password for logging in to the web network management, the following interface is displayed to let the user select (1) Enter the interface of configuring the user name and password for logging in to the web network management; (2) Log in to the web network management without any authentication parameters. The login dialog box is displayed and the user can enter the homepage of the web network management after entering the user name and password manually. User Name & Password Management of Web NMS in Masterplan Select MP2000-104B device from the topology view, right-click and choose User name/password management of WEB NMS to display following interface. On the interface, you can add default user name and password for logging in to the web of a device on the topology. When using the web NMS, the user name and password are introduced as authentication parameters to the web server. After passing the authentication, enter the homepage of web NMS directly. If there are no such configurations, the user needs to input user name and password manually when using the web NMS. Maipu Confidential & Proprietary Information Page 113 of 257 MP2000-104B-AC User Manual Version 1.0 Click Add to display following interface. Input the device IP address, user name, password and description, and click OK to create a piece of login information. Edit a piece of login information: Select a desired line of login information on the User name and password management of WEB NMS interface, and click Edit to display following interface. Input the new login information and click OK. Delete a piece of login information: Select a desired line of login information on the User name and password management of WEB NMS interface, and click Delete. If the device name is configured as Default, the configuration is the default user name/password used by the user for logging in to the web. Maipu Confidential & Proprietary Information Page 114 of 257 MP2000-104B-AC User Manual Version 1.0 Configuration File Management On the interface, you can back up or recover the configuration files of the device. Click Backup, select the directory for saving the backup file and click OK to download the configuration file of the current gateway to the PC hard disk of the administrator. If you want to use the existing configuration file to cover the configurations in the current gateway, click Browse, select the desired configuration file, and click Recover. Then the system displays the prompt for restarting the device. The new configuration can take effect only after restarting the device, so it is recommended to restart the device. Log Management Display log information saved in the flash file. Log information level definition Level Description 0 The system is unavailable. 1 Actions need to be taken at once. Maipu Confidential & Proprietary Information Page 115 of 257 MP2000-104B-AC User Manual Version 1.0 2 Critical status 3 Error status 4 Warning status 5 Normal but noticeable status 6 Report information 7 Debug information In the logs, there is the following content: %SYS-5-LOGIN: Here, 5 in %SYS-5-LOGIN means the level. You can find its description from the above table. Note Click Clear and the system displays the prompt for clearing all logs. If clicking OK, all the logs are cleared, so please be careful. SNMP Parameter Configuration Simple Network Management Protocol (SNMP) is a standard protocol for managing Internet. It is to ensure that the management information can be transmitted between the network management station and the managed devices-Agent. It is convenient for the system administrator to manage the network system. For the details pf SNMP protocol, refer to the materials about TCP/IP. Enter the interface for configuring SNMP parameters via Navigation >System Management->Configuration of SNMP parameters. Start the SNMP Agent: Tick the check box and the network management agent process on the VoIP gateway is started. The SNMP network management software can manage the VoIP gateway via the SNMP agent. SNMP community name table includes two configuration items, that is, community name and access right. The community name specifies the community to which the VoIP gateway is added. The community name Maipu Confidential & Proprietary Information Page 116 of 257 MP2000-104B-AC User Manual Version 1.0 should be the same as that on the network management work station. Otherwise, the network management station cannot perform any operations in the VoIP gateway. The access right specifies the operation right that the SNMP management station with the community name has for the managed devices. The rights include Read and Write. TRAP host name table includes the host name and the community name. The host name can be configured as the name or IP address of the host of the SNMP trap packets sent by the receiving device. Usually, the IP address is the address of the network management work station. The community name specifies the community to which the management station receiving TRAP packets. It can be the same as or different from the community name in the SNMP community name table. and in the Edit line to edit and delete the corresponding item. Click Click the Add community name and Add host name buttons to add the items in the SNMP community name table and TRAP host name table. The community name, access right and the IP address of the host receiving the TRAP packets need to be configured only when the SNMP agent is enabled, so when the gateway does not start the SNMP agent, you cannot configure the parameters. Currently, web interface supports only some SNMPv2 configurations. If you want to configure the SNMPv1 or SNMPv3 parameters and other SNMPv2 parameters, telnet to the device and use the shell interface to configure. The host receiving the TRAP packets can be configured as the host name or IP address. When configured host name, please confirm whether you configure the mapping of the host name and the confirmed IP address in the host name and IP address mapping table. The mapping of the host name and the IP address needs to be configured via shell. Save Configuration The last item of the navigation is the Save Configuration function. Click it and the current running configurations of the device are saved to the configuration file on the device. When you modify the running configurations of the device and hope that the new configurations take effect when starting the device next time, remember to save them. Reset Button There is a reset button at the right of the back of MP2000-104B router. It provides two functions for the user. When the system is running (SYS indicator flashes and INUSE indicator is off), hold the reset button. After more than 3 seconds, the device deletes the configuration files of the system, recovers the default configurations in Maipu Confidential & Proprietary Information Page 117 of 257 MP2000-104B-AC User Manual Version 1.0 the factory and restarts. After the device restarts successfully, the default configurations are recovered. When the system is powered on, hold the reset button and the device downloads the application program from the FTP server. After the downloading and the system is powered on normally, the device deletes the configuration files and recovers the default configurations. For the upgrade, refer to the section of Device Software Upgrade. The above two operations are to make the device can be powered on and work normally again when the system is abnormal. Use the reset button and after the system is powered on, the original configuration files are deleted, so the services need to be re-configured and saved. Maipu Confidential & Proprietary Information Page 118 of 257 MP2000-104B-AC User Manual Version 1.0 Shell Configuration Guide Configure Router via Telnet If the router is configured with the IP addresses of the interfaces, you can use Telnet to log in to the router via the LAN or WAN and configure the router. Configure the router via LAN Configure the router via LAN Connect the network interface of the PC to the Ethernet interface of the router. Run the application program of the Telnet client on a PC of the LAN. Set Telnet Terminal Preferred Options: The set content: Terminal->Preferred Options->Analog Options and set it as VT100/ANSI. Configure terminal preferred options Maipu Confidential & Proprietary Information Page 119 of 257 MP2000-104B-AC User Manual Version 1.0 When configuring Telnet client program, you should cancel the Local Response (echo) option. Otherwise, the contents input by the user are displayed repeatedly, which affects the normal use of the command editing function of shell system. Input the IP address of the router and set up telnet connection with the router. The host name is set as the IP address of the router 128.255.255.1; The port is set as Telnet (23); Terminal type is set as ANSI. Connect window ; The other operations are the same as the configuration via console interface. Configure via WAN Configure the router via WAN Connect the PC to the remote router via the local router. Run the Telnet client application program on the local PC. The following steps are the same as those of the configuration via LAN. When configuring router via Telnet, do not change the IP address of the WAN interface casually. When other parameters are sure to be configured correctly, modify it again if necessary. After modifying the IP address, Telnet may be disconnected and you need to input new IP address to reconnect it. Maipu Confidential & Proprietary Information Page 120 of 257 MP2000-104B-AC User Manual Version 1.0 When the user logs in to Maipu router via PC (such as WIN2000), do as follows: First, input user name and password to enter WIN2000 system. With the command prompt of WIN2000 system, run telnet client program to log in to the router. The command is: telnet 128.255.255.1; After executing the command, the output result is: Connecting to 128.255.255.1... Display system prompt of the router: router> Press the Ctrl ] combination key to return to the telnet program: Microsoft Telnet> When the user logs in to the router via other Telnet client program and if the command editing environment works abnormally, refer to the corresponding instructions to configure Telnet client program. RIP Dynamic Routing Configuration RIP(Routing Information Protocol)is a kind of distance-vector interior gateway routing protocol, which is usually applied for the simple smallscale networks learning routes. The section mainly explains how to configure RIP dynamic routing protocol to interconnect networks. Main contents of The section are: Description of related commands for configuring RIP protocol Examples of configuring RIP protocol Monitor and debug RIP protocol Maipu Confidential & Proprietary Information Page 121 of 257 MP2000-104B-AC User Manual Version 1.0 RIP Basic Commands Command Description Config mode router rip *To enable RIP protocol and enter RIP Protocol Configuration Mode config address-family ipv4 vrf vrfname *To enable VRF and enter the RIP protocol VRF configuration mode config-rip auto-summary *To Enable route auto-summary function of RIP version 2 config-rip configrip-af default-information originate *To configure the default route (0.0.0.0/0) to be notified, and set itself as the default gateway config-rip configrip-af default-metric metric *To configure the default measurement of routing items when RIP redistributing routing protocols config-rip configrip-af distance distance *To configure the administration distance of RIP routing config-rip configrip-af distribute-list {access-listname | prefix prefix-listname} in/out [interface] *To configure RIP route filtering config-rip configrip-af interface *To switch to Interface Configuration Mode config-rip maximum-paths max-number *To configure the maximum paths of the next hops of RIP load balance config-rip configrip-af maximum-prefix max-number [warning-number] *To configure the maximum number of the routing items and the number of the warning routing items in RIP routing database config-rip configrip-af neighbor ip-address *To configure the neighbor router which advertises the routing information in the form of unicast config-rip network {networknumber|interface} *To configure the direct interconnection networks or interfaces covered by RIP config-rip configrip-af offset-list access-list-name in/out offset [interface] *To configure RIP to modify the measurement of the specified route config-rip configrip-af output-delay delay-interval *To configure the minimum sending interval among each packet in a RIP update config-rip configrip-af passive-interface interface *To configure a interface as the passive interface of RIP config-rip configrip-af recv-buffer-size buf-size *To configure the buffer size for RIP receiving packets config-rip configrip-af redistribute {bgp | connected | ospf process-id | static} [metric metric] [route-map route-map-name] *To configure RIP to redistribute routes of other protocols config-rip configrip-af timers basic update invalid holddown flush *To configure the time of RIP timer config-rip configrip-af version {1 | 2} *To configure the RIP global version config-rip configrip-af ip rip authentication {mode {text | md5} | key {0 | 7} key-string | key-chain keychain-name} *To configure the protocol packet authentication on the interface of RIP version 2 config-if-xxx ip rip receive version {1 | 12 | 2} *To configure the version of the packets received by RIP on the interface config-if-xxx Maipu Confidential & Proprietary Information config-rip-af Page 122 of 257 MP2000-104B-AC User Manual Version 1.0 ip rip receive-packet *To configure RIP to enable receiving packets on the interface config-if-xxx ip rip send version {1 | 2 | 1 2 | 2 1 | 12 | 1-compatible } * To configure the version of the packets sent by RIP on the interface, and specify to send packets with which version and which form on the interface config-if-xxx ip rip send-packet * to configure RIP to enable sending packets on the interface config-if-xxx ip split-horizon [poisoned] * to configure RIP to enable split-horizon or poisoned reverse on an interface config-if-xxx *To configure the summary address of RIP version 2 on the interface config-if-xxx show ip rip [vrf vrf-name] To configure overall information of RIP enable show ip rip database [detail] [vrf vrf-name] [detail]] To display information about RIP routing database enable show ip [interface] To display information about RIP interface enable show ip protocols rip To display related information about RIP protocol enable show running-config router rip To display information about RIP configuration enable show ip route rip To display RIP routing information in the routing table enable ip summary-address A.B.C.D/n rip rip interface Note: 1. The symbol “*” before Commands means that there is the configuration example to explain the command in details later. 2. Configuration mode means the mode for executing the configuration command, such as config, config-if-xx (interface name) and config-xx (protocol name). Description of Related Commands for Configuring RIP The command router rip This command enables the RIP protocol and enters the RIP routing configuration mode; the no format of the command can be used to disable the RIP protocol. router rip no router rip [Default status] do not run RIP protocol [Command mode] Global Configuration Mode The command address-family Maipu Confidential & Proprietary Information Page 123 of 257 MP2000-104B-AC User Manual Version 1.0 This command enables VRF and enters the RIP protocol VRF configuration mode. This command makes RIP learn routing in the specified VRF. The no format of the command is to disable VRF of RIP protocol. address-family ipv4 vrf vrf-name no address-family ipv4 vrf vrf-name Syntax Description vrf-name The VRF name of the enabled VRF [Default status] do not enable VRF [Command mode] RIP Protocol Configuration Mode The command auto-summary This command enables the route auto-aggregation function in RIP version 2. Route auto-aggregation means that all sub-net routes in the same natural network segmemt aggregate to be a route of a natural mask when they are being notified to outside; the no format of the command can be used to disable the route auto-aggregation function in RIP version 2. auto-summary no auto-summary [Default status] no route auto-aggregation function in RIP version 2 [Command mode] RIP Protocol Configuration Mode Note: Route auto-aggregation function is always enabled in RIP version 1. RIP version 1 doesn’t support host routes. When RIP version 1 is sending the default route 0.0.0.0/0, the route autosummary doesn’t need to run. The command default-information originate This command configures the default route (0.0.0.0/0) to be notified and makes itself as the default gateway. The no format of the command can be used to cancel the default route to be notified. default-information originate no default-information originate [Default status] do not notify the default route [Command mode] RIP Protocol Configuration Mode Note: If a default route (0.0.0.0/0) is learned, it replaces the configured default route (0.0.0.0/0). The command default-metric Maipu Confidential & Proprietary Information Page 124 of 257 MP2000-104B-AC User Manual Version 1.0 This command configures the default measurement of routing items when RIP redistributing other routing protocols; the no format of the command can be used to recover the default measurement to the default value. default-metric metric no default-metric metric Syntax Description metric To configure the default measurement value of routing items when RIP redistributing other routing protocols. The value range is 1-16. Maipu Confidential & Proprietary Information Page 125 of 257 MP2000-104B-AC User Manual Version 1.0 [Default status] metric = 1。 [Command mode] RIP Protocol Configuration Mode The command distance This command configures the administration distance of RIP routes. The administration distance of routes is applied for the election of routes among different protocols; whose value is smaller, whose priority is higher. The no format of the command can be used to recover the administration distance of RIP routes to the default value. distance distance no distance distance Syntax Description distance To configure the administration distance value of RIP routes. The value range is 1-255. [Default status] distance = 120。 [Command mode] RIP Protocol Configuration Mode The command distribute-list This command configures the RIP route filtering, which can be used to filter routes which are learned or notified to outside; the no format of the command can be used to cancel the RIP route filtering. distribute-list {access-list-name | prefix prefix-list-name} in/out [interface] no distribute-list {access-list-name | prefix prefix-list-name} in/out [interface] Syntax Description access-list-name To configure the standard access list name of the RIP route filtering. Here, only the standard access list is supported. Prefix-list-name To configure the prefix list name of the RIP route filtering. In To configure to filter the learned routes Out To configure to filter routes that are notified to outside interface To configure the interface using the filtering configuration [Default status] do not filter routes [Command mode] RIP Protocol Configuration Mode The command maximum-paths This command configures the maximum number of the next hop’s paths of RIP load balance; the no format of the command can be used to recover the maximum number of the next hop’s paths to the default value. maximum-paths max-number no maximum-paths max-number Maipu Confidential & Proprietary Information Page 126 of 257 MP2000-104B-AC User Manual Version 1.0 Syntax Description max-number To configure the maximum number of the next hop’s paths of RIP load balance. The value range is 1-6. [Default status] number-paths = 4。 [Command mode] RIP Protocol Configuration Mode Note: When the number of the learned route’s next hops exceeds the maximum number of the route’s next hops, then to replace the next hop which has already consumed half (or over half) of the valid time with the learned new next hop. The command maximum-prefix This command is to configure the upper limit number and the warning number of the routing items in RIP routing database. The configuration of this command doesn’t affect the learned routes. The no format of the command can be used to cancel the restriction of the upper limit number and the warning number. maximum-prefix max-number [warning-number] no maximum-prefix Syntax Description max-number To configure the value of the upper limit number of the routing items in RIP routing database; to not learn new route any more if the value is exceeded. The value range is 1-65535. warning-number To configure the proportion of the warning number of the routing items to the upper limit number of the routing items in RIP routing database. The system alarms if the value is exceeded. The value range is 1-100. [Default status] no restriction of upper limit number and warning number [Command mode] RIP Protocol Configuration Mode The command neighbor This command configures the neighbor router which notifies the routing information in the form of unicast. The no format of the command can be used to cancel a neighbor router which notifies the routing information in the form of unicast. neighbor ip-address no neighbor ip-address Syntax Description ip-address To configure the IP address of the neighbor routers’s (notifying the routing information in the form of unicast) direct connect interface [Default status] no neighbor router [Command mode] RIP Protocol Configuration Mode Maipu Confidential & Proprietary Information Page 127 of 257 MP2000-104B-AC User Manual Version 1.0 Note: Notifying the routing information to neighbor only processes on ther interface covered by RIP; and passive-interface cannot prevent the sending of this kind of packets. The command network This command configures the direct interconnection networks or interfaces covered by RIP. Covering an interface is equivalent to covering all direct interconnection networks on the interface. The no format of the command can be used to cancel the direct interconnection networks or interfaces covered by RIP. network {network-number| interface } no network {network-number| interface } Syntax Description network-number To configure the network addresses covered by RIP. The mask of the network address is obtained from the natural network segment and cannot be configured. All direct interconnection networks matching the covered network address run RIP. The address of the super-net cannot be covered by the command interface To configure the interface name of the interface covered by RIP [Default status] no direct interconnection network and interface is covered [Command mode] RIP Protocol Configuration Mode Note: A. RIP notifying the routing information is based on the IP address of the interface. But on a Maipu router, the routing information can only be issued on the primary address; the secondary address is only the source of the routing information in the direct interconnection networks covered by RIP. B . The direct route generated by the IP address configured via ip unnumber (use the address of other interface) is not notified to outside as the information about the direct interconnection network in RIP. C.When receiving RIP protocol packets, the protocol checks whether the source address of a packet directly connects with the receiving interface, that is to check if they are in a same sub-net. If it is a point-to-point interface, when they are not in a same sub-net, the protocol even checks whether the source address matches the peer address. In some link layers, the local router cannot learn the point-to-point interface whose peer address is not in a same sub-net. Users need to use the command ip route peer-address to configure the peer IP address of the interface, and configure the static route of the address, and then the local end can learn routes from peer normally. The command offset-list Maipu Confidential & Proprietary Information Page 128 of 257 MP2000-104B-AC User Manual Version 1.0 This command configures RIP to modify the measurement of the specified routes, which can revise the learned routes or the notified routes. The no format of the command can be used to recover to the default measurement of RIP routes. offset-list access-list-name in/out offset [interface] no offset-list access-list-name in/out [offset] [interface] Syntax Description access-list-name To configure the access list name for routing. Here, only the standard access list is supported. in To configure RIP to modify the measurement of the learned routes out To configure RIP to modify the measurement of routes notified to outside offset To configure the added offset value for the modified measurement of the specified route. The value range is 0-16. interface To configure the name of the interface on which RIP modifies the measurement of the specified route [Default status] use the default measurement [Command mode] RIP Protocol Configuration Mode The command output-delay This command configures the minimum sending interval among each packet in a RIP update. This command is to resolve the packet-loss problem when a high-speed interface sending the RIP protocol packets to a low-speed interface. The no format of the command can be used to recover the minimum sending interval to the default value. output-delay delay-interval no output-delay delay-interval Syntax Description delay-interval To configure the minimum sending interval value among each packet in a RIP update. The unit is millisecond, and the value range is 8-50. [Default status] delay-interval = 0, no minimum interval restriction [Command mode] RIP Protocol Configuration Mode The command passive-interface This command is to configure the interface which restrains from sending packets. The interface only receives the route updating packets, but doesn’t send them. The no format of the command can be used to cancel the interface which restrains from sending packets. passive-interface interface no passive-interface interface Syntax Description interface To configure the interface name of the interface which restrains from sending packets Maipu Confidential & Proprietary Information Page 129 of 257 MP2000-104B-AC User Manual Version 1.0 [Default status] the interface which restrains from sending packets of RIP is not specified [Command mode] RIP Protocol Configuration Mode Note: Passive-interface doesn’t restrain from sending the route updating to neighbor by unicast. This command can be combined with the command neighbor to use; which can control a router send the route updating by unicast aiming at some neighbors, but not update routes by broadcast (RIPv2 is multicast) for all neighbor routers on the interface. The command recv-buffer-size This command configures the buffer size for RIP receiving packets. This command is to resolve the packet-loss problem when a high-speed interface sending RIP protocol packets to a low-speed interface. The no format of the command is to recover the buffer size for RIP receiving packets to the default value. recv-buffer-size buf-size no recv-buffer-size buf-size Syntax Description buf-size To configure the value of the buffer size for RIP receiving packets. The unit is byte and the value range is 41600-5242880. [Default status] buf-size = 41600bytes (the default buffer size for UDP socket receiving packets) [Command mode] RIP Protocol Configuration Mode The command redistribute This command configures to redistribute routes of other protocols in RIP. The no format can be used to cancel the redistribution. redistribute {bgp | connected | ospf process-id | static} [metric metric] [route-map route-map-name] no redistribute {bgp | connected | ospf process-id | static} Maipu Confidential & Proprietary Information Page 130 of 257 MP2000-104B-AC User Manual Version 1.0 Syntax Description bgp To configure to redistribute routes of BGP protocol in RIP connected To configure to redistribute the direct connected routes in RIP ospf To configure to redistribute routes of OSPF protocol in RIP process-id To configure the protocol processing number of OSPF protocol’s routes which is redistributed in RIP static To configure to redistribute the static routes in RIP metric To configure the measurements of other protocol’s routes which are redistributed in RIP. The default value is 1, metric To configure the measurement value of other protocol’s routes which are redistributed in RIP. The value range is 0-16. route-map To configure the route map of other protocol’s routes which are redistributed in RIP. route-map-name To configure the route map name of other protocol’s routes which are redistributed in RIP. [Default status] do not redistribute routes of other protocols [Command mode] RIP Protocol Configuration Mode Note: 1. If the measurement value is not specified when configuring redistribution, users can use the measurement configured by the command default-metric. If there is no measurement configured by the command default-metric, users can use the default measurement value. 2. In RIP redistribution, the route map (route-map) can match two attributes: the destination sub-net address (match ip address) and route tag (match tag); users can Set two attributes, route tag (set tag) and metric (set metric). 3. The sources of routing items in RIP database comprise the redistributed routes of other protocols, the direct connected routes covering the network and the learned routes. When routes from various sources exist in a same route, they are elected via the administration distance of each kind of route. 4. When the configuration of the route map is changed, RIP protocol cannot apperceive automatically; RIP cannot respond the change of the route map’s configuration until the redistribution is re-configured. The command timers basic This command configures the time of RIP timer. In a same RIP routing domain, the configurations of timer basic on all routers should be consistent. The no format of the command can be used to recover the time of RIP time to the default value. timers basic update invalid holddown flush no timers basic Maipu Confidential & Proprietary Information Page 131 of 257 MP2000-104B-AC User Manual Version 1.0 Syntax Description update The sending interval (second) of the normal routing information’s updating. The value range is 5-2147483647. invalid The valid time of a route (second). The value should be treble update. If a route is not responded the packet refreshing in the valid time, then the route is marked as the invalid route, and is notified as unreachable. However, the route is still used for transmitting packets, which means it will not be deleted immediately from the core routing table until the route is deleted from the routing database of RIP (flush timer timeout). The value range is 5-2147483647. holddown The time for restraining an invalid route from updating. When a route is marked as invalid, it enters the update-restraining status. In the update-restraining status, the valid route is not permitted to be respond the packets updating until the holddown time is exhausted. The value range is 0-2147483647. flush The time for holding an invalid route before it is cleared (second). The value should be bigger than the value of holddown. Otherwise, the invalid route will be updated by the new route before the period of restraining update is out. The value range is 5-2147483647. [Default status] update = 30 seconds; invalid = 180 seconds; holddown = 180 seconds; flush = 240 seconds. [Command mode] RIP Protocol Configuration Mode Note: If holddown is set as 0, routes don’t have the period of restraining update. The command version This command configures the RIP global version. The configurations of the command on all routers in a same RIP routing domain should be consistent. We suggest users use the RIP version 2 and no autosummary. The no format of the command can be used to recover the RIP global version to the default value. version {1 | 2} no version {1 | 2} Syntax Description 1 To configure the RIP global version as version 1. 2 To configure the RIP global version as version 2. [Default status] RIP version 1 [Command mode] RIP Protocol Configuration Mode Maipu Confidential & Proprietary Information Page 132 of 257 MP2000-104B-AC User Manual Version 1.0 The command ip rip authentication This command configures the protocol packet authentication on the interface of RIP version 2. The no format of the command can be used to cancel the protocol packet authentication. ip rip authentication {mode {text | md5} | key {0 | 7} key-string | keychain key-chain-name} no ip rip authentication {mode {text | md5} | key {0 | 7} key-string | key-chain key-chain-name} Syntax Description mode To configure the authentication mode of the packet authentication on the interface of RIP version 2 text To configure the packet authentication mode on the interface of RIP version 2 as the plain-text authentication mode; should be used by combining with key or key-chain. md5 To configure the packet authentication mode on the interface of RIP version 2 as the MD5 authentication mode; should be used by combining with key or key-chain. key To configure the password of the packet authentication on the interface of RIP version 2 0 To configure the password of the packet authentication’s plain text mode on the interface of RIP version 2 7 To configure the password of the packet authentication’s cipher text mode on the interface of RIP version 2. It is used for script running when enabling the password encryption service. Users should not configure the command. key-string To configure the password character string of the packet authentication on the interface of RIP version 2 key-chain To configure the password chain of the packet authentication on the interface of RIP version 2. When the password and password chain are both configured, use the configured password. key-chain-name To configure the name of the packet authentication’s password chain on the interface of RIP version 2 [Default status] no authentication for protocol packets [Command mode] Interface Configuration Mode Note: When processing MD5 authentication, the following points need to be noticed: 1. In the MD5 authentication information, the key ID needs to be carried. When configure the password via key, the key ID is 1. When configure the password via key-chain, key ID is the key ID of the password on keychain. 2. If the key IDs of the two ends in the authentication are not the same, the key ID which is bigger can pass the authentication, while the smaller one cannot. Maipu Confidential & Proprietary Information Page 133 of 257 MP2000-104B-AC User Manual Version 1.0 3. The serial number information is carried in MD5 authentication information, which can prevent from re-play attacks. The command ip rip receive version This command configures the version of the packets received by RIP on the interface. The no format of the command can be used to recover the version to the default value. ip rip receive version {1 | 2 | 12} no ip rip receive version Syntax Description 1 To configure RIP only to receive RIP version 1 packets on the interface 2 To configure RIP only to receive RIP version 2 packets on the interface 12 To configure RIP to receive RIP version 1 and version 2 packets at the same time on the interface [Default status] receive packets according to the RIP global version [Command mode] Interface Configuration Mode The command ip rip receive-packet This command configures RIP to enable receiving packets on the interface. The no format can be used to disable receiving packets on the interface. ip rip receive-packet no ip rip receive-packet [Default status] enable receiving packets on the interface [Command mode] Interface Configuration Mode The command ip rip send version This command configures the version of the packets sent by RIP on the interface, and specifies to send packets with which version and which form on the interface. The no format of the command can be used to recover to send packets according to the RIP global version. ip rip send version {1 | 2 | 1 2 | 2 1 | 12 | 1-compatible} no ip rip send version Maipu Confidential & Proprietary Information Page 134 of 257 MP2000-104B-AC User Manual Version 1.0 Syntax Description 1 To configure RIP to send RIP version 1 packets on the interface 2 To configure RIP to send RIP version 2 packets on the interface 12 To configure RIP to send RIP version 1 and version 2 packets at the same time on the interface; which means to respectively send an updating packets with two versions 21 To configure RIP to send RIP version 1 and version 2 packets at the same time on the interface; which means to respectively send an updating packets with two versions 12 To configure RIP to send RIP version 2 packets in the form of broadcast on the interface 1-compatible To configure RIP to send RIP version 2 packets in the form of broadcast on the interface [Default status] send packets according to the RIP global version [Command mode] Interface Configuration Mode Note: The command doesn’t affect sending unicast packets to neighbor. The command ip rip send-packet This command configures RIP to enable sending packets on the interface. The no format of the command can be used to disable sending RIP packets on the interface. ip rip send-packet no ip rip send-packet [Default status] enable sending RIP packets on the interface [Command mode] Interface Configuration Mode The command ip split-horizon This command configures RIP to enable split-horizon or poisoned reverse on an interface. The split-horizon and poisoned reverse only take effect for the learned routes, the direct routes of the networks covered by RIP, the redistributed direct and static routes. The no format of the command can be used to cancel the function. ip split-horizon [poisoned] no ip split-horizon Syntax poisoned Description To Enable poisoned reverse [Default status] Enable poisoned reverse [Command mode] Interface Configuration Mode Maipu Confidential & Proprietary Information Page 135 of 257 MP2000-104B-AC User Manual Version 1.0 The command ip summary-address rip This command configures the address summarization of RIP version 2 on the interface. The address summarization is invalid for RIP version 1. The no format of the command can be used to cancel the address summarization of RIP version 2 on the interface. ip summary-address rip A.B.C.D/n no ip summary-address rip A.B.C.D/n Syntax Description A.B.C.D/n To configure the summary route of the address summarization on the interface of RIP version2 [Default status] no address summarization [Command mode] Interface Configuration Mode Note: In RIP, there are two kinds of route summaries: route auto-summary and the address summary configured on the interface. For RIP version 1, only the route auto-summary is valid. For RIP version 2, when the route auto-summary and the address summary on the interface exist at the same time, the route auto-summary is performed at first; when the route auto-summary cannot be performed (super-net), then the address summary on the interface is enabled. Examples of Configuring RIP RIP Enabling Configuration Maipu Confidential & Proprietary Information Page 136 of 257 MP2000-104B-AC User Manual Version 1.0 Illustration: The network topology figure, the g1 of Router-A connects with the e0 of Router-B, their addresses are 10.1.1.1 and 10.1.1.2; meanwhile the g0 of Router A connects with another LAN 20.1.1.0/24. A. The configuration of Router-A: Command Description router-A#configure terminal To enter Global Configuration Mode router-A(config)# interface gigaethernet0 To enter the g0 interface router-A(config-if-gigaethernet0)# ip address 20.1.1.1 255.255.255.0 To configure the ip address router-A(config-if-gigaethernet0)# interface gigaethernet1 To enter the g1 interface router-A(config-if-gigaethernet1)# ip address 10.1.1.1 255.255.255.0 To configure the ip address router-A(config-if-gigaethernet1)#exit To return to Global Configuration Mode router-A(config)#router rip To enter the RIP Configuration Mode router-A(config-rip)# network 20.0.0.0 To specify the network number run by RIP router-A(config-rip)# network 10.0.0.0 Same as above router-A(config-rip)#version 2 To configure the RIP version B. The configuration of Router-B: Command Description router-B#configure terminal To enter Global Configuration Mode router-B(config)# interface ethernet0 To enter the e0 interface router-B(config-if- ethernet0)# ip address 10.1.1.2 255.255.255.0 To configure the ip address router-B(config)#router rip To enter the RIP Configuration Mode router-B(config-rip)# network 10.0.0.0 To specify the network number run by RIP router-B(config-rip)#version 2 To configure the RIP version After the above configurations are completed, Router-A and Router-B start to run RIP. Run the command show ip route rip on Router-B, we can see that Router B has already learned another sub-net of Router-A. R 20.1.1.0/24 [120/2] via 10.1.1.1, 00:00:06, ethernet0 Maipu Confidential & Proprietary Information Page 137 of 257 MP2000-104B-AC User Manual Version 1.0 RIP Route Summarization Configuration In the network topology figure 4-5, configure route summarization on Router-A. Command Description router-A#configure terminal To enter Global Configuration Mode router-A(config)# interface gigaethernet0 To enter the g0 interface router-A(config-if-gigaethernet0)# ip address 20.1.1.1 255.255.255.0 To configure the ip address router-A(config-if-gigaethernet0)# interface gigaethernet1 To enter the g1 interface router-A(config-if-gigaethernet1)# ip address 10.1.1.1 255.255.255.0 To configure the ip address router-A(config-if-gigaethernet1)#exit To return to Global Configuration Mode router-A(config)#router rip To enter the RIP Configuration Mode router-A(config-rip)# network 20.0.0.0 To specify the network number run by RIP router-A(config-rip)# network 10.0.0.0 Same as above router-A(config-rip)# version 2 To configure the RIP version router-A(config-rip)# auto-summary To enable auto-summary The configuration of Router-B is the same as 4.2.3.1. Run the command show ip route rip on Router-B, we can see the summary route learned by Router-B. R 20.0.0.0/8 [120/2] via 10.1.1.1, 00:00:07, ethernet0 RIP Default Route A dvertisement In the network topology figure 4-9, configure the notification of the default route on Router-A. Command Description router-A#configure terminal To enter Global Configuration Mode router-A(config)# interface gigaethernet0 To enter the g0 interface router-A(config-if-gigaethernet0)# ip address 20.1.1.1 255.255.255.0 To configure the ip address router-A(config-if-gigaethernet0)# interface gigaethernet1 To enter the g1 interface router-A(config-if-gigaethernet1)# ip address 10.1.1.1 255.255.255.0 To configure the ip address router-A(config-if-gigaethernet1)#exit To return to Global Configuration Mode router-A(config)#router rip To enter the RIP Configuration Mode router-A(config-rip)# network 10.0.0.0 To specify the network number run by RIP Maipu Confidential & Proprietary Information Page 138 of 257 MP2000-104B-AC User Manual Version 1.0 router-A(config-rip)# version 2 To configure the RIP version router-A(config-rip)# default-information originate To notify the default route The configuration of Router-B is the same as 4.2.3.1. Run the command show ip route rip on Router-B, we can see the information about the default route. R 0.0.0.0/0 [120/2] via 10.1.1.1, 00:00:02, ethernet0 RIP Administration Distance Adjustment In the network topology figure 4-9, the configuration of Router-A is the same as 4.2.3.1. Adjust RIP administration distance on Router-B. Command Description router-B#configure terminal To enter Global Configuration Mode router-B(config)# interface ethernet0 To enter the e0 interface router-B(config-if- ethernet0)# ip address 10.1.1.2 255.255.255.0 To configure the ip address router-B(config)#router rip To enter the RIP Configuration Mode router-B(config-rip)# network 10.0.0.0 Same as above router-B(config-rip)# version 2 To configure the RIP version router-B(config-rip)# distance 100 To adjust the administration distance of RIP routes as 100 Run the command show ip route rip on Router-B. R 20.1.1.0/24 [100/2] via 10.1.1.1, 00:00:06, ethernet0 RIP Route Filtering Configuration In the network topology figure 4-5, the configuration of Router-A is the same as 4.2.3.1. Filter the route 20.1.1.0/24 on Router-B. Command Description router-B#configure terminal To enter Global Configuration Mode router-B(config)# interface ethernet0 To enter the e0 interface router-B(config-if- ethernet0)# ip address 10.1.1.2 255.255.255.0 To configure the ip address router-B(config)#ip access-list standard 10 To configure the standard access list router-B(config-std-nacl)# deny 20.1.1.0 0.0.0.255 To configure the rule to deny 20.1.1.0/24 router-B(config-std-nacl)# permit any To configure the rule to permit other routes router-B(config)#router rip To enter the RIP Configuration Mode Maipu Confidential & Proprietary Information Page 139 of 257 MP2000-104B-AC User Manual Version 1.0 router-B(config-rip)# network 10.0.0.0 Same as above router-B(config-rip)# version 2 To configure the RIP version router-B(config-rip)# distribute-list 10 in e0 To use the access list on the e0 Run the command show ip rotue rip on Router-B, there is no RIP route 20.1.1.0/24. RIP Load Balance Configuration In the network topology figure 4-6, Router-B can get to LAN via Router-A or Router C. The configurations of Router-A and Router-B are the same as 4.2.3.1. The configuration of Router-C: Command Description router-C#configure terminal To enter Global Configuration Mode router-C(config)# interface gigaethernet0 To enter the g0 interface router-C(config-if-gigaethernet0)# ip address 20.1.1.3 255.255.255.0 To configure the ip address router-C(config-if-gigaethernet0)# interface gigaethernet1 To enter the g1 interface router-C(config-if-gigaethernet1)# ip address 10.1.1.3 255.255.255.0 To configure the ip address router-C(config-if-gigaethernet1)#exit To return to Global Configuration Mode router-C(config)#router rip To enter the RIP Configuration Mode router-C(config-rip)# network 20.0.0.0 To specify the network number run by RIP router-C(config-rip)# network 10.0.0.0 Same as above router-C(config-rip)#version 2 To configure the RIP version Maipu Confidential & Proprietary Information Page 140 of 257 MP2000-104B-AC User Manual Version 1.0 Run the command show ip route rip Router-B, we can see routes of the load blance. R 20.1.1.0/24 [100/2] via 10.1.1.1, 00:00:06, ethernet0 [100/2] via 10.1.1.3, 00:00:06, ethernet0 If the RIP load balance function needs to be disabled, users need to configure the command maximum-paths on Router-B. Command Description router-B#configure terminal To enter Global Configuration Mode router-B(config)# interface ethernet0 To enter the e0 interface router-B(config-if- ethernet0)# ip address 10.1.1.2 255.255.255.0 To configure the ip address router-B(config)#router rip To enter the RIP Configuration Mode router-B(config-rip)# network 10.0.0.0 Same as above router-B(config-rip)# version 2 To configure the RIP version router-B(config-rip)# maximum-paths 1 To make RIP only use one path, and disable the load balance Run the command show ip route rip on Router-B, there is only one route message. RIP Passive Interface Configuration In the network topology figure 4-9, configure the g1 interface on the Router-A as the passive interface. Command Description router-A#configure terminal To enter Global Configuration Mode router-A(config)# interface gigaethernet0 To enter the g0 interface router-A(config-if-gigaethernet0)# ip address 20.1.1.1 255.255.255.0 To configure the ip address router-A(config-if-gigaethernet0)# interface gigaethernet1 To enter the g1 interface router-A(config-if-gigaethernet1)# ip address 10.1.1.1 255.255.255.0 To configure the ip address router-A(config-if-gigaethernet1)#exit To return to Global Configuration Mode router-A(config)#router rip To enter the RIP Configuration Mode router-A(config-rip)# network 20.0.0.0 To specify the network number run by RIP router-A(config-rip)# network 10.0.0.0 Same as above router-A(config-rip)# version 2 To return to Global Configuration Mode router-A(config-rip)# passive-interface gigaethernet1 To Set g1 as the passive interface Maipu Confidential & Proprietary Information Page 141 of 257 MP2000-104B-AC User Manual Version 1.0 The configuration of Router-B is the same as 4.2.3.1. Run the command show ip route rip on Router-B, we can find that there is no RIP route. Enable debug ip rip event, we can find the RIP updating packets sent by Router-A will not be received. RIP Unicast Neighbor Configuration Example: In the network topology figure 4-7, the configuration of Router-c is: Command Description router-C#configure terminal To enter Global Configuration Mode router-C(config)# interface ethernet0 To enter the e0 interface router-C(config-if- ethernet0)# ip address 10.1.1.3 255.255.255.0 To configure the ip address router-C(config)#router rip To enter the RIP Configuration Mode router-C(config-rip)# network 10.0.0.0 Same as above router-C(config-rip)# version 2 To configure the RIP version The configurations of Router-A and Router-B are the same as 4.2.3.1. Router-C recceives RIP updating packets from Router-A and learns RIP routes. If users hope that Router-A only sends RIP updating to Router-B, they can combine the passive interface and unicast neighbor to use. Maipu Confidential & Proprietary Information Page 142 of 257 MP2000-104B-AC User Manual Version 1.0 The configuration of Router-A: Command Description router-A#configure terminal To enter Global Configuration Mode router-A(config)# interface gigaethernet0 To enter the g0 interface router-A(config-if-gigaethernet0)# ip address 20.1.1.1 255.255.255.0 To configure the ip address router-A(config-if-gigaethernet0)# interface gigaethernet1 To enter the g1 interface router-A(config-if-gigaethernet1)# ip address 10.1.1.1 255.255.255.0 To configure the ip address router-A(config-if-gigaethernet1)#exit To return to Global Configuration Mode router-A(config)#router rip To enter the RIP Configuration Mode router-A(config-rip)# network 20.0.0.0 To specify the network number run by RIP router-A(config-rip)# network 10.0.0.0 Same as above router-A(config-rip)# version 2 To configure the RIP version router-A(config-rip)# passive-interface gigaethernet1 To Set g1 as the passive interface router-A(config-rip)# neighbor 10.1.1.2 To specify 10.1.1.2 as a unicast neighbor Hereafter, router-A only updates packets to 10.1.1.2 in the form of unicast. RIP Routing Cost Offset Configuration In the network topology figure 4-5, in order to make the 20.1.1.0/24 routing cost learned by router-B from router-A increases 2, the configuration of router-B is: Command Description router-B#configure terminal To enter Global Configuration Mode router-B(config)# interface ethernet0 To enter the e0 interface router-B(config-if- ethernet0)# ip address 10.1.1.2 255.255.255.0 To configure the ip address router-B(config)#ip access-list standard 10 To configure the standard access list router-B(config-std-nacl)# permit 20.1.1.0 0.0.0.255 To configure the rule to permit 20.1.1.0/24 router-B(config)#router rip To enter the RIP Configuration Mode router-B(config-rip)# network 10.0.0.0 To specify the network number run by RIP router-B(config-rip)# version 2 To configure the RIP version router-B(config-rip)# offset-list 10 in 2 e0 To use the access list on the e0 Maipu Confidential & Proprietary Information Page 143 of 257 MP2000-104B-AC User Manual Version 1.0 The configuration of Router-A is the same as 4.2.3.1. Run show ip route rip on Router-B, the cost of 20.1.1.0/24 has increased 2 on the original basis. R 20.1.1.0/24 [120/4] via 10.1.1.1, 00:00:06, ethernet0 RIP Route Redistribution Configuration In the network topology figure 4-6, configure static routing on Router-A. If Router-B wants to learn these static routes, users need to configure the redistribution of static routes on Router-A. Command Description router-A#configure terminal To enter Global Configuration Mode router-A(config)# interface gigaethernet0 To enter the g0 interface router-A(config-if-gigaethernet0)# ip address 20.1.1.1 255.255.255.0 To configure the ip address router-A(config-if-gigaethernet0)# interface gigaethernet1 To enter the g1 interface router-A(config-if-gigaethernet1)# ip address 10.1.1.1 255.255.255.0 To configure the ip address router-A(config-if-gigaethernet1)#exit To return to Global Configuration Mode router-A(config)# ip route 5.1.1.0 255.255.255.0 20.1.1.5 To configure the static routing router-A(config)#router rip To enter the RIP Configuration Mode router-A(config-rip)# network 20.0.0.0 To specify the network number run by RIP router-A(config-rip)# network 10.0.0.0 Same as above router-A(config-rip)#version 2 To configure the RIP version router-A(config-rip)#redistribute static To configure RIP to redistribute the static routes The configuration of Router-B is the same as 4.2.3.1. Router-B then can learn the route 5.1.1.0/24 via RIP. R 5.1.1.0/24 [120/2] via 10.1.1.1, 00:00:06, ethernet0 Maipu Confidential & Proprietary Information Page 144 of 257 MP2000-104B-AC User Manual Version 1.0 Configure the Default Cost of RIP Redistribution The default cost of redistribution is 1. The command default-metric can be used to change the default cost. In the network topology figure 4-6, configure default-metric for Router-A on the basis of 4.2.3.10. Command Description router-A#configure terminal To enter Global Configuration Mode router-A(config)# interface gigaethernet0 To enter the g0 interface router-A(config-if-gigaethernet0)# ip address 20.1.1.1 255.255.255.0 To configure the ip address router-A(config-if-gigaethernet0)# interface gigaethernet1 To enter the g1 interface router-A(config-if-gigaethernet1)# ip address 10.1.1.1 255.255.255.0 To configure the ip address router-A(config-if-gigaethernet1)#exit To return to Global Configuration Mode router-A(config)# ip route 5.1.1.0 255.255.255.0 20.1.1.5 To configure the static routing router-A(config)#router rip To enter the RIP Configuration Mode router-A(config-rip)# network 20.0.0.0 To specify the network number run by RIP router-A(config-rip)# network 10.0.0.0 Same as above router-A(config-rip)# version 2 To configure the RIP version router-A(config-rip)# default-metric 5 To configure the default cost of RIP redistribution as 5 router-A(config-rip)# redistribute static To configure RIP to redistribute the static routes The cost of 5.1.1.0/24 learned by Router-B will be 6. Enabling VRF instance in RIP In the network topology figure 4-8, router-A is a PE device, the two LANs it connects with respectively locate in VRF a and VRF b. RIP needs to be used in both VRF a and VRF b. Maipu Confidential & Proprietary Information Page 145 of 257 MP2000-104B-AC User Manual Version 1.0 The configuration of rotuer-A: Command Description router-A#configure terminal To enter Global Configuration Mode router-A(config)# ip vrf a To configure VRF a router-A(config-vrf)# rd 1:1 To configure RD router-A(config-vrf)# exit To return to Global Configuration Mode router-A(config)# ip vrf b To configure VRF b router-A(config-vrf)# rd 2:2 To configure RD router-A(config-vrf)# exit To return to Global Configuration Mode router-A(config)# interface gigaethernet0 To enter the g0 interface router-A(config-if-gigaethernet0)# ip vrf forwarding b To make g0 run in VRF b router-A(config-if-gigaethernet0)# ip address 20.1.1.1 255.255.255.0 To configure the ip address router-A(config-if-gigaethernet0)# interface gigaethernet1 To enter the g1 interface router-A(config-if-gigaethernet0)# ip vrf forwarding a To make the g1 run in VRF a router-A(config-if-gigaethernet1)# ip address 10.1.1.1 255.255.255.0 To configure the ip address router-A(config-if-gigaethernet1)#exit To return to Global Configuration Mode router-A(config)#router rip To enter the RIP Configuration Mode router-A(config-rip)# address-family ipv4 vrf a To enable VRF a instance of RIP router-A(config-rip-af)# network 10.0.0.0 To specify the network number run by RIP router-A(config-rip-af)# version 2 To configure the RIP version router-A(config-rip-af)# exit To return to the RIP Configuration Mode Maipu Confidential & Proprietary Information Page 146 of 257 MP2000-104B-AC User Manual Version 1.0 router-A(config-rip)# address-family ipv4 vrf b To Enable VRF b instance of RIP router-A(config-rip-af)# network 20.0.0.0 To specify the network number run by RIP router-A(config-rip-af)# version 2 To configure the RIP version router-A(config-rip-af)# exit To return to the RIP Configuration Mode The configuration of Router-B is the same as 4.2.3.1; cannot learn the routers in vrf b on Router-B. RIP Authentication Configuration In the network topology figure 4-6, authentication on Router-A and Router-B. users need to enable MD5 The configuration of Router-A: Command Description router-A#configure terminal To enter Global Configuration Mode router-A(config)# interface gigaethernet0 To enter the g0 interface router-A(config-if-gigaethernet0)# ip address 20.1.1.1 255.255.255.0 To configure the ip address router-A(config-if-gigaethernet0)# interface gigaethernet1 To enter the g1 interface router-A(config-if-gigaethernet1)# ip address 10.1.1.1 255.255.255.0 To configure the ip address router-A(config-if-gigaethernet1)# ip rip authentication mode md5 To specify the authentication type of RIP as MD5 router-A(config-if-gigaethernet1)# ip rip authentication key 0 maipu To specify the password of RIP router-A(config-if-gigaethernet1)#exit To return to Global Configuration Mode router-A(config)#router rip To enter the RIP Configuration Mode router-A(config-rip)# network 20.0.0.0 To specify the network number run by RIP router-A(config-rip)# network 10.0.0.0 Same as above router-A(config-rip)#version 2 To configure RIP version authentication The configuration of Router-B: Command Description router-B#configure terminal To enter Global Configuration Mode router-B(config)# interface ethernet0 To enter the e0 interface router-B(config-if- ethernet0)# ip address 10.1.1.2 255.255.255.0 To configure the ip address router-A(config-if- ethernet0)# ip rip authentication mode md5 To specify the authentication type of RIP as MD5 router-A(config-if- ethernet0)# ip rip authentication key 0 maipu To specify the password of RIP router-B(config)#router rip To enter the RIP Configuration Mode Maipu Confidential & Proprietary Information authentication Page 147 of 257 MP2000-104B-AC User Manual Version 1.0 router-B(config-rip)# network 10.0.0.0 To specify the network number run by RIP router-B(config-rip)#version 2 To configure RIP version Configure the RIP Version for Sending and Receiving Configuring the version for sending and receiving is mainly used for intercommunicating the routing information among different RIP protocol versions. Maipu Confidential & Proprietary Information Page 148 of 257 MP2000-104B-AC User Manual Version 1.0 As shown in the above figure 4-9, RIP V2 runs between router-A and Router-B, but only RIP V1 can run between Router-A and Router-C. Here, users need to specify the version number for sending on the interface of router-A. The configuration of Router-A: Command Description router-A#configure terminal To enter Global Configuration Mode router-A(config)# interface gigaethernet0 To enter the g0 interface router-A(config-if-gigaethernet0)# ip address 20.1.1.1 255.255.255.0 To configure the ip address router-A(config-if-gigaethernet0)# ip rip receive version 1 To specify to receive RIP packets of version 1 on the g0 interface router-A(config-if-gigaethernet0)# ip rip send version 1 To specify to send RIP packets of version 1 on the g0 interface router-A(config-if-gigaethernet0)# interface gigaethernet1 To enter the g1 interface router-A(config-if-gigaethernet1)# ip address 10.1.1.1 255.255.255.0 To configure the ip address router-A(config-if-gigaethernet1)#exit To return to Global Configuration Mode router-A(config)#router rip To enter the RIP Configuration Mode router-A(config-rip)# network 20.0.0.0 To specify the network number run by RIP router-A(config-rip)# network 10.0.0.0 Same as above router-A(config-rip)#version 2 To configure RIP version The configuration of Router-B is the same as 4.2.3.1. The configuration of Router-C: Command Description router-C#configure terminal To enter Global Configuration Mode router-C(config)# interface ethernet0 To enter the e0 interface router-C(config-if- ethernet0)# ip address 20.1.1.2 255.255.255.0 To configure the ip address router-C(config)#router rip To enter the RIP Configuration Mode router-C(config-rip)# network 20.0.0.0 To specify the network number run by RIP router-C(config-rip)#version 1 To configure RIP version Maipu Confidential & Proprietary Information Page 149 of 257 MP2000-104B-AC User Manual Version 1.0 Monitoring and Debugging of RIP Display information of RIP protocol RIP Command Description show ip rip [vrf vrf-name] To display overall information of RIP show ip rip database [detail] [vrf vrf-name] [detail] To display information about RIP routing database show ip rip interface [interface] To display information about RIP interface show running-config router rip To display information about RIP configuration show ip route rip To display RIP routing information in the routing table show ip protocol rip To display related information about RIP protocol Display debugging information of RIP protocol Command Description debug ip rip all To display all debug information about RIP debug ip rip events To display debug information about RIP events debug ip rip packet To display debug information about receiving/sending and processing RIP packets debug ip rip trigger To display debug information about RIP timer OSPF Dynamic Routing Configuration The main contents of the section are: • • • • • Brief Introduction of OSPF protocol Description of OSPF basic commands Description of related commands for configuring OSPF Examples of configuring OSPF Monitoring and debugging of OSPF Brief Introduction to OSPF Protocol OSPF (Open Shortest Path First) is a link-status based dynamic routing protocol, which is used to calculate routes in the single Autonomous System (short for AS). The OSPF Version 2 realized by Maipu obeys rfc2328 and supports other OSPF extended functions defined by rfc, such as NSSA (rfc3101). The supported main functions of OSPF are: Maipu Confidential & Proprietary Information Page 150 of 257 MP2000-104B-AC User Manual Version 1.0 Stub Areas――support the stub area function defined by rfc2328. Route Redistribution――routes learned via any IP routing protocol can be redistributed to any other IP routing protocols. In the intra-area, this indicates that OSPF can redistribute routes of RIP; correspondingly, routes of OSPF can be redistributed by RIP. In the inter-area, this indicates that OSPF can redistribute routes of EGP and BGP; of course, routes of OSPF can be redistributed by EGP and BGP. Authentication――The plain text authentication and MD5 authentication are supported among the neighbor routers in an area. OSPF interface parameter configuration――can configure parameters on a interface, for example, the output charges, the retransmitting interval time, the transmitting delay time, the priority, the hello interval time, the dead time of the neighbor and the authentication password etc. Virtual Link――support the virtual links to backbone area Not-so-Stubby Area――support NSSA and obey rfc3101 Demand Circuit――support demand circuit, obeys rfc1793 The function for controlling database overflow――obeys rfc1765 Description of OSPF Basic Commands The commands of OSPF can be divided into three classes: the commands for configuring OSPF process, the commands for configuring OSPF area, the commands for configuring OSPF interface. Description of Commands for Configuring OSPF Process Command Description Config mode *To Enable OSPF process or Enable OSPF process from vrf, we suggest that one vrf only be configured with one OSPF process; after configured the command, switch to the OSPF routing configuration mode config *To specify the range of the interface addresses to be covered by OSPF, the interface whose IP address is in the address range is added into the OSPF routing process; the routing information of the interface is managed by OSPF config-ospf clear ip ospf [process-id] process To restart the OSPF process enable auto-cost reference-bandwidth ref-bandwidth To Set bandwidth value to calculate the cost (can choose from the parameter range of 1-4294967), the default value is 100 config-ospf capability opaque To support transparent lsa config-ospf default-information originate[always | metric metricvalue | metric-type type-value | The autonomous system border router redistributes the default route to the routing area of OSPF; can specify the cost, the cost type and config-ospf router ospf vrfname] process-id [ vrf network network-id wildmask area area-id Maipu Confidential & Proprietary Information Page 151 of 257 MP2000-104B-AC User Manual Version 1.0 route-map map-name] route map mapping default-metric metric-value To specify the cost value of all redistributed routes distance {distance-value|ospf {external distance-value |interarea distance-value | intra-area distance-value }} To Set administration distance of OSPF routes; can individually specify the administration distance for a route type distribute-list {access-listnumber | access-list-name} out config-ospf config-ospf config-ospf [routing-protocol | process-id ] *To permit or forbid some autonomous system external routes to be advertised into OSPF routing area according to the function of the access list; only takes effect on ASBR router distribute-list {access-listnumber | access-list-name} in To permit or forbid some routes to be added into according to the function of the access list config-ospf host ip-address area area-id To specify to advertise the host route in the area config-ospf log-adjacency-changes [ detail ] To record the changes of the adjacency status config-ospf The maximum number of the concurrent DD packet interactions in a ospf process, the default value is 2 config-ospf max-concurrent-dd max-value neighbor ip-address [cost costvalue| poll-interval interval-value | priority priority] To Set neighbor router (Set neighbor only when the network mode is NBMA), can specify cost parameter for the point-to-multipoint network type config-ospf ospf abr-type {cisco|ibm|shortcut|standard} The abr type of ospf is compatible with one of cisco, ibm, shortcut area and standard config-ospf overflow database external To configure the two parameters of the database overflow function: config-ospf ospfExtLsdbLimit ospfExitOverflowInterval ospfExtLsdbLimit (the default value is infinite) , ospfExitOverflowInterval (the default value is 0). config-ospf overflow database max-lsa-num [hard | soft] To configure the maximum number of the LSAs of ospf database, and the process mode when the maximum number is exceeded; by default, the maximum number is infinite, and the process mode is hard, which means to shutdown the present ospf process. If configure it as soft, then only the alarm message is prompted. The no format of the command can be used to recover to the default value passive-interface interface-name [ip-address] To restrain the route updating information from being sent and received on the given interface config-ospf redistribute protocol [protocolid] [metric value|metric-type type |tag value |route-map name ] *To redistribute routes generated by the specified routing protocol into the OSPF routing area; can specify the cost, the cost type, the route tag and the route map mapping for the route config-ospf refresh timer time-value To Set time for refreshing timer config-ospf router-id ip-address To set a fixed Router ID for the router config-ospf summary-address address mask [tag tag-value][not-advertise] *To summarize the external routes of ospf timers spf delay-time hold-time Maipu Confidential & Proprietary Information config-ospf The spf calculating delay and the time for restraining calculation config-ospf Page 152 of 257 MP2000-104B-AC User Manual Version 1.0 Description of Commands for Configuring OSPF Area Command Description Config mode area area-id authentication To configure OSPF area as the plain text authentication config-ospf area area-id message-digest *To configure authentication MD5 config-ospf To Set cost of the default route of stub or NSSA area config-ospf ABR router filters with in/out direction by using the access list or the prefix list when it advertising the type3 LSA to other areas config-ospf authentication area area-id default-cost costvalue area area-id filter-list {access access-name | prefix prefixname} in | out area area-id nssa {defaultinformation-originate [metric metric-value |metric-type typevalue] | no-redistribution|nosummary|translatealways|translatecandidate|translatenever|translator-role always|candidate|never} OSPF area as the config-ospf To set an area as nssa area; the sub-command can specify the parameter as: NSSA area generating the default route, do not distribute the external routes, do no distribute summary LSA, and specify the role of NSSA area ABR when translating type 7 LSA to type 5 LSA *Inter-area route summarization; to perform the amalgamated calculation and route summarization in the area border; can choose to advertise, not advertise and advertise the replaced route config-ospf area area_id range prefix-range [advertise| not-advertise] area area-id default|disable|enable To configure the action mode of the area border router as shortcut config-ospf area area-id stub [no-summary] *To configure OSPF area as the stub area config-ospf area transit-area-id virtual-link address [authentication [message-digest | null]] [hellointerval seconds] [retransmitinterval seconds] [transmit-delay seconds] [dead-interval seconds] [authentication-key key] [message-digest-key key-id md5 key] * To configure the virtual link passing the transit area to the backbone area. Users can configure the interface parameters for the interface of the virtual link. The meaning of the interface parameter is consistent with the meaning of the normal OSPF interface. shortcut config-ospf Description of Commands for Configuring OSPF Interfac e Command Description Config mode *To configure the authentication mode, can specify the plain text authentication, md5 authentication and no authentication. No authentication by default. config-if-xx ip ospf [ip-address] authentication [message-digest|null] ip ospf [ip-address] authentication-key 0|7 password *To configure the authentication password of the plain text authentication config-if-xx ip ospf [ip-address] cost costvalue To Set OSPF cost of the interface, specify the cost for the packet being sent out from the OSPF interface config-if-xx Maipu Confidential & Proprietary Information Page 153 of 257 MP2000-104B-AC User Manual Version 1.0 To filter the LSA flooding to the OSPF interface; not filter by default; after the interface is configured with the command, LSA is not updated from the interface 。 config-if-xx ip ospf [ip-address] databasefilter all out config-if-xx ip ospf [ip-address] dead-interval interval-value To Set dead time interval of the neighbor, the unit is second. If an OSPF router has not received the hello packet from the neighbor router after waiting for such a period, then the neighbor is regarded as down ip ospf[ip-address] demand-circut To Enable demand circuit on the interface config-if-xx ip ospf disable all To make the interface not run OSPF config-if-xx ip ospf [ip-address] hello-interval interval-value *To Set time interval for the interface sending HELLO packets, the unit is second config-if-xx ip ospf [ip-address] messagedigest-key key-id md5 0|7 password *To Set MD5 authentication ip ospf mtu mtu-value To specify the maximum transmission unit of the interface (only take effect in ospf) config-if-xx ip ospf [ip-address] mtu-ignore To ignore mtu communicating inter- config-if-xx ip ospf network {broadcast|nonbroadcast|point-to-point|point-tomultipoint [non-broadcast]} To set OSPF network type (broadcast network/non-broadcast network/point-to-point network/point-to-multipoint network/point-tomultipoint non-broadcast network) config-if-xx ip ospf [ip-address] priority-value priority To Set priority of the router, the parameter is used when DR electing config-if-xx ip ospf [ip-address] retransmitinterval interval-value To Set time interval for re-transmitting the lost link state advertisement config-if-xx ip ospf [ip-address] transmit-delay delay-value To Set delay for transmitting the connection status config-if-xx config-if-xx when DD packets Note: 1. The symbol “*” before Commands means that there is the configuration example to explain the command in details later. 2. Above commands all have corresponding no commands, which are used for cancel the corresponding configurations and functions. 3. The old versions before 5.1.x do not permit to enable only one ospf process and no interface is in up status; that is when initializing a router, the ospf is configured at first while the interface is not configured to be up; at that time, ospf cannot be configured and the error is reported. However, the version 6.0.x permits to configure as so. Description of Commands for Configuring OSPF OSPF requires that all configurations of the OSPF-protocol based router, the border router and the autonomous system border router need to be consistent. Basically they can be divided into the following parts. Thereinto, enabling OSPF process is necessary, other configurations depend on the application conditions and they are optional. Maipu Confidential & Proprietary Information Page 154 of 257 MP2000-104B-AC User Manual Version 1.0 Enable OSPF Process Similar with other routing protocols, in order to enabling OSPF function, an OSPF routing process needs to be created. Specify the address range related with the process, and specify the area the address range belongs to. The following commands can be used to complete the function. The command router ospf This command enables the OSPF protocol and creates an OSPF routing process; after configured this command, switch to the OSPF routing configuration mode. The no format of the command can be used to disable the OSPF routing process. router ospf process-id [vrf vrf-name] no router ospf process-id Syntax Description process-id The number of the OSPF process, multiple OSPF processes can be enabled at the same time vrf-name To specify vrf name, Enable OSPF process from VRF; we suggest that one vrf is only configured with one OSPF process [Default status] do not run the OSPF protocol Note: The old versions before 5.1.x do not permit to enable only one ospf process and no interface is in up status; that is when initializing a router, the ospf is configured at first while the interface is not configured to be up; at that time, ospf cannot be configured and the error is reported. However, the version 6.0.x permits to configure as so. The command network This command specifies the range of the addresses to be covered by OSPF process, and the OSPF area the address range belongs to. The no format of the command can be used to cancel the specified covered addresses. network ip-address wildcard-mask area area-id no network ip-address wildcard-mask area area-id Syntax Description ip-address wildcard-mask To define the ip address/wildcard-mask pair, and specify the covered range area-id To define the OSPF area to which the interfaces in the covered range belong [Default status] the covered addresses is not specified Maipu Confidential & Proprietary Information Page 155 of 257 MP2000-104B-AC User Manual Version 1.0 Note: After an OSPF process is created, the process doesn’t know which interface or network it should enter; the command network can make the OSPF process know that. This command can specify the interface to an area In the command network, all the interfaces that can match with the address and the wildcard-mask pair are set into the specified area. The 0 in the wildcard-mask means the placeholder, 1 means can be matched randomly. Configure Basic Parameters of OS PF Interface OSPF permits to modify the OSPF parameters of a given interface. The modification for the interface’s parameters is not necessary. However, the parameters of some interfaces should be consistent in the whole OSPF area. These parameters can be modified via the command ip ospf hellointerval, ip ospf dead-interval and ip ospf authentication in the interface mode. Therefore, if users need to configure these parameters, they should ensure that the configurations of all OSPF routers in a same OSPF area are consistent and compatible. The command ip ospf authentication This command specifies the authentication mode and the authentication password of the OSPF interface. The no format of the command can be used to clear the specified authentication mode and authentication password. ip ospf [ip-address] authentication [message-digest|null] no ip ospf [ip-address] authentication [message-digest|null] Syntax Description ip-address Can individually specify the authentication mode of the specified interface’s address on OSPF interface authentication To configure the plain text authentication authentication message-digest To configure the MD5 authentication authentication null Null authentication [Default status] No authentication Configure the simple text password: ip ospf [ip-address] authentication-key 0|7 password no ip ospf [ip-address] authentication-key 0|7 password Maipu Confidential & Proprietary Information Page 156 of 257 MP2000-104B-AC User Manual Version 1.0 Syntax Description ip-address Can individually specify the plain text authentication password of the specified interface’s address on OSPF interface 0 To configure the password which is not encrypted 7 To configure the password which is encrypted, used for script running when enabling the password encryption service; users should not configured the command manually password The password of the plain text authentication [Default status] the password is not configured Configure the key-id and password of the MD5 authentication: ip ospf [ip-address] message-digest-key key-id md5 0|7 password no ip ospf [ip-address] message-digest-key key-id md5 0|7 password Syntax Description ip-address Can individually specify the id and password of the MD authentication of the specified address on OSPF interface key-id To configure the key-id of the MD5 authentication 0 To configure the password which is not encrypted 7 To configure the password which is encrypted, used for script running when enabling the password encryption service; users should not configured the command manually password The password of the MD5 authentication [Default status] the password is not configured Note: After the authentication mode is configured, the corresponding authentication password needs to be configured, and then it can take effect. For example, after configured the plain text authentication mode, users need to configure the corresponding plain text password. In general case, the authentication mode and the authentication password are configured respectively. In order to be compatible with the old version, under the condition that the authentication mode is not configured, when configuring a kind of authentication password, the corresponding authentication mode is specified. For example, a user doesn’t specify any authentication mode at the beginning, and then he configures a key-id and a password of MD5 at the first time, the MD5 authentication mode is then configured by default. Maipu Confidential & Proprietary Information Page 157 of 257 MP2000-104B-AC User Manual Version 1.0 The command ip ospf hello-interval This command configures the time interval for the interface sending HELLO packets; the default value depends on the network type of the interface. The default values of the broadcast network and the point-to-point network are 10 seconds, the NBMA and point-to-point network are 30 seconds. The no format of the command can be used to recover the HELLO interval time to the default value. ip ospf [ip-address] hello-interval hello-interval no ip ospf [ip-address] hello-interval Syntax Description ip-address Can individually specify the hello-interval of an address on the OSPF interface hello-interval Hello packet interval time, the unit is second, the range is 1-65535 [Default status] not configured; adopt the default value The command ip ospf dead-interval This command configures the dead time of the neighbor, the unit the second. If an OSPF router has not received the hello packet of the neighbor router after waiting for such a period, the neighbor is regarded as down. The default value is four times of the hello time; the default hello time depends on the network type. ip ospf [ip-address] dead-interval dead-interval no ip ospf [ip-address] dead-interval Syntax Description ip-address Can individually specify the dead-interval of an address on the OSPF interface dead-interval The dead time of the neighbor, the unit is second, the range is 165535 [Default status] not configured; adopt the default value Note: After the hello interval time is modified, if the dead time is the default value (four times of the hello time), then the corresponding dead time interval is modified. But if the dead time is not the default value (not four times of the hello time), modifying hello time interval doesn’t affect the dead time. Modifying the dead time doesn’t affect the hello interval time. The command ip ospf mtu This command configures the maximum transmission unit of the interface. When encapsulating OSPF packets, in order to avoid the fragment, the sizes of the packets are all restricted to be smaller than the MTU value of the interface. Maipu Confidential & Proprietary Information Page 158 of 257 MP2000-104B-AC User Manual Version 1.0 ip ospf mtu mtu-value no ip ospf mtu mtu-value Syntax Description mtu-value The maximum transmission unit of the interface, the range is 576~65535 [Default status] not configured; adopt the default value The command ip ospf mtu-ignore This command ignores the MTU value during the inter-communication of DD packets ip ospf [ip-address] mtu-ignore no ip ospf [ip-address] mtu-ignore Syntax Description ip-address Can individually specify that an address on the OSPF interface to ignore the MTU value when DD packets are inter-communicating [Default status] by default, the MTU value needs to be compared when DD packets are inter-communicating. The command ip ospf network This command configures the network type of the ospf interface. By default, the network type of OSPF is determined by the network type of the physical interface. ip ospf network {broadcast|non-broadcast|point-to-point|point-tomultipoint [non-broadcast]} no ip ospf network Syntax Description broadcast Broadcast network non-broadcast Non-broadcast network (NBMA) point-to-point Point-to-point network point-to-multipoint Point-to-multipoint network point-to-multipoint non-broadcast Point-to-multipoint non-broadcast network [Default status] not configured; Adopt the default value Note: • • • • On the PPP and HDLC protocol interfaces, the network type of OSPF is point-to-point by default. On the frame relay, X.25 and ATM protocol interfaces, the network type of OSPF is non-broadcast by default. On the Ethernet protocol interface, the network type of OSPF is broadcast by default. When one interface is configured with multiple sub-addresses, the ospf attributes of each address can be specified via ip ospf Maipu Confidential & Proprietary Information Page 159 of 257 MP2000-104B-AC User Manual Version 1.0 • ip-address. For other commands for configuring the interface, please refer to 7.4.2.3 of The chapter. Configure Basic Parameters of OS PF Area OSPF permits to configure the parameters of the area, which comprise the authentication, defining as the stub area, specifying the cost of the default summary route. The authentication provides the protection for the password to prevent unauthorized users from accessing the area. The stub area is an area that the external route information cannot be redistributed into. ABR generates a default route to the stub area; the router of the stub area gets to destination outside the autonomous system via the default route. In order to reduce the amount of LSAs which are sent to the stub area, the command area stub no-summary can be configured on ABR. This can prevent the type 3 LSA from being sent to the stub area. The command area authentication This command configures the authentication type of OSPF area. The no format of the command can be used to clear the authentication mode, which means it doesn’t need to authenticate. area area-id authentication [message-digest] no area area-id authentication Syntax Description area-id The area id number authentication To configure OSPF area as the plain text authentication authentication message-digest To configure OSPF area as the MD5 authentication [Default status] no authentication The command area stub This command configures OSPF area as the stub area. The no format of the command can be used to clear the configuration of stub area. area area-id stub [no-summary] no area area-id stub [no-summary] Syntax Description area-id The area id number no-summary To prevent the type 3 LSA from being sent to the stub area [Default status] not configured, the area is the normal area Maipu Confidential & Proprietary Information Page 160 of 257 MP2000-104B-AC User Manual Version 1.0 Note: • • • When configuring the stub area, the area id number cannot be the backbone area; that is the area id cannot be 0. In the stub area, the type 5 LSA (that is the external LSA) is not accepted and transmitted. The command should be configured on all routers in the stub area, the neighborhood relation then can be formed among the routers. Configure OSPF as NSSA Area NSSA area is similar with the stub area of ospf, doesn’t diffuse the type 5 LSA from the backbone to the nssa area; however it can redistribute the external route of the autonomous system restrictedly. NSSA can redistribute the type 7 autonomous system external route in the NSSA area via redistribution. NSSA area border router translates the type 7 external LSA to the type 5 external LSA, and floods the translated type 5 external LSA to the whole autonomous system area. Summary and filtering are supported during the process of translating. The command area nssa This command configures an area as the nssa area (Not-so-Stubby Area). The command no area nssa can be used to cancel the NSSA feature of the area. area area-id nssa [default-information-originate|no-redistribution|nosummary| translate-always|translate-candidate|translate-never| translator-role role] no area area-id nssa [default-information-originate|noredistribution|no-summary| translate-always|translatecandidate|translate-never| translator-role role] Syntax Description area-id OSPF area id default-information-originate NSSA area generates a default route no-redistribution Not to redistribute the external route no-summary Not to redistribute the summary LSA translate-always The area ARB of NSSA always translates the type 7 LSA to the type 5 LSA translate-candidate Whether to translate the type 7 LSA to the type 5 LSA depends on the election among NSSA ABR translate-never The area ARB of NSSA never translates the type 7 LSA to the type 5 LSA translator-role role To specify the role of NSSA area ABR when translating the type 7 LSA to the type 5 LSA; there are three options: always, candidate and never. [Default status] not configured, the area is a normal area Maipu Confidential & Proprietary Information Page 161 of 257 MP2000-104B-AC User Manual Version 1.0 Note: • • • • The backbone area cannot be configured as nssa area. Any router in a same area needs to support nssa area; otherwise the neighborhood relation cannot be formed among the routers. If possible, do not use displaying redistribution on nssa abr. Because the packets translated through the router are confusable. Can generate a type7 default route to get to the destination network outside the autonomous system; when configuring the default route, the type7 default route is being sent to the NSSA area or NSSA border router. Configure OS PF Inter-Area Route Summarization The route summarization is a set of routes generated by the area border router and the autonomous system border router, it advertises to the neighbor router. If the serial numbers of the networks in an area are continuous, the area border router and the autonomous system border router can be configured as the advertising summarization route. The summary route specifies the range of the network serial number. The route summarization reduces the size of the link state database. The route summarization of ospf is divided into the inter-area route summarization and the external route summarization. Configure the command area range on the area border router; the area border router summarizes routes in the configured network segment, and only generates one summary route summary lsa which is advertised by the area border router to other areas. The lsa in the network segment will not be advertised outside. The command area range This command realizes the inter-area route summarization; and the command can be used to perform the amalgamated calculation and route summarization in the area border. The command no area range can make the command invalid. area area-id range prefix-range [advertise| not-advertise] no area area-id range prefix-range [advertise| not-advertise] Syntax Description area-id The area id prefix-range The summarized address advertise To advertise outside not-advertise To not advertise outside [Default status] do not summarize Maipu Confidential & Proprietary Information Page 162 of 257 MP2000-104B-AC User Manual Version 1.0 Note: 1. The command area range only takes effect on the area border router. Configure OS PF Redistributed External Route Summarization When redistributing routes from other protocols to ospf, each route in the external link state advertisement is advertised respectively. Via the command summary-address, all redistributed routes covered by the given network address and mask can be summarized to one route, and it is advertised by the summarized external lsa. This can reduce the size of the ospf link summarization of the external routes, use address. This command summarizes all ase lsas one summary ase lsa, and only advertises the routers via asbr. state database. For the the command summaryin the network segment to summary ase lsa to other The command summary-address This command completes the summarization for the external routes of ospf. The command no summary-address can make the command invalid. summary-address address mask [tag tag-value][not-advertise] no summary-address address mask [tag tag-value][not-advertise] Syntax Description address The summarized address mask The mask of the summarized address tag-value To Set tag value not-advertise To not advertise outside after summarized [Default status] do not summarize Note: This command only takes effect on ASBR, to summarize the external routes redistributed by ospf. Configure Virtual Link In ospf protocol network, the backbone area has to always keep connected, and all areas have to connect to the backbone are. If the backbone area is divided into two or multiple parts, then some destinations is changed to be unreachable. In order to guarantee the rules in the above ospf protocol network, for the separated backbone area and the area which doesn’t connect to the backbone, users can configure the virtual link to meet the above requirements. Maipu Confidential & Proprietary Information Page 163 of 257 MP2000-104B-AC User Manual Version 1.0 The application of the virtual link has two conditions: to connect two separated backbone areas by configuring the virtual link; to connect a third part area to the backbone via an area connecting to the backbone (called transit area). The command area virtual-link This command configures the virtual link passing the transit area to the backbone area. Users can configure some interface parameters for the interface of the virtual link, such as hello-interval. The meaning of the interface parameter is consistent with the meaning of the normal OSPF interface. area transit-area-id virtual-link address [authentication [message-digest | null]] | [hello-interval seconds] | [retransmit-interval seconds] | [transmit-delay seconds] |[dead-interval seconds] |[authentication-key key] | [message-digest-key key-id md5 key] no area transit-area-id virtual-link address [authentication [messagedigest | null]] | [hello-interval ] | [retransmit-interval] | [transmit-delay] |[dead-interval] |[authentication-key] | [message-digest-key key-id ] Syntax Description transit-area-id The id of the transit area which the virtual link passes address The peer router-id address of the virtual link [Default status] the virtual link is not configured Note: • • • • • • • The router configured with the virtual link should be an area border router. Virtual link is identified by the router id of the peer router. The two peer routers configured with the virtual link have to be in a same public area, called virtual link transit area. Virtual link can be regarded as a part of the backbone; it can be regarded as the unnumbered point-to-point network. Its cost is the spending of this link, and the cost cannot be configured. Each virtual link is identified uniquely via the transit area and the peer router id of the virtual link. The command no area virtual-link can be used to cancel the configuration of the virtual link. Virtual link cannot be configured via stub or nssa area, which means the transit area of the virtual link cannot be stub or nssa area. Configure Demand Circuit The demand circuit is the network that the cost varies according to using; the cost is based on the link time and the transmitted packets. The typical demand circuits include ISDN circuit, X.25SVC and dial-up circuit. The lower layer data link of the earlier OSPF is always enabled, which causes Maipu Confidential & Proprietary Information Page 164 of 257 MP2000-104B-AC User Manual Version 1.0 some unnecessary costs; after the demand circuit function is added, the hello packets and routing updating information of OSPF are restrained on the demand circuit. When no data is being transmitted, the lower layer data link is permitted to disable. On the demand circuit, the hello packets and LSAs are only transmitted during the process of initializing the neighbor or when reflecting the changes of the topology. When the topology has big changes and routes need to be calculated again, the LSAs which reflect changes are transmitted on the demand circuit, so that the integrality of the network can be maintained. The command ip ospf demand-circuit This command enables the demand circuit on the OSPF interface. If it is on a point-to-point network, the command takes effect by just being configured on one peer end. Of course, the routers of the two peers need to support the demand-circuit function. If it is on a point-to-multipoint network, the command can just be configured on the multipoint peer. ip ospf [ip-address] demand-circuit no ip ospf [ip-address] demand-circuit Syntax Description ip-address Can individually specify the OSPF interface of an address on OSPF interface as the demand circuit [Default status] not configured, not the demand circuit Note: • In order to Enable demand circuit between routers, it can just be configured on one side interface, can be configured on both side interfaces. • The demand circuit only takes effect in the point-to-point and point-to-multipoint interface mode. • Please do not Enable function on the broadcast or nbma network, because on the broadcast or nbma network, protocol packets cannot be restrained effectively. Generate Default Route Once a router is specified to redistribute routes of other routing protocols into the OSPF routing area, the router is automatically called the autonomous system border router. By default, the autonomous system border router doesn’t generate a default route to the OSPF routing area, but users can compel the autonomous system border router to generate a default route to the OSPF routing area. The command default-information originate The autonomous system border router redistributes the default route into the routing area of OSPF; can specify the cost, the cost type and the route mapping. Maipu Confidential & Proprietary Information Page 165 of 257 MP2000-104B-AC User Manual Version 1.0 default-information originate [always] [metric metric-value] [metrictype type-value] [route-map map-name] no default-information originate [always] [metric metric-value] [metric-type type-value] [route-map map-name] Syntax Description always No matter whether a default route exists or not, to generate a default ASE LSA metric-value To Set metric value type-value To Set metric type map-name To Set routing map name [Default status] not configured Control the Default Cost of OSPF Interface By default, OSPF calculates the cost of the interface according to the bandwidth of the interface. For example, the cost of the Ethernet interface whose bandwidth is 100M is 1. The formula to calculate the cost of the OSPF interface is reference bandwidth divided by interface bandwidth. By default, the refernce bandwidth is 100M; the interface bandwidth value is determined by the command bandwidth in Interface Configuration Mode. The following command can be used to modify the reference bandwidth. The command auto-cost reference-bandwidth This command modifies the reference bandwidth value for calculating the OSPF cost. The no format of the command can be used to recover to the default reference bandwidth. The default reference bandwidth for calculating cost is 100M. auto-cost reference-bandwidth ref-bandwidth no auto-cost reference-bandwidth Syntax Description ref-bandwidth The reference bandwidth value for calculating OSPF cost, the range is 1-4294967. [Default status] not configured; adopt the default value Maipu Confidential & Proprietary Information Page 166 of 257 MP2000-104B-AC User Manual Version 1.0 Configure Administration Distance of OS PF The administration distance indicates the reliability of the route source, or the priority. It is usually an integer among the range of 0-255; the value is bigger, the reliability is lower, the priority is lower. OSPF uses three different administration distances: the intra-area route, the inter-area route and the external route. The default administration distances of the intra-area route and inter-area route are 110, the default administration distance of the external route is 150. The command distance This command configures the administration distance of OSPF route; users can individually specify the administration distance for a route type. distance {dist-all | ospf {intra-area dist1 | inter-area dist2 | external dist3 } } no distance {dist-all | ospf } Syntax Description dist-all The administration distance of OSPF routes (include intraarea, inter-area and external routes), the range is 1-255. dist1 The administration distance of the intra-area route, the range is 1-255, the default value is 110. dist2 The administration distance of the inter-area route, the range is 1-255, the default value is 110. dist3 The administration distance of the external route, the range is 1-255, the default value is 150. [Default status] not configured, adopt the default value Prevent Flooding LSA on Interface By default, OSPF floods new LSA to all interfaces in a same area, the interface which receives the LSA are excluded. Although there are some redundant processes, it is favorable to the synchronization of database. However, if the redundant processes are too many (for example in a fully connected network topology), they then waste the bandwidth and occupy the CUP resources, and may affect the network. On the broadcast, NBMA and point-to-point networks, the following command can be configured to prevent the flooding of LSA on the given interface. The command database-filter all out Configure the command on an interface to prevent LSA from being flooded to the interface. ip ospf [ip-addr] database-filter all out no ip ospf [ip-addr] database-filter all out Maipu Confidential & Proprietary Information Page 167 of 257 MP2000-104B-AC User Manual Version 1.0 Syntax Description ip-address Can individually specify to prevent the flooding of LSA on an address of OSPF interface [Default status] not configured, do not prevent Control OSPF Database Overflow In order to run the OSPF protocol correctly, each OSPF router in the area has to maintain a consistent link-state database. When a router cannot save a big database because of the limited resources, the problem of database overflow may occur. For the database overflow which can be predicted, it can be avoided by configuring Stub or NSSA area. For the database overflow which cannot be predicted, it needs to be processed properly. The command overflow database This command configures the related parameters for controlling the overflow of the database. overflow database {external ospfExitOverflowInterval| max-lsa-num [hard | soft]} no overflow database[ external ospfExitOverflowInterval] Syntax ospfExtLsdbLimit ospfExtLsdbLimit ospfExtLsdbLimit Description To configure the maximum number of the permitted external LSAs, the range is 0~4294967294. The default value is ~0. When the amount of the external LSA exceeds the value, then in the database overflow status. ospfExitOverflowInterval To configure the time interval for trying to exit from the database overflow status, the range is 0~65535. The default value is 0, which means once in the database overflow status, it stop trying to exit from the status max-lsa-num To configure the maximum number of the total various LSAs in the OSPF database. The 0~4294967294, and the default value is ~0. maximum value is exceeded, the hard or soft mode is adopted. hard To shutdown the present ospf process when the total amount of various LSAs exceeds the maximum value. By default, this mode is adopted. soft Only to prompt the alarm message when the total amount of various LSAs exceeds the configured maximum value amount of range is Once the processing [Default status] not configured Configure Route Redistribution OSPF can redistribute routes learned from other routing protocols into the OSPF routing area. Via the function route-map, the route redistribution can be controlled conditionally. Maipu Confidential & Proprietary Information Page 168 of 257 MP2000-104B-AC User Manual Version 1.0 The command redistribute This command redistributes the route generated by the given routing protocol into the OSPF routing area; can specify the cost, the cost type, the route tage and the route map for the route. redistribute protocol [protocol-id] [metric metric-value|metric-type metric-type |tag tag-value |route-map route-map-name ] no redistribute protocol [protocol-id] [metric metric-value|metrictype metric-type |tag tag-value |route-map route-map-name ] Syntax Description protocol The redistributed routing protocols, include rip, ospf, static, bgp and connect (direct connected route) protocol-id The protocol process number; some protocols carry the protocol process numbers, the range is 1-65535. metric-value To specify the metric value of the redistributed route, the range is 0-16777214. metric-type To specify the metric-type of the redistributed route, type 1 or type 2. tag-value To specify the tag value carried by the redistributed route, the range is 0-4294967295 route-map-name To specify the redistributed router to perform route map mapping [Default status] not configured, do not redistribute any protocol The command default-metric This command specifies the default cost value of all redistributed routes. default-metric metric-value no default-metric [metric-value] Syntax Description metric-value To specify the metric value of the redistribute route, the range is 0-16777214 [Default status] not configured, adopt the default value Note: • • Because definitions for the cost among protocols are different, the cost of the protocol needs to be translated when redistributing. If the costs of the redistributed routes are no configured, for the non default route, if it is a BGP route, the default cost is 1, other protocols is 20. For the default route, if it is learned via the static default route, the default cost is 20; the default cost of the default route generated forcibly is 1. Maipu Confidential & Proprietary Information Page 169 of 257 MP2000-104B-AC User Manual Version 1.0 Configure Route Filtering The following informations. functions can be configured to filter some routing Prevent the routing updating packets from passing an interface In order to prevent other routers in a same network from learning routes, users can prevent from sending the routing updating messages on an interface. The routing messages are neither sent nor received on the interface. The command passive-interface This command restrains the route updating information from being sent and received on the given interface. passive-interface interface-name [ip-address] no passive-interface interface-name [ip-address] Syntax Description interface-name The name of the interface on which the route updating information needs to be restrained ip-address Can specify to restrain the route updating on an address of the interface [Default status] not configured Control route advertisement when route updating The command distribute-list out can be used to filter the autonomous system external routes via the access list. The command area filter-list can be used to filter the type 3 route advertisements of inter-area via the access list or the prefix list with in/out direction. The command distribute-list out This command permits or forbid to advertise some autonomous system external routes into the OSPF routing area according to the function of the access list; only takes effect on ASBR router. distribute-list {access-list-number | access-list-name} out [routing-protocol [process-id] ] no distribute-list {access-list-number | access-list-name} out [routing-protocol [process-id] ] Maipu Confidential & Proprietary Information Page 170 of 257 MP2000-104B-AC User Manual Version 1.0 Syntax Description access-list-number The standard access list number, the range is 1-1000. access-list-nam The standard access list name routing-protoco The routing protocol to be filtered process-id The process number of the routing protocol (some protocols are not distinguished by the protocol number) [Default status] not configured The area filter-list ABR router can use the access list or the prefix list to filter with in/out direction when receiving and advertising the type 3 LSA. area area-id filter-list {access access-name | prefix prefix-name} in | out no area area-id filter-list {access access-name | prefix prefix-name} in|out Syntax Description area-id The id number of the area receiving or advertising the type 3 LSA access-name The applied access list name prefix-name The applied prefix list name in To filter when the area is receiving the type 3 LSA out To filter when the area is advertising the type 3 LSA to other areas [Default status] not configured Control the process of route updating When adding routes into the forwarding table, in order to restrain some routes from being added, the following command can be used to filter. The command distribute-list in This command permits or forbid to add some routes into the core routing table according to the function of the access list. distribute-list {access-list-number | access-list-name} in no distribute-list {access-list-number | access-list-name} in Syntax Description access-list-number The standard access list number, the range is 1-1000. access-list-nam The standard access list name [Default status] not configured Maipu Confidential & Proprietary Information Page 171 of 257 MP2000-104B-AC User Manual Version 1.0 Restart OSPF Process The following command can be used to clear all database, neighbor status, interface stuats and routes of the present OSPF process, and restart OSPF to set up neighbor and calculate routes. The command clear ip ospf process This command resets the OSPF process, clear all data structures of ospf, and permit OSPF process again. Execute in enable mode. clear ip ospf [process-id] process Syntax Description process-id OSPF process id number [Default status] do not execute Examples of Configuring OSPF Enable OSPF Process Illustration: In the configuration figure, router 1 connects with router 2 via Ethernet ports; router2 connects with router3 via serial ports; encapsulate PPP protocol. In order to make router1 connect with router3, the configuration of running OSPF dynamic routing protocol is: Maipu Confidential & Proprietary Information Page 172 of 257 MP2000-104B-AC User Manual Version 1.0 The configuration of router-1: Command Description router-1#configure terminal router-1(config)#router ospf 1 To set up OSPF process router-1(config-ospf )#network 70.1.1.0 0.0.0.255 area 0 To specify the corresponding OSPF interface and the area it belongs to router-1(config-ospf)#exit router-1(config)#int fastethernet0 router-1(config-if-fastethernet0)# 255.255.255.0 ip address 70.1.1.1 To configure the interface address router-1(config-if- fastethernet0)#exit The configuration of router-2: Command Description router-2# configure terminal router-2(config)#router ospf 1 To set up OSPF process router-2(config-ospf)# network 70.1.1.0 0.0.0.255 area 0 To specify the corresponding OSPF interface and the area it belongs to router-2(config-ospf)# network 30.1.1.0 0.0.0.255 area 1 To specify the corresponding OSPF interface and the area it belongs to router-2(config-ospf)#exit router-2(config)#interface serial0/0 router-2(config-if-serial0/0)# physical-layer sync router-2(config-if-serial0/0)# clock rate 19200 router-2(config-if-serial0/0)# encapsulation ppp To encapsulate PPP router-2(config-if-serial0/0)# ip address 30.1.1.1 255.255.255.0 To configure the interface address router-2(config-if-serial0/0)#exit router-2(config)# int fastethernet0 router-2(config-if-fastethernet0)# 255.255.255.0 ip address 70.1.1.2 To configure the interface address router-2(config-if-fastethernet0)# exit The configuration of router-3: Command Description router-3# configure terminal router-3(config)#router ospf 1 To set up OSPF process router-3(config-ospf)# network 30.1.1.0 0.0.0.255 area 1 To specify the corresponding OSPF interface and the area it belongs to router-3(config-ospf)#exit router-3(config)#interface serial0/0 Router-3(config-if-serial0/0)# physical-layer sync Router-3(config-if-serial0/0)# encapsulation ppp To encapsulate PPP router-3(config-if-serial0/0)# ip address 30.1.1.2 255.255.255.0 To configure the interface address Maipu Confidential & Proprietary Information Page 173 of 257 MP2000-104B-AC User Manual Version 1.0 Router-3(config-if-serial0/0)#exit After configured as above, router 1 can learn the route 30.1.1.0/24, and router 3 can learn the route 70.1.1.0/24. Configure OS PF Interface P arameters The following configuration is to make the OSPF interface between router1 and router2 perform the plain text authentication, and configure the hello time as 20. Notice: the configurations of router 1 and router 2 need to be consistent, which means the authentication mode, the password and the hello interval time need to be consistent, so that can establish OSPF neighbor. The configuration of router-1: Command Description router-1(config)#int fastethernet0 router-1(config-if-fastethernet0)# ip ospf authentication To configure the interface authentication mode as the plain text authentication router-1(config-if-fastethernet0)# ip ospf authentication-key 0 To configure the password of the maipu plain text authentication router-1(config-if-fastethernet0)# ip ospf hello-interval 20 To configure hello interval time router-1(config-if- fastethernet0)#exit The configuration of router-2: Command Description router-2(config)#int fastethernet0 router-2(config-if-fastethernet0)# ip ospf authentication To configure the interface authentication mode as the plain text authentication router-2(config-if-fastethernet0)# ip ospf authentication-key 0 To configure the password of the maipu plain text authentication router-2(config-if-fastethernet0)# ip ospf hello-interval 20 To configure hello interval time router-2(config-if- fastethernet0)#exit After configured OSPF interface authentication in this way, if there is another OSPF router on the Ethernet of router1 and router2, however it is not configured with the plain text authentication or the plain text authentication password is not maipu, it cannot establish OSPF routes with router 1 and router 2. Maipu Confidential & Proprietary Information Page 174 of 257 MP2000-104B-AC User Manual Version 1.0 Configure OS PF Area Parameters The following configuration is to configure the area 1 as the MD5 authentication, and configure the area 1 as the stub area. Notice: router2 and router3 both need to configure the area 1 as the stub area. If users want to configure MD5 authentication password on the interface, the MD5 authentication passwords of the two connected interfaces have to be the same. The configuration of router-2: Command Description router-2(config)#router ospf 1 To enter the OSPF configuration mode router-2(config-ospf)# area 1 authentication message-digest To configure routes in area 1 need to process the MD5 authentication router-2(config-ospf)# area 1 stub To specify area 1 as the stub area router-2(config-ospf)#exit router-2(config)#interface serial0/0 router-2(config-if-serial0/0)# ip ospf message-digest-key 1 md5 0 To configure the MD5 authentication maipu password of the interface router-2(config-if-serial0/0)#exit The configuration of router-3 is the same as router2. After configured as stub area, we can see that router3 generates a default route. Configure OS PF Inter-Area Route Summarization If there are multiple continuous addresses which belong to area 1 on the area border router router2, the the route summarization can be configured. For example: The configuration of router-2: Command Description router-2(config)#router ospf 1 To enter the OSPF configuration mode router-2(config-ospf)# network 33.33.33.0 0.0.0.255 area 1 To specify OSPF interface and area router-2(config-ospf)# area 1 range 33.33.33.0/24 To summarize the internal routes of area 1 router-2(config-ospf)#exit router-2(config)#interface loopback3 router-2(config-if-loopback3)# 255.255.255.255 ip address 33.33.33.33 To configure the interface address router-2(config-if-loopback3)#exit router-2(config)#interface loopback4 Maipu Confidential & Proprietary Information Page 175 of 257 MP2000-104B-AC User Manual Version 1.0 router-2(config-if-loopback4)# 255.255.255.255 ip address 33.33.33.44 To configure the interface address address 33.33.33.55 To configure the interface address router-2(config-if-loopback4)#exit router-2(config)#interface loopback5 router-2(config-if-loopback5)# 255.255.255.255 ip router-2(config-if-loopback5)#exit After configured as above, the area 0 generates a 33.33.33.0/24 interarea summary route. Configure OS PF Inter-Area Route Filtering If some routes belonging to the area 1 on the area border router router 2 cannot be advertised to other areas, use the inter-area route filtering command area filter-list, for example: The configuration of router-2: Command Description router-2(config)#ip access-list standard test To configure a test standard access list router-2(config-std-nacl)# deny host 44.44.44.44 To configure the deny address router-2(config-std-nacl)# permit 44.44.44.0 0.0.0.255 To configure the permit address router-2(config-std-nacl)#exit router-2(config)#router ospf 1 To enter the OSPF configuration mode router-2(config-ospf)# network 44.44.44.0 0.0.0.255 area 1 To specify OSPF interface and area router-2(config-ospf)# area 1 filter-list access test out To apply the access list name test to the filtering with out direction of area1 router-2(config-ospf)#exit router-2(config)#interface loopback44 router-2(config-if-loopback3)# 255.255.255.255 ip address 44.44.44.44 To configure the interface address address 44.44.44.45 To configure the interface address address 44.44.44.46 To configure the interface address router-2(config-if-loopback3)#exit router-2(config)#interface loopback45 router-2(config-if-loopback4)# 255.255.255.255 ip router-2(config-if-loopback4)#exit router-2(config)#interface loopback46 router-2(config-if-loopback4)# 255.255.255.255 ip router-2(config-if-loopback4)#exit Maipu Confidential & Proprietary Information Page 176 of 257 MP2000-104B-AC User Manual Version 1.0 After configured as above, the area 1 doesn’t advertise the route 44.44.44.44/32 to outside, only can learn the inter-area routes of 44.44.44.45/32 and 44.44.44.46/32 in the area 0. This is a filtering of out direction. For the filtering of in direction, do not filter routes advertised from other areas; for example, configure a filtering of in direction on the area 0, and configure it on the area border router. The configuration of router-2: Command Description router-2(config)#ip access-list standard maipu To configure a test standard access list router-2(config-std-nacl)# deny host 44.44.44.45 To configure the deny address router-2(config-std-nacl)# permit any To configure the permit address router-2(config-std-nacl)#exit router-2(config)#router ospf 1 To enter the OSPF configuration mode router-2(config-ospf)# area 0 filter-list access maipu in To apply the access list name maipu to the filtering of in direction of area0 router-2(config-ospf)#exit After configured as above, the area 0 cannot learn the route 44.44.44.45/32 of the area1, but can only learn the route 44.44.44.46/32 of area1. C o n f i g u r e t o R e d i s t r i b u te t h e E x t e r n a l R o u t e s and Summarize As shown in figure 4-11, area 1 is still a normal OSPF area; router3 is configured with continuous static routes, the next path is s1/0; router3 redistributes static routes and summarizes them. The configuration is as follow: The configuration of router-3 Command Description router-3(config)#router ospf 1 To enter the OSPF configuration mode router-3(config-ospf)# redistribute static To redistribute the static routes router-3(config-ospf)# summary-address 77.77.77.0 255.255.255.0 To summarize the redistributed static routes router-3(config-ospf)#exit router-3(config)# ip route 77.77.77.77 255.255.255.255 serial1/0 To configure the static route router-3(config)# ip route 77.77.77.88 255.255.255.255 serial1/0 To configure the static route router-3(config)# ip route 77.77.77.99 255.255.255.255 serial1/0 To configure the static route After configured as above, router 1 and router 2 can learn a summarized external route 77.77.77.0/24. Maipu Confidential & Proprietary Information Page 177 of 257 MP2000-104B-AC User Manual Version 1.0 Configure External Route Filtering As figure 4-11, there is a static route 88.88.88.88 on router3; the following configuration can be used to filter the static route when redistributing. The configuration of router-3: Command Description router-3(config)#router ospf 1 To enter the OSPF configuration mode router-3 (config-ospf)# redistribute static To redistribute static routes router-3(config-ospf)# distribute-list 33 out static To filter the static route matching ACL 33 router-3(config-ospf)#exit router-3(config)# ip route 88.88.88.88 255.255.255.255 serial1/0 To configure the static route router-3(config)# ip route 99.99.99.99 255.255.255.255 serial1/0 To configure the static route router-3(config)#ip access-list standard 33 To configure the standard access list router-3(config-std-nacl)#deny 88.88.88.0 0.0.0.255 To configure the network segment to be denied router-3(config-std-nacl)#permit any To configure permit item After configured as above, we can see that it only redistributed the static route of 99.99.99.99, but does not generate the external route of 88.88.88.88. Configure Administration Distance of OSPF Route The command distance can be used to modify the administration distance of OSPF route. For example, execute the command show ip route on router-1; we can see the changes of OSPF route’s distance: Before modifying: router-1#show ip route ospf Codes: C - connected, S - static, R - RIP, O - OSPF, OE-OSPF External, M Management D - Redirect, E - IRMP, EX - IRMP external, o - SNSP, B - BGP, i-ISIS Gateway of last resort is not set O 26.26.26.26/32 [110/2] via 70.1.1.2, 00:02:24, fastethernet0 (intraarea route) O 30.1.1.1/32 [110/2] via 70.1.1.2, 00:02:24, fastethernet0 (inter-area route) OE 77.77.77.77/32 [150/20] via 70.1.1.2, 00:02:24, fastethernet0 (external route) Maipu Confidential & Proprietary Information Page 178 of 257 MP2000-104B-AC User Manual Version 1.0 Modify the distance of all OSPF routes: The configuration of router-1: Command Description router-1(config)#router ospf 1 To enter the OSPF configuration mode router-1(config-ospf)# distance 100 To modify the distance value of all OSPF route types router-1(config-ospf)#exit The displaying results after modified: router-1#show ip route ospf Codes: C - connected, S - static, R - RIP, O - OSPF, OE-OSPF External, M Management D - Redirect, E - IRMP, EX - IRMP external, o - SNSP, B - BGP, i-ISIS Gateway of last resort is not set O 26.26.26.26/32 [100/2] via 70.1.1.2, 00:00:04, fastethernet0 O 30.1.1.1/32 [100/2] via 70.1.1.2, 00:00:04, fastethernet0 OE 77.77.77.77/32 [100/20] via 70.1.1.2, 00:00:04, fastethernet0 Modify the distance of each route type of OSPF: The configuration of router-1: Command Description router-1(config)#router ospf 1 To enter the OSPF configuration mode router-1(config-ospf)# distance ospf external 120 inter-area 90 To modify the distance value of each intra-area 60 route type router-1(config-ospf)#exit The displaying results after modified: router-1#show ip route ospf Codes: C - connected, S - static, R - RIP, O - OSPF, OE-OSPF External, M Management D - Redirect, E - IRMP, EX - IRMP external, o - SNSP, B - BGP, i-ISIS Gateway of last resort is not set O 26.26.26.26/32 [60/2] via 70.1.1.2, 00:00:03, fastethernet0 O 30.1.1.1/32 [90/2] via 70.1.1.2, 00:00:03, fastethernet0 OE 77.77.77.77/32 [120/20] via 70.1.1.2, 00:00:03, fastethernet0 Configure NSSA Area Users can configure the area1 as NSSA area, thus if redistribute the external routes on router-3, then the external routes is advertised with NSSA-LSA in area 1; on the area border router-2, the NSSA-LSA is translated to external LSA and be advertised to the area 0. For example: Maipu Confidential & Proprietary Information Page 179 of 257 MP2000-104B-AC User Manual Version 1.0 The configuration of router-2: Command Description router-2(config)#router ospf 1 To enter the OSPF configuration mode router-2(config-ospf)# area 1 nssa To configure area 1 as NSSA area router-2(config-ospf)#exit The configuration of router-3: Command Description router-3(config)#router ospf 1 To enter the OSPF configuration mode router-3 (config-ospf)#area 1 nssa To configure area 1 as NSSA area router-3(config-ospf)# redistribute static To redistribute the external routes in the NSSA area router-3(config-ospf)#exit Seeing the LSA database of area1 on router-2, we can see the corresponding NSSA-LSA, and can see the corresponding translated external LSA. On router-2, the external routes marked as N2 type can be learned; on router 1, the external routes marked as E2 are learned. Configure Virtual Link As shown in the above figure, on the basis of figure 4-10, another router route4 is connected into; router 3 connects with router 4 by serial interfaces, configured with the PPP protocol; router 3 and router 4 belong to the area 2. Thus, in order to make routes of area 0 can interact with routes of area 2; a virtual link should be established between the border router 3 and router 2, so as to connect the area 2 with the area 0. Suppose that the router ID of router 2 is 70.1.1.2, and the router ID of router 3 is 60.1.1.1, the configurations of the two are: Maipu Confidential & Proprietary Information Page 180 of 257 MP2000-104B-AC User Manual Version 1.0 The configuration of router-2: Command Description router-2(config)#router ospf 1 To enter the OSPF configuration mode router-2(config-ospf)# area 1 virtual-link 60.1.1.1 To specify to establish a virtual link to the peer 60.1.1.1 via the area 1 router-2(config-ospf)#exit The configuration of router-3: Command Description router-3(config)#router ospf 1 To enter the OSPF configuration mode router-3(config-ospf)# area 1 virtual-link 70.1.1.2 To specify to establish a virtual link to the peer 60.1.1.1 via the area 1 router-3(config-ospf)#exit After configured as above, router 3 establishes an adjacency to router 2 by passing the virtual link; and achieve at the destination connected with area2 and area0. Monitor & Debug OSPF The specific statistic information can be displayed. For example, the OSPF routing table, the link state database, the interface information, the neighbor information. The information can be utilized to view the using condition of the resources and solve the network problems. The following commands can be used to display statistic information of various routes. router# Command Description show ip ospf [process-id] To display basic information about OSPF show ip ospf [process-id] border- To display information about the routing tables of the border router and routers the autonomous system border router show ip buffers ospf [ process-id] To display buffer information of OSPF show ip ospf [process-id] database [router|network|summary|asbrTo display related information about the link state database of OSPF; summary|external|nssathe type of the link state can be specified to display detailed external|opaque-link|opaqueinformation area|opaque-as] [selforiginate|adv-router ip-addr|linkstate-id] show ip ospf interface [interface- To display interface information of OSPF; users can see which interface name [detail]] run OSPF show ip ospf [process-id] neighbor [all|detail|neighbor- To display information about OSPF neighbor id|interface interface-addr] Maipu Confidential & Proprietary Information Page 181 of 257 MP2000-104B-AC User Manual Version 1.0 show ip ospf protocols To display process parameters and the statistic information of OSPF protocol show ip ospf [process-id] route To display routing information of OSPF show ip ospf [process-id] virtualTo display information about OSPF virtual link link show ip route ospf To display OSPF routing information in the core routing table show run router ospf To display OSPF process running presently For example: Command Description of displayed results show ip ospf interface name gigaethernet0 is up, line protocol is up (monitor the information about an interface of ospf) Internet Address 129.255.19.90, 129.255.255.255( 0.0.0.0, area: 0 a[129.255.19.90] d[129.255.255.255]) Area MTU 1500 Process ID 64, ospf process number: 64 Router ID 222.222.222.222, router ID:222.222.222.222 Network Type BROADCAST, type: broadcast Cost: 1 cost value: 1 Transmit Delay is 1 sec, State Backup, Status: BDR Priority 1, Priority: 1 TE Metric 0 Designated Router (ID) 55.0.0.1, the designated Router: 55.0.0.1 Interface Address 129.255.19.160, the IP address of the designated router’s interface: 129.255.19.160 Backup Designated Router (ID) 222.222.222.222, designated router: 222.222.222.222 backup the Interface Address 129.255.19.90 backup the IP address of the designated router’s interface: 129.255.19.90 Timer intervals configured, Hello 10, hello time interval: 10 seconds Dead 40, dead time interval: 40 seconds Wait 40, Retransmit 5 Hello due in 00:00:01 Neighbor Count is 1, Adjacent neighbor count is 1 Crypt Sequence Number is 0 Hello received 234 sent 236, DD received 8 sent 13 LS-Req received 2 sent 2, LS-Upd received 13 sent 10 LS-Ack received 7 sent 10, Discarded 0 show ip ospf neighbor Neighbor ID Pri State (display ospf neighbor) 55.0.0.1 1 Full/DR Dead Time Address Interface 00:00:36 129.255.19.160 gigaethernet0 Configure BGP Dynamic Route BGP (Border Gateway Protocol) is distance-vector-based path vector routing protocol. This protocol is used to transfer the route information between autonomous systems. IGP can be used to determine the route in the autonomous system. Maipu Confidential & Proprietary Information Page 182 of 257 MP2000-104B-AC User Manual Version 1.0 BGP uses TCP as the transfer protocol (port number 179). This not only ensures the reliability of all transmission, but reduces the resource occupied by the protocols. BGP is a factual standard of external routing. The section explains how to configure BGP dynamic routing protocol of Maipu routers for network interconnection. BGP Configuration Commands Configuration Mode Command Description * Enable BGP process, specify the local autonomous system number and enter the BGP protocol configuration mode config router bgp autonomous-system neighbor {neighbor-address | group-name } remote-as asnumber * Specify BGP peer entity or the autonomous system number of the peer entity group config-bgp neighbor group-name peer-group Create a peer entity group config-bgp-af config-bgp config-bgp-af neighbor neighbor-address peergroup group-name Add the peer entity to a peer entity group neighbor {neighbor-address group-name } next-hop-self Configure the next hop in the route notified to the BGP peer entity or peer entity group as itself | config-bgp config-bgp-af config-bgp config-bgp-af Here, the configbgp-af configuration mode does not include IPv4 vrf configuration sub mode. neighbor {neighbor-address | group-name } password [Encryption-type] string Configure the MD5 password of BGP peer entity or peer entity group config-bgp config-bgp-af Here, the configbgp-af configuration mode only refers to IPv4 vrf configuration sub mode. Configure the interval of sending route to BGP peer entity or peer entity group. Use the key word asorig to specify the interval of sending local route information. config-bgp neighbor {neighbor-address | group-name } route-map mapname {in | out } Configure BGP peer entity or peer entity group to use route-map config-bgp neighbor {neighbor-address | group-name } route-reflector- * Configure the BGP peer entity or peer entity group as the client of the route reflector config-bgp neighbor {neighbor-address | group-name } advertisementinterval [asorig] seconds Maipu Confidential & Proprietary Information config-bgp-af Here, the configbgp-af configuration mode only refers to IPv4 vrf configuration sub mode. config-bgp-af config-bgp-af Page 183 of 257 MP2000-104B-AC User Manual Version 1.0 client neighbor {neighbor-address | group-name } send-community [both | extended | standard] Configure the community attributes to be sent to the BGP peer entity or peer entity group config-bgp neighbor {neighbor-address | group-name} timers {keepaliveinterval holdtime-interval|connect connect-interva} Configure the timer of BGP peer entity or peer entity group config-bgp neighbor {neighbor-address | group-name } ebgp-multihop [ttl] Configure allowing EBGP peer entities or peer entity groups on the network that are not connected directly to be connected config-bgp-af config-bgp-af Here, the configbgp-af configuration mode only refers to IPv4 vrf configuration sub mode. config-bgp config-bgp-af Here, the configbgp-af configuration mode only refers to IPv4 vrf configuration sub mode. Configure the source address used when setting up connection with BGP peer entity or peer entity group and sending update packets or specify the interface address as source address config-bgp neighbor {neighbor-address | group-name } distribute-list access-list-name {in | out} Configure the distribution filtering list applied on the BGP peer entity or peer entity group config-bgp neighbor {neighbor-address | group-name } filter-list aspathlist-name {in | out} Configure the AS_PATH attribute filtering list about BGP route applied on BGP peer entity or peer entity group. config-bgp neighbor {neighbor-address | group-name } prefix-list prefixlist-name {in | out} Configure the prefix filtering list applied on the BGP peer entity or peer entity group. config-bgp neighbor version 4 Configure only BGPv4 is received neighbor {neighbor-address | group-name } update-source {interface | ip-address} neighbor-address config-bgp-af Here, the configbgp-af configuration mode only refers to IPv4 vrf configuration sub mode. config-bgp-af config-bgp-af config-bgp-af config-bgp config-bgp-af Here, the configbgp-af configuration mode only refers to IPv4 vrf configuration sub mode. neighbor {neighbor-address | group-name } capability {dynamic | orf prefix-list { both | receive | send } | route-refresh} Maipu Confidential & Proprietary Information Configure the local supported capability notification when negotiating with BGP peer entity or peer entity group config-bgp config-bgp-af Page 184 of 257 MP2000-104B-AC User Manual Version 1.0 neighbor {neighbor-address peer_group-name } shutdown | Close the connection with a BGP neighbor or peer entity group config-bgp config-bgp-af Here, the configbgp-af configuration mode only refers to IPv4 vrf configuration sub mode. neighbor {neighbor-address | peer_group-name } softreconfiguration inbound Configure BGP peer entity or peer entity group to support input soft re-configuration function. config-bgp neighbor {neighbor-address peer_group-name } activate | Configure BGP peer entity or peer entity group to be activated in the local address cluster config-bgp neighbor {neighbor-address | peer_group-name } description string Configure the description of BGP peer entity or peer entity group config-bgp config-bgp-af config-bgp-af config-bgp-af Here, the configbgp-af configuration mode only refers to IPv4 vrf configuration sub mode. neighbor neighbor-address num port Configure the TCP port number used by the BGP protocol of BGP peer entity config-bgp config-bgp-af Here, the configbgp-af configuration mode only refers to IPv4 vrf configuration sub mode. neighbor {neighbor-address | peer_group-name } maximumprefix num [threshold-value] [warning-only] Configure the maximum number of route prefixes that can be received from BGP per entity or peer entity group config-bgp config-bgp-af config-bgp config-bgp-af Here, the configbgp-af configuration mode only refers to IPv4 vrf configuration sub mode. neighbor {neighbor-address | peer_group-name } weight num Configure the default weight of the peer entity or peer entity group neighbor {neighbor-address | peer_group-name } removeprivate-AS Configure removing the private AS number from the AS_PATH attributes of BGP route before releasing BGP route to BGP peer entity or peer entity group config-bgp neighbor {neighbor-address | peer_group-name } defaultoriginate [route-map map-name] Configure sending default route to the BGP peer entity or peer entity group config-bgp neighbor {neighbor-address | peer_group-name } allowas-in [num] Configure allowing to receive BGP route information with local AS number in AS_PATH attributes from BGP peer entity or peer entity group config-bgp Maipu Confidential & Proprietary Information config-bgp-af config-bgp-af config-bgp-af Page 185 of 257 MP2000-104B-AC User Manual Version 1.0 neighbor {neighbor-address | peer_group-name } attributeunchanged [as-path/med/nexthop] Configure not to change the attribute in BGP route when forwarding BGP route to the BGP peer entity or peer entity group config-bgp neighbor {neighbor-address | peer_group-name } collideestablished Configure to perform the connection confliction check when the BGP peer entity or peer entity group is in the connection state config-bgp neighbor {neighbor-address | peer_group-name } dontcapability-negotiate Configure not to negotiate with the BGP peer entity or peer entity group about the capability notification config-bgp config-bgp-af config-bgp-af Here, the configbgp-af configuration mode only refers to IPv4 vrf configuration sub mode. neighbor {neighbor-address | peer_group-name } enforcemultihop Configure the EBGP connection set between the local and BGP peer entity or peer entity group cannot be straight-through config-bgp config-bgp-af Here, the configbgp-af configuration mode only refers to IPv4 vrf configuration sub mode. neighbor {neighbor-address | peer_group-name } overridecapability Configure the BGP connection between the local and BGP peer entity or peer entity group neglects the capability negotiation result. config-bgp neighbor {neighbor-address peer_group-name } passive Configure the local not to initiate the TCP connection of BGP neighbor to BGP peer entity or peer entity group actively config-bgp | config-bgp-af Here, the configbgp-af configuration mode only refers to IPv4 vrf configuration sub mode. neighbor {neighbor-address | peer_group-name } strictcapability-match Configure the BGP connection between the local and the BGP peer entity or peer entity group matches capability negotiation result strictly config-bgp neighbor {neighbor-address | peer_group-name } unsuppressmap map-name Configure BGP peer entity or peer entity group to be used for matching the route-map of suppression route config-bgp neighbor neighbor-address soo asn:nn Configure Site of Origin in extended community attributes of BGP peer entity config-bgp-af config-bgp-af Here, the configbgp-af configuration mode only refers to IPv4 vrf configuration sub mode. neighbor {neighbor-address | peer_group-name } as-override Configure the AS number cover of BGP peer entity or peer entity group config-bgp-af Here, the configbgp-af Maipu Confidential & Proprietary Information Page 186 of 257 MP2000-104B-AC User Manual Version 1.0 configuration mode only refers to IPv4 vrf configuration sub mode. bgp enforce-first-as Configure the first AS number in AS_PATH attributes of the BGP route information received from EBGP neighbor should be the AS number of the neighbor config-bgp bgp fast-external-failover Configure the straight-through EBGP neighbor to shut down the EBGP connection at once when the connected interface is down. config-bgp bgp bestpath { as-path ignore | compare-routerid | compareconfed-aspath | med { confed / missing-as-worst }} Configure the policy for selecting route of BGP config-bgp bgp always-compare-med Configure allowing to compare the MED attributes of BGP route from different AS neighbors config-bgp bgp cluster-id {cluster-id-in-ip| cluster-id-in-num} Configure the cluster ID of the route reflector config-bgp bgp router-id router-id Configure the router ID used by the local BGP config-bgp bgp confederation identifier asnumber Configure the autonomous system number of the BGP confederation config-bgp bgp confederation peers number [as-number] as- Configure the sub autonomous system number belonging to BGP confederation config-bgp local-preference Configure the default local priority of BGP route config-bgp bgp default ipv4-unicast Configure each peer entity enables the functions of notifying and receiving BGP route of ipv4-unicast address by default config-bgp bgp dampening [reach_half-life [reuse_value suppress_value max-suppress-time [un_reach_half-life] ]|route-map map_name] Configure the suppression config-bgp bgp deterministic-med Configure BGP to select the best MED routes received by each AS to compare config-bgp bgp client-to-client reflection Configure allowing BGP route reflector to forward the route information received by a BGP route reflector client to other BGP route reflector client config-bgp bgp log-neighbor-changes Configure recording the stats change logs of BGP neighbors config-bgp bgp scan-time time Configure the interval of the local BGP process scanning BGP RIB config-bgp address-family { ipv4 [vrf vrfname | multicast | unicast ] } Enable functions of notifying and receiving BGP route of a address cluster and enter the BGP protocol configuration mode of the address cluster config-bgp network network-number network-mask [route-map mapname [backdoor]| backdoor] * Configure the route information of BGP notification config-bgp maximum-paths { number | ibgp number } Configure BGP to support load balance config-bgp maximum-paths { number |eibgp number | ibgp { number | unequal-cost number} } Configure the load balance of BGP in the VRF sub mode of IPv4 config-bgp-af bgp default value Maipu Confidential & Proprietary Information parameters of BGP route config-bgp-af config-bgp-af Here, the config- Page 187 of 257 MP2000-104B-AC User Manual Version 1.0 bgp-af configuration mode only refers to IPv4 vrf configuration sub mode. redistribute { connected | ospf as-number | rip | static } [routemap map-name] Re-distribute the route information of other routing protocols in BGP config-bgp distance {bgp external-distance internal-distance local-distance| administrative-distance networknumber network-mask [ aclname]} Configure the management distance of BGP route config-bgp aggregate-address address mask [as-set/summary-only] Configure the aggregation route information sent by BGP config-bgp timers bgp holdtime Configure the sending interval of BGP global keepalive and holdtime timer time config-bgp show running-config router bgp View the BGP protocol configuration of the local config-bgp clear ip bgp {* | address | asnumber| peer-group group_name| external } Re-set BGP neighbor enable clear ip bgp [ipv4 {unicast | multicast}] dampening {address| address/ prefix- length } Clear the route flapping attenuation information and the suppression for the suppressed route enable clear ip bgp [ipv4 {unicast | multicast}] flap-statistics {address| address/ prefixlength } Clear the statistics information of route flapping enable clear ip bgp {* | address | asnumber| peer-group group_name| external } [ipv4 {unicast | multicast} | vrf vrf_name] [soft ] in Perform the soft re-configuration on the route entering the router. enable clear ip bgp {* | address | asnumber| peer-group group_name | external } [ipv4 {unicast | multicast} | vrf vrf_name] [soft ] out Perform the soft re-configuration on the route sent by the router enable clear ip bgp {* | address | asnumber| peer-group group_name | external } [ipv4 {unicast | multicast} | vrf vrf_name] soft Perform the soft re-configuration on routes sent by the router and routes entering the router at the same time enable clear ip bgp {* | address | asnumber| peer-group group_name| external } [ipv4 {unicast | multicast}] in prefixfilter Inform the BGP neighbor via orf mechanism after the configurations of the local input prefix-list change enable show ip bgp [ipv4 {unicast | multicast}] [address | address/prefix- length [longer- Display BGP route information enable keepalive-interval Maipu Confidential & Proprietary Information Note: The command distance administrativedistance network-number network-mask [ aclname] can be used only in config-BGP Configuration Mode. config-bgp-af config-bgp-af Here, the configbgp-af configuration mode only refers to IPv4 vrf configuration sub mode. config-bgp-af Note: If the local saves the original route received from the neighbor, use the route to recalculate directly; if the local does not save, but the neighbor supports route update, send the route update message to the neighbor. Page 188 of 257 MP2000-104B-AC User Manual Version 1.0 prefixes] | cidr-only | community-list community_list_name [exactmatch] | filter-list filter_list_name | inconsistent-as | prefix-list prefix_list_name| quote-regexp regexp_str_quote| regexp regexp_str| route-map map_name] show ip bgp paths Display summary information attributes of BGP route AS-PATH enable show ip bgp attribute-info Display summary information of BGP route attributes enable show ip bgp community-info Display summary information of BGP route community attributes enable show ip bgp scan Display information scanning in BGP enable show ip bgp vrf [vrf_name] Display vrf information in BGP enable show ip bgp [ ipv4 {unicast | multicast} ] neighbor [ peer-addr [ advertised-routes | received prefix-filter | received-routes | routes] Display neighbor information enable show ip bgp [ ipv4 {unicast | multicast} ] summary Display summary information of BGP neighbor enable bgp rfc1771-path-select Configure BGP protocol according to RFC1771 route config bgp rfc1771-strict Configure the BGP protocol to classify the ORIGIN attributes of re-distributed routes according to RFC1771 config about of the to next select hop Note “*” before description. command means it has configuration example The prompts of all address cluster configuration sub modes are the same (config-bgp-af0 in the BGP configurations. Therefore, there are notes for the commands that can be configured only in some address cluster configuration sub modes. If there are no notes, the commands can be configured in all address cluster configuration sub modes. router bgp command The command is used to Enable BGP process, specify the local autonomous system number and enter the BGP protocol configuration mode. The no form of the command is used to disable the BGP process and delete the BGP configuration. router bgp autonomous-system no router bgp autonomous-system Syntax Description autonomous-system The local autonomous system number. The value range is 165535. Maipu Confidential & Proprietary Information Page 189 of 257 MP2000-104B-AC User Manual Version 1.0 [Default status] BGP is disabled. Maipu Confidential & Proprietary Information Page 190 of 257 MP2000-104B-AC User Manual Version 1.0 neighbor remote-as command The command is used to specify the autonomous system number of the BGP peer entity or peer entity group. The no form of the command is used to delete the autonomous system number of the peer entity or peer entity group. neighbor {neighbor-address | group-name } remote-as asnumber no neighbor { neighbor-address | group-name } [remote-as as-number] Syntax Description neighbor-address The IP address of the peer entity. group-name The name of the peer entity group. as-number The autonomous system number of the peer entity or peer entity group. neighbor peer-group command The command is used to create a peer entity group. The no form of the command is used to delete the created peer entity group. neighbor group-name peer-group no neighbor group-name [peer-group] Syntax Description group-name The name of the peer entity group. [Default status] None neighbor peer-group command The command is used to add a peer entity to a peer entity group. The no form of the command is used to delete the peer entity in the peer entity group. neighbor neighbor-address peer-group group-name no neighbor neighbor-address peer-group group-name Syntax Description neighbor-address The IP address of the peer entity. group-name The name of the peer entity group. neighbor next-hop-self command The command is used to the next hop in the route notified to the BGP peer entity or peer entity group as the local IP address. The no form of the command is used to cancel the existing configurations. Maipu Confidential & Proprietary Information Page 191 of 257 MP2000-104B-AC User Manual Version 1.0 neighbor {neighbor-address | group-name } next-hop-self no neighbor {neighbor-address | group-name } next-hop-self Syntax Description neighbor-address The IP address of the peer entity. group-name The name of the peer entity group. [Default status] It is disabled by default. neighbor password command The command is used to configure the MD5 password used on the TCP connections between BGP peer entity or peer entity groups. The no form of the command is used to cancel the configuration. neighbor {neighbor-address | group-name } password [Encryption-type] string no neighbor {neighbor-address | group-name } password [[Encryptiontype] string] Syntax Description neighbor-address The IP address of the peer entity. group-name The name of the peer entity group. encryption-typ Encryption type. string Password [Default status] By default, it is disabled. Note • If authentication function needs to be configured, it should be used at the two ends of BGP neighbor at the same time. • • Here, the encryption type has no actual meaning, so there is no difference whether to specify the encryption type. • neighbor advertisement-interval command The command is used to configure the interval of sending route to BGP peer entity or peer entity group. Use the key word asorig to specify the interval of sending local route information. The no form of the command is used to recover the default value of the interval of sending route to BGP peer entity or peer entity group. neighbor {neighbor-address | group-name } advertisement-interval [asorig] seconds no neighbor {neighbor-address | group-name } advertisementinterval [asorig] seconds Syntax Description neighbor-address The IP address of the peer entity. group-name The name of the peer entity group. seconds The minimum interval of notifying route to the neighbor. The value range is 0-600. [Default status] The default sending interval is 30s. Maipu Confidential & Proprietary Information Page 192 of 257 MP2000-104B-AC User Manual Version 1.0 neighbor route-map command The command is used to configure the route-map applied on the peer entity or peer entity group. The no form of the command is used to delete the route-map applied on the peer entity or peer entity group. neighbor {neighbor-address | group-name } route-map map-name {in | out } no neighbor {neighbor-address | group-name } route-map map-name {in | out } Syntax Description neighbor-address The IP address of the peer entity. group-name The name of the peer entity group. map-name The name of the route mapping. in Input notification. out Output notification. [Default status] None neighbor route-reflector-client command The command is used to configure the BGP peer entity or peer entity group as the client of the route reflector. The no form of the command is used to cancel the existing configuration. neighbor {neighbor-address | group-name } route-reflector-client no neighbor {neighbor-address | group-name } route-reflector-client Syntax Description neighbor-address The IP address of BGP neighbor. group-name The name of the peer entity group. [Default status] By default, it is disabled. neighbor send-community command The command is used to configure the community attributes to be sent to the BGP peer entity or peer entity group. The no form of the command is used to cancel the existing configuration. neighbor {neighbor-address | group-name } send-community [both | extended | standard] no neighbor {neighbor-address | group-name } send-community [both | extended | standard] Maipu Confidential & Proprietary Information Page 193 of 257 MP2000-104B-AC User Manual Version 1.0 Syntax Description neighbor-address The IP address of the peer entity. group-name The name of the peer entity group. both The sending standard and extended community attributes. extended Send the extended community attributes standard Send the standard community attributes [Default status] By default, do not send the community attributes. neighbor timers command The command is used to configure the timer of BGP peer entity or peer entity group. The no form of the command is used to recover the default value. neighbor {neighbor-address | group-name} timers {keepalive-interval holdtime-interval|connect connect-interva} no neighbor {neighbor-address | group-name } timers [connect connect-interva] Syntax Description neighbor-address The IP address of the peer entity. group-name The name of the peer entity group. keepalive-interval Specify the keepalive interval with the neighbor holdtime-interval Specify the holdtime interval with the neighbor connect-interva Specify the interval of initiating the connection request to the neighbor [Default status] By default, the keepalive interval is 60s and the holdtime interval is 180s. neighbor ebgp-multihop command The command is used to Set IP TTL of the packets between EBGP peer entities or peer entity groups. It is used to allow EBGP peer entities or peer entity groups on the network that are not connected directly to be connected. If ttl is not specified, it is configured as the maximum value (255). The no form of the command is used to cancel the existing xonfiguration. neighbor {neighbor-address | group-name } ebgp-multihop [ttl] no neighbor {neighbor-address | group-name } ebgp-multihop ttl Syntax Description neighbor-address The IP address of the peer entity. group-name The name of the peer entity group. ttl The maximum number of hops. The value range is 1-255. neighbor update-source command Maipu Confidential & Proprietary Information Page 194 of 257 MP2000-104B-AC User Manual Version 1.0 The command is used to configure the source address used when setting up connection with BGP peer entity or peer entity group and sending update packets or specify the interface address as source address. The no form of the command is used to cancel the existing configuration. neighbor {neighbor-address | group-name } update-source {interface|ip-address} no neighbor {neighbor-address | group-name } update-source Syntax Description neighbor-address The IP address of the peer entity. group-name The name of the peer entity group. interface Specify the TCP connection interface. ip-address The address of a local interface. [Default status] By default, use the local output interface address of BGP neighbor address route as the source address. neighbor distribute-list command The command is used to configure the distribution filtering list applied on the BGP peer entity or peer entity group. The no form of the command is used to cancel the configuration. neighbor {neighbor-address | group-name } distribute-list access-listname {in | out} no neighbor {neighbor-address | group-name } distribute-list accesslist-name {in | out} Syntax Description neighbor-address The IP address of the peer entity. group-name The name of the peer entity group. access-list-name The name of the access list. in Configure the access list to function on the route notified from the neighbor. out Configure the access list to function in the route notified to the neighbor. [Default status] By default, it is disabled. neighbor filter-list command The command is used to configure the AS_PATH attribute filtering list about BGP route applied on BGP peer entity or peer entity group. The no form of the command is used to cancel the configuration. neighbor {neighbor-address | group-name } filter-list aspath-listname{in | out} no neighbor {neighbor-address | group-name } filter-list access-listname {in | out} Maipu Confidential & Proprietary Information Page 195 of 257 MP2000-104B-AC User Manual Version 1.0 Syntax Description neighbor-address The IP address of the peer entity. group-name The name of the peer entity group. aspath-list-name AS list number in Configure the AS number filtering list to function on the route notified from the neighbor out Configure the AS number filtering list to function on the route notified to the neighbor [Default status] By default, it is disabled. neighbor prefix-list command The command is used to configure the prefix filtering list applied on the BGP peer entity or peer entity group. The no form of the command is used to cancel the configuration. neighbor {neighbor-address | group-name } prefix-list prefix-list-name {in | out} no neighbor {neighbor-address | group-name } prefix-list prefix-listname {in | out} Syntax Description neighbor-address The IP address of the peer entity. group-name The name of the peer entity group. prefix-list-name The name of the prefix list. in Configure the prefix list to function on the route notified from the neighbor. out Configure the prefix list to function on the route notified to the neighbor [Default status] By default, it is disabled. neighbor version command The command is used to configure that only specified BGP version (BGPv4) is received. The no form of the command is used to use the default version. neighbor neighbor-address version 4 no neighbor neighbor-address version Syntax Description neighbor-address The IP address of the peer entity. 4 The BGP version number. Currently, it can only be configured as 4. Maipu Confidential & Proprietary Information Page 196 of 257 MP2000-104B-AC User Manual Version 1.0 neighbor capability command The command is used to configure the local supported capability notification when the local BGP negotiates with BGP peer entity or peer entity group. The no form of the command is used to cancel the configuration. neighbor {neighbor-address | group-name } capability {dynamic | orf prefix-list { both | receive | send } | route-refresh} no neighbor {neighbor-address | group-name } capability {dynamic | orf prefix-list { both | receive | send } | route-refresh} Syntax Description neighbor-address The IP address of the peer entity. group-name The name of the peer entity group. dynamic Specify the capability. orf Specify the neighbor to support orf capability. prefix-list Specify the prefix-list-based orf capability. both Notify the neighbor of being willing to receive and send prefix-list-based orf receive Notify the neighbor of being willing to receive prefix-list-based orf send Notify the neighbor of being willing to send prefix-list-based orf route-refresh Specify the neighbor to support the capability of updating the route neighbor to support dynamic neighbor shutdown command The command is used to close the connection with a BGP neighbor or peer entity group. The no form of the command is used to Enable connection with the neighbor. neighbor {neighbor-address |group-name } shutdown no neighbor {neighbor-address | group-name } shutdown Syntax Description neighbor-address The IP address of the peer entity. group-name The name of the peer entity group. neighbor soft-reconfiguration inbound command The command is used to configure BGP peer entity or peer entity group to support input soft re-configuration function. The peer entity or peer entity group begins to store the received original route. The no form of the command means not to store the received original route. Maipu Confidential & Proprietary Information Page 197 of 257 MP2000-104B-AC User Manual Version 1.0 neighbor {neighbor-address | group-name } soft-reconfiguration inbound no neighbor {neighbor-address | group-name } soft-reconfiguration inbound Syntax Description neighbor-address The IP address of the peer entity. group-name The name of the peer entity group. neighbor activate command The command is used to configure the BGP peer entity or peer entity group to be activated in a local address cluster. The no form of the command is used to cancel the configuration. neighbor {neighbor-address | group-name } activate no neighbor {neighbor-address | group-name } activate Syntax Description neighbor-address The IP address of the peer entity. group-name The name of the peer entity group. [Default status] By default, the BGP peer entity or peer entity group is activated only in ipv4 unicast address cluster. neighbor description command The command is used to configure the description of BGP peer entity or peer entity group. The no form of the command is used to delete the configured description. neighbor {neighbor-address | peer_group-name } description string no neighbor {neighbor-address | peer_group-name } description Syntax Description neighbor-address The IP address of the peer entity. peer_group-name The name of the peer entity group. string The description about the neighbor, comprising 0-80 bytes. neighbor port command The command is used to configure the TCP port number used by the BGP protocol of BGP peer entity. The no form of the command is used to cancel the configuration. Maipu Confidential & Proprietary Information Page 198 of 257 MP2000-104B-AC User Manual Version 1.0 neighbor neighbor-address port num no neighbor neighbor-address port num Syntax Description neighbor-address The IP address of the peer entity. num The port number of the neighbor peer end. The value range is 0-65535. [Default status] The default value is TCP179 port. neighbor maximum-prefix command The command is used to configure the maximum number of route prefixes that can be received from BGP per entity or peer entity group. The no form of the command is used to cancel the configuration. neighbor {neighbor-address | peer_group-name } maximum-prefix num [ threshold-value] [warning-only] no neighbor {neighbor-address | peer_group-name } maximum-prefix [num [warning-only]] Syntax Description neighbor-address The IP address of the peer entity. peer_group-name The name of the peer entity group. num The number of route. The value range is 14294967295. warning-only Only warning, but not stop receiving routes threshold-value The threshold. The value range is 1-100. neighbor weight command The command is used to configure the default weight of the peer entity or peer entity group. The no form of the command is used to cancel the configuration. neighbor {neighbor-address | peer_group-name } weight num no neighbor {neighbor-address | peer_group-name } weight Syntax Description neighbor-address The IP address of the peer entity. peer_group-name The name of the peer entity group. num The default weight. The value range is 0-65535. neighbor remove-private-AS command The command is used to configure removing the private AS number from the AS_PATH attributes of BGP route before releasing BGP route to BGP peer entity or peer entity group. The no form of the command is used to cancel the configuration. Maipu Confidential & Proprietary Information Page 199 of 257 MP2000-104B-AC User Manual Version 1.0 neighbor {neighbor-address | peer_group-name } remove-private-AS no neighbor {neighbor-address | peer_group-name } remove-privateAS Syntax Description neighbor-address The IP address of the peer entity. peer_group-name The name of the peer entity group. neighbor default-originate command The command is used to send the default route to the BGP peer entity or peer entity group. The no form of the command is used to cancel the configuration. neighbor {neighbor-address | peer_group-name } default-originate [route-map map-name] no neighbor {neighbor-address | peer_group-name } default-originate [route-map map-name] Syntax Description neighbor-address The IP address of the peer entity. peer_group-name The name of the peer entity group. map-name The name of the route-map neighbor allowas-in command The command is used to configure allowing receiving BGP route information with local AS number in AS_PATH attributes from BGP peer entity or peering entity group. The no form of the command is used to cancel the configuration. neighbor {neighbor-address | peer_group-name } allowas-in [num] no neighbor {neighbor-address | peer_group-name } allowas-in Syntax Description neighbor-address The IP address of the peer entity. peer_group-name The name of the peer entity group. num The allowed times that the AS number appears in a piece of route information. The value range is 1-10. [Default status] By default, the BGP protocol does not receive the BGP route information with local AS number in AS_PATH attributes from BGP peer entity or peering entity group Maipu Confidential & Proprietary Information Page 200 of 257 MP2000-104B-AC User Manual Version 1.0 neighbor attribute-unchanged command The command is used to configure not to change the attribute in BGP route when forwarding BGP route to the BGP peer entity or peer entity group. The no form of the command is used to cancel the configuration. neighbor {neighbor-address | peer_group-name } attribute-unchanged [as-path/med/next-hop] no neighbor {neighbor-address | peer_group-name } attribute-unchanged [as-path/med/next-hop] Syntax Description neighbor-address The IP address of the peer entity. peer_group-name The name of the peer entity group. as-path The as-path attribute in the BGP route. med The med attribute in the BGP route. next-hop The next-hop attribute in the BGP route. neighbor collide-established command The command is used to configure to perform the connection confliction check when the BGP peer entity or peer entity group is in the connection state. The no form of the command is used to cancel the configuration. neighbor {neighbor-address | peer_group-name } collide-established no neighbor {neighbor-address | peer_group-name } collideestablished Syntax Description neighbor-address The IP address of the peer entity. peer_group-name The name of the peer entity group. neighbor dont-capability-negotiate command The command is used to configure not to negotiate with the BGP peer entity or peer entity group about the capability notification. The no form of the command is used to cancel the configuration. neighbor {neighbor-address | peer_group-name } dont-capabilitynegotiate no neighbor {neighbor-address | peer_group-name } dont-capabilitynegotiate Syntax Description neighbor-address The IP address of the peer entity. peer_group-name The name of the peer entity group. Maipu Confidential & Proprietary Information Page 201 of 257 MP2000-104B-AC User Manual Version 1.0 neighbor enforce-multihop command The command is used to configure the EBGP connection set between the local and BGP peer entity or peer entity group cannot be straight-through. The no form of the command is used to cancel the configuration. neighbor {neighbor-address | peer_group-name } enforce-multihop no neighbor {neighbor-address | peer_group-name } enforce-multihop Syntax Description neighbor-address The IP address of the peer entity. peer_group-name The name of the peer entity group. neighbor override-capability command The command is used to configure the BGP connection between the local and BGP peer entity or peer entity group neglects the capability negotiation result. The no form of the command is used to cancel the configuration. neighbor {neighbor-address | peer_group-name } override-capability no neighbor {neighbor-address | peer_group-name } overridecapability Syntax Description neighbor-address The IP address of the peer entity. peer_group-name The name of the peer entity group. neighbor passive command The command is used to configure the local not to initiate the TCP connection of BGP neighbor to BGP peer entity or peer entity group actively. The no form of the command is used to cancel the configuration. neighbor {neighbor-address | peer_group-name } passive no neighbor {neighbor-address | peer_group-name } passive Syntax Description neighbor-address The IP address of the peer entity. peer_group-name The name of the peer entity group. neighbor strict-capability-match command The command is used to configure the BGP connection between the local and the BGP peer entity or peer entity group matches capability negotiation result strictly. The no form of the command is used to cancel the configuration. Maipu Confidential & Proprietary Information Page 202 of 257 MP2000-104B-AC User Manual Version 1.0 neighbor {neighbor-address | peer_group-name } strict-capabilitymatch no neighbor {neighbor-address | peer_group-name } strict-capabilitymatch Syntax Description neighbor-address The IP address of the peer entity. peer_group-name The name of the peer entity group. neighbor unsuppress-map command The command is used to configure BGP peer entity or peer entity group to be used for matching the route-map of suppression route. The suppression route matching with the route-map is not suppressed again. The no form of the command is used to cancel the configuration. neighbor {neighbor-address | peer_group-name } unsuppress-map map-name no neighbor {neighbor-address | peer_group-name } unsuppress-map map-name Syntax Description neighbor-address The IP address of the peer entity. peer_group-name The name of the peer entity group. map-name The name of the route-map neighbor soo command The command is used to configure Site of Origin in extended community attributes of BGP peer entity. The no form of the command is used to cancel the configuration. neighbor neighbor-address soo asn:nn no neighbor neighbor-address soo Syntax Description neighbor-address The IP address of the peer entity. asn:nn Configure the community number in the format of ASN:NN Note: There are two formats supporting the S00 value, that is, ASN:NN and IP-address:nn. bgp enforce-first-as command The command is used to configure the first AS number in AS_PATH attributes of the BGP route information received from EBGP neighbor should be the AS number of the neighbor. The no form of the command is used to cancel the requirement. Maipu Confidential & Proprietary Information Page 203 of 257 MP2000-104B-AC User Manual Version 1.0 bgp enforce-first-as no bgp enforce-first-as [Default status] By default, it is disabled. bgp fast-external-failover command The command is used to configure the straight-through EBGP neighbor to shut down the EBGP connection at once when the connected interface is down, but does not wait until the BGP keepalive times out. The no form of the command is used to cancel the configuration. bgp fast-external-failover no bgp fast-external-failover [Default status] By default, it is enabled. bgp bestpath command The command is used to configure the policy for selecting route of BGP. The no form of the command is used to cancel the configuration. bgp bestpath { as-path ignore | compare-routerid | compare-confedaspath | med { confed/missing-as-worst }} no bgp bestpath { as-path ignore | compare-routerid | compare-confedaspath | med { confed/missing-as-worst }} Syntax Description as-path ignore When selecting routes, do not compare as-path compare-routerid When selecting routes, compare routerid compare-confed-aspath When selecting routes, confederation as-path med confed When selecting routes, compare the med between the confederation routes med missing-as-worst When selecting route, the route without med has the highest priority. compare the bgp always-compare-med command The command is used to configure allowing comparing the MED attributes of BGP route from different AS neighbors. The no form of the command is used to prohibit the comparison. bgp always-compare-med no bgp always-compare-med [Default status] By default, do not compare the MED attributes of BGP route from different AS neighbors. Maipu Confidential & Proprietary Information Page 204 of 257 MP2000-104B-AC User Manual Version 1.0 bgp cluster-id command The command is used to configure the cluster ID of the route reflector. The no form of the command is used to delete the configured cluster ID of the route reflector. bgp cluster-id {cluster-id-in-ip| cluster-id-in-num} no bgp cluster-id Syntax Description cluster-id-in-ip The cluster ID of the route reflector, in the form of IP address cluster-id-in-num The cluster ID of the route reflector, in the form of numbers bgp router-id command The command is used to configure the router ID used by the local BGP. The no form of the command is used to delete the configured route ID. bgp router-id router-id no bgp router-id router-id Syntax Description router-id The router ID. bgp confederation identifier command The command is used to configure the autonomous system number of the BGP confederation. The no form of the command is used to delete the configuration. bgp confederation identifier as-number no bgp confederation identifier as-number Syntax Description as-number The autonomous system number bgp confederation peers command The command is used to configure the sub autonomous system number belonging to BGP confederation. The no form of the command is used to delete the sub autonomous system number from the BGP confederation. bgp confederation peers as-number no bgp confederation peers as-number Syntax Description as-number The autonomous system number Maipu Confidential & Proprietary Information Page 205 of 257 MP2000-104B-AC User Manual Version 1.0 bgp default local-preference command The command is used to configure the default local priority of BGP route. The no form of the command is used to recover the default value of the local priority. bgp default local-preference value no bgp default local-preference value Syntax Description value The local priority. The value range is 04294967295. [Default status] By default, the local priority is 100. bgp default ipv4-unicast command The command is used to configure each peer entity enables the functions of notifying and receiving BGP route of ipv4-unicast address by default. The no form of the command is used to cancel the configuration. bgp default ipv4-unicast no bgp default ipv4-unicast [Default status] By default, the functions are enabled. bgp dampening command The command is used to configure the BGP route suppression and the parameters. The no form of the command is used to cancel the route suppression. bgp dampening [reach_half-life [reuse_value suppress_value maxsuppress-time [un_reach_half-life] ]|route-map map_name] no bgp dampening [route-map map_name] Syntax Description reach_half-life The half life of the BGP route suppression. The value range is 1-45. reuse_value The re-used value when the routing begins. The value range is 1-20000. suppress_value The suppression value when the routing begins. The value range is 1-20000. max-suppress-time The maximum suppression time of the route. The value range is 1-255. un_reach_half-life The un-reachable half life punished by the route. The value range is 1-45 minutes. map_name Use the specified route-map to Set parameter. [Default status] By default, half-life is 15minutes, resue is 750, suppress is 2000 and max-suppress-time is the 4multiples of half-life. Maipu Confidential & Proprietary Information Page 206 of 257 MP2000-104B-AC User Manual Version 1.0 bgp deterministic-med command The command is used to configure BGP to select the best MED routes received by each AS to compare. The no form of the command is used to cancel the function. bgp deterministic-med no bgp deterministic-med [Default status] By default, it is disabled. bgp client-to-client reflection command The command is used to configure allowing BGP route reflector to forward the route information received by a BGP route reflector client to other BGP route reflector client. The no form of the command is used to prohibit BGP route reflector from forwarding the route information received by a BGP route reflector client to other BGP route reflector client. bgp client-to-client reflection no bgp client-to-client reflection [Default status] By default, it is reflected. bgp log-neighbor-changes command The command is used to display prompt information when the neighbor statue changes. The no form of the command is used to cancel displaying the prompt information. bgp log-neighbor-changes no bgp log-neighbor-changes [Default status] By default, the prompt information is not displayed. bgp scan-time command The command is used to configure the interval of the local BGP process scanning BGP RIB. The no form of the command is used to recover the default value. bgp scan-time time no bgp scan-time Syntax Description time The interval, the value range is 0-60. [Default status] The default value is 60s. Maipu Confidential & Proprietary Information Page 207 of 257 MP2000-104B-AC User Manual Version 1.0 address-family command The command is used to activate a address cluster and enter the configuration sub mode of the address cluster. The no form of the command is used to cancel all the configurations of an address cluster. address-family { ipv4 [vrf vrfname | multicast | unicast ]} no address-family Syntax Description ipv4 ipv4 address cluster vrf Vrf address cluster multicast Multicast address cluster unicast Unicast address cluster vrfname Specify the vrf name network command The command is used to configure the route information of BGP notification. The no form of the command is used to cancel the existing configuration. network network-number network-mask [route-map map-name [backdoor] | backdoor] no network network-number network-mask [route-map map-name [backdoor] | backdoor] Syntax Description network-number The network which BGP informs network-mask The network mask which BGP informs route-map The route mapping map-name The name of the route mapping backdoor Configure the route as the backdoor route [Default status] None maximum-paths command The command is used to configure BGP to support load balance. The no form of the command is used to cancel the existing configuration. maximum-paths { number | ibgp number } no maximum-paths { number | ibgp number } In IPv4 VRF configuration mode, configure the BGP load balance. The no form of the command is used to cancel the existing configuration. maximum-paths { number |eibgp number | ibgp { number | unequal-cost number} } no maximum-paths { number |eibgp number | ibgp { number | unequalcost number} } Maipu Confidential & Proprietary Information Page 208 of 257 MP2000-104B-AC User Manual Version 1.0 Syntax Description number The number of EBGP routes that allow load balance. ibgp number Perform load balance between IBGP routes eibgp number Perform load balance between EBGP and IBGP routes ibgp unequal-cost number Perform load balance between IBGP routes [Default status] By default, the BGP does not perform any load balance. redistribute command The command is used to re-distribute the route information of other routing protocols in BGP. The no form of the command is used to cancel re-distributing the route information of other protocols. redistribute { connected | ospf as-number | rip | static } [route-map mapname] no redistribute { connected | ospf as-number | rip | static } [route-map map-name] Syntax Description as-number Re-distribute the autonomous system number or process number of route protocol map-name The name of the route mapping [Default status] 缺省不启用。By default, it is not enabled. distance bgp command The command is used to configure the management distance between external BGP and the internal BGP, and the management distance of the route received from a neighbor. The no form of the command is used to recover the management distance between external BGP and the internal BGP. distance {bgp external-distance internal-distance local-distance| administrative-distance network-number network-mask [acl-name] } no distance bgp { bgp [external-distance internal-distance local-distance ] | administrative-distance network-number network-mask [acl-name]} Maipu Confidential & Proprietary Information Page 209 of 257 MP2000-104B-AC User Manual Version 1.0 Syntax Description external-distance The management distance of BGP external route. The value range is 1-255. internal-distance The management distance of BGP internal route. The value range is 1-255. local-distance The management distance of BGP local route. The value range is 1-255. network-numbe Network address. Routes received from all neighbors in the network are set with management distance. network-mask Network mask acl-name The ACL name, used to filter which routes are set with management distance [Default status] By default, the management distance of the BGP external route is 20 and the management distance of the BGP internal route is 200. aggregate-address command The command is used to configure the aggregation route information sent by BGP. The no form of the command is used to cancel the function. aggregate-address address mask [as-set/summary-only] no aggregate-address address mask [as-set/summary-only] Syntax Description address The address of aggregation route. mask The network mask of the aggregation route. as-set Generate the route with the AS_PATH attributes of AS set summary-only Only inform aggregation route [Default status] None timers bgp command The command is used to configure the sending interval of BGP global keepalive and holdtime timer time. The no form of the command is used to cancel the configuration. timers bgp keepalive-interval holdtime no timers bgp keepalive-interval holdtime Maipu Confidential & Proprietary Information Page 210 of 257 MP2000-104B-AC User Manual Version 1.0 Syntax Description keepalive-interval The interval of sending keepalive packets holdtime Holdtime timer time show running-config router bgp command The command is used to view the local BGP protocol configuration. The command does not have no form. show running-config router bgp clear ip bgp command The command is used to re-set BGP connection after route policy or BGP protocol configuration changes so that the new configured policy can take effect. clear ip bgp {* | address | as-number| peer-group group_name| external} Syntax Description * All BGP neighbors address Specify IP address of BGP neighbor as-number Re-set BGP connection matching AS number. The value range is 1-65535. group_name The name of Peer-group external All EBGP neighbor clear ip bgp dampening command The command is used to clear the route flapping attenuation information and the suppression for the suppressed route. clear ip bgp [ipv4 {unicast | multicast}] dampening {address| address/ prefix- length } Syntax Description ipv4 unicast Clear information of ipv4 unicast address cluster ipv4 multicast Clear information of ipv4 multicast address cluster address Specify the network IP address attenuation information is cleared. address/ prefix- length Specify the address prefix whose attenuation information is cleared whose clear ip bgp flap-statistics command The command is used to clear the statistics information of the route flapping. Maipu Confidential & Proprietary Information Page 211 of 257 MP2000-104B-AC User Manual Version 1.0 clear ip bgp [ipv4 {unicast | multicast}] flap-statistics {address| address/ prefix- length } Syntax Description ipv4 unicast Clear information of ipv4 unicast address cluster ipv4 multicast Clear information of ipv4 multicast address cluster address Specify the network IP address whose flapping statistics information is cleared address/ prefix- length Specify the address prefix whose flapping statistics information is cleared clear ip bgp in command The command is used to perform the soft re-configuration on the route entering the router. If the local saves the original route received from the neighbor, use the route to re-calculate directly; if the local does not save, but the neighbor supports route update, send the route update message to the neighbor. clear ip bgp {* | address | as-number| peer-group group_name| external } [ipv4 {unicast | multicast} | vrf vrf_name] [soft] in Syntax Description * All BGP neighbors address Specify IP address of BGP neighbor as-number Re-set BGP connection matching AS number. The value range is 1-65535. group_name The name of Peer-group ipv4 unicast Process route information address cluster ipv4 multicast Process route information of ipv4 multicast address cluster vrf_name Specify the name of the vrf whose route information is processed external All EBGP neighbors of ipv4 unicast clear ip bgp out command The command is used to perform the soft re-configuration on the route sent by the router, that is, re-send all routes that the local sends to the neighbor. clear ip bgp {* | address | as-number| peer-group group_name | external } [ipv4 {unicast | multicast} | vrf vrf_name] [soft] out Maipu Confidential & Proprietary Information Page 212 of 257 MP2000-104B-AC User Manual Version 1.0 Syntax Description * All BGP neighbors address Specify IP address of BGP neighbor as-number Re-set BGP connection matching AS number. The value range is 1-65535. group_name The name of Peer-group ipv4 unicast Process route information address cluster ipv4 multicast Process route information of ipv4 multicast address cluster vrf_name Specify the name of the vrf whose route information is processed external All EBGP neighbors of ipv4 unicast clear ip bgp soft command The command is used to perform the soft re-configuration on routes sent by the router and routes entering the router at the same time. clear ip bgp {* | address | as-number| peer-group group_name| external } [ipv4 {unicast | multicast} | vrf vrf_name] soft Syntax Description * All BGP neighbors address Specify IP address of BGP neighbor as-number Re-set BGP connection matching AS number. The value range is 1-65535. group_name The name of Peer-group ipv4 unicast Process route information address cluster ipv4 multicast Process route information of ipv4 multicast address cluster vrf_name Specify the name of the vrf whose route information is processed external All EBGP neighbors of ipv4 unicast clear ip bgp in prefix-filter command The command is used to inform the BGP neighbor via orf mechanism after the configurations of the local input prefix-list change. clear ip bgp {* | address | as-number| peer-group group_name | external } [ipv4 {unicast | multicast}] in prefix-filter Maipu Confidential & Proprietary Information Page 213 of 257 MP2000-104B-AC User Manual Version 1.0 Syntax Description * All BGP neighbors address Specify IP address of BGP neighbor as-number Re-set BGP connection matching AS number. The value range is 1-65535. group_name The name of Peer-group ipv4 unicast Process ipv4 unicast address cluster ipv4 multicast Process ipv4 multicast address cluster prefix-filter The name of prefix-filter entering the local external All EBGP neighbors BGP Configuration Examples Example 1: Basic configuration of BGP Illustration The port S1/0(192.1.1.1) of Router A connects to the port S1/0 (192.1.1.2) of Router B; the port S2/0(193.1.1.1) of Router B connects to the port S2/0 (193.1.1.2) of Router C; The loopback addresses of three routers 2.2.2.2(Router B) and 3.3.3.3(Router C). are 1.1.1.1(Router A), RouterA is located in AS 100, while RouterB and RouterC are located in AS 200. Maipu Confidential & Proprietary Information Page 214 of 257 MP2000-104B-AC User Manual Version 1.0 RouterA configuration Command Description RouterA#configure terminal Enter the Global Configuration Mode. RouterA(config)#interface loopback0 Enter the loopback interface. RouterA(config-if-loopback0)#ip 255.255.255.0 address 1.1.1.1 Configure the IP address RouterA(config-if-loopback0)#interface s1/0 Enter the interface s1/0. RouterA(config-if-serial1/0)#encapsulation hdlc Encapsulate the link-layer protocol HDLC. RouterA(config-if-serial1/0)#ip 255.255.255.0 address 192.1.1.1 Configure the IP address. RouterA(config-if-serial1/0)#exit RouterA(config)#router bgp 100 Enter the BGP Configuration Mode. RouterA(config-bgp)#neighbor 192.1.1.2 remote-as 200 Specify AS number of the BGP peer entity RouterA(config-bgp)#network 1.1.1.0 255.255.255.0 Configure the network to which the BGP is sent RouterA(config-bgp)#exit RouterB configuration Command Description RouterB#configure terminal Enter the Global Configuration Mode. RouterB(config)#interface loopback0 Enter the loopback interface. RouterB(config-if-loopback0)#ip 255.255.255.255 address 2.2.2.2 Configure the IP address RouterB(config-if-loopback0)#interface s1/0 Enter the interface s1/0. RouterB(config-if-serial1/0)#encapsulation hdlc Encapsulate the link-layer protocol HDLC. RouterB(config-if-serial1/0)#ip 255.255.255.0 address 192.1.1.2 RouterB(config-if-serial1/0)#clock rate 9600 Configure clock RouterB(config-if-serial1/0)#interface s2/0 RouterB(config-if-serial2/0)#encapsulation hdlc RouterB(config-if-serial2/0)#ip 255.255.255.0 address Encapsulate the link-layer protocol HDLC. 193.1.1.1 RouterB(config-if-serial2/0)#clock rate 9600 RouterB(config-if-serial2/0)#exit RouterB(config)#router bgp 200 Enter BGP Configuration Mode RouterB(config-bgp)#neighbor 192.1.1.1 remote-as 100 Specify AS number of BGP neighbor RouterB(config-bgp)#neighbor 193.1.1.2 remote-as 200 Specify AS number of BGP neighbor RouterB(config-bgp)#neighbor 193.1.1.2 next-hop-self Set its own address as the next hop RouterB(config-bgp)#exit RouterC configuration : Command Maipu Confidential & Proprietary Information Description Page 215 of 257 MP2000-104B-AC User Manual Version 1.0 RouterC#configure terminal Enter the Global Configuration Mode. RouterC(config)#interface loopback0 RouterC(config-if-loopback0)#ip 255.255.255.255 address 3.3.3.3 RouterC(config-if-loopback0)#interface s2/0 RouterC(config-if-serial2/0)#encapsulation hdlc RouterC(config-if-serial2/0)#ip 255.255.255.0 address Encapsulate the link-layer protocol HDLC. 193.1.1.2 RouterC(config-if-serial2/0)#exit RouterC(config)#router bgp 200 Enter BGP Configuration Mode RouterC(config-bgp)#neighbor 193.1.1.1 remote-as 200 Specify the autonomous number of BGP neighbor RouterC(config-bgp)#exit The above explains the dynamic routing protocol BGP. About the configuration mode of the physical layer and link layer, refer to related sections. Example 2: The configuration of BGP route reflector Illustration: The port S1/0(192.1.1.1) of Router A connects to the port S1/0 (192.1.1.2) of Router B; the port S2/0(193.1.1.1) of Router B connects to the port S2/0 (193.1.1.2) of Router C. RouterD s1/0 connects with the interface s1/0 of RouterC, and their related addresses are 194.1.1.1(Router C) and 194.1.1.2(Router D). Maipu Confidential & Proprietary Information Page 216 of 257 MP2000-104B-AC User Manual Version 1.0 Router C acts as a reflector and supports two clients: Router B and Router C. Router A is located in AS 100, while Router B, Router C and Router D is located in AS 200. RouterA configuration Command Description RouterA#configure terminal Enter the Global Configuration Mode. RouterA(config)#interface loopback0 RouterA(config-if-loopback0)#ip address 1.1.1.1 255.255.255.0 RouterA(config-if-loopback0)#interface s1/0 Enter interface s1/0 RouterA(config-if-serial1/0)#encapsulation hdlc Encapsulate the link-layer protocol HDLC. RouterA(config-if-serial1/0)#ip 255.255.255.0 address 192.1.1.1 RouterA(config-if-serial1/0)#exit RouterA(config)#router bgp 100 Enter BGP Configuration Mode RouterA(config-bgp)#neighbor 192.1.1.2 remote-as 200 Specify AS number of BGP neighbor RouterA(config-bgp)#network 1.1.1.0 255.255.255.0 Configure the network to which the BGP is sent RouterA(config-bgp)#exit RouterB configuration: Command Description RouterB#configure terminal Enter the Global Configuration Mode. RouterB(config)#interface loopback0 RouterB(config-if-loopback0)#ip 255.255.255.255 address 2.2.2.2 RouterB(config-if-loopback0)#interface s1/0 RouterB(config-if-serial1/0)#encapsulation hdlc RouterB(config-if-serial1/0)#ip 255.255.255.0 address Encapsulate the link-layer protocol HDLC. 192.1.1.2 RouterB(config-if-serial1/0)#clock rate 9600 RouterB(config-if-serial1/0)#interface s2/0 RouterB(config-if-serial2/0)#encapsulation hdlc RouterB(config-if-serial2/0)#ip 255.255.255.0 address Encapsulate the link-layer protocol HDLC. 193.1.1.1 RouterB(config-if-serial2/0)#clock rate 9600 RouterB(config-if-serial2/0)#exit RouterB(config)#router rip Enter RIP Configuration Mode RouterB(config-rip)#network 193.1.1.0 RouterB(config-rip)#version 2 Maipu Confidential & Proprietary Information Page 217 of 257 MP2000-104B-AC User Manual Version 1.0 RouterB(config-rip)#exit RouterB(config)#router bgp 200 Enter BGP Configuration Mode RouterB(config-bgp)#neighbor 192.1.1.1 remote-as 100 Specify AS number of BGP neighbor RouterB(config-bgp)#neighbor 193.1.1.2 remote-as 200 Specify AS number of BGP neighbor RouterB(config-bgp)#neighbor 193.1.1.2 next-hop-self Set its own address as the next hop RouterB(config-bgp)#exit RouterC configuration: Command Description RouterC#configure terminal Enter the Global Configuration Mode. RouterC(config)#interface loopback0 RouterC(config-if-loopback0)#ip 255.255.255.255 address 3.3.3.3 RouterC(config-if-loopback0)#interface s1/0 RouterC(config-if-serial1/0)#encapsulation hdlc RouterC(config-if-serial1/0)#ip 255.255.255.0 address Encapsulate the link-layer protocol HDLC. 194.1.1.1 RouterC(config-if-serial1/0)#interface s2/0 RouterC(config-if-serial2/0)#encapsulation hdlc RouterC(config-if-serial2/0)#ip 255.255.255.0 address Encapsulate the link-layer protocol HDLC. 193.1.1.2 RouterC(config-if-serial2/0)#exit RouterC(config)#router rip Enter RIP Configuration Mode RouterC(config-rip)#network 193.1.1.0 RouterC(config-rip)#network 194.1.1.0 RouterC(config-rip)#version 2 RouterC(config-rip)#exit RouterC(config)#router bgp 200 Enter BGP Configuration Mode RouterC(config-bgp)#neighbor 193.1.1.1 remote-as 200 Specify AS number of BGP neighbor RouterC(config-bgp)#neighbor 194.1.1.2 remote-as 200 Specify AS number of BGP neighbor RouterC(config-bgp)#neighbor client 193.1.1.1 route-reflector- Configure BGP neighbor as the client of the route reflector RouterC(config-bgp)#neighbor client 194.1.1.2 route-reflector- Configure BGP neighbor as the client of the route reflector RouterC(config-bgp)#exit Maipu Confidential & Proprietary Information Page 218 of 257 MP2000-104B-AC User Manual Version 1.0 RouterD configuration: Command Description RouterD#configure terminal Enter the Global Configuration Mode. RouterD(config)#interface s1/0 RouterD(config-if-serial1/0)#encapsulation hdlc RouterD(config-if-serial1/0)#ip 255.255.255.0 address Encapsulate the link-layer protocol HDLC. 194.1.1.2 RouterD(config-if-serial1/0)#clock rate 9600 RouterD(config-if-serial1/0)#exit RouterD(config)#router rip Enter RIP Configuration Mode RouterD(config-rip)#network 194.1.1.0 RouterD(config-rip)#version 2 RouterD(config-rip)#exit RouterD(config)#router bgp 200 Enter BGP Configuration Mode RouterD(config-bgp)#neighbor 194.1.1.1 remote-as 200 Specify AS number of BGP neighbor RouterD(config-bgp)#exit Note The above explains the dynamic routing protocol BGP. About the configuration mode of the physical layer and link layer, refer to related sections. Configuring RIP routing protocol on Router B, Router C and Router D is to ensure that the routers in the same autonomous system can access each other. Example 3:Configure BGP route selecting and route filtering Maipu Confidential & Proprietary Information Page 219 of 257 MP2000-104B-AC User Manual Version 1.0 Illustration RouterA, RouterB, RouterC and RouterD are connected as shown in the figure above. Configure the command route-map on RouterC and modify the local-preference of route information matching the access list (1.1.1.0/24) so that the data of 1.1.1.0/24 accessed by Router D can reach Router A via Router C. RouterA is located in AS 100; RouterB, RouterC, and RouterD are located in AS 200. RouterA configuration: Command Description RouterA#configure terminal Enter the Global Configuration Mode. RouterA(config)#interface loopback0 RouterA(config-if-loopback0)#ip 255.255.255.0 address 1.1.1.1 RouterA(config-if-loopback0)#interface loopback1 RouterA(config-if-loopback1)#ip 255.255.255.0 address 2.2.2.2 RouterA(config-if-loopback1)#interface s1/0 Enter interface s1/0 RouterA(config-if-serial1/0)#encapsulation hdlc Encapsulate the link-layer protocol HDLC. RouterA(config-if-serial1/0)#ip 255.255.255.0 address 192.1.1.1 RouterA(config-if-serial1/0)#interface s2/0 RouterA(config-if-serial2/0)#encapsulation hdlc RouterA(config-if-serial2/0)#ip 255.255.255.0 address 193.1.1.1 RouterA(config-if-serial2/0)#exit RouterA(config)#router bgp 100 Enter BGP Configuration Mode RouterA(config-bgp)#network 1.1.1.0 255.255.255.0 Configure the network to which the BGP is sent RouterA(config-bgp)#network 2.2.2.0 255.255.255.0 Configure the network to which the BGP is sent RouterA(config-bgp)#neighbor 192.1.1.2 remote-as 200 Specify AS number of BGP neighbor RouterA(config-bgp)#neighbor 193.1.1.2 remote-as 200 Specify AS number of BGP neighbor RouterA(config-bgp)#exit Maipu Confidential & Proprietary Information Page 220 of 257 MP2000-104B-AC User Manual Version 1.0 B、RouterB configuration: Command Description RouterB#configure terminal Enter the Global Configuration Mode. RouterB(config)#interface serial1/0 RouterB(config-if-serial1/0)#encapsulation hdlc RouterB(config-if-serial1/0)#ip 255.255.255.0 address Encapsulate the link-layer protocol HDLC. 192.1.1.2 RouterB(config-if-serial1/0)#clock rate 9600 RouterB(config-if-serial1/0)#interface s2/0 RouterB(config-if-serial2/0)#encapsulation hdlc RouterB(config-if-serial2/0)#ip 255.255.255.0 address Encapsulate the link-layer protocol HDLC. 194.1.1.2 RouterB(config-if-serial2/0)#clock rate 9600 RouterB(config-if-serial2/0)#exit RouterB(config)#router bgp 200 Enter BGP Configuration Mode RouterB(config-bgp)#neighbor 192.1.1.1 remote-as 100 Specify AS number of BGP neighbor RouterB(config-bgp)#neighbor 194.1.1.1 remote-as 200 Specify AS number of BGP neighbor RouterB(config-bgp)#neighbor 194.1.1.1 next-hop-self Set its own address as the next hop RouterB(config-bgp)#exit Maipu Confidential & Proprietary Information Page 221 of 257 MP2000-104B-AC User Manual Version 1.0 RouterC configuration: Command Description RouterC#configure terminal Enter the Global Configuration Mode. RouterC(config)#interface serial1/0 RouterC(config-if-serial1/0)#encapsulation hdlc RouterC(config-if-serial1/0)# 255.255.255.0 ip address Encapsulate the link-layer protocol HDLC. 195.1.1.2 RouterC(config-if-serial1/0)#clock rate 9600 RouterC(config-if-serial1/0)#interface s2/0 RouterC(config-if-serial2/0)#encapsulation hdlc RouterC(config-if-serial2/0)#ip 255.255.255.0 address Encapsulate the link-layer protocol HDLC. 193.1.1.2 RouterC(config-if-serial2/0)#clock rate 9600 RouterC(config-if-serial2/0)#exit RouterC(config)# ip prefix-list 1 permit 1.1.1.0/24 Set prefix list RouterC(config)# route-map localpref permit 10 Set route map RouterC(config-route-map)#match ip address prefix-list 1 Use the prefix list in route map to match RouterC(config-route-map)#set local-preference 200 Set local priority RouterC(config-route-map)#exit RouterC(config)# route-map localpref permit 20 Set route map RouterC(config-route-map)#set local-preference 100 Set local priority RouterC(config-route-map)#exit RouterC(config)#router bgp 200 Enter BGP Configuration Mode RouterC(config-bgp)#neighbor 193.1.1.1 remote-as 100 Specify AS number of BGP neighbor RouterC(config-bgp)#neighbor 195.1.1.1 remote-as 200 Specify AS number of BGP neighbor RouterC(config-bgp)#neighbor 195.1.1.1 next-hop-self Set its own address as the next hop RouterC(config-bgp)#neighbor 193.1.1.1 route-map localpref Apply route-map localpre to the input route in of the neighbor 193.1.1.1 RouterC(config-bgp)#exit Maipu Confidential & Proprietary Information Page 222 of 257 MP2000-104B-AC User Manual Version 1.0 RouterD configuration: Command Description RouterD#configure terminal Enter the Global Configuration Mode. RouterD(config-if-loopback0)#interface s1/0 RouterD(config-if-serial1/0)#encapsulation hdlc RouterD(config-if-serial1/0)#ip 255.255.255.0 address Encapsulate the link-layer protocol HDLC. 195.1.1.1 RouterD(config-if- serial1/0)#interface s2/0 RouterD(config-if-serial2/0)#encapsulation hdlc RouterD(config-if-serial2/0)#ip 255.255.255.0 address Encapsulate the link-layer protocol HDLC. 194.1.1.1 RouterD(config-if-serial2/0)#exit RouterD(config)#router bgp 200 Enter BGP Configuration Mode RouterD(config-bgp)#neighbor 194.1.1.2 remote-as 200 Specify AS number of BGP neighbor RouterD(config-bgp)#neighbor 195.1.1.2 remote-as 200 Specify AS number of BGP neighbor RouterD(config-bgp)#exit Note The above explains the dynamic routing protocol BGP. About the configuration mode of the physical layer and link layer, refer to related sections. BGP Monitoring & Debugging show ip bgp command The command is used to display all BGP route and the related information. show ip bgp [ipv4 {unicast | multicast}] [address | address/prefix- length [longer-prefixes] | cidr-only | community-list community_list_name [exact-match] | filter-list filter_list_name | inconsistent-as | prefix-list prefix_list_name| quote-regexp regexp_str_quote| regexp regexp_str| route-map map_name] Syntax Description ipv4 unicast Display route information in the BGP global ipv4 unicast route table ipv4 multicast Display route information in the BGP global ipv4 multicast route table address Display details of the route with an IP address in the route table. address/prefix- length Display details of the route complying with the network prefix in the route table. longer-prefixes Display details of the route covered by the network prefix in the route table cidr-only Display information of classless route in the route table Maipu Confidential & Proprietary Information Page 223 of 257 MP2000-104B-AC User Manual Version 1.0 community-list Display information of routes filtered by community-list in the route table community_list_name The name of the community-list to be matched exact-match Perform exact matching when using community-list to filter filter-list The information of routes filtered by filter-list (that is aspath-list) in the route table filter_list_name The name of the filter-list to be matched inconsistent-as Display information about routes whose AS numbers in ASPATH attributes are different in the route table prefix-list The information of routes filtered by prefix-list in the route table prefix_list_name The name of the prefix-list to be matched quote-regexp Display information about routes complying with regular expressions with quotations in the route information regexp_str_quote The regular expressions with quotations regexp Display information about routes complying with the regular expressions in the route table regexp_str Regular expressions route-map Display information about routes filtered by route-map in the route table map_name The name of the route-map to be matched show ip bgp paths command The command is used to display summary information of AS-PATH attributes of the BGP route. show ip bgp paths show ip bgp attribute-info command The command is used to display summary information of BGP route attributes. show ip bgp attribute-info show ip bgp community-info command The command is used to display summary information of the BGP route community attributes. show ip bgp community-info show ip bgp scan command The command is used to display next hop address reachability and the related information of the BGP route information. Maipu Confidential & Proprietary Information Page 224 of 257 MP2000-104B-AC User Manual Version 1.0 show ip bgp scan show ip bgp vrf command The command is used to display vrf information in the BGP. show ip bgp vrf [vrf_name] Syntax Description vrf_name Specify the vrf name to be displayed show ip bgp neighbor command The command is used to display neighbor information. show ip bgp [ ipv4 {unicast | multicast} ] neighbor [ address [ advertisedroutes | received prefix-filter | received-routes | routes]] Syntax Description ipv4 unicast Specify ipv4 unicast address cluster, which does not affect the later commands. ipv4 multicast Specify ipv4 multicast address cluster, which does not affect the later commands. address The address of the neighbor to be displayed advertised-routes Display route information sent to the neighbor received-routes Display original route information received from the neighbor prefix-filter Display prefix-list-based orf information received from the neighbor routes Display route information received from the neighbor show ip bgp summary command The command is used to display BGP and the summary information of the neighbor. show ip bgp [ ipv4 {unicast | multicast} ] summary Syntax Description ipv4 unicast Display information about ipv4 unicast address cluster ipv4 multicast Display information about ipv4 multicast address cluster bgp rfc1771-path-select command The command is used to configure the BGP protocol to select the route according to RFC1771. bgp rfc1771-path-select bgp rfc1771-strict command Maipu Confidential & Proprietary Information Page 225 of 257 MP2000-104B-AC User Manual Version 1.0 The command is used to configure the BGP protocol to classify the ORIGIN attributes of the re-distributed routes according to RFC1771. bgp rfc1771-strict debug ip bgp command The command is used to Enable debug information switch of the BGP packets. debug ip bgp {all | event | keepalives | updates [out | in ] | dampening | filters | fsm | normal} Syntax Description all Enable all the debug information switches of BGP packets event Enable debug information switches of BGP events keepalive Enable debug information switches of BGP keepalive updates Enable debug information switches of BGP routes out Enable output route debug information switches in Enable intput route debug information switches dampening Enable debug suppression filters Enable debug information switches of BGP route filtering fsm Enable debug information switches of BGP finite state machine normal Enable debug information switches of BGP timers Maipu Confidential & Proprietary Information information switches of BGP Page 226 of 257 route MP2000-104B-AC User Manual Version 1.0 Upgrade Device Software Upgrade Via shell Upgrade bin Files of Monitor Program via sysupdate Step 1: Run and set TFTP/FTP server Use Maipu TFTP server, CISCO TFTP or other TFTP/FTP server. The following takes Maipu TFTP as an example to describe. Open Maipu TFTP server, and click Option on the tools bar to display following interface. Set Public Path as the directory where the program to be upgraded is located; set server IP address as the PC address; set server port as TFTP service port 69; the other parameters adopt the default values. Click OK to close the Option interface and return to the main interface. Set Maipu TFTP server Step 2: Make TFTP server in the listening state. Click Listen on the tools bar to display following interface. Maipu Confidential & Proprietary Information Page 227 of 257 MP2000-104B-AC User Manual Version 1.0 Maipu TFTP server is in the listening state Step 3: Connect the network Connect the PC as TFTP server and router via Ethernet (or via other modes) to ensure that they can ping each other. Step 4: Upgrade monitor program. 1: Upgrade monitor program: MP2000# sysupdate 128.255.32.10 monitor.bin [reload | <CR>] If the reload sub command is added, the system prompts whether to restart the router at once and whether to save the configuration after the upgrade. If the reload sub command is not added, you can execute the reload command or power off to restart the router after the upgrade. Here, the router prompts “Do you really update "monitor.bin" ? (yes|no):”. Input n <CR> to cancel the operation; input y <CR> to perform the upgrade operation. After entering y <CR>, the router prompts the following information: downloading "Monitor" (239648 Bytes): ############################################## ############################################## ############################################## ############################################## ############################################## ############################################## ############################################## ############################################## ############################################## ############################################## ###### OK Download "monitor.bin" (239648 Bytes) successed Maipu Confidential & Proprietary Information Page 228 of 257 MP2000-104B-AC User Manual Version 1.0 erase old Monitor from flash: .... write new Monitor to flash: .......................................................... 239648 bytes written router# It shows that upgrading monitor program succeeds. Here, you just need to restart the router. You can use the show version command to judge whether monitor program is upgraded successfully. Upgrade the bin Files of Application Program via sysupdate Commands Command format: Sysupdate dest-ipaddress filename [ ftp ftp-username ftp-password ] Commands: Syntax Description dest-ipaddress Ip address of FTP server fielname FTP file name ftp-username FTP user name ftp-password FTP user password Command mode: privilege mode Application Example Step 1: Run and set TFTP/FTP server Use Maipu TFTP server, CISCO TFTP or other TFTP/FTP server. The following takes Maipu TFTP as an example to describe. Open Maipu TFTP server, and click Option on the tools bar to display following interface. Set Public Path as the directory where the program to be upgraded is located; set server IP address as the PC address; set server port as TFTP service port 69; the other parameters adopt the default values. Click OK to close the Option interface and return to the main interface. Maipu Confidential & Proprietary Information Page 229 of 257 MP2000-104B-AC User Manual Version 1.0 Set Maipu TFTP server Step 2: Make TFTP server in the listening state. Click Listen on the tools bar to display following interface. Maipu TFTP server is in listening state Step 3: Connect the network Connect the PC as TFTP server and router via Ethernet (or via other modes) to ensure that they can ping each other. Step 4: Upgrade application program. MP2000# sysupdate 128.255.32.10 mp2000.bin [reload | <CR>] Maipu Confidential & Proprietary Information Page 230 of 257 MP2000-104B-AC User Manual Version 1.0 If the reload sub command is added, the system prompts whether to restart the router at once and whether to save the configuration after the upgrade. If the reload sub command is not added, you can execute the reload command or power off to restart the router after the upgrade. Here, the router prompts “Do you really update "mp2000.bin" ? (yes|no):”. Input n <CR> to cancel the operation; input y <CR> to perform the upgrade operation. After entering y <CR>, the router prompts the following information: downloading "MPROS" (4813331 Bytes): ############################################## ############################################## ############################################## ############################################## ############################################## ########################################### OK Download "mp2000.bin" (4813331 Bytes) successed Erase old MPROS from flash: ..................................... Write new MPROS to flash …………………………………………………………………………………… ........................................................................................................ ........................................................................................................ ........................................................................................................ ........................................................................................................ ........................................................................................................ ............... 4813331 bytes written Mp2000# It shows that upgrading IOS files succeeds. You just need to restart the router. Upgrade bin Files of Application Program via live-update (Breakpoint Transmission) Commands Command format: Live-update dest-ipaddress port ftp filename ftp-username ftp-password [reload CR] [bandwidth bandValue] [CR] Commands: Syntax Description dest-ipaddress IP address of FTP server port FTP port number and the value range is 1-65535 fielname FTP file name Maipu Confidential & Proprietary Information Page 231 of 257 MP2000-104B-AC User Manual Version 1.0 ftp-username FTP user name ftp-password FTP user password bandValue Bandwidth and the value range is1-1000Kb Command mode: privilege mode Application Example Step 1: Check whether the network is connected and whether the device and the FTP server are connected physically. Step 2: Run the FTP server that supports breakpoint transmission, such as the FTP server provided by MP5 working station of Maipu. Step 3: Execute the upgrade command. live-update 128.255.40.220 2111 ftp mp2000.bin admin admin bandwidth 200 Upgrade starts: 14:46:36: LIVEUPDATE:Start updating Upgrade ends: 14:47:35: LIVEUPDATE:Download Complete. Note: When the upgrade via live-upgrade (breakpoint transmission mode) starts, the calls cannot be made for about 30s. It is recommended to perform the upgrade at the middle night. Other Added Debug switch Syntax Description debug live-update The process of writing FLASH in the upgrade debug live-update detail The FTP process in the upgrade View FTP Parameters Syntax Description show live-update ftp-parameters View FTP parameters FTP parameters: Ftp Server Address: 128.255.40.220 Ftp Server port: 2111 File name: mp2000.bin User name: admin Maipu Confidential & Proprietary Information Page 232 of 257 MP2000-104B-AC User Manual Version 1.0 Passeword: admin Bandwidth: 200 Kbps File size:4813566 Byte DownLoaded: 2359296 Bytes Clear Upgrade Transaction Syntax Description clear live-update Stop the current upgrade transaction and clear FTP parameters Pause Upgrade Transactions Syntax Description pause live-update Pause the upgrade transaction and do not clear FTP parameters. Execute the satrt live-update command, continue the current breakpoint upgrade. Re-start Upgrade Syntax Description start live-update If executing the pause live-update command on the current upgrade, the command is used to recover the upgrade. Upgrade Program via Web On this interface, you can upgrade IOS program of the device Ithe IOS program includes web network management program). Upgrade the IOS application program: You can upgrade the application program of the IOS device via web. The extension name of the IOS application program is .bin (such as rp6-iv-8.2.1(L07-i).bin). Ensure that the IOS program to be upgraded matches with the device. You need to restart the device after upgrading IOS application program successfully. You can restart the device on the interface. If the user needs to restart the device, click Restart Device. When the user confirms to restart the device, the web prompts the user whether to save the current configuration. To make the configuration after restarting the device is consistent with the current configuration, it is recommended that the user saves the current device configuration. Maipu Confidential & Proprietary Information Page 233 of 257 MP2000-104B-AC User Manual Version 1.0 IOS files are the application program of the device, including device program, web network management program and DDNS module. Upgrade Program via Masterplan For the installation and use of Masterplan, please refer to the user manual. Here, only the new auto upgrade programs and the related functions in Masterplan are described. Manage Device Program Files This part adds the upgrade packet in directory format. The other functions are the same as those of the versions before MP5. The upgrade packets should be organized according to the following format: The outer folder name is not always release and it can be named as others. OS: Includes a bin file Ext: Includes all the voice files of directory structure; the directory corresponds with the correct structure relationship of the voice files in FLASH. Submit Upgrade Packets Maipu Confidential & Proprietary Information Page 234 of 257 MP2000-104B-AC User Manual Version 1.0 Enter the configuration management of Masterplan-〉Device program file management, click Add to display interface of adding files, select the upgrade packet to be submitted and edit the related information: After clicking Add, the upgrade packet begins to be uploaded. The process of submitting the upgrade packet is recorded. It records whether each sub packet and sub file in the upgrade packet are submitted successfully, which is convenient for confirming which file is not uploaded successfully when the uploading fails. Discover Device to Be Upgraded Maipu Confidential & Proprietary Information Page 235 of 257 MP2000-104B-AC User Manual Version 1.0 Masterplan server adds the service of discovering the device to be upgraded. Based on the current network discovery, the network management system can automatically compare the current IOS version number on the device with the latest version number of this kind of devices on the network management system. If finding that the version number on the network management system is newer, the device is discovered as the device to be upgraded and is added to the list of the devices to be upgraded. As shown in the following figure, one MP2000-104B is added to the list. Manage Upgrade Tasks Open Configuration management-〉Auto Upgrade Management-〉Upgrade Task Management. Maipu Confidential & Proprietary Information Page 236 of 257 MP2000-104B-AC User Manual Version 1.0 Add a upgrade task Click Add Task on the upgrade task management interface to display following interface. Select (tick the check box at the left and the check box on the title bar, and select all or cancel all) the upgrade tasks to be added, edit the upgrade task information, and click OK to add the upgrade task to the upgrade task list. Maipu Confidential & Proprietary Information Page 237 of 257 MP2000-104B-AC User Manual Version 1.0 After being added to the upgrade task list, the upgrade task of the device is enabled. The upgrade status row records the status information of the current device upgrade; the upgrade error description row records the error information of the upgrade process. The upgrade task management interface lists all added upgrade tasks. You can search the desired upgrade tasks via the filtering function at the top. As shown in the following figure, you can view all, the tasks to be upgraded, being upgraded tasks, complete upgrade tasks and failed upgrade tasks. Edit upgrade tasks On the upgrade task management interface, select the desired upgrade task (that is, tick the desired upgrade task), and click Edit Task to edit Maipu Confidential & Proprietary Information Page 238 of 257 MP2000-104B-AC User Manual Version 1.0 the related fields of the current upgrade task. Note that the being upgraded task cannot be edited. Field description: Upgrade type, upgrade version, upgrade time, upgrade bandwidth and auto restart can be modified. Upgrade type: The options are intact packet, system packet and extension packet. Intact packet refers to the packet that includes the device program .ios file and extended voice file; system file refers to the device program .ios file; extension packet refers to the voice file. Upgrade time: By default, start the upgrade tasks at once. You can modify it to start the upgrade task at other time. Upgrade bandwidth: It is the receiving rate of the device when MP5 server transmits the program files to the device. The value range is 1KB/s -100MB/s. Transmission mode: Currently, only FTP mode is supported. Auto Restart: Whether to restart the device after the program is upgraded. Delete upgrade task On the upgrade task management interface, select the desired upgrade task (that is, tick the desired upgrade task), and click Delete Task. The being upgraded task cannot be deleted. Advanced Configuration of Auto Upgrade Open Configuration Management- 〉 Auto Upgrade Management- 〉 Advanced Configuration to display following interface. On the interface, you can Set check period of discovering the devices to be upgraded. The value range is 10-1440 minutes. The default value is 60 minutes. On the interface, you can configure the FTP service parameters. There are two configurations, including (1) Connect up to ten and the downloading rate is not limited; (2) Connect up to 100 and the maximum rate is 64KB/s. Maipu Confidential & Proprietary Information Page 239 of 257 MP2000-104B-AC User Manual Version 1.0 Update Troubleshooting Methods for Irregular System If the device becomes abnormal and cannot be powered on, you can adopt the Monitor FTP to upgrade the device program. If SYS light is always on and INUSE light flashes for about 2 minutes and restarts after system is powered on for a period of time (1 minute), it indicates that application program cannot be started. In other word, the application program of FLASH may be destroyed. In such case, the user should apply FTP loading application program. First, set username and password of FTP server as admin and admin, and then set IP address of server as 192.168.0.2. Rename the application program as MPL02RT and then put it in work directory of FTP server. Connect PC to WAN port of device. Power on the device again and hold RESET button at the same time. If SYS light is off and IN USE light is on, system begins to download program from server. Then the user can release RESET button. System is started successfully when SYS light is flashing. In such case, the user can configure system via web. Attention: based on operation mentioned above, the device does not write application program in flash. Thus, you need to write application program in FLASH via web. Please refer to ‘Software Update of the Device’ for update. When using FTP to upgrade device program, IP address of WAN port should be 192.168.0.1. For failed update, please check whether there is something wring with the network between device and FTP server. Maipu Confidential & Proprietary Information Page 240 of 257 MP2000-104B-AC User Manual Version 1.0 To use web to manage the device after update, you need log in to device via LAN port. The default address of LAN port should be 192.168.0.1. There is no default IP address for WAN port. Maipu Confidential & Proprietary Information Page 241 of 257 MP2000-104B-AC User Manual Version 1.0 Typical Applications In The chapter, we aim to assist the user to perform basic application configuration of MP2000-104B router via a typical application example of MP2000-104B router, including local FXS port, FXO port configuration, H323 configuration, fax configuration, communications between local phones, between local and H323, between local and PSTN and realization of fax function. Environment The figure above shows a typical VoIP application of MP2000-104B router. MP2000-104B router connects to another Ethernet via IP network, so as to perform communication and fax with IP phones in other Ethernets. At the same time, MP2000-104B router can realize communication and faxing with traditional phones by accessing PSTN traditional telecom telephone Maipu Confidential & Proprietary Information Page 242 of 257 MP2000-104B-AC User Manual Version 1.0 network via FXO port. In such case, MP2000-104B router equals to a small PBX. Configuration Steps Let’s start now to configure one MP2000-104B router or several MP2000104B routers owned by you. It is easy to perform configuration since MP2000-104B router provides you with very friendly WEB configuration interface and many helps. Maipu Confidential & Proprietary Information Page 243 of 257 MP2000-104B-AC User Manual Version 1.0 Configure Communication between Local and H323 MP2000-104B router is configured with communication function between local FXS ports by default. Now, the user needs to configure communication between local FXS port and remote IP phone via IP network. Configure WAN To realize communication with IP phone of H323 port, we should allocate a WAN IP address for MP2000-104B router. Follow steps below: Enter WAN configuration-> Configuration Wizard of Accessing WAN from navigation bar and then configure WAN accessing step by step according to wizard. First, enter the interface: Click Next to enter Choosing Interface for WAN Connection: Choose WAN as interface and click Next to enter the WAN Connection Type interface: Maipu Confidential & Proprietary Information Page 244 of 257 MP2000-104B-AC User Manual Version 1.0 See three internet connection types for MP2000-104B router from the figure above. It takes Fixed Address Line as example to perform configuration. Tick Fixed Address Line and then click Next to enter the interface: In the figure above, it sets WAN IP address of MP2000-104B router as 128.255.16.94, subnet mask as 255.255.252.0, and Router address as 128.255.19.254. WAN port configuration is complete here. You can click WAN Configuration->WAN port Connection information to view all WAN configuration information: Maipu Confidential & Proprietary Information Page 245 of 257 MP2000-104B-AC User Manual Version 1.0 Configure Protocol In the last step, we have performed WAN configuration for MP2000-104B router, but it is impossible to realize WAN communication only based on it. MP2000-104B router supports H323 protocol and SIP protocol. Now, we take H323 protocol as the example to configure protocol for remote IP phone communication. Enter the Voice Configuration->Protocol Configuration interface in navigation bar: Choose a wanted protocol from the drop-down list. There are three options: none, H323ocol and SIP protocol. In this example, we choose H323 protocol. The following figure illustrates configuration given by system after choosing H323 protocol: Maipu Confidential & Proprietary Information Page 246 of 257 MP2000-104B-AC User Manual Version 1.0 If there is a gatekeeper in network, fill in address of gatekeeper and then register to gatekeeper. Click Apply to save configuration information. With Apply successfully prompt, configuring gateway register succeeds. Otherwise, it fails. You can click Advanced configuration hyperlink on the right corner of the interface to configure advanced properties of H323 protocol. Check whether register is successful by prompt in yellow on the right side of this option. Now, we still cannot get via communication with IP phones of other gateways. We don’t know whom we communication with and how to communication. In next section, we will perform call route configuration, so as to complete communication between local FXS and IP phones of other gateways in IP network. Configure Call Route Click Voice Configuration->Call Route Configuration in the navigation bar to display following interface. Maipu Confidential & Proprietary Information Page 247 of 257 MP2000-104B-AC User Manual Version 1.0 Click Add on the VOIP Config and POTS Config interfaces to configure all routes of MP2000-104B router. VOIP dial-up port corresponds to remote IP phone or gateway via IP network communication. Configuration of POTS dial-up port to local communication is in accordance with each port of this gateway. Click the VOIP Config tab and then click Add to display following interface. On the above interface, a batch of POTS routes is configured. The start voice port is FXS[0] and the end voice port is FXS[3]. The start phone number is 401 and the phones increase by 1 according to the port number. That is, the corresponding phone numbers of ports FXS[0]~FXS[3] are 401-404. Click Apply. If the system prompts that the configuration succeeds, view the following information via the POTS Config option of Voice Configuration->Call Route Configuration. Maipu Confidential & Proprietary Information Page 248 of 257 MP2000-104B-AC User Manual Version 1.0 In this way, the corresponding phone number of the local FXS port is configured. Next, we need to configure the VoIP route of the peer gateway. Click the VoIP Config tab and click Add to display following interface. A VOIP dial-peer call route with dial-peer number as 3 is configured in the above figure. Route target is a MP2000-104B router whose IP address is 128.255.16.97. A phone 2008 is configured for this gateway. We can perform configuration for other gateways and VoIP routes of IP phones by the method above. When configuring phone number of peer gateway, the user can match it with x. For example, six phone numbers 2000-2015 are configured in router 128.255.16.97. Now, we need to configure routes of these sixteen numbers in MP2000-104B router. Follow the steps below: Maipu Confidential & Proprietary Information Page 249 of 257 MP2000-104B-AC User Manual Version 1.0 2xxx in the above figure can match all numbers started with 2 in gateway 128.255.16.97. Click Apply to save call route information you configure and then see it in Voice config->Call route config. Now, the configuration for communication between local FXS port and H323 port is complete. Please refer to corresponding configuration instruction in Chapter 3 for details. Let’s dial peer phone number you have configured now. Configure Communication between FXS and PSTN MP2000-104B router has a FXO port via which we can communicate with phones in PSTN. When FXO port connected with PSTN, MP2000-104B router is similar to a special phone in PSTN telephone network. Other Maipu Confidential & Proprietary Information Page 250 of 257 MP2000-104B-AC User Manual Version 1.0 PSTN phones can realize communication with other IP phone in MP2000104B router by dialing PSTN phone numbers corresponding to FXO ports of MP2000-104B router. Similarly, IP phones in MP2000-104B router can dial any number in PSTN via FXO port. In The section, we configure communication between FXS and PSTN. We still take MP2000-104B route 128.255.16.94 as an example. Enter Voice Configuration->Voice Port Configuration from the navigation bar. Click Advanced hyperlink on the right side of FXO port to display following interface. Maipu Confidential & Proprietary Information Page 251 of 257 MP2000-104B-AC User Manual Version 1.0 Tick the Disable check box to enable FXO port. Pay attention to the Connection-plar option on this interface. It refers to corresponding called telephone number or FXS port of MP2000-104B router when PNST is dialing FXO port. Select the FXS port radio button and there will be a drop-down list with all FXS ports of the current gateway. You can select the FXS port that FXO port is bound to from the drop-down list. When PSTN dials the phone number of the FXO port, the gateway automatically searches the phone number configured on the FXS port that the FXO port is bound to and initiates a call. If configured as number, there are three kinds of filling modes: It can be configured as any complete number of FXS port on MP2000-104B router, such as 401. It can be business number of some business configured by MP2000-104B router. Take IVR second dialing access number as an example. On the premise of IVR access number, if user dials exterior line number of FXO by PSTN phone, it will be transferred to the IVR voice interactive system of the gateway directly. Or the user can leave it blank. When PSTN user dials FXO port, he will hear long ring-back tone that reminds you of dialing extension of MP2000104B router. Fill the blank with a connection-plar type and save it. Call route Configuration: Click Voice Configuration->Call Route Configuration in navigation bar to display following interface. Choose port FXO[0] from the Voice Port drop-down list. We configure FXO here as trunk interface to connect with telecom PSTN network. Then the user can dial original exterior line number via MP2000-104B router. See the configuration in the following figure: Maipu Confidential & Proprietary Information Page 252 of 257 MP2000-104B-AC User Manual Version 1.0 Click Apply to add the call route of the FXO port. After the configuration succeeds, the following interface is displayed. In the above figure, the peer port of voice port 2/0 is FXO[0] port. We have configured a number match rule “xx.” for it, so the user can dial via original PSTN number. Now, we have completed configuration for communication between FXS and PSTN. Let’s dial a PSTN number by IP phone. Number Transform Configuration for PSTN Port For programming dialing type conveniently, we need to identify numbers of different types. For example, PSTN numbers start with 028 and IP Maipu Confidential & Proprietary Information Page 253 of 257 MP2000-104B-AC User Manual Version 1.0 numbers start with 193. In such case, it is easy for us to identify PSTN number and IP number. We have described in detail the configuration of number transform in the previous section, so we skip it here. The figure below shows a number transform rule with index as 1. The rule of this index is to delete prefix 028 from the numbers beginning with 028. The number transform rule only takes effect when it is applied in some dial-up port. Namely, number transform rule only goes into effect when it binds with dial-up port. See the figure below: In the above figure above, we configure number of FXO[0] in POTS dial-up port as 0286xxx, and choose the rule with index as 1 in Apply index of transform rule to called number. Thus, when the user dials numbers beginning with 028, the device deletes 028s first and then seeks for call route according to number match rule. For example, when calling number 401 in MP2000-104B router dials 028604, the called number will be transformed into 604 according to number transform rule, so as to accord with one number in PSTN. Maipu Confidential & Proprietary Information Page 254 of 257 MP2000-104B-AC User Manual Version 1.0 Configure IP Fax Fax is a common telephone business we use in daily work. Enter the fax service configuration interface by clicking Voice Configuration->Fax Service Configuration in navigation bar: There are two fax modes for MP2000-104B router: T32 fax mode and transparent transmission mode. We will perform configurations here for these two fax modes. In the figure above, tick Enable global T.38 capability of this gateway check box to make all gateways support T38 fax capability. Or the user can enable T38 capability under some dial-peer only or disable T38 capability under some dial-peer, or enable transparent transmission mode according to requirement. In such case, Enable global T.38 capability of this gateway means to check fax capability and its type according to specific settings of each dial-peer. Click Voice Config->Call Route Config to display following interface. Maipu Confidential & Proprietary Information Page 255 of 257 MP2000-104B-AC User Manual Version 1.0 In the above figure, the fax capability of Index 5 is disabled, so it has no fax capability here. The fax capability of Index 9 is pass-through, namely, the transparent transmission mode. The fax capability of Index 10 is configured. If the user configures Enable global T.38 capability of this gateway, this port faxes in T38 fax mode. Otherwise, it has no fax capability. How to configure fax capability of each dial-peer? You should keep a point in your mind: only under VOIP dial-peer. Click Add in the figure to add a VOIP dial-peer. The fax protocol is blank on the right side of dial-peer to configure its by default. We can click fax capability. Click icon on the right side of Index 10 to display following interface: On this interface, the system provides the user with four options to choose in the Fax drop-down box. The first one ‘-’ indicates that it inherits the configuration of Enable global T.38 capability of this Router and VOIP dial-peer is ‘-’ by default. Disable indicates that the fax capability of this dial-peer is disabled. T.38 stands for fax via T38 protocol. Pass through indicates transparent transmission mode for fax, so the code type of gateways of two-side should be the same. Fox example, we set it as g.711A code here, so that of peer gateway should be g.711A code too. If the user doesn’t configure Enable global T.38 capability of this gateway, the calling gateway has T38 capability by default. When the gateway is used as called gaetway, it will confirm whether to support T38 fax capability by checking call route list according to calling number. Now, we configure index 3, 5,9,10 as these four fax capabilities. Maipu Confidential & Proprietary Information Page 256 of 257 MP2000-104B-AC User Manual Version 1.0 Now, we can fax with the dial-peer which is configured with fax capability. As a called gateway, it confirms self-fax type by checking dial-peer of calling number when receiving IP calls. For example, when phone number 2009 is dialing via, the fax capability of gateway is confirmed as pass through. If it is phone number 2010, the fax capability of gateway is confirmed as T38. If it is called by phone number 9000 which conforms to index 100, global fax capability will be used since there is no fax protocol configuration under this index. When local fax mode is confirmed, fax is feasible only if the opposite terminal has the proper fax mode to match with local one. Maipu Confidential & Proprietary Information Page 257 of 257