1
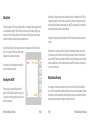
Angel Eye 2.0
Product Manual
Page 1
BrickHouse Security User Manual
The Angel Eye 2.0
In the Box
is an audio and video recording system capable of being
disguised as a common button or screw. With the included
remote control, recording can be started and stopped with
a single button touch and reviewed directly from the DVR.
Compatible with up to an 8 GB micro SD card, it can record
over 3 hours of video per charge and about 15 minutes per
GB on its highest resolution.
Inside your box you will find the Mini DVR
with LCD viewing screen, a mini camera with
integrated microphone, a remote control,
a USB cable, an AV cable, an 1800 mA
battery, and a battery charger, as well as
several button and screw covers for use
in disguising the mini camera. There are
several extra buttons included, so that you
can match the buttons on a piece of clothing
to the button cover you choose for the mini
camera.
BrickHouse Security User Manual
Page 2
Page 3
BrickHouse Security User Manual
BrickHouse Security User Manual
Page 4
Page 5
BrickHouse Security User Manual
Getting Started
The first step in getting your DVR working is charging its battery. You can charge the battery by plugging it directly
into the included battery charger. The LED on the charger will remain orange while the battery charges, and go
out once its full. To insert the battery, slide the cover off of the back of the DVR and insert it so that the copper
contacts on the battery meet the ones on the device, and replace the cover.
Next, insert the micro SD card into the device. Insert it as shown in the image next to the TF card slot until you
feel it “click” into place. The DVR has only 104MB of memory
available, which is only enough for a few photos.
Recording video: To begin recording video, press the Record button while in video standby mode. The REC icon
will appear in the upper left corner of the screen, and a timer will begin counting in the lower right corner. While
recording, the Recording Indicator will remain a steady blue. Press ESC to stop recording. The current recording
will be saved and the device will return to video standby mode.
Taking photos: To take a photo, press the Power button. The DVR will vibrate once to indicate that a photo was
captured.
Now, insert the jack from the included camera into the AV/in
port, and the device is ready to record.
Recording Audio: To record audio, press the ESC button while in video standby mode to enter the main menu.
In the main menu, use the Right button to scroll to Audio Record and press OK to select it. In the Audio Record
screen, press the REC button to start recording and the ESC button to stop. While recording audio, the Recording
Indicator will steadily blink blue. To exit the Audio Record screen, press the ESC button when not recording and
you will return to the main menu.
Recording From the DVR
Motion Detection Recording
Power the device on by pressing the Power button for 2
seconds. The DVR will vibrate to indicate it is turning on, and
will go directly to video standby mode, showing a live view of
whatever the camera sees.
To record based on motion activation, move the switch on the side of the DVR to Q while in the Video Standby
screen. The DVR will record whenever it detects something moving in the frame, and stop automatically 5 seconds
after motion stops. Just like manual recording, the Recording Indicator will remain blue while recording. Note that
videos recorded using motion detect will always have a resolution of 640 x 480.
BrickHouse Security User Manual
Page 6
Page 7
BrickHouse Security User Manual
Viewing Files on the DVR
Recording Settings
To review recorded files on the DVR, simply scroll to Playback on the main menu using the Right and Left buttons
and press OK to enter the Playback menu. Choose the type of file you would like to review: Video, Audio, or Photo
and press OK to view a list of those files. Scroll to the file you would like to access and hit OK to access it. While
playing back a video or audio file, you can adjust the volume by pressing the Right and Left buttons. A volume bar
will appear along the left edge of the screen. When playback reaches the end of an audio or video file, the DVR
will immediately begin playing back from the beginning of the next file in the list.
To change recording settings, press OK while in the video standby screen. This will bring up the Record Settings
menu. Here, you can choose settings for recordings. Scroll through the menu options with the Right and Left buttons and select one by pressing OK.
Switch Setting: Switch Setting allows you to change the function of the switch on the side of the DVR. It defaults
to Q activating Motion detect, but you can also choose; “Lock and Standby”, which will disable all buttons and
turn off the LCD screen, “Lock, Standby, and Record Video”, which will disable buttons and the LCD screen and
begin video recording, “Lock, Standby, and Record Audio”, which will disable buttons and the LCD screen and
begin audio recording.
To delete a file, highlight it from the list and press the REC button.
Recording Video With the Remote Control
To record video with the remote control, you must start with the DVR powered off. Hold down the Unlock symbol
on the remote for 2-3 seconds. The DVR will emit a long vibration to indicate that recording has started. Hold
down the Lock symbol for 2-3 seconds to end recording, and the DVR will vibrate 3 times to indicate that recording has stopped and the DVR has powered off.
BrickHouse Security User Manual
Resolution: Resolution allows you to change between 720 x 480 and 320 x 240 video resolution.
Page 8
The Q/N switch will operate even when the DVR is powered off. It will automatically power the DVR on and begin
recording according to the settings you choose, allowing for simple one-touch recording.
Mic Select: On the Mic Select menu you can choose a source for audio recording. Internal Mic refers to the microphone on the DVR itself. External Mic is any microphone plugged into the AV/In port.
Page 9
BrickHouse Security User Manual
Vibrating: This menu allows you to turn the DVR’s vibration alerts on and off.
Storage Select: Choose whether data will be stored to the DVR’s internal memory or a micro SD card. Keep in
mind that the device only has 104MB of internal memory.
FPS: FPS stands for Frames Per Second, which refers to recording speed. The fewer frames recorded each second, the more a video will seem to “stutter”. You can choose 10, 20, or 30 FPS. 30 is approximately real time.
Storage Info: View remaining memory in internal memory or the SD card.
Remote Control Setting: Choose whether the remote control will power the DVR on and begin audio recording,
power the DVR on and begin video recording, or turn the remote control off.
Format: Under Format, either the internal memory or SD memory in the DVR. Formatting a card deletes all data on
it and makes sure it is ready to record information.
Standby Setting: Select 10 seconds, 20 seconds, or never. This setting refers to how long it will take for the LCD
screen to go black while recording. Allowing the screen to shut off will save battery power while recording.
System Time Setting: Set the time and date for the DVR.
Overwrite Enable: Turning overwriting on will cause the device to automatically delete the oldest file in the saved
memory when it fills up, and replace it with the current file being recorded. If overwrite is set to Off, the device will
stop recording once memory is full.
System Setting
Display Setting: Choose where files will play back. LCD Output is the screen on the DVR. TV_NTSC Output is used
when connecting the device to a monitor or television in North America using the included AV cables.
TV_PAL Output is used when connecting the device to a monitor or television that uses the PAL video format. PAL
is the standard through much of Europe and Asia.
Brightness: Adjust the brightness of the DVR’s LCD screen by using the Left and Right buttons.
System Settings allow you to change storage and display options on your DVR. Scroll through the menu options
with the Right and Left buttons and select one by pressing OK.
Language: Here you can choose what language the DVR will use to display information.
BrickHouse Security User Manual
Page 11
Page 10
BrickHouse Security User Manual
Default: Default allows you to reset the DVR to its original manufacturer’s specifications.
Glossary
Viewing Files on a Monitor
Composite Video: Composite video cables carry video signal down a single line. Composite video RCA plugs are
commonly yellow for video, with red and white wires carrying audio.
To view files on a monitor, connect the included AV cable to the AV/out port on the DVR. Connect the white, yellow,
and red RCA connections to the corresponding composite inputs on a monitor. From the System Setting menu,
select TV_NTSC Output or TV_PAL Output, depending on the format of your monitor, and the DVR’s display will
move to your monitor.
DVR: short for Digital Video Recorder. This abbreviation refers to any device capable of recording and saving a
digital video file. This is the high-tech equivalent of a VCR.
Viewing Files on a Computer
Connecting the device to your computer requires that the DVR first be powered on. Connect the device via USB
cord and the DVR will automatically change to PC Connection mode. Your PC will detect the DVR as removable storage. Open the removable drive on your PC to view the DCIM folder. The DCIM folder contains 3 folders;
100VIDEO, 200AUDIO, and 300PHOTO. Each contains video files, audio files, or photo files, respectively.
FPS: FPS stands for frames per second. It is used for measuring the frame speed in a moving image. FPS defines
how many pictures are seen per second.
GB: GB is short for gigabyte which is a unit used to measure computer storage capacity and is approximate to
1.07 billion bytes. 1 Gigabyte of data is almost twice the amount of data that a CD-ROM can hold. Additionally, 1
Gigabyte could hold the contents of about 10 yards of books on a shelf.
LCD: Abbreviation of “liquid crystal display”. LCD screens are thin, flat electronic displays.
To view video files, we suggest using VLC Player. VLC can be downloaded for free from the programmers’ site at
http://www.videolan.org.
LED: An abbreviation for “light emitting diode”; it’s an electronic device that lights up when electricity passes
through it. LEDs are good for displaying images because they can be relatively small, and they do not burn out.
However, they require more power than LCDs.
BrickHouse Security User Manual
Page 13
Page 12
BrickHouse Security User Manual
Micro SD Card: Micro SD cards, also known as TransFlash, are smaller versions of SD memory cards. As electronic devices are becoming smaller, Micro SD cards are becoming more and more common in the marketplace.
Currently, the highest capacity of micro SD card is 32 GB.
NTSC: the standard analog video format used throughout North America and much of South America. Some other
areas of the world use formats called PAL or SECAM.
PAL: the standard analog video format used in much of Europe, Asia, and other parts of the world. Some other
areas use formats called NTSC or SECAM.
RCA Connector: A type of electrical connector commonly used to carry audio and video signals. They have largely
replaced BNC connections on most home entertainment systems. It is used to connect everything from cameras
to video game systems.
USB: Universal Serial Bus. USB is currently the standard method for connecting devices to a computer.
WWW.BRICKHOUSESECURITY.COM
BrickHouse Security User Manual
Page 14
BrickHouse Security User Manual
Page 15