1
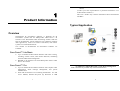
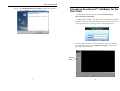
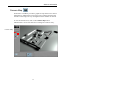
SecuGuard™ Lite/Basic SecuGuard™ Lite/Basic IP Surveillance Software User’s Manual The software described in this manual is furnished under a license agreement and may be used only in accordance with the terms of that agreement. IP Surveillance Software Copyright Notice User’s Manual Copyright © 2006~8 All rights reserved. Reproduction without permission is prohibited. Trademarks All trademarks or registered marks in this manual belong to their respective manufacturers. Disclaimer Information in this document is subject to change without notice and does not represent a commitment on the part of the provider. February 2008 Version: 2.8.x *This User’s Guide contains the basic procedures required to install and operate SecuGuard™ Lite/Basic IP Surveillance Software. The manufacture provides this document “as is,” without warranty of any kind, either expressed or implied, including, but not limited to, its particular purpose. The provider reserves the right to make improvements and/or changes to this manual, or to the products and/or the programs described in this manual, at any time. Information provided in this manual is intended to be accurate and reliable. However, the provider assumes no responsibility for its use, or for any infringements on the rights of third parties that may result from its use. This document might include unintentional technical or typographical errors. Changes are periodically made to the information herein to correct such errors, and these changes are incorporated into new editions of the document. device) (Contact your sales representatives to purchase SecuGuard Pro IP Surveillance Software.) 1 Chapter 1 This User’s Guide only contains information about SecuGuard™ Lite/Basic. Product Information Typical Application Overview SecuGuard™ IP Surveillance Software is designed for IP Surveillance systems that use Multi-profile Video Server / IP Cameras as the Distributed Video Networking solution. With the help of SecuGuard™, system integrators can seamlessly integrate other applications, such as I/O sensors and alarms, with CCTV systems over an IP-based network. Two models of SecuGuard™ IP Surveillance Software are available: SecuGuard™ Lite/Basic y y Up to 16-channel IP Surveillance Software with video viewing, recording, camera control, video motion detection, scheduling and user authorization management Bundled in the Software CD with Multi-profile Series Video Server / IP Cameras SecuGuard™ Pro y y Up to 64-channel IP Surveillance Software with complete video management, alarm message management, and system administration Sold with the Software CD containing SecuGuard Pro and User’s Manual, Software Key-lock (by Print-Port or USB 1 Note The Multi-layer Motion Detection and I/O Device Management functions are provided only with SecuGuard™ Pro. 2 Product Information Recording Features Administration Management and Video Server / IP Camera Control y Supports Multi-profile Series Video Server / IP Cameras y Separately configurable camera names, video quality, and video resolution y Can add up to 32 users per system y User authorization level protection by password y Supports PTZ camera controls y Automatically resumes viewing and recording after the system reboots y Easy camera management with your own e-map Viewing y Remote Access from client web browser y Supports 1, 4, 9, 16 camera viewing formats (For SrcuGuard™ Pro, a maximum number of 64 cameras) y Zoom-in/Zoom-out functions for individual cameras when playing back images y Viewing and recording by schedule or event triggering for each camera y Historic playbacks by time or events y Snapshots taken in playback mode to get JPEG images for printing or saving as evidences y Adjustable contrast, brightness, sharpness, blurriness, and grayscale of the snapshot images 3 y Images recorded in AVI format―compatible with popular media players y Adjustable recording frame rate over the LAN/Internet to match the real frame transmit speed, and to keep the video synchronized with the actual time y Overridable HD space in FIFO (First-In-First-Out) sequence y Recorded video files can be stored on a local PC or a Windows-based networked storage server (SecuGuard™ Lite/Basic does not support storing on a network hard disk) Alarm y Video Motion Detection function for each camera y Selectable Video Motion Detection area for each camera (SecuGuard™ Lite only supports full image Video Motion Detection) y Alarms can be triggered by Video Motion Detection, video failures, storage full, Digital Input, and sent via email or Digital Output, or can trigger the PTZ camera to move to a preset position (SecuGuard™ Lite only supports Video Motion Detection, Video Fail alarm) y Alarm status can be reviewed via the alarm log (only supported by SecuGuard™ Pro) 4 Product Information 2 System Requirements SecuGuard™ Lite/Basic OS: CPU: Memory: VGA: Windows 2000 / XP / Vista P4 2.4G Hz or above (3.4GHz recommend) (lite/basic) 512MB or above (1G recommend) AGP(4X) VGA card with 32MB of display memory or above Since a video surveillance system cousumes a lot of system resources, we Note strongly recommend that the server you use for running SecuGuard™ is used solely for video surveillance. Chapter 2 SECUGUARD™ Lite/Basic Installation Before Installing the Software 1. 2. 3. Make sure your PC has DirectX 8.1 or above installed. Use the the enclosed software CD. Run SecuGuard Lite.exe or SecuGuard Basic.exe, which is included on the Software CD. Starting the Installation Step 1. The Installation Wizard will start. Click on Next to continue. 5 6 Service Information Step 2. The Customer Information window will open next. Keyin the User Name which is the username to login SecuGuard™ Lite/Basic. Step 4. The Select Program Folder window will open next. Select the program folder that you wish the wizard to create an icon for, and then click on Next to continue. Step 3. The Choose Destination Location window will open next. Select the folder you wish to intall SecuGuard™ Lite/Basic to, and then click on Next to continue. Step 5. The wizard will start the installation process. A digital signature request window will appear during the installation process. Click on Continue Anyway to continue the installation. 7 8 Service Information Step 6. The InstallShield Wizard Complete window will open next. Click on Finish to complete the installation. Accessing SecuGuard™ Lite/Basic for the First Time To launch the SecuGuard program, click on StartÆProgram FilesÆSecuGuard Lite/Basic. An authentication request will appear when accessing SecuGuard™ Lite/Basic. Enter the user name and then enter the password that you set up. For other users, type the given user name and password. The main page will open next. The resolution is 1024 x 768, without any video image. Click on the Application Settings button to set up the SecuGuard and cameras. Application Setting 9 10 Service Information 3 Chapter 3 SECUGUARD™ Lite/Basic General Operation Log in/out Administrators and users can directly use the Logout/Login function via the Exit/Minimize button located in the bottom right corner of the the main page to exit/access SecuGiard™ Lite. PTZ Camera Control, Camera List, and Viewing Selction as below. Exit, Minimize, System time & Storage Space Function Buttons Main Viewing Screen PTZ Camera Camera list Exit/ Minimize Log in/ Out Viewing Selection Viewing Selection SecuGuardLite has multi viewing formats. You can easily change the viewing format by using Viewing Formats Selection. And you can also select the camera you wish to view/control by clicking on one of the buttons in the Camera List. Panel of SecuGuard Lite/Basic There are a lot of information and control functons in the panel: System time & Staorage Space Information, Function Buttons, 11 12 Service Information follows: 1. Set up the time period by time and weekday. 2. Action items only include recording. 3. Camera selectable. 4. Details of scheduling tasks are described in the task remarks. 5. The editable scheduling task list is provided. Function Buttons Recording Scheduling Remote Service Administrators can set up scheduling tasks on the Application Setting/Scheduling page. Playback The time period setting for Scheduling jobs is based on 24-hour time. If you wish to set an 8-hour time task, which will run Note overnight, you can set up 2 different scheduling jobs, such as 20:00-23:59, and 00:00-04:00. Application Settings Camera Map SnapShot A Scheduling job also includes recording. For this reason, the Recording button from the Function Buttons on the main page will turn dark to disable the recording function when the Note Scheduling function is active. This is to avoid conflicts caused by the scheduling task and the manual operation of recording and remote service. Recording To activate the recording function, click on the reording button from the Function Buttons. There are 3 kinds of recording, which can be activate with each camera separately.When recording, users can set up the other camera status in the meanwhile: 1. Monitor only, no recording: no recording at any time. 2. Round-the-clock: recording all the time. 3. Motion detect: recording only when Video Motion Detection is triggered. Scheduling To activate the scheduling function, click on the Scheduling button from the Function Buttons. The 5 features for scheduling are as 13 Remote Service For SecuGuard Pro, Remote Service allows client users to access the SecuGuard Pro from a remote site. Administrators can activate Remote Service to let users view real-time video images, and the playback of recorded files via any standard web browser, by typing http://IP Address of SecuGuard server in the address input box. (This funtion does not work in the SecuGuard Lite/Basic version) 14 Service Information display, email addresses to send alarms to, and camera scanning intervals. Play back Administrators and users with authorization can view the playback of historic recorded files via the Playback function. To activate the Playback function, click on the Playback button from the Function Buttons. A Security Playback window will open to play back the recorded file. 3. Recording: There are 2 major settings on the Recording page. One is the recording setting for each camera, and the other is Video Motion Detection settings. 4. Scheduling: Administrators can set up the time period, weekday, tasks, and camera enabling on this page. 5. User Management: The administrator’s password and user list can be set up on this page. Up to 32 users can be listed. Administrators can also configure camera operation and remote service for each user on this page. 6. Adding Camera: Now, SecuGuard Lite/Pro support A-MTK, AXIS, MOXA, Shinsoft, PANASONIC, and Vivotek series IP camera in our searching lists. By clicking the button, Administrators can easily and those IP cameras to your recording systems. Close the window System Time Even List Zoom in/out Speed Up, Speed Down Advanced Search Image Processing Play Session Tuning Control Panel Application Settings There are 6 major setting categories for SecuGuardLite/Basic: 1. Video Server / IP Camera Configure: Administrators must configure Multi-profile Series Video Server / IP Cameras and cameras to acquire video images before using the functions provided by SecuGuardLite. 2. General Setting: From the General Setting page, administrators can configure the SecuGuard Lite server’s host name, the start-up status, storage disk locations, camera caption, camera 15 16 Service Information Camera Map SecuGuardLite/Basic provides a graphic E-map function for camera management. Administrators can import a layout image and place the cameras on the image for easy management of the number of cameras. To activate this function, click on the Camera Map button. Administrators can use this function to manage the cameras easily. Camera Map 17