1
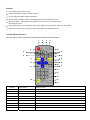
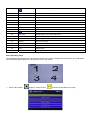
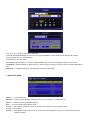
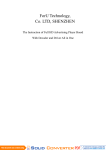
D3 MEDIA TOUCHSCREEN
USER MANUAL
Features
Low voltage (6V-18V) power supply
USB2.0 compatible for update and edit functions.
CF, SD, MMC and USB for loading media data.
Screen rotation capability, media can be displayed in portrait and landscape mode.
Slide show options - adjustable interval timing from 3 sec to 25 sec, 14 transition modes
and background music.
File formats supported AVI: DIVX/XVID, DVD: VOB / MPG2, VCD: DAT/MPG1 , MP3 and JPG formats.
Automatic on/off timer, up to 6 times each day, clock display and calendar functions.
Using the Remote Control
The following is a list of all buttons on the remote control and their functions.
1
6
8
2
3
4
5
22
7
21
20
9
19
10
18
11
23
24
25
26
27
17
16
15
14
12
13
Number
Button Name
Button Function
1
Power
Power On/OFF
2
FILE
File List
3
DISP
In file mode, Press "DISP", button to display the properties of the file
4
MODE
Repeat One
、 File/Folder, Repeat OFF, Repeat all (Default is Repeat all)
5
STOP
STOP
6
PLAY/PAUSE
PLAY/PAUSE
7
Fast forward
Fast Forward 2x, 4x, 6x, 8x
8
Fast Backward
Fast Backward 2x, 4x, 6x, 8x
9
SETUP
Enter the system SETUP menu
In SET UP mode, move the cursor left
10
11
BCC
Enter function to adjust Brightness, Contrast, Color
12
AV
AV/VGA Switch
13
PROG
Program the play list
14
VIDEO
Switch between 480P、480I、720P
15
AUDIO
Switch between different AUDIO Modes
16
DEL
Delete the selected file
17
COPY
Copy the selected file
18
EQ
spectrum shows
In SET UP mode, move the cursor right
19
20
RETURN
Switch between CF, SD and USB source
21
PREVIOUS
Return to previous Video, Photo or Music file
22
BGM
Play Background Music
23
ZOOM
Zoom In / Zoom Out
24
NEXT
Advance to the next Video, Photo or Music file in a folder that is playing
25
MUTE
Mute the sound
26
VOL-
Volume Down
27
VOL+
Volume Up
Basic Operating steps
This D3 Media Touchscreen has a push button switch on the rear to change from touchscreen to normal mode
The selected mode will appear on the top left corner of the screen.
1. Press "stop" button
and then "setup" button
to enter into the Main menu page
OSD Language------Supports Chinese and English, Default in English
Defaults----------------Reset to defaults
Main Page-------------Highlight “Main Page”, Press “ENTER” and return Main Page, press UP/DOWN key to move the cursor
1.2 Video Page
Video Output ----RGB or YPbPr output (Default-RGB)
TV Display --------4:3 PS/ 4:3LB/ Wide (Default-Wide)
TV Type ----- ------NTSC/ PAL/ Auto (Default-NTSC)
Resolution--------480P/ 720P/ 480I (Default-480P)
JPG Rotate--------No Rotation/ Rotation 90/ Rotation 180/ Rotation 270/ HOR Flip/ VER Flip (Default-No Rotation)
Main Page---------Highlight “Main Page”, Press “ENTER” and return Main Page
1.3 Calendar Page
Use up / down ket to select from 2000 to 2099, then
Press LEFT/DOWN/PREV/NEXT to move the cursor, press PREV/NEXT to switch between Year, Month, Date and time
Press UP/DOWN key and change the time
Press ENTER to save the setting
Time Display---Three modes: On, Only stop, Off Mode (Default/Off), the Time mode displays at right-up corner of the UI
Alarm Mode ---Supports different or same setting for 7 days a week,, two modes for every day and every week (Default/Every
Day)
Main Page------ Highlight “Main Page”, Press “ENTER” and return to Main Page
,
1.4 ROLLTXT PAGE
Rolltxt ----- --On/Off (Default:On)
Roll Style --- Option for three different roll styles such as R->L / D->U Fade/ L->R (Default is R->L)
Speed --------Normal / Fast /Slow (Default is Normal)
Size ---------- Small /Normal /Big (Default is Small)
F-Color ----- Sets different foreground colors such as Black, Blue, Yellow, Red, Grey, Magenta, White,
(Default F-color is Black)
B-Color ----- Sets different background colors such as Yellow, Red, Grey, Magenta, Trans, H-Trans, White, Black and Blue
(Default is Yellow)
Position ----- The text can be set to scroll at the top or bottom of the screen, however, the RTC time will not be shown
if it scrolls on the bottom. (Default is “bottom” )
1.5 CUST PAGE
Playlist Record : On/Off(Default: Off)
Generates a file each each day, that contains the start time, end time and total play times for each file
– File for each day, the file will be named by“ Year Month Day .HHH”,eg,“20080808.HHH” Open file with notebook.
– Content format as follows:
date: 20090130 start time: 07:25:27 file: 002.MPG
end time: 07:25:42 total: 15 Secs
date: 20090130 start time: 07:25:42 file: 003.MPG
date: 20090130 time: 07:25:57 system stop!!!
date: 20090130 start time: 07:25:58 file: 003.MPG
end time: 07:26:00 total: 2 Secs
Record Storage: Records can be saved in 5 days, 7days,10 days,15 days, 20 days, 25 days(Default is 5 days)
Screen Style: Horizontal or Vertical (Default: Horizontal)
Main Page: Highlight “Main Page”, Press “ENTER” and return Main Page, press UP/DOWN key to move the cursor
1.6 Data Source Device Tool
Format----- NAND (internal Hard drive) / CF Card / SD Card/ USB (Default is NAND)
Main Page ----- use cursor to highlight “Main Page”, Press “ENTER” and return to Main Page
Creating Rolltxt File
– Create new .txt file and name it “ROLLTXT.ROL”
NB: Title must be all upper case as shown.
– Text content can be English, Russian, Chinese, Korean, Japanese
– Text content can contain approx 1000 words
– The first line of the text file must be numbers. This sets the time interval in seconds for the gap between the text for
example,"20"means it repeats after 20s . There are different styles such as up to down. Except in the " right to left"
style, text content must be divided into several sentences using "\” to mark the end of each sentence.
Playing List
1)
Option for Monthly, Weekly or Daily Playlist.
Monthly Playlist: PLISTM01.XML~ PLISTM12.XML
Weekly Playlist:PLISTW00.XML~ PLISTW06.XML
Daily Playlist:PLISTD01.XML~ PLISTD31.XML
File must be named is ” PLAYLIST.XML”, all characters must be upper case
2) Option for multi group lists, every group can be played at preset times.
3) The playing times for each file can be preset
4) For picture style, the playing mode and time can be preset.
5) The audio level can be preset
6) Create a play list using xml Editor.exe
7) Each group can contain up to 80 files
8) When selecting a group, it is based on the first programmed time, so do not set times that overlap.
9) When using the Playlist function, The Resume Play funtion in the main menu must be turned off to avoid a conflict.
Supporting Code information for writing XML Touchscreen programs
The details are as follows:
<programe>
<open=“stat.avi">
<title="title.jpg">
<mopen=“demo.mpg">
<sx="0" sy="0" ex="100" ey="100" type="1" file="08.avi" interval="3"
mode="2" repeat="1" back="1"/>
<sx="100" sy="0" ex="200" ey="100" type="2" file="folder"/>
<sx="0" sy="100" ex="100" ey="200" type="3"/>
<sx="100" sy="100" ex="200" ey="200" type="4"/>
</programe>
The blank color means keywords ,the content is in “ ”
<open="stat.avi"> "stat.avi" means file A referred above
<title="title.jpg"> “title.jpg”means file B referred above
<mopen=”demo.mpg”> means the playing file when touch the stat.avi
sx=“0” sy=“0” ex=“100” ey=“100“ defines the touch area,
file=“08.avi”defines the play file when touch the area,
type=“?”, 1-file, 2-Sub Directory,3-Higher level Directory,4-Root
Interval=“?” ,defines the play time for the photo
mode=“?”,defines the play mode for the photo
repeat=“?”,defines the play times for the file
back=“?”, after play the defined file,0-go back to the current directory title, 1-go back to the directory
Root title
sx=“0” sy=“0” ex=“100” ey=“100“ means the touch area, it’s the Diagonal coordinates of Rectangular or
Square ,the smaller value should placed in the front ,while the larger one should placed in the latter, or else
there would no touch function
The coordinates can be tested online, press STOP, then press LEFT button on the remote 10 times
continuously. As long as you press the touch screen, the corresponding value will display in the upper-left
corner. After the test , restart the machine, it will work in the normal mode.
type=“?”, 1-File, 2-Low-level Directory,3-Higher Level Directory,4-Root
Remark:there are no higher level directory when in the root, so do not use type=”3“
There are no low level directory when in the deepest directory, so please do not use type=”2“
Press the right key on the remote, enter the touch screen calibration mode, after upgrade the different software,
if the touch screen do not work, please check if the touch screen has been calibrated.