1
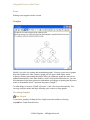
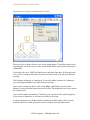
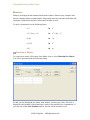
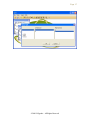
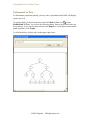
Lillypadz® Discrete Math Tutor
User’s Manual
©2009 Lillypadz – All Rights Reserved
Lillypadz® Discrete Math Tutor
Copyright
The Software and Documentation is owned by Lauren Lilly (Lillypadz.com) and is
protected by copyright laws and international treaty provisions, as well as other
intellectual property laws and treaties. You shall treat the Software like any copyrighted
material. Lillypadz Discrete Math Tutor is the Intellectual Property of Lauren C. Lilly.
For more information, visit http://www.Lillypadz.com.
©2009 Lillypadz – All Rights Reserved
Page 3
Contents
Welcome to Lillypadz® Discrete Math Tutor ..................................................................... 5
Main Screen ........................................................................................................................ 7
File Operations ................................................................................................................ 7
Open ............................................................................................................................ 7
Save ............................................................................................................................. 7
Print ............................................................................................................................. 8
Graphs ................................................................................................................................. 8
Creating Graphs .............................................................................................................. 8
New Graph .................................................................................................................. 8
New Trees ................................................................................................................... 9
Working with Graphs...................................................................................................... 9
Saving a Graph ............................................................................................................ 9
Controlling Appearance and Behavior ...................................................................... 10
Actions on the Graph ................................................................................................ 10
Automatic Matrices ................................................................................................... 11
Graph Editing Tools .................................................................................................. 11
Demonstrating Searches ............................................................................................ 11
Matrices............................................................................................................................. 14
Creating a Matrix .......................................................................................................... 14
Auto Populate a Matrix ............................................................................................. 15
Edit Matrix .................................................................................................................... 16
Matrix Math .................................................................................................................. 16
Matrix Options .............................................................................................................. 16
Polynomial to Tree ............................................................................................................ 18
©2009 Lillypadz – All Rights Reserved
Lillypadz® Discrete Math Tutor
©2009 Lillypadz – All Rights Reserved
Page 5
Welcome to Lillypadz® Discrete Math Tutor
Lillypadz® Discrete Math Tutor (LDMT) is a tool intended to improve the learning of
concepts related to Discrete Mathematics. It can be useful for professors and students
alike. For professors, font sizes may be made large for demonstrating to a classroom. For
students, it will remove the artistic requirements and help focus on the concepts.
In this first version, we provide the tools to demonstrate Graphs and Matrices.
Graphs
Create nodes by simply double-clicking on the screen
Create edges by dragging from one node the other
Renumber nodes
Instantly create an Adjacency Matrix
Create a Path Matrix
Path and Adjacency Matrices are labeled
The related matrices are kept up to date automatically
These matrices can participate in matrix math (see below)
Locate cycles
Layout a tree automatically
Create 3- and 4-level binary trees automatically
Demonstrate, step-by-step, Depth First and Breadth First Searches
Matrices
Create multiple matrices
Any number of rows and columns
Perform mathematical functions on matrices
Square a matrix in one click (good for demonstrating Graph concepts)
Automatically set up matrices such as xij, aij, bij, and identity
Polynomial to Tree
Create a binary tree in graphical form representing a polynomial
Sets
Quick set creation
Demonstrate Union, Intersection, Difference, Equality
Subset,
Cross Product
Power Sets, and
Venn diagrams
©2009 Lillypadz – All Rights Reserved
Lillypadz® Discrete Math Tutor
Relations and Functions
Define your own relation or use samples
Test for Reflexive, Symmetric, Transitive
Test for function, 1 to 1, onto
Inverse of a relation
Demonstrate relation composition
Create matrix of relation
Show relation as a set
Hasse diagram
©2009 Lillypadz – All Rights Reserved
Page 7
Main Screen
The main screen provides four major sections. The first is the File menu that allows
opening saved files and saving matrix files.
The next section deals with Matrices, then Graphs, and finally a Math-to-Graph
demonstration.
Each of these sections is documented below.
File Operations
Open
You may Open a previously saved file by clicking on the Open File icon, or selecting
File►Open from the menu. You will be guided to locate a file and open it in a standard
dialog. If you open a .lpm file, it will open a new matrix window. If you open a .lpg file,
it opens a new graph window. Graphs open an independent window due to the fact that
they not only contain the graph, but may also contain matrices. Matrix windows are
simpler and remain contained within the main window rather than being independent
windows.
Save
You may save a matrix by selecting the one you want to save and clicking the Save icon
or selecting File►Save; Ctrl-S also works. To save a graph, see Saving a Graph.
©2009 Lillypadz – All Rights Reserved
Lillypadz® Discrete Math Tutor
Print
Printing is not supported in this version.
Graphs
Module 1 provides for creating and manipulating graphs. You may create trees or graphs,
directed or undirected. After creating a graph you may open a Path Matrix and/or
Adjacency Matrix representing that graph. When you update the graph, the matrices are
updated automatically. Since these matrices can be accessed like other matrices, you can
do mathematical operations on them to demonstrate such things as squaring the adjacency
matrix to demonstrate that A2 represents the paths of length 2.
To make things even easier, LDMT will create 3- and 4-level trees automatically. You
can copy and paste nodes and edges allowing quick creation of large graphs.
Creating Graphs
New Graph
Create a new graph by clicking the New Graph icon in the toolbar or selecting
Graph►New Graph from the menu.
©2009 Lillypadz – All Rights Reserved
Page 9
Once you see the blank page, double-click anywhere to create a new node. To connect
nodes, move the mouse cursor to a node until it becomes a pointing finger. Hold down
the left mouse button and drag an edge to another node.
To create a loop (self-referencing edge), double click on the node. After the loop appears,
you may manipulate it by selecting it and adjusting it with the green handles that appear.
If you are in Tree mode (
a cycle.
), you may not drag more than one edge to a node, nor create
To delete a node or edge, click on it and press the Delete key or click the cut (
in the toolbar.
) button
New Trees
As a convenience, you can create trees automatically; 3- and 4-level and numbered either
breadth- or depth-wise.
3-level, numbered depth-wise
3-level, numbered breadth-wise
4-level, numbered depth-wise
4-level, numbered breadth-wise
Note that the numbering has nothing to do with searching the tree, it is just for
convenience and demonstrating in a simple fashion, depth and breadth concepts.
Working with Graphs
Once a graph is created, you may control its behavior, save it, or invoke a number of
operations that help demonstrate graph behavior.
Saving a Graph
Save
To save a file, click the Save icon. You will be prompted to provide a name and location
to save the file. You may also use Ctrl-S.
Save As
To save a file you opened previously under a different name, click the Save As icon.
Again, you will be prompted to provide a name and location.
Hint: as with all applications, a good habit is to open a file you want to copy and select
Save As immediately. If you wait, you will forget and save the changes over the top of a
file you don’t want changed.
©2009 Lillypadz – All Rights Reserved
Lillypadz® Discrete Math Tutor
Controlling Appearance and Behavior
Allow Cycles
If you want to allow cycles in a graph, click this icon. It remains highlighted to remind
you of the mode you are in.
No Cycles Allowed (Tree Mode)
In this mode, you may not create cycles and you may not have two edges directed to a
single node.
Note: changing modes will not remove existing edges, but will no longer allow you to
create new invalid edges. Cycles will remain, but new cycles cannot be created.
Directed Edges
In this mode, edges have arrowheads to indicate direction. In addition, the adjacency
matrix for this graph in this mode is not symmetrical.
Undirected Edges
Using this setting, edges have no arrowheads, and the adjacency matrix for the graph is
symmetrical.
Font
The list beside the Font label allows changing the size of the font for the labels of the
graph. Note that the font for the matrices is handled independently.
Actions on the Graph
You can perform several automatic operations that affect the layout of the graph.
Lay Out as Tree
This option will cause the graph to be automatically reorganized as a tree. It will not do
anything if the graph is not a tree.
Renumber Nodes
If you delete nodes, the node numbers are not reused. To cause the graph to be
renumbered, click this icon.
Check for Cycles
LDMT will automatically highlight cycles in your graph.
©2009 Lillypadz – All Rights Reserved
Page 11
Automatic Matrices
LDMT will automatically create and keep up to date both Adjacency and Path matrices.
These matrices can be used as the source for doing computations on matrices from the
main window as well.
Create an Adjacency Matrix
Click on this icon to open an adjacency matrix representing this graph.
Create a Path Matrix
Click on this icon to open a path matrix representing this graph.
Graph Editing Tools
You can cut, copy, paste, and delete items from the graph. Select the items to process by
clicking on one, or, to select multiple items, click on the first and then hold the Ctrl key
down while clicking on others.
To select a whole set of items, you may “lasso” them. At one corner of the group to
select, on an empty spot, hold down the left mouse button. Then drag the mouse to the
opposite corner of the area you want to select. You should see a dotted line appear. When
you let the mouse button up, all of the items completely contained in the area are
selected. You may now copy, cut, or delete these items.
Demonstrating Searches
LDMT provides an easy means of demonstrating breadth- and depth-first searches on
graphs.
Breadth-First Search
Click on the breadth-first icon. Since the subsequent operations are the same as for depthfirst, see the steps below.
Depth-First Search
Click on the depth-first icon and follow the instructions below.
©2009 Lillypadz – All Rights Reserved
Lillypadz® Discrete Math Tutor
Instructions for Depth and Breadth Searches
When you click on either of these icons, a new dialog appears. This dialog allows you to
step through a search one step at a time, automatically with a delay between each step, or
continuously.
If you start with a tree, LDMT will find the root and begin from there. If the graph is not
a tree, click on a node to start from. If you do not select a node, you will get a reminder
message.
Select Manual, Animated, or Continuous. If you select either Animated or Continuous,
you can change the number of seconds between each step.
Once you have made you choice, click on the Step (or Go) button. If you selected
Manual, you must click the button between each step. This might help you as you explain
the search process.
If you selected either Automated or Continuous, you can watch as the search progresses.
If you selected Continuous, it will start over until you click stop.
As the search progresses, the node labels are replaced with the number of the order in
which the node was visited. When the search is complete, the node labels return.
©2009 Lillypadz – All Rights Reserved
Page 13
When you are finished demonstrating, close the dialog with the X in the upper right
corner.
©2009 Lillypadz – All Rights Reserved
Lillypadz® Discrete Math Tutor
Matrices
Matrices are displayed and contained in the main window. Matrices may contain values
that are rational numbers or polynomials. Polynomials may have rational coefficients and
exponents. Polynomials may have subscripted variables as well.
To enter a polynomial, use the following forms:
x^2
►
x2
x^2 + 2xy + y^2
►
x2 + 2xy + y2
(1/2)x
►
½x
x^(1/2)
►
x½
x12
►
x12
Creating a Matrix
To create a new matrix, click on the New Matrix icon, or select Matrix►New Matrix.
You will be presented with the following dialog.
So that you can distinguish one matrix from another, you may type a title. This title is
displayed in the heading of the matrix and is used to select matrices for computations. If
you click one of the Auto Populate buttons, the title will be created for you.
©2009 Lillypadz – All Rights Reserved
Page 15
Select the size of the matrix in the Dimensions box. If you click Square (the default) you
need only supply the number of rows. If you uncheck Square, you can supply both rows
and columns. After doing so, enter the numbers or polynomials you want to display in the
rows and columns of the table below. Empty cells will be replaced with zeros.
When you have entered all the values, click OK.
Auto Populate a Matrix
To quickly create a matrix without having to put in all the values, enter the dimensions
and click one of the Auto Populate buttons.
11, 12, 13
This button creates a matrix with integers as the values, the values are 11, 12, 13.. for row
one, 21, 22, 23… for row two, and so on.
xij, aij, bij
If you click the xij button, the variable for each cell is x with a subscript for row and
column. The values are x11, x12, … for row one, x21, x22,… for row two and so on. The
title will automatically be set to X. Likewise, for aij and bij replace x with a or b and the
title will be A or B.
Identity Matrices
* Identity will create a multiplicative identity matrix and name it I. + Identity will
create the additive identity and also name it I.
©2009 Lillypadz – All Rights Reserved
Lillypadz® Discrete Math Tutor
Edit Matrix
If you want to edit a matrix, select it by clicking on the header next to the title, and click
the Edit Matrix icon from the menu. You will be presented with the same dialog used to
create a matrix from which you can change any of the options. Click OK to continue.
Matrix Math
To apply quick math to a matrix, simply select the matrix and click the icon. The quick
math icons are
and
to square and cube a matrix. These are useful for demonstrating
paths of length 2 and 3 respectively.
To apply more complex computations, LDMT supplies a computation dialog that allows
you to add, subtract, multiply matrices, add and subtract a scalar and compute the
additive inverse.
To open the Matrix Math dialog, click on the Matrix Math icon
or select
Matrix►Enter Computation. You will see the following dialog. Select an operation in
the leftmost box. The options are:
+
Add two matrices
*
Multiply two matrices
-
Subtract the right matrix from the left
+ scalar
Add a scalar to a matrix
* scalar
Multiply a matrix by a scalar value
+ inverse
Compute the additive inverse of a matrix
If you select an operation on two matrices, you must select one matrix from the Left
Operand list and one from the Right Operand list. If you select a scalar operation, a
scalar text box will appear. Enter the scalar there. If you select + Inverse select only an
item from Left Operand.
When you click OK, the matrix will appear in the main window.
Matrix Options
You can change the size of the font for a matrix by selecting a number from the Font list.
You can save a matrix by clicking on the Save icon, or selecting the matrix and selecting
File►Save from the main menu.
©2009 Lillypadz – All Rights Reserved
Page 17
©2009 Lillypadz – All Rights Reserved
Lillypadz® Discrete Math Tutor
Polynomial to Tree
To demonstrate polynomial parsing, you may enter a polynomial and LDMT will display
a parse tree for it.
To open the dialog, from the main menu select the Math to Tree icon or select
Math►Math To Tree. You will see the following dialog. Enter a polynomial in the text
box at the top. To see only the parsed result, click Display to see the parsed result and the
graph (as below), click Graph.
To close the dialog, click the red x in the upper right corner.
©2009 Lillypadz – All Rights Reserved
Page 19
Sets
You can create a window with multiple sets on it, and then demonstrate set operations
such as Union and Intersection. These operations help the student see the common and
different elements of the sets to clearly explain what these operations are about.
Create the first set by selecting new set from the toolbar or Set►New Set from the
menu. You will be prompted with a dialog that allows you to create sets in many ways.
To create a set using only integers, select the Range of Integers radio button, for letters,
choose Letters, for a null set, Null Set, for subscripted elements, select Subscripted, and
then the letter to use for the set element, and the number of elements to create. Finally, to
create your own names, select List of Names and type your own list, comma separated,
space separated, or one on each line. (You cannot use names with spaces in them.)
Once you have made your selection, press Create. You will see your set appear in a new
window.
If you want to add another set, select Add Another Set . You will be prompted with the
same dialog as before. You may add as many sets as you wish to this window.
To move the sets around, simply drag them (hold down the left mouse button inside the
border and move the mouse).
To perform operations on sets, select the sets to operate on by clicking within the border
of the set. The border will turn red. The indicator at the bottom will display the sets that
you have selected. Set operations will proceed left to right, in the order you select the
sets. To unselect a set, click on it again.
Perform operations on sets by selecting and then clicking one of the toolbar buttons:
Union
Intersection
Difference
Equality
Subset
Product
Power Set
©2009 Lillypadz – All Rights Reserved
Lillypadz® Discrete Math Tutor
Once you have created a new set from a function, to remove it (them), click the Remove
result button . To remove the demonstration lines, but not the sets, click Remove lines
from operation, .
Venn Diagrams
To quickly and easily demonstrate Venn Diagrams, click the
or
buttons from the
main window. These will create a two- or three-set Venn diagram that demonstrates these
concepts. Once the diagram appears, you may click on the set title to expand the set to
show its elements. To hide the elements, click the title again.
To create a Venn Diagram from your own sets, create at least two sets in a set window,
select them, and then click
from that window. You can use as many sets as you wish,
however, it gets rather crowded.
Relations and Functions
Demonstrating relations is as easy as creating one or two sets and then dragging edges
from one element to another. We have also provided many “canned” examples to speed
things along.
Using Examples
The examples will give you a quick idea of how things work. Select Relation► followed
by one of the options.
Generic a basic relation to get things started
Equailiy demonstrates an Equality relation, Less Than, and Less Than or Equal are
similar.
Multiple Of, Subset Of, Substring Of are similarly useful.
Creating your own Relations
Click on
or select Relation►New Relation. You will be prompted to create a set just
as in the Sets module. At this point, you may create a relation on the set by dragging
edges (as in the graph module) from one element to the other.
If you want two sets, click to add the second set. The edges within the first set
disappear (if you created any), and you will only be allowed to drag edges from the left
set to the right set.
If you want to demonstrate composition, add another set. Now, the middle set is common
to both relations. You may drag edges from the left most to the middle, or from the
middle to the rightmost. Demonstrate composition by clicking Demonstrate Composition
.
©2009 Lillypadz – All Rights Reserved
Page 21
The test buttons will test only the left relation (whether on one or two sets). You may test
for Reflexive , Symmetric , Transitive , Equivalence , Is Function , one-toone , and onto .
Create the Matrix
To create the matrix of the leftmost relation, click the Show Relation Matrix button.
Relation as Set
You may show the relation as a set of ordered pairs by clcking the Relation as Set button.
Inverse Relation
Click the Inverse Relation button to create a new window with the inverse relation.
Hasse Diagram
Create a Hasse Diagram by clicking the Hasse Diagram button.
©2009 Lillypadz – All Rights Reserved