1
PPP Mode
Getting Started
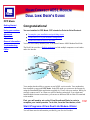
Congratulations!
Using your modem
You are installed in PPP Mode. PPP stands for Point-to-Point Protocol.
Advanced
Operations
●
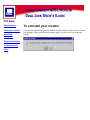
To complete your installation and get dialing access
●
To add other PCs to your modem's configuration
General Information
●
To add other Internet Service Providers
Troubleshooting
FAQs
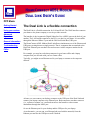
You have successfully installed your 3Com HomeConnect ADSL Modem Dual Link.
The Dual Link provides a flexible mechanism to link multiple computers to each other
and to the Internet.
Your modem has the ability to support several ADSL service modes. Your modem has
been installed to support the PPP mode. In the PPP mode you connect to the Internet by
using the Broadband Dialer application supplied (by 3Com) with your modem. While you
can only connect one PC at a time to a specific Internet connection, if you obtain and
install multiple internet connections, you can access different ISPs on other PCs attached
to the modem.
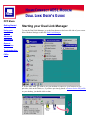
First, you will need to set up the 3Com Broadband Dialer in order to
complete your install process. To do this, from the Start button, click:
Start->Programs->3Com Dual Link Modem->Dialer
You will then enter the information provided by your Service Provider.
Once you have completed the installation of the Dual Link software on this PC, you may
want to set up additional PCs.
At some point you may need to have more than one ISP. You can add ISPs using
information provided by your service provider.
The modem installation procedure you have completed installed a program group on your
hard drive. This program group provides shortcuts to:
1. Access the modem for diagnostics, monitoring your connection and upgrading your
modem software. For the most part, you should not have to directly access your
modem.
2. View this online guide.
3. Install the Instant Update package which allows you to automatically obtain
software updates for your modem over the Internet.
4. Uninstall the modem program group from your hard drive.
You can learn more about unfamiliar or technical terms by consulting the glossary in this
guide.
PPP Mode
Getting Started
Using your Dual Link Modem
Using your modem
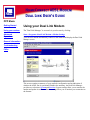
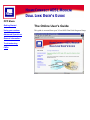
The "Dual Link Manager" is accessed via your browser by clicking:
Advanced
Operations
Start->Programs->Dual Link Modem->Modem Settings
General Information
Your browser should automatically connect to the modem and display the Dual Link
Manager screen.
Troubleshooting
FAQs
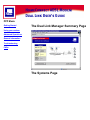
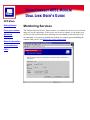
This screen contains a summary of your modem's configuration and an indication of
whether the ADSL line is operational. Besides the summary, the Dual Link Manager
provides two selections: System and Services. System settings allow you to monitor the
modem and update its software. Service settings allow you to monitor your connection to
the Internet.
PPP Mode
Getting Started
Advanced Procedures
Using your modem
Advanced Operations
General Information
Troubleshooting
FAQs
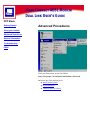
From your Start button, proceed as follows:
Start->Programs->3Com Dual Link Modem->Advanced
and select one of the options given:
● Install Instant Update
●
Serial Download
●
Uninstall Modem Utilities
PPP Mode
Getting Started
General Information
Using your modem
The information provided in these pages covers points of interest and information that
you don't need to know to operate your modem under normal circumstances but that
might be of use or interest to you:
● Specifications
Advanced
Operations
General Information
Troubleshooting
FAQs
●
Safety Information
●
Technical Support
●
Glossary of Terms
●
Manufacturer's Declaration of Conformity
●
3Com Corporation Limited Warranty
●
Copyright Information
PPP
Mode
Home
Troubleshooting
Here you will find troubleshooting tools and information for your 3Com HomeConnect ADSL
Modem Dual Link.
❍ LED Status Indicator Diagnostics
❍
Troubleshooting Tools
❍
Troubleshooting Tables
■
Power Problems
■
LAN Connection Problems
■
USB Connection Problems
■
Control Center Connection Problems
■
Dual Link Manager (Web Browser) Connection Problems
■
ADSL Connection Problems
■
Slow Network response
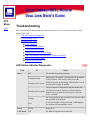
LED Status Indicator Diagnostics
LED
Alert
IS
When
Off
The modem is operating properly
Flashing Orange
During boot, the modem is checking for the download
of new software. This lasts for about 4 seconds.
Flashing Green slowly
While the modem is initializing. This lasts for 30 to 40
seconds after booting the modem.
The reset button is being held in and the modem has
just been powered on. This lets you know that the
Flashing Green rapidly
modem has recognized the reset request. It lasts for
about 4 seconds.
Orange
An unexpected error has occurred, but it does not affect
the operation of the modem.
Red
A non-recoverable error has occurred. If this happens,
the modem will automatically reboot.
Power
Green
Power is on.
LAN Status
Off
No Ethernet signal has been detected.
USB Status
Green
A PC or hub is properly connected to the Ethernet port.
Flashing Green
A proper connection exists and data is present on the
Ethernet port.
Off
No USB signal has been detected.
Flashing Orange
A PC is properly connected to the USB port but the
modem has not "enumerated." (When you plug in the
modem, the PC senses voltage differences in the USB
network and proceeds to query (enumerate) the modem
for type, vendor, functionality and bandwidth
required.)
Orange
The modem has enumerated with the PC. This means
that the operating system running on the PC has
recognized the modem.
Green
The modem's software has established communications
with the 3Com USB driver software running on the PC.
Flashing Green
The modem is working and data is present on the USB
port.
ADSL Status Off
No ADSL signal has been detected
Flashing Orange
The modem is attempting to synchronize with the DSL
service provider's equipment.
Green
The link has been established between your modem
and the DSL service provider's equipment.
Flashing Green
The link is up and there is data on the ADSL port.
Troubleshooting Tools
The 3Com HomeConnect ADSL Modem Dual Link has a number of features which can be used to
help troubleshoot problems.
The Dual Link Manager has several important diagnostic tools:
On the Dual Link Manager Summary Page, you can see your ADSL line status (whether the line is
up or down.)
In the Dual Link Manager Systems Page area, Diagnostics includes a number of statistics that your
service provider would find useful if they were trying to fix an ADSL line problem.
In the Dual Link Manager, you also have the ability to reset the ADSL port. This renegotiates the
ADSL-level connection.
Troubleshooting Tables
The troubleshooting tables are organized so that potential hardware and line problems are presented
first, followed by higher level configuration problems.
How to Use these Tables
If you are having any type of connection problem (e.g., the workstations on the local LAN cannot
connect to the remote network) you should work your way down the tables to eliminate any
low-level problem before working through the WAN connection problems.
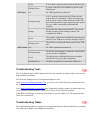
Power Problems
Symptoms
Possible Cause
The LAN LED is Off. The LAN cable is not connected
The MDI/X switch on the back
of the modem is set to connect
to a single PC but the cable is
connected to a hub (or vice
versa).
Corrective Action
Check that one end of the LAN cable
is fully plugged into the LAN port on
your modem and the other end is
fully plugged into the local LAN
connection.
Press the switch in to connect to a
hub and out to connect to a PC.
LAN Connection Problems
Symptoms
Possible Cause
The LAN LED is Off. The LAN cable is not connected
Corrective Action
Check that one end of the LAN cable
is fully plugged into the LAN port on
your modem and the other end is
fully plugged into the local LAN
connection.
The MDI/X switch on the back
of the modem is set to connect
to a single PC but the cable is
connected to a hub (or vice
versa).
Press the switch in to connect to a
hub and out to connect to a PC.
The LAN cable has been
damaged.
Replace the cable with another LAN
cable.
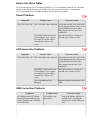
USB Connection Problems
Symptoms
My Windows-based PC did not
automatically detect the modem
when I plugged in the USB cable
for the first time.
Possible Cause
The modem is not
powered on.
Corrective Action
Plug in the modem and allow it
enough time to complete the
boot process. (Status LED goes
off.)
The USB LED on the modem is
Off.
There's a USB
connection problem.
Check that one end of the USB
cable is fully plugged into the
USB port on the modem and the
other end is fully plugged into
the PC's USB port.
The USB cable has
been damaged.
Replace the USB cable.
Although your PC has a
USB port, the operating
system that is running
on your system does
not support its use.
If you are running Microsoft
Windows 3.1, Windows 95, or
Windows NT, you will need to
upgrade your operating system
to Windows 98 or Windows
2000.
The USB port on your
PC is not enabled.
Verify that the USB port is
enabled by running the PC's
Setup program (typically the F1
or Delete key at boot). Refer to
your computer manufacturer's
documentation if you are having
trouble running the Setup
program or cannot find the USB
Configuration Settings section.
I successfully installed the 3Com
The 3Com USB driver
USB driver, but after rebooting, I
did not install correctly
cannot communicate over the USB. or the 3Com USB
driver is not running.
The USB LED on the Dual Link
Unit is solid orange.
De-install then re-install the
3Com USB driver. (See the
driver installation procedure in
Your Installation Guide.)
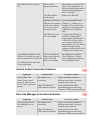
Control Center Connection Problems
Symptoms
From the Dual Link
Control Center, when I
attempt to connect to my
service, I get a connection
timeout.
Possible Cause
Corrective Actions
The modem is not
powered on.
Plug in the modem and allow it
sufficient time (about 1 minute) to
complete the boot process.
There's an Ethernet or
USB connection problem.
See previous sections in this
troubleshooting guide concerning
Ethernet or USB connection problems.
Dual Link Manager Connection Problems
Symptoms
I can't bring up the Dual
Link Manager from my
browser
Possible Cause
Corrective Actions
The modem is not
powered on.
Power on the modem and allow it
sufficient time (about 1 minute) to
complete the boot process.
There's an Ethernet or
USB connection problem.
See previous sections in this
troubleshooting guide concerning
Ethernet or USB connection problems.
I did not first establish a
connection to the modem
through the Dual Link
Control Center.
Before you can access the Web-based
management screens of the Dual Link
unit, you must first establish a
connection to the Dual Link unit.
Double click 3Com Dual Link Control
Center icon on your desktop. Then
click the Dual Link Manager icon to
launch a browser and bring up the
Dual Link Manager.
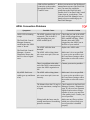
ADSL Connection Problems
Symptoms
ADSL LED is blinking
orange
The Dual Link Control
Manager Summary
confirms that the ADSL
status is "down".
The Dual Link Control
Manager> System>
Diagnostics shows that
there is a loss of signal
error.
My ADSL link is not
stable (goes up and down
a lot).
Possible Cause
Corrective Action
The ADSL (modem) cable is not
connected. (This is the RJ11
cable that plugs into your
ADSL-enabled jack.)
Check that one end of the ADSL
cable is fully plugged into your
DSL-enabled wall plug. Check
that the other end is fully
plugged into the ADSL port in
the back of your modem.
The ADSL cable has been
damaged.
Replace the ADSL cable.
The ADSL cable wiring (inner
pair versus outer pair) is not set
correctly.
Make sure it is set as specified
by your service provider or use
the Auto Detect setting to allow
the modem to select the correct
pair.
There is a problem at the other
end of the ADSL connection that
causes the ADSL negotiation to
fail.
Contact your service provider.
The ADSL cable wiring (inner
pair versus outer pair) is not set
correctly.
Make sure it is set as specified
by your service provider or use
the Auto Detect setting to allow
the modem to select the correct
pair.
The distance from the CO may be Check statistics in the Dual Link
at or near maximum, causing loss Manager Systems> Diagnostics
of signal.
page. If you see a low upstream
signal-to-noise ratio or a large
number of errors, you may have
a line quality issue. Contact your
service provider.
Wiring inside the house may be
causing interference from analog
phones or modems.
Make sure any filter or splitter
which you received from your
service provider is installed
properly.
Slow Network Response
Symptoms
Web browsing is slower than
expected.
Possible Cause
ADSL level connection
problem.
Corrective Action
Use Dual Link Manager to
reset the ADSL line, then
reconnect to your service.
Contact your service provider.
PPP Mode
Getting Started
The Dual Link Manager Summary Page
Using your modem
Advanced Operations
General Information
Troubleshooting
FAQs
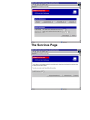
The Systems Page
The Services Page
PPP Mode
Getting Started
Using your modem
Advanced Operations
Frequently Asked Questions
●
What if I have other PCs that I need to configure?
●
How do I upgrade code?
●
How can I obtain Diagnostic information?
●
How can I check the status of the DSL Line?
●
How do I uninstall the software on my PC?
●
How can I delete the configuration?
❍ On the back of the Dual Link modem, there is a small button that you can
use to reset the modem. Unplug the modem, hold the reset button in for 5
seconds while plugging the modem back in to its power source.
●
How can I re-install the modem?
❍ To reinstall the modem, first, the software should be removed from any
PCs you are running on the modem, and then, the modem configuration
should be deleted.
General Information
Troubleshooting
FAQs
PPP Mode
Getting Started
Configuring other PCs to use your Modem
Using your modem
Configuring other PCs in PPP mode
Advanced Operations
You must run the HomeConnect Dual Link modem installation on each PC that will use
the modem to access the Internet.
General Information
Troubleshooting
Simply insert the installation CD in your CD-ROM drive and perform the installation as
directed on the Installation map provided with your modem.
FAQs
Then follow the instructions to configure that PC to access the 3Com Broadband Dialer
by adding the username and password you received from your service provider.
PPP Mode
Getting Started
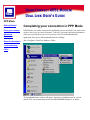
Completing your connection in PPP Mode
Using your modem
Advanced
Operations
In PPP Mode, you need to complete the installation process on each PC you want to have
access to the service you have purchased. To do this, you need to add some information
which you received from your service provider to the 3Com Broadband Dialer
application. First, access the Broadband Dialer by clicking:
General Information
Start->Programs->Dual Link Modem->Dialer
Troubleshooting
FAQs
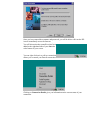
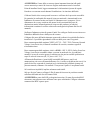
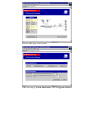
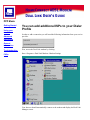
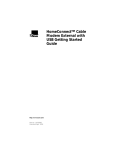
The Broadband Dialer window will appear. During the installation process, an icon
named "ISP" was created and placed in the Dialer Profiles dialog box, as shown.
To dial the connection, double-click on the ISP icon.
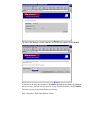
The first time that you attempt to connect, you will complete the installation process by
entering the username and password provided by your service provider in the boxes
given. (This is done on each PC that you will be using to access the service.)
Click Next to complete the setup.
Once you have entered the username and password, you will be able to click on the ISP
icon to immediately access the Internet.
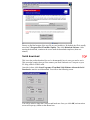
You will also notice that a small icon has been
added to the right-hand side of your Start bar
at the bottom of your screen.
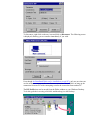
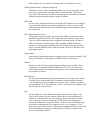
You can right click on it to pull up a menu that
allows you to control your Internet connection.
Clicking on Connection Details gives you information on the current status of your
connection.
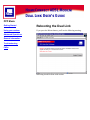
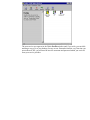
To disconnect, right click on the tray icon and click on Disconnect. The following screen
is displayed, allowing you to reconnect immediately if you wish.
Even though the Broadband Dialer can be installed on several PCs, only one at a time can
use the modem to connect to the same Internet connection. You will have to hang up the
connection from one PC before attempting to make the connection from another PC.
The ISP Profile icon can be moved from the Dialer window to your Windows Desktop.
To do this, grab the icon using a left-click and then drag it to the Desktop.
PPP Mode
Getting Started
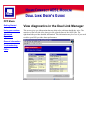
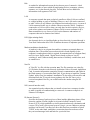
View diagnostics in the Dual Link Manager
Using your modem
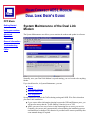
This screen gives you information that may help solve problems should they arise. The
statistics on the left side of the chart give the general status of the ADSL line. The
right-hand side provides detailed information. This information may be of use if you need
to talk to your DSL provider about performance.
Advanced
Operations
General Information
Troubleshooting
FAQs
PPP Mode
Getting Started
Using your modem
Advanced
Operations
General Information
Troubleshooting
FAQs
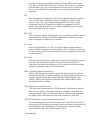
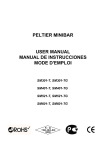
This is a representation of the back of your 3Com modem Dual Link. Note the Reset
button has been highlighted. If you need to reset the modem's configuration, unplug the
modem, then plug it back in while holding the reset button in for 5 seconds.
PPP Mode
Getting Started
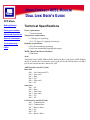
Technical Specifications
Using your modem
Power requirements:
17 watts maximum
Temperature requirements:
0 - 50 degrees C (operating)
-35 to +70 degrees C (shipping and storage)
Humidity requirements:
0-95% non-condensing (operating)
0-100% non-condensing (shipping and storage)
MTBF (Mean Time Between Failures:
65,000 hours
Jacks
Advanced Operations
General Information
Troubleshooting
FAQs
The HomeConnect ADSL Modem Dual Link has one RJ-11 jack for the ADSL Modem,
one RJ-45 jack for the LAN interface, one Type B jack for the USB interface, one DB-9
jack for the console interface, and one DC jack.
ADSL Interface (one RJ-11 jack)
Inner Pair
Pin 1 - Not Connected (NC)
Pin 2 - (Not used)
Pin 3 - Ring
Pin 4 - Tip
Pin 5 - (Not used)
Pin 6 - NC
Outer Pair
Pin 1 - NC
Pin 2 - Ring
Pin 3 - (Not used)
Pin 4 - (Not used)
Pin 5 - Tip
Pin 6 - NC
LAN Interface (one RJ-45 jack)
Pin 1 - Transmit Data +
Pin 2 - Transmit Data Pin 3 - Receive Data +
Pin 4 - NC
Pin 5 - NC
Pin 6 - Receive Data -
Pin 7 - NC
Pin 8 - NC
USB Interface (one Type B Jack)
Pin 1 - +5V
Pin 2 - Data Pin 3 - Data +
Pin 4 - Ground
Console Interface (DB-9) (Default configured as DCE)
Pin 1 - DCD LL <= PC
Pin 2 - Transmit Data LL => PC
Pin 3 - Receive Data LL <= PC
Pin 4 - DTR LL <= PC
Pin 5 - Ground
Pin 6 - DSR LL => PC
Pin 7 - RTS LL <= PC
Pin 8 - CTS LL => PC
Pin 9 - RI LL => PC
PPP Mode
In German
In French
In Spanish
Getting Started
Using your modem
Advanced Operations
Safety Information
General Information
When using the unit, observe the following safety information:
Troubleshooting
Retain this User's Guide for later use and pass it on to subsequent owners/managers of
the unit.
FAQs
The power adapter supplied with the unit is fitted with a molded plug for connection to a
standard electrical mains system supply socket. If this plug is not suitable for connection
to your mains supply, contact your reseller for advice. Do not attempt to connect to the
mains supply using an inappropriate mains adapter.
Protect the unit from sudden, transient increases and decreases in electrical power by
fitting it with an in-line surge suppressor or uninterruptible power supply.
Products manufactured by 3Com are safe and without risk provided they are installed,
used, and maintained in good working order and in accordance with their instructions
and recommendations.
Should any of the following conditions occur, isolate the electricity supply and refer to
your 3Com reseller.
●
If the case or cover is not correctly fitted.
●
If the case is damaged.
●
If the unit begins to make an odd noise, smell or emit smoke.
●
If the unit shows signs of a distinct change in performance.
Never install telephone wires during a thunder storm, or install telephone connection
sockets in wet locations (unless the socket is specifically designed for wet locations).
Do not touch uninstalled telephone wires or terminals unless the telephone line has been
disconnected at the network interface. Always exercise caution when installing or
modifying telephone lines.
Do not spill food or liquids on the unit. If the unit gets wet, isolate the electrical supply
and contact your 3Com reseller.
Do not push any objects into the openings of the unit. Doing so can cause fire or electric
shock by shorting out internal components.
Ensure nothing rests on the unit's system cables and that the cables are not located
where they can be stepped on and cause damage to the unit.
Keep the unit away from radiators and heat sources. Allow 25 mm (1 inch) around the
unit or stack to provide adequate air circulation.
Install the unit in a clean area that is free from dust or extreme temperatures.
The Dual Link has been designed to be a free-standing unit. Do not place anything else
on top of the unit's case.
Allow a clearance gap of at least 50 mm (2 in) from the rear panel of the unit, to allow
for cable access.
Normal operations of this unit could be interrupted by a lightning surge. In this event,
the user must recycle the power to the unit in order to establish normal operating
conditions.
Important Safety Information
WARNING: Warnings contain directions that you must follow for your personal safety.
Follow all instructions carefully.
Please read the following information carefully and thoroughly before installing the
unit: Take exceptional care during the installation and removal of the unit.
Locate the unit close to the main socket outlet, and ensure that the main socket is
accessible.
Use the power adapter supplied with the unit to ensure compliance with national and
international safety standards. Refer to the Conformity statement for more details.
Disconnect the power adapter before moving the unit. Power can only be disconnected
from the unit by removing the power adapter from the unit or from the socket outlet.
Only connect apparatus complying with the relevant interface requirements to the ports
on this unit. The safety status of the ports on this equipment are as follows.
Ports identified by the labels XXXX and YYYY = TNV.
TNV (Telecoms Network Voltage) is a circuit which, under normal operating
conditions, carries telecommunication signals.
Ports identified by the labels AAAA and BBBB = SELV.
SELV (Safety Extra Low Voltage) is a secondary circuit which is designed and
protected so that under normal and single-fault conditions, the voltage between any two
accessible parts does not exceed a safe value (42.2 V peak or 60 V DC).
There are no user-replaceable fuses or user-serviceable parts inside the unit. If there is a
physical problem with the unit that cannot be solved with problem solving actions in
this guide, contact the 3Com reseller from whom the equipment was purchased.
If the units are stackable, only stack similar units.
WARNING: Twisted Pair RJ45 data ports. These are shielded RJ45 data sockets. They
cannot be used as telephone sockets. Only connect RJ45 data connectors to these ports.
PPP Mode
Getting Started
Using your modem
Advanced Operations
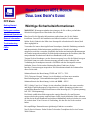
Wichtige Sicherheitsinformationen
WARNUNG: Warnungen enthalten Anweisungen, die Sie zu Ihrer persönlichen
Sicherheit befolgen müssen. Bitte halten Sie sich daran.
General Information
Bitte lesen Sie die folgenden Informationen aufmerksam, ehe Sie die Einheit
installieren: Lassen Sie bei Installation und Abbau besondere Vorsicht walten.
Troubleshooting
Stellen Sie die Einheit in der Nähe einer Stromquelle auf und achten Sie darauf, daß
diese zugänglich ist.
FAQs
Verwenden Sie immer den mitgelieferten Netzadapter, damit die Einhaltung nationaler
und internationaler Sicherheitsnormen gewährleistet ist. Wurde kein Adapter
mitgeliefert, muß das verwendete Netzkabel den lokalen und nationalen Bestimmungen
des Landes entsprechen und darf die Sicherheitsbestimmungen des Produkts (siehe den
entsprechenden Abschnitt am Ende dieses Handbuchs) nicht verletzen.
Trennen Sie den Netzadapter von der Stromversorgung, bevor Sie die Einheit bewegen.
Die Einheit kann nur von der Stromversorgung getrennt werden, indem Sie die
Verbindung des Netzadapters entweder von Einheit oder der Stromquelle trennen.
Schließen Sie nur Geräte an den Schnittstellen dieser Einheit an, die den
Interface-Voraussetzungen entsprechen. Die Sicherheitsmerkmale der Schnittstellen
dieses Geräts sind:
Schnittstellen mit der Bezeichnung XXXX und YYYY = TNV.
TNV (Telecoms Network Voltage) ist ein Schaltkreis, auf dem unter normalen
Betriebsbedingungen Telekommunikationssignale übertragen werden.
Schnittstellen mit der Bezeichnung AAAA und BBBB = SELV.
SELV (Safety Extra Low Voltage) ist ein sekundärer Schaltkreis, der unter normalen
und Single-Fault-Bedingungen so eingerichtet ist, daß die Spannung zwischen zwei
zugänglichen Bauteilen einen Sicherheitswert nicht übersteigt (42,2 V Spitzenspannung
bzw. 60 V Gleichspannung).
Die Einheit enthält keine Sicherungen oder sonstige Bauteile, die vom Benutzer
ausgewechselt oder gewartet werden können. Sollte ein physikalischer Fehler auftreten,
der mit den in diesem Handbuch beschriebenen Maßnahmen nicht zu beheben ist, setzen
Sie sich mit dem 3Com-Vertreter in Verbindung, bei dem Sie das Gerät erworben
haben.
Bei stapelfähiger Konstruktion nur gleichartige Einheiten verwenden.
Nur für ServiceConnect: Erden Sie das Gerät an der Grundplatte des ServiceConnect
2000-Gehäuses.
WARNUNG: Twisted Pair RJ45-Datenschnittstellen. Dies sind abgeschirmte
RJ45-Schnittstellen, die nicht für Telefonsignale verwendet werden können. Schließen
Sie an diesen Schnittstellen nur RJ45-Datenstecker an.
PPP Mode
Getting Started
Important Notice de Securite
Using your modem
AVERTISSEMENT: les avertissements présentent des instructions que vous devez
suivre très attentivement pour votre sécurité personnelle.
Advanced Operations
Veuillez lire les informations suivantes attentivement avant l'installation de l'appareil.
General Information
Troubleshooting
Soyez très prudents pendant toute la durée de l'installation et du déplacement de
l'appareil.
Placez l'appareil près d'une prise murale qui doit rester accessible à tout instant.
FAQs
Utilisez l'adaptateur électrique fourni avec l'appareil pour garantir la conformité totale
aux normes de sécurité nationales et internationales. Si aucun adaptateur n'est fourni, le
câble électrique utilisé doit être conforme aux normes locales et nationales du pays et ne
doit en aucun cas contrevenir aux normes de sécurité d'utilisation de l'appareil (veuillez
consulter la section Approvals (Agréments) au dos du présent manuel).
Déconnectez l'adaptateur électrique avant de déplacer l'appareil. L'alimentation ne peut
être déconnectée de l'appareil qu'en retirant l'adaptateur de l'appareil ou de la prise de
courant.
Ne connectez l'appareil qu'en conformité avec les exigences techniques des ports de
connexion de l'appareil. Les normes de sécurité de chaque port sont les suivantes :
Les ports identifiés par les étiquettes XXXX et YYYY = TNV. Les circuits TNV
(Telecoms Network Voltage, tension du réseau de télécommunications) sont des circuits
qui, en condition normale d'utilisation, transportent les signaux de télécommunication.
Les ports identifiés par les étiquettes AAAA et BBBB = SELV.
Les circuits SELV (Safety Extra Low Voltage, très basse tension de sécurité) sont des
circuits secondaires qui sont conçus et protégés pour qu'en conditions normales et à
défaillance unique, la tension n'excède jamais la valeur de sécurité de 42,2 V en crête,
ou 60 V DC.
L'appareil ne contient aucun fusible remplaçable par l'utilisateur ni aucune pièce dont la
maintenance peut être effectuée par l'utilisateur. Si un problème physique survient dans
l'appareil, qui ne peut être résolu au moyen des techniques de dépannage du présent
manuel, contactez le revendeur 3Com qui vous a fourni l'appareil.
Si vous disposez de plusieurs appareils empilables sur racks, n'empilez que les appareils
similaires.
ServiceConnect uniquement : connectez la terre au milieu de la base du rack
ServiceConnect 2000.
AVERTISSEMENT: ports de données RJ45 à paires torsadées. Il s'agit de prises de
données RJ45 blindées. Elles ne peuvent être utilisées comme prises de téléphone. Elles
ne doivent recevoir que les connecteurs de données RJ45.
PPP Mode
Getting Started
Using your modem
Advanced Operations
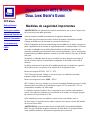
Medidas de seguridad importantes
ADVERTENCIA: las advertencias contienen instrucciones que es preciso seguir al pie
de la letra para evitar daños personales.
Antes de instalar la unidad, lea atentamente la siguiente información.
General Information
Troubleshooting
FAQs
Tome todas las precauciones necesarias a la hora de instalar o desinstalar la unidad.
Coloque la unidad cerca de una toma de corriente de fácil acceso.
Utilice el adaptador de corriente suministrado con la unidad, de este modo se asegura el
pleno cumplimiento de las normas de seguridad nacionales e internacionales. En caso de
no recibir un adaptador con la unidad, deberá utilizar un cable que responda a los
requisitos estipulados por la normativa local o nacional pertinente y que no contravenga
la garantía de seguridad del producto (consulte la sección relativa a este punto al final de
esta guía).
Desenchufe el adaptador antes de mover la unidad. La única forma de interrumpir el
paso de corriente consiste en desenchufar el adaptador de la unidad o de la toma de
corriente.
No deben conectarse a los puertos de la unidad aparatos que no cumplan los requisitos
de la interfaz en uso. Los puertos de la unidad son de los siguientes tipos:
Puertos con etiqueta XXXX o YYYY = TNV.
TNV (Telecoms Network Voltage) es un circuito que, en condiciones normales,
transmite señales de telecomunicación.
Puertos con etiqueta AAAA o BBBB = SELV.
SELV (Safety Extra Low Voltage) es un circuito secundario diseñado para que el voltaje
entre dos puntos accesibles no exceda límites seguros (42,2 V punta ó 60 V CC) en
circunstancias normales o de fallo simple.
La unidad no contiene fusibles ni otros componentes que el usuario pueda cambiar o
reparar. De producirse problemas cuya resolución no se explique en esta guía, póngase
en contacto con el proveedor de 3Com.
Si las unidades que posee son apilables, acople las que sean similares entre sí.
ServiceConnect: la conexión de tierra debe centrarse con respecto a la base del bastidor
de ServiceConnect 2000.
ADVERTENCIA: puertos de datos de par trenzado RJ45. Son enchufes blindados
RJ45 a los que sólo deben acoplarse conectores de datos RJ45. No pueden utilizarse
como enchufes telefónicos. Informazioni importanti per la sicurezza
AVVERTENZA: il testo delle avvertenze riporta importanti istruzioni alle quali
occorre attenersi per motivi di sicurezza. Seguire attentamente tutte le istruzioni.
Prima di installare l'unità, leggere attentamente le informazioni riportate di seguito.
Procedere con estrema cautela durante l'installazione e la rimozione dell'unità.
Collocare l'unità vicino a una presa di corrente e verificare che la presa sia accessibile.
Per garantire la conformità alle norme di sicurezza nazionali e internazionali, usare
l'adattatore di corrente fornito con l'unità. Se l'adattatore non è compreso, il cavo
alimentatore deve essere conforme alle norme locali e nazionali del paese di
destinazione nonché all'omologazione di sicurezza del prodotto (per ulteriori
informazioni consultare la sezione relativa alle omologazioni riportata alla fine del
manuale).
Scollegare l'adattatore prima di spostare l'unità. Per scollegare l'unità occorre rimuovere
l'adattatore dall'unità stessa o dalla presa di corrente.
Collegare alle porte dell'unità solamente apparecchi conformi ai requisiti della relativa
interfaccia. Le specifiche riguardanti la sicurezza delle porte sono le seguenti:
Porte contrassegnate dalle targhette XXXX e YYYY = TNV. TNV (Telecoms Network
Voltage) è un circuito che, in normali condizioni di esercizio, trasmette segnali di
telecomunicazione.
Porte contrassegnate dalle targhette AAAA e BBBB = SELV. SELV (Safety Extra Low
Voltage) è un circuito secondario ideato e protetto in modo tale che, in condizioni
normali e in caso di un unico guasto, la tensione tra due parti accessibili qualsiasi non
superi il valore di sicurezza (42,2 V picco o 60 V CC).
All'interno dell'unità non vi sono fusibili sostituibili dall'utente o parti la cui
manutenzione può essere effettuata dall'utente. Se si verifica un problema che non si è in
grado di risolvere seguendo le istruzioni per la risoluzione dei problemi riportate nel
presente manuale, contattare il rivenditore 3Com presso il quale si è acquistata l'unità.
Se le unità sono impilabili, impilare solamente unità simili.
Solo per ServiceConnect: collegare il filo di massa di sicurezza in posizione centrale
sulla base dell'unità rack ServiceConnect 2000.
AVVERTENZA: porte dati RJ45 per doppino intrecciato. Si tratta di prese dati RJ45
schermate e non possono essere utilizzate come prese telefoniche. Collegare solamente
connettori dati RJ45 a queste porte.
PPP Mode
Getting Started
TECHNICAL SUPPORT
Using your modem
3Com provides easy access to technical support information through a variety of
services. This section describes these services.
Advanced Operations
General Information
Troubleshooting
FAQs
Information contained in this section is correct at time of publication. For the most
recent information, 3Com recommends that you access the 3Com Corporation World
Wide Web site.
Technical Support
Technical Support Hotline
Technical questions about the 3Com HomeConnect ADSL Modem Dual Link can be
answered by technical support representatives. Regular long distance charges will apply
if you are outside the 847 area code. The hours service is available are 7:00 am - 8:00
pm CST, Monday through Friday and 7:00 am - 4:00 pm CST on Saturday. Dial the
following number:
847-262-3700
Online Technical Support
3Com offers product support 24 hours a day, 7 days a week, through:
World Wide
Web:
3Com BBS:
consumer.3com.com/dsl
You can send a message to technical support by
selecting Contact Us from the Site Tools section on
the Web site.
847-262-6000
If You Need to Return the Modem to Us
Contact 3Com Customer Support. If the support representative determines that you need
to return the modem, you will receive an USO (User Service Order) number. You must
have a USO number before returning the modem to us. Ship the unit, postage paid, in a
strong box made of corrugated cardboard with plenty of packing material. DO NOT
send the modem back in the original box. Send ONLY the modem (NOT manuals,
diskettes, etc.) Include your USO number, name and address on the shipping label as
well as inside the package. If possible, send the package via a courier capable of
tracking the progress of the shipment. Ship to the following address:
3Com
USO# ______
Dock 15
1800 W. Central Road
Mount Prospect, IL 60056
Customers in Canada needing to return a modem for repair or replacement should send
the modem to the following address:
Keating Technologies
25 Royal Crest Court
Suite 120
Markham, ONT L3R 9X4
PPP Mode
Getting Started
Glossary
Using your modem
ADSL (Asymmetric Digital Subscriber Line)
A new technology that allows more data to be sent over existing copper telephone
lines (POTS or "Plain Old Telephone Service"). ADSL is more than 275 times
faster than a 28.8 modem and up to 4 times faster than a T1 connection. That's
really, really fast. DSL (ADSL, SDSL) technology uses your ordinary phone line
but doesn't tie it up. You can access the Internet while you are telephoning or
faxing. ADSL requires a special ADSL modem which allows your PC to connect
to a remote site using a network protocol such as IP or IPX. Your HomeConnect
ADSL Modem Dual Link contains one ADSL modem port, which is the WAN
(Wide Area Network) interface. ADSL service runs between your home and your
service provider, who then uses ATM technology to speed communications to
more distant points.
Advanced Operations
General Information
Troubleshooting
FAQs
ATM (Asynchronous Transfer Mode)
A network technology based on transferring data in small cells or packets of a
fixed size. The small cell size allows ATM equipment to transmit video, audio,
and computer data over the same network without any type of data consuming the
entire capacity of the line. ATM differs from TCP/IP, where message packets take
different routes from source to endpoint. ATM defines connections by two main
parameters: Virtual Path Identifier (VPI) and Virtual Channel Identifier (VCI).
VPI and VCI are defined in this Glossary. Your service provider will tell you
what VPI and VCI values you must use in your Dual Link in order to properly
connect to their service.
Bridging, Bridged
In networking, bridging is the process of moving a packet (or piece) of data from
source to destination. A bridge is a mechanism which forwards packets between
different networks based on hardware-level addresses. Your HomeConnect
modem automatically maintains a forwarding table that contains information
needed to correctly route data, so you don't need to manually add or delete entries
as your home network configuration changes.
Connector (or Jack)
The part of a cable that plugs into a port or interface to connect one device to
another.
Console Port
The console port on your Dual Link can be matched to the Com port (Com1,
Com2...) on your computer using the DB-9 serial cable provided. On the ADSL
Modem Dual Link, it is typically used only in the case of disaster recovery.
DHCP (Dynamic Host Configuration Protocol)
This allows a device to have a different IP address every time it connects to the
network or, in some cases, to change while it is still connected. The software
keeps track of IP addresses. This allows a new computer to be added to a network
without having to manually assign it a unique IP address.
DIP switch
A series of tiny switches built into circuit boards. DIP switches let you configure
a circuit board to conform to a particular application. In the case of your Dual
Link modem, the DIP switch is reserved and all toggle switches should be left in
the Off position.
DSL (Digital Subscriber Line)
The two main categories of DSL currently are the ADSL (Asynchronous DSL)
and SDSL (Synchronous DSL). DSL technologies pack data onto copper wires.
They are used for connections from a telephone switching station to a home or
office, not between switching stations. DSL is similar to ISDN in that both
operate over existing copper telephone lines (POTS) and both require the short
runs to a central telephone office (usually less than 20,000 feet). But DSL offers
much higher speeds.
Encapsulation
In networking, encapsulation means wrapping a data set in a protocol header. This
allows one network to send its data via another network's connections.
Ethernet
Ethernet is a LAN (local area network) protocol that was developed by Xerox
Corporation in cooperation with DEC and Intel in 1976. It is one of the most
widely implemented LAN standards. Its function is to move data packets from
one computer to another.
Flash Memory
An area on the modem where basic information necessary to operate the modem
is stored. In your modem Dual Link, it contains a program with the extension
".nac" which must be easy to update but not easy to erase. A utility provided on
your installation CD, if you install it on your PC, can search for any updates to the
Nac file from the 3Com web site.
Host
The word Host has several different meanings in the computer industry. The
"host" can be referred to as the computer system that is accessed remotely by
modem over telephone lines by a user sitting at a remote terminal. It has also
come to mean any computer connected to a TCP/IP network, including the
Internet. Each Host has a unique IP address. "To host", on the other hand, means
to provide the infrastructure for a computer service, as, for example, to "host"
Web servers, where the hardware, software and communication lines are provided
and controlled by the company providing the server while the content on the
server is controlled by the user.
Hub
A conduit for information between devices that are part of a network. A hub
contains a number of ports which all participating devices (computers, printers,
scanners, etc.) in the network plug into. The hub then receives and directs
information to all segments of the LAN.
LAN
A computer network that spans a relatively small area. Most LANs are confined
to a single building or group of buildings. However, one LAN can be connected
to other LANs over any distance via telephone lines and radio waves. A system of
LANs connected in this way is called a wide-area network (WAN). Computers
connected to a LAN are able to share, not only data, but also expensive devices,
such as laser printers and scanners. Ethernet LANs are most common for PCs.
Data transmission is very fast on a LAN, but the distances and numbers of
computers that can be connected are limited.
LED (light emitting diode)
An electronic device or signal that lights up when electricity is passed through it.
Your Dual Link modem uses LEDs to indicate the status of important operations.
Modem (modulator-demodulator)
A modem is a device or program that enables a computer to transmit data over
telephone lines. The modem converts data which is stored digitally (in the
computer) to analog data (which is required for transmission over telephone lines)
and vice versa. Simply stated, "digital" data is based on discrete "on-off"
switching (1 and 0) whereas analog data consists of infinitely variable data, such
as sound waves.
Nac file
A "Nac file" is a file with the extension .nac. The file extension was coined by
U.S. Robotics from the words Network Application Code or Network Application
Card. It contains information essential to network communications and resides in
the Flash memory of your modem Dual Link. If you choose to install the "Instant
Update" utility from your modem's installation CD, the utility will search for and
download from the 3Com web site any update to the Nac file. Once you've
received an updated Nac file, you would install to the modem using the DL
manager.
NIC (network interface card)
An expansion board or adapter that you install or insert into a computer in order
to make it capable of communicating to a network. A common example is an
Ethernet LAN adapter.
IP (Internet Protocol)
Specifies the format of packets (pieces of data) and the addressing scheme. Most
networks combine IP with a higher-level protocol called Transport Control
Protocol (TCP), which establishes a virtual connection between a destination and
a source. IP by itself is like a postal system. Using it, you can "address a package
and drop it in the mail," but there's no direct link between you and the recipient.
TCP/IP, on the other hand, establishes a connection between two hosts so that
they can send messages back and forth for a period of time.
IP Address
An identifier for a computer or device on a TCP/IP network. Networks using the
TCP/IP protocol route messages based on the IP address of the destination. The
format of an IP address is a 32-bit numeric address written as four numbers
separated by periods. Each number can be zero to 255. For example, 1.160.10.240
could be an IP address.
Jack
The part of a cable that plugs into a port or interface to connect one device to
another.
Packet
A piece of a message transmitted over a packet-switching network. In IP
networks, packets are often called datagrams. In a packet-switching network,
messages are divided into "packets" which are addressed and sent separately and
matched up at their destination.
PIN
A male lead (a thin metal foot or prong) on a connector.
POTS
Plain Old Telephone Service.
PPP (Point-to-Point Protocol)
A method of connecting a computer to the Internet. Other methods are Bridged
(RFC-1483) and PPPoE. PPP is one of the most widely used data link protocols in
networks. It lets a computer connect to the Internet with a standard dial-up
telephone line and a high-speed modem. In order to use PPP, your service
provider must support it.
PPPoE (Point-to-Point Protocol over Ethernet)
PPPoE was developed to allow users to connect a LAN to connect to the Internet
over a single link (Virtual Circuit). In PPP and RFC-1483, connections exist
between the HomeConnect ADSL Modem Dual Link and the ISP, while in
PPPoE, the link is to the individual PCs. So the user on the LAN can select when
to connect to a particular service by "logging in" to that service (sort of like
placing a telephone call.) Choosing which of the protocols to use is not up to the
user but dependent on the ISP. Ask your service provider if it's available.
Protocol
An agreed-upon format for transmitting data between two devices. The protocol
determines the type of error-checking to be used, the data compression method,
how the sending device will indicate that it has finished sending a message, and
how the receiving device will indicate that it has received a message. From a
user's point of view, the only interesting aspect about protocols is that your
computer or device must support the right ones if you want to communicate with
other computers.
PVC (permanent virtual circuit)
A virtual circuit that is permanently available. The only difference between a
PVC and a switched virtual circuit (SVC) is that an SVC must be re-established
each time data is to be sent. Once the data has been sent, the SVC disappears.
PVCs are more efficient for connections between hosts that communicate
frequently.
RFC
Short for Request for Comments, a series of notes about the Internet, started in
1969. An RFC can be submitted by anyone. Eventually, if it gains enough
interest, it may evolve into an Internet standard. RFC-1483 is the protocol
traditionally used for ATM networks. Each RFC is designated by an RFC
number. Once published, an RFC never changes. Modifications to an original
RFC are assigned a new RFC number.
RFC-1483
This is a protocol used for ATM networks. It's a very efficient channel or path for
data transmission. It differs from PPPoE and PPP in that it doesn't provide any
built-in negotiation for addresses or connection.
RJ-11 Jack
Short for Registered Jack-11, a four- or six-wire connector used primarily to
connect telephone equipment in the United States. RJ-11 connectors are also used
to connect some types of local-area networks (LANs), although RJ-45 connectors
are more common.
RJ-45 Jack
Short for Registered Jack-45, an eight-wire connector used commonly to connect
computers onto local-area networks (LANs), especially Ethernets. RJ-45
connectors look similar to the ubiquitous RJ-11 connectors used for connecting
telephone equipment, but they are somewhat wider.
SDSL (symmetric digital subscriber line)
SDSL is called symmetric because it supports the same data rates for upstream
and downstream traffic. A similar technology that supports different data rates for
upstream and downstream data is called asymmetric digital subscriber line
(ADSL). ADSL is more popular in North America, whereas SDSL is being
developed primarily in Europe
TCP (Transmission Control Protocol)
TCP is one of the main protocols in TCP/IP networks. Whereas the IP protocol
deals only with packets, TCP enables two hosts to establish a connection and
exchange streams of data. TCP guarantees delivery of data and also guarantees
that packets will be delivered in the same order in which they were sent.
TCP/IP (Transmission Control Protocol/Internet Protocol)
The communications protocols used to connect hosts on the Internet. TCP/IP is
built into the UNIX operating system and is used by the Internet, making it the de
facto standard for transmitting data over networks. Even network operating
systems that have their own protocols support TCP/IP.
Telecommuting
A term coined in the early 1970s to describe a geographically-dispersed office
where workers can work at home on a computer and transmit data and documents
to a central office via telephone lines.
USB (Universal Serial Bus)
A new external bus standard that supports very fast data transfer rates. A single
USB port can be used to connect up to 127 peripheral devices. Manufacturers are
including USB ports in more and more new computers.
VCI (Virtual Circuit Identifier)
A virtual circuit is a connection between two devices that acts as though it's a
direct connection even though it may physically be circuitous. The term is used
most frequently to describe connections between two hosts in a packet-switching
network. The two hosts can communicate as though they have a dedicated
connection even though the packets might actually travel very different routes
before arriving at their destination.
VPI (Virtual Path Identifier)
"Virtual path" refers, in networking, to the location of a file or directory on a
server being accessed remotely via the Web. The VPI is the address of the file.
WAN (Wide Area Network)
A computer network that spans a relatively large geographical area. Typically, a
WAN consists of two or more local-area networks (LANs). Computers connected
to a wide-area network are often connected through public networks, such as the
telephone system. They can also be connected through leased lines (cable) or
satellites. The largest WAN in existence is the Internet.
Workstation
(1). In networking, workstation refers to any computer connected to a local-area
network. It could be a "workstation" (definition 2) or a personal computer (PC).
(2). A "workstation" in a second sense generally means a computer that is capable
of a moderate amount of computing power and high graphics capabilities. It is
somewhere in power between a PC and a mini-computer, although the lines are
becoming more and more blurred.
PPP Mode
Getting Started
Using your modem
Manufacturer's Declaration of Conformity
Advanced Operations
We declare under our sole responsibility that this product: HomeConnect ADSL Modem
Dual Link to which this declaration relates, is in conformity with the following
standards or more normative documents:
General Information
ANSI C63.4-1992 Methods of Measurement
Troubleshooting
Federal Communications Commission 47 CFR part 15, subpart B
15.107 (e) Class B conducted limits
FAQs
15.109 (g) Class B Radiated Emissions Limits
3Com Corporation, 5400 Bayfront Plaza, Santa Clara, California 95-52-8145
Tested to comply with FCC Standards
for Home and Office Use
FCC CLASS B STATEMENT
This device complies with Part 15 of the FCC Rules. Operation is subject to the
following two conditions:
This device may not cause harmful interference, and
This device must accept any interference received, including interference that may cause
undesired operation.
WARNING: This equipment has been tested and found to comply with the limits for a
Class B digital device, pursuant to Part 15 of the FCC Rules, and the Canadian
Department of Communications Equipment Standards entitled, "Digital Apparatus,"
ICES-003. These limits are designed to provide reasonable protection against harmful
interference in a residential installation. This equipment generates, uses and can radiate
radio frequency energy and, if not installed and used in accordance with the instructions,
may cause harmful interference to radio communications. However, there is no
guarantee that interference will not occur in a particular installation. If this equipment
does cause harmful interference to radio or television reception, which can be
determined by turning the equipment off and on, the user is encouraged to try to correct
the interference by one or more of the following measures: Reorient or relocate the
receiving antenna.
Increase the separation between the equipment and receiver.
Connect the equipment into an outlet on a circuit different from the one which the
receiver is connected to.
Consult the dealer or an experienced radio/TV technician for help.
The user may find the following booklet prepared by the Federal Communications
Commission helpful:
The Interference Handbook
This booklet is available from the U.S. Government Printing Office, Washington, D.C.
20402. Stock No. 004-000-00345-4.
NOTE: In order to maintain compliance with the limits of a Class B digital device,
3Com requires that you use quality interface cables when connecting to this device.
Changes or modifications not expressly approved by 3Com could void the user's
authority to operate this equipment. Refer to the manual for specifications on cabling
types.
UL-CERTIFIED/CUL-CERTIFIED
This information technology equipment is UL-certified and CUL-certified for the uses
described in this guide.
IC (INDUSTRY CANADA)
INDUSTRY CANADA CLASS B EMISSION COMPLIANCE STATEMENT
This digital apparatus does not exceed the Class B limits for radio noise emissions from
digital apparatus set out in the interference-causing equipment standard entitled Digital
Apparatus, ICES-003 of Industry Canada.
AVIS DE CONFORMITÉ À LA RÉGLEMANTATION D'INDUSTRIE CANADA
Cet appareil numérique respecte les limites de bruits radioélectriques applicables aux
appareils numériques de Classe B préscrites dans la norme sur le matériel brouilleur:
Appareils Numériques, NMB-003 édictée par l'Industrie Canada.
Canadian Installations
NOTICE: The Industry Canada (IC) label identifies certified equipment. This
certification means the equipment meets certain telecommunications network protective,
operational, and safety requirements as prescribed in the appropriate Terminal
Equipment Technical Requirements document(s). The Department does not guarantee
the equipment will operate to the user's satisfaction.
Before installing this equipment, users should ensure that it is permissible to be
connected to the facilities of the local telecommunications company. The equipment
must also be installed using an acceptable method of connection. In some cases, the
company's inside wiring associated with a single-line, individual service may be
extended by means of a certified connector assembly (telephone extension cord.) The
customer should be aware that compliance with the above conditions may not prevent
degradation of service in some situations. Currently, telecommunication companies do
not allow users to connect their equipment to jacks except in precise situations that are
spelled out in tariffing arrangements with those companies.
Repairs to certified equipment should be coordinated by a representative designated by
the supplier. Any repairs or alterations made by the user to this equipment, or equipment
malfunctions, may give the telecommunications company cause to request the user to
disconnect the equipment.
For your own protection, make sure that the electrical ground connections of the power
utility, telephone lines, and internal metallic water pipe system, if present, are connected
together. This precaution may be particularly important in rural areas.
CAUTION: Do NOT attempt to make such connections yourself. Instead, contact an
electric inspection authority or electrician, as appropriate.
WARRANTY AND REPAIR SERVICE CENTER:
Keating Technologies
25 Royal Crest Court, Suite 200
Markham, ONT L3R 9X4
AVIS: L'étiquette de Industrie Canada identifie le matériel homologué. Cette étiquette
certifie que le matériel est conforme à certaines normes de protection, d'exploitation et
de sécurité des réseaux de télécommunications. Le Ministére n'assure toutefois pas que
le matériel fonctionnera à la satisfaction de l'utilisateur.
Avant d'installer ce matériel, l'utilisateur doit s'assurer qu'il est permis de le raccorder
aux installations de l'enterprise locale de télécommunication. Le matériel doit également
être installé en suivant une méthode acceptée draccordment. L'abonné ne doit pas
oublier qu'il est possible que la conformité aux conditions énoncées ci-dessus n'empêche
pas le dégradation du service dans certaines situations.
Les réparations de matériel homologué doivent être effectuées par un centre d'entretien
canadien autorisé désigné par le fournissuer. La compagnie de télécommunications peut
demander à l'utilasateur de débrancher un appareil à la suite de réparations ou de
modifications effectuées par l'utilasateur ou à cause de mauvais fonctionnement.
Pour sa propre protection, l'utilisateur doit s'assurer que tous les fils de mise à la terre de
la source d'énergie électrique, des lignes téléphoniques et des canalisations d'eau
métalliques, s'il y en a, sont raccordé ensemble. Cette précaution est particulièrement
importante dans les régions rurales.
Avertissment: L'utilisateur ne doit pas tenter de faire ces raccordements luimême; il
doit avoir recours à un service d'inspection des installations électriques, ou á un
électricien, selon le cas.
Centre de guarantie et de service après-vente:
Keating Technologies
25 Royal Crest Court, Suite 200
Markham, ONT L3R 9X4
PPP Mode
Getting Started
3Com Corporation Limited Warranty
Using your modem
Advanced Operations
This warranty applies to customers located in the United States, Australia, Canada
(except Quebec), Ireland, New Zealand, U.K., and other English language countries, and
countries for which a translation into the local language is not provided.
General Information
HARDWARE
Troubleshooting
3Com warrants to the end user ("Customer") that this hardware product will be free
from defects in workmanship and materials, under normal use and service, for the
following length of time from the date of purchase from 3Com or its authorized reseller:
Five (5) years
FAQs
3Com's sole obligation under this express warranty shall be, at 3Com's option and
expense, to repair the defective product or part, deliver to Customer an equivalent
product or part to replace the defective item, or if neither of the two foregoing options is
reasonably available, 3Com may, in its sole discretion, refund to Customer the purchase
price paid for the defective product. All products that are replaced will become the
property of 3Com. Replacement products may be new or reconditioned. 3Com warrants
any replaced or repaired product or part for ninety (90) days from shipment, or the
remainder of the initial warranty period, whichever is longer.
SOFTWARE
3Com warrants to Customer that each software program licensed from it will perform in
substantial conformance to its program specifications, for a period of ninety (90) days
from the date of purchase from 3Com or its authorized reseller. 3Com warrants the
media containing software against failure during the warranty period. No updates are
provided. 3Com's sole obligation under this express warranty shall be, at 3Com's option
and expense, to refund the purchase price paid by Customer for any defective software
product, or to replace any defective media with software which substantially conforms
to applicable 3Com published specifications. Customer assumes responsibility for the
selection of the appropriate applications program and associated reference materials.
3Com makes no warranty or representation that its software products will meet
Customer's requirements or work in combination with any hardware or applications
software products provided by third parties, that the operation of the software products
will be uninterrupted or error free, or that all defects in the software products will be
corrected. For any third party products listed in the 3Com software product
documentation or specifications as being compatible, 3Com will make reasonable
efforts to provide compatibility, except where the non-compatibility is caused by a
"bug" or defect in the third party's product or from use of the software product not in
accordance with 3Com's published specifications or user manual.
THIS 3COM PRODUCT MAY INCLUDE OR BE BUNDLED WITH THIRD PARTY
SOFTWARE, THE USE OF WHICH IS GOVERNED BY A SEPARATE END USER
LICENSE AGREEMENT. THIS 3COM WARRANTY DOES NOT APPLY TO SUCH THIRD
PARTY SOFTWARE. FOR THE APPLICABLE WARRANTY, PLEASE REFER TO THE
END USER LICENSE AGREEMENT GOVERNING THE USE OF SUCH SOFTWARE.
YEAR 2000 WARRANTY
In addition to the Hardware Warranty and Software Warranty stated above, 3Com
warrants that each product sold or licensed to Customer on and after January 1, 1998
that is date sensitive will continue performing properly with regard to such date data on
and after January 1, 2000, provided that all other products used by Customer in
connection or combination with the 3Com product, including hardware, software, and
firmware, accurately exchange date data with the 3Com product, with the exception of
those products identified at 3Com's Web site,
http://www.3com.com/products/yr2000.html, as not meeting this standard. If it appears
that any product that is stated to meet this standard does not perform properly with
regard to such date data on and after January 1, 2000, and Customer notifies 3Com
before the later of April 1, 2000, or ninety (90) days after purchase of the product from
3Com or its authorized reseller, 3Com shall, at its option and expense, provide a
software update which would effect the proper performance of such product, repair such
product, deliver to Customer an equivalent product to replace such product, or if none of
the foregoing is feasible, refund to Customer the purchase price paid for such product.
Any software update or replaced or repaired product will carry a Year 2000 Warranty
for ninety (90) days after purchase or until April 1, 2000, whichever is later.
OBTAINING WARRANTY SERVICE
Customer must contact a 3Com Corporate Service Center or an Authorized 3Com
Service Center within the applicable warranty period to obtain warranty service
authorization. Dated proof of purchase from 3Com or its authorized reseller may be
required. Products returned to 3Com's Corporate Service Center must be pre-authorized
by 3Com with a Return Material Authorization (RMA) number or User Service Order
(USO) number marked on the outside of the package, and sent prepaid and packaged
appropriately for safe shipment, and it is recommended that they be insured or sent by a
method that provides for tracking of the package. Responsibility for loss or damage does
not transfer to 3Com until the returned item is received by 3Com. The repaired or
replaced item will be shipped to Customer, at 3Com's expense, not later than thirty (30)
days after 3Com receives the defective product. 3Com shall not be responsible for any
software, firmware, information, or memory data of Customer contained in, stored on,
or integrated with any products returned to 3Com for repair, whether under warranty or
not.
Dead- or Defective-on-Arrival. In the event a product completely fails to function or
exhibits a defect in materials or workmanship within the first forty-eight (48) hours of
installation but no later than thirty (30) days after the date of purchase, and this is
verified by 3Com, it will be considered dead- or defective-on-arrival (DOA) and a
replacement shall be provided by advance replacement. The replacement product will
normally be shipped not later than three (3) business days after 3Com's verification of
the DOA product, but may be delayed due to export or import procedures. The shipment
of advance replacement products is subject to local legal requirements and may not be
available in all locations. When an advance replacement is provided and Customer fails
to return the original product to 3Com within fifteen (15) days after shipment of the
replacement, 3Com will charge Customer for the replacement product, at list price.
WARRANTIES EXCLUSIVE
IF A 3COM PRODUCT DOES NOT OPERATE AS WARRANTED ABOVE,
CUSTOMER'S SOLE REMEDY FOR BREACH OF THAT WARRANTY SHALL BE
REPAIR, REPLACEMENT, OR REFUND OF THE PURCHASE PRICE PAID, AT
3COM'S OPTION. TO THE FULL EXTENT ALLOWED BY LAW, THE
FOREGOING WARRANTIES AND REMEDIES ARE EXCLUSIVE AND ARE IN
LIEU OF ALL OTHER WARRANTIES, TERMS, OR CONDITIONS, EXPRESS OR
IMPLIED, EITHER IN FACT OR BY OPERATION OF LAW, STATUTORY OR
OTHERWISE, INCLUDING WARRANTIES, TERMS, OR CONDITIONS OF
MERCHANTABILITY, FITNESS FOR A PARTICULAR PURPOSE,
SATISFACTORY QUALITY, CORRESPONDENCE WITH DESCRIPTION, AND
NON-INFRINGEMENT, ALL OF WHICH ARE EXPRESSLY DISCLAIMED. 3COM
NEITHER ASSUMES NOR AUTHORIZES ANY OTHER PERSON TO ASSUME
FOR IT ANY OTHER LIABILITY IN CONNECTION WITH THE SALE,
INSTALLATION, MAINTENANCE OR USE OF ITS PRODUCTS.
3COM SHALL NOT BE LIABLE UNDER THIS WARRANTY IF ITS TESTING
AND EXAMINATION DISCLOSE THAT THE ALLEGED DEFECT OR
MALFUNCTION IN THE PRODUCT DOES NOT EXIST OR WAS CAUSED BY
CUSTOMER'S OR ANY THIRD PERSON'S MISUSE, NEGLECT, IMPROPER
INSTALLATION OR TESTING, UNAUTHORIZED ATTEMPTS TO OPEN,
REPAIR OR MODIFY THE PRODUCT, OR ANY OTHER CAUSE BEYOND THE
RANGE OF THE INTENDED USE, OR BY ACCIDENT, FIRE, LIGHTNING,
POWER CUTS OR OUTAGES, OTHER HAZARDS, OR ACTS OF GOD.
LIMITATION OF LIABILITY
TO THE FULL EXTENT ALLOWED BY LAW, 3COM ALSO EXCLUDES FOR
ITSELF AND ITS SUPPLIERS ANY LIABILITY, WHETHER BASED IN
CONTRACT OR TORT (INCLUDING NEGLIGENCE), FOR INCIDENTAL,
CONSEQUENTIAL, INDIRECT, SPECIAL, OR PUNITIVE DAMAGES OF ANY
KIND, OR FOR LOSS OF REVENUE or profits, LOSS OF BUSINESS, LOSS OF
INFORMATION OR DATA, OR OTHER FINANCIAL LOSS ARISING OUT OF OR
IN CONNECTION WITH THE SALE, INSTALLATION, MAINTENANCE, USE,
PERFORMANCE, FAILURE, OR INTERRUPTION OF ITS PRODUCTS, EVEN IF
3COM OR ITS AUTHORIZED RESELLER HAS BEEN ADVISED OF THE
POSSIBILITY OF SUCH DAMAGES, AND LIMITS ITS LIABILITY TO REPAIR,
REPLACEMENT, OR REFUND OF THE PURCHASE PRICE PAID, AT 3COM'S
OPTION. THIS DISCLAIMER OF LIABILITY FOR DAMAGES WILL NOT BE
AFFECTED IF ANY REMEDY PROVIDED HEREIN SHALL FAIL OF ITS
ESSENTIAL PURPOSE.
DISCLAIMER
Some countries, states, or provinces do not allow the exclusion or limitation of implied
warranties or the limitation of incidental or consequential damages for certain products
supplied to consumers, or the limitation of liability for personal injury, so the above
limitations and exclusions may be limited in their application to you. When the implied
warranties are not allowed to be excluded in their entirety, they will be limited to the
duration of the applicable written warranty. This warranty gives you specific legal rights
which may vary depending on local law.
GOVERNING LAW
This Limited Warranty shall be governed by the laws of the State of California, U.S.A.
excluding its conflicts of laws principles and excluding the United Nations Convention
on Contracts for the International Sale of Goods.
3Com Corporation
5400 Bayfront Plaza
P.O. Box 58145, Santa Clara, CA 95052-8145
(408) 326-5000
June 7, 1999
PPP Mode
Getting Started
Copyright Information
Using your modem
3Com Corporation
5400 Bayfront Plaza, Santa Clara, California 95052-8145
Advanced Operations
General Information
Troubleshooting
FAQs
Copyright ©2000 3Com Corporation. All rights reserved.
No part of this documentation may be reproduced in any form or by any means or used
to make any derivative work (such as translation, transformation, or adaptation) without
written permission from 3Com Corporation.
3Com Corporation reserves the right to revise this documentation and to make changes
in content from time to time without obligation on the part of 3Com Corporation to
provide notification of such revision or change.
3Com Corporation provides this documentation without warranty of any kind, either
implied or expressed, including, but not limited to, the implied warranties of
merchantability and fitness for a particular purpose. 3Com may make improvements or
changes in the product(s) and/or the program(s) described in this documentation at any
time.
UNITED STATES GOVERNMENT LEGENDS:
If you are a United States government agency, then this documentation and the software
described herein are provided to you subject to the following:
United States Government Legend: All technical data and computer software is
commercial in nature and developed solely at private expense. Software is delivered as
Commercial Computer Software as defined in DFARS 252.227-7014 (June 1995) or as
a commercial item as defined in FAR 2.101(a) and as such is provided with only such
rights as are provided in 3Com's standard commercial license for the Software.
Technical data is provided with limited rights only as provided in DFAR 252.227-7015
(Nov 1995) or FAR 52.227-14 (June 1987), whichever is applicable. You agree not to
remove or deface any portion of any legend provided on any licensed program or
documentation contained in, or delivered to you in conjunction with this Install Guide.
Portions of this documentation are reproduced in whole or in part with permission from
Network Telesystems, Inc. (NTS).
Unless otherwise indicated, 3Com registered trademarks are registered in the United
States and may or may not be registered in other countries.
3Com, the 3Com logo, and HomeConnect ADSL Modem Dual Link are registered
trademarks of 3Com Corporation. 3ComFacts is a service mark of 3Com Corporation.
Acrobat and Acrobat Reader are trademarks of Adobe. Artisoft and LANtastic are
registered trademarks of Artisoft, Inc. Banyan and VINES are registered trademarks of
Banyan Systems Incorporated. CompuServe is a registered trademark of CompuServe,
Inc. DEC and PATHWORKS are registered trademarks of Digital Equipment
Corporation. Intel and Pentium are registered trademarks of Intel Corporation. AIX, AT,
IBM, NetView, and OS/2 are registered trademarks and Warp is a trademark of
International Business Machines Corporation. Internet Explorer, Microsoft, MS-DOS,
Windows, Windows 95, and Windows NT are registered trademarks of Microsoft
Corporation. Novell and NetWare are registered trademarks of Novell, Inc. PictureTel is
a registered trademark of PictureTel Corporation. UNIX is a registered trademark of
X/Open Company, Ltd. in the United States and other countries.
Other brand and product names may be registered trademarks or trademarks of their
respective holders.
PPP Mode
Getting Started
Instant Update Utility
Using your
modem
Occasionally, newer versions of the modem's internal software may be made available to
reflect advances in the rapidly-changing ADSL field. This software will be made available
from 3Com and can be downloaded to your PC using this Dual Link utility. Once the new
software is stored on your PC, use the Manager to update the Dual Link modem.
● Installing Instant Update
Advanced
Operations
General
Information
●
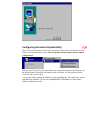
Configuring Instant Update
●
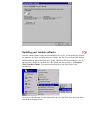
Updating your modem software
●
Serial download
Troubleshooting
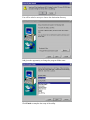
Installing Instant Update
FAQs
The Instant Update package allows you to automatically obtain software updates for your
modem over the Internet. To install it from your Install CD, click on
Start>Programs>3Com Dual Link Modem> Advanced>Install Instant Update
This will start the install procedure. Ensure your CD is in your CD-ROM drive. Then click
OK.
You will be asked to accept or choose the destination directory.
And given the opportunity to change the program folder name.
Click Finish to complete the setup of the utility.
Configuring the Instant Update Utility
There is one last step that you will want to complete in order to have full control over the
Utility. From the Start button, select Start>Programs>Instant Update>Instant Update
Configuration.
This gives you a series of screens that allow you to control the operation and frequency of
the Instant Update. By default, the Instant Update will check for code updates from the
3Com web site every 30 days.
You may not wish to change the defaults. On the scheduling tab, if you think there may be
an updated file available, you can select Update Now. Click Close to exit the Instant
Update configuration screen.
Updating your modem software
Once the Instant Update Utility has been installed on your PC, it will monitor the Internet
for updates to the basic operating software (called a .nac file) for your Dual Link Modem
and download an update file when one is found. This file will be downloaded to your PC
and stored in a folder on your hard drive. By default, the file location is: C:\Program
Files\3Com\Dlcc\Update. You can then download it to your Dual Link at your
convenience.
To retrieve a downloaded .nac file and install it on your Dual Link, first open your Dual
Link Modem Settings Screen.
From the Main page, select System.
Under the category System Maintenance, click on Upgrade Software.
Browse to find the location of the .nac file on your hard drive. By default, the file is usually
stored in C:\Program Files\3Com\Dlcc\Update. Then click Download Software. After
starting the download, remain on the screen until the download completes (about one
minute).
Serial download
This is not the preferred method, but we've documented it here in case you need to use it.
This procedure requires that you first connect your Dual Link unit to a Com port on your
PC using a DB-9 to DB-9 cable.
Once this is done, click Start>Programs>3Com Dual Link Modem>Advanced>Serial
Download to start the serial download. You will see the following screen.
You will be asked to input the Com port and baud rate. Once you click OK, an instruction
screen will open up, similar to that shown here.
It will direct you to:
1. Turn OFF (unplug) the Dual Link unit.
2. Press Return to start the download.
3. Turn on the Dual Link unit.
This will write the new .nac file onto the Dual Link.
PPP Mode
Getting Started
To uninstall your modem
Using your modem
If you need to uninstall the Dual Link modem, use the Uninstall utility shown in the Dual
Link Manager. Before the uninstall procedure begins, you will receive the following
warning.
Advanced
Operations
General Information
Troubleshooting
FAQs
PPP Mode
Getting Started
Starting your Dual Link Manager
Using your
modem
To start the Dual Link Manager, go to the Start button on the lower left side of your screen.
Select Modem Settings to enter the Dual Link Manager.
Advanced
Operations
General
Information
Troubleshooting
FAQs
If, on the other hand, you want to use your modem to connect to your Internet service
provider, click on the Dialer, or, if you have previously placed a shortcut for the ISP profile
on your desktop, just double click on that.
PPP Mode
Getting Started
Using your modem
Advanced
Operations
System Maintenance of the Dual Link
Modem
The System Maintenance area allows you to monitor the modem and update its software.
General Information
Troubleshooting
FAQs
Normally, once your Dual Link Modem is up and running, you won't need to do anything
further.
If you should need to, in System Maintenance, you can:
● Reboot
●
Upgrade the software
●
Reset the ADSL line
●
View diagnostics
System Parameters include the Traffic-sharing setting and ADSL Wire Pair selected on
your Dual Link installation.
● if you want to allow information-sharing between the USB and Ethernet ports, you
will need to ensure that the "Traffic Sharing" function is set to YES.
● ADSL uses one of two sets of wires in the connecting line to access your service.
Generally, the correct pair is automatically selected during the installation process
and should not be changed. This function is provided on the remote possibility that
some manual change is required.
PPP Mode
Getting Started
Rebooting the Dual Link
Using your modem
If you press the Reboot button, you'll see the following warning:
Advanced Operations
General Information
Troubleshooting
FAQs
Rebooting should be done with caution.
PPP Mode
Getting Started
Reset the ADSL Line
Using your modem
If you click the Reset button, you will see a message warning you that if you reset the
ADSL line, all currently active services will be dropped. While this allows you to reset
the ADSL line connection, you should rarely ever have to use this function. If your ADSL
line is not functioning properly, you could use this function to require that the modem
"relearn" the connection.
Advanced
Operations
General Information
Troubleshooting
FAQs
PPP Mode
Getting Started
Managing Service Profiles
Using your modem
The Services screen allows you to create, view, monitor and delete service profiles.
Service profiles are used by the modem to store information about connections over the
ADSL line. The installation procedure for your modem automatically stores the
configuration information for your connections into one or more service profiles.
Normally there is a single profile that is called "ISP". Typically you will not need to
access the profiles directly.
Advanced
Operations
General Information
Troubleshooting
FAQs
For more information, see the following topics:
● Display Selected Service
●
Add New Service
PPP Mode
Getting Started
Monitoring Services
Using your modem
The "Display Selected Service" function shows you statistics for the service you selected
and gives you the opportunity, if this service was set up by mistake or is no longer your
service provider, to delete the entry. Deleting services manually (from this page) is not
recommended. If you need to reinstall your modem, we would suggest uninstalling the
software from your PC and deleting the current configuration.
Advanced
Operations
General Information
Troubleshooting
FAQs
PPP Mode
Getting Started
Using your
modem
Advanced
Operations
You can add additional ISPs to your Dialer
Profile
In order to add a connection you will need the following information from your service
provider:
VPI/VCI
General
Information
Troubleshooting
FAQs
username/password
First, access the Dual Link modem by clicking:
Start->Programs->Dual Link Modem->Modem Settings
Your browser should automatically connect to the modem and display the Dual Link
Manager screen.
Click on Services on the lower right portion of the Dual Link Manager to access the
Services screen.
Enter the service name desired (no spaces) and VPI/VCI information provided and click
Add. Notice that the Operational Mode "PPP" should be selected.
Click OK.
The Dual Link Manager confirms that the service has been added. Click Finished.
If you look at the drop down menu for Available Services on the Dual Link Manager
Services screen, you will now see the new service listed as available. Click Finished.
Close the browser and open the Dialer by clicking:
Start->Programs->Dual Link Modem->Dialer
The new service now appears in the Dialer Profiles window and, if you wish, you can click
and drag a copy of it to your desktop for easy access. Remember that the very first time you
access the new ISP, you will need to have the username and password which you received
from your service provider.
PPP Mode
Getting Started
The Dual Link is a flexible connection
Using your modem
The Dual Link is a flexible connection for LAN and WAN. The WAN interface connects
your home to the phone company or service provider network.
Advanced
Operations
General Information
Troubleshooting
FAQs
The interface is the Asymmetric Digital Subscriber Line (ADSL) port on the back of your
modem. The LAN interface attaches to the PC(s) you have in your home. It is accessible
through the Ethernet 10Base-T port and the Universal Serial Bus (USB) port.
The HomeConnect ADSL Modem Dual Link allows simultaneous use of the Ethernet and
USB ports, treating them as a single network. That is, computers that are attached to the
Dual Link Ethernet port can share files and resources with a computer attached to the
USB port.
For example, you may have a desktop computer in your home-office and a laptop
computer that you also take with you to a remote office.
Typically, you might use an Ethernet card in your laptop to connect to the corporate
network.
At home you can connect your desktop computer to the USB port of the Dual Link and
connect your laptop computer to the Ethernet port. Both computers can share resources
(i.e., a printer or scanner, etc.) and both can access the Internet or other remote
destinations through the ADSL port.
Or use the Ethernet port for your desktop and the USB port for your laptop.
As an alternative, you can run your Ethernet hub (used with the network) from the
Ethernet port and use the USB port as well if desired.
PPP Mode
Getting Started
The Online User's Guide
Using your modem
This guide is accessed from your 3Com ADSL Dual Link Program Group.
Advanced Operations
General Information
Troubleshooting
FAQs