1
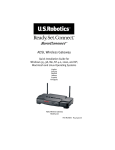
3Com HomeConnect
®
ADSL Modem PCI
Quick Start
Installation Guide
Product # 3CP3617B-BSO
Part # 10041435
Microsoft Windows 95/98/Me/2000 and NT 4.0
Internal
™
3Com HomeConnect
®
™
ADSL Modem PCI
Quick Start
Installation Guide
Microsoft® Windows
95/98/Me/2000 and NT 4.0
Internal
Product # 3CP3617B-BSO
http://www.3com.com
Published February 2001
3Com Corporation, 5400 Bayfront Plaza, Santa Clara, California, 950528145
Copyright © 2001, 3Com Corporation. All rights reserved. No part of this
documentation may be reproduced in any form or by any means or used to make
any derivative work (such as translation, transformation, or adaptation) without
written permission from 3Com Corporation.
3Com Corporation reserves the right to revise this documentation and to make
changes in content from time to time without obligation on the part of 3Com
Corporation to provide notification of such revision or change.
3Com Corporation provides this documentation without warranty of any kind,
either implied or expressed, including, but not limited to, the implied warranties
of merchantability and fitness for a particular purpose. 3Com may make improvements or changes in the product(s) and/or the program(s) described in this
documentation at any time.
UNITED STATES GOVERNMENT LEGENDS:
If you are a United States government agency, then this documentation and the
software described herein are provided to you subject to the following:
United States Government Legend: All technical data and computer software
is commercial in nature and developed solely at private expense. Software is
delivered as Commercial Computer Software as defined in DFARS 252.227-7014
(June 1995) or as a commercial item as defined in FAR 2.101(a) and as such is
provided with only such rights as are provided in 3Com’s standard commercial
license for the Software. Technical data is provided with limited rights only as
provided in DFAR 252.227-7015 (Nov 1995) or FAR 52.227-14 (June 1987),
whichever is applicable. You agree not to remove or deface any portion of any
legend provided on any licensed program or documentation contained in, or
delivered to you in conjunction with, this User Guide.
Unless otherwise indicated, 3Com registered trademarks are registered in the
United States and may or may not be registered in other countries.
3Com, the 3Com logo, and HomeConnect are registered trademarks of
3Com Corporation. Microsoft, Windows, and Windows NT are registered
trademarks of Microsoft Corporation. The BellSouth company names and logos
and all related products and service names, design marks and slogans are
trademarks and service marks owned by and used under license from BellSouth
Intellectual Property Corporation. Other brand and product names may be
registered trademarks or trademarks of their respective holders.
Table of Contents
Installation Sequence................................................................... i
Windows 95/98/Me/2000 ............................................................ i
Windows NT................................................................................ i
Requirements ............................................................................. ii
Items to Have Ready .................................................................. ii
Conventions ............................................................................... ii
Chapter One, Installing Modem Software ................................ 1
Software Installation Procedure ................................................ 1
Windows 95, 98 and Me Users: Install Dial-Up Networking 2
Windows NT Users Note: install the hardware first ............ 4
All Users: Continuing the install .......................................... 5
Completing the Installation ................................................ 6
Windows NT Users -- Completing the Install ...................... 9
Chapter Two, Installing the Hardware .................................... 15
Installing the Modem Hardware .............................................. 15
(All Users: Windows 95/98/Me/2000 and NT) .......................... 15
Installing the ADSL (phone) line to your ADSL Jack ................. 19
Windows NT: verifying Remote Access Service (RAS) .............. 19
Chapter Three, Verifying your ADSL Connection................... 21
ADSL Link Operational (UP) .................................................... 21
ADSL Link Not Operational (DOWN) ....................................... 22
Chapter Four, Connecting to Your Internet Provider ............ 23
Establishing a BellSouth Connection ....................................... 23
Chapter Five, Troubleshooting ................................................ 25
The FastAccess icon is not on the Desktop ............................. 25
Creating a Dial-Up Connection in Windows 2000 ............ 25
Creating a Dial-Up Connection in Windows 95/98/Me ..... 29
Creating a Dial-Up Connection in Windows NT ............... 31
Modifying the values of a Dial-Up Connection ................. 35
Dialing a connection ........................................................ 38
QuickView Is showing a Red Light ........................................... 39
QuickView is green but you can’t get to the Internet. ............ 39
In Windows 95 or Me, a message is asking for 1_4_1.bin. ..... 39
You cancelled during Windows 95/98 Plug & Play ................... 39
You are having problems with Dial-Up Networking................. 39
Dial-Up Networking missing in Windows 95/98/Me ......... 39
Dial-Up Networking problems when trying to connect .... 40
Chapter Six, Uninstalling the 3Com PCI modem .................... 43
Appendix A: Installing RAS for a
PPPoA ADSL Installation .................................................... A-i
Appendix B, Technical Support ............................................. B-vii
Technical Support Hotline ...................................................... B-vii
Online Technical Support ....................................................... B-vii
BellSouth Users: Limited Warranty Note ....................... B-viii
Manufacturer's Declaration of Conformity ............................ B-ix
3Com Corporation Limited Warranty ................................... B-xiii
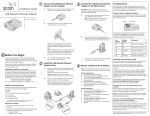
Installation Sequence
(Installation and configuration of the 3Com HomeConnect ADSL Modem PCI has a
slightly different sequence for Windows 95/98/Me/2000 users and Windows NT users.)
Windows 95/98/Me/2000
Chapter One
Software
Windows NT
Chapter Two
Card
Verify R.A.S.
Chapter Two
Card
Chapter Thr
ee
Three
Verify
Connection
Chapter FFour
our
Connect
Chapter One
Software
Chapter Thr
ee
Three
Verify
Connection
Chapter FFour
our
Connect
Requirements
The following list provides the minimum requirements needed for
successfully installing and configuring your ADSL Modem.
●
●
●
●
●
Microsoft Windows operating system 95/98/Me, Windows
2000 Professional or Windows NT 4.0 Workstation. For NT
4.0, you will also need a copy of Service Pack 4 or higher.
32 Megabytes of RAM.
Approximately 10 Megabytes of free hard disk space.
One free PCI slot.
ADSL service.
In addition to the above, your DSL provider may require the use of
ADSL micro filters. If so, this will have been addressed in any documentation you may have received from them.
Items to Have Ready
The following items will be required to install your modem. You
should locate them now and have them ready.
●
●
●
●
Your Microsoft Windows 95/98/Me/2000 or NT 4.0 CD-ROM.
A small screwdriver for removing your PC cover and
installing the PCI card.
Microsoft NT Service Pack 4 or higher if installing in NT.
Your Internet Service Provider’s (Phone Company’s) name.
Conventions
Bold Type
Information
Caution
Warning
Emphasis
Chapter One
Installing Modem Software
Windo
ws 95/98/Me*/2000 users will install the C
D-R
OM first,
indows
CD-R
D-RO
follo
wing pr
ocedur
es in this chapter
procedur
ocedures
chapter.. Then, shut off the computer and
following
install the PCI car
d.
card.
d,
Windo
ws NT users should go first to Chapter Two and install the car
card,
indows
vice (RA
S) and, last, install the 3Com
erify R
emote Access S
er
ervice
(RAS)
Remote
Ser
then vverify
e as sho
wn in this chapter
HomeConnect softwar
software
shown
chapter..
Chapter Three covers verifying the connection, and Chapter Four,
connecting to your service provider.
You are now ready to begin the modem software installation.
You may be asked to insert your Windows operating
system CD-ROM during the install. You should locate it
now and have it ready before you begin in case it is
needed.
During the software installation, there are some differences between
the installation of the software to systems running Windows 95/98/
Me/2000 and those running Windows NT. Consequently, we will
use a symbol in the text to identify those steps that apply specifically
to Windows NT operating systems.
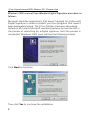
Software Installation Procedure
Place the 3Com ADSL PCI Installation CD-ROM in your CD-ROM
drive. The Setup program should automatically start, as shown on
the following page.
* Throughout this guide, Millennium (Windows upgrade to Windows 98) is abbreviated as Me.
3Com HomeConnect ADSL Modem PCI: Chapter One
All users: It is a good idea to close all open applications you
may have running before starting the installation, although it
is not mandatory. If you haven’t done this, you can do so at
this point by hitting the Cancel button.
If the installation does not automatically launch, you can manually
start it. From the Start menu, select Run and type x:\setup.exe,
where x is the letter of your CD-ROM drive.
Alternately, you can click the MyComputer icon on your
desktop, click the CD-ROM Drive icon, and find the Setup
icon (shown here.) Double click on that, and the install
program will start.
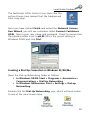
Windows 95, 98 and Me Users: Install Dial-Up Networking
In Windows 95, 98 and Me, if the Dial-Up Networking function has
not already been installed on your computer, you will be prompted
to install it. The prompts will look a little different in Windows 95,
98 and Me.
In Windows 95, the first screen will ask if you want to install Dial-Up
2
Install Guide: Installing the Software
Networking. Click to accept and you will see a screen similar to that
shown in Windows 98 and Me, allowing you to initiate the windows
procedure to complete the installation. Click Finish. Windows 95
will install Dial-Up Networking. Windows 98 and Me will launch the
Windows Add/Remove Programs applet.
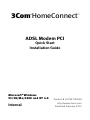
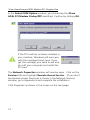
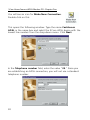
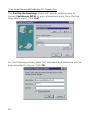
The Add/Remove Progams Properties applet (shown below) will
appear. Make sure you have the Windows Setup tab selected, then
double click over the word “communications” in the window. (Don’t
unclick the check mark next to the word and don’t click OK.) This
will open the Communications screen.
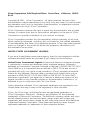
In the Communications screen (shown on the following page),
check the Dial-Up Networking box by clicking the little square to the
left of the Dial-Up Networking icon. Then click OK.
3
3Com HomeConnect ADSL Modem PCI: Chapter One
Windows may require you to reboot in order to establish the correct
entries in the Windows registry. If you reboot and the program
doesn’t resume automatically, just reinsert your CD-ROM and the
install procedure will recommence and you will find the Dial-Up
Networking capability has been installed. Proceed to the next section, All Users: Continuing the Install.
Windows NT Users Note: install the hardware first
When you click Next from the Welcome screen, NT users will see a
slightly different sequence of screens from those viewed by Windows 95/98/Me or 2000 users.
If you are using Windows NT as your operating system, you
should have first installed the PCI Card in your computer, so, when
you hit the Next button on the Welcome screen, you will be given a
chance to exit the program in case you haven’t installed the card. If
you wish to proceed, select Yes and continue.
4
Install Guide: Installing the Software
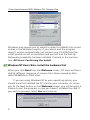
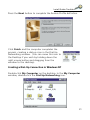
All Users: Continuing the install
Next, all users will see a screen similar to that shown here:
Select BellSouth FastAccess Internet Service and click Next.
Then select PPP Over ATM (LLC) and click Next.
5
3Com HomeConnect ADSL Modem PCI: Chapter One
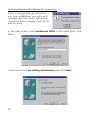
Completing the Installation
The 3Com HomeConnect ADSL Modem PCI has been set up for
ease of installation, but there are some choices that we preferred to
let you make. Before copying files, you can choose whether you
want to accept the default directory or change it.
Click either Browse (to identify the directory you would prefer to
copy files to) or Next to proceed. The install program will then
check whether you would like to change the default program folder.
6
Install Guide: Installing the Software
Select Next to start copying the files from the CD-ROM to your
computer. You will get a last chance to review your selections.
Click Next to start copying files.
Windows 95/98/Me users will see the following screen.
Follow the instructions on the screen, turn off the computer and
install the PCI card following the instructions in Chapter Two.
7
3Com HomeConnect ADSL Modem PCI: Chapter One
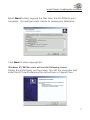
Windows 2000 users will see Windows Digital Signature procedure as
follows:
Microsoft identifies applications that haven’t applied for a Microsoft
Digital Signature in order to protect you from programs that haven’t
been adequately tested. The 3Com Modem has been adequately
tested on all current Microsoft operating systems but we are still in
the process of submitting for a digital signature. Until this process is
completed, Windows 2000 users will see the following screens:
Click Next to continue.
Then click Yes to continue the installation.
8
Install Guide: Installing the Software
Windows 95/98/Me/2000 users are now finished
with the software installation. You should now
shut down your computer and insert the PCI card in
an available PCI slot as covered in Chapter Two.
Windows NT Users -- Completing the Install
Most NT users will not see the following screen, which will
appear only if the PCI card has previously not only been
inserted in the computer but also configured with its driver
software. The install process has detected the presence of
the card and instructs you to reboot your computer as the
last step.
Most NT users should see the following screen. If you have installed
the PCI card (the hardware) and you now see the screen shown on
the following page, the system is signaling you that you now need
to configure it to use the proper driver software.
9
3Com HomeConnect ADSL Modem PCI: Chapter One
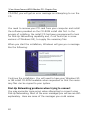
Select Finish, and you will see the Windows NT Network applet as
shown.
The Adapter Tab should be shown. Unless the 3Com ADSL Modem
PCI has been previously installed on your PC, you will not see a
driver for it in this window. Select Add, and in the following window, select Have Disk.
10
Install Guide: Installing the Software
The Insert Disk screen will appear. You will type the information
telling the computer where to find the correct driver, as shown. The
letter D shown represents the letter of the drive where you have
your install CD-ROM running.
Then click OK.
11
3Com HomeConnect ADSL Modem PCI: Chapter One
In the Select OEM Option window, you should see the 3Com
ADSL PCI Modem Dialup/PPP identified. Confirm by clicking OK.
If the PCI card has not been installed in
your machine, Windows will warn you
with the message shown here. If you
get this message, you need to exit and
shut off your computer and install the
PCI card.
The Network Properties window will now be open. Click on the
Services Tab and highlight Remote Access Service. (If you don’t
see Remote Access Service as a choice in the Network Services
window, go to Appendix A and complete the installation.)
Click Properties as shown in the screen on the next page.
12
Install Guide: Installing the Software
In the Remote Access Setup window, click Add.
The screen should list the ISDN1-USRPCIAWR device as shown on
the following page. If not, select this device from the pull down
menu. Click OK.
13
3Com HomeConnect ADSL Modem PCI: Chapter One
The new device is now listed in the Remote Access Setup window.
Click Continue.
Now click Close in the Network Properties window.
Windows NT will now advise you to reboot. After the PC reboots, be
sure to reinstall your Windows NT service pack.
Windo
ws NT users should go next to
indows
Chapter Thr
ee and confirm yyour
our ADSL Connection.
Three
14
Chapter Two
Installing the Hardware
Windows 95/98/Me/2000 users will install the software and then
the hardware(the PCI card). Windows NT users will install the
hardware (the PCI card) and then verify they have RAS before
putting the installation CD-ROM in the drive and running the Setup
program. Instructions which pertain only to NT 4.0 users are
flagged with the symbol:
Warning for Windows NT users: Before installing your
ADSL modem on Windows NT, please be sure you have
installed at least Service Pack 4 or higher from Microsoft.
DO NOT install the modem unless you have done this. You
can obtain Service Pack 4 or higher from Microsoft, free
of charge, from their Web Site:
www.microsoft.com
If you will be installing the Remote Access Service, you may
be required to insert your Windows NT System CD-ROM to
copy files, so you should have this handy before starting.
Installing the Modem Hardware
(All Users: Windows 95/98/Me/2000 and NT)
Make sure you have shut down and unplugged your computer.
Remove the cover from your computer. Refer to the manual that
came with your computer if you need instructions for your model.
15
3Com HomeConnect ADSL Modem PCI: Chapter Two
Warning: Make sure to ground yourself by touching the
metal case of the computer when installing the modem
hardware. Electrostatic discharge can damage your
computer or the 3Com ADSL Modem PCI.
Removing the Cover from your PC
Locate a vacant PCI slot on one of the system boards. An example
of a PCI slot is shown below. Your computer’s manual will also
contain examples if you need assistance locating a PCI slot on your
machine. PCI slots are usually white (as opposed to the long black
slots you may also see).
16
Install Guide: Installing the Hardware
Using a screwdriver, remove the metal bracket on the rear of the
computer corresponding to the vacant PCI slot you just identified.
To loosen the screw, turn it counter-clockwise. Once the screw has
been removed you should be able to lift the bracket out by pulling
up on it (see photos below). This will expose a long narrow rectangular opening in the back of your computer perpendicular to the
vacant slot.
Insert your 3Com ADSL Modem PCI card into the slot where you
just removed the bracket. Do not touch any of the electronics on
the board. Hold the modem from the edge and firmly press it
straight down. Do not force the modem into the slot.
Make sure it is fully seated in the slot. Then, screw it into place
using the screw you removed from the bracket.
17
3Com HomeConnect ADSL Modem PCI: Chapter Two
Plug the computer back in and turn it on.
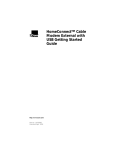
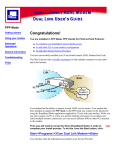
A Typical Installation
Computer
to Power
2-for-1
Adapter
Phone Jack
Microfilter
Modem
PCI Card
Phone or other
Analog Device
18
Install Guide: Installing the Hardware
Installing the ADSL (phone) line to your ADSL Jack
The drawing on page 18 shows how to connect your phone and
computer to your ADSL-enabled phone jack. Plug the 2 for 1
adapter into your telephone wall jack. To one of the adapter’s
outlets, attach the microfilter and then the phone cord to your
phone. To the other outlet, attach the phone line that will go to the
outlet in your new PCI card. Attach the other end of that line to
the outlet in your newly-installed PCI card.
Windows NT: verifying Remote Access Service (RAS)
Windows NT users now need to verify they have Microsoft Remote
Access Service (RAS) installed as covered in this section. RAS is
required for using PPP over ATM software with your modem. If RAS
is not installed, you will find complete instructions for setting it up in
Appendix A.
On your Windows NT desktop, click Start > Settings > Control
Panel to open the Control Panel.
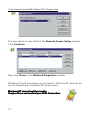
When your Control Panel is displayed, double-click on the icon
labeled Network and select the Services tab as shown in the
following example.
19
3Com HomeConnect ADSL Modem PCI: Chapter Two
If Remote Access Service is listed under the Services tab, then it
is already installed on your computer and you can continue with
the software installation. If you do not see Remote Access Service
listed, the detailed procedure is found in Appendix A: Installing RAS
for a PPPoA ADSL Installation.
Windows NT users now install the CD-ROM as
described in Chapter One.
Windows 95/98/Me/2000 users proceed to Chapter
Three to verify the ADSL connection.
Note: Windows 2000 users may see the
Windows Digital Signature screen on restarting the computer. If so, Click Yes to continue. Proceed to Chapter Three.
20
Chapter Three
Verifying your ADSL Connection
The ADSL Quick View application starts automatically when you
enter Windows. An icon appears in the System Tray at the bottom
right side of your screen.
Quick View shows you, at a glance, whether or not you have a
good physical connection with the ADSL line. A GREEN light in
Quick View means your connection is operational. A RED light
indicates that you have not connected yet. A YELLOW light means
you are in the process of connecting.
When you first turn on your computer, your ADSL modem will
begin to connect to your ISP. While it is connecting, Quick View will
show the Line Status as DOWN. It may take as long as 60 seconds
to make the connection.
If Quick View is operational, you have properly installed the PCI
card and have completed setting up your modem. You will complete your registration as a BellSouth FastAccess user following the
instructions in Chapter Four.
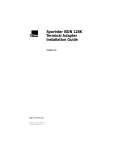
ADSL Link Operational (UP)
When you have a good physical connection with your ADSL line,
Quick View will display a green light, as shown below.
This screen shows Quick View in the System
Tray, which is located at the lower right hand
corner of your computer screen. Quick View
is the icon with the round circle over the
name 3Com.
21
3Com HomeConnect ADSL Modem PCI: Chapter Three
To fully display Quick View, point your mouse to the Quick View
icon in the System Tray and double-click your left mouse button.
You’ll see Quick View as a larger Window.
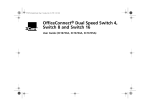
ADSL Link Not Operational (DOWN)
When you do not have a good physical
connection with your ASDL line, Quick
View will display a red light as shown.
The indicator must be green for your connection to your ISP to be
active.
If you should find your connection is down, proceed to Chapter
Five, Troubleshooting, to resolve.
If your ADSL connection is up (green), proceed to Chapter Four to
finish setting up your connection.
22
Chapter Four
Connecting to Your Internet Provider
Once you have the green light showing in Quick View, you’re ready
to go. Congratulations!
Establishing a BellSouth Connection
You will see the FastAccess ADSL icon on your desktop. Double
click.
Windows 95/98/ME
FASTACCESS ADSL ICON
Windows NT/2000
FASTACCESS ADSL ICON
Note: If you don’t see the FastAccess ADSL icon on your
desktop, go to Chapter Five, Troubleshooting, to install
Dial-Up Networking.
Enter your FastAccess User Name and Password as designated in
the FastAccess registration process.
23
3Com HomeConnect ADSL Modem PCI: Chapter Four
Click Connect.
Congratulations! Your FastAccess Installation is now complete!
24
Chapter Five
Troubleshooting
In the best of all possible worlds, you won’t need this chapter. We
have included some of the situations you could possibly encounter
while you are installing your 3Com ADSL Modem PCI. You can also
go to the Online Help manual which will be available on your PC
following installation from the CD-ROM by selecting Start > Programs > 3Com ADSL modem PCI > Online Help
The following sections will address some possible problems:
•
•
•
•
•
•
The BellSouth FastAccess icon is not on the Desktop
Quick View is showing a Red Light
Quick View is Green, but you can’t get to the Internet
In Windows 95 or Me, a message is asking for 1_4_1.bin
You cancelled during Windows 95/98 Plug and Play
You are having problems with Dial-Up Networking
The FastAccess icon is not on the Desktop
If you need to install the FastAccess icon, follow the procedure
which follows for your operating system
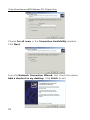
Creating a Dial-Up Connection in Windows 2000
Open the Network and Dial-up Connections window by selecting
Start > Settings >Networking and Dial-Up Connections and
double click on the Make New Connection icon.
25
3Com HomeConnect ADSL Modem PCI: Chapter Five
The Network Connection Wizard will be displayed. Click Next.
In the following window, Network Connection Type, select the
Dial-up to private network option. Click Next.
26
Install Guide: Troubleshooting
In the Select a Device window, choose the 3Com ADSL PCI Modem DialUp/PPP.
Note: Be sure you select the lowest ATM value for the
device; in this case, you would select the connection:
ATM5-0.
Click Next.
Enter p8,35 in the phone number field. Click Next.
27
3Com HomeConnect ADSL Modem PCI: Chapter Five
Choose For all users in the Connection Availability window.
Click Next.
From the Network Connection Wizard, first, check the option:
Add a shortcut to my desktop. Click Finish to exit
28
Install Guide: Troubleshooting
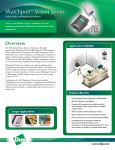
The FastAccess ADSL shortcut icon looks like the
picture shown here (except that the background
color may vary.)
Once you have clicked Finish and exited the Network Connection Wizard, you will see a window called Connect FastAccess
ADSL. Type in your user name and password. Check to ensure that
the phone number is set to p8,35 (this is the correct setting in
Windows 2000) and click Dial.
Creating a Dial-Up Connection in Windows 95/98/Me
Open the Dial-up Networking folder as follows:
• In Windows 95/98: Start > Programs > Accessories >
Communications > Dial-Up Networking
• In Windows Millennium: Start > Settings > Dial-up
Networking
Double-click the Dial-Up Networking icon, which will look similar
to one of the icons shown here.
29
3Com HomeConnect ADSL Modem PCI: Chapter Five
You will see an icon for Make New Connection.
Double click on this.
This opens the following window. Type the name FastAccess
ADSL in the name box and select the 3Com ADSL device with the
lowest line number from the drop-down menu. Click Next.
In the Telephone number field, enter the value “35.” Since you
are establishing an ADSL connection, you will not use a standard
telephone number.
30
Install Guide: Troubleshooting
Press the Next button to complete the Service Profile definition.
Click Finish and the computer completes the
process, creating a dial-up icon in the Dial-Up
Networking window. (You can move this icon to
the Desktop if you wish by holding down the
right mouse button and dragging from the
window to the desktop).
Creating a Dial-Up Connection in Windows NT
Double-click My Computer on the desktop. In the My Computer
window, double-click the Dial-Up Networking icon.
31
3Com HomeConnect ADSL Modem PCI: Chapter Five
If this is the first Dial-up connection
you have established, you will see a
message like that shown telling you
the phone book is empty. Click OK to
add an entry.
In the next screen, enter FastAccess ADSL in the name field. Click
Next.
Check the entry I am calling the Internet and click Next.
32
Install Guide: Troubleshooting
Enter 35 into the phone number field.
Note: Don’t use a standard telephone number. The phone
number field should contain only the number 35.
Click Next.
You’ll see the final New Phonebook Entry Wizard screen. Just
click Finish.
33
3Com HomeConnect ADSL Modem PCI: Chapter Five
The Dial-Up Networking screen will appear, allowing you to
choose FastAccess ADSL as your phonebook entry from the top
drop-down menu. Click Dial.
On the following screen, enter the username and password you’ve
been provided to log on. Click OK.
34
Install Guide: Troubleshooting
Modifying the values of a Dial-Up Connection
In Windows 95/98/Me, use the following procedure.
There are some differences in the screens you will see in Windows
2000 and NT. These will be described in a separate note, following
the procedure below.
To further modify the options that your Dial-Up
Connection is using, open the connection by
selecting its Properties. This is done by highlighting the connection in the Dial-up Networking Folder and then either choosing Properties
from the File menu, or right-clicking the mouse
and selecting Properties from the pop-up
menu. An example is shown here.
When you click on Properties, you will see the following screen.
Gener
al Tab
General
The General properties tab allows you to choose or change the
modem you are using for the connection and/or to change the
phone number.
35
3Com HomeConnect ADSL Modem PCI: Chapter Five
Telephone number
This field should be set to the VCI for your connection. For
BellSouth, this should be 35.
Use area code and Dialing Properties
This check box should NOT be checked. If it is, it may modify the
Telephone number field and change your VCI settings.
Connect using
This list box allows you to change the name of the modem with
which you are connecting.
S er
ervver Types Tab
The Server Types properties screen is used to set various options
related to your connection and to define the protocols for the
computer you are dialing.
These boxes
should NOT
be checked.
Advanced Options
You do NOT want to check the boxes Log on to Network and
Enable software compression.
Allowed Network Protocols
If you are connecting to the Internet you must check TCP/IP option
as shown in thepreceding screen. (In general, this is the only option
36
Install Guide: Troubleshooting
that you should have checked when connecting to the Internet.)
The TCP/IP Settings button allows you to configure your specific
TCP/IP settings. For your BellSouth installation, do not change the
settings on TCP/IP or Scripting or Multilink tabs.
The following differences appear in Windows 2000:
If your FastAccess icon is not on the desktop, find the
Network and Dial-Up Connections icon (either on the
desktop or in the Control Panel), right click it, and select
properties from the drop-down menu. Then right click the
FastAccess icon and select properties. You should not
change most of the settings you will find in the Properties
window. Proceed with caution.
There is no Server Types tab in Windows 2000. To check
for the advanced options in Windows 2000, go to the
Networking Tab and select setting. Make sure that the
option Enable software compression is not checked.
In Windows 2000, in the Properties for the PPPoA DUN
session, make sure the item: Register this connection’s
addresses in DNS is unchecked.This option is found by
going to the Network tab, selecting TCP/IP Properties,
and on the following screen, under the Advanced button, selecting the DNS tab.
The following differences appear in Windows NT:
To modify your Dial-Up Connection properties, locate your
FastAccess icon (either in the Dial-Up Networking folder
or on the desktop). Under the More button, you can
choose to Edit Phonebook Entry and click the Server
tab. Here too, make sure that only TCP/IP is enabled
37
3Com HomeConnect ADSL Modem PCI: Chapter Five
under Network Protocols and that Enable software
compression is not checked.
Dialing a connection
To connect to BellSouth, open up the Dial-Up Networking window,
and double-click on the FastAccess ADSL icon you have defined.
(For future convenience, you can also drag and drop a shortcut
onto the desktop.)
Enter the User name and Password assigned to you by BellSouth.
The Phone Number should be 35 (except in Windows 2000, where
you will see p8,35 for your BellSouth FastAccess connection).
Once you have entered in the User Name and Password, press the
Connect button to make the connection. And that’s it. You’re on!
If the FastAccess icon is not on the desktop, you can start your dialup session by selecting one of the following command paths
(depending on your operating system):
Windows 95/98: Start > Programs > Accessories > Communications > Dial-Up Networking
Windows Me: Start > Settings > Dial-Up Connections
Windows 2000: Start > Settings > Network and Dial-Up
Connections
38
Install Guide: Troubleshooting
Windows NT: Start > Programs > Accessories > Dial-Up Networking
QuickView Is showing a Red Light
Check the following:
• Are you plugged in?
• Check with your provider for possible access problems.
QuickView is green but you can’t get to the Internet.
There may be a line problem. Contact your service provider.
In Windows 95 or Me, a message is asking for
1_4_1.bin.
Just type the location of your windows systems files (e.g.,
[drive]:\windows\system) and accept it. This will find the needed
information.
You cancelled during Windows 95/98 Plug & Play
If you pressed the “cancel” button during the install process while
Windows 95 or 98 Plug & Play was “copying files,” you may have
disabled the Plug & Play utility for your modem. To resolve this, you
need to simply reinsert your installation CD-ROM and reinitiate the
install process from the beginning.
You are having problems with Dial-Up Networking
Dial-Up Networking missing in Windows 95/98/Me
If you are installing to Windows 95 or 98, and you have put the PCI
card in the card slot before installing your software from the
39
3Com HomeConnect ADSL Modem PCI: Chapter Five
CD-ROM, you will get an error message on attempting to run the
CD.
You need to remove your PCI card from your computer and install
the software provided on the CD-ROM install disk first. In the
process of installing, the install CD has been programmed to look
for Dial-Up Networking capability and, if not found (as in some
versions of Windows 95), to supply the necessary files.
When you start the installation, Windows will give you a message
like the following:
Continue the installation. You will need to have your Windows 95
or 98 install CD-ROM available when requested so that the necessary files can be copied to your system.
Dial-Up Networking problems when trying to connect
You may encounter some errors when attempting to connect using
Dial-Up Networking. Most of the error messages you will see are selfexplanatory. Here are some of the messages you could receive.
40
Install Guide: Troubleshooting
Windows 95/98/Me
Error 602:
•
Your physical connection to the ADSL line is down. This can
be verified by using the Quick View application.
•
Contents of the phone number field are wrong. Check this.
The phone number field should contain only the number 35.
Error 645:
The Username and/or Password you entered is not the one
for the computer you are dialing.
•
Check if Require data encryption is checked in the Server
Types property screen for the dial-up connection. If it is,
uncheck it and try the call again. The computer you are
dialing may not support sending and receiving encrypted
data.
•
Error 650:
The computer you are dialing or your ISP connection is
currently down. Check with your Service Provider.
•
Contents of the phone number field are wrong. Check this.
The phone number field should contain only the number 35.
•
Error 691:
•
The Username and/or Password you entered is not correct
for the connection you are dialing to.
Windows NT and 2000
Error 692:
•
Your physical connection to the ADSL line is down. This can
be verified by using the Quick View application.
Error 718:
•
The computer you are dialing to (typically your Internet
Service Provider connection) is currently down. Check with
your Service Provider to verify that you are dialing to a live
connection.
41
3Com HomeConnect ADSL Modem PCI: Chapter Five
42
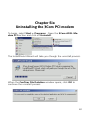
Chapter Six
Uninstalling the 3Com PCI modem
To begin, select Start > Programs. Open the 3Com ADSL Modem PCI section and click on Uninstall.
The InstallShield Wizard will take you though the uninstall process.
When the Confirm File Deletion window opens, click OK to
continue the uninstall process.
43
3Com HomeConnect ADSL Modem PCI: Chapter Six
As part of the uninstall process, the Wizard will remove the device
from the Network Control Panel. A check is automatically placed in
a box which will open the Network Configuration screen. Click
Finish.
When the Network Configuration
screen opens, choose the 3Com
ADSL PCI Modem from the list of
installed components. Highlight the
modem name and click the Remove
button. Then click OK to finish.
You will now be prompted to restart the computer to finish the
uninstall. Click Yes and reboot the computer.
44
Appendix A: Installing RAS for a
PPPoA ADSL Installation
1. To install RAS, which is required if you have a PPPoA setup, first
right click on Network Neighborhood and go to Properties.
Click on the Services tab and click the Add button.
2. Select Remote Access Service and click OK.
3Com HomeConnect ADSL Modem PCI: Appendix A
3. Next you will be required to insert your Windows NT CD-ROM
and type the path to the necessary files such as [Drive]:\I386
(That’s i386 but with a capital “i”.)
Note: Windows may come up with a screen telling you
“there are no RAS capable devices to add. Do you want
RAS setup to invoke the Modem installer to enable you to
add a modem?” Answer No.
4. Next it will ask you to install a RAS Device. The easiest way to
do this is to install a "dummy" or fake modem just to make RAS
work correctly. The next few steps demonstrate this process. First,
click Install Modem.
ii
Appendix A: Installing RAS for PPPoA
5. Check the box as shown below and click Next.
6. Next, choose any modem you want. This is going to be the
"dummy" modem to ensure RAS installs correctly. You might
arbitrarily choose the Standard 300 bps Modem. Choose it and
click Next.
iii
3Com HomeConnect ADSL Modem PCI: Appendix A
7. After you select the modem, choose a port to install it to. Again,
this is random. Select the COM1 port and click Next.
8. You should receive this window saying the modem installed
correctly. Click Finish.
iv
Appendix A: Installing RAS for PPPoA
9. The newly installed “dummy” modem should appear in the
window now. Click OK.
10. This shows the Remote Access Setup. Yours should be similar to
this one, varying only by the modem you selected. Click Continue.
v
3Com HomeConnect ADSL Modem PCI: Appendix A
11. Now the Services tab in the Windows Network applet should
show Remote Access Service installed. Click Close.
After RAS is installed, you will need to re-start your computer.
Once you have re-started your computer, re-apply your Service
Pack and again re-start your computer. This is necessary to ensure
that Windows gets all the information stored correctly in its registries.
Windows NT users are now ready to install the CDROM as described in Chapter One.
vi
Technical Support
3Com provides easy access to technical support information
through a variety of services. This section describes those services.
Technical Support Hotline
Toll-free Technical Support for U.S. Customers
888-877-5040 7:00am - 8:00pm CST; Monday through Friday
7:00am - 4:00pm CST; Saturday
Technical Support for Canadian Customers
Canadian customers can speak to a technical support representative by contacting Keating Technologies.
This is not a toll-free number.
905-479-0231 7:00am - 7:00pm CST; Monday through Friday
Online Technical Support
3Com offers product support 24 hours a day, 7 days a week,
through:
World Wide Web
http://support.3com.com/
broadbandsupport.htm
Email
You can send a message to technical support by selecting Contact
. section of the web site.
Us from the “Site Tools”
3Com HomeConnect ADSL Modem PCI: Appendix B
BellSouth Users: Limited Warranty Note
The warranty information pertaining to BellSouth FastAccess Internet service and
the 3Com HomeConnect ADSL Modem are contained in separate documents
included in your BellSouth FastAccess kit. If your modem becomes defective within
the first year from the date of purchase, call 1-888-321-ADSL. If the modem
becomes defective beyond one year from the date of purchase, contact 3Com at
the address provided in the 3Com warranty.
If you need to return the modem to Us
after the first year, contact 3Com Customer Support. If the support representative determines that you need to return the modem, you will receive an USO (User Service Order) number. You
must have a USO number before returning the modem to us. Ship
the unit, postage paid, in a strong box made of corrugated cardboard with plenty of packing material. DO NOT send the modem
back in the original box. Send ONLY the modem (NOT manuals,
diskettes, etc.) Include your USO number, name and address on
the shipping label as well as inside the package. If possible, send
the package via a courier capable of tracking the progress of the
shipment. Ship to the following address:
3Com
USO# __________
Attn: Dock 15
1800 W. Central Road
Mount Prospect, IL 60056
Customers in Canada needing to return a modem for repair or
replacement should send the modem to the following address:
Keating Technologies
25 Royal Crest Court; Suite 120
Markham, ONT L3R 9X4
viii
Install Guide: Appendix B
Manufacturer's Declaration of Conformity
3Com Corporation
3800 Golf Road
Rolling Meadows, IL 60008 USA
(847)262-5000
declares that the 3Com ADSL Modem PCI conforms to the FCC's specifications:
Part 15, Subpart B, Class B
Operation is subject to the following two conditions:
(1) this device may not cause harmful electromagnetic interference, and
(2) this device must accept any interference received including interference
that may cause undesired operations.
FCC Notice: Radio and Television Interference
Note: This equipment has been tested and found to comply with the limits for a
Class B digital device, pursuant to Part 15 of the FCC Rules. These limits are designed to
provide reasonable protection against harmful interference in a residential installation.
This equipment generates, uses and can radiate radio frequency energy and, if not
installed and used in accordance with the instructions, may cause harmful interference
to radio communications. However, there is no guarantee that interference will not
occur in a particular installation. If this equipment does cause harmful interference to
radio or television reception, which can be determined by turning the equipment off and
on, the user is encouraged to try to correct the interference by one or more of the
following measures:
º
º
º
Reorient or relocate the receiving antenna.
º
Consult the dealer or an experienced radio/TV technician for help.
Increase the separation between the equipment and receiver.
Connect the equipment into an outlet on a circuit different from that to which
the receiver is connected.
The user may find the following information prepared by the Federal Communications Commission helpful: The CIB Interference Handbook and The CIB Telephone
Interference Bulletin.
These documents are available on the Internet through the FCC Compliance
and Interference Bureau Home Page at http://www.fcc.gov/cib listed under documents.
Select CIB Interference Handbook or CIB Telephone Interference Bulletin.
CAUTION: CHANGES OR MODIFICATIONS NOT EXPRESSLY APPROVED
BY THE PARTY RESPONSIBLE FOR COMPLIANCE COULD VOID THE USER'S
AUTHORITY TO OPERATE THIS EQUIPMENT.
ix
3Com HomeConnect ADSL Modem PCI: Appendix B
FCC Part 68 Statement
3Com Corporation
Model: 3Com ADSL Modem PCI
There are no current FCC, Part 68, rules governing DSL modems. However,
care should be taken in connecting to a DSL network.
A FCC compliant, 26 AWG, telephone cord with a modular plug is provided
with this equipment. This device connects to the telephone network via a RJ -11 plug
and jack. The plug and jack also comply with FCC part 68 rules. Be sure that the
telephone line you are connecting the modem to is a DSL line and not a standard analog,
digital ( PBX ), party, or coin telephone line.
If this device causes harm to the telephone network, the telephone company
will notify you in advance that temporary discontinuance of service may be required. But,
if advance notice is not practical, the telephone company will notify the customer as
soon as possible. Also, you will be advised of your right to file a complaint with the FCC if
you believe it is necessary.
The telephone company may make changes in its facilities, equipment,
operations, or procedures that could effect the operation of the equipment. If this
happens, the telephone company will provide advance notice in order for you to make
necessary modifications to maintain uninterrupted service.
If trouble is experienced with this device, for repair and warranty information,
please refer to the Warranty section of this User Guide.
In the event of device malfunction, all repairs should be performed by 3Com or
an authorized agent. It is the responsibility of users requiring service to report the need
for service to our company or to one of our authorized agents. In the event service is
required, refer to the Warranty section for information.
Service can be obtained at:
3Com Corporation
1800 W. Central Road
Mount Prospect, IL 60056
If the device is causing harm to the telephone network, the telephone
company may request that you disconnect the equipment until the problem is resolved.
This registered device is capable of providing users access to interstate
providers of operator services through the use of equal access codes.
x
Install Guide: Appendix B
UL/cUL Listing:
This Information Technology Equipment is UL and cUL listed for both the US and
Canadian markets respectively.
Canadian Notice:
This digital apparatus does not exceed the Class B limits for radio noise
emissions from digital apparatus set out in the interference-causing equipment standard
entitled Digital Apparatus, ICES-003 of Industry Canada.
Cet appareil numérique respecte les limites de bruits radio-électriques
applicables aux appareils numériques de la Classe B préscrites dans la norme sur le
matériel brouilleur: Appareils Numériques, NMB-003 édictée par l'Industrie Canada
The Industry Canada (IC) label identifies certified equipment. This certification
means that the equipment meets certain telecommunications network protective,
operation, and safety requirements. Industry Canada does not guarantee the equipment
will operate to the users' satisfaction.
Before installing this equipment, users should ensure that it is permissible to be
connected to the facilities of the local telecommunications company. The equipment
must also be installed using an acceptable method of connection. In some cases, the
inside wiring associated with a single-line individual service may be extended by means of
a certified connector assembly (telephone extension cord). The customer should be
aware that compliance with the above conditions might not prevent degradation of
service in some situations.
Repairs to certified equipment should be made by an authorized Canadian
maintenance facility designated by the supplier. Any repairs or alterations made by the
user to this equipment, or equipment malfunctions, may give the telecommunications
company cause to request the user to disconnect the equipment.
Users should ensure for their own protection that the electrical ground
connections of the power utility, telephone lines, and internal metallic water pipe system,
if present, are connected together. This precaution may be particularly important in rural
areas.
CAUTION: Users should not attempt to make electrical ground connections by
themselves, but should contact the appropriate inspection authority or an
electrician, as appropriate.
Warranty and Repair Service Center:
Keating Technologies
25 Royal Crest Court, Suite 120
Markham, ONT L3R 9X4
xi
3Com HomeConnect ADSL Modem PCI: Appendix B
This is a class B product based on the standard of the Voluntary Control Council
for Interference from Information Technology equipment (VCCI). If this is used near a
radio or television receiver in a domestic environment, it may cause radio interference.
Install and use the equipment according to the instruction manual.
Translation: This is a Class B product based on the standard of the Voluntary
Control Council for Interference from Information Technology Equipment (VCCI). If this is
used near a radio or television receiver in a domestic environment, it may cause radio
interference. Install and use the equipment according to the instruction manual.
xii
Install Guide: Appendix B
3Com Corporation Limited Warranty
This warranty applies to customers located in the United States, Australia,
Canada (except Quebec), Ireland, New Zealand, U.K., and other English language
countries, and countries for which a translation into the local language is not provided
HARDWARE: 3Com warrants to the end user ("Customer") that this
hardware product will be free from defects in workmanship and materials, under normal
use and service, for the following length of time from the date of purchase from 3Com
or its authorized reseller: Five (5) years
3Com's sole obligation under this express warranty shall be, at 3Com's option
and expense, to repair the defective product or part, deliver to Customer an equivalent
product or part to replace the defective item, or if neither of the two foregoing options
is reasonably available, 3Com may, in its sole discretion, refund to Customer the purchase
price paid for the defective product. All products that are replaced will become the
property of 3Com. Replacement products may be new or reconditioned. 3Com
warrants any replaced or repaired product or part for ninety (90) days from shipment, or
the remainder of the initial warranty period, whichever is longer.
SOFTWARE: 3Com warrants to Customer that each software program
licensed from it will perform in substantial conformance to its program specifications, for
a period of ninety (90) days from the date of purchase from 3Com or its authorized
reseller. 3Com warrants the media containing software against failure during the
warranty period. No updates are provided. 3Com's sole obligation under this express
warranty shall be, at 3Com's option and expense, to refund the purchase price paid by
Customer for any defective software product, or to replace any defective media with
software which substantially conforms to applicable 3Com published specifications.
Customer assumes responsibility for the selection of the appropriate applications
program and associated reference materials. 3Com makes no warranty or representation that its software products will meet Customer's requirements or work in combination with any hardware or applications software products provided by third parties, that
the operation of the software products will be uninterrupted or error free, or that all
defects in the software products will be corrected. For any third party products listed in
the 3Com software product documentation or specifications as being compatible, 3Com
will make reasonable efforts to provide compatibility, except where the non-compatibility
is caused by a "bug" or defect in the third party's product or from use of the software
product not in accordance with 3Com's published specifications or user manual.
THIS 3COM PRODUCT MAY INCLUDE OR BE BUNDLED WITH THIRD PARTY
SOFTWARE, THE USE OF WHICH IS GOVERNED BY A SEPARATE END USER LICENSE
AGREEMENT. THIS 3COM WARRANTY DOES NOT APPLY TO SUCH THIRD PARTY
SOFTWARE. FOR THE APPLICABLE WARRANTY, PLEASE REFER TO THE END USER
LICENSE AGREEMENT GOVERNING THE USE OF SUCH SOFTWARE.
OBTAINING WARRANTY SERVICE: Customer must contact a 3Com
Corporate Service Center or an Authorized 3Com Service Center within the applicable
warranty period to obtain warranty service authorization. Dated proof of purchase from
xiii
3Com HomeConnect ADSL Modem PCI: Appendix B
3Com or its authorized reseller may be required. Products returned to 3Com's Corporate Service Center must be pre-authorized by 3Com with a Return Material Authorization (RMA) number or User Service Order (USO) number marked on the outside of the
package, and sent prepaid and packaged appropriately for safe shipment, and it is
recommended that they be insured or sent by a method that provides for tracking of the
package. Responsibility for loss or damage does not transfer to 3Com until the returned
item is received by 3Com. The repaired or replaced item will be shipped to Customer, at
3Com's expense, not later than thirty (30) days after 3Com receives the defective
product.
3Com shall not be responsible for any software, firmware, information, or
memory data of Customer contained in, stored on, or integrated with any products
returned to 3Com for repair, whether under warranty or not.
WARRANTIES EXCLUSIVE: IF A 3COM PRODUCT DOES NOT OPERATE AS
WARRANTED ABOVE, CUSTOMER'S SOLE REMEDY FOR BREACH OF THAT WARRANTY
SHALL BE REPAIR, REPLACEMENT, OR REFUND OF THE PURCHASE PRICE PAID, AT
3COM'S OPTION. TO THE FULL EXTENT ALLOWED BY LAW, THE FOREGOING WARRANTIES AND REMEDIES ARE EXCLUSIVE AND ARE IN LIEU OF ALL OTHER WARRANTIES,
TERMS, OR CONDITIONS, EXPRESS OR IMPLIED, EITHER IN FACT OR BY OPERATION OF
LAW, STATUTORY OR
OTHERWISE, INCLUDING WARRANTIES, TERMS, OR CONDITIONS OF MERCHANTABILITY, FITNESS FOR A PARTICULAR PURPOSE, SATISFACTORY QUALITY, CORRESPONDENCE WITH DESCRIPTION, AND NON-INFRINGEMENT, ALL OF WHICH ARE
EXPRESSLY DISCLAIMED. 3COM NEITHER ASSUMES NOR AUTHORIZES ANY OTHER
PERSON TO ASSUME FOR IT ANY OTHER LIABILITY IN CONNECTION WITH THE SALE,
INSTALLATION, MAINTENANCE OR USE OF ITS PRODUCTS.
3COM SHALL NOT BE LIABLE UNDER THIS WARRANTY IF ITS TESTING AND
EXAMINATION DISCLOSE THAT THE ALLEGED DEFECT OR MALFUNCTION IN THE
PRODUCT DOES NOT EXIST OR WAS CAUSED BY CUSTOMER'S OR ANY THIRD PERSON'S
MISUSE, NEGLECT, IMPROPER INSTALLATION OR TESTING, UNAUTHORIZED ATTEMPTS
TO OPEN, REPAIR OR MODIFY THE PRODUCT, OR ANY OTHER CAUSE BEYOND THE
RANGE OF THE INTENDED USE, OR BY ACCIDENT, FIRE, LIGHTNING, POWER CUTS OR
OUTAGES, OTHER HAZARDS, OR ACTS OF GOD.
LIMITATION OF LIABILITY. TO THE FULL EXTENT ALLOWED BY LAW, 3COM
ALSO EXCLUDES FOR ITSELF AND ITS SUPPLIERS ANY LIABILITY, WHETHER BASED IN
CONTRACT OR TORT (INCLUDING NEGLIGENCE), FOR INCIDENTAL, CONSEQUENTIAL,
INDIRECT, SPECIAL, OR PUNITIVE DAMAGES OF ANY KIND, OR FOR LOSS OF REVENUE OR
PROFITS, LOSS OF BUSINESS, LOSS OF INFORMATION OR DATA, OR OTHER FINANCIAL
LOSS ARISING OUT OF OR IN CONNECTION WITH THE SALE, INSTALLATION, MAINTENANCE, USE, PERFORMANCE, FAILURE, OR INTERRUPTION OF ITS PRODUCTS, EVEN IF
3COM OR ITS AUTHORIZED RESELLER HAS BEEN ADVISED OF THE POSSIBILITY OF SUCH
DAMAGES, AND LIMITS ITS LIABILITY TO REPAIR, REPLACEMENT, OR REFUND OF THE
PURCHASE PRICE PAID, AT 3COM'S OPTION. THIS DISCLAIMER OF LIABILITY FOR
DAMAGES WILL NOT BE AFFECTED IF ANY REMEDY PROVIDED HEREIN SHALL FAIL OF ITS
ESSENTIAL PURPOSE.
xiv
Install Guide: Appendix B
DISCLAIMER: Some countries, states, or provinces do not allow the exclusion
or limitation of implied warranties or the limitation of incidental or consequential
damages for certain products supplied to consumers, or the limitation of liability for
personal injury, so the above limitations and exclusions may be limited in their application
to you. When the implied warranties are not allowed to be excluded in their entirety,
they will be limited to the duration of the applicable written warranty. This warranty
gives you specific legal rights which may vary depending on local law.
GOVERNING LAW: This Limited Warranty shall be governed by the laws of
the State of California, U.S.A. excluding its conflicts of laws principles and excluding the
United Nations Convention on Contracts for the International Sale of Goods.
3Com Corporation
5400 Bayfront Plaza
P.O. Box 58145
Santa Clara, CA 95052-8145
(408) 326-5000
xv
3Com Corporation
5400 Bayfront Plaza
P.O. Box 58145
Santa Clara, CA 95052-8145