1
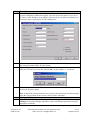
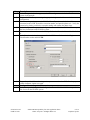
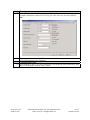
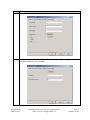
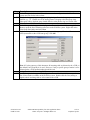
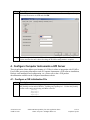
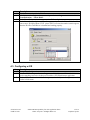
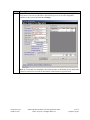
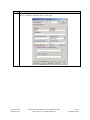
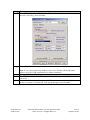
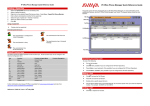
Avaya Solution & Interoperability Test Lab A Sample Configuration for Computer Instruments e-IVR Automated Attendant and Voicemail 3.0 with Avaya IP Office System 1.4 - Issue 1.0 Abstract These Application Notes describe the configuration steps required for the Computer Instruments e-IVR Automated Attendant and Voicemail to successfully interoperate with the Avaya IP Office System. Features and functionality were validated and performance testing was conducted in order to verify operation under load. Information in these Application Notes has been obtained through interoperability compliance testing and additional technical discussions. Testing was conducted via the DeveloperConnection Program at the Avaya Solution and Interoperability Test Lab. SCR; Reviewed: NAB 12/12/03 Solution & Interoperability Test Lab Application Notes ©2003 Avaya Inc. All Rights Reserved. 1 of 23 compinstr-ipo.doc 1. Introduction These Application Notes describe the compliance-tested configuration utilizing Avaya IP Office 1.4 and Computer Instruments e-IVR Auto Attendant and Voicemail 3.0. Computer Instruments Enhanced Interactive Voice Response (e-IVR) is a customer premise multi-application e-business and Customer Relationship Management (CRM) solution. e-IVR is a suite of Windows 2000 applications that contain all of the necessary functionality to act as a Web server, an electronic commerce storefront server, a value-added interactive voice response (IVR) platform, a fax response platform and a messaging server. e-IVR Auto Attendant is a flexible feature-rich Auto Attendant that offers call answering and multiple menu services. Recorded menus allow the caller to select a department, individual extension, or an operator. In addition, the Auto Attendant is integrated with all other e-IVR applications such as Form Survey and Fax Back. e-IVR Auto Attendant supports: • Voice Menus • Extension Transfers • Launch of any e-IVR service (Menus, Audio Text Messages, Form Filler surveys, Data Locators, Fax-On-Demand, etc.) or custom application • Transfer to internal extensions or external numbers • “Hide” VIP extensions behind an admin extension • Integrated dial-by-name directory e-IVR Voicemail is fully integrated with the e-IVR suite. Night callers interested in additional information can leave messages in a “request” box for daytime retrieval. e-IVR supports direct access from other e-IVR applications for “phantom” message boxes. e-IVR Voicemail supports: • Operation in integrated or simple mode • Voicemail boxes with up to 5 greetings • Dial-By-Name directory • Subscriber registration wizard to train new users • Hands-Free-Playback option • Select playback order • Optional shared access to voicemail boxes In the tested configuration shown in Figure 1, e-IVR interfaces with the IP Office System via 4port Intel Dialogic voice cards. The Intel Dialogic cards are connected to analog station ports on the IP Office and/or IP Office Phone Expansion Modules. IP Office is configured to route all inbound calls to a hunt group that includes the analog station ports connected to e-IVR. Upon receipt of the inbound calls, e-IVR Auto Attendant transfers the caller to the appropriate destination extension based on caller input in response to the programmed menu listed below: • Press 1 for Sales • Press 2 for Marketing • Press 3 for Tech Support SCR; Reviewed: NAB 12/12/03 Solution & Interoperability Test Lab Application Notes ©2003 Avaya Inc. All Rights Reserved. 2 of 23 compinstr-ipo.doc • Press 8 if you know your party’s extension If the destination extension is not answered, IP Office routes the caller to the Voicemail Server, in this case, e-IVR Voicemail. e-IVR Voicemail either plays the greeting recorded for the extension or the default system greeting. The caller can either leave a message or hang-up. Analog Station Port(s) PSTN Avaya IP400 Phone 16 Expansion Module x227 x228 x229 x230 Analog and PRI Trunks e-IVR Auto Attendant Voicemail Avaya IP 403 Avaya IP Office Manager PC 192.45.70.226 Agent 1 "Sales" x210 Ethernet Agent 2 "Marketing" x229 Agent 3 x211 Agent 5 x212 Agent 4 x230 Digital Phones Analog Phones Agent 6 "Tech Support” x250 Agent 7 “Operator” x251 IP Phones Figure 1: Computer Instruments e-IVR and Avaya IP Office Configuration 1.1. Observations / Limitations / Caveats During the course of compliance testing, the following were noted: • MWI lamp takes 1 – 3 seconds following call disconnect before lighting up. • Call Routing by DNIS (Auto Attendant functionality) did not work at the time of publication. This is under investigation by Computer Instruments. • Call Routing by ANI (Auto Attendant functionality) and other TAPI-based features (Agent e-IVR Screen Pops) were beyond the scope of this compliance test, and were not validated. SCR; Reviewed: NAB 12/12/03 Solution & Interoperability Test Lab Application Notes ©2003 Avaya Inc. All Rights Reserved. 3 of 23 compinstr-ipo.doc • e-IVR Record A Call is not available on IP Office due to functionality not available in IP Office 1.4. 2. Equipment and Software Validated The following equipment and software were used for the configuration provided in Figure 1. Equipment Avaya™ IP 403 Office System Avaya™ IP 400 Phone 16 Expansion Module Avaya IP Office Manager Avaya 6408D+, 6416D+M Digital Telephones Avaya 4612 IP Telephones Computer Instruments e-IVR Windows 2000 PC for IP Office Manager Generic Analog Telephones Software 1.4(22) 3.4(16) 1.73 3.0.6 Windows 2000 Professional - 3. Configure Avaya IP Office These Application Notes address provisioning of IP Office as it relates to the integration with eIVR Automated Attendant and Voicemail features. For all other provisioning information such as provisioning of the trunks for outbound dialing, call coverage, extensions, etc., please refer to the IP Office Product documentation. Step 1. Description IP Office License Key Physical Installation Physically connect or plug in the red Avaya Software Sentinel key into the parallel port of the IP Office Manager PC. Configure License Key Server IP Address 2. 3. 4. Login to the IP Office Manager PC and go to Start → Programs → IP Office → Manager to launch the Manager application. Login to the Manager application using the appropriate credentials. In the Manager window that appears, select File → Open to search for the IP Office system in the network. Login to the IP Office system using the appropriate login credentials to receive its configuration. SCR; Reviewed: NAB 12/12/03 Solution & Interoperability Test Lab Application Notes ©2003 Avaya Inc. All Rights Reserved. 4 of 23 compinstr-ipo.doc Step 5. 6. 7. 8. 9. Description In the Manager window, go to the Configuration Tree and double-click System. In the System Configuration window that appears, select the System Tab and set License Server IP Address to the IP address of the machine where the red Avaya Software Sentinel key is connected, which is typically the IP Office Manager PC. In the Manager window, go to the Configuration Tree and double-click License to open the list of licenses installed in the IP Office system. Right click in the license list window and select New. In the License window that appears, enter the CTI Link Pro License Key and click OK. In this example, 0…0 is shown. In the Manager window, select File → Save to save the license to the IP Office system and wait for the system to update. Note 1: Before the system reloads, the new licenses will be listed with an Unknown status. After the system reloads, the new licenses will list with a valid status. Configure e-IVR extensions Login to the IP Office Manager PC and go to Start → Programs → IP Office → Manager to launch the Manager application. Login to the Manager application using the appropriate credentials. SCR; Reviewed: NAB 12/12/03 Solution & Interoperability Test Lab Application Notes ©2003 Avaya Inc. All Rights Reserved. 5 of 23 compinstr-ipo.doc Step Description 10. In the Manager window that appears, select File → Open to search for the IP Office system in the network. 11. Login to the IP Office system using the appropriate login credentials to receive its 12. 13. 14. 15. configuration. Select an analog station port on the IP Office Phone Expansion module that will be connected to the e-IVR. Record the extension number, and attach a phone to it. Verify the extension by placing a call to the extension number and confirm the phone rings. In the Manager window, go to the Configuration Tree and double-click Extension to open the list of extensions on the IP Office system. Select the extension number recorded in Step 12 from the Extension list and double-click it. In the Extension window that appears, click the IVR Port radio button in the Equipment Classification section and click OK. 16. Repeat Steps 12 - 15 for each analog station port connected to the e-IVR. For the purposes of this document, 4 ports were used. Configure User settings of e-IVR extensions 17. In the Manager window, go to the Configuration Tree and double-click User to open the list of users on the IP Office system. SCR; Reviewed: NAB 12/12/03 Solution & Interoperability Test Lab Application Notes ©2003 Avaya Inc. All Rights Reserved. 6 of 23 compinstr-ipo.doc Step Description 18. In the User list window that appears, find the user assigned to the e-IVR extension, e.g., Extn227. Double-click the user in the User list window. In the User window that appears, set Name to eivr1 (or any other name that you wish to associate with the e-iVR extension) and Extension to the extension number to be used. 19. In the Voicemail tab of the User window, uncheck Voicemail On. SCR; Reviewed: NAB 12/12/03 Solution & Interoperability Test Lab Application Notes ©2003 Avaya Inc. All Rights Reserved. 7 of 23 compinstr-ipo.doc Step Description 20. In the Telephony tab of the User window, set Wrap-up Time to 5 seconds as suggested by Computer Instruments, uncheck Call Waiting On, check Cannot be Intruded, and click OK. 21. Repeat Steps 18 - 20 for each e-IVR extension needed. For the purposes of this document, four e-IVR extensions were configured. Configure Hunt Group 22. In the Manager window, go to the Configuration Tree and double-click HuntGroup to open the list of hunt groups on the IP Office system. SCR; Reviewed: NAB 12/12/03 Solution & Interoperability Test Lab Application Notes ©2003 Avaya Inc. All Rights Reserved. 8 of 23 compinstr-ipo.doc Step Description 23. Right click in the HuntGroup list window and select New. In the HuntGroup window that appears, add extensions to the Extension List that will be part of the hunt group by right clicking in the Extension List section and selecting Add. Then, set Name to eIVR, Extension to the extension number to be used for the hunt group, and Hunt Type to Circular. SCR; Reviewed: NAB 12/12/03 Solution & Interoperability Test Lab Application Notes ©2003 Avaya Inc. All Rights Reserved. 9 of 23 compinstr-ipo.doc Step Description 24. In the Voicemail tab of the HuntGroup window, uncheck Voicemail On. 25. In the Queuing tab of the HuntGroup window, uncheck Queuing On as suggested by Computer Instruments and click OK. SCR; Reviewed: NAB 12/12/03 Solution & Interoperability Test Lab Application Notes ©2003 Avaya Inc. All Rights Reserved. 10 of 23 compinstr-ipo.doc Step Description 26. In the Manager window, select File → Save to save the configuration to the IP Office system and wait for the unit to reboot. 27. Verify the hunt group is operating properly by placing calls to the hunt group extension defined, e.g., 771. Confirm one of the analog phones belonging to the hunt group rings. Subsequent calls to the hunt group should make the other phones ring in a circular order. Select Inbound Call Route 28. In the Manager window, go to the Configuration Tree and double-click Incoming Call Route to open the list of incoming call routes on the IP Office system. Right click in the Line Group list window and select New. 29. In the Incoming Call Route window that appears, set Line group ID to 0 and Destination to eIVR (same name as the e-IVR hunt group). Click OK. Note 2: For the purposes of this document, all incoming calls are directed to the e-IVR, so the default Line Group ID (0) is used. However, if only a specific group of trunks is to be directed to the e-IVR, another number should be used. Assign Trunks to the Incoming Call Route 30. In the Manager window, go to the Configuration Tree and double-click Line to open the list of lines (trunks) available on the IP Office system. Double-click the Line (analog or digital) whose incoming calls are to be routed to the e-IVR. SCR; Reviewed: NAB 12/12/03 Solution & Interoperability Test Lab Application Notes ©2003 Avaya Inc. All Rights Reserved. 11 of 23 compinstr-ipo.doc Step Description 31. In the Line window that appears, assign the line to the Line group ID identified in Step 29. 32. 33. 34. 35. For example, each channel in the PRI line window must be assigned to the Line group ID from Step 29. To do so, double-click the channel and edit the Incoming Group field in the Edit Channel pop up that appears. A similar procedure is used on the analog lines. Repeat Steps 30 - 31 for each line (trunk) assigned to the incoming call route. In the Manager window, select File → Save to push the configuration to the IP Office system and wait for the unit to reboot. Verify the incoming call route is properly operating by placing calls through the selected inbound line (trunk) and confirming one of the phones assigned to the hunt group rings. Set e-IVR as the Voicemail Server In the Manager window, go to the Configuration Tree and double-click System to open the System Configuration window of the IP Office system. SCR; Reviewed: NAB 12/12/03 Solution & Interoperability Test Lab Application Notes ©2003 Avaya Inc. All Rights Reserved. 12 of 23 compinstr-ipo.doc Step Description 36. In the Voicemail tab of the System Configuration window, set Voicemail Type to Group, Voicemail Destination to eIVR and click OK. 37. In the Manager window, select File → Save to push the configuration to the IP Office system and once the unit is done rebooting, the IP Office configuration is complete. 4. Configure Computer Instruments e-IVR Server These Application Notes address provisioning of e-IVR as it relates to integration with IP Office. For all other provisioning information such as Computer Instruments e-IVR software installation, Dialogic card installation and configuration, etc., please refer to the e-IVR product documentation available on the Computer Instruments website. 4.1. Configure e-IVR Initialization File Step 1. Description Open C:\Winnt\EIVR.ini (using notepad or another text editor). In the INI file, look for the [Switch] section and set IPOffice, TapiRing and TapiDrop to 1. If either the [Switch] section or the entries are missing, add them to the file. [Switch] IPOffice=1 TapiRing=1 TapiDrop=1 SCR; Reviewed: NAB 12/12/03 Solution & Interoperability Test Lab Application Notes ©2003 Avaya Inc. All Rights Reserved. 13 of 23 compinstr-ipo.doc Step 2. Description In the same INI file, look for the [IPOffice] section and set up a channel entry for each eIVR extension configured in the IP Office switch. For example, IP Office extensions 227 through 230 are set up as eIVR extensions. The IP Office port associated with each of these extensions will be connected to one of the four ports on the e-IVR server’s Dialogic board. The INI entries depicted below provide the mapping used. [IPOffice] Chan1=227 Chan2=228 Chan3=229 Chan4=230 Note 3: Failure to properly match ports to extensions will prevent the system from operating properly. 4.2. Installing and Configuring Avaya IP Office TAPI Service Provider Please refer to the Avaya IP Office CTI Link Installation Manual, 40DHB0002UKCC – Issue 4 (05/08/2002) for additional information. Step Description 1. Install the Avaya IP Office TAPI Service Provider driver and DevLink driver from the 2. 3. 4. 5. Avaya IP Office User Applications CD on the e-IVR server. NOTE: do not install the Phone Manager. After system reboot, login to the system again as “administrator” and go to Start → Settings → Control Panel. In the Control Panel window that appears, double-click Phone and Modem Options. In the Advanced tab of the Phone and Modem Options window, double-click Avaya IP Office TAPI2 Service Provider. In the Avaya TAPI2 configuration window that appears, set Switch IP Address to the IP Address of the IP Office System, check Third Party, set Switch Password to the IP Office System password, check WAV Users and ACD Queues and click OK. Reboot the system. SCR; Reviewed: NAB 12/12/03 Solution & Interoperability Test Lab Application Notes ©2003 Avaya Inc. All Rights Reserved. 14 of 23 compinstr-ipo.doc Step 6. 7. 8. Description Verify Connectivity with the IP Office After system reboot, login to the system and go to Start → Programs → Accessories → Communications → Phone Dialer. In the Phone Dialer window that appears, select Edit → Options. In the Lines tab of the Options window that appears, drop-down the Phone Calls: list. If one or more “IP Office Phone: XXX” (where XXX is an extension number) entries appear, then the IP Office TAPI Driver is installed and working properly. 4.3. Configuring e-IVR Step 1. 2. Description Set up Base Configuration On the e-IVR Server, go to Start → Programs → Voice System → Voice Administrator (or the matching icon on the desktop) to launch the e-IVR Administrator application. In the e-IVR Administration window that appears, select the System Config icon (wrench) on the left side menu. SCR; Reviewed: NAB 12/12/03 Solution & Interoperability Test Lab Application Notes ©2003 Avaya Inc. All Rights Reserved. 15 of 23 compinstr-ipo.doc Step 3. Description In the Defaults tab of the Base System Configuration window that appears, verify PBX Integration is set to Avaya IP Office, and Default Operator is set to the designated operator on the system and click Save Settings. Note 4: On a brand new installation, the default operator would default to 100 and another extension could not be set until the destination extension has been provisioned. SCR; Reviewed: NAB 12/12/03 Solution & Interoperability Test Lab Application Notes ©2003 Avaya Inc. All Rights Reserved. 16 of 23 compinstr-ipo.doc Step 4. Description In the Channel tab of the Base System Configuration window, verify all e-IVR ports (channels) are associated to an application, in this instance, Voicemail Server. This determines what happens when an inbound call is received. Figure 1 – e-IVR System Configuration – Channel Tab 5. 6. Set up User Extensions In the e-IVR Administration window, select the Extension Manager icon (hand holding phone) on the left side menu. In the e-IVR Extension Editor window that appears, click New and enter a valid IP Office User extension in the popup that appears. SCR; Reviewed: NAB 12/12/03 Solution & Interoperability Test Lab Application Notes ©2003 Avaya Inc. All Rights Reserved. 17 of 23 compinstr-ipo.doc Step 7. Description Returning to Extension tab of the e-IVR Extension Editor window, enter the User’s First Name, Last Name, and check Allow Call Transfer. SCR; Reviewed: NAB 12/12/03 Solution & Interoperability Test Lab Application Notes ©2003 Avaya Inc. All Rights Reserved. 18 of 23 compinstr-ipo.doc Step 8. 9. Description In the Mailbox tab of the e-IVR Extension Editor window, check Voicemail Subscriber and Allow Outcalling? then click Save. Repeat Steps 7 and 8 for every user that needs voicemail on the IP Office system. Note 5: For systems with a large number of users, the e-IVR has a Bulk Add feature. Please refer to the e-IVR documentation for further information. Configure Welcome Menu Application 10. In the e-IVR Administration window, select the Menu Manager icon (telephone) on the left side menu. 11. In the Menu Editor window that appears, click New and enter a new Menu Application Name, for example, Test Main App, in the popup that appears and click Save. SCR; Reviewed: NAB 12/12/03 Solution & Interoperability Test Lab Application Notes ©2003 Avaya Inc. All Rights Reserved. 19 of 23 compinstr-ipo.doc Step Description 12. In the Menu Editor window, go to the Menu Prompt field and type the prompt you wish the Menu to play to the caller, select Text-to-Speech, and configure Button Action and Button Parameter values for the menu by selecting the desired button. For example, the figures below show the Button Action for pressing 1 and pressing 8. Click Save when finished. 13. Return to the Channel tab of the Base System Configuration window (see Figure 1) and set Application for each Channel to Test Main App and click Update. 5. Interoperability Compliance Testing This Interoperability Compliance Test included feature, functionality and performance load testing. Feature and functionality testing examined e-IVR Auto Attendant’s ability to properly transfer inbound and internal calls to the appropriate destination extension (digital, analog, IP phone) based on caller input in response to the menu prompt played as well as e-IVR Voicemail’s ability to properly record and playback voicemail messages. Performance load tests verified the configuration to continue when operating under load. 5.1. General Test Approach Feature and functionality testing was performed manually. Inbound calls were made to the IP Office system from analog and PRI trunks as well as internal extensions. The IP Office system routed the calls to the e-IVR, which transferred the calls based on caller input. Analog loop start trunks from the central office were connected to the IP Office. A PRI trunk was provisioned between the IP Office and Avaya Communication Manager systems. Performance testing was accomplished by utilizing call generation tools for placing and receiving calls through analog SCR; Reviewed: NAB 12/12/03 Solution & Interoperability Test Lab Application Notes ©2003 Avaya Inc. All Rights Reserved. 20 of 23 compinstr-ipo.doc station ports. Analog station ports on the call generation tools were connected to analog station ports on the IP Office Phone Expansion Module. Call generation tool scripts were written to place calls to the e-IVR configured hunt group on the IP Office system. Each script barged in on the Menu prompt and provided a valid and distinct user extension for the destination of the call transfer. The e-IVR then transferred the calls to the appropriate destination extension. The call generation tool script on the destination extension verified the incoming call was from the proper source. 5.2. Test Results All feature, functionality, and performance test cases passed successfully. Overnight performance testing at a rate of approximately 250 BHCC using 3 ports* was conducted on the 4port e-IVR system provided for compliance testing. Performance statistics were captured on the e-IVR server to ensure that it was able to handle the call volume. During the course of compliance testing, the following were noted: • MWI lamp takes 1 – 3 seconds following call disconnect before lighting up. • Call Routing by DNIS (Auto Attendant functionality) did not work at the time of publication. This is under investigation by Computer Instruments. • Call Routing by ANI (Auto Attendant functionality) and other TAPI-based features (Agent e-IVR Screen Pops) were beyond the scope of this compliance test, and were not validated. • e-IVR Record A Call is not available on IP Office due to functionality not available in IP Office 1.4. 6. Verification Steps The following verification Steps can be used in the field to verify correct system operation: To verify the e-IVR hunt group is operating properly: connect analog phones to all analog station ports assigned to the hunt group and call the hunt group. Verify that one of the phones rings. To verify incoming calls are properly routed to the e-IVR hunt group: connect analog phones to the ports assigned to the hunt group and place calls through the trunks assigned to the hunt group. Verify that one of the phones rings. To verify connectivity between e-IVR and IP Office, open Phone Dialer on the e-IVR Server and verify the IP Office extensions are listed in the Lines Used for Phone Calls pull down list. To verify e-IVR Auto Attendant is operating properly for internal calls: place a call to the e-IVR hunt group. Verify the e-IVR Menu prompt is played, enter ‘8’, and then enter a valid extension number on the IP Office system. Verify the call is transferred to the correct extension. Repeat for inbound trunk calls. To verify e-IVR Voicemail is operating properly for internal calls: place a call from one IP Office extension to another and allow it to go to coverage. Verify e-IVR Voicemail * During load testing, one of the ports on the call generation tool failed to work properly and forced the load testing to be performed on 3 of the 4 e-IVR ports. Time constraints prevented another attempt to repeat the load test. SCR; Reviewed: NAB 12/12/03 Solution & Interoperability Test Lab Application Notes ©2003 Avaya Inc. All Rights Reserved. 21 of 23 compinstr-ipo.doc plays the proper welcome greeting and record a message and hang up. After a minute or two, retrieve the message (IP Office Shortcode *17) and verify it plays back properly. Repeat for inbound trunk calls. 7. Support Customers should call Computer Instruments Technical Support when having problems related to the e-IVR. Computer Instruments will then determine the nature of the problem and recommend the best plan to the customer, whether it is to: Fix the problem through remote access. Dispatch, at Computer Instruments’ discretion, on-site technical support. For technical support on e-IVR, contact the Computer Instruments Customer Service Center at 1888-451-0851 and press 2 for technical support. 8. Conclusion These Application Notes describe the required configuration steps for Computer Instruments’ eIVR Auto Attendant and Voicemail to successfully interoperate with Avaya IP Office System. The e-IVR and IP Office features, functionality, and performance were validated with the following limitations / caveats previously identified: e-IVR Auto Attendant - Route by ANI was beyond the scope of this testing, and e-IVR Auto Attendant - Route by DNIS did not work and is being investigated by Computer Instruments. 9. Additional References Avaya IP Office Installation Manual, 40DHB0002USCL, Issue 8 (03/07/2003). e-IVR – User Manual for Interactive Voice Response Core System Features, Copyright 2003. Installing e-IVR on IP Office, Version 3.0, and Copyright 2003. SCR; Reviewed: NAB 12/12/03 Solution & Interoperability Test Lab Application Notes ©2003 Avaya Inc. All Rights Reserved. 22 of 23 compinstr-ipo.doc ©2003 Avaya Inc. All Rights Reserved. Avaya and the Avaya Logo are trademarks of Avaya Inc. All trademarks identified by ® and ™ are registered trademarks or trademarks, respectively, of Avaya Inc. All other trademarks are the property of their respective owners. The information provided in these Application Notes is subject to change without notice. The configurations, technical data, and recommendations provided in these Application Notes are believed to be accurate and dependable, but are presented without express or implied warranty. Users are responsible for their application of any products specified in these Application Notes. Please e-mail any questions or comments pertaining to these Application Notes along with the full title name and filename, located in the lower right corner, directly to the Avaya DeveloperConnection Program at [email protected]. SCR; Reviewed: NAB 12/12/03 Solution & Interoperability Test Lab Application Notes ©2003 Avaya Inc. All Rights Reserved. 23 of 23 compinstr-ipo.doc