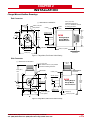
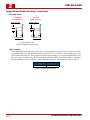
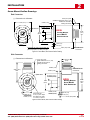
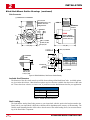
1
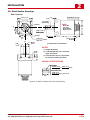
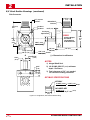
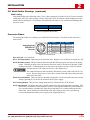
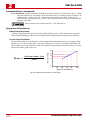
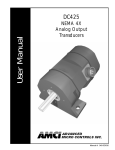
ADVANCED
MICRO CONTROLS INC.
Manual #: 940-0D024
se
d
En
c o de rs
al
u
an
a
User
M
DC25
Analog Output
DuraCoder
o
A M CI Re s
lv
er
B
GENERAL INFORMATION
Important User Information
The products and application data described in this manual are useful in a wide variety of different applications. Therefore, the user and others responsible for applying these products described herein are responsible
for determining the acceptability for each application. While efforts have been made to provide accurate
information within this manual, AMCI assumes no responsibility for the application or the completeness of the
information contained herein.
UNDER NO CIRCUMSTANCES WILL ADVANCED MICRO CONTROLS, INC. BE RESPONSIBLE OR
LIABLE FOR ANY DAMAGES OR LOSSES, INCLUDING INDIRECT OR CONSEQUENTIAL DAMAGES OR LOSSES, ARISING FROM THE USE OF ANY INFORMATION CONTAINED WITHIN THIS
MANUAL, OR THE USE OF ANY PRODUCTS OR SERVICES REFERENCED HEREIN.
No patent liability is assumed by AMCI, with respect to use of information, circuits, equipment, or software
described in this manual.
The information contained within this manual is subject to change without notice.
This manual is copyright 2009 by Advanced Micro Controls Inc. You may reproduce this manual, in whole or
in part, for your personnal use, provided that this copyright notice is included. You may distribute copies of
this complete manual in electronic format provided that they are unaltered from the version posted by
Advanced Micro Controls Inc. on our official website: www.amci.com. You may incorporate portions of this
documents in other literature for your own personal use provided that you include the notice “Portions of this
document copyright 2009 by Advanced Micro Controls Inc.” You may not alter the contents of this document
or charge a fee for reproducing or distributing it.
Standard Warranty
ADVANCED MICRO CONTROLS, INC. warrants that all equipment manufactured by it will be free from
defects, under normal use, in materials and workmanship for a period of [18] months. Within this warranty
period, AMCI shall, at its option, repair or replace, free of charge, any equipment covered by this warranty
which is returned, shipping charges prepaid, within eighteen months from date of invoice, and which upon
examination proves to be defective in material or workmanship and not caused by accident, misuse, neglect,
alteration, improper installation or improper testing.
The provisions of the "STANDARD WARRANTY" are the sole obligations of AMCI and excludes all other
warranties expressed or implied. In no event shall AMCI be liable for incidental or consequential damages or
for delay in performance of this warranty.
Returns Policy
All equipment being returned to AMCI for repair or replacement, regardless of warranty status, must have a
Return Merchandise Authorization number issued by AMCI. Call (860) 585-1254 with the model number and
serial number (if applicable) along with a description of the problem. A "RMA" number will be issued.
Equipment must be shipped to AMCI with transportation charges prepaid. Title and risk of loss or damage
remains with the customer until shipment is received by AMCI.
24 Hour Technical Support Number
24 Hour technical support is available on this product. If you have internet access, start at www.amci.com.
Product documentation and FAQ’s are available on the site that answer most common questions.
If you require additional technical support, call (860) 583-7271. Your call will be answered by the factory during regular business hours, Monday through Friday, 8AM - 5PM Eastern. During non-business hours an automated system will ask you to enter the telephone number you can be reached at. Please remember to include
your area code. The system will page an engineer on call. Please have your product model number and a
description of the problem ready before you call.
We Want Your Feedback
Manuals at AMCI are constantly evolving entities. Your questions and comments on this manual are both
welcomed and necessary if this manual is to be improved. Please direct all comments to: Technical Documentation, AMCI, 20 Gear Drive, Terryville CT 06786, or fax us at (860) 584-1973. You can also e-mail your
questions and comments to [email protected]
ADVANCED MICRO CONTROLS INC.
TABLE OF CONTENTS
General Information
Important User Information .....................
Standard Warranty ...................................
Returns Policy ..........................................
24 Hour Technical Support Number ........
We Want Your Feedback .........................
Chapter 2: Installation
2
2
2
2
2
About This Manual
Audience ..................................................
Navigating this Manual ............................
Manual Conventions ................................
Trademarks and Other Legal Stuff ..........
Revision Record .......................................
Where to Go From Here ..........................
5
5
5
5
6
6
Chapter 1: The Analog Output
DuraCoder
Analog DuraCoder Overview ..................
Part Numbering System ...........................
Output Waveforms ...................................
Output Period ................................. 8
....................................................... 8
Voltage Output Waveforms ........... 8
Current Output Waveforms ........... 8
Electrical Specifications ..........................
Environmental Specifications ..................
Mechanical Specifications .......................
7
7
8
9
9
9
Flange Mount Outline Drawings ..............
End Connector .............................. 11
Side Connector .............................. 11
Alternate Shafts ............................. 12
Shaft Loading ................................ 12
Servo Mount Outline Drawings ...............
End Connector .............................. 13
Side Connector .............................. 13
Alternate Shafts ............................. 14
Shaft Loading ................................ 14
Blind Shaft Mount Outline Drawings ......
End Connector .............................. 15
Side Connector .............................. 16
Available Shaft Diameters ............ 16
Shaft Loading ................................ 16
5/8" Shaft Outline Drawings ....................
End Connector .............................. 17
Side Connector .............................. 18
Shaft Loading ................................ 19
Connector Pinout ......................................
Output Load Calculations ........................
Voltage Output DuraCoder ........... 20
Current Output DuraCoder ........... 20
CDCAV Cable .........................................
20 Gear Drive, Plymouth Ind. Park, Terryville, CT 06786
Tel: (860) 585-1254 Fax: (860) 584-1973 http://www.amci.com
11
13
15
17
19
20
20
3
TABLE OF CONTENTS
Notes
4
ADVANCED MICRO CONTROLS INC.
ABOUT THIS MANUAL
Read this chapter to learn how to navigate through this manual and familiarize yourself
with the conventions used in it. The last section of this chapter highlights the manual’s
remaining chapters and their target audience.
Audience
This manual explains the installation and operation of AMCI’s analog output DuraCoders. It is written for
the engineer responsible for incorporating the Analog DuraCoder into a design as well as the engineer or
technician responsible for its actual installation. If there are any unanswered questions after reading this manual, call the factory. An applications engineer will be available to assist you.
Navigating this Manual
This manual is designed to be used in both printed and on-line forms. Its on-line form is a PDF document,
which requires Adobe Acrobat Reader version 4.0+ to open it.
Bookmarks of all the chapter names, section headings, and sub-headings are in the PDF file to help you navigate through it. The bookmarks should have appeared when you opened the file. If they didn’t, press the F5
key on Windows platforms to bring them up.
Throughout this manual you will also find blue text that functions as a hyperlink in HTML documents.
Clicking on the text will immediately jump you to the referenced section of the manual. If you are reading a
printed manual, most links include page numbers.
The PDF file is password protected to prevent changes to the document. You are allowed to select and copy
sections for use in other documents and, if you own Adobe Acrobat version 4.05 or later, you are allowed to
add notes and annotations.
Manual Conventions
Three icons are used to highlight important information in the manual:
NOTES highlight important concepts, decisions you must make, or the implications of those
decisions.
CAUTIONS tell you when equipment may be damaged if the procedure is not followed
properly.
WARNINGS tell you when people may be hurt or equipment may be damaged if the procedure is not followed properly.
The following table shows the text formatting conventions:
Format
Normal Font
Emphasis Font
Cross Reference
Description
Font used throughout this manual.
Font used the first time a new term is introduced.
When viewing the PDF version of the manual, clicking on the
cross reference text jumps you to referenced section.
Trademarks and Other Legal Stuff
The AMCI logo is a trademark, and “AMCI” and “DuraCoder” are registered trademarks of Advanced Micro
Controls Inc. “Adobe” and “acrobat” are registered trademarks of Adobe Systems Incorporated.
All other trademarks contained herein are the property of their respective holders.
20 Gear Drive, Plymouth Ind. Park, Terryville, CT 06786
Tel: (860) 585-1254 Fax: (860) 584-1973 http://www.amci.com
5
ABOUT THIS MANUAL
Revision Record
This manual, 940-0D024 is the fifth release of the manual. It changes the format of the manual, adds information on the output preset pin, and specifies new shaft and mounting options. It was first released May 26,
2009.
Where to Go From Here
The table below gives a brief description of the content of each chapter to help you find the information you
need to assist you in your job.
6
CHP
NUM.
Chapter Title
1
THE ANALOG
OUTPUT
DURACODER
2
INSTALLATION
Chapter Description
Intended for anyone new to the Analog DuraCoder, this chapter
gives a basic overview of the unit. The chapter also explains
the Analog DuraCoder part numbering system.
This chapter is intended for the engineer or technician responsible for installing and wiring the Analog DuraCoder. Information in this chapter includes mechanical drawings,
installation guidelines and connector pinout.
ADVANCED MICRO CONTROLS INC.
CHAPTER 1
THE ANALOG OUTPUT DURACODER
Analog DuraCoder Overview
DuraCoders are designed as direct replacements for optical
encoders. Instead of being designed around a disk and optics, a
DuraCoder uses a resolver as its primary shaft position sensor.
Constructed in a manner similar to high precision motors,
resolvers are absolute, single turn position sensors that are
unsurpassed in terms of ruggedness and reliability. The
resolver is an analog device whose outputs vary sinusodially as
the shaft is rotated.
Originally designed for military applications over 60 years ago,
resolvers have gained popularity in many industrial markets
from steel mills to packaging machines. If you are interested in
learning more about resolvers, check out our website at: http://
www.amci.com/tutorials/tutorials-what-is-resolver.asp.
The resolver’s analog signals are decoded into a 12 bit position
value by electronics incorporated into the DuraCoder. This 12
bit (4096 count), absolute position value is available as an analog output. Several different voltage and current outputs are
available, as well as the amount of shaft rotation needed to generate full scale output.
Figure 1.1 An Analog Output DuraCoder
The Analog DuraCoder is available in a variety of industry standard size 25 optical encoder packages. A
servo mount unit with a 3/8” shaft and a side connector is shown in figure 1.1. Flange mount and end connect
units are also available. If your application requires you to mount the DuraCoder to a motor, a blind shaft
mounting option is also available. Finally, a face mount unit with a 5/8 inch shaft is available for applications
that may be exposed to high shaft loads.
Outline drawings of all of the packing options is available in the Outline Drawings section of the
INSTALLATION chapter, starting on page 11.
The zero position of the Analog DuraCoder can be set by pulsing a pin to DC Return on the Mill Spec Connector. This will set the output to its minimum value, which may not be zero. (On a 4 to 20mA unit, the output would be set to 4mA.).
Part Numbering System
DC25
–
HOUSING
F = Square Flange
S = 2.5" Dia. Servo Mount
H = 63mm Blind Shaft Mount
BEARING SEAL
B = Nitrile (standard)
V = Viton
1
SHAFT DIA.
X
OUTPUT CODING
DuraCoder Type = "V"
Standard Shaft
1 = 0 to 5Vdc
1 = 0.375" Dia.
2 = 10mm Dia.
2 = 0 to 10Vdc
3 = 0.250" Dia.
4 = ±10Vdc
5 = 0.625" Dia.
DuraCoder Type = "C"
Flange Mount Only
1 = 4 to 20mA
Housing = 'F'
2 = 0 to 20mA
Blind Shaft Hole
1 = 0.375" Dia
DURACODER TYPE
2 = 10mm Dia.
V = Absolute Analog Voltage
4 = 0.500" Dia
C = Absolute Analog Current
6 = 12mm Dia.
CONNECTOR
S = Side
E = End
FL = Integral Cable
OUTPUT PERIOD
K = 360° Output Signal Period
L = 180° Output Signal Period
M = 90° Output Signal Period
N = 45° Output Signal Period
Figure 1.2 Part Numbering System
20 Gear Drive, Plymouth Ind. Park, Terryville, CT 06786
Tel: (860) 585-1254 Fax: (860) 584-1973 http://www.amci.com
7
1
INTRODUCTION
Output Waveforms
Output Period
The figure below shows the four available
Output Periods when you order an AMCI
Analog DuraCoder. The Output Period can
be viewed as the amount of rotation needed
to achieve full scale output.
Voltage Output Waveforms
1 Output Period
+5Vdc
1 Shaft Rotation
0Vdc
360º Output Period
Increasing Position Values p
1 Output Period
+10Vdc
0Vdc
1 Shaft Rotation
180º Output Period
180º Output Period
Increasing Position Values p
1 Output Period
+10Vdc
0Vdc
1 Shaft Rotation
90º
Output
Period
90º
90º
p Increasing
Position Values
90º
–10Vdc
Figure 1.4 Available Voltage Outputs
Current Output Waveforms
1 Output Period
20mA
1 Shaft Rotation
Output
Period
45º
45º
45º
45º
45º
45º
45º
45º
4mA
0mA
Increasing Position Values p
1 Output Period
20mA
Figure 1.3 Output Periods
0mA
Increasing Position Values p
Figure 1.5 Available Current Outputs
8
ADVANCED MICRO CONTROLS INC.
1
INTRODUCTION
Electrical Specifications
Operating Voltage
4.5Vdc to 30Vdc
Power Requirements
1.8 W max.
58mA @ 24Vdc optimal
Position Resolution
12 bit (4,096 counts) for 360° Output Period
11 bit (2,048 counts) for 180º Output Period
10 bit (1,024 counts) for 90º Output Period
9 bit (512 counts) for 45º Output Period
Position Update Time
20 microseconds
Max. Output Settling Time
5 milliseconds when switching between minimum
and maximum output
Direction of Increasing Counts
Default CCW looking at shaft
Can be set to CW increasing by shorting a pin to
DC Return.
Zero Position:
Can be set on any Analog DuraCoder by pulsing
pin J on the Mill Spec connector to DC Return.
Environmental Specifications
Operating Temperature
-40°F to +185°F (-40°C to +85°C)
Shock
50g, 11 millisecond duration
Vibration
20g, 5 to 2000Hz
Enclosure Rating
IP67
Approximate Weight
2.0 lbs. (0.91 Kg) 0.625" shafts
1.4 lbs. (0.65 Kg) All other shafts
Mechanical Specifications
Package Style
2.5 inch aluminum housing with flange, servo, or
blind shaft mounting
Connector Location
Side or End
Housing
Powder coated aluminum
Shaft
0.250", 0.375", 0.625", or 10mm
Blind Shaft with 0.375", 0.500", 10mm or 12 mm
hole
Max. Starting Torque @ 25°C
2.0 oz-in: 0.250", 0.375", and 10mm shafts
6.0 oz-in: All blind shafts
6.0 oz-in: 0.625" shaft
Moment of Inertia (oz-in-sec2)
6.00 X 10⁻⁴: 0.250", 0.375", and 10mm shafts
7.00 X 10⁻⁴: All blind shafts
8.50 X 10⁻⁴: 0.625" shaft
Max. Operating Speed
6000 RPM
Max. Shaft Loading (0.625" shaft)
Axial: 50 lbs. (222 N)
Radial: 100 lbs. (445 N)
As specified max. loads, bearing life is 2X10⁹
revolutions min.
Max. Shaft Loading (All other shafts)
Axial: 20 lbs. (222 N)
Radial: 40 lbs. (445 N)
As specified max. loads, bearing life is 2X10⁹
revolutions min.
20 Gear Drive, Plymouth Ind. Park, Terryville, CT 06786
Tel: (860) 585-1254 Fax: (860) 584-1973 http://www.amci.com
9
1
INTRODUCTION
Notes
10
ADVANCED MICRO CONTROLS INC.
CHAPTER 2
INSTALLATION
Flange Mount Outline Drawings
End Connector
( ) = Dimensions in millimeters
1.032"
CL
0.218" (5.54) dia.
Four places.
(26.21)
typ.
0.250"
0.300" (7.62)
0.94" (23.9) max.
Additional clearance of
4.5" (114) needed for removal
of mating connector.
(6.35)
0.3747" (9.517)
0.3744" (9.510)
1.032"
(26.21)
DC25
typ.
CL
(67.3)
0.900" (22.86)
Shaft Seal 0.850" (21.59)
1.250" (31.75)
1.249" (31.72)
2.50"
Analog Output
Flange Mount
End Connector
2.65"
(63.5)
dia.
2.95" (74.9) max.
MS3102E18-1P
Connector
2.65" (67.3)
Figure 2.1 Flange Mount, End Connect Outline Drawing
Side Connector
( ) = Dimensions in millimeters
1.40" sq.
1.37" (34.8) max.
Total clearance of 5.0" (127) needed
for removal of mating connector.
2.69" (68.3)
max.
(35.6)
MS3102E18-1P
Connector
Shaft Seal
0.300" (7.62)
2.65"
0.3747" (9.517)
0.3744" (9.510)
(67.3)
C
L
DC25
Analog Output
Flange Mount
Side Connector
1.250" (31.75)
1.249" (31.72)
1.032"
2.50"
(63.5)
dia.
(26.21)
typ.
1.032"
(26.21)
2.65" (67.3)
typ.
0.218" (5.54) dia.
Four places
0.900" (22.86)
0.850" (21.59)
0.250" (6.35)
2.65" (67.3) max.
C
L
Figure 2.2 Flange Mount, Side Connect Outline Drawing
20 Gear Drive, Plymouth Ind. Park, Terryville, CT 06786
Tel: (860) 585-1254 Fax: (860) 584-1973 http://www.amci.com
11
2
INSTALLATION
Flange Mount Outline Drawings (continued)
Alternate Shafts
10mm Shaft
(Shaft Option 2)
0.3934" (9.993)
0.3931" (9.985)
0.900" (22.86)
0.850" (21.59)
1/4" Shaft
(Shaft Option 3)
0.2497" (6.342)
0.2492" (6.330)
0.900" (22.86)
0.850" (21.59)
() = Dimensions in mm
Figure 2.3 Flange Mount Alternate Shafts
Shaft Loading
Limit shaft loading to the following values. These values statistically yield an L10 life of 2X10⁹ revolutions.
(Statistically, only 10% of the bearings will have failed after 2X10⁹ revolutions.) Shaft loading has an exponential effect on bearing life. The bearings will statistically last longer if you can limit shaft loading below
the given values. Consider using the 5/8" shaft DuraCoder from AMCI if your shaft loading is expected to
be greater than the values given below. Outline drawings for the 5/8" shaft DuraCoders start on page 17.
Radial Load
Axial Load
40 lbs. (178 N)
20 lbs. (88 N)
Table 2.1 Flange Mount Shaft Loading
12
ADVANCED MICRO CONTROLS INC.
2
INSTALLATION
Servo Mount Outline Drawings
End Connector
( ) = Dimensions in millimeters
2.50" (63.5)
0.94" (23.9) max.
Additional clearance of 4.5" (114)
needed for removal of
mating connector.
0.300" (7.62)
0.3747" (9.517)
0.3744" (9.510)
Shaft Seal
DC25
(58.64)
0.900" (22.86)
0.850" (21.59)
1.250" (31.75)
1.249" (31.72)
2.50"
Analog Output
Servo Mount
End Connector
2.31"
(63.5)
dia.
0.10" (2.5)
0.10" (2.5)
3.00" (76.2) max.
#8-32 UNC- 2B. 0.18" (4.6) min depth. Six
places, 60° apart on a 1.875" (47.63) B.C.
MS3102E18-1P
Connector
Figure 2.4 Servo Mount, End Connect Outline Drawing
Side Connector
( ) = Dimensions in millimeters
1.44" (36.6) max.
Total clearance of 5.1" (130)
needed for removal of
mating connector.
1.40" sq.
(35.6)
0.300" (7.62)
2.69" (68.3)
max.
MS3102E18-1P
Connector
0.300" (7.62)
Shaft Seal
0.3747" (9.517)
0.3744" (9.510)
DC25
2.31"
Analog Output
Servo Mount
Side Connector
(58.6)
1.250" (31.75)
1.249" (31.72)
#8-32 UNC-2B.
0.18" (4.6) min. depth.
Six places, 60° apart
on 1.875" (47.62) B.C.
0.900" (22.86)
0.850" (21.59)
2.50"
(63.5)
dia.
0.10" (2.5)
0.10" (2.5)
2.70" (68.6) max.
Figure 2.5 Servo Mount, Side Connect Outline Drawing
20 Gear Drive, Plymouth Ind. Park, Terryville, CT 06786
Tel: (860) 585-1254 Fax: (860) 584-1973 http://www.amci.com
13
2
INSTALLATION
Servo Mount Outline Drawings (continued)
Alternate Shafts
10mm Shaft
(Shaft Option 2)
0.3934" (9.993)
0.3931" (9.985)
0.900" (22.86)
0.850" (21.59)
1/4" Shaft
(Shaft Option 3)
0.2497" (6.342)
0.2492" (6.330)
0.900" (22.86)
0.850" (21.59)
() = Dimensions in mm
Figure 2.6 Servo Mount Alternate Shafts
Shaft Loading
Limit shaft loading to the following values. These values statistically yield an L10 life of 2X10⁹ revolutions.
(Statistically, only 10% of the bearings will have failed after 2X10⁹ revolutions.) Shaft loading has an exponential effect on bearing life. The bearings will statistically last longer if you can limit shaft loading below
the given values. Consider using the 5/8" shaft DuraCoder from AMCI if your shaft loading is expected to
be greater than the values given below. Outline drawings for the 5/8" shaft DuraCoders start on page 17.
Radial Load
Axial Load
40 lbs. (178 N)
20 lbs. (88 N)
Table 2.2 Servo Mount Shaft Loading
14
ADVANCED MICRO CONTROLS INC.
2
INSTALLATION
Blind Shaft Mount Outline Drawings
End Connector
0.94" (23.9) max.
Total clearance of 4.5" (114) needed
for removal of mating connector.
( ) = Dimensions in millimeters
VIEW A
Shaft Seal
2.50" (63.5) Dia.
0.67"
(17.0)
CL
0.79"
(20.0)
DC25
25°
Analog Output
Blind Shaft Mount
End Connector
1.125"
(28.58)
0.067" (1.70) radius
on 2.48" (63.0) B.C.
2.72" (69.0)
4.09" (103.9)
VIEW A
SEE
CHART
2.48" (63.0) B.C.
Customer
Side
4-40 Thru Tap
3 places,
120° apart
0.65" (16.5) Clearance
SEE
CHART
MS3102E18-1P
Connector
Nominal Hole
Diameters Available
0.75"
English
0.375"
0.500"
(19.0)
Metric
10 mm
12 mm
0.14"
(3.6)
1.10" (27.9) depth
Shaft Length
0.59" (15) min.
1.10" (27.9) max.
Figure 2.7 Blind Shaft Mount, End Connect Outline Drawing
20 Gear Drive, Plymouth Ind. Park, Terryville, CT 06786
Tel: (860) 585-1254 Fax: (860) 584-1973 http://www.amci.com
15
2
INSTALLATION
Blind Shaft Mount Outline Drawings (continued)
Side Connector
( ) = Dimensions in millimeters
1.40" sq.
(35.6)
1.44" (36.6) max.
Total clearance of 5.1" (130)
needed for removal of
mating connector.
2.69" (68.3)
max.
0.67"
(17.0)
CL
VIEW A
MS3102E18-1P
Connector
Shaft Seal
0.79"
(20.0)
DC25
25°
Analog Output
Blind Shaft Mount
Side Connector
1.125"
(28.58)
0.067" (1.70) radius
on 2.48" (63.0) B.C.
2.72" (69.0)
2.50" (63.5) Dia.
3.79" (96.3)
VIEW A
SEE
CHART
2.48" (63.0) B.C.
Customer
Side
4-40 Thru Tap
3 places,
120° apart
0.65" (16.5) Clearance
SEE
CHART
0.75"
(19.0)
Nominal Hole
Diameters Available
English
0.375"
0.500"
Metric
10 mm
12 mm
0.14"
(3.6)
1.10" (27.9) depth
Shaft Length
0.59" (15) min.
1.10" (27.9) max.
Figure 2.8 Blind Shaft Mount, Side Connect Outline Drawing
Available Shaft Diameters
The diameter of the drive shaft must be specified when ordering a blind shaft DuraCoder. Available options
are given in the table below. Other diameter options may have become available after the release of this manual. Please check our website, www.amci.com, if you do not see the shaft diameter that fits your application.
Nominal Hole Diameters
English
Metric
0.375"
0.500"
10 mm
12 mm
Table 2.3 Available Blind Shaft Diameters
Shaft Loading
The load that the Analog DuraCoder presents to your input shaft, which is equal to the load presented to the
DuraCoder by your input shaft, is difficult to calculate and is dependent on the accuracy of the mounting. The
flexible metal mounting bracket will be able to absorb most of the radial loading forces, but accurate mounting of the DuraCoder is important.
16
ADVANCED MICRO CONTROLS INC.
2
INSTALLATION
5/8" Shaft Outline Drawings
End Connector
2.65" (67.3) sq.
MS3102E18-1P Connector
0.125" (3.18)
See Keyway
Specifications
DC25
See Note 1
DeviceNet
5/8" Shaft
Flange Mount
End Connector
CL
1.032"
(26.21)
0.6247" (15.867)
0.6237" (15.842)
typ.
See Note 2
1.032"
(26.21)
typ.
1.500" (38.10)
diameter
1.499" (38.07)
CL
1.500"
1.45" (36.8)
1.40" (35.6)
2.50"
(63.5)
dia.
3.64" (92.5)
0.94" (23.9) max.
See Note 3
0.750"
(19.05)
( ) = Dimensions in millimeters
(38.10)
NOTES:
1) Integral Shaft Seal.
0.470"
(11.95)
0.94"
(23.9)
2) 1/4-20 UNC-2B 0.50" (12.7) minimum
depth. Six Places.
3) Total clearance of 4.5" (114) needed
for removal of mating connector.
KEYWAY SPECIFICATIONS
KEYWAY
0.1895" (4.813)
0.108" (2.74)
X 0.106" (2.69) Deep
0.1885" (4.788)
INCLUDED KEY
1.00"
0.188" (4.78)
Sq. X 1.00" (25.4)
0.187" (4.75)
(25.4)
Figure 2.9 5/8" Shaft, Face Mount, End Connect Outline Drawing
20 Gear Drive, Plymouth Ind. Park, Terryville, CT 06786
Tel: (860) 585-1254 Fax: (860) 584-1973 http://www.amci.com
17
2
INSTALLATION
5/8" Shaft Outline Drawings (continued)
Side Connector
1.37" (34.8) max.
See Note 3
2.69" (68.3)
max.
See Note 1
See Note 2
1.40" sq.
(35.6)
MS3102E18-1P
Connector
0.125" (3.18)
See Keyway
Specifications
DC25
Analog Output
5/8" Shaft
Flange Mount
Side Connector
CL
1.032"
(26.21)
0.6247" (15.867)
0.6237" (15.842)
typ.
1.45" (36.8)
1.40" (35.6)
1.500" (38.10)
diameter
1.499" (38.07)
1.032" (26.21) typ.
2.65" (67.3) sq.
CL
1.500"
0.750"
2.50"
(63.5)
dia.
3.34" (94.8)
( ) = Dimensions in millimeters
(19.05)
(38.10)
NOTES:
1) Integral Shaft Seal.
0.470"
(11.95)
0.94"
(23.9)
2) 1/4-20 UNC-2B 0.50" (12.7) minimum
depth. Six Places.
3) Total clearance of 5.0" (127) needed
for removal of mating connector.
KEYWAY SPECIFICATIONS
KEYWAY
0.1895" (4.813)
0.108" (2.74)
X 0.106" (2.69) Deep
0.1885" (4.788)
INCLUDED KEY
1.00"
0.188" (4.78)
Sq. X 1.00" (25.4)
0.187" (4.75)
(25.4)
Figure 2.10 Flange Mount, Side Connect Outline Drawing
18
ADVANCED MICRO CONTROLS INC.
2
INSTALLATION
5/8" Shaft Outline Drawings (continued)
Shaft Loading
Limit shaft loading to the following values. These values statistically yield an L10 life of 2X10⁹ revolutions.
(Statistically, only 10% of the bearings will have failed after 2X10⁹ revolutions.) Shaft loading has an exponential effect on bearing life. The bearings will statistically last longer if you can limit shaft loading below
the given values.
Radial Load
Axial Load
100 lbs. (445 N)
50 lbs. (222 N)
Table 2.4 Flange Mount Shaft Loading
Connector Pinout
The Analog DuraCoder uses a military spec. MS3102E18-1P connector. The pinout of this connector is
shown below.
Analog DuraCoder
MS3102E18-1P
Connector
H
A
I
G
B
C
J
F
E
D
Pin:
A
B
C
D
E
Function
No Connection
No Connection
+DC Input Power
Direction Control
DC Return
Pin:
F
G
H
I
J
Function
Analog Output
No Connection
Case Ground
DC Return
Preset Input
Figure 2.11 Connector Pinout
Pins A, B, & G: No Connection.
Pin C: +DC Input Power: Input pin to power the DuraCoder. Requires a 5 to 30Vdc power supply at 1.5W.
Pin D: Direction Control: This pin controls which direction the shaft must rotate in to increase the analog
output. With this pin open circuit, the output will increase with CCW rotation of the shaft. (While
looking at the shaft.) Connecting this pin to Pin I forces the output to increase with CW rotation.
This pin must never be connected to Pin C (+DC Input Power)
The connection between Pin D and Pin I (DC Return), must be done at the DC25 Connector. Do not connect a pair of wires into a custom cable and connect these pins at the
other end of this cable.
Pins E and I: DC Return: These two pins are internally tied together. Pin E is the used as the return for the
analog signal and pin I is used as the return for the DC power supply.
Pin F: Analog Output: This pin is the analog output and it is referenced to Pin E, DC Return.
Pin H: Case Ground: The DuraCoder body is usually connected to earth ground through it mounting. If the
DuraCoder is mounted on a non-conductive surface, or not properly bonded to a painted metal surface, consider running a stranded wire from this pin and attach it to a solid ground point near the
DuraCoder. Do not connect the cable shields to this pin as doing so may cause a ground loop
between the DuraCoder and the power supply or the signal input device.
20 Gear Drive, Plymouth Ind. Park, Terryville, CT 06786
Tel: (860) 585-1254 Fax: (860) 584-1973 http://www.amci.com
19
2
INSTALLATION
Connector Pinout (continued)
Pin J: Zero Preset: This pin is internally tied high, but not directly to the +DC Input Power, (Pin C). When
this pin is pulled low by connecting it to the DC Return, (Pin I), the analog output will change to its
minimum value. (In the case of a 4 - 20mA output, the output becomes 4mA. In the case of a
±10Vdc Output, the output becomes –10Vdc.) This pin must be released from Pin I before normal
operation can resume.
This pin must never be connected to Pin C (+DC Input Power)
Output Load Calculations
Voltage Output DuraCoder
A voltage output DuraCoder can drive an output load of 2 KΩ or greater. If the output load is greater that
10KΩ, consider installing a 10KW resistor in parallel with the input terminals for greater noise immunity.
Current Output DuraCoder
The maximum load that can be driven by a current output DuraCoder depends on the power supply voltage
applied to the +DC Power Input (Pin C). For input voltages up to 15Vdc, the maximum load is 420Ω. For
input voltages greater than or equal to 15Vdc, the formula for determining the maximum load is given below
along with a simple graph of the curve.
RLOADMAX =
(+DC Input Voltage) – 5Vdc
0.020A
+DC Input Voltage
30
24
20
15
0
0
250
500
750
950
1250
Maximum Load Resistance (Ω)
Figure 2.12 Maximum Load Resistance - Current Output
20
ADVANCED MICRO CONTROLS INC.
2
INSTALLATION
CDCAV Cable
A pre-assembled and tested cable is available from AMCI for use with all Analog DuraCoders. The part
number is CDCAV-x, where “x” is the length of the cable in feet.
1
3
6
I
F
+Vdc
B
J
E
2
A
H
G
POWER SUPPLY
C
D
BLK
RED
RED
BLK
-Vdc
GND
INPUT DEVICE
CHASSIS
GND
+IN
-IN
SHIELDS
5
4
BLK
WHT
WHT
BLK
BELDEN 9730 CABLE OR EQU.
(One pair unused and not shown)
7
Figure 2.13 CDCAV-x Cable
1) Connector Type: MS3106A18-1S AMCI Part Number: MSD-10
2) CDCAV-x cable is made by AMCI with Belden 9730 cable or an exact equivalent. The 9730 is a three pair
cable and the additional pair is cut off inside the jacket and left electrically isolated from the other pairs. If
you are making your own cable, Belden 9729, which is a two pair cable, can be used in place of the 9730.
3) The case of the DuraCoder must be connected to Earth Ground. This is usually accomplished through its
mounting. If not properly grounded through its mounting, a wire from Pin H must be connected to an Earth
Ground point as close as possible to the DuraCoder. Do Not connect Pin H to the cable shields. This can
form a ground loop that may affect the operation of the DuraCoder.
4) Units are shipped with CCW increasing output when looking at the shaft. For CW increasing output,
jumper Pin D to Pin I at the connector.
5) Each time Pin J detects a transition from open circuit to DC Return (Pin I), the DuraCoder’s output will be
changed to its minimum value. To be changed, Pin J must be connected to Pin I for a minimum of 100
milliseconds.
A) You cannot permanently tie Pin J it Pin I. If you do, the DuraCoder will reset the output to its minimum value on every power up.
B) Presetting the Analog DuraCoder’s output causes a preset value to be stored in the
DuraCoder’s EEPROM memory. This memory has a maximum life of 100,000 write
cycles. Therefore, presetting the output value every machine cycle should be avoided.
6) Use a regulated power supply with a voltage output in the range of 7 to 30Vdc. If the cable length is less
than 30 feet, a power supply of 5 to 30Vdc can be used.
7) For voltage output DuraCoders, (DC25x-xxVxxx), the input device impedance must be greater than 2KΩ.
If the input impedance exceeds 10KΩ, consider installing a 10KΩ resistor in parallel with the input
terminals to improve the output’s noise immunity.
20 Gear Drive, Plymouth Ind. Park, Terryville, CT 06786
Tel: (860) 585-1254 Fax: (860) 584-1973 http://www.amci.com
21
ADVANCED MICRO CONTROLS INC.
20 GEAR DRIVE, TERRYVILLE, CT 06786 T: (860) 585-1254 F: (860) 584-1973
www.amci.com
LEADERS IN ADVANCED CONTROL PRODUCTS