1
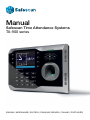
Manual Safescan Time Attendance Systems TA-900 series English | Nederlands | Deutsch | Français | Español | Italiano | Português 1 English | Nederlands | Deutsch | Français | Español | Italiano | Português Contents 1.0 Consideration 1.1 Environmental Considerations 2.0 Mounting and connecting the terminal 2.1 Connect the TCP/IP network cable if you want to synchronize the terminal through the network 2.2 Wi-Fi connection 2.3 Function Keys and Display 2.4 Key functions 3.0 First use 4.0 Identity Verification 5.0 USER 5.1 Check-in Add New User ID. NO 5.1.1 5.1.2 Add New User Name 5.1.3 How to create a User Name 5.1.4 Enroll New User Fingerprint (FP) 5.1.5 Enroll New User with Password (PWD) 5.1.6 Enroll New User with RFID Card (Card) 5.1.7 ID card verification 5.1.8 Set User Authority (Purview) 5.1.9 Save/Exit New User registration 5.2 Manage User(s) 5.2.1 Search for user(s) 5.2.2 User(s) Attendance records Edit User(s) 5.2.4 Delete User(s) 5.2.5 Add User(s) 5.2.3 5.3 Short Message Service (SMS) How to create a Short Message 5.3.1 5.3.2 How to write a text for Short Message View Public Short messages 5.3.4 View Personal Short messages 5.4 Work Codes 5.4.1 Adding Work Codes 5.4.2 How to create a Work Code Name 5.4.3 Editing and Deleting Work Codes 5.4.4 Using Work Codes 5.3.3 2 English | Nederlands | Deutsch | Français | Español | Italiano | Português 6.0 Communication Settings 6.1 Network (Ethernet) 6.2 RS232/485 6.3 Setting Security for RS 232 Communications 6.4 Wi-Fi configuration 6.4.1 Manual Wireless Configuration 7.0 System Setting Overview 7.1 System Setting Suggested Threshold Settings 7.1.1 7.1.2 Date format 7.2 Data management 7.2.1 Picture formats 7.3 Keyboard 7.4 Display Setting 7.5 Reset 7.6 Bell setting 7.7 Miscellaneous Settings (Misc. Set) 7.7.1 Sleep time (Idle) 7.7.2 Fingerprint Image (FP Image) 7.7.3 Power Button 7.7.4 Language 8.0 Date and Time Setting 8.1 9.0 USB Disk/PenDrive (flash drive) Changing Date and Time settings 9.1 Downloading Attendance Records/ Logs 9.2 How to Download Attendance Records 9.3 Downloading User Data (i.e. fingerprints, RFID Card and PWD) 9.4 Downloading SMS (Short Message) 9.5 Uploading user data (templates) 9.6 Uploading SMS (Short Message) 9.7 Uploading Picture(s) 10.0 Auto Test 10.1 TFT Screen Test 10.2 Audio Test 10.3 Keypad Test 10.4 Fingerprint Sensor Test 10.5 Real-time clock (RTC) Test 11.0 Record (attendance/audit logs) 12.0 System information 12.1 Records Information 12.2 Device information 3 English | Nederlands | Deutsch | Français | Español | Italiano | Português 13.0 Fingerprint Recognition Technology 13.1 How Fingerprint Recognition Technology Works 13.2 Getting Good Fingerprint Images 13.3 Correcting Wet or Dry Fingerprint Images 13.4 Proper Finger Placement 13.5 Fingerprint Matching 13.5.1 1:N Fingerprint Matching 13.5.2 How to Use 1:N Fingerprint Matching 13.5.3 1:1 Fingerprint Matching (ID. NO +fingerprint) 13.5.4 How to Use 1:1 Fingerprint Matching 13.6 Password Matching 13.6.1 How to Use Password Matching 14.0 Getting familiar with the keypad 15.0 User Access to Attendance Records 16.0 Typing with Safescan TA-900 Series keypad 17.0 Synchronize data with the software 16.1 How to create a “word” 17.1 By USB stick 17.2 Via local Network TCP/IP or Wi-Fi 17.2.1 Connect Terminal with Safescan Time Attendance Software 17.3 Synchronizing user data with Time Attendance Software 4 English | Nederlands | Deutsch | Français | Español | Italiano | Português Manual Safescan Time Attendance Systems TA-900 series Package contents: • Safescan time attendance terminal (model 910, 920, 955, 960 & 965) • Installation CD with Safescan Time Attendant software and quick guide • Power adapter with removable Euro and UK plug • Metal fixing bracket for wall-fitting (incl. 2 special screws and screwdriver) • Mounting materials (4 screws, 4 dowels) • 5x RFID badges (only with 910, 920, 955, 965) The Safescan TA-900 series time attendance systems record your staff’s check-in and -out times. The time records for each user are stored on the Safescan registration terminal and can be transferred to your PC directly by network (TCP/IP) connection or indirectly by uploading the data onto your USB stick. On your PC you can then process the data, for example by using the Safescan Time Attendant software. The TA-900 series consists of the 2 following models: • Safescan TA-910, registration through RFID proximity badge (or keyfob) and/or password • Safescan TA-920; Internal WiFi module; registration through RFID proximity badge (or keyfob) and/or password • Safescan TA-955, registration through fingerprint, RFID proximity badge (or keyfob) and/or password • Safescan TA-960; Internal WiFi module; registration through fingerprint and/or password • Safescan TA-965; Internal WiFi module; registration through fingerprint, RFID proximity badge (or keyfob) and/or password The Safescan Time Attendant software, which is shipped with each TA-900 terminal, enables you to make selections of time attendance records sorted by group employee, per group of employees or by period of time. Reports can be printed or exported for further use in other programs. User logs and records can easily be adjusted; removed or new logs can be added. This manual has been written to provide instructions on how to setup and operate the TA-900 series devices. Where applicable, references to the Safescan Time Attendant software have been added. All functions described in this document are current as of November 2011. Every effort has been made to ensure the information in this document is complete and consistent with the Safescan TA-900 Series you have purchased. Since the Safescan TA-900 Series is con-stantly being improved, it is remotely possible that this document may not precisely coincide with the Safescan TA-900 you have purchased. Safescan will not assume liability for any direct or indirect financial loss resulting from any inaccuracies or omissions found in this document. If after reading this manual you have any questions/remarks, suggestions, etc. regarding the contents of this manual, or regarding the TA-900 series or any other Safescan products, or if you are looking for more resources to help you setup and/or operate your Safescan product, then please don’t hesitate to visit our website at www.safescan.com/support 5 English | Nederlands | Deutsch | Français | Español | Italiano | Português 1.0 Consideration The Safescan TA-900 Series Time Attendance terminals are designed to work with Safescan Time Attendance PC-software. 1.1 Environmental Considerations Do not install or operate the Safescan TA-900 Series where strong light is present. Intense light will adversely impact the sensor’s ability to accurately read fingerprints. The Safescan TA-900 Series operating temperature range is 0° to 40° C (32° to 105° F). Do not operate the Safescan TA-900 Series in very hot environments. Keep the Safescan TA-900 Series away from direct heat sources and provide adequate ventilation to prevent the Safescan TA-900 Series from overheating. 2.0 Mounting and connecting the terminal Mount the metal mounting bracket to a wall at a height of 1.4 - 1.5 meters. Screw 3x Security screw Connect the mains adapter to the bottom of the terminal.The terminal is now ready for use. TA Terminal - Back USB TYPE B TA Terminal - Left side TCP/IP DC 5V USB TYPE A 2.1 Connect the TCP/IP network cable if you want to synchronize the terminal through the network. If there isn’t a TCP/IP network connection available, you can read out the data TCP/IP Switch with a USB stick (PenDrive) and subsequently read this in into the Safescan Time Attendant software. TA 800 series 6 PC English | Nederlands | Deutsch | Français | Español | Italiano | Português 2.2 Wi-Fi connection To connect the TA-920, 960 or 965 by Wi-Fi please follow the steps described in chapter 6.4. 2.3 Function key and display TA-910 / 920 1. Function keys 2. TFT screen 3. LED indicator 4. Navigation keys 5. RFID Badge sensor area 6. Keypad 7. USB upload/download port TA-955 / 960 / 965 1. Function keys 2. TFT screen 3. LED indicator 4. Navigation keys 5. RFID Badge sensor area (only 955 & 965) 6. Fingerprint sensor 7. Keypad 8. USB upload/download port 2.4 Key functions: <On/Off>: Press and hold for 3 seconds to switch the terminal off. <T9 input>: To switch to T9 text input mode in the menu screen. <Escape>: To cancel operations, to exit (sub) menus or to exit T9 text input mode. <Menu>: To enter the menu items. <Backspace> <OK>: To confirm. <F1. . . F8>: Function keys (free to define). Default: F1=Check-in, F2=Check-out, F3=Break-in, F4=Break-out, F5=Overtime-in, F6=Overtime-out, F7=Work code, F8=SMS <Up/Down/Left/Right> W 7 Green W indicates the wireless connection English | Nederlands | Deutsch | Français | Español | Italiano | Português 3.0 First use Step 1:Install the Safescan TA-900 Series and power it up. Step 2Change the default language (English) in the desired language – see chapter 7.7.4 Step 3: Enroll users by registering his/her fingerprints, RFID cards or passwords. If the Safescan TA-900 Series is operating in stand-alone mode, assign users’ security privileges directly on the Safescan TA-900 Series. Step 4: After enrolling user(s), verify that his/her enrolled fingerprint, RFID card and/or password is recognized by the Safescan TA-900 Series. Step 5:Configure the Safescan TA-900 Series communication settings (TCP/IP or Wi-Fi) and then download the users’ newly enrolled fingerprints, RFID card and password from the Safescan TA-900 Series onto a computer. Data can be transmitted via TCP/IP, Wi-Fi or by using a USB flash drive (see chapter 6). Note: Always back up the fingerprint templates in de Safescan Time Attendance software on your computer. Having a “template backup” can potentially save you a lot of time. If the Safescan TA-900 Series fails or is vandalized, having a “backup” eliminates the need of having to re-enroll all your users. Step 6: Verify that Safescan TA-900 Series displays the correct day and time. Now the terminal is ready for operation. The green W indicates the wireless connection. 4.0 Identity verification The Safescan TA-900 Series will NOT record an employee’s attendance UNTIL the individu-al’s identity is verified. The Safescan TA-900 Series uses various methods to verify a user’s identity: • Fingerprint Matching (only with TA-955, 960 & 965) • Password Matching • RFID Matching (only with TA-910, 920, 955 & 965) 5.0 User The User Menu allows you to: • Add/Edit/Delete users • Access the users’ attendance records • Register RFID cards • Create personalized “Check/Clock-In/Short messages” • Create Work Codes 5.1 Add new user Start at the Check/Clock-In screen. Press the Menu key to open the Main Menu. From the Main Menu, highlight and select User Mng to add/change/ delete users’ fingerprint(s), RFID cards, password or authority (Admin or user). From the User Menu, scroll with the ◄ / ►/ ▲/ ▼ keys until New User is highlighted. Press OK to accept. 8 English | Nederlands | Deutsch | Français | Español | Italiano | Português The following “New User” settings are available. • ID. NO (Account Number): Unique identification number associated with each user. • Name: Up to 24 characters can be entered. • Fingerprint (FP) (only with TA-955, 960 & 965): A user can enroll up to 10 fingerprints. • Password (PWD): A user can enroll a password using 1 to 8 characters. • RFID card (Card) (only with TA-910, 920, 955 & 965): A user can enroll a RFID card • Security/Authority (Purview): Identifies a user as a normal user or an Administrator. Note: Administrators have unrestricted access to the entire Safescan TA-900 Series menu system and can freely modify user information. Administrator(s) can also enroll other “Administrators.” • Non-Administrators (i.e. normal users) cannot access the Safescan TA-900 Series menu system. • Non-Admins cannot modify user information; • Non-Admins cannot make system changes to the Safescan TA-900 Series. 5.1.1 Add New User ID. NO From within the New User Menu, scroll with the ▲/ ▼ keys until the cursor is in the ID. NO field. Note: The Safescan TA-900 Series automatically assigns the next available ID number by default. Press OK to accept the default ID NO. If a different ID NO is preferred, use the backspace key and/or scroll keys ◄ / ► and type a different ID number (max. 9 digits). 5.1.2 Add New User Name The Safescan TA-900 Series allows up to 24 “letters” (or “symbols”) to be entered describing a user. From within the New User Menu, scroll with the ▲ / ▼keys until the cursor is in the Name field. 9 English | Nederlands | Deutsch | Français | Español | Italiano | Português Each time you press the asterisk key on the keypad, you have the choice to enter either “letters” or “symbols.” When in “letter mode” [English] will appear at the bottom of the screen. Press the asterisk again and [symbol] will replace [English] at the bottom of the screen. When in “symbol mode,” press the right scroll key to access more symbols. 5.1.3 How to create a User Name The following example illustrates how to create the user name John. From within the New User menu, press the asterisk key until [English] appears at the bottom of the screen. You are now ready to begin entering “letters.” Input example “John” Press <5> (JKL).Display shows: 0=j, 1=k, 2=l, 3=J, 4=K, 5=L.Press <3> (J). Press <6> (MNO).Display shows: 0=m, 1=n, 2=o, 3=M, 4=N, 5=O.Press <2> (o). Press <4> (GHI).Display shows: 0=g, 1=h, 2=i, 3=G, 4=H, 5=I.Press <1> (h). Press <6> (MNO).Display shows: 0=m, 1=n, 2=o, 3=M, 4=N, 5=O.Press <1> (n). After entering the desired “letter,” the display will return to the [English] prompt. You’ve now completed entering the user’s name and are ready to enter “John’s” fingerprint(s), RFID card and/or password and authority setting. Note: • Press <#> to input a space between words. • Within the text input mode, press <*> to select symbols. • Press <ESC> to exit the text input mode. 5.1.4 Enroll New User Fingerprint (FP) From within the New User Menu, scroll with the ▲/ ▼keys until the cursor is in the FP field. Notice “Enroll FP” will become highlighted. Press OK to accept selection. Place the finger you wish to enroll on the sensor, ensuring the finger is placed flat and centered. Hold the finger still for at least two full seconds until the Safescan TA-900 Series prompts with a beep to remove it. You will then be prompted to repeat the process 2 more times, each time using the very SAME finger. 10 English | Nederlands | Deutsch | Français | Español | Italiano | Português Notice that every time the Safescan TA-900 Series successfully records the user’s finger-print, each of the 3 green bars will become highlighted until all 3 bars are eventually highlighted. As noted, the Safescan TA-900 Series will beep with each successful fingerprint template recording. When all 3 fingerprint template recordings are successful, a check mark will appear beside the 3-colored green bars. After 3 successful fingerprint “recordings”, the user’s fingerprint template is now successfully registered in the Safescan TA-900 Series database. Press OK if you would like to continue recording additional fingerprint/templates. Note: It is highly recommended that users register at least one finger from each hand. Since the fingerprint sensor may have difficulty reading fingers with cuts or scratches, having a “backup” finger(s) registered ensures that the user will always be recognized by the Safescan TA-900 Series. If one finger is temporarily rendered “unreadable” by recent cuts or scratches, the user can use their backup finger. After fingerprint registration is completed, press the ESC key to return to the New User menu. 5.1.5 Enroll New User with Password (PWD) Note: A password is NOT required. However, a password can be used if a user is having difficulty having his/her fingerprint recorded or recognized by the Safescan TA-900 Series. From within the New User Menu, scroll with the ▲/ ▼keys until the cursor is in the PWD field. Notice Enroll Pwd will become highlighted. Press OK to accept selection. In the “Input Pwd” field, enter a password of 1 to 8 characters. Then scroll down to the “Pwd Affirm” field and re-enter the same password. After completed, scroll with the ▲/ ▼keys until OK is highlighted. Then press the OK key to accept. After saving the password, the screen will return to the New User menu and the icon Enroll Pwd. This indicates a password has been saved and registered to that user. 11 will display alongside English | Nederlands | Deutsch | Français | Español | Italiano | Português 5.1.6 Enroll New User with RFID Card (Card) From within the New User Menu, scroll with the ▲ / ▼keys to position the cursor on the “ID card.” Highlight “Enroll Card” and press OK. Press OK to accept selection. This screen appears Flash your card 2 to 3 inches from the Safescan TA-900 series internal card reader. The terminal will then read and register your card. Press OK to confirm registration of your card. After saving the RFID card, the screen will return to the New User menu and the icon will display alongside Enroll RFID. This indicates a RFID card has been saved and registered to that user. 5.1.7 ID card verification Flash your card 2 to 3 inches from the Safescan TA-900 Series. If the card has already been registered to the Safescan TA-900 series, the cardholder information will then be displayed on the screen. The Safescan TA-900 series will prompt you if it does not recognize the card. 5.1.8 Set User Authority (Purview) The Safescan TA-900 series recognizes two (2) types of users: • User NO administrative rights; Only Check/Clock-in/out and/or need door access. • Admin UNRESTICTED Safescan TA-900 series system rights; Can add, modify and delete user. Note: Until an administrator is actually registered on the Safescan TA-900 Series, ALL users have unrestricted access to the Safescan TA-900 series menu settings (i.e. Add/Edit/Delete users). For this reason, we advise enrolling an “administrator” after initial installation to help ensure safeguarding the Safescan TA-900 series. 12 English | Nederlands | Deutsch | Français | Español | Italiano | Português From within the New User Menu, scroll with the ▲/ ▼keys until the cursor is in the Purview field. “Purview” is the abbreviation for “authority.” Scroll with the ◄ / ► keys to choose either User or Admin. 5.1.9 Save/Exit New User registration After New User information is entered, scroll with the ▲/ ▼keys until OK is highlighted. Press OK to accept. You will then be prompted “Changed Saved! Continue?” Press OK to save. To cancel and return to the previous menu, scroll and choose Cancel, or press ESC. 5.2 Manage User(s) The Manage Users menu allows the System Administrator(s) to view all users’ information stored in the Safescan TA-900 Series. This includes the users’ ID. NOs (numbers), names, how many fingerprints they have registered and if they have registered RFID cards or passwords. 5.2.1 Search for user(s) Administrators can search for any registered user. Start at the User Menu. From within the User Menu, scroll with the ◄ / ►keys until manage is highlighted. Press OK to select Note: In the figure, the icon indicates that particular user is a System Administrator. The icon indicates that a password has been registered to the respective user(s). The icon indicates that a RFID card has been registered to the respective user(s). 13 English | Nederlands | Deutsch | Français | Español | Italiano | Português Press the menu key and the following drop-down menu appears Note: The “Attlog” option may appear as “Record,” instead. Use the ▲/ ▼scroll keys and highlight “search user.” Then press OK to select. Enter the ID Number and/or name of the user you wish to search for. Press OK to initiate the search. After searching successfully, the user’s record will be highlighted in blue. If the user is not registered on the Safescan TA-900 Series, the message “No Enroll!” will appear. 5.2.2 User(s) Attendance records Administrators can retrieve any registered user’s recent attendance record. Start at the User Menu 14 English | Nederlands | Deutsch | Français | Español | Italiano | Português From within the User Menu, scroll with the ◄ / ►keys until Manage is highlighted. Press OK to select. Select the user whose attendance records you need to view by scrolling with the ▲/ ▼ keys to highlight his/her record. Then press the Menu key so the drop-down menu appears. Use the ▲/ ▼scroll keys and highlight “record (Attlog)”. Then press OK to select. The selected user’s attendance records will be displayed. Press ESC to cancel and return to the previous menu. 5.2.3 Edit User(s) Administrators can edit any registered user’s profile information. Start at the User Menu. Scroll with the ◄ / ►keys and highlight Manage. Then press OK to open the User Manage screen 15 English | Nederlands | Deutsch | Français | Español | Italiano | Português Select the user whose profile you need to edit by scrolling with the ▲/ ▼ keys. Then press the Menu key so the drop-down menu appears. Use the ▲/ ▼scroll keys and highlight Edit. Then press OK to select. The Edit Menu appears. All the available “edit” options are the same as in the “Add user” menu. Administrators can add more fingerprints, register a name if the user previously did not enter one, add a password or RFID card, or change his/her user authority status to “User” or “Admin.” After making all necessary changes, use the ▲/ ▼scroll keys and highlight OK . Press OK to save changes and return to the previous menu. 5.2.4 Delete User(s) Administrators can delete all or partial registered user information on the Safescan TA-900 Series. Deleting may be necessary when: • A user’s fingerprint is no longer recognized (possibly caused by injury) or his/her password has been forgotten. • The user is no longer employed and his/her fingerprint(s)/password and user information need to be deleted from the Safescan TA-900 Series for security purposes. Start at the User Menu. Scroll with the ◄ / ►keys and highlight Manage. Then press OK to open the User Manage screen. 16 English | Nederlands | Deutsch | Français | Español | Italiano | Português Select the user to be deleted by scrolling with the ▲/ ▼ keys. Then press the Menu key so the drop-down menu appears. Use the ▲/ ▼scroll keys and highlight Del User. Then press OK to select. The Delete User screen appears. You can delete the user, fingerprint, RFID card or password. Scroll with the ▲/ ▼ keys to highlight your selection. Press OK to delete your selection. The Safescan TA-900 Series will prompt you “OKDel”? Press OK again to confirm deletion. 5.2.5 Add User(s) Administrators can add users from the User Manage Menu also. Start at the User Menu. Scroll with the ◄ / ►keys and highlight Manage. Then press OK to open the User Manage screen. 17 English | Nederlands | Deutsch | Français | Español | Italiano | Português Press the Menu key so the drop-down menu appears. Use the ▲/ ▼scroll keys and highlight New User. Then press the OK key to select. The “add” options are the same as in the “New User Menu.” Administrators can add a new user and register his/her fingerprints, name, password, RFID card and authority status. After New User information is completely entered, scroll with the ▲/ ▼keys until OK is highlighted. Press OK to accept. You will then be prompted “Changed Saved! Continue?” Press OK to save. To cancel and return to the previous menu, scroll and choose Cancel or press ESC. 5.3 Short Message Service (SMS) The short message is similar to a “company bulletin board.” It allows Safescan TA-900 Series System Administrators to post messages to the employees. Short messages can be created for the entire employee staff (“public”) or for an individual employee (“personal”). If a short message has been created for the entire employee staff, the icon will be displayed at the bottom of the Check/Clock-In screen during a pre-defined time frame. Employees should press the # key to view the Public Short Message. If a short message has been created for an individual employee, the message will appear only after that specific employee “Checks/Clocks in” to the Safescan TA-900 Series. 18 English | Nederlands | Deutsch | Français | Español | Italiano | Português 5.3.1 How to create a Short Message Start at the Check/Clock-In screen. Press the Menu key to open the Main Menu. From the Main Menu, highlight and select User Mng. From within the User Mng Menu, scroll with the◄ / ►/ ▲/ ▼keys until SMS is highlighted. Press OK to accept. Then press the key . Scroll with the ▲/ ▼ keys to select New from the drop-down menu. Then press OK. A similar screen will appear. • Start time: When the short message will start displaying. • Valid Time: How long will the message be displayed. • Message types: Personal: only specified employees will see. Public: entire staff will see To create the “content” of the short message, scroll with the ▲/ ▼keys until the cursor is in the “message” box. Each time you press the asterisk on the keypad you have the choice to enter either “letters” or “symbols.” When in “letter mode” you see [English] appear at the bottom of the screen. Press the asterisk again and [symbol] appears at the bottom of the screen. While in “symbol mode” press the right scroll 19 key ►to access more symbols. English | Nederlands | Deutsch | Français | Español | Italiano | Português 5.3.2 How to write a text for Short Message The following example illustrates how to create the user name John. From within the New User menu, press the asterisk key until [English] appears at the bottom of the screen. You are now ready to begin entering “letters.” Input example “John” 4.5 Press <5> (JKL).Display shows: 0=j, 1=k, 2=l, 3=J, 4=K, 5=L.Press <3> (J). 4.6 Press <6> (MNO).Display shows: 0=m, 1=n, 2=o, 3=M, 4=N, 5=O.Press <2> (o). 4.7 Press <4> (GHI).Display shows: 0=g, 1=h, 2=i, 3=G, 4=H, 5=I.Press <1> (h). 4.8 Press <6> (MNO).Display shows: 0=m, 1=n, 2=o, 3=M, 4=N, 5=O.Press <1> (n). After entering the desired “letter,” the display will return to the [English] prompt. You’ve now completed entering the user’s name and are ready to enter “John’s” fingerprint(s), RFID card and/or password and authority setting. Note: • Press <#> to input a space between words. • Within the text input mode, press <*> to select symbols. • Press <ESC> to exit the text input mode. The content of the short message is now complete. Now scroll with the ▲/ ▼ keys to change the date and time of the short message. Use the ◄ / ► keys to change the value of each setting, or use the keypad to manually enter the desired value. Select how long the message will be Valid (displayed). Select the “type” of user receiving the message (Personal, Public, or Reserved). If the short message will be “personal” (not for everyone), the “Assign” option will become available. Highlight Assign and press OK. Scroll with the ▲/ ▼keys to move through employees line by line. Scroll with the * or # keys to move through employees page by page. Press OK to select the desired employee(s) who will receive the short message. Press the key to save selection and return to the New SMS menu. When you have completed writing the content of the message and when the message will be displayed, highlight the OK key and press OK. The short message has now been saved. Note: you can save multiple messages and randomly choose who will receive them and when. 20 English | Nederlands | Deutsch | Français | Español | Italiano | Português 5.3.3 View Public Short messages When a “Public” short message has been created, the “Check/ Clock-In screen has the envelope icon displayed at the bottom of the screen. To view the Public Short Message, press the # key. 5.3.4 View Personal Short messages If the specified employee has a short message waiting for him/her, the message will ONLY be displayed when that specific employee “Checks/Clocks-In.” The Personal message will be displayed for 30 seconds. 5.4 Work Codes In some cases, the same employee may perform different work/jobs. For example, in a res-taurant the same employee may start his/her shift as a waiter and then switch to tending bar. Since different positions receive different rates of pay, the Safescan TA-900 Series allows an employee to enter different work codes when “checking/clocking in.” Also useful to assign doctor’s visits e.g. Note: Please make sure that the Work Codes match with the chosen Codes in the Safescan Time Attendance software or vice versa. Start at the Check/Clock-In screen. Press the Menu key to open the Main Menu. From the Main Menu, highlight and select User Mng. From within the User Mng Menu, scroll with the ◄ / ►/ ▲/ ▼keys until Work Code is highlighted. Press OK to accept. Then press the appears. 21 key. The following drop-down menu English | Nederlands | Deutsch | Français | Español | Italiano | Português 5.4.1 Adding Work Codes Scroll with the ▲/ ▼ keys and highlight add from the drop-down menu. Then press OK. The ADD New Work Code screen will appear. Code: The number which represents the Work Code. Name: Description of work code. Scroll with the ▲/ ▼ keys and place the cursor in the Name field. Use the Safescan TA-900 Series keyboard to create a ”Work Code Name.” Each time you press the asterisk on the keypad you have the choice to enter either “letters” or “symbols.” When in “letter mode” you see [English] appear at the bottom of the screen. Press the asterisk key again and [symbol] appears at the bottom of the screen. While in “symbol mode” press the right scroll key to access more symbols. 5.4.2 How to create a Work Code Name The following example illustrates how to create the user name Bar. From within the New User menu, press the asterisk key until [English] appears at the bottom of the screen. You are now ready to begin entering “letters.” Input example “Bar” Press <2> (ABC).Display shows: 0=a, 1=b, 2=c, 3=A, 4=B, 5=C.Press <4> (B). Press <2> (ABC).Display shows: 0=a, 1=b, 2=c, 3=A, 4=B, 5=C.Press <0> (a). Press <7> (PQRS).Display shows: 0=p, 1=q, 2=r, 3=s, 4=P, 5=Q, 6=R, 7=S.Press <2> (r). After entering the desired “letter,” the display will return to the [English] prompt. You’ve now completed entering the user’s name and are ready to enter “John’s” fingerprint(s), RFID card and/or password and authority setting. Note: • Press <#> to input a space between words. • Within the text input mode, press <*> to select symbols. • Press <ESC> to exit the text input mode. You have now completed adding a Work Code. 22 English | Nederlands | Deutsch | Français | Español | Italiano | Português 5.4.3 Editing and Deleting Work Codes From within the User Menu, scroll with the ▲/ ▼keys until Work Code is highlighted. Press OK to accept. Examples of Work Codes. Scroll with the ▲/ ▼keys to move through Work Codes line by line. Scroll with the * or # keys to move through Work Codes page by page. Highlight the desired Work Code to be edited or deleted. Then press the key. Scroll with the ▲/ ▼keys and highlight to Add, Edit or Delete a Work Code. Then press OK. 5.4.4 Using Work Codes When “checking/clocking in” with a specific “Work Code,” the user first needs to enter his/her Work Code PRIOR to entering his/her fingerprint, RFID card or password. Note: To “check/clock-in” with a Work Code, the user will FIRST press the asterisk key from the Check/Clock- In screen PRIOR to entering his/her fingerprint (RFID or password). After pressing the asterisk the Work Code screen appears. The user may directly enter a work code by typing with the Safescan TA-900 Series keypad, or he/she may scroll with the ▲/ ▼ keys to select the desired Work Code. Highlight the desired work code and press OK to accept. After selecting the Work Code, the user is then returned to the Check/Clock-In screen. 23 English | Nederlands | Deutsch | Français | Español | Italiano | Português Now the user will check/clock-in as normal, with either a fingerprint, RFID card or password. Note: The default Work Code shortcut key is the asterisk . But the shortcut keys are user-defined and can be changed (see chapter 5.4). 6.0 Communication Settings The Safescan TA-900 Series only records “time stamps.” It does NOT perform calculations and will NOT compute “actual hours worked.” As mentioned earlier in the manual, the Safescan TA-900 Series supports Safescan Time Attendance software. Please install the in the package included Safescan Time Attendance software on your computer. After installing Safescan Time Attendance software, connect the Safescan TA-900 Series to the computer (or network) that is running the Safescan Time Attendance software. The “time stamps” on the Safescan TA-900 Series will be uploaded into the Safescan Time Attendance software’s database so that employee-hours can be computed and reports generated. Communication Settings The Safescan TA-900 Series can communicate via the TCP/IP Network port (Ethernet), RS/232 or RS485. 6.1 Network (Ethernet) Start at the Check/Clock-In screen. Then press the Menu key to open the Main menu. From the Main Menu, highlight and select Comm to configure Communication Settings. Then press OK to accept. From within the Comm Menu, scroll with the ◄ / ►keys until Network is highlighted. Press the OK key to accept. This “Network” settings are available. 24 English | Nederlands | Deutsch | Français | Español | Italiano | Português • Terminal IP address: Default IP is 192.168.1.201. This can be modified, but do NOT use an IP address al-ready being used by device on the same network. • Subnet mask: Default mask 255.255.255.0. This can be modified. • Gateway address: Default gateway address is 0.0.0.0. This can be modified. • Network speed: Note 3 options available (Automatic, 10M and 100M) Scroll with the ▲/ ▼keys to place the cursor in the desired field. Enter your preferred network communication settings. After making changes, either press OK or, highlight the OK button and press OK. After selecting OK a message will display “Change Saved Successfully! OK” Press OK to continue. The screen will change to the previous menu. Press ESC to continue moving backward in the menu system. 6.2 RS232/485 Start at the Check/Clock-In screen and press the Menu key to open the Main menu. From the Main Menu, highlight and select Comm to configure Communication Settings. Then press OK to accept. From within the Comm Menu, scroll with the ◄ / ►keys until RS232/485 is highlighted. Press OK to accept. This “RS232/485” settings are available. 25 English | Nederlands | Deutsch | Français | Español | Italiano | Português • Baud rate: Use the / to change pre-set values. • RS232: If using RS232 communication, select “On”. • RS485: If using RS485 communication, select “On”. Scroll with the ▲/ ▼keys to place the cursor in the desired field. Scroll with the ◄ / ►keys to change between pre-defined values. After making changes, either press OK, or highlight the OK button and then press OK. After selecting OK, a message will display “Change Saved Successfully! OK” Press OK to continue, and the screen will return to the previous menu. Press ESC to return to the previous menu. 6.3 Setting Security for RS 232 Communications Start at the Check/Clock-In screen, press the Menu key to open the Main menu. From the Main Menu, highlight and select Comm to configure Communication Settings. Then press OK to accept. From within the Comm Menu, scroll with the ◄ / ►keys until Security is highlighted. Press OK to accept. This “Security” settings are available. 26 English | Nederlands | Deutsch | Français | Español | Italiano | Português Scroll with the ▲/ ▼keys to place the cursor in the desired field. • DeviceID/Serial # Prior to setting up RS232/RS485 communication, a 1 to 254 digit serial number of the Safescan TA-900 Series must be entered to secure the data communication between the PC and the Safescan TA-900 Series. • Password Enter a password comprised of 1 to 6 numbers. Enter the unique DeviceID # and Password to protect your RS232 connection. After making changes either press OK or, highlight the OK button and press OK. After selecting OK, a message will display “Change Saved Successfully! OK”. Press OK to continue, and the screen will return to the previous menu. Press ESC to return to the previous menu. 6.4 Wi-Fi configuration Before the TA 900 can access the WLAN, other physical components of the network are required including access points and wireless media. In addition, the service set identifier (SSID) must be available. Start at the Check/Clock-In screen, press the Menu key button and then press to open the Main Menu. From the Main Menu, select Comm. to configure Communication Settings and press to enter. Select Wireless LAN and enter with of the Available WLANs 27 to see an overview English | Nederlands | Deutsch | Français | Español | Italiano | Português Click to Refresh the screen, the available WLANs will then be listed on the interface with an indication of the signal strengthen Select the required Wireless LAN and enter with . Scroll with ▼to the input field for the password (Pass.) and enter the password of the wireless router using the T9 input method editor (see Chapter 16 for more on the T9 input method (IME) editor). Set the IP Address to DHCP and complete the setting with OK (M-) Press to return to the previous menu. For manual settings, see the chapter 6.4.1 Manual WIFI configuration. Note: The password must be the same as that of the wireless router so that the TA 900 can gain access to the WLAN. On the Check/Clock-In screen the following image is displayed when the device is connected to the Wireless LAN. 6.4.1 Manual Wireless Configuration Start at the Check/Clock-In screen, press the Menu key button and then press to open the Main Menu. From the Main Menu, select Comm. to configure Communication Settings and press 28 to enter. English | Nederlands | Deutsch | Français | Español | Italiano | Português Select Wi-Fi Setup to enter the Wi-Fi Setup interface. Set Network SSID. Set the Network ID (SSID) by imputing the network ID with the T9 inputting method editor(IME) (more about T9 inputting see in chapter 16). The Network ID must be provided for identification. Network ID (SSID): Specifies the network identification of the wireless network to be accessed. (Letters are case-sensitive.) Set a password: Scroll down with the ▼key to the input field for the password and input a password by using the T9 inputting method editor(IME) The password must be the same as that of the Wireless router so that the device can access the WLAN. Set a local IP address: Select a mode for designating a local IP address. The IP address can be designated manually or automatically by selecting DHCP mode. Local IP address: If the 802.11 wireless network is not configured with the function of dynamic host configuration protocol (DHCP), set the Manual IP Designation in the IP Address field and scroll down with the ▼key to input an IP address, subnet mask, and gateway address. The chosen IP address is the IP address of the machine on the wireless network, and does not have any relationship with communication. Designate an IP address: When setting a local IP addresses in manual mode, designate and input a correct IP address, subnet mask, and gateway address on the Manual IP designation interface. The chosen IP address is the IP address of a device on the wireless network, and does not have any relationship with communication. The Wi-Fi IP cannot share the same network segment with the machine IP. 29 English | Nederlands | Deutsch | Français | Español | Italiano | Português Subnet mask and gateway: The subnet mask and gateway address of the chosen IP address must be defined in the appropriate Netmask and Gateway fields. After an IP address is chosen , complete the setting and confirm with OK (M-) and return to the Check/Clock-In screen. On the Check/Clock-In screen the following image is displayed when the device is connected to the Wireless LAN. 7.0 System Setting Overview This menu allows you to program: • System: Fingerprint matching threshold, date format, audio responses, volume and “memory near-full” alerts • Data Mng: Clear data files • Update: Firmware changes • Keyboard/Keypad: Modify function keys and short-cut keys • Display: Allowed “user-access attempts,” clock display, picture slideshow settings • Power: Power conservation options • Reset: Shutdown and reset Safescan TA-900 Series • Bell: Bell scheduling • Misc Set.: Miscellaneous Settings 30 English | Nederlands | Deutsch | Français | Español | Italiano | Português 7.1 System Setting The System Menu allows you to configure Fingerprint matching threshold, date format, audio responses, volume and memory near-full alerts. From within the System Menu, scroll with the ◄ / ► and ▲/ ▼keys until System is highlighted. Press OK. This settings are available. 1:1 matching threshold: Default value is 15. If users are experiencing difficulty having their fingerprints read during 1:1 matching, consider lowering the threshold 1:N matching threshold: Default value is 35. If users are experiencing difficulty having their fingerprints read during 1:N matching, consider lowering the threshold 7.1.1 Suggested Threshold Settings FRR = False Rejection Rate One to many (1:N) FAR = False Acceptance Rate One to one (1:1) FRRFAROne-to-many One-to-one HighLow4525 MiddleMiddle3515 LowHigh2510 7.1.2 Date format Scroll with the ◄ / ► keys to choose from 10 options of data formats: YY-MM-DD, YY/MM/DD, YY.MM.DD, MM-DD-YY, MM/DD/YY, MM.DD.YY, DD-MM-YY, DD/MM/YY, DD.MM.YY, YYYYMMDD. Keybeep: Scroll with the ◄ / ►keys to select whether or not a “beep” should sound each time a key is touched. Volume: Scroll with the ◄ / ►keys to adjust desired volume. 31 English | Nederlands | Deutsch | Français | Español | Italiano | Português Recheck Minute: When full, the Safescan TA-900 Series prevents new records from over-writing previous records (virtual value is 66). Alarm attendance log (Log Alert): Set the number of remaining log entries before the Safescan TA-900 Series will send an alarm (virtual value is 1-99). Scroll with the ▲/ ▼keys to select desired option. Some values require manual data entry. Some pre-defined values can be changed with the scroll ◄ / ►keys. When finished, press OK or highlight OK and press OK to save. 7.2 Data management This menu allows you to clear data files. From within the System Menu, scroll with the ◄ / ►keys and ▲/ ▼keys until Data Mng is high-lighted. Then press OK. This settings are available. • Detete Attlog Erases attendance records/audit logs. • Delete All Erases all data (fingerprints templates and attendance records/logs). • Clear Purview Changes Administrator status to ordinary user status. • Delete Picture Options to browse and delete picture(s) uploaded to the Safescan TA-900 Series are displayed on the Check/Clock-In screen. 32 English | Nederlands | Deutsch | Français | Español | Italiano | Português Scroll with ▲/ ▼keys to browse pictures on the Safescan TA-900 Series. To delete the picture currently displayed, scroll with the ▲/ ▼keys and highlight either Del or Del All. Del ALL will delete all the pictures previously uploaded. Then press OK twice to confirm. After deleting a picture, the next saved picture will be displayed. Continue selectively deleting individual pictures, or press the ESC key to return to the previ-ous menu. 7.2.1 Picture formats Rules regarding supported picture formats: • The Safescan TA-900 Series only reads .JPG file format • The picture’s filename must begin with “AD_” • Then add a number Example: AD_0.jpg, AD_1.jpg, AD_2.jpg, etc Picture-size cannot exceed 50K. Maximum storage is 10 pictures 7.3 Keyboard The Safescan TA-900 Series has functions keys on either side of the screen. The function keys act as “short-cuts” similar to computer keyboard function keys. The Safescan TA-900 Series has 6 pre-defined function keys, labeled F1 through F6, F7 and F8 are empty and for customization. The function keys are “user-definable.” However, the Safescan TA-900 Series ships with the following pre-defined default Function Key values: F1 = Check-In F2 = Check-Out F3 = Break-Out F4 = Break-In F5 = OT-In F6 = OT-Out F7 = F8 = You can customize the Safescan TA-900 Series function and shortcut keys. 33 English | Nederlands | Deutsch | Français | Español | Italiano | Português From within the System Menu, scroll with the ◄ / ►keys and ▲/ ▼keys until Keyboard is highlighted. Press OK and the Key State settings appears. Scroll with the ▲/ ▼keys to browse function keys line by line. Press * or # keys to browse page by page. Press OK to edit the selected shortcut key. • Set shortcut keys: Highlight the Function key for which you wish to create a short cut and press OK. • Function: Scroll with the ◄ / ►keys to change the pre-defined value. If the shortcut key is set to “Status Key,” this screen appears. • No.: Assigns a code to shortcut • Name: Create a name for the shortcut (See chapter 16; Typing with Safescan TA-900 Series Keypad) • Automatic switch: Set times when this short cut is active 34 English | Nederlands | Deutsch | Français | Español | Italiano | Português 7.4 Display Setting This allows you to program User-Access attempts before Safescan TA-900 Series “times out”, Clock display and Picture Slideshow settings. From within the System Menu, scroll with the ◄ / ►keys and ▲/ ▼keys until Display is highlighted. Press OK. The Display Setup options are displayed. • 1:1 Match Retry Times How many attempts user is allowed when using 1:1 fingerprint matching verification (1 to 9 attempts) before Safescan TA-900 Series times out. • Password Retry Times How many attempts user is allowed when using Password matching verification (1 to 9 attempts) before Safescan TA-900 Series times out. • Clock mode Choose between 2 styles (round or square). • Picture Delay How often the picture on the Check/Clock-In screen will change. (picture/slide loop). • Clock Delay How long Clock will remain displayed when it appears during “Check/Clock-In”. Scroll with the ◄ / ►keys to change the pre-fixed settings. After making changes, either press OK, or highlight the OK button and then press OK. After selecting OK, a message will display “Change Saved Successfully! OK” To continue, press OK. To cancel and return to the previous menu, press ESC. 35 English | Nederlands | Deutsch | Français | Español | Italiano | Português 7.5 Reset This resets the Safescan TA-900 Series to its factory default settings, including communication settings, system settings, etc. From within the System Menu, scroll with the ◄ / ►keys and ▲/ ▼keys until Reset is highlighted. Press OK. Choose “reset all default settings”. The Safescan TA-900 Series will prompt “Are you sure?” Press OK to restore the default settings. Press ESC to cancel and return to the previous menu. Note: • Reset does NOT erase user information or attendance records. • Reset only erases changes made to the Safescan TA-900 Series system configuration since leaving the factory. 7.6 Bell setting The Safescan TA-900 Series has an internal bell which can be scheduled to ring at certain intervals. From within the System Menu, scroll with the ◄ / ►keys and ▲/ ▼keys until Bell is highlighted. Press OK. Scroll with ▲/ ▼keys to view the bell settings line by line. Scroll with the * or # keys to view the bell settings page by page. Press key to turn the scheduled bell on and off. Press OK Edit the scheduled bell. 36 English | Nederlands | Deutsch | Français | Español | Italiano | Português Bell Time: Indicates what time the bell will ring. Tone: Indicates which audio file will play (.wav). Volume: Indicates how loud the bell will sound. Times: Indicates the number of times the Tone will repeat. On/Off: Turns bell on and off. Change the values by using the scroll keys and keypad. When finished, press OK, or highlight the OK button and then press OK. Press ESC to cancel and return to the previous menu. 7.7 Miscellaneous Settings (Misc. Set.) Use Miscellaneous Settings to adjust the following settings: • Sleep time • Fingerprint Image • Power Button • Language 7.7.1 Sleep time (Idle) To help prolong the life of the Safescan TA-900 Series. From within the System Menu, scroll with the ◄ / ►keys and ▲/ ▼keys until Misc.Set. is highlighted. Press OK. Enter the “idle” minutes the Safescan TA-900 Series should wait before it enters Sleep Mode to conserve power. Press OK, or highlight the OK After selecting OK, a message will display “Change Saved Successfully! OK”. To continue, press OK. Press the ESC key to cancel and return to the previous menu. 37 button and then press OK. English | Nederlands | Deutsch | Français | Español | Italiano | Português 7.7.2 Fingerprint Image (FP Image) To set how the fingerprint images are showed on the display. From within the System Menu, scroll with the ◄ / ►keys and ▲/ ▼keys until Misc.Set. is highlighted. Press OK. Scroll with ▲/ ▼keys and enter the setting then select with ◄ / ►the right method. • Enroll show • Both show • Match show • Neither show After selecting OK, a message will display “Change Saved Successfully! OK”. To continue, press OK. Press the ESC key to cancel and return to the previous menu. 7.7.3 Power Button To lock the power button. From within the System Menu, scroll with the ◄ / ►keys and ▲/ ▼keys until Misc.Set. is highlighted. Press OK. 38 English | Nederlands | Deutsch | Français | Español | Italiano | Português Scroll with ▲/ ▼keys and enter the setting then select with ◄ / ► “On or OFF” After selecting OK, a message will display “Change Saved Successfully! OK” To continue, press OK. 7.7.4 Language Change the language on the terminal. From within the System Menu, scroll with the ◄ / ►keys and ▲/ ▼keys until Misc.Set. is highlighted. Press OK. Scroll with ▲/ ▼keys and enter the setting then select the language with ◄ / ►. After selecting OK, a message will display “Change Saved Successfully! OK”. To continue, press OK. 8.0 Date and Time Setting This screen allows you to manually set the date and time. Start at the Check/Clock-In screen; press the Menu key to open the Main Menu. From within the Main Menu, scroll with the ◄ / ►and ▲/ ▼keys until Date/Time is highlighted and press OK. 8.1 Changing Date and Time settings Use the scroll keys ▲/ ▼to place the cursor either in the Date or Time fields. Enter the correct Date and Time. When finished, press OK or highlight OK and press OK to save. Press ESC to cancel the operation and return to the previous menu. 39 English | Nederlands | Deutsch | Français | Español | Italiano | Português 9.0 USB Disk/PenDrive (flash drive) This feature allows you to manually upload and download data (i.e. fingerprint templates, attendance records/ transaction logs and pictures/images) between the Safescan TA-900 Series and the USB Disk/PenDrive. Start at the Check/Clock-In screen; press the Menu key to open the Main Menu. From within the Main Menu, scroll with the◄ / ►and ▲/ ▼keys until PenDrive is highlighted and press OK. The PenDrive options appears. • Download Attlog/Record: Copies attendance records/audit logs from the Safescan TA-900 Series to the USB Disk/PenDrive. • Download User: Copies users’ info (inc. templates) from the Safescan TA-900 Series to the USB Disk/PenDrive. • Download SMS: Copies Short Message(s) from the Safescan TA-900 Series to the USB Disk/PenDrive. • Upload User: Copies users’ info from the USB Disk/PenDrive to the Safescan TA-900 Series. • Upload SMS: Copies Short Message(s) from the USB Disk/PenDrive to the Safescan TA-900 Series. • Upload pictures: Copies pictures from the USB Disk/PenDrive to the Safescan TA-900 Series. 9.1 Downloading Attendance Records/ Logs The following files are copied to the USB Disk/PenDrive: • X_attlog.dat (attendance log) • X_oplog.dat (management log) • X_user (User info including templates) Note: The “X” represents the machine number of the Safescan TA-900 Series from which the data file(s) originated. 40 English | Nederlands | Deutsch | Français | Español | Italiano | Português 9.2 How to Download Attendance Records Insert the USB PenDrive into the Safescan TA-900 Series. Start at the Check/Clock-In screen. Press the Menu key to open the Main menu From within the Main Menu, scroll with the◄ / ►and ▲/ ▼keys until PenDrive is highlighted and press OK. Use the scroll ▲/ ▼ keys to highlight Download Attlog and press OK. The Safescan TA-900 Series will prompt “downloading the data, please wait......” When the records have finished downloading, the Safescan TA-900 Series will prompt “download attendance data successful”. Press ESC to exit and return to the previous menu. 9.3 Downloading User Data (i.e. fingerprints, RFID Card and PWD) Insert the USB Disk/PenDrive into the Safescan TA-900 Series. From within the PenDrive menu, scroll with the ▲/ ▼ keys and highlight Download Users. Then press OK. The Safescan TA-900 Series will prompt “downloading User Data, please wait.....” When the User Data finishes downloading, the Safescan TA-900 Series will prompt “Download User Data successful” Press ESC to exit and return to the previous menu. 41 English | Nederlands | Deutsch | Français | Español | Italiano | Português 9.4 Downloading SMS (Short Message) Insert the USB USB Disk/PenDrive into the Safescan TA-900 Series. From within the PenDrive menu, scroll with the ▲/ ▼ keys and highlight Download SMS. Then press OK. The Safescan TA-900 Series will prompt “downloading SMS Data, please wait.. ...” When the SMS Data finishes downloading, the Safescan TA-900 Series will prompt “Download SMS Data successful.” Press ESC to exit and return to the previous menu. 9.5 Uploading user data (templates) Insert the USB Disk/PenDrive into the Safescan TA-900 Series. From within the PenDrive menu, scroll with the ▲/ ▼ keys and highlight Upload Users. Then press OK. The Safescan TA-900 Series will prompt “Uploading User Data, please wait......” When the User Data finishes uploading, the Safescan TA-900 Series will prompt “Upload User Data successful.” Press ESC to exit and return to the previous menu. 9.6 Uploading SMS (Short Message) Insert the USB Disk/PenDrive into the Safescan TA-900 Series. From within the PenDrive menu, scroll with the ▲/ ▼ keys and highlight Upload SMS. Then press OK. The Safescan TA-900 Series will prompt “Uploading SMS Data, please wait......” When the User Data finishes uploading, the Safescan TA-900 Series will prompt “Upload User Data successful.” Press ESC to exit and return to the previous menu. 42 English | Nederlands | Deutsch | Français | Español | Italiano | Português 9.7 Uploading Picture(s) You can upload pictures to be displayed on the Safescan TA-900 Series. Pictures are uploaded with the USB PenDrive, just as user data and attendance records are. Insert the USB PenDrive into the Safescan TA-900 Series. From within the PenDrive menu, scroll with the ▲/ ▼ keys and highlight Upload Picture. Then press OK. Scroll with the ▲/ ▼keys to preview the picture on the USB PenDrive Press OK to choose the picture(s) you want to upload to the Safescan TA-900 Series. After uploading the pictures the Safescan TA-900 Series will display the message “upload successful.” The picture file will automatically be added to the existing pictures stored on the Safescan TA-900 Series. Press ESC to exit and return to the previous menu. Rules regarding supported picture formats: • The Safescan TA-900 Series only reads .JPG file format • The picture’s filename must begin with “AD_” Then add a number (examples: AD_0.jpg, AD_1.jpg, AD_2.jpg) • Picture-size cannot exceed 50K. • Do not store more than 10 pictures in the Safescan TA-900 Series 43 English | Nederlands | Deutsch | Français | Español | Italiano | Português 10.0 Auto Test The Safescan TA-900 Series has built-in Auto Test features which allow users to quickly check if major system functions are operating properly. Start at the Check/Clock-In screen; press the Menu key to open the Main Menu. From the Main Menu, highlight and select Auto Test and press OK. The Auto Test menu will open From within the Auto Test User Menu, scroll with the ▲/ ▼keys until the feature you wish to test is highlighted. Press OK to accept. 10.1 TFT Screen Test This option allows you to test if all the TFT colors are properly displayed. Start at the Auto test Menu. Then scroll with the ▲/ ▼keys until Test TFT is highlighted. Press OK to accept. You will notice several horizontal colored bars: RED GREEN DARK BLUE YELLOW AQUA BLUE PURPLE Press OK again, and you should see an all-white display. Press OK again, and you should see an all-black display. This indicates all colors are displayed and the Safescan TA-900 Series’s color TFT screen is operating properly. To exit the TFT Test screen and return to the Auto Test Menu, press OK repeatedly or press ESC at any time. 44 English | Nederlands | Deutsch | Français | Español | Italiano | Português 10.2 Audio Test This option allows you to test if all the Safescan TA-900 Series. Start at the Auto test Menu. Then scroll with the ▲/ ▼keys until Audio Test is highlighted. Press OK to accept. Check the messages for accuracy, clarity and pronunciation. To exit the Audio Test screen and return to the Auto Test Menu, press OK repeatedly or press ESC at any time. 10.3 Keypad Test The Safescan TA-900 Series allows you to test that each key on its keypad is responding properly. Start at the Auto test Menu. Then scroll with the ▲/ ▼keys until Keyboard Test is highlighted. Press OK to accept. You will notice the screen displays the keys for every corresponding key on the Safescan TA-900 Series keypad. As you touch each “keypad key,” its corresponding key on the screen display will highlight in red (__). If the key is not properly working it will highlight in gray/black (__). To exit the Keyboard Test screen and return to the Auto Test Menu, press OK or press ESC at any time. 10.4 Fingerprint Sensor Test The Fingerprint Sensor Test verifies if the sensor is working correctly. You can visually examine the image resolution and clarity of scanned fingerprints in real-time. Start at the Auto test Menu. Then scroll with the ▲/ ▼keys until Sensor Test is highlighted. Press OK to accept. Place finger(s) repeatedly on the sensor and observe the recorded images. If images are acceptable, press the ESC key at any time to return to the Auto test Menu. 45 English | Nederlands | Deutsch | Français | Español | Italiano | Português 10.5 Real-time clock (RTC) Test This test ensures the clock is operating normally down to the millisecond. Start at the Auto test Menu. Then scroll with the ▲/ ▼keys until RTC Test is highlighted. Press OK to accept. You will notice the Date (YYY-MM-DD) and Time (HH-MM) appear on the top of the screen. Beneath the date/time line you will see: 00(s) : 08(ms) The line above represents seconds(s) and milliseconds (ms). Press OK once and the seconds and milliseconds advance in real-time, as does a stop watch. Each time you press OK, the “stop watch” will reset to zero and then start again. If the clock is operating correctly, press ESC at any time to return to the Auto Test Menu. 11.0 Record (attendance/audit logs) The Safescan TA-900 Series stores user attendance/door-access records which can be viewed directly from the Safescan TA-900 Series screen display. Start at the Check/Clock-In screen and press the Menu key to open the Main Menu. From the Main Menu, highlight and select Record (Attendance Logs/ Records) and press OK. From within the Record Menu, scroll with the ▲/ ▼keys and indicate which user’s rec-ord and what time frame should be displayed. To display the records for ALL users, the Record Menu usually defaults with the word ALL in the ID. NO field. Either press OK to accept “ALL records,” or use the backspace key. A blank value in the ID. NO field will also display ALL users’ attendance records. To display only an individual’s attendance record, enter his/her ID NO. Once the ID number and desired timeframe have been entered, highlight the OK 46 key and press OK. English | Nederlands | Deutsch | Français | Español | Italiano | Português Example of attendance record. Sample information provided: • ID NO. 10001 (no name) clocked in 7:21am with his/her finger. • ID NO. 10001 (no name) clocked out 12:14pm with his/her finger. • ID NO. 10001 (no name) clocked in 1:12pm with his/her finger. • ID NO. 10001 (no name) clocked in 6:30pm with his/her finger. When finished reviewing attendance records, press ESC at any time to exit and return to the previous menu. 12.0 System information This menu provides information regarding the Safescan TA-900 Series storage utilization and firmware. Start at the Check/Clock-In screen and press the Menu key to open the Main Menu. From the Main Menu, highlight and select Sys Info and press OK. Example of system information. 12.1 Records Information In the sample screen above, the following “Record” information is displayed: • Total enrolled users on the Safescan TA-900 Series is one (1). • Total enrolled Managers on the Safescan TA-900 Series is none (0). • Total enrolled passwords on the Safescan TA-900 Series is none (0). • Total fingerprint storage capacity is 8,000. - Two (2) fingerprints (templates) have been enrolled. - Safescan TA-900 Series can store 7,998 more fingerprints (templates). 47 English | Nederlands | Deutsch | Français | Español | Italiano | Português • Total Attendance Log storage capacity of 200,000 records. - 1,000 records have been stored. - Safescan TA-900 Series can store 199,000 more records. 12.2 Device information To view Device Information, scroll with the ◄ / ►keys. You can “toggle” back and forth between Records Information and Device Information by using the scroll the ◄ / ►keys. Press ESC to return to the previous menu. 48 English | Nederlands | Deutsch | Français | Español | Italiano | Português Appendix 1. 13.0 Fingerprint Recognition Technology Prior to operating the Safescan TA-900 Series, it is essential to understand how fingerprint recognition technology works. Adding and verifying fingerprints are the core functions of the Safescan TA-900 Series. Once you acquire a thorough understanding of fingerprint recognition technology, you will find your experience with the Safescan TA-900 Series to be very productive and rewarding. 13.1 How Fingerprint Recognition Technology Works When the user places his/her finger on a Fingerprint Recognition Device (i.e. Safescan TA-900 Series) for the first time, the fingerprint is scanned and converted into a computer-generated “biometric template.” The templates are only recognized by each respective bio-metric manufacturer’s device. However, these “templates” are NOT actual fingerprint images. “Real” fingerprint images cannot be re-generated from these templates. All fingerprints contain a number of unique physical characteristics called minutiae. Minutia includes certain visible aspects of fingerprints such as ridges, ridge endings, and bifurcation (forking) of ridges. Most of the minutiae are found in the core points of fingerprints, which are found near the center of the fingerprint on the fleshy pad of the finger. Figure A-1 shows the positions of core points within fingerprints. The core points are repre-sented by the red dots in the figure below (note: if this manual is printed in black and white you will only see a thick dot near the upper ridges in the figure below). Figure A-1 A core point is defined as the topmost point on the innermost upward recurring ridge line. A user is considered “enrolled” in the Safescan TA-900 Series after his/her fingerprint(s) or password has been successfully registered in the Safescan TA-900 Series.| When the user places his/her finger(s) on the Safescan TA-900 Series fingerprint sensor during the enrollment process, the Safescan TA-900 Series takes a picture of that user’s fin-ger’s key minutiae points. Then the Safescan TA-900 Series uses its proprietary mathemati-cal algorithm and converts that picture into a unique mathematical template which is compa-rable to a 60-digit password. This unique template is then encrypted and stored in the Safescan TA-900 Series database. Note: Privacy issues should never be a concern when using the Safescan TA-900 Series because NO REAL IMAGE OF A USER’S FINGERPRINT IS STORED. ONLY the minutiae-based templates are stored. 49 English | Nederlands | Deutsch | Français | Español | Italiano | Português Each time a user’s fingerprint is scanned, the Safescan TA-900 Series searches its database for a matching fingerprint. If the Safescan TA-900 Series finds the user’s fingerprint, then his/her “attendance” is recorded in the Safescan TA-900 Series “audit log” and will be noted in subsequent reports. 13.2 Getting Good Fingerprint Images The quality of fingerprint images is relative to the number of minutiae points captured by the Safescan TA-900 Series sensor. Fingerprint images not possessing an adequate number of minutiae points may be unreadable. It is advised to issue a secret password or an RFID card for those users whose fingerprint images lack sufficient minutia points and cannot be read by the sensor. Safescan TA-955 has an integrated card reader if you do not intend to assign passwords. Figure A-2 shows poor-quality fingerprints, characterized by smudged, faded or distorted areas on the fingerprint. These conditions can be caused by excessive dryness, wetness, insufficient pressure. Figure A-2 The Safescan TA-900 Series fingerprint matching algorithm is capable of extracting the cor-rect minutiae without the benefit of a perfect print. However, the positioning of the finger and the moisture and pressure of the fingerprint are significant factors to consider when it is placed on the sensor. This will help achieve a good consistent fingerprint match. 13.3 Correcting Wet or Dry Fingerprint Images When the temperature is rigid or when hands have just been washed, fingerprints often be-come very dry. In this case, the user should moisturize his/her fingerprint simply by breathing on the fleshy pad of his/her fingertip prior to placing his/her finger on the sensor. The moisture from his/her breath should improve the recognition of his/her fingerprint. Conversely, if the fingerprint is too wet, the ridges and valleys are rendered indistinguishable. The lack of recognizable minutiae causes wet fingerprints to be rejected by the Safescan TA-900 Series. This can be remedied simply by swiping the finger on a clean dry towel or cloth. How much pressure is required for a good-quality fingerprint? If too much pressure is applied when pressing down on the sensor, the finger’s ridges become pressed together and create an unrecognizable image. Applying too much pressure (similar to fingerprints that are too wet) will create a “blurred” image which the Safescan TA-900 Series sensor might not recognize. If too little pressure is applied, the resulting image will be similar to the dry fingerprint and unidentifiable. Issues related to moisture and pressure can easily be addressed with practice and users getting a feel of the sensor. 50 English | Nederlands | Deutsch | Français | Español | Italiano | Português Be sure to maintain contact with the fingerprint sensor for 2 full seconds, until the Safescan TA-900 Series responds. The Safescan TA-900 Series has both audio and visual indicators which respond when the Safescan TA-900 Series senses a finger. 13.4 Proper Finger Placement The user’s finger should completely cover the sensor. The finger should be placed flat and in the center of the sensor. The finger should cover at least 80% of the sensor as shown below. Correct Incorrect Difficulties: Fingerprint is not recognized or is refused often Causes and solutions: • Finger is greasy or too moist: please wipe the finger dry on the palm of your hand • Finger is too dry: blow over the finger in order to make it moister • Not enough pressure: press the finger slightly harder on the fingerprint sensor • First type your user ID and then place the fingerprint (recognition 1:1). 13.5 Fingerprint Matching The Safescan TA-955 supports two methods of fingerprint matching, 1:N and 1:1. 13.5.1 1:N Fingerprint Matching When using 1:N Fingerprint Matching, the Safescan TA-900 Series will place the fingerprint (“1”) in its temporary memory and then compare it to ALL (“N”) fingerprint templates stored in the Safescan TA-900 Series database (up to 2800 templates). By using 1:N matching, the user enjoys the convenience of not entering his/her User ID number prior to placing his/ her finger on the sensor. 1:N is principally a 1-touch matching. It is the FASTEST and EASIEST method of fingerprint matching. 13.5.2 How to Use 1:N Fingerprint Matching From the Check/Clock-In screen, properly place finger on the sensor. 51 English | Nederlands | Deutsch | Français | Español | Italiano | Português When the Safescan TA-900 Series responds with a tweet and the light flashes green the user has successfully verified his/her identity by using 1:N matching. If the Safescan TA-900 Series responds with a double tweet and the light flashes red the process must be repeated. 13.5.3 1:1 Fingerprint Matching (ID. NO +fingerprint) When too many users’ fingerprints are not easily recognized by the Safescan TA-900 Series, it can be set to perform 1:1 fingerprint matching. 1:1 matching requires an added step of entering the user’s ID. number first. However, 1:1 matching is more consistent than 1:N matching. 13.5.4 How to Use 1:1 Fingerprint Matching PRIOR to placing his/her finger on the Safescan TA-900 Series fingerprint sensor, the user must FIRST enter his/her ID number and press OK. If the fingerprint template registered with his/her user ID number (“1”) matches his/her finger (“1”), the user’s identity has successfully been verified using 1:1 fingerprint matching. Start at the Check/Clock-In Screen. From the Check/Clock-In screen, enter the User ID number and press OK. The user has to place his/her finger on the sensor. Note: Remember, the user should place his/her finger flat and keep it centered on the sensor. If the Safescan TA-900 Series recognizes the user’s fingerprint this screen appears. 52 English | Nederlands | Deutsch | Français | Español | Italiano | Português If the Safescan TA-900 Series does not recognize the user’s finger it will respond by tweet twice and the light flashes red. When this occurs, the user again must place his/her finger on the sensor. This time ensuring his/her finger is placed flat and centered on the sensor. 13.6 Password Matching If fingerprint matching becomes too problematic for too many users, they can register with passwords instead of fingerprints. 13.6.1 How to Use Password Matching Start at the Check/Clock-In Screen. At the Check/Clock-In screen, enter the employee’s User ID. number and press OK. After a user’s ID number is entered and the user is NOT prompted to enter his/her password (“PWD”), this means that NO password has been registered to that ID number. If the Safescan TA-900 Series prompts “Error Enroll NO(number),” this means the user has mistakenly entered an incorrect ID number. If this is the case, the user should reattempt entering his/her correct user ID number. After entering the user ID. number, the user will enter his/her password (“PWD”). 53 English | Nederlands | Deutsch | Français | Español | Italiano | Português If the Safescan TA-900 Series responds with a tweet and the green light flashes then the user has successfully verified his/her identity using Password verification. If the Safescan TA-900 Series prompts the user with “Error Pwd”, then the user should re-attempt entering his/her correct password. Appendix 2. 14.0 Getting familiar with the keypad Key Function Numeric keypadUsed for data input ▲Scroll Up ▼Scroll down ◄ Scroll right ►Scroll left ◙Shuts down Safescan TA-900 Series when held down for 3 seconds when in Check/Clock-In screen ← Backspace Key (erases 1 character at a time) M/ Menu / <Enter> Key ESC Escape key (cancels operation and returns to previous menu) Asterisk often used to page up ▲display Also used when creating “letter” and/or “symbol” data input #Pound key often used to page down ▼display 54 English | Nederlands | Deutsch | Français | Español | Italiano | Português FP = Fingerprint PW = Password PIN = Personal Identification Number RF = Radio Frequency ID (proximity card) Appendix 3. 15.0 User Access to Attendance Records Users can view their own attendance records when checking/clocking in. After checking/clocking in, the user presses the Menu key within 10 seconds. The user’s attendance records will then display. Scroll with the ▲/ ▼ keys to browse attendance records line by line Press the and keys to browse page by page. Press OK or menu for detailed view. Press ESC to return to the previous menu. Immediately after the Admin places his/her finger on the Safescan TA-900 Series press the key and the Attendance records” will display. Scroll with the ▲/ ▼ keys to browse the attendance log line by line. Press the ◄ / ► key to browse the attendance log page by page. Press the and key to see more detail. Appendix 4. 16.0 Typing with Safescan TA-900 Series keypad The Safescan TA-900 Series keypad allows you to type letters of the alphabet and symbols, similar to the way many cell phones have this feature for text-messaging. In several Safescan TA-900 Series input screens, pressing the asterisk user to enter either “letters” or “symbols.” 55 key on the keypad allows the English | Nederlands | Deutsch | Français | Español | Italiano | Português Each time you press the asterisk key on the keypad you have the choice to enter either “letters” or “symbols”. When in “letter mode,” [English] appears at the bottom of the screen. Press the key again and you will notice how [symbol] replaces [English] at the bottom of the screen. While in “symbol mode” pressing the right scroll key ► offers even more symbols to choose from. 16.1 How to create a “word” In the following example we will illustrate how to create the name Joe. Step 1 From within the New User menu, press the asterisk key until [English] appears at the bottom of the screen. You are now ready to begin entering “letters.” Step 2 Press the 5JKL key once. Notice there are 6 choices: 0j 1k2l 3J4K5L To enter the username Joe, press the 3 key to create an uppercase letter “J.” After entering the desired “letter,” the display will return to the [English] prompt. Step 3 Now press the 6MNO key once to continue entering the username Joe. Again, notice there are 6 choices: 0m1n 2o 3M4N 5O To continue entering the username Joe, press the 2 key to create a lowercase “o.” After entering the desired “letter,” the display will return to the [English] prompt. Step 4 Now press the 3DEF key once to continue entering the username Joe Again, notice there are 6 choices: 0d 1e 2f 3D4E5F Finish entering the username Joe by pressing the 1 key once to create a lowercase “e.” You have now completed entering the user’s name and are ready to enter his/her finger-print(s) and/or password and authority setting. 56 English | Nederlands | Deutsch | Français | Español | Italiano | Português Appendix 5. 17.0 Synchronize data with the software 17.1 By USB stick Before you can synchronize your Safescan TA 900 terminal with the Safescan Time Attend-ance software on your computer you must add your device to the software: please proceed as follows: • Install the software on your computer and start it up • Select “Device”: • Add • Assign a name • Select “This Computer” • Press OK Under active you will see that your USB drive is not connected. Once you connect your USB stick into your computer the status turns on connected and the log data will be transferred into the software automatically. The user data has to be synchronized manually. Start Time Attendance Software before connecting the USB stick into your computer. 17.2 Via local Network TCP/IP or Wi-Fi If your terminal is connected via your local (wireless) network to your computer, the log data is automatically transferred into the software, the user data must be synchronized manually. 57 English | Nederlands | Deutsch | Français | Español | Italiano | Português 17.2.1 Connect Terminal with Safescan Time Attendance Software During your first synchronization with the Safescan Time Attendance Software on your computer, you must add your device in the software: please proceed as follows: • Install the software on your computer and start it up • Select “Device”: • Add • Assign a name • Enter the IP address which is stored in your terminal • Select “This Computer” • Enter the communication key when Be one have deposited in your terminal • Press OK Under active you will see that your device is connected. Once you have connected your device with your computer the log data will be transferred into the software automatically. The user data has to be synchronized manually. 17.3 Synchronizing user data with Time Attendance Software For the synchronization of user data, select the desired drive, the synchronization button is active. Select the Sync button and then the User.dat file on your USB stick and open it. If there are any changes the system will show you this in a separate window. If there are no changes you will get the message: there are no changes found. To synchronize the User Data from Device (terminal) to the Database (software) choose the “Device -> Database”button. The system will show very every line of data what “kind” it is and what the “resolution” is. For example, if there is a difference between the data on the USB stick and on the database, it will show here. You can then decide which information should be synchronized into which direction (either from database/software to device/terminal, or from device/terminal to database/software). 58 English | Nederlands | Deutsch | Français | Español | Italiano | Português After you have made the right selections continue with the “Commit. sync” button to execute the synchronisation. Press OK, the system can not find any changes anymore. Press OK. The synchronization is done. 59 13-001 60 www.safescan.com