1
MAP1
MIDI Arpeggiator
User’s Manual
0$34#$USHJJLDWRU
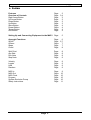
; ,QGH[
Features
Overview of Controls
Right Arrow Button
Up Arrow Button
Down Button
Up Button
Store Button
Preset Button
Tempo Button
Run Button
Page
Page
Page
Page
Page
Page
Page
Page
Page
Page
2
3,4
3
3
3
3
4
4
4
4
Setting Up and Connecting Equipment to the MAP1 Page
5
Arpeggio Functions
Styles
Octave
Steps
Chord
Page
Page
Page
Page
Page
6
6,7
7
7
8
Split Point
Arp Side
Run Note
Stop Note
Page
Page
Page
Page
8
8
8
9
Velocity
Legato
Hold
Random
Page
Page
Page
Page
9
9
9
9
MIDI In
MIDI Out
MIDI Clock
Program
System Exclusive Dump
Safety instructions
Page
Page
Page
Page
Page
Page
9
10
10
10
10
11
3DJH#4
0$34#$USHJJLDWRU
; )HDWXUHV
The MAP1 (MIDI Arpeggiator) is a MIDI arpeggiator which, in addition to the "classical"
arpeggios (playing a series of notes either upwards or downwards), also features so-called
"styles" which enables its use as an automated accompaniment unit. The MAP1’s compact
design makes it easy to place the unit on top of a master keyboard or synthesizer. All of the
external connection points are conveniently located on the rear of the unit.
The MAP1 arpeggiator plays several notes which it receives at once (i.e. a chord) one after
the other.
It can be configured to play the notes in a certain order (e.g. from the lowest note to the
highest, or vice versa), or to change the dynamics, tempo or note length, and can also vary
the region where the arpeggio is played. All of these configuration parameters can be
stored in one of the MAP1’s memory locations, and loaded when needed.
The MAP1 has 64 preset memories, which can be selected via MIDI program change commands. Each preset in the MAP1 can be individually configured to accept or reject MIDI
program change messages.
The presets can be stored via MIDI system exclusive to a sequencer or MIDI file player, and
loaded back into the MAP1 later.
All MIDI data received via the MAP1’s MIDI IN port, including data which is not altered by
the MAP1, are sent out again via the unit’s MIDI OUT port (e.g. pitch bend, modulation, volume, etc.).
The MAP1’s MIDI THRU port retransmits all of the data received via the MIDI IN port without alteration.
The MAP1 can play arpeggios either to the left or right of a selectable split point, or over the
entire keyboard range.
The arpeggio Start and Stop functions can be assigned to a MIDI note or controller (e.g. a
sustain pedal).
The Hold and Legato functions can be controlled via MIDI controller messages.
The dynamics of the arpeggios can be controlled via a MIDI keyboard, or generated randomly by the MAP1.
The length of the notes varies in certain arpeggio styles.
The Chord function allows a mixture of notes and normal chords to be played, dependent
on which Style is selected in the MAP1.
The MAP1 can be configured to extend an arpeggio by octaves up to plus or minus three
octaves.
The number of note steps per measure can be set to "uneven" values via the Step function.
The MAP1’s tempo generator can be synchronized to an external MIDI clock, or act as a
MIDI clock source.
3DJH#5
0$34#$USHJJLDWRU
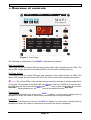
; 2YHUYLHZ#RI#FRQWUROV
MIDI Thru
MIDI Out
MIDI In
Power
MAP1
MIDI Arpeggiator
Store
&
Preset
Arp. Style
Octave
Steps
Chord
Split Point
Arp. Side
Run Note
Stop Note
Velocity
Legato
Hold
Random
MIDI In
MIDI Out
Clock
Prog./SysEx
Tempo
&
Run
Edit
Down
Up
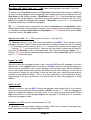
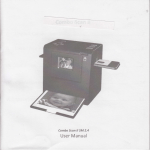
IFigure 1: Front Panel
The following is a description of the MAP1’s switches and controls.
Right Arrow Button:
This button moves the active LED one step to the right in the horizontal row of LEDs. The
active LED "wraps around" to the leftmost LED in the row after reaching the end.
Up Arrow Button:
This button moves the active LED one step upwards in the vertical column of LEDs. The
active LED "wraps around" to the LED at the top of the column after reaching the bottom.
L#Note: The active LEDs in the row and column should be thought of as the endpoints of
an x/y axis. For example, if the third LED from the left in the row of LEDs is lit, and the second LED from the top of the column is lit, then MAP1 is set to their intersection, the function
Run Note. When powered on, the MAP1 is set to the default function Arp Style.
Down Button:
This button decrements the value in the MAP1’s display. In most cases, holding this key
pressed will cause the value to continuously decrement the value (autorepeat).
Up Button:
This button increments the value in the MAP1’s display. In most cases, holding this key
pressed will cause the value to continuously increment the value (autorepeat).
3DJH#6
0$34#$USHJJLDWRU
Store Button:
This button is used to either store to one of the MAP1’s preset memory locations, or to initiate a MIDI SysEx dump. Pressing the key causes the Store LED to blink, while the Preset LED is either blinking, meaning that one of the current preset’s parameters has been
edited, or is steadily lit, meaning that nothing has been changed. The display shows the
current preset number, which can be changed via the Down/Up buttons. Pressing the
Store button a second time will cause the displayed preset to be overwritten with the
MAP1’s current configuration. The Store operation can be cancelled by pressing either of
the Arrow keys. In this case, although the configuration will not be written to a preset location, the edited data will still be active. Alternatively, the Store operation can be cancelled
be pressing the Preset button, which will cause the currently edited data to be overwritten
by the contents of a preset memory location.
L#Note: If the MAP1 is playing an arpeggio during the Store operation, then loading this
preset later will cause the arpeggio to begin playing immediately.
If the MAP1 is displaying "ê:êñ" in the display (as selected via the function Prog./SysEx),
then pressing the Store button will initiate a MIDI system exclusive data dump of all 64 of
the MAP1’s presets via the MIDI OUT port.
Preset Button:
Pressing this button causes the current preset number, "1Sñî" to "1ñéë" to be displayed.
The Down/Up buttons can be used to increment or decrement the preset number, respectively. Pressing the Preset button a second time will load the configuration data of the displayed preset location into the MAP1’s active memory area. If this button is pressed
accidentally, then a press on one of the Arrow keys will cancel the preset loading operation, and the display will return to its previous value.
Tempo Button:
When the Tempo button is active, then the display shows the current arpeggio tempo in
beats per minute (BPM). The Down/Up buttons can be used to change the tempo value
over a range from 20 BPM to 240 BPM. Pressing Tempo again returns the display to its
previous state.
Run Button:
When the Run button is pressed, the Run LED lights, the MAP1 sends a MIDI start command through its MIDI OUT port, the Tempo LED begins to blink in the current tempo, and
the unit transmits arpeggios and MIDI clocks via the MIDI OUT port.
A second press on the Run button causes the MAP1 to stop transmitting arpeggios and
MIDI clocks, and to send a MIDI stop command. The Run LED is extinguished, and data
received at the MIDI IN port is sent out via the MIDI OUT port without alteration.
3DJH#7
0$34#$USHJJLDWRU
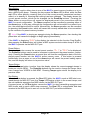
; 6HWWLQJ#XS#’
S#Note:
Please be certain to only use the original voltage adaptor with the MAP1. Using another
adaptor can permanently damage the unit!
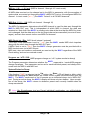
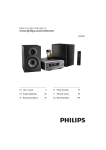
Connect your master keyboard, synthesizer or sequencer to the MAP1. The MIDI OUT port
of the keyboard should be connected to the MAP1’s MIDI IN port, and the MAP1’s MIDI
OUT port should be connected to the keyboard’s MIDI IN port. You can, of course, connect
a MIDI IN port of an expander module or other piece of MIDI equipment to the MAP1’s MIDI
OUT port instead of the keyboard.
Please first turn the keyboard on after making the MIDI connections. After the keyboard has
finished "booting," you may then connect the MAP1 to its voltage adaptor. When powered
on, the MAP1 immediately transmits MIDI "all notes off" and "reset all controllers" messages, in order to clear any hanging notes or controllers, and it also sends a MIDI "local off"
message to the keyboard, since the MAP1 will be generating note data itself and sending it
to the keyboard.
Of course, if you’re not using the keyboard’s MIDI IN, then it doesn’t matter in which order
you turn the equipment on.
Power
12 Volt AC
MIDI In
MIDI Out
Figure 2: Rear connections on the MAP1
3DJH#8
MIDI Thru
0$34#$USHJJLDWRU
; $USHJJLR#IXQFWLRQV
L# Note: The MAP1 has 26 different Arpeggio Styles. These can be selected with the
Down/Up keys. After the last Style (""Uñç"), the list is repeated, with the addition of a
period in the first position of the name in the display. The period is an indicator that in addition to the arpeggios, the keys currently pressed in the arpeggio region are also emitted. In
order to keep the MAP1 in its convenient compact form, it was necessary to abbreviate the
display in this fashion, but you'll find that this "shorthand" notation soon becomes almost
second nature.
The following is a description of each of the MAP1’s various arpeggio styles:
Style: LUP / Ldn / LUd (latch up, latch down, latch up and down)
The latch mode can "memorize" up to eight notes and the order in which they were played.
If a split point has been set (see Page 8), then the latched notes are also controlled by the
notes played on the non-arpeggiated side of the split point.
For example, suppose the arpeggio is active on the right of a split point set at C4, and the
Hold function is activated. Now, in order to start an arpeggio, the root note of the chord to
be arpeggiated must be pressed and held. To input a C Major chord, we would press and
hold the root tone of C, and then press E and G, which we would not need to keep pressed
down. Now, if we play a note of C to the left of the split point, the MAP1 will play a C Major
arpeggio. If we now change the note to the left of the split by playing say, an A, the MAP1
will change the arpeggio from C Major to A minor. In other words, the MAP1 is able to distinguish between Major and minor key arpeggios.
"-61" (latch up) means that the arpeggio is played from the lowest note to the highest note
and then begins again at the lowest note (keeping in mind that there might be an additional
"octaved" arpeggio to be played).
"-EO" (latch down) is the opposite of "-61" in that the arpeggio is played from the highest
note to the lowest.
"-6E" is a combination of "-61" and "-EO", in which the arpeggio is first played from the
lowest to the highest note, and then back down from the highest note to the lowest, after
which the entire process begins again.
Style: UP / dn / Udn / Udr (up, down, up and down, up and down rhythmic)
These are the "classic" arpeggio styles, as found in older synthesizers. " 61" plays an
arpeggio from the lowest note to the highest note, " EO" from the highest note to the lowest,
while "6EO" alternates between " 61" and " EO". The Style "6ES" is like "6EO" with the
change that the pauses between the notes in the arpeggio varies.
Style: UP. / dn. / Udn. / Udr. (up, down, up and down, up and down rhythmic)
When a period is displayed in the last position of the display, that the notes of the arpeggio
have variable lengths. The lengths are generated randomly by the MAP1. Also, when an
arpeggio of this type is held via the Hold button, the arpeggio does not cease immediately
when the Hold function is released, but instead plays until the last note of the arpeggio.
Otherwise, these styles are the same as the UP/dn/Udn/Udr styles described above.
3DJH#9
0$34#$USHJJLDWRU
Style: UP2 / dn2 / Ud2 / rnd (up, down, up and down, random)
In these styles, the sequence of notes in the arpeggio is somewhat different. For example, if
the C Major chord C4-E4-G4-C5 is played in Style "61í", the MAP1 will produce the
arpeggio C4-E4-G4-E4-G4-C5-G4-C5. In "EOí", the same chord will produce the arpeggio
C5-G4-E4-G4-E4-C4-E4-C4, while the Style "6Eí" would produce C4-E4-G4-E4-G4-C5G4-C5-G4-E4-C4-E4-C4. The Style "SOEñ" is similar to "6Eí", with the difference that
change from note to note varies in length.
Style: UP2. / dn2. / Ud2. (up, down, up and down, up and down)
As before, a period is displayed in the last position of the display indicates that the notes of
the arpeggio have variable lengths. The lengths are generated randomly be the MAP1.
Also, when an arpeggio of this type is held via the Hold button, the arpeggio does not cease
immediately when the Hold function is released, but instead plays until the last note of the
arpeggio before stopping. Otherwise, these styles are the same as the UP2/dn2/Ud2 styles
described above.
Style: At1 / At2 / ... / At7 / At8 (Autotrigger modes 1 through 8)
The autotrigger styles repeat a played chord with varying note lengths and dynamics.
L Note: The autotrigger styles ""Uñî" through ""Uñç" have factory installed dynamic patterns, and to hear the different, factory programmed dynamics the Velocity should be set to
the value 127 with these styles.
Octave: -3o. / -2o. / -1o. / oFF / 1oc. / 2oc. / 3oc. (-3 octaves to +3 octaves)
If the Octave mode is active, then the MAP1 extends an arpeggio with a copy of the same
arpeggio, one two or three octaves above or below the chord being input. Note that octaves
which fall within the non-arpeggiated side of an active split point will not be played. For
example, if the arpeggio is active to the right of a split point, then it would be better to use
the octave settings +1, +2 and +3. No additional octaves are played In the setting "P''".
Step: St.1 / St.2 / ... / St.8 (note steps 1 through 8)
The note step subdivide the range of notes in an arpeggio, Small values a make an arpeggio faster, large values slow an arpeggio down. In the setting "êUñë", an arpeggio has eight
notes per measure.
3DJH#:
0$34#$USHJJLDWRU
Chord: on / oFF
If Chord mode is activated, then the MAP1 emits the notes of an '"arpeggio" according to
the current style. For example, in the autotrigger styles with Octave mode activated, all of
the notes are played simultaneously, and in other styles, chords alternate with single arpeggio notes.
Split Point: oFF / ’c-1 / ... / ’F9 (split point off / MIDI note C1 though F9)
It is possible to set a split point over the entire range of the keyboard, from the lowest C# to
the highest F#. If it is desired that the MAP1 plays arpeggios over the entire range of the
keyboard, then it is possible to set the split point to "P''". However, if a split point is set,
then the range on one side of the split point (including the split point itself) will be arpeggiated, while the other side will be played back normally. The Arp Side parameter, described
below, determines which side of the split point will be arpeggiated.
ARP Side LFt. / rht. (arpeggio side left / right)
This simple parameter determines which side of a split point is to be arpeggiated. " -'Uñ"
means that arpeggios are to be played in the region to the left of the split point, and "SIUñ"
means that they are to be played in the region to the right.
Run Note: oFF / SUS. / ALL / c-1 / ... /G9 (start note off / sustain / all notes / C1 to G9)
The Run Note function makes it possible to configure the MAP1 to start an arpeggio when
a certain key on the keyboard is pressed, or when a MIDI sustain pedal message is
received. For example, if the Run Note is set to " Dë" then pressing the C4 key on the
attached MIDI keyboard will start the arpeggiator. After the arpeggio has started, then the
key assigned to be the Run Note can be played normally.
If Run Note is set to "ê6êñ" then pressing the sustain pedal will start the arpeggiator. In this
mode, the sustain pedal also takes on the role of the Hold function after the arpeggio has
started. If Run Note is set to ""--", then pressing an arbitrary MIDI key will start the arpeggiator.
3DJH#;
0$34#$USHJJLDWRU
Stop Note: oFF / SUS. / ALL / c-1 / ... / G9 (start note off/sustain / all notes / C1 to G9)
In analogy to the Run Note function, the Stop Note setting allows the setting of a MIDI key
to stop a running arpeggio. After the arpeggio has stopped, then the key assigned to be the
Stop Note can be played normally. If Stop Note is set to "ê6êñ" then pressing the sustain
pedal will stop the arpeggiator. As before, the sustain pedal also takes on the role of the
Hold function after the arpeggio has stopped. If Stop Note is set to ""--", then pressing
an arbitrary MIDI key will stop the arpeggiator.
L#Note: If the same key is assigned to be
both the Run Note and the Stop Note, then it
follows that this key cannot be played normally, since it both starts and stops the arpeggiator. Similarly, setting both Run Note and Stop Note to "ê6êñ" means that the sustain pedal
cannot be used for the Hold function.
Velocity: rnd / dYn / 1/ ... / 127 (random / dynamic / 1 through 127)
The Velocity setting is for all MIDI notes transmitted by the MAP1. This includes not only
arpeggios, but also "normal" notes in the case where a split point has been set. The setting
"SOEñ" generates random velocity values, "E:Oñ" transmits the velocity as was played, and
" î" through "îíè" set a fixed velocity. Note that the fixed velocity values can still be influenced by the Random function described below. Note that the autotrigger Styles ""Uñî"
through ""Uñç" have factory installed dynamic patterns, and that Velocity must be set to the
value "îíè" with these styles.
Legato: on / oFF
Normally, before the arpeggiator plays a note, it sends a MIDI note off message for the preceding note. If the Legato function is turned on, the MAP1 first turns off the preceding note
after a note on message for the current arpeggio note has been sent. With a polyphonic
sound, this setting will generally produce the familiar legato style of playing. In the case of
a monophonic sound, the usual effect is that the new note won't cause the instrument to
generate a new ADSR-envelope. This is, of course, dependent on the architecture and/or
programming of the given synthesizer or sound module to which the arpeggiator is being
applied.
Hold: on / oFF
If Hold is turned on, then the MAP1 will play an arpeggio continuously (that is, it isn't necessary to hold a chord pressed down manually). If Hold is turned "P''", then an arpeggio will
either be stopped immediately when the chord is no longer being pressed down. When
Hold is turned off in certain arpeggio Styles, the arpeggio is first played to its conclusion
before the arpeggiator stops.
Random: on / oFF (random value generator on / off)
The Random setting generates random velocities, MIDI notes or orders of arpeggio playback, dependent on which arpeggio Style is active.
3DJH#<
0$34#$USHJJLDWRU
MIDI In: 1 / 2 / ... / 16 / oni. (MIDI in channel 1 through 16 / omni mode)
All MIDI data received on the channel set in the MIDI In parameter, with the exception of
system data, are routed out through the MAP1's MIDI OUT port on the configured MIDI Out
channel. In omni mode ("POJñ"), the MAP1 "listens" to all 16 MIDI channels.
MIDI Out: 1 / 2 / ... / 16 (MIDI out channel 1 through 16)
The MIDI Out parameter determines which MIDI channel is used for data sent through the
MAP1's MIDI OUT port. This is independent of which MIDI in channel the data was
received on. Note that if the MAP1 is sending note data at the time that the MIDI Out channel is changed, that the data sent on the old output channel are cancelled (via note off messages), and tare then resent via the new MIDI Out channel.
MIDI Clock: int. / Etn. (MIDI clock internal / external)
If the MIDI Clock parameter is set to "JOUñ" then the MAP1 sends MIDI clock impulses
along with the other data through the MIDI OUT port.
If MIDI Clock is set to "&UOñ" then the MAP1's tempo generator must be provided with a
MIDI clock stream via its MIDI IN port.
MIDI start, stop and continue commands are sent out by the MAP1 regardless of the MIDI
Clock setting, and can be received as well.
Program: on / oFF / SYS. (MIDI program change on / off / system exclusive dump)
The Program parameter determines whether the MAP1 responds to / sends MIDI program
change messages. This parameter can be set for each individual preset, and always influences both the MIDI in and MIDI out.
System Exclusive Dump
If the function "ê:êñ" is selected via the Up button, the Store LED will begin to blink, which
means that pressing the Store button will initiate a MIDI system exclusive dump from the
MAP1. The MAP1 sends each of its 64 presets as an individual dump via its MIDI OUT
port. During an active dump, the MAP1's display will show only two dashes. Upon completion of the dump, the MAP1 returns to whatever preset was currently loaded when the
dump was started.
L
Note: Alle Einstellungen sind pro Preset individuell speicherbar, um größtmögliche
Flexibilität zu bekommen.
3DJH#43
0$34#$USHJJLDWRU
Wichtige Sicherheitsanweisungen
1. Lesen Sie alle Anweisungen, bevor Sie das Gerät benutzen.
2. Benutzen Sie das Gerät niemals in der Nähe von Wasser, z.B. neben einer
Badewanne, einem Waschbecken, einem Küchenabfluß, in einem feuchten Keller
oder neben einem Swimming Pool.
3. Das Gerät sollte so aufgestellt werden, daß eine ausreichende Frischluftzufuhr immer
gewährleistet ist.
4. Das Gerät sollte nicht in der Nähe von Wärmequellen, z.B. Heizkörpern, Öfen oder
anderen hitzeentwickelnden Geräten aufgestellt werden.
5. Das Gerät darf nur an genormte Steckdosen angeschlossen werden.
6. Plazieren Sie das Gerät so, daß keine Gegenstände, Flüssigkeiten oder Staub in das
Geräteinnere dringen können.
7. Wird das Gerät über einen längeren Zeitraum nicht benutzt, ziehen Sie das externe
Steckernetzteil aus der Steckdose.
8. Das Gerät sollte von einem qualifizierten Fachpersonal gewartet werden, wenn:
- das externe Netzteil beschädigt ist oder
- Gegenstände oder Flüssigkeiten in das Gerät eingedrungen sind oder
- das Gerät im Regen war oder
- das Gerät infolge eines Sturzes beschädigt wurde oder
- das Gerät in seiner normalen Funktionsweise gestört sein sollte.
9. Nehmen Sie Reparaturen nicht selbst vor, sondern lassen Sie diese von einem qualifizierten Techniker durchführen.
3DJH#44
MAM GmbH
Postfach 2627
91014 Erlangen