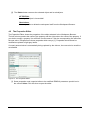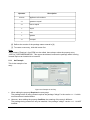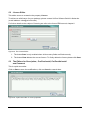
1
EBKGUI
User's Manual
V1.1
February 2008
Build # 4
©2006 by UniCon Software GmbH. All rights reserved
Information in this document is subject to change without notice. No part of this document may be reproduced or transmitted in any form
or by any means, electronic or mechanical, for any purpose, without the express consent of UniCon Software GmbH.
eLux is a registered trademark of UniCon Software GmbH in Germany.
All other Trade Names referred to are the Servicemark, Trademark or Registered Trademark of the respective manufacturers.
The end user takes full responsibility for his or her actions. Neither UniCon Software GmbH nor its partners assume liability for any
errors or damage resulting from the information contained herein.
Contents
1
2
EBKGUI Overview ....................................................................................................................1
Installation.................................................................................................................................2
2.1 Installing the eLux-EBKGUI-CD ...........................................................................................2
2.2 Defining the EBKGUI Application.........................................................................................3
2.3 Defining the EBKViewer Application ....................................................................................3
3
Starting the EBKGUI.................................................................................................................4
3.1 First Start..............................................................................................................................4
4
Elements of EBKGUI ................................................................................................................6
4.1 Toolbar .................................................................................................................................6
4.2 Menus ..................................................................................................................................7
4.2.1
„File“ Menu .................................................................................................................7
4.2.2
„Edit“ Menu .................................................................................................................8
4.2.3
„Build“ Menu ...............................................................................................................8
4.2.4
„Settings“ Menu ..........................................................................................................8
4.2.5
„Log“-Menu .................................................................................................................9
4.2.6
„Tools“ Menu ..............................................................................................................9
4.2.7
„Help“Menu.................................................................................................................9
4.3 The Context Menus............................................................................................................10
4.3.1
The Workspace Viewer Context Menu .....................................................................10
4.3.1.1
The EPM Context Menu ...................................................................................10
4.3.1.2
The Context Menu of a File ..............................................................................10
4.3.2
The File Browser Context Menu ...............................................................................11
4.3.2.1
The Context Menu Folder.................................................................................11
4.3.2.2
The Context Menu of a File ..............................................................................11
4.4 Workspace Browser ...........................................................................................................11
4.5 The Properties Editor .........................................................................................................13
4.6 The File Browser ................................................................................................................14
4.7 Build ...................................................................................................................................15
4.8 The Output Window ...........................................................................................................16
5
The Editors .............................................................................................................................17
5.1 Requires- and Conflicts Editor ...........................................................................................18
5.1.1
An Example ..............................................................................................................19
5.2 Licence Editor ....................................................................................................................20
5.3 The Editors for Description-, Pre/PostInstall, Pre/PostUninstall and Comment ................20
5.4 The Containers Editor ........................................................................................................21
5.5 The Installoption Editor ......................................................................................................21
6
Creating a New Workspace ....................................................................................................22
7
Adding New Objects to a Workspace .....................................................................................23
7.1 Creating an EPM................................................................................................................23
7.2 Creating an FPM ................................................................................................................23
8
Creating a Folder ....................................................................................................................24
9
Creating a Symbolic Link ........................................................................................................25
10 EBKGUI Preferences..............................................................................................................27
10.1 The Global Tab.................................................................................................................27
10.2 The Build Tab ...................................................................................................................30
10.3 The EPM/FPM Tab...........................................................................................................31
10.4 Invalid Preferences...........................................................................................................32
11 Index .......................................................................................................................................33
EBKGUI User Manual
Build # 4
Table of Figures
Figure 1: Starting the Installation ...................................................................................................... 2
Figure 2: Application definition for EBKGUI ...................................................................................... 3
Figure 3: Starting the EBKGUI in a shell........................................................................................... 4
Figure 4: The Welcome Message on first start ................................................................................. 4
Figure 5: The Main Window of the EBKGUI ..................................................................................... 5
Figure 6: The EBKGUI Toolbar......................................................................................................... 6
Figure 7: The File Menu.................................................................................................................... 7
Figure 8: The Edit Menu .................................................................................................................. 8
Figure 9: The Build Menu ................................................................................................................. 8
Figure 10: The Preferences Menu .................................................................................................... 8
Figure 11: The Log Menu.................................................................................................................. 9
Figure 12: The Tools Menu............................................................................................................... 9
Figure 13: The Help Menu ................................................................................................................ 9
Figure 14: The EPM Context Menu ................................................................................................ 10
Figure 15: The Context Menu of a File ........................................................................................... 10
Figure 16: The Workspace Browser ............................................................................................... 11
Figure 17: The Properties Editor..................................................................................................... 13
Figure 18: The File Browser............................................................................................................ 14
Figure 19: Build Section.................................................................................................................. 15
Figure 20: The Output Window ....................................................................................................... 16
Figure 21: Special Editor for a Property.......................................................................................... 17
Figure 22: Special Editor for the Property "Requires" of an EPM ................................................... 18
Figure 23: Example of an Entry ...................................................................................................... 19
Figure 24: The Licence Editor......................................................................................................... 20
Figure 25: A plain text editor for some properties ........................................................................... 20
Figure 26: The Containers Editor.................................................................................................... 21
Figure 27: The Installoption Editor .................................................................................................. 21
Figure 28: Dialog to create a new workspace................................................................................. 22
Figure 29: Dialog to create a new EPM .......................................................................................... 23
IFigure 30: Dialog to create a new FPM ......................................................................................... 23
Figure 31: Dialog to create a new folder ......................................................................................... 24
Figure 32: The dialog to create a symbolic link............................................................................... 25
Figure 33: Selecting the link target ................................................................................................. 26
Figure 34: A symbolic link ............................................................................................................... 26
Figure 35: Settings in the Global tab............................................................................................... 27
Figure 36: Settings in the Build tab ................................................................................................. 30
Figure 37: Settings in the EPM/FPM tab......................................................................................... 31
Figure 38: Invalid settings, here: "Zip location" ............................................................................... 32
EBKGUI User Manual
Build # 4
1 EBKGUI Overview
eLux-Builder-Kit-GUI (EBKGUI) is a graphic user interface replacing the "old" EBK. The procedure
to create your own eLux NG software packages is much more comfortable now. EBKGUI is not a
graphic front-end for the old EBK, but a completely new program.
The graphic interface helps reducing sources of error during the creation of packages. Whereas
the old version required to edit make files and spec files manually, this is done automatically by the
EBKGUI. The user only has to enter the individual parameters of an EPM or FPM, must combine
the files for the package and define the container which the package is to be created for. With one
click on the Build button the defined package is created. If required, after creation it can be signed
and zipped to an archive.
The „eLux NG EBKGUI CD“ for PC can be installed on any PC provided this meets the hardware
requirements to run with eLux .
Further, the CD contains the EBKViewer, another EBK tool. The EBKViewer can display the
header information of the created EPMs and FPMs as well as the file and folder structure of an
FPM. The EBKViewer is described in a separate manual on http://www.myelux.com .
EBKGUI User Manual
Build # 4
1
2 Installation
2.1
Installing the eLux-EBKGUI-CD
The eLux-EBKGUI CD contains the software "eLux NG for PC", which is to be installed on a
Windows PC. This software has been customized for the EBKGUI.
For installation please boot the target system from the eLux-EBKGUI CD and start the installation
from the menu in the eLux starter.
Figure 1: Starting the Installation
The installation of "eLux NG for PC" is described in detail in the manual "eLux NG for PC
Installation Guide" on http://www.myelux.com, if required.
Please note:
•
The installation deletes all existing data from the target disk!
•
It requires a (virtual) harddisk of at least 6.0 Gbyte to make sure that data can be saved to
"/home".
EBKGUI User Manual
Build # 4
2
2.2
Defining the EBKGUI Application
After the installation of the EBKGUI the application must be defined in the eLux NG starter.
–
Open the Configuration tab in the starter
–
Click New
–
Define the application as the figure shows:
Figure 2: Application definition for EBKGUI
–
2.3
Then click Apply and OK. The application is created.
Defining the EBKViewer Application
It is not necessarily required to define an application for the EBKViewer. It can as well be started
from the EBKGUI directly.
However, if you want to have an individual application in the starter, consult the directions in the
EBKViewer Manual.
EBKGUI User Manual
Build # 4
3
3 Starting the EBKGUI
There are 2 ways to start the EBKGUI.
1. by opening the application in the starter
2. in a local shell by entering ebkgui + RETURN
Figure 3: Starting the EBKGUI in a shell
3.1
First Start
No matter how you start the application, a message will appear on the first start, which requires
that you define some personal settings.
Figure 4: The Welcome Message on first start
Click OK to open the dialog which enables to check and modify the settings. The mandatory
settings, requested for the error-free use of EBKGUI with eLux NG, have already been defined.
The settings can be modified any time.
Click OK to confirm the settings.
The detailed explanation of the single options can be found in chapter „EBKGUI Preferences".
EBKGUI User Manual
Build # 4
4
Having confirmed the settings, the main window is opened:
Figure 5: The Main Window of the EBKGUI
The following chapters describe the single elements of the main window.
EBKGUI User Manual
Build # 4
5
4 Elements of EBKGUI
4.1
Toolbar
Figure 6: The EBKGUI Toolbar
The toolbar enables fast access to the frequently used menu options. The following table describes
the icons in short.
Restriction:
The toolbar icons cannot be customized.
Icon
Description
Menu
Available
Click this icon to create a new workspace.
File
always
Click this icon to open an existing workspace.
File
always
Saves the currently open workspace.
File
a workspace is
open
Loads the currently open workspace again.
Edit
a workspace is
open
Performs the „strip“ command for the selected file.
This icon is active only when a file has been selected.
Edit
a file is selected
Click this icon to create a new "Symbolic Link".
Edit
an FPM or a
folder is selected
Moves an FPM up one position.
Edit
an FPM is
selected
Moves an FPM down one position.
Edit
an FPM is
selected
Re-calculates the size and quantity of the files for the
selected FPM.
Edit
an FPM is
selected
Creates packages of the entire workspace.
Build
a workspace is
open
Creates only the package for the currently selected
objekt. This may be the workspace, an EPM or an
FPM.
If an EPM is selected, its FPMs are created
automatically!
Build
a workspace,
EPM or FPM is
selected
Opens the Settings dialog.
Settings
always
Opens the Settings dialog, but moves directly to the
settings for signing packages.
Settings
always
EBKGUI User Manual
Build # 4
6
4.2
Menus
4.2.1
„File“ Menu
Figure 7: The File Menu
[1] Creates a new workspace.
[2] Opens an existing workspace
[3] Saves the currently open workspace
[4] Imports an EPM into the currently open workspace from another workspace.
[5] Exports an EPM from the workspace into any required folder.
[6] Contrary to [4] the EPM will not be imported, but only linked.
[7] Exits EBKGUI
[8] The workspaces opened last are displayed. Click on it opens the workspace.
EBKGUI User Manual
Build # 4
7
4.2.2
„Edit“ Menu
Figure 8: The Edit Menu
[1] Reloads the currently open workspace.
[2] Executes the command „strip“ for the selected file.
[3] Calculates size and quantity of the files of the selected FPMs.
[4] Creates a new „Symbolic Link“.
[5] Moves the selected FPM one position up.
[6] Moves the selected FPM one position down.
4.2.3
„Build“ Menu
Figure 9: The Build Menu
[1] Creates all packages of the current workspace.
[2] Creates the package for the currently selected object only. If the workspace is selected, [1]
is performed. If an EPM is selected the EPM and its FPMs are created. If an FPM is
selected only, then merely this is created.
4.2.4
„Settings“ Menu
Figure 10: The Preferences Menu
[1] Opens the „Settings“ dialog.
[2] Like [1], only that the dialog opens for the settings of the signature of the packages.
EBKGUI User Manual
Build # 4
8
4.2.5
„Log“-Menu
Figure 11: The Log Menu
[1] Clears the contents of the „output“ window.
[2] Opens the „build“ logfile of the currently open workspace and displays it.
[3] Deletes the „build“ logfile of the currently open workspace
4.2.6
„Tools“ Menu
Figure 12: The Tools Menu
[1] Starts the EBKViewer.
If the EBKViewer should not be installed, this option is not active.
[2] This tool repairs occurring potential problems in the sort sequence of FPMs.
4.2.7
„Help“Menu
Figure 13: The Help Menu
[1] For the time being online help is not available.
[2] For the time being online help is not available.
[3] Shows the dialog with information on EBKGUI.
EBKGUI User Manual
Build # 4
9
4.3
The Context Menus
Context menus are available for the Workspace Viewer and the File Browser, allowing fast access
to frequently used commands. Rightclick an object to open the context menu, activate the required
option by left mouseclick.
4.3.1
The Workspace Viewer Context Menu
Except for two options the context menus of the Workspace Viewer contain the menu options
already described.
4.3.1.1 The EPM Context Menu
The EPM context menu contains two menu options which cannot be accessed otherwise (neither
via menu bar nor toolbar).
Figure 14: The EPM Context Menu
[1] Creates ONLY the EPM, without any of its FPMs.
[2] The property values of "version" and "release" of its FPMs are overwritten by the EPM
values.
4.3.1.2 The Context Menu of a File
The Context Menu of a file only contains one menu option which is accessible neither via the menu
nor via the toolbar.
Figure 15: The Context Menu of a File
[1] Opens the file with the settings defined in the editor.
Note:
This option is available for each file, this function can be applied for binary files, too!
EBKGUI User Manual
Build # 4
10
4.3.2
The File Browser Context Menu
The context menu options depend on the selected object (file or folder).
4.3.2.1 The Context Menu Folder
This context menu contains the 3 commands:
Add with path
Add selected and
Set Folder of the File Browser.
4.3.2.2 The Context Menu of a File
Beside the two menu options Add selected and Add with path the file may be edited with an
external editor just like in the Workspace Viewer context menu of a file.
4.4
Workspace Browser
The Workspace Browser shows the workspace structure and the EPMs and FPMs contained
herein as well as the file and folder structure.
Figure 16: The Workspace Browser
EBKGUI User Manual
Build # 4
11
Icon
Description
Workspace
EPM
linked EPM
FPM
Folder
File
Symbolic Link
The properties of the selected object are displayed in the Properties Editor.
[1] Click the Add button to add new objects to the current workspace. Which type of object
may be added depends on the selected object in the workspace browser.
Selected object
What can be added?
Workspace
new EPM
EPM
new FPM
FPM
new folder
Folder
new folder
File
button disabled
[2] Click on the Tag button to select files and folders. Thereby the EBKGUI is directed to
integrate only the selected files and folders into an FMP.
To display a selection, special icons are used:
Icon
Description
The folder is „selected“
A subfolder or a file in this folder or its subfolder is „selected“
The file is „selected“
The „Symbolic Link“ is „selected“
EBKGUI User Manual
Build # 4
12
[3] The Delete button removes the selected object and its subobjects.
ATTENTION:
Deleting the object is irreversible!
Restrictions:
It is not possible to delete the workspace itself from the Workspace Browser.
4.5
The Properties Editor
The Properties Editor shows the properties of the object selected in the Workspace Browser.
The left column contains the name of the property and the right column the value of the property. If
you wish to modify a property it is sufficient in most cases to click the corresponding line and enter
the new value. Exceptions are those properties which carry a [1]. Properties which cannot be
modified are printed in light grey letters.
If a newly entered value is automatically being replaced by the old one, the new value is unvalid or
not allowed.
Figure 17: The Properties Editor
[1] Some properties need a special editor to be modified. EBKGUI presents a special icon in
the column Value. Click this icon to open the editor.
EBKGUI User Manual
Build # 4
13
4.6
The File Browser
The File Browser enables you to add files and folders to an FPM. Beside the files and folders the
Browser displays the size in bytes, date/time of last modification and the permissions (in octal
system).
Figure 18: The File Browser
To add a file or a folder to an FPM, the FPM or a folder within this FPM must be selected in the
Workspace Browser. Otherwise the buttons [1] and [2] are deactivated.
Files and folders that are being added keep the following properties:
•
Date and time of the last modification
•
Owner
•
Group
•
Permissions
[1] Add with path adds the selected file or the folder including its superior folders to the
selected FPM or to the folder in the Workspace Browser.
Example:
Suppose the file „amixer“ is selected in the figure above. If you click on [1], the folders "bin"
and "init.d" would be created first in the selected FPM (or a folder in the FPM) and
afterwards the file „amixer“ is being copied into the folder „init.d“.
[2] With Add selected only the selected folder and its contents or the selected file are added
to the the selected FPM or one of its subfolders.
[3] The button Set Folder defines the top folder of the File Browser. It is the root folder „/“ in
the above figure.
EBKGUI User Manual
Build # 4
14
4.7
Build
The Build section enables you to define for which container the packages of the current workspace
are to be created, whether the packages are to be signed and zipped to an archive, and where the
created packages are to be copied to.
These settings are saved directly in the workspace. They are applied when a workspace is being
loaded.
The packages are copied into the corresponding container subfolder of the output folder.
Figure 19: Build Section
[1] This is to define for which container the packages of the workspace are to be created.
[2] This is the target (output) folder where the created packages, the signatures and the zip
archives are being copied to.
In the output folder EBKGUI automatically creates subfolders named by the container.
[3] These two options allow to define if the created packages are to be signed or are to be
zipped into an archive. The latter option creates a separate archive for each package. The
archive contains the EPM, all FPMs and the signatures for the EPM and the FPMs.
The option to sign the packages is only available, if the path to the signature program
„eluxsign“ is set and the signature key as well as the signature certificate have been
entered.
[4] The „Build“ button is enabled only if the workspace, an EPM or an FPM have been selected
in the Workspace Browser.
[5] The button "View log" offers to display the logfile of the Workspace. This logfile contains
detailed information about the creation of the packages.
EBKGUI User Manual
Build # 4
15
4.8
The Output Window
In the output window EBKGUI displays different status messages, e.g.
•
Progress of the current creation procedure
•
Creation of a new Workspace
•
Loading/Saving a Workspace
•
...
Figure 20: The Output Window
The messages in the output window can be deleted with the menu option „Log -> Clear output
window“.
EBKGUI User Manual
Build # 4
16
5 The Editors
As already mentioned there are special editors to customize some properties of the EPM rsp. FPM.
When an editor is available for a property an extra button is active in the "Property Editor".
Figure 21: Special Editor for a Property
Click on this button to open the editor. The following table lists the properties which may be
customized with this special editor.
Property
Requires
Conflicts
Licence
Description
Preinstall
Postinstall
Preuninstall
Postuninstall
Comment
Containers
EBKGUI User Manual
Build # 4
17
5.1
Requires- and Conflicts Editor
This editor allows to customize the properties „Requires“ and „Conflicts“.
Figure 22: Special Editor for the Property "Requires" of an EPM
[1] Lists the values for „Requires“ rsp. „Conflicts“ defined so far. A click on [2] deletes entries
and a click on [7] allows to enter new ones. The entries are displayed according to the
scheme ''PACKAGENAME OPERATOR VERSION'' (example: „ebkgui >= 1.4“)..
In order to edit an entry it must be selected. It is automatically loaded into the entry settings
[3] and can be edited there.
[2] Click on Delete to delete the selected entry in [1].
[3] New entries are created here.
[4] Enter the name of your entry here. The name must specify some other existing package,
e.g. „ebkgui“ in the above figure.
[5] The „Operator“ dropdown list allows you to select the adequate operator, which applies to
the version defined in [6]. If the version of the package should not be relevant, then select
the operator <none>. Then the entry applies to all versions of the package name entered in
[4].
EBKGUI User Manual
Build # 4
18
Operator
<none>
Description
applies to all versions
>=
greater or equal
<=
less or equal
=
equal
<
less
>
greater
<>
unequal
[6] Defines the version of the package name entered in [4].
[7] To create a new entry, click this button first.
Note:
If the property "Requires“ of an EPM is to be edited, there always exists the property entry
„%ELUX_CONTAINERBASEOS“. This cannot be deleted, because the package which is being
created requires an installed eLux baseOS.
5.1.1
An Example
This is the example of an
entry:
Figure 23: Example of an Entry
•
•
When editing the property Requires the entry says:
The package which is being created requires the package "ebkgui" in the version >= 1.1 which
must have been installed before.
However, when editing the property Conflicts, the meaning of the entry is different:
The package being created can only be installed, if the package "ebkgui“ version >= 1.1 is NOT
installed.
EBKGUI User Manual
Build # 4
19
5.2
Licence Editor
This editor serves to customize the property Licence.
To achieve a valid licence for your package, please contact UniCon Sofware GmbH in Karlsruhe
(e-mail address: [email protected]).
For further details to the subject of licencing we refer to the former EBK manual, chapter 6.
Figure 24: The Licence Editor
1. The button Save is only enabled when all three entry fields are filled correctly.
2. The button Clear deletes the current licence. To finally delete the licence please click Save.
5.3
The Editors for Description-, Pre/PostInstall, Pre/PostUninstall
and Comment
This is a plain text editor.
Click on Save to save the modifications, click on Cancel to cancel them.
Figure 25: A plain text editor for some properties
EBKGUI User Manual
Build # 4
20
5.4
The Containers Editor
With this editor you can define for which container the EPM or FPM is to be created.
Figure 26: The Containers Editor
The settings defined here apply to the selected package only. If you should try to create the
package for a container which has not been selected for the corresponding package, the package
will be skipped during the creation procedure.
5.5
The Installoption Editor
This property only exists for an FPM, therefore the editor is only available for FPMs allowing to
define its install option.
Figure 27: The Installoption Editor
[1] The option Mandatory means that it is a MUST to install the FPM.
[2] The option Install has two sub-options. If Install is enabled the sub-option as default is
automatically enabled, too.
[3] as default means that the FPM is being installed by default, but installation may be
disabled with the tool ELIAS NG.
[4] optional means that the FPM is NOT being installed by default, but may be enabled
for installation with the tool ELIAS NG.
[5] This option is available independent from [1] or [2]. During the installation of this FPM
package eLux is forced to uninstall a possibly existing FPM package first and then install
this FPM package, instead of performing an update.
EBKGUI User Manual
Build # 4
21
6 Creating a New Workspace
To create a new workspace either click the corresponding icon in the toolbar or use the menu "File
Æ New Workspace“. If a workspace should already be open, it will be saved, then the following
dialog opens:
Figure 28: Dialog to create a new workspace
[1] Enter the name of the new workspace.
[2] Click Browse to select the required workspace folder.
[3] Enable this option if you wish to create a subfolder to the folder selected in [2] naming the
workspace. Then the workspace is being saved in this folder.
Note:
If you do not enable [3] please consider that the folder defined in [2] must be EMPTY.
Please click OK to confirm the creation of the new workspace. The new workspace is created and
loaded into the Workspace Viewer.
Thereafter you can start to define the BUILD settings (output folder, which container, ….) for the
packages or create the EPMs and FPMs.
EBKGUI User Manual
Build # 4
22
7 Adding New Objects to a Workspace
This chapter describes in detail the function Add in the Workspace Viewer.
7.1
Creating an EPM
1. Select the workspace object.
2. Click Add or rightclick the workspace object and
select Add new EPM in the context menu.
3. The dialog to create a new EPM opens.
4. Enter the name of the EPM.
Figure 29: Dialog to create a new EPM
5. Click Finish to create the EPM.
6. Select the EPM in the Workspace Viewer if you want to edit the properties of the EPM with
the Properties Editor. Also, you can continue to create EPMs or FPMs for this EPM.
7.2
Creating an FPM
1. Select the workspace object.
2. Click Add or rightclick the workspace object and
select Add new FPM in the context menu.
3. The dialog to create a new FPM opens.
4. Enter the name of the FPM.
I
Figure 30: Dialog to create a new FPM
5. Click Finish to create the FPM.
6. Select the FPM in the Workspace Viewer if you want to edit the properties of the FPM with
the Properties Editor.
However, you can also continue to create FPMs or add files, folders and "Symbolic Links"
to the FPM.
EBKGUI User Manual
Build # 4
23
8 Creating a Folder
1. Select the FPM or one of its subfolders you want to create the new folder to.
2. Click Add or rightclick the desired object and select Add new folder in the context menu.
3. The dialog to create a new folder opens:
Figure 31: Dialog to create a new folder
4. Enter the name of the folder.
5. Click Finish to create the folder.
6. Now you can continue to create folders or add files to this folder by means of the File
Browser.
EBKGUI User Manual
Build # 4
24
9 Creating a Symbolic Link
A "symbolic link" is a kind of pointer to a file located at a completely different place.
A "symbolic link“ can only be created directly in an FPM or in one of its subfolders.
1. Select the FPM or one of its subfolders where the symbolic link is to be created.
2. Click this icon
and select
in the toolbar or rightclick the FPM or its subfolder
Create symbolic link in the context menu.
3. The dialog to create a symbolic link opens.
Figure 32: The dialog to create a symbolic link
[1] Enter the name of the symbolic link. By default the name is automatically taken from
[2] or [3]. Disable the check box "Generate symbolic name automatically“ if you wish
to enter a name or customize the automatically generated name.
[2] Enter the target into this line, where the link is to point to. If the link is to point to a
file or folder existing in this FMP you can use button [3].
[3] Use this button if the desired target for this link is to be a file or folder existing in this
FPM.
This button displays a list of all files and folders of the FPM, in which you want to
create a link. The correct path of the selected object will then automatically be
copied to [2].
EBKGUI User Manual
Build # 4
25
Figure 33: Selecting the link target
4. If all entries are correct, confirm with OK.
The link is created and displayed in the corresponding subfolder. If selected the target can
be checked in the Properties Editor.
Figure 34: A symbolic link
EBKGUI User Manual
Build # 4
26
10 EBKGUI Preferences
The dialog Preferences either opens automatically during the first start of EBKGUI or by clicking
the toolbar icon
or the menu "Settings".
The dialog Preferences consists of the tabs Global, Build and EPM/FPM. Each tab contains
settings for a certain category. The single tabs and their options are described below.
If the button Defaults is enabled, only the default values are loaded for the currently displayed tab.
The values in the other tabs remain.
Click Ok to save the settings, if they are correct. If they should not be correct, a message.will
show. Further instructions for this case can be found in the chapter "Incorrect Settings".
Cancel reverses the settings you made.
10.1 The Global Tab
The Global tab is to set the general preferences for the EBKGUI.
Figure 35: Settings in the Global tab
EBKGUI User Manual
Build # 4
27
[1] When enabled, EBKGUI automatically adds comments to the superior elements of a
workspace, EPM or FPM with the following actions:
•
Add...
•
•
•
•
•
...a file to an FPM
•
...a folder to an FPM
Delete...
•
...an EPM from a workspace
•
...an FPM from an EPM
•
...a file from an FPM
•
...a folder from an FPM
Create...
•
...an EPM in a workspace
•
...an FPM in an EPM
Import...
•
...an EPM from another workspace into the current workspace
Link...
•
...an EPM from another workspace into the current workspace
These comments are of the following format:
DATE – TIME : [ACTION] ELEMENTTYPE ''ELEMENTNAME''
DATE
TIME
ACTION
ELEMENTTYPE
ELEMENTNAME
USER
(USER)
: current date
: current time
: type of action
(ADD, CREATE, DELETE, IMPORT, LINK)
: type of element, where the action has been performed on
(EPM, FPM, FILE, FOLDER)
: name of the element
: name of the user who has performed the action
An Example:
12.01.2006 - 16:06.39 : [CREATE] EPM "ebkgui" (eluxng)
[2] Enable this option if you want to increment the release number of an EPM or FPM
automatically as soon as at least one property of the EPM/FPM has been modified. The
increment of the release number will not be performed immediately, but only when saving
the workspace the first time or when clicking the Build button.
A dialog shows before the release number is incremented by EBKGUI. When you confirm
by click on Yes, the release numbers of all modified EPM/FPM are incremented by 1.
EBKGUI User Manual
Build # 4
28
Restrictions:
•
Adding a file or folder to an FPM is not considered a modification.
•
The last release number of the modified EPM/FPM must be numeric. If not, then
EBKGUI sets the digit "0".
[3] If this option is enabled, EBKGUI automatically starts with the workspace opened last.
[4] Enable this option to edit text files with an external editor.
By default EBKGUI opens an Xterm and starts the vi editor.
You can either open the editor from the command line or via browse via ….
Restrictions:
•
EBKGUI cannot differentiate between text files and binary files. Therefore it is
possible to open all files in the defined editor.
•
As transfer parameter the editor in use has to accept the file to be edited.
[5] The Defaults button resets the settings to the default values for the current tab.
EBKGUI User Manual
Build # 4
29
10.2 The Build Tab
All settings concerning the Build procedure are defined here.
Figure 36: Settings in the Build tab
[1] This field is to define which parameters are to be used by EBKGUI to perform the „strip“
command to a file.
[2] Enter the path to the zip program here. You can type it or use the Browse button.
[3] Define here where EBKGUI will find the „eluxbuildrc“. Please consider that EBKGUI needs
the write permission to this file!
[4] Enter a folder where EBKGUI saves temporary files.
[5] The path to the „elusign“ program which is required by EBKGUI to sign the created
packages.
[6] Enter the path to your signature key.
[7] Enter the path to your signature certificate.
Note:
In order to enable the signature of packages, all the 3 Signature settings must be correct.
Otherwise the signature option is disabled.
EBKGUI User Manual
Build # 4
30
10.3 The EPM/FPM Tab
You can enter default values for new EPM/FPMs. The values entered here are automatically
transferred when creating an EPM or FPM.
Figure 37: Settings in the EPM/FPM tab
[1] If this checkbox is activated, EBKGUI transfers the values entered in [2] and [3] into the
corresponding properties when creating new EPMs or FPMs.
[2] Enter the text which is to be assigned to the "Copyright" property of any new EPM or FPM.
[3] Enter the text which is to be assigned to the "Vendor" properety of any new EPM or FPM.
EBKGUI User Manual
Build # 4
31
10.4 Invalid Preferences
If settings are invalid and you try to close the "Preferences" dialog by clicking OK, you get an error
message. Furthermore, all invalid settings are coloured in red.
Figure 38: Invalid settings, here: "Zip location"
Confirm the message with click on OK. Then the invalid settings can be corrected and saved by
clicking OK.
However, if you click Cancel, the invalid settings are cancelled and the preferences are reset to
the former settings.
Setting
Value must be valid
no value allowed
Strip command
NO
YES
Zip location
YES
NO
elxubuildrc
YES
NO
Temp folder
YES
NO
eluxsign location
YES
YES
Signature Key
YES
YES
Signature Certificate
YES
YES
EBKGUI User Manual
Build # 4
32
11 Index
Add .......................................................12, 28
Browse .................................................22, 30
Build .............................................1, 8, 15, 30
BUILD .........................................................22
Cancel ..................................................20, 32
Clear ...........................................................20
Configuration ..............................................3
Conflicts ......................................................18
CONTAINERBASEOS ................................19
Context........................................................10
Copyright.....................................................31
Create .........................................................28
Date ............................................................14
Defaults......................................................29
Delete ...................................................13, 28
EBKGUI CD ..................................................1
EBKViewer....................................................1
EBKViewer Application .................................3
Edit................................................................8
eluxbuildrc...................................................30
eluxsign.......................................................15
EPM ..............................................................1
error message.............................................32
Example ......................................................28
File ................................................................7
File Browser ..........................................10, 14
Folder..........................................................24
FPM ........................................................1, 24
Generate symbolic name automatically ......25
Global..........................................................27
Group ..........................................................14
Help...............................................................9
icons..............................................................6
Import..........................................................28
Install..........................................................21
Licence.......................................................20
Link .............................................................28
Log ................................................................9
EBKGUI User Manual
logfile .......................................................... 15
main window................................................. 5
make files ..................................................... 1
Mandatory ................................................. 21
modification ................................................ 29
Operator ..................................................... 18
output ................................................... 15, 16
Owner......................................................... 14
''PACKAGENAME ...................................... 18
Permissions................................................ 14
Preferences ...................................... 8, 27, 32
properties ................................................... 17
Properties Editor............................. 12, 13, 26
red .............................................................. 32
Requires ..................................................... 18
Save ........................................................... 20
shell .............................................................. 4
Signature................................................... 30
signatures................................................... 15
spec files ...................................................... 1
starter ........................................................... 3
subfolders................................................... 25
symbolic link ............................................... 25
Symbolic Links ........................................... 23
Tag ............................................................. 12
target .................................................... 15, 25
temporary ................................................... 30
toolbar .......................................................... 6
Tools............................................................. 9
UniCon ....................................................... 20
Value.......................................................... 13
Vendor........................................................ 31
View log...................................................... 15
Welcome ...................................................... 4
Workspace Browser ................................... 11
Workspace Viewer ..................................... 10
zip............................................................... 15
Zip location ................................................. 32
Build # 4
33