1
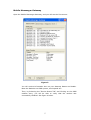
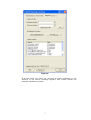
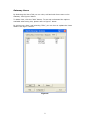
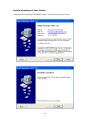
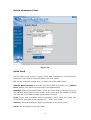
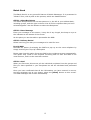
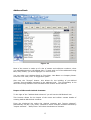
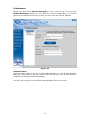
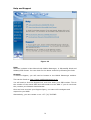
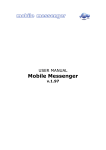
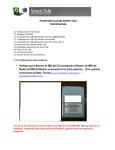
QUICK START GUIDE
Mobile Messenger
v.1.97
Note that this manual is intended only as a Quick Start reference for getting up
and running with Mobile Messenger, and Mobile Messenger Gateway, quickly.
For the more thorough Guides, please refer to the full Guides for both Mobile
Messenger, and the Mobile Messenger Gateway, that are available on
www.mobilemessenger.co.za.
Table of Contents
Chapter
Page
1.
Modem Installation
3.
2.
Mobile Messenger License
3.
3.
SMS Gateway Install
4.
4.
Mobile Messenger Gateway
5.
5.
SMS Gateway Users
8.
6.
Mobile Messenger Client Install
10.
2.
Mobile Messenger Client
11.
7.
Quick Send
12.
8.
Batch Send
12.
9.
Address Book
13.
10.
Import of Outlook Contacts
13.
11.
Message Logs
14.
12.
Preferences
15.
13.
Help and Support
16.
Modem Installation
Prepare the SIM Card:
1. Set SIM card to “Pin Code Request OFF” using a cell phone.
2. Remove the SIM card tray by pressing down on the tray release button
(yellow) with a pen.
3. Insert the SIM card face-up (with gold connectors to the top).
4. Replace the SIM card tray.
Prepare the Modem:
If you are not using a USB Modem:
5. Remove the red protective cover from the modem aerial connector.
6. Attach the aerial to the modem.
7. Insert “male” side of RS232 into the corresponding connector on the
modem.
8. Insert the “female” 9 pin RS232 plug into an available comm. port in the
“gateway” PC. (NOTE: Please ensure that the PC is switched off when
completing this process in order to avoid short-circuits).
9. Plug power supply into the GSM modem.
If you are using a USB Modem:
10. Plug the USB Cable into a spare USB slot on your P.C. (We recommend
USB2)
Then, switch the P.C on.
NOTE: If you are using the recommended Itegno USB Modem, remember that
we do include Drivers for this with the SMS Gateway Installation.
Mobile Messenger License
Once you have obtained a License key you can copy the license file (*.smskey) to
the install directory (by default c:\Program Files\ Mobile Messenger Gateway\)
then Start up the SMS Gateway.
Remember to copy this only once you have installed the Mobile Messenger
Gateway. Please see the following page for instructions on how to do this.
3
Mobile Messenger Gateway Install
Simply follow through the Installation Steps. (See Figures 1 and 2 below)
4
Mobile Messenger Gateway
Open the Mobile Messenger Gateway, and you will see the first screen:
Figure 3
You will receive information here on your Gateway Status and health.
Note the Statistics on SMS queues, send speeds etc.
Then, by Selecting the “Device Status Tab” and Clicking on the GSM
modem entry, you will be able to verify that the modem was
successfully installed. See figure 4 below.
5
Figure 4
To get more detail on the status of your Modem, click the GS Modem
entry.
To test if the Gateway is operational you can select the Diagnostic Tab and
send a Test SMS to your Cellphone. (See figure 5 below)
Enter the destination cell number into the text box and click “Send”. This
will send a test SMS to the cell number you entered.
To see the Gateway sending the SMS, click the “Gateway Status” Tab and
you should see the “Total Sent” entry increment as the SMS is sent.
6
Figure 5
If at this point you have not received all these messages or the
“Modem is not found” message appears then please repeat the
software installation process.
7
Gateway Users
By Selecting the Users Tab you can view, add and edit client users to the
Gateway. See figure 6 below.
To Add a User, click the “Add” button. To see and understand the options
available when doing this, please refer to figure 7 below.
By clicking on a User, and selecting “Edit”, you can view or update the Users
details. See figure 7 below.
Figure 6
8
Figure 7
•
•
•
•
•
•
Login Name: Enter a Username for the User. Note that you cannot change
this after you have added the User.
Password: Enter a Password for the User. You can edit this at anytime.
Full Name: Enter the Users name here.
Email Address: Enter the Users e-mail address here.
Credits: “Tick” this box should you wish to restrict the User to a set
amount of Credits. (1 Credit = 1 SMS) Once the Users have run out of
Credits, they will not be able to send SMS, and you will need to “top” them
up here.
To give the User unlimited Credits, leave this box “unchecked”.
At this stage your SMS Gateway should be running. You can now install the
Mobile Messenger Client. Remember, you will need a Username and Password for
each User that you install the Mobile Messenger Client for.
9
Mobile Messenger Client Install
Simply follow through the Installation Steps. (See Figures 8 and 9 below)
10
Mobile Messenger Client
Figure 10
Quick Send
Use the Quick send screen to quickly send SMS messages to a single person.
Simply fill in the fields as described below, and click "Send".
To: You will enter the number that you wish to send the SMS to here.
Address Book shortcut: At the top right of the “To:” field there is an “address
book” button; click this for quick access to the address book.
Message: Enter your message here; it may be of any length, but keep an eye on
the indicator at the bottom of the screen. It will count down the number of letters
you have left in the SMS message you are about to send.
From: If you wish to indicate who the message is from, enter your name here
and it will be appended to the message as " – From: your name".
Delivery: Select how long you wish your message to be valid for here.
Send: Click this button to send the SMS.
11
Batch Send
The Batch Send is a very powerful feature of Mobile Messenger. It is presented in
“Wizard” form, with 4 parts to the process, which are detailed below.
STEP 1. Select Recipients
The Select Recipients screen has two panes on it; the left is your address book,
including groups, and the right is where a list of all the recipients that you have
selected appears. Use the Buttons to select the Recipients.
STEP 2. Enter Message
Enter your message in this screen; it may be of any length, but keep an eye on
the indicator at the bottom of the screen.
At this point you are also able to personalise the SMS.
STEP 3. Delivery Period
Select how long you wish your message to be valid for here.
Pop Up SMS
One has the option of selecting the SMS’s to pop up on the users cellphone by
simply checking the “Pop Up” SMS option
Please note that this option forces the SMS to the recipients screen automatically.
This option may result in the recipient not being able to save this SMS in the
usual manner, and is to be used with caution.
STEP 4. Send
When you first enter this screen, all the individual recipients from the groups and
files you have specified in your Recipients list will be calculated and presented
here.
Once you have confirmed that all the information you have entered is correct,
and the recipients are as you expect, select the [Send] button on this screen.
The SMS messages will be sent immediately.
12
Address Book
Figure 11
Most of the screen is made up of a list of names and cellphone numbers; when
you add addresses they will appear here. To work with one of the addresses using
New, Edit, Delete, you must highlight it in this list first.
You can order your Address Book by First Nam, Last Name or Company Name.
Click the Text “Last, First” to toggle this option.
Also note the “Groups” button: this allows for the building of pre-defined
“Groups” from available members in the address book. The functionality is the
same as moving members into the Batch Send section of this manual.
Import of Microsoft Outlook Contacts:
To the right of the “address book shortcut” you will see the MS Outlook icon.
This function allows for the import of the name and cellular contact details of
existing default MS Outlook contacts.
From the displayed list select the desired contacts and “import selected”.
Alternatively use the “Ctrl, Enter” method to select multiple contacts followed by
“import selected”. “Shift, Enter” will select simultaneous contacts.
13
Note: Only Contacts with a cell phone number will be imported where the number
is captured under “Mobile”.
Adding Contacts to Groups:
Once you have clicked “import selected”, you will be asked if you wish to add any
of the selected Contacts to one or more of your Groups.
To so this, select “Yes”, and on the following screen, tick the Groups that you
would like to add the Contacts to.
Message Logs
Figure 12
The Log List and Message Window:
In the centre of the screen is the message log. It displays all the messages that
you've requested to view. Below this is the message window. It displays details
on the highlighted message.
Sent: SMS messages that you have sent for the given time period.
Inbox: SMS messages that you have received for the given time period.
.
14
Preferences
Before you start using Mobile Messenger, it has to be set up. If at any time
Mobile Messenger detects an error with the current configuration, you will be
placed in the Preferences screen so that you may enter the correct settings.
Figure 13
Authentication:
Because many people may use a single SMS gateway on a Local Area Network
LAN, they each have to log onto the service so that they may be identified for
purposes of sending/receiving messages.
You will need to type in the username and password for the user here.
15
Help and Support
Figure 14
Help:
We have included a User Manual with Mobile Messenger, in Microsoft® Word and
Adobe® PDF format. You can check for the latest versions by following the links.
Support:
To receive Support, you will need to browse to the Mobile Messenger website.
This can be found at: http://www.mobilemessenger.co.za
You will need to click the Support link, and then enter your SIM number. This is
the number of the actual SIM card that sends out the SMS: if you do not know
this, contact your Network Administrator.
Once we have received your Support Query, our team will investigate and
respond to you ASAP.
Alternatively, you can contact us on: +27 (31) 7647085.
16