1
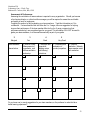
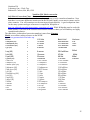
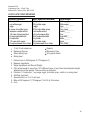
Cedar Crest College
The Allen Center for Nutrition
Fall, 2009
COURSE NO: NTR 220
COURSE TITLE: Principles of Food
COURSE DESCRIPTION/
OBJECTIVES: The selection, preparation, and storage of food. Techniques in food preparation are
developed. Food components, the chemistry of food preparation and their specific nature and behavior
during preparation are introduced, along with the recognition and evaluation of quality in food products.
Basic kitchen utensils and equipment will be covered. Menu planning will be introduced. Open to all
students.
CREDITS: 3 credit hours
CLOCK HOURS/WEEK: 5 hours (2 hours didactic, 3 hours laboratory)
INSTRUCTOR: Barbara M. Carlson, MA, RD, CDE
Cedar Crest Phone Number: 610-606-4487 /
email: [email protected]
If you will miss a class, please phone the number above and send an email.
PREREQUISITE: BIO 127 or 227
COURSE OUTCOMES:
1. The student will have a basic knowledge of culinary techniques.
2. The student will have a basic knowledge of food chemistry and physical properties of common
ingredients.
3. The student will have a working knowledge of food safety and sanitation
4. The student will demonstrate the ability to:
A.
B.
C.
D.
E.
Use current information technologies.
Work effectively as a team member
Apply food science knowledge to functions of ingredients in food
Demonstrate basic food preparation and presentation skills
Demonstrate safety skills and sanitation knowledge
TEXTBOOK: Introductory Foods: Marion Bennion & Barbara Schuele, Prentice Hall, 12th ED. / The lab
manual and notes are prepared by the instructor and will be posted or handed out in class.
CLASS ATTENDANCE
1
Class Attendance is expected except in case of illness and emergency. Missed labs must be made up, and
require an appointment to complete the work. If you miss a lab contact the instructor to schedule additional
lab time. Make up labs will be during the regular work hours.
If absent more than twice without a doctor’s note, final numerical grade (on a scale of 1 to 100) will be
lowered by 3 points. If late more than twice your numerical grade will be lowered by 2 points for each
additional late entry to class. Students are not expected to attend class when ill. However, to be fair to all
students, a physician’s note is required to make up labs, quizzes or exams.
Food tasting
Individuals are expected to taste all food items prepared.
Valid exceptions are given for individuals with physician documented allergies, health conditions or
documented religious affiliations. A letter from the physician’s office or the church is required.
Individuals who choose a vegetarian lifestyle are asked to taste a very small portion of the animal proteins
prepared in this class.
The majority of clients you will encounter are omnivores. Learning to prepare quality animal protein
products is essential. Families spend a significant portion of their food dollars on proteins. It is always
appropriate to teach sound vegetarian principles, but individuals who choose to eat animal proteins will also
need your guidance.
GRADES
Biweekly online quizzes will be used to assess learning. The quizzes are open from noon the day after the
appropriate lab until Noon the following Tuesday.
Only in case of a documented emergency or with a physician’s note, will a quiz makeup be given. Make ups
will be given through the academic services office. Students must schedule the quiz time with academic
services. Inform, instructor of date and time. A copy of the quiz will be sent to the academic services office.
Quizzes are to be taken closed book. STUDY for the quizzes using prepared study guides.
Midterm and a final will be given in class, closed book. The topics covered in weekly quizzes, in lab and
from study guides will be used as the basis of midterm and final exams.
The final project instructions are attached to the syllabus.
Grades will be awarded as follows:
Quizzes: Six Quizzes – 50 points each (25 questions)
300 points
Midterm
100 points
Final
100 points
Final Project
100 points
Total
600 Points
2
600 Points total
Points for percentage
> points noted
558 or greater
540 - 557
522 - 539
498 - 521
480 - 497
462 - 479
438 - 461
420 - 437
402 - 419
378 - 401
360 - 377
<359
Percentage
Grade
93
90-92
87-89
83-86
80-82
77-79
73-76
70-72
67-69
63-66
60-62
<60%
A
AB+
B
BC+
C
CD+
D
DF
TEACHING METHODS:
1. Lecture/teacher-centered discussion
2. Observation and experience (cooking methods)
3. Demonstration (knife skills and food preparation skills)
4. Student presentations (sanitation)
5. Practice/skill rehearsal (food preparation)
6. Written exercises and practice
WORK EXPECTED OF THE STUDENT:
1. Appropriate dress is required. Students coming to lab without proper shoes will not be allowed to participate
in lab.
2. Students are expected to have read the assignment prior to class and to actively participate in class discussions
and lab.
3. In the lab, students are expected to work as a team with other students to complete lab assignments.
4. Students are responsible for all terms defined in the textbook.
CLASSROOM PROTOCOL
Appropriate classroom behavior is implicit in the Cedar Crest Honor Code. Such behavior is defined and guided by
complete protection for the rights of all students and faculty to a courteous, respectful classroom environment. That
environment is free from distractions such as late arrivals, early departures, inappropriate conversations and any other
behaviors that might disrupt instruction and/or compromise students’ access to their Cedar Crest College education.
Lap tops are not allowed in class, please do not embarrass me or your classmates by bringing your lap top.
Why? In past classes where I allowed lap tops, individuals using them were disrespectful to their classmates and the
instructor. The overwhelming consensus of students was to ban laptops at the end of the course where they were allowed.
The cedar crest college honor code will prevail at all times. Please verify on each test and assignment that the work done is
your own with your SIGNATURE. PLAGIARISM or any other form of academic dishonesty will result in no points on the
paper/exam on which you plagiarized or cheated. In addition, such an act may result in failing the entire course. Please refer
to you customs book for a complete explanation of the Cedar Crest Honor Code.
Weekly Lab and Lecture Plan
3
Nutrition 220
Laboratory One – Week Two
Barbara M. Carlson, MA, RD, CDE
Week One and Two
Date: August 27, 2009
Week One Lecture
ASSIGNMENT
Text / Lab Manual
Chapters
1 through 7
Laboratory handouts
Date: September 3,
2009
Week 2 Lab
Quiz Weeks One and
Two:
Online
Open –
September 4
(noon) through
September 8
(noon)
Date: September 10,
2009
Week 3: Lecture
Quiz Weeks three and
four:
Lab Week 4 continued:
METHODS AND ACTIVITES
Technology
Food consumption
Food Safety
Standards of Identity
Heat Transfer
Weights and Measures
Recipe: type and use
Sensory Evaluation
Review of course
Review of Laboratory Procedures
Review of E-college Procedures
Demonstration:
o Knife safety
o Garbage Disposals
o Scales
o Thermometer Use
o Hedonistic Scale
Signed Safety form
due
Please read the
Laboratory Assignment:
Week Two - prior to lab.
Lab Observation and Read the Lab Safety
Worksheets due prior Handout prior to Lab.
to leaving lab.
Sign and Return the
Signature Page at the
next Class
Lab Activity:
Measurement: weight versus
customary measure
Equipment use
o Microwave use: Heating
frozen Entree
o Temperature evaluation:
calibrating thermometers
o Oven Use: checking
temperatures
o Product Assessment –
hedonistic Scale
Text:
Chapter 8, 9,10 13
and 14
Lecture:
Demonstration
Particle size salt
Gluten Production :
compounds that interfere
Reading recipes
Rice cookery
Emulsification
Weekly Homework
September 25
Date: September 17,
2009
Week 4: Lab
LECTURE TOPIC
Seasoning and flavors
Food Composition
Starches and Grains
gluten
Batters
Methods: Muffin,
sponge,
modified, quick,
shortened vs.
unshortened.
Lab
Preparing homemade Pasta
o Comparison of Fresh,
commercial dry and
gluten free
Muffin preparation
4
Nutrition 220
Laboratory One – Week Two
Barbara M. Carlson, MA, RD, CDE
Week One and Two
ASSIGNMENT
Text / Lab Manual
LECTURE TOPIC
METHODS AND ACTIVITES
o White flour
o Wheat flour
o Corn
o Gluten free
Cake preparation
o Sponge (modified)
Online
Open –
September 18
(noon) through
September 22
(noon)
Date: September 24,
2009
Week 5: Lecture
CHAPT - 11, 15, 16,
18, 17 and 19
October 1, 2009
Week 6 Lab
Dough (biscuits)
Yeast Bread
Pastry
Thickening agents
(starches continued)
Leavening agents
Lecture / Demonstration
Thickening
agents
Leavening Agents
Lab
o White Sauces (pudding)
o French Bread (artisan bread
and traditional)
o Gluten Free Bread
o Pate Brisee
o Standard Pastry
o Biscuits
Quiz Weeks 5 and 6
Online:
Open: October
2 (noon)
through
October 6
(noon)
October 8, 2009
Week 7
Midterm – In Class
Lecture
Week 8
October 15, 2009
Lab
Quiz weeks 7 and 8
Online
Open October
16 (noon)
through
October 20
(noon)
Chapters 20, 21, 22,
28
Fruits, Vegetables and Lecture
Gels
Lab
Fruit compote
o Osmosis
o Effect of hyper and hypoosmolar solutions
o Sugar substitute
Vegetable cookery
o Steaming
o Braising
o Baking
o Blanching
Gelatin
5
Nutrition 220
Laboratory One – Week Two
Barbara M. Carlson, MA, RD, CDE
Week One and Two
October 22, 2009
Week 9
Lecture
ASSIGNMENT
Text / Lab Manual
Chapters 23 and 24
November 28
LECTURE TOPIC
Dairy:
Milk, Cheese and Eggs
October 29, 2009
Week 10
Lab
Quiz – Weeks 9 & 10
Online:
Open: October
30 (noon)
through
November 3
(noon)
November 5, 2009
Week 11 Lecture
Chapters 25, 26 and
27
November 12
Week 12
Lab
Quiz
Online:
Open:
November 13
(noon) through
November
(noon) 17
November 19 - Team Meals
December 3 - Team meals
Final – Final’s week - See Finals Schedule
Meat, Poultry and fish
METHODS AND ACTIVITES
Lecture / Demonstration
Egg Foams
Milk Coagulation
Soufflé
o Cheese sauce / white
sauce
o Milk skim
o Milk whole
o Cream
o Soy
Boiled egg
Scrambled Egg
Cholesterol free product
comparison
Milk and Milk substitute evaluation
– sensory
o Dairy
o Soy
o Rice
o Shelf Stable
Lecture
Demonstration
Braise vs. Sauté
Poaching
Taking temperatures
Poached chicken
Braised chicken
Pan Fried Chicken
Roast Poultry quarters
Ground Meat – internal temp
Lentils
Small Red
Beans
Splits
6
Nutrition 220
Laboratory One – Week Two
Barbara M. Carlson, MA, RD, CDE
Appendix One: Final Project
Plan and prepare a complete meal.
Four teams of three or four people will work together. The meal must contain the following components.
1. Menu plan – approved by instructor: due one week prior to meal.
a. Protein – May be braised, poached, sautéed or baked (must be an animal protein)*.
i. A sauce may accompany the protein. The sauce must use a thickening agent / or an emulsifying
agent / or if based on fruit an osmotic agent.
b. Vegetable or Vegetable Salad – a cookery method or knife skill should be apparent in the preparation
c. Starch – may be made from scratch - pasta, biscuit, bread, pastry or rice
d. Dessert – Fruit or Batter Based dessert
e. Beverage – Water, Coffee, Iced Tea either plain or flavored may be added to meal. The cost of these items
does not need to be considered in your budget, but ingredients should be less than $10.00 and included in
your shopping list.
* The majority of patients you will encounter are omnivores. Learning to prepare quality animal protein products is essential.
This is often the most expensive component of a meal and maintaining appropriate portion control and reducing loss are
skills every future nutrition professional requires.
Teams who strongly desire to offer a vegetarian option may choose to include a lentil or vegetable combination in the
Vegetable or Starch category. If offered as a vegetarian option: the item must provide a complete protein.
2. Budget – due one week prior to meal
a. The meal budget will be $6.00 per person, or a total of 90.00 for all ingredients
b. Menu items should be prepared in amounts adequate to serve 8 people a full portion or 15 people a ½ portion.
c. Budgets should be calculated for amount of an item used in meal preparation. As an example: if you need
flour, calculate the cost of 2 cups, not the entire bag. Unless you are requesting an unusual or expensive
spice, you do not need to calculate the cost of spices. (Should you ask for a vanilla bean – plan to include the
$5.00 to $10.00 cost in your budget.)
d. A shopping list with specific details must be completed and turned in to the professor one week before meal
preparation date.
3. Written Report:
a. Methods used to prepare each item will be discussed.
b. A sensory assessment form for each item will be developed along providing guidance for quality items and
appropriate terms.
c. This report will be completed by each team member individually.
4. Meal Service
a. Teams will have 2 hours to prepare the meal.
b. Teams not preparing a food item will come to class at time designated for meal service.
c. All individuals will complete the meal evaluation forms.
Grades will be based on the following
1.
Menu Plan – 15 points:
i.
Did the menus use skills practiced in the appropriate lab.
ii.
Did foods complement each other?
7
Nutrition 220
Laboratory One – Week Two
Barbara M. Carlson, MA, RD, CDE
iii.
2.
3.
4.
5.
6.
Did the menu combinations provide a variety of tastes, textures and appearance
qualities considered appropriate to good quality meals?
Budget – 15 points:
i.
Did the menu maintain the allowed budget?
ii.
Was proposed budget accurate and well researched?
Shopping List – 15 points:
i.
Did the shopping list include all ingredients required?
ii.
Was it organized in a manner that made shopping for items simple at Allentown
Wegmans?
1. All produce grouped
2. Staples grouped
3. Refrigerated and frozen items grouped
4. Packaged items grouped
Time Management – 15 points:
i.
Was the meal prepared within the two hour time frame?
ii.
Were foods served at the appropriate temperatures and food safety maintained?
Sensory evaluation – 15 points:
i.
Were foods prepared in a manner that produced items which tasted good, looked good
and met criteria for a quality food item?
ii.
If a food fell short, could the evaluation help with assessment of why the quality was not
good?
Written discussion – 25 points:
i.
Were preparation methods and the science of food preparation discussed?
For example: Was the development of gluten discussed for any food containing wheat
flour? Did the method of protein preparation discuss the meat muscle and desirable
methods (moist versus dry) of cooking?
ii.
Did the sensory evaluation form promote simple, clear assessment of the qualities
appropriate to each food item?
8
Nutrition 220
Laboratory One – Week Two
Barbara M. Carlson, MA, RD, CDE
Reading Assignment week One
Objectives: Following this lesson you will be able to correctly complete each of the following:
Dress appropriately for work in a commercial kitchen or food service operation.
Maintain a safe and sanitary workplace
Exercise proper personal hygiene
Exercise proper kitchen cleanliness and organization
Develop a good work ethic and code of conduct
Use and maintain kitchen tools and equipment
Practice interpretation of food preparation and storage methodologies
Please read each of the following and sign the attached form indicating that you read and understand
each area.
Uniform Requirements
White Lab coat, Chef’s coat or full apron (preferably white)
Head covering: hair net, scarf that fully covers hair, Paper toque or baker’s cap, men may wear baseball
caps
Shoes – nonskid, fully covers foot (no sandals, no crocs or shoes with open areas on the front and top of
the foot). Clogs with a fully covered toe and upper foot, but open in the back are permissible.
Safety – This safety section is large and is as comprehensive as possible. The best safety advice in a kitchen is
to pay attention to all sharp and hot items and to contaminated food items.
Food can be potentially dangerous if handled in a manner that promotes growth of pathogens. Learn the danger
and safety zones for cold and hot temperatures.
Keep refrigerator and freezer doors closed except when removing food or placing food into them. Never block
open the door. Use a cart if you have a large numbers of items and place them into the refrigerator or freezer as
quickly as possible.
Safety - Knives
Knives – carried with blade pointed down and away from the body.
Always cut with the blade of the knife angled away from you.
Never try to open a can or bottle with a knife or use a knife as a screwdriver.
Don't use a knife to cut string, bones, metal, or paper.
Always use a cutting board and keep it firmly in place by placing a damp towel underneath to keep it from
moving around the countertop.
Never cut anything that is in your hand. Use the board and make sure it has ample space for the task.
Use the right knife for the job: paring knives for paring, a chef's knife for chopping or mincing, a slicing
knife for slicing, and so forth.
Always hold a knife by its handle, never the blade.
Be very careful when removing blades from blenders and food processors.
Never lay an unused knife on edge of pointing forward on a counter. The point should face to the back of
the counter and the blade should touch the counter, not be exposed or at an angle where someone
reaching across a counter could be cut.
9
Nutrition 220
Laboratory One – Week Two
Barbara M. Carlson, MA, RD, CDE
Store knives properly-a knife block or knife rack is best. If you are storing knives in a drawer, make sure
to keep them in a separate compartment, away from other utensils. Store with the blade DOWN and the
handle FORWARD.
If you should happen to drop a knife, don't try to catch it. Step back alertly and wait until the knife comes
to a complete rest before picking it up. Keep your mind focused on the job when using a knife.
Hand-wash your knives and dry thoroughly. Never put knives into the dishwasher.
NEVER drop a knife into a sink filled with sudsy water.
Safety - Stoves
Gas stoves have an open flame and require particular care. NEVER lay flammable materials on top of
the stove.
Use care when you have a towel (cloth or paper) near an open flame, be sure it does not come into
contact with the flame. If it does catch fire, drop the towel onto the floor or into a sink IF the sink is close.
Extinguish with water or by smothering the flame with a metal pot.
Ignition Systems
There are two types of automatic ignitions: constant burning pilots and, on newer ranges, pilotless ignition.
(Pilotless ignition is used in CCC kitchens. The electric ranges are all flat surface ranges.)
Gas range
Constant burning pilots are small blue flames burning near the burner or the burner flashtube. These
pilots are on at all times (none in CCC kitchens)
Pilotless or intermittent ignition systems are electronic and "spark" ignition type. You will hear a clicking
sound when the top burner or thermostat is turned on. A "glow coil" igniter heats when the oven is turned
on and ignites the burner. Pilotless systems operate only when the range is in use.
When the burner does not light, turn the control OFF. If left in the ignite position, gas can escape and
create a hazard.
If the oven burner does not light when the oven control knob is turned on, first turn it OFF. Then
refer to the range "user's manual" for lighting instructions.
o If you smell the odor of gas, check to be sure all range controls are turned OFF.
o Call Security if gas odor persists, evacuate the classroom and leave the building.
o IF you can SAFELY do so, notify individuals in offices and classrooms close to the kitchen
that there is gas in the building and tell them to evacuate.
Electric Ranges
It is sometimes difficult to determine which burners are hot, on flat surface ranges.
The Jenn-Aire ranges DO NOT have a warning light for hot surfaces. When using these ranges be very
careful not to touch the burner surfaces, or lay any flammable objects on the burners. After using the
range, place a pot with one inch of cold water on the hot burner, this will help to disperse the heat
and warn others that the burner is hot.
10
Nutrition 220
Laboratory One – Week Two
Barbara M. Carlson, MA, RD, CDE
The Frigidaire ranges have a warning light section (near the center front of the stove) which provides
a visible key to hot burners. Even though they have a visible warning you should still be very careful not
to touch the burner surfaces, or lay any flammable objects on the burners. After using the range, place
a pot with one inch of cold water on the hot burner, this will help to disperse the heat and warn
others that the burner is hot.
All Ranges
Use the correct temperature/flame setting
o HIGH FLAME. Used to bring large quantities to a boil quickly...often used for a short time under
big pans in order to start food cooking rapidly.
o MEDIUM FLAME. Used for browning meats evenly without burning and with little spattering...may
also be used to keep large quantities of food boiling.
o LOW FLAME. Used for melting and warming foods, to cook small quantities of food or to keep
cooked foods warm until serving time.
Do not use the top of any range as a storage area. Flammable items may catch fire and plastic items
may ignite or melt.
Keep electrical cords away from the range top.
Keep flammable items away from the cooking area & appliances in your kitchen.
Don't store towels, pot holders, pizza boxes, or paper bags on the stove or near hot appliances.
Be very careful with towels and potholders when working around open flames. Keep pot holders next to
the stove where they can be easily accessed, but assure they are not in contact with flames or burners.
Pan Selection and Care
Pan selection is important. Avoid pans that are too heavy to move easily when they are filled with food.
Discard pans that are easily tipped or those with loose handles.
Select the right size pan, big enough to contain the food and to avoid boil-overs or spillovers. This will
save energy and cleaning time and prevent dangerous accumulation of food on the range top. (Heavy
spattering or spillovers left on a range can ignite.)
Always turn pan handles to the side or back of the range...not out into the room where they can be
easily hit, possibly knocking the pan off the range.
Never turn a handle over another burner, it can become hot and cause burns.
FIRE
We can replace equipment, we can’t replace YOU! Safety first!
THE FIRE EXTINGUISHER IN THE CCC KITCHEN IS LOCATED BESIDE
THE PANTRY. Always take a minute to locate the extinguisher when working in a kitchen. Be fully
aware of its location.
Pull the fire alarm and LEAVE THE BUILDING for any fire that is not
IMMEDIATELY controlled!
11
Nutrition 220
Laboratory One – Week Two
Barbara M. Carlson, MA, RD, CDE
In the event of a small grease fire, do not try to move the pan!
o Turn off the burner if possible.
o Slide a large cover onto the pan to extinguish the fire only if you can do so without being
burned.
IF YOU ARE USING A FIRE EXTINGUISHER FOR ANY FIRE THAT IS NOT IMMEDIATELY
EXTINGUISHED!
o Use a fire extinguisher rated ABC for kitchen fires.
o Do not use water on a grease fire. (Water will spread the flames.)
o Do NOT throw any powdered substance on an open flame, powders, including flour can
explode.
o Grease can catch fire and should be handled carefully. Do not pour hot grease into a glass
or plastic container which can break or melt.
o Never leave cans with fat drippings around the range...put them in the refrigerator or the
garbage.
o Clean any grease build-up from the stove, oven & exhaust fan regularly. Cooking grease &
oil ignite easily & burn rapidly.
Oven fires
o DO NOT OPEN THE OVEN DOOR
o If the fire does not go out quickly, pull the fire alarm and leave the building.
Oven Safety
Pull the oven racks out when testing foods for doneness, putting food in or removing food. Do not lean
into the oven. Hot oven gases can burn.
Use sturdy pot holders for handling hot pans and oven racks rather than dish towels or other substitutes
which can cause burns if they are too thin, become entangled or catch fire.
Never use a wet towel or pot holder, they can cause burns
Additional Stove safety
Avoid reaching over the stove for anything while cooking. Store frequently needed items in other areas of
the kitchen.
Dress for fire safety in the kitchen. Don't wear loosing fitting clothing.
Never leave cooking unattended. If you must leave the kitchen for some reason, turn the heat off & take
something with you to remind you that you have something cooking.
Shield yourself from steam when uncovering food, especially microwave servings. Steam can cause
serious burns. Tip the cover away from you when taking it off a pan. Always remember that steam will
rise out of a boiling pot of water when you take off the cover.
o Steam is often thought of as the cloud of visible vapor that comes out of a teapot. Wrong! The
visible part is just the part of the steam cloud that has cooled down to under the boiling point of
water and is visible as a cloud of condensed water droplets. Real, live, dangerous steam is water
vapor that is above the boiling point of water, often way above it, and escaping confinement. It
can be highly pressurized and moving very fast, and is almost invisible as it escapes its
confinement. It causes real nasty burns. Be particularly wary of pressure cookers, steam pipes,
water into super heated environments, and boilers.
12
Nutrition 220
Laboratory One – Week Two
Barbara M. Carlson, MA, RD, CDE
If you take a hot pan or a cover from the fire and put it on a counter, place it on a hot pad AND
leave a hot pad on top of the hot lid or utensil as a warning to the others in the kitchen that it is
hot.
Cleaning Ranges
On most ranges, the burner knobs, burner grates, burner bowls and burners can be removed for cleaning
at the sink. On some models, the burner top can be lifted for easy cleaning; on others, it can be
completely removed to make it easy to clean the burner box.
Wipe up spills when they happen, using a soft, dry cloth or paper towel. When the range has cooled,
wash off the spills with a sudsy cloth or sponge.
Wipe any spatters off adjacent burners too, so that when those burners are used, the spatters will not
burn onto the burner and be hard to clean.
Harsh cleaners and scouring pads will scratch the range finish. Use only cleaners recommended by the
range manufacturer.
Microwave safety
NEVER super heat liquids in a microwave, they can explode when removed. Food can become
superheated when the temperature below the surface is above boiling and the surface tension retains the
steam.
If you heat liquids ALONE in the microwave put a glass stir stick into the cup to release the surface
tension.
o Never super heat a liquid in the microwave. Most liquids, of 1 to 2 cup volume will reach boiling
in 2 minutes.
Use pot holders to remove hot items from microwave
Use glass utensils in the microwave, not plastic, which can bend and spill hot items
Slips and Falls
Soapy water, grease and oils, and things like the traditional vegetable and fruit peel are standard in kitchens and
are all slippery.
If you spill something on the floor, clean it up. Keep a mop or such handy for this purpose. Mops in
the CCC kitchen are in the pantry Spills on floors should be immediately cleaned and dried. When a spill
occurs in a kitchen where other people are working, place a cone (if available) or a metal pan over the
spill. Announce to others in the area that you are marking a spill and will get cleaning equipment. If
possible, ask another person to monitor the area and make others aware of the spill.
If no one is around to help, place a waste paper basket on top of the spill, or cover with towels and
leave them in place. In the CCC kitchen, when you see a waste basket in the middle of a kitchen,
or towels on the floor you should immediately think – SPILL, and avoid the area except to assist
with clean up.
Clean up as much as possible with paper towels. Use a mop or additional towels and hot soapy water to
clean any grease, or residue. Grease spills can be particularly slippery, be sure that you continue to
clean the area until all grease is eliminated. Dry the floor with additional paper towels.
Often when you are working in the kitchen you are moving fast. Don't leave book bags, boxes, stools,
bags of groceries or anything else out on the floor where they can trip up a fast moving cook.
13
Nutrition 220
Laboratory One – Week Two
Barbara M. Carlson, MA, RD, CDE
Safety around Kitchen Electricity
Report all frayed or cut electrical cords immediately and do not use the equipment.
Never put your hand into an appliance with blades that is plugged in (examples are blenders, food
processors, slicers, mixer, robot-coupe). Unplug the appliance prior to reaching into it, to extract food, or
unstuck blades.
Don't overload circuits by using multiple plugs, extension cords or the like. If you have old wiring, it is
often a good idea to get it checked by a professional for load carrying capacity.
Don't use appliances near the sink or other water. If one falls in, it can electrocute anyone nearby. If
you must have a wall socket near the sink, make sure it has a "Ground Fault Interrupter" type socket
assembly.
Sanitation and Food Safety
DO NOT reuse a towel that has been used to clean utensils or counter tops. Immediately after use,
place these towels in the laundry.
Use freshly washed towel or paper towels anywhere food will touch.
Clean Sponges after every lab, by washing in hot soapy water, rinsing until water runs clear, and
placing in the microwave for 60 seconds.
o Use care when removing the sponge, it contains hot water and steam. USE A POT HOLDER!
o Allow to dry at room temperature.
Follow guidelines for food storage. Cold food should be in the refrigerator or freezer until used. Hot food
should be held at the correct temperature. Follow storage guidelines (Appendix One)
Cross Contamination Prevention
Cross-contamination is the transfer of harmful bacteria from contaminated foods to cutting boards, utensils,
and other foods if they are not handled properly. This is especially true when handling raw meat, poultry,
and seafood. Keep these foods and their juices away from already cooked or ready-to-eat foods and fresh
produce.
When handling foods, it is important to Be Smart, Keep Foods Apart -- Don't Cross-Contaminate. By
following these simple steps, you can prevent cross-contamination and reduce the risk of food borne illness.
When Shopping:
o Separate raw meat, poultry, and seafood from other foods in your grocery-shopping
cart. Place these foods in plastic bags to prevent their juices from dripping onto other
foods.
o Place these foods at the bottom of your cart; this prevents juices from dropping onto
other foods.
o It is also best to separate these foods from other foods at check out and in your grocery
bags.
When Refrigerating Food:
o Place raw meat, poultry, and seafood in containers or sealed plastic bags to prevent
their juices from dripping onto other foods. Raw juices often contain harmful bacteria.
o Place these items on the lowest shelf in your refrigerator.
o Store eggs in their original carton and refrigerate as soon as possible.
14
Nutrition 220
Laboratory One – Week Two
Barbara M. Carlson, MA, RD, CDE
When Preparing Food:
o Wash hands and surfaces often. Wash hands with soap and warm water for 20
seconds before and after handling any food, after using the bathroom, changing
diapers; or handling pets.
o Use hot, soapy water and paper towels or clean cloths to wipe up kitchen surfaces or
spills.
o Wash cloths often in the hot cycle of your washing machine.
o Wash cutting boards, dishes, and counter tops with hot, soapy water after preparing
each food item and before you go on to the next item.
o A solution of 1 tablespoon of unscented, liquid chlorine bleach per gallon of water may
be used to sanitize surfaces and utensils.
Cutting Boards:
o Always use a clean cutting board.
o If possible, use one cutting board for fresh produce and a different board for raw meat,
poultry, and seafood.
o Once cutting boards become excessively worn or develop hard-to-clean grooves, you
should replace them.
Marinating Food:
o Always marinate food in the refrigerator, not on the counter.
o Sauce that is used to marinate raw meat, poultry, or seafood should not be used on cooked
foods, unless it is boiled just before using.
When Serving Food:
o Always use a clean plate.
o Never place cooked food back on the same plate or cutting board that previously held raw
food.
When Storing Leftovers:
o Refrigerate or freeze leftovers within 2 hours of cooking. Store in clean, shallow, covered
containers to prevent harmful bacteria from multiplying.
o Use the 2 inches, 2 hours rule. It takes two hours to chill 2 inches. If a food is stored in a
container that is more than two inches deep, separate it into two or more shallow
containers, or use an ice water bath and stir the contents to chill quickly.
Cleaning Counter tops
Clear the countertop of everything that is movable. In the CCC kitchens EVERYTHING is moveable.
Fill the sink with hot water, add a dish washing detergent.
With a damp cloth or paper towels, wipe the entire area.
o If there are stains sprinkle a light coating of baking soda. Make sure the baking soda covers the
stain evenly. You may want to drop a little water across the counter to help dampen the baking
soda for better absorption.
15
Nutrition 220
Laboratory One – Week Two
Barbara M. Carlson, MA, RD, CDE
o Wait 15 to 30 minutes. Dampen a clean scrub cloth and use small circles to rub the baking soda
into the countertop. If the counter is deeply stained, leave the rubbed-in baking soda for another
15 minutes or so to allow complete absorption.
o If this is noticed at the end of class, notify your professor. They will help determine whether the
area will need treatment after class ends.
o Rinse your cleaning cloth and begin wiping the counter to remove the baking soda paste. Do a
thorough job of wiping away all the pasty grit created by the baking soda mix.
o Check with your finger to detect any residual baking soda. When you are sure the entire counter
surface is wiped clean and free of soda, use a paper towel or dish towel to dry it.
This list is not meant to cover every possible danger within a kitchen. But, it does highlight major dangers. If
these guidelines are followed throughout all kitchen experiences, most accidents and dangers will be prevented.
16
Nutrition 220
Laboratory One – Week Two
Barbara M. Carlson, MA, RD, CDE
Appendix A. - Critical Temperatures for Food Service
The following temperature guidelines, based on the federal Food and Drug Administration’s 2006 Food Code,
apply at various stages of food preparation and serving. Strictly maintaining these temperatures is particularly
important when dealing with potentially hazardous foods. Foods which favor bacterial growth include meat,
poultry, eggs, seafood, dairy products, cut melon, raw seed sprouts, garlic-in-oil mixtures, cooked rice or potatoes
and others.
Your book may have slightly different temperatures for some foods. Books and guidelines change over time as
new information about food safety develops. In most cases, temperatures for cooked foods are decreasing, from
recommendations of previous years. For example temperatures for pork were once set at 175 degrees and
higher.
It is critical that you know the DANGER ZONE temperatures, the correct temperatures for refrigeration and
freezing. You do not need to know the temperatures for individual foods in this course. However, you do need to
know where to access them.
Remember the danger zone: 41º F - 140º F. Potentially hazardous foods exposed to this temperature range for
a cumulative total of more than 4 hours are not safe to eat.
Storage
Refrigeration (food) temperature
40º F or below
Freezer (food) temperature
0º F or below
Dry storage
50º F - 70 º F
Use open shelving and do not cover food with foil during the chilling process. Food should be covered
and labeled after it reaches the chill temperature.
Seafood should be held at temperatures of 30º F – 34º F for freshness and control of pathogens; it is the
only exception to refrigeration temperatures.
Check foods in multiple locations throughout a cold storage area; temperature may not be uniform.
For ready-to-eat foods prepared on-site, label and comply with storage time standards. For many foods
the standard is seven days maximum for food held at 40º F or below. Standards may be different for
hospital food service facilities.
17
Nutrition 220
Laboratory One – Week Two
Barbara M. Carlson, MA, RD, CDE
Thawing
In the refrigerator
40º F or below
Under running water
70º F or below (water temperature)
Do not thaw at room temperature.
If a microwave is used to thaw food, the food must be cooked immediately after thawing.
Cooking
Food
Thermometer must hold this temperature for
Beef roast
145º F minimum of 3 minutes or
140º F for 12 minutes
130º F for 121 minutes
Beef, steaks, fish, seafood (filets, chops or intact
pieces), bacon
145 º F for minimum of 15 seconds
Pork, veal and lamb
160 º F for minimum of 15 seconds
Ground beef or pork, chopped/flaked meat
160 º F for minimum of 15 seconds
Poultry, stuffed foods
165º F for minimum of 15 seconds
Eggs
Cooked to hold
155º F for minimum of 15 seconds
Cooked to order
145º F for minimum of 15 seconds
Foods cooked in microwave
165º F, hold for minimum of 2 minutes
Fruits, vegetables
140º F (no minimum time)
For combination dishes, choose the ingredient with the most stringent standard and follow it.
Measure temperature in the thickest part of the food.
Cooling Potentially Hazardous Food
From hot temperature
Cool to 70º F within two 2 hours; cool to 41º F or
below within 4 more hours (6 hours total)
From room temperature
Cool to 40º F within 4 hours
18
Nutrition 220
Laboratory One – Week Two
Barbara M. Carlson, MA, RD, CDE
Do not cool at room temperature.
Use a blast chiller or ice bath to hasten cooling.
Divide food into small units or use a shallow pan. Two inches of food can chill within 2 hours.
Food should never be left out at room temperature for more than 2 hours (one hour if the temperature is
over 90 degrees)
Holding
Hot food
140º F or above
Cold food
40º F or below
Keep food covered.
Stir hot food frequently.
Store utensil in food.
Take actual food temperature; do not rely on a thermostat setting.
Check temperature frequently (at least every 2 hours).
Do not use hot holding equipment to heat or reheat food.
Reheating
Leftovers
165º F minimum
Cold food
40º F or below
Food must reach temperature within 2 hours.
More Useful Temperatures
Hand washing water
110º F
Sanitizing solutions (heat)
170º F for minimum of 30 seconds
Sanitizing solutions (chemical)
75º F - 120º F
19
Nutrition 220
Laboratory One – Week Two
Barbara M. Carlson, MA, RD, CDE
Name: ____________________________________________________________
Please Print
I read and understand the safety information provided in this document. I understand that it is my responsibility to
work in a manner that ensures my safety and the safety of my classmates.
My weekly lab grade will be based on the assignment and following lab protocols and safety procedures.
Signature
/
Date
20
Nutrition 220
Laboratory One – Week Two
Barbara M. Carlson, MA, RD, CDE
Nutrition 220: Introductory Foods Preparation
Lab check IN / Check OUT and Evaluation
Kitchen check out and Lab procedures and weekly report. Date:
Work group: List team names here
Names: _______________________________ / _________________________________
________________________________/___________________________________
Personal Dress and Hygiene prior to lab.
1. Did you wear appropriate shoes, without open toes or open tops?
Yes
No
If no, did you ask to be excused from lab and make an appointment to complete the lab at
another date?
2. Did you wear appropriate head covering?
Yes
No
3. Did you wear gloves if your nails were polished?
Yes
No
4. Did you remove jewelry that was not appropriate?
Yes
No
TEAM Assessment: Teams should work together to assure the following are completed before
and after lab.
2. All equipment will be washed prior to use and counter tops sanitized and counter tops dried
with paper towels.
Completed: ______ yes
______ no
3. Cross contamination of equipment will be minimized by use of clean measuring equipment for
every item acquired during Mise en Place (preparation).
Was clean measuring equipment used? ______ yes
______ no
Was measurement completed at designated location? ______ yes ______ no
4. Counter tops sanitized
Were countertops sanitized prior to lab? ______ yes
Were countertops sanitized after lab? ______ yes
______ no
______ no
5. Sinks clean and wiped dry after lab? ______ yes
______ no
6. Garbage Disposals must be cleared of any waste by running the disposal, using running cold
water.
Were garbage disposals cleared after lab? ______ yes ______ no
21
Nutrition 220
Laboratory One – Week Two
Barbara M. Carlson, MA, RD, CDE
7. Drawers, pots and pans and bake wear lists must be verified to assure the equipment
belonging to each kitchen is returned to its proper place and available for the next lab.
Was all equipment cleaned and returned to its proper location? ______ yes
______ no
8. Was equipment use in your kitchen OR equipment borrowed from the stock kitchen, or
another kitchen cleaned and returned to the original location? ______ yes ______ no
9. Only dishes, cups and silverware may be placed in dishwashers. All food preparation
equipment is to be washed and dried with clean dish towels.
Were utensils (dishes, silverware and cups) placed in dishwasher? ______ yes
______ no
10. Dish towels, soiled pot holders, sponges will be placed in the clothes baskets in the utility
room. Sponges should be washed with soap and water, rinsed and microwaved for 60
seconds to sterilize them.
Was the sponge sanitized & microwaved for 60 seconds? ______ yes ______ no
22
Nutrition 220
Laboratory One – Week Two
Barbara M. Carlson, MA, RD, CDE
Assessment of Performance:
Assessing the contribution of team members is required in every organization. Should you become
a food service director, or clinical nutrition manager you will be required to assess the work habits
and quality of work for employees.
Complete this section by fairly evaluating your team members. Treat this information as if it is
confidential. If a team member falls into either the 2 or 3 range, offer one suggestion for helping
improve their performance. If the team member falls into the 4 or 5 range, comment on their
performance and why it was considered good or very good. This information WILL NOT be used to
grade your team members, it will be used be used only as part of your grade.
2
Marginal
Team Members
Names below:
3
Fair
A. Mise en Place:
Measurement of
ingredients, and
kitchen sanitation
and set-up
4
Good
B. Technique and
preparation:
Reading recipe
and following
instructions.
5
Very Good
C. Discussion and
evaluation of
product properties:
D. Clean up
sanitation: did each
team member assist
with sanitation.
1.
2.
3.
4.
Do you have one (or more) suggestions for your team members, or the professor to make this lab a
better learning experience?
23
Nutrition 220
Laboratory One – Week Two
Barbara M. Carlson, MA, RD, CDE
Team member signatures:
/
/
Turn in the above pages prior to leaving the lab.
24
Nutrition 220
Laboratory One – Week Two
Barbara M. Carlson, MA, RD, CDE
Nutrition 220: Metric conversion
Soft Metric Conversion Chart – Gourmet Sleuth.com
Soft conversion is exact. Hard conversion rounds up or down to easily remembered numbers. Note
that there is even some difference in units used in the UK and Canada, versus metric systems used in
other countries. You will sometimes see the term imperial units (British). A good comparison chart
for the many systems and types of measure is compiled in Wikipedia at:
http://en.wikipedia.org/wiki/Approximate_conversion_of_units While Wikipedia must be used with
some caution, if you look at the resources used for their extensive charts you will find they are highly
reputable and extensive.
The chart below (without hard conversion numbers) comes from Gourmet
Sleuth, an excellent cooking reference on the WWW.
http://www.gourmetsleuth.com/index.asp
Volume
U.S. Units
Metric Units*
Hard conv.
1 teaspoon (US)
=
1/6 ounce
4.929 milliliters
5 ml
1 tablespoon (US)
=
0.5 ounce
14.79 milliliters
15 ml
1 fluid ounce (US)
=
1 ounce
29.57 milliliters
30 ml
1 gill (US)
=
4 ounces
118 milliliters
240 ml
1 cup (US)
=
8 ounces
236.6 milliliters
1 pint (US)
1 quart (US)
1 gallon (US)
1 cubic inch
1 teaspoon (UK)
1 dessert spoon (UK)
1 tablespoon (UK)
1 fluid ounce (UK)
1 gill (UK)
1 breakfast cup (UK)
1 pint (UK)
1 quart (UK)
1 gallon (UK)
1 milliliter
1 centiliter
1 deciliter
1 liter
1 dekaliter
=
=
=
=
=
=
=
=
=
=
=
=
=
=
=
=
=
=
16 ounces
32 ounces
128 ounces
0.5541 ounces
1.2 teaspoons
2.4 teaspoons
1.2 tablespoons
0.96076 ounces
1.2 gills
1.2 cups
1.2 pints
1.2 quarts
1.2 gallons
0.203 teaspoon
2.03 teaspoons
0.423 cup
1.057 quarts
2.642 gallons
473.2ml
946.3ml
3.785 liters
16.387 milliliters
6.16 milliliters
12.32 milliliters
18.48 milliliters
28.4 milliliters
142 milliliters
284 milliliters
568 milliliters
1.136 liters
4.546 liters
l milliliter
10 milliliters
100 milliliters
1000 milliliters
10000 milliliters
480ml
960ml
3.84liters
25
Nutrition 220
Laboratory One – Week Two
Barbara M. Carlson, MA, RD, CDE
Nutrition 220: Introductory Food Preparation
Laboratory One – Week Two
1. Review of Kitchen Safety:
a. Prior to lab students will read Safety and Sanitation homework.
i. Using the Safety and Sanitation homework as a guide students will be
prepared to practice all concepts in the lab.
2. Weights and measures – Students will weigh and measure a variety of ingredients
a. Objectives
i. Using common measurement and scales students will weigh and compare
common ingredients in a recipe and compare their weight to a standard
calculation.
ii. Following exercise, students will compare accuracy of measurements.
iii. Following exercise students will have a basic introduction to conversion of
common measures from Metric to American Measure.
3. Preparation of a basic bar cookie, for kitchen familiarization.
a. Objectives
i. Students will prepare a simple bar cookie.
ii. Students will be able to follow simple recipe instructions.
iii. Students will become familiar with basic equipment, ovens, organization in
kitchen areas.
4. Sensory Quality of Food
a. Objectives
i. Students will complete “Affective” product evaluations.
ii. Students will correctly complete a scalar comparison form.
iii. Students will be able to prepare a product evaluation form.
5. Laboratory Check In/Out procedures
a. Objectives
i. Students will be able to properly clean kitchen area before and after use.
ii. Students will be able to access, use and replace equipment
iii. Students will be able to evaluate individual and team contributions to
laboratory
26
Nutrition 220
Laboratory One – Week Two
Barbara M. Carlson, MA, RD, CDE
Please complete activities in the order listed. This will allow each kitchen free access to
microwaves, scales and mixers without overlap.
Kitchen One and Three:
1. Thermometer calibration
2. Microwave use – frozen entrée
3. Setting and checking oven temperature
4. Brownie Preparation
5. Measurement Exercise
6. Knife use – Vegetable preparation
7. Garbage disposal use
8. Hedonistic Scales and product Assessment
9. Self and Team Evaluation
Kitchen Two and Four:
1. Setting and checking oven temperature
2. Brownie Preparation
3. Measurement Exercise
4. Thermometer calibration
5. Microwave use – frozen entrée
6. Knife Use – Vegetable preparation
7. Garbage disposal use
8. Hedonistic Scales and product Assessment
9. Self and Team Evaluation
Measurement Exercise
Follow these instructions prior to preparing the bar cookie recipe.
1. Set scale to gram measurement.
2. “Tare” any measuring cup, glass bowls, paper prior to adding ingredients.
3. Measure each ingredient.
4. Weigh each ingredient after measuring.
5. Record the actual weight.
a. If any ingredient varies more than 10 % from the Metric Measure provided, adjust
the ingredient.
Each Kitchen will prepare a basic bar cookie recipe.
Kitchen One – Chocolate syrup brownies / Kitchen Two – Basic Brownies /
Kitchen Three – Gluten Free Brownies / Kitchen Four – Butterscotch Brownies
27
Nutrition 220
Laboratory One – Week Two
Barbara M. Carlson, MA, RD, CDE
CHOCOLATE SYRUP BROWNIES
Measured Ingredient
1/2 cup butter
1 cup white sugar
4 eggs
16 ounce chocolate syrup
1 teaspoon vanilla extract
1 1/8 cups all-purpose flour
1/3 cup evaporated milk
1/4 cup butter
1 1/2 cups white sugar
1/2 cup semisweet choc chips
15 by 12 inch sheet pan
Measuring Spoons
Glass baking cups
Mixing bowl
1.
2.
3.
4.
5.
6.
7.
8.
9.
Metric Measure (calculated)
115 g butter
200 g white sugar
4 eggs
474 ml chocolate syrup
5 ml vanilla extract
140 g all-purpose flour
80 ml evaporated milk
55 g butter
300 g white sugar
85 g semisweet choc chips
Actual weight
Butter ______
White sugar______
Eggs______
Choc syrup______
Vanilla______
Flour______
Evap milk______
Butter______
Sugar______
Choc chips______
Spatula
Measuring Cups
Wax paper sheets
Preheat oven to 350 degrees F (175 degrees C).
Measure Ingredients.
Weigh Ingredients and Record Weight
If the actual weight is more than 10 % different (more or less) than the anticipated weight,
adjustment may be needed. Discuss with your professor.
Combine: 1/2 cup butter, 1 cup sugar, eggs, chocolate syrup, vanilla, in a mixing bowl
Add flour; beat well.
Spread batter in a 15 x 12 inch pan.
Bake at 350 degrees F (175 degrees C) for 25 to 30 minutes.
Cool.
28
Nutrition 220
Laboratory One – Week Two
Barbara M. Carlson, MA, RD, CDE
Kitchen One – Chocolate syrup brownies / Kitchen Two – Basic Brownies /
Kitchen Three – Gluten Free Brownies / Kitchen Four – Butterscotch Brownies
GLUTEN FREE BROWNIES
Measured Ingredient
1 (15.5 ounce) can black
beans, rinsed and drained
3 eggs (2 oz or 60 grams each)
3 tablespoons vegetable oil
1/3 cup cocoa powder
1 teaspoon Baking Powder
1 pinch salt
1 teaspoon vanilla extract
3/4 cup white sugar
2 teaspoon instant coffee
1/2 cup milk chocolate chips
Metric Measure (calculated)
439 g black beans, rinsed and
drained
3 eggs: 180 g
45 ml vegetable oil
30 g cocoa powder
5 grams Baking Powder
1 g salt
5 ml vanilla extract
150 g white sugar
2g instant coffee
85 g milk chocolate chips
Actual weight
Black Beans _________ g
Eggs: ________________ g
Vegetable Oil _________ g
Cocoa Power _________ g
Baking Powder ________ g
Salt _________________ g
Vanilla extract _________ g
White sugar __________ g
Instant Coffee _________ g
Chocolate chips _______ g
Equipment needed:
Blender
Spatula
Measuring Cups
Wax paper sheets
8 inch square baking dish (glass or metal)
Measuring Spoons
Glass baking cups
DIRECTIONS
1.
2.
3.
4.
Preheat oven to 350 degrees F (175 degrees C).
Measure Ingredients.
Weigh Ingredients and Record Weight
If the actual weight is more than 10 % different (more or less) than the anticipated weight,
adjustment may be needed. Discuss with your professor.
5. Lightly grease an 8x8 square baking dish with nonstick spray or vegetable shortening.
6. Combine the black beans, eggs, oil, cocoa powder, salt, vanilla extract, sugar, and instant
coffee in a blender; blend until smooth; pour the mixture into the prepared baking dish.
Sprinkle the chocolate chips over the top of the mixture.
7. Bake in the preheated oven until the top is dry and the edges start to pull away from the
sides of the pan, about 30 minutes.
29
Nutrition 220
Laboratory One – Week Two
Barbara M. Carlson, MA, RD, CDE
Kitchen One – Chocolate syrup brownies / Kitchen Two – Basic Brownies /
Kitchen Three – Gluten Free Brownies / Kitchen Four – Butterscotch Brownies
Butterscotch Brownies
Measured Ingredient
3 1/2 cups all-purpose flour
2 1/4 teaspoons baking powder
3/4 teaspoon salt
3/4 cup butter, softened
1 1/2 cups packed brown sugar
3/4 cup white sugar
3 eggs
1 egg yolk
2 teaspoons vanilla extract
6 tablespoons peanut butter
2 cups semisweet choc chips
9 by 13 inch baking pan
Measuring Spoons
Glass baking cups
Mixing bowl
Metric Measure (calculated)
440 g all-purpose flour
8 g baking powder
5 g salt
170 g butter, softened
330 g packed brown sugar
150 g white sugar
3 eggs (180 grams)
1 egg yolk
10 ml vanilla extract
100 g peanut butter
335 g semisweet choc chips
Actual weight
Flour ________
Baking powder ________
Salt ________
Butter ________
Brown sugar ________
White sugar ________
Eggs ________
Egg yolk ------Vanilla ________
Peanut butter________
Choc chips________
Spatula
Measuring Cups
Wax paper sheets
DIRECTIONS
1.
2.
3.
4.
Preheat oven to 350 degrees F (175 degrees C).
Measure Ingredients.
Weigh Ingredients and Record Weight
If the actual weight is more than 10 % different (more or less) than the anticipated weight,
adjustment may be needed. Discuss with your professor.
5. Grease a 9x13 inch baking dish.
6. Sift together the flour, baking powder and salt; set aside.
7. In a large bowl, cream together 3/4 cup of butter, brown sugar and white sugar until light
and fluffy.
8. Beat in the eggs and yolk one at a time.
9. Stir in the vanilla and 6 tablespoons peanut butter.
10. Blend in the sifted ingredients and stir in the chocolate chips.
11. Press the mixture evenly into the prepared pan.
12. Bake in the preheated oven for 25 to 30 minutes, or until a toothpick inserted into the
center comes out with moist crumbs. Cool
30
Nutrition 220
Laboratory One – Week Two
Barbara M. Carlson, MA, RD, CDE
Kitchen One – Chocolate syrup brownies / Kitchen Two – Basic Fudge Brownie /
Kitchen Three – Gluten Free Brownies / Kitchen Four – Butterscotch Brownies
Basic Fudge Brownie
Measured Ingredient
8 (1 ounce) squares
unsweetened baking chocolate
1 cup butter
5 eggs
3 cups white sugar
1 tablespoon vanilla extract
1 1/2 cups all-purpose flour
9 X 13 inch baking pan
Measuring Spoons
Glass baking cups
Mixing bowl
Metric Measure (calculated)
224 g unsweetened baking
chocolate
225 g butter
5 eggs (300 grams)
600 g white sugar
15 ml vanilla extract
190 g all-purpose flour
Actual weight
Baking choc _______
Butter _______
Eggs _______
White sugar_______
Vanilla _______
Flour _______
Spatula
Measuring Cups
Wax paper sheets
DIRECTIONS
1.
2.
3.
4.
Preheat oven to 375 degrees F (190 degrees C).
Measure Ingredients.
Weigh Ingredient and Record Weight
If the actual weight is more than 10 % different (more or less) than the anticipated weight,
adjustment may be needed. Discuss with your professor.
5. Grease a 13x9-inch baking pan. If using a glass dish, preheat to 350 degrees F (175
degrees C).
6. Place 8 ounces of baking chocolate with 1 cup of butter in a microwave-safe bowl.
7. Microwave on High until the chocolate is soft and the butter has melted. Use 30 second
intervals and stir after each interval.
8. Stir butter and chocolate to mix.
9. Place the eggs, 3 cups of sugar, and 1 tablespoon of vanilla extract in a large bowl, and
beat with an electric mixer on high speed for 2 minutes.
10. Reduce the mixer speed to low, and beat in the melted butter-chocolate mixture.
11. Beat in the flour until just combined (do not over mix).
12. Spread the batter in the prepared pan.
13. Bake in the preheated oven until a toothpick inserted into the center comes out with fudgy
crumbs, about 35 minutes. Do NOT over bake, cool in the pan.
31
Nutrition 220
Laboratory One – Week Two
Barbara M. Carlson, MA, RD, CDE
Laboratory Session One / Sensory Evaluation of Bar Cookies
Compare the four bar cookies. Use the following rating scale and characteristics of good
quality product to determine your rating.
Rate the brownies in this order:
1.
2.
3.
4.
Standard Brownie – this recipe should be the standard by which the others are rated
Chocolate Syrup Brownie
Blondie
Gluten Free Brownie
Use the following scale
Points
7
6
5
4
3
2
1
Quality
Excellent
Very good
Good
Medium
Fair
Poor
Very Poor
1. Place the numerical score in the box in the upper left hand corner of each square.
Comments should justify the numerical score.
2. Use the characteristics of a high quality brownie to justify your score.
Characteristics of a High quality product.
Regular, even shape with crust of uniform color. Tender, even grained, with good flavor.
Cooked throughout, neither dry nor mushy. Sweetness should enhance, not overpower
other flavors.
EXTERNAL CHARACTERISTICS
SHAPE - uniform and even
CRUST - uniform color, characteristics of kind
APPEARANCE Uniform, well cut shape
INTERNAL CHARACTERISTICS
TEXTURE - appropriate to recipe: chewy or cake like
GRAIN - even cells
COLOR - characteristic of kind, brown or golden
FLAVOR Blended flavor of well-baked ingredients, characteristic of the kind, free
from excessive flavor of spices or other flavorings.
32
Nutrition 220
Laboratory One – Week Two
Barbara M. Carlson, MA, RD, CDE
Brownie: Sensory Evaluation
Sample
Appearance
Exterior
Appearance
Interior
Volume and
weight
Texture
Moisture,
Tenderness
Flavor
Sample One:
Basic Brownie
Sample Two:
Chocolate Syrup
Brownie
Sample Three:
Blondie
Sample Four:
Gluten Free
Which product was your favorite?
Why?
Use terms that describe flavor, taste, odor and texture. Be specific and factual.
Which product was your least favorite?
Why? Use terms that describe flavor, taste, odor and texture. Be specific and factual.
33
Nutrition 220
Laboratory One – Week Two
Barbara M. Carlson, MA, RD, CDE
Sensory Evaluation – Lemonade
Objectives:
1. Students will use a Duo-Trio test to identify differences in the product.
2. Students will be able to use a simple scale to record their findings.
This is a Duo-Trio test. You are to choose the sample that is different. Two samples are identical, one
is different. Taste the standard lemonade, then, choose the different sample and explain why it seemed
different to you.
Sample
A.
B.
Select the sample that is different.
Identical to standard
Different from Standard
The sample that was different was: _______________________.
The sample that I preferred was: ________________________.
Check each of the characteristics that made sample ____________ seem different.
____________ It was sweeter.
____________ It was less sweet.
____________ It was bitter.
____________ It had an aftertaste.
____________ It was more flavorful.
___________ It was less flavorful.
____________ It had more pulp.
____________ It had less pulp.
Comments:
34
Nutrition 220
Laboratory One – Week Two
Barbara M. Carlson, MA, RD, CDE
Create your own evaluation chart for chocolate.
Objective: Following completion of this exercise students will have a
basic understanding of the steps of developing a product evaluation
and form to assess food product qualities.
Consider the following:
1. What characteristics would you rate?
2. What descriptive terms would you use on your evaluation
sheet
3. What scale would you use to differentiate excellent
products from products that are lower in quality?
4. You must have at least 3 categories to evaluate the
chocolate. Once you have created your evaluation, taste
the three varieties of chocolate and rate them on your
scale.
Rating Scale
/
/
/
/
/
Characteristics of good Chocolate: Choose 3 variables and describe what you would use as a high
standard for each.
1.
: standard
2.
: standard
3.
: standard
Variable
1.
2.
3.
Sample Number One
Sample Number Two
Sample Number Three
Which sample was your favorite and why?
35
Nutrition 220
Laboratory One – Week Two
Barbara M. Carlson, MA, RD, CDE
Fall 2009: Nutrition 220
Study guide for Quiz One and Midterm. After completing the study guide, email the completed
paper to me, I will send you the correct answers in return.
Use your book and lecture notes to find the correct answers and take the quiz.
1. The Five primary tastes are: (circle 5)
a. Salty
b. Umami or savory
c. Sour
d. Bitter
e. Sweet
f. Peppery
g. Hot
h. Pungent
i. Fishy
j. Chemical
k. Putrid
2. Objective evaluation of a food involves:
a. A panel of individuals who taste food and describe it in terms of flavor, texture,
consistency and appearance.
b. Is judged by computers
c. Is carried out by use of a variety of equipment types dependent on what is being
evaluated.
d. Evaluation of texture only.
3. Flavor precursors are substances that produce flavors after (or as a result of):
a. Cooking (heat): baking, roasting, boiling or frying
b. An enzyme or chemical agent catalyzing a reaction in the food: fermentation
(cheese), addition of an acid (cerviche) or the addition of a yeast or microbe.
c. Flavors that are synthesized and added to foods.
d. All of the above are correct
36
Nutrition 220
Laboratory One – Week Two
Barbara M. Carlson, MA, RD, CDE
4. Which of the following do not require a Nutrition Facts label? Circle all that are correct.
a. Fresh fruit and vegetables
b. Raw fish, sold unpackaged at the meat and fish counter
c. Single raw ingredient meat and poultry
d. Eggs
e. Foods with insignificant amounts of nutrients
f. Foods prepared and ready to eat in grocery (not factory)
g. Foods sold in food services
h. Luncheon meat sliced at the deli counter
i. Tea and Coffee
j. Spices
5. Food Borne illness is always caused by a bacteria.
a. True
b. False
6. The types of food borne illness include
a. Bacterial Toxins (produced prior to consumption)
b. Bacterial Food infection
c. Prions
d. Trichina and parasites
e. Viral infections
f. Chemical contaminants
g. All of the above
7. Preventing Food Borne illness requires that a kitchen manager can ignore only one of the
following in his/her kitchen. Which one?
a. Organic versus - Non Organic ingredients
b. Sources of possible cross contamination
c. Employee cleanliness and use appropriate kitchen attire.
d. Calibration of thermometers on a regular basis
e. Temperatures of refrigerators
f. Temperatures of freezers
g. How long food deliveries stand at room temperature
h. Cleanliness of shelving and elimination of moisture build up
i. Temperature of dishwashing water
j. Depth of pans used to chill pre-cooked foods
37
Nutrition 220
Laboratory One – Week Two
Barbara M. Carlson, MA, RD, CDE
8. What are the following conversions (you may use either hard or soft conversion). You must
give BOTH hard and soft for ounces. Some conversions are metric to English, some are
metric to smaller or larger metric measures, some conversions are English to English
smaller or larger conversions.
a.
b.
c.
d.
e.
f.
g.
h.
i.
j.
k.
1 pound =
1 ounce =
1 ounce =
1 teaspoon =
1 liter =
3 teaspoons =
¼ cup =
8 tablespoons
16 tablespoons =
1 quart =
4 quarts =
____________ grams
____________ grams (soft conversion)
____________ grams (hard conversion)
____________ grams
____________ milliliters
____________ tablespoons
____________ tablespoons
____________ cup(s)
____________ cup(s)
____________ cup(s)
____________ gallon(s)
9. Liquids should always be measured in liquid measuring cups. To assure accuracy the cup
must be
a. Held at eye level, and the amount of liquid should be at the bottom of the level
point.
b. Placed on a table, and the amount of liquid should look for a meniscus at the top of
the level line.
38
Nutrition 220
Laboratory One – Week Two
Barbara M. Carlson, MA, RD, CDE
10. Match the recipe format with the correct type of recipe:
a. Standard Style
b. Action Style
c. Descriptive Style
d. Narrative Style
b
c
The action or method is described in order of the steps used in the
mixing procedure. Example:
Measure and Sift together:
1 cup flour
1 teaspoon salt
1 teaspoon soda
The ingredient is followed by the procedure. For example:
1 cup flour
d
Sift dry ingredients into mixing bowl.
The ingredients and instructions are not listed separately. They
are combined into paragraphs. Example:
Sift and combine 1 cup flour, 1 teaspoon salt and 1 teaspoon soda
in a large mixing bowl.
a
In this method ingredients are listed first and are followed by
detailed instructions.
1 cup flour
1 teaspoon salt
½ cup butter
Preheat oven to 350 degrees F. Cut the butter into ½ inch cubes.
Combine the flour and salt. Cut the butter into the flour and salt
mixture.
11. The four media for heat transfer are:
a. Water, steam, broiling and braising
b. Steam, frying and baking
c. Water, steam, air and fat
d. Convection, conduction, radiation and transfer
39
Nutrition 220
Laboratory One – Week Two
Barbara M. Carlson, MA, RD, CDE
12. Heat transfer from an energy source typically uses more than one form of transfer.
a. True
b. False
13. The primary agencies that oversee food safety and trade are the FDA, USDA and the CDC.
a. True
b. False
14. Thermometers are calibrated in the factory and should maintain perfect temperature for
years.
a. True
b. False
15. Measurement is preferred over weighing ingredients because it is more accurate.
a. True
b. False
16. A commercial kitchen might use the 2 inch, 2 hour rule for which of the following?
a. Cooking a casserole
b. Cooling a casserole
c. Setting gelatin
d. Freezing leftovers
17. Food poisoning is unpleasant but never causes death or long term health problems.
a. True
b. False
40


![[WAP035] [Evaluating Twittervane] Project Final Report](http://vs1.manualzilla.com/store/data/005882807_1-a2020170b6b6795bf72e9c3d683c54a5-150x150.png)