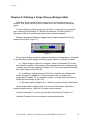
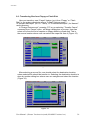
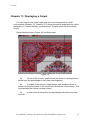
1
NRX1025P
Computer Jacquard System
Manual for Designer
and Weaver
Version 2.0
Namd Parda Co.
*User (Operator) must have about high school diploma and have general
computer knowledge.
User Manual - (Picasso Versions 6xx) and (NAMAD Versions 1xx)
1
NRX1025P
Table of Contents
Page
3
5
5
6
7
9
9
12
16
17
18
18
20
22
23
24
25
25
26
27
28
30
32
32
33
34
40
45
Chapter 1 : Introduction
Chapter 2 : System Preparation
2-1: Turning On The Computer
2-2 : Managing System Directory
2-3 : Defining Creel Table
Chapter 3 : Table Definition
3-1 : Weave Table
3-2 : Design Table
3-3 : Station Test Table
Chapter 4 : Defining a Carpet Group (Design Table)
4-1 : Emptying a design table
4-2 : Designing a new Carpet group (Design)
Chapter 5 : Select a Carpet Group(Design) for editing
Chapter 6 : Select a Carpet Group(Design) for weaving
Chapter 7 : Changing Environment from “Design” to “Weave”
and vise versa
Chapter 8 : Saving a Carpet Group (Design)
Chapter 9 : File Processing in System
9-1 : Delete a Carpet from System
9-2 : Delete a design from System
9-3 : Transfer a new Carpet from Floppy or Flash Disk
Chapter 10 : Select and assign Carpet Color
Chapter 11 : Displaying a Carpet
Chapter 12 : System Settings
12-1 : Power Saving (Just applied for Solenoid systems V6.*)
12-2 : Auto Correct
Appendix 1 : Error messages and Warnings
System Menu
Appendix 2 : Glossary
User Manual - (Picasso Versions 6xx) and (NAMAD Versions 1xx)
2
NRX1025P
Chapter 1: Introduction
Card less Jacquard system is a complex mechanical / electronic system attached
to a PC as its central core, eliminating old punched cards.
Installing this system over weaving machines, increases the factory throughput
and provides extended facilities for changing carpet designs. It also dramatically
reduces the time of producing carpets.
Weaving commands are transferred from PC to the weaving machine, eliminating
the need of punched cards.
Diagram below shows different parts and their interconnections.
Display Unit Computer Interface Controllers Jacquard
Weaving
Machine
Operator controls the weave cycles via PC. He is responsible to select the carpet
design, and select all the preferences regarding the orders given. Operator can
select the number of carpets should be weaved, change the carpet colors, assign
spaces between carpets, etc. Many other facilities are described using same
software.
Using such a system saves valuable time and costs of your company by:
•
•
•
Eliminating the cost of punch cards, and storing the decks,
Eliminating the errors in punch cards,
Eliminating the loss of material in time of design change.
Extending weaving throughput by:
•
•
•
•
Reducing the time for installing new designs,
Reducing the time for creel color assignment,
Reducing the manual operation times for control of the machine.
Facilitating the weaver activities Vs. old fashion way
User Manual - (Picasso Versions 6xx) and (NAMAD Versions 1xx)
3
NRX1025P
Reducing the total amount of capital:
• Reducing the goods inventory by weaving the exact number of carpets,
• Extending the opportunity to weave new designs in minutes in
minimum number,
• Extending the opportunity of having a broad set of new designs at
hand,
• Providing the opportunity of production based on market research,
providing the possibility of marketing by using weaved carpet as a
sample.
User Manual - (Picasso Versions 6xx) and (NAMAD Versions 1xx)
4
NRX1025P
Chapter 2: System Preparation
To prepare a system, these steps should be followed:
2 – 1: Turning on the computer
Before turning on the PC make sure that all the connections are properly in place.
After the PC is turned on “Namad Parda” software automatically tests the hardware
connected to PC. The “Station Test” window shows the results (Figure1).
If the result is successful, the operator can start weaving. If the result is
unsuccessful, operator can not weave, but is able to use all the other features of the
software like selecting design or color setting.
Figure 1
User Manual - (Picasso Versions 6xx) and (NAMAD Versions 1xx)
5
NRX1025P
2 – 2: Managing System Directories
All operations on Carpet and Design information are applied on two main
directories by default,
a) “D:\Picasso.Dat\Carpet” and “D:\Picasso.Dat\Design” (for solenoid
systems V6xx),
b) “D:\Namad.Dat\Carpet” and “D:\Namad.Dat\Design” (for piezo systems:
Namad 1xx).
Designer can manage these directories as needed. For example, for 2X3 meters
carpets it’s helpful to make subdirectories like“...\Carpet\2X3\” directory and save
these types of carpets in this directory.
Using “Make Directory” and “Delete Directory” commands under “Design” and
“Carpet” menu, you can manage to make as many directories as you wish.
*Note: All the names and embedded
directories follow the rules of operating
system.
In “Design environment” you can select these commands from “Carpet” and
“Design” menu.
In “Carpet” menu “Create/Delete Carpet directory” command, creates or deletes
the selected carpet subdirectories shown in the File Dialogue box.
In “Design” menu, “Create/Delete Design directory” command, creates or deletes
the selected design subdirectories shown in the File Dialogue box. (Figure 2)
Figure 2
User Manual - (Picasso Versions 6xx) and (NAMAD Versions 1xx)
6
NRX1025P
2–3: Defining Creel Table
Defining “Color Group” or “Creel” table is an important task for preparing
system to start weaving.
Pressing “Shift-F7” in “Design Environment” or selecting “Creel” command
from “Design” menu, opens color setting window with Namad Parda default color
information. The colors set will remain for future use. Thus for the next time this
window opens up, you will see the former setting on the screen. User can edit the
desired colors and save the changes to harmonize the colors in “Creel” with new
carpet design (Figure 3).
Figure 3
Color setting window has three sections:
1Main section,
2RGB definition,
3Status Bar.
1-
Main Section:
In this section three columns and (n) rows (depending on the number of
system colors) can be seen.
First left column (3rd Carpet), middle column (2nd carpet), and the right column
(1st carpet), shows color information for each carpet. By using this page you may
define three different creel color sets to weave three different carpets with
different designs and different colors. Move through different rows using cursor
keys
.
User Manual - (Picasso Versions 6xx) and (NAMAD Versions 1xx)
7
NRX1025P
*Note: Have in mind that the color of threads in
Creel are different from the colors you see in the
color selection menu. This section is made to
facilitate what you see on the screen with what is
going to be weaved.
2- RGB definition:
Three boxes show RED-GREEN-BLUE colors indicating percentage of the
selected RGB colors in main section. User can define the needed colors by
increasing/decreasing percentages of the color, using +/- keys on Num Pad.
To change a certain color, first you have to select it using cursor keys, then by
pressing + and – on Num Pad, the percentage of the system colors will change.
Use Tab Key to move between Red, Green and Blue.
These colors are used in Coloring Page. If the colors are defined incorrectly
you may come back to this page and redefine the colors.
“Coloring” page is described in more detail in (Chapter 10).
3- Status Bar:
A status line at the bottom of page displays all available keys that can be
used in this screen.
•
•
•
•
“F1” saves the color setting, and returns to “Design Environment”
“Esc” ignores the changes, and return to “Design Environment”
“Cursor Up, Cursor Down” moves through color boxes
“+”, “-” increases and decreases RGB value
• “Tab Key” is also available for selecting Red, Green and
Blue section.
User Manual - (Picasso Versions 6xx) and (NAMAD Versions 1xx)
8
NRX1025P
Chapter 3: Table Definition
Three different tables are used in Namad Parda software.
System has two main environments, 1) Weave Environment, 2) Design
Environment. Each having a main table named “Weave Table” and “Design Table”.
“Station Test Table” is the third table in the software.
3-1- Weave Table:
“Weave Table” is used in the time of weaving Carpet. Weaving attributes
needed to weave a carpet is saved in ”Design Table” in a *.ds6 file. The file
containing these attributes should be selected in “Weave Table” by pressing F3
or selecting “Load design” command from the “Design” menu. After selecting a
Design, Table will be filled with assigned attributes.
This table has 6 columns and 9 rows as follows:
3-1-1- Column definition
3-1-1-1- 1st column - Carpet Name
This column shows the carpet’s name which must be at most (8) letter
characters.
3-1-1-2- 2nd column – Weaved
This column shows the number of weaved carpets.
3-1-1-3- 3rd column – Remained
This column shows the number of remained carpets.
3-1-1-4- 4th column – Ratio
This column shows the current ratio1.
For example: Ratio=2232,causes first course be
weaved 2 times, second line 2 times, third line 3 times
and fourth course 2 times. This algorithm repeats for the
rest of weaving.
The number in this column will be updated while weaving. Generally Ratio
is 1 for Textima machines, and is 2 for VanDeWiele machines.
1
Ratio is a string of digits, each shows the repetition of a course (line) while weaving.
User Manual - (Picasso Versions 6xx) and (NAMAD Versions 1xx)
9
NRX1025P
3-1-1-5- 5th Column – Card
This column shows the total number of weaved course per total number of
carpet’s course. The numbers in this column is updated after every course
weaved.
Figure 4
3-1-1-6- 6th column – Status
This column shows whether the carpet must be weaved or not. If an “X”
is shown in this column the carpet must be weaved and if there is blank in
this place, carpet should not be weaved. When weaving a carpet is
reached to the end, this “X” will disappear automatically. You may
manually replace X with a blank to stop the carpet from weaving by
pressing Space Bar.
3-1-2- Row definition
Table has 3 sections, each have at most three carpets. Carpets in a
section will be weaved next to each other and if they all finish together,
next section’s weaving will be start. Otherwise a section must be
completely finished before next section can start.
User Manual - (Picasso Versions 6xx) and (NAMAD Versions 1xx)
10
NRX1025P
3-1-3- Together/Separated
On the lower right corner of the table there is a field titled “Together” or
“Separated” which enables the weaver to change the course of the
carpet(s) to backwards or forwards, for a single carpet or for the whole
carpets together. “F9” toggles between “Together” and “Separated”.
“Together” - If you have selected this command, back and forth
movements will be applied to all carpets.
“Separated”- If you have selected this command, back and forth
movements will be applied only to the current carpet2.
3-1-4- Weave/Stop
On the lower left corner of the table there is a field titled “Weave or Stop”
which shows the state of the system, either working or not working.
3-1-5- Design Name
Design name is shown at the middle top of the table.
This name is the one that you have selected in “Select a Carpet Group”,
refer to Chapter 6.
3-1-6- Keys and Functions
Some of the available keys listed in Status Bar, are described below.
•
“Esc”, stop weaving
•
“F2”,.starts weaving.
•
”F3”, brings up Load Design dialogue to select a formerly saved
design
•
“F4”, number in the card column is decreased by 1.
•
“F5”, number in the Card column is increased by 1.
•
“F6”, displays the current carpet in “Carpet Display” screen
(Chapter 11).
•
“F8”, changes the course of the current carpet to “0”,start of the
carpet.
• “F9”, toggles between “Together” and “Separated”
Shortcuts for the commands in Menu are listed below.
•
•
2
“Ctrl+F4”, decreases the number in this column by 20.
“Ctrl+F5”, increases the number in this column by 20.
Current carpet is the highlighted row, and you can select a different one using Tab.
User Manual - (Picasso Versions 6xx) and (NAMAD Versions 1xx)
11
NRX1025P
•
•
“F10”, activates the menu bar when in “Stop state.”
“Alt-X”, exits the program when in “Stop state”.
User Manual - (Picasso Versions 6xx) and (NAMAD Versions 1xx)
12
NRX1025P
3-2- Design Table
“Design Table” is used to define “Carpet Groups” with assigned attributes to
each. User can define placements for any “Carpet” to be weaved on side, on
top or below each one. Other attributes such as “Color”, “Simple Horizontal” and
“Cutting Place”, are defined in ”Design Table” before it can be weaved. If theses
attributes are not defined, default values are used. In either ways the “Carpet
Group” should be saved. The saved “Carpet Group” file will then be used by
“Weave Table” for weaving process.
This table has 7 columns and 9 rows as follows:
Figure 5
3-2-1- Column definition
3-2-1-1- 1st column - Carpet Name
This column shows the carpet’s name.
3-2-1-2- 2nd column – Weft3 × Warp4
3
4
. Weft is the horizontal threads that the Pile is weaved into.
. Warp is the total vertical yarn of a carpet, spooled around the bobbin
User Manual - (Picasso Versions 6xx) and (NAMAD Versions 1xx)
13
NRX1025P
These values are extracted from the selected carpet file, showing
number of rows and columns in a Carpet’s design.
3-2-1-3- 3rd column – Width x Height
This column shows the dimensions of the selected file of the carpet and
is extracted after selecting the carpet.
Height is calculated from the dividing of carpet’s Weft by Height density5.
Width is calculated from the dividing of carpet’s Warp by width density6.
These values are extracted and calculated from the header of *.PCX file
of the carpet.
3-2-1-4- 4th column – Ratio
This column shows the current ratio.
Ratio is set by a string of numbers; each shows the repetition of a
course while weaving.
Note: Width density unit for hand made
carpets is 7 to 10 centimeter; in machine
made carpet width density unit is 1 meter.
To harmonize width density with height density in carpet, the repetition
of a complete horizontal course is set by Ratio.
For example, Ratio = 2 means each course will be weaved twice, and
Ratio=1 means each course will be weaved once. This process continues
for the rest of weaving till the end of the carpet.
3-2-1-5- 5th column– Simple Vertical
Simple Vertical courses will be weaved after finishing each carpet. To
make it easy to cut and divide finished carpets, some number of Simple
Vertical weft7 must be weaved. These separation wefts are called Simple
Vertical. Default number in simple vertical is set to 30 courses.
Note: There are two different Simple Vertical wefts. First
one is a divider between carpets. Second one is used after
certain number of carpets which is used to show the end of
a number of carpets ready to be sent for finishing.
5
Number of piles per vertical unit, based on the number of hooks
Number of piles per one meter
7
pile less weft
6
User Manual - (Picasso Versions 6xx) and (NAMAD Versions 1xx)
14
NRX1025P
3-2-1-6- 6th column – Repeat
This column shows how many times a carpet will be weaved.
User Manual - (Picasso Versions 6xx) and (NAMAD Versions 1xx)
15
NRX1025P
3-2-1-07- 7th column – Simple Horizontal
Simple Horizontal is the number of pile-less weft separating carpets.
Default number is set to 2 piles.
Simple Horizontal has two uses. 1- To move the rightmost carpet to
left, 2-putting pile less weft between neighboring carpets.
3-2-2- Row definition
“Design Table” has 3 sections, each have at most three carpets.
Carpets in a section will be weaved next to each other and if they all
finish together, next weaving section will be start. Otherwise a section
must be completely finished before next can section start.
When setting carpets in a “Carpet group”, designer should consider the
width and height of the carpets and also Machine’s width. If carpets
doesn’t fill the Machine’s width, it will be weaved by Pile-less woofs, it
may be harmful for machine (refer to your machine technical manual).
Note: If you wish to weave only two carpets, first
one should be placed in the 1st row, and second in
the second row. The third row can be leaved
empty
3-2-3- There are two extra fields located on the right side of the table:
3-2-3-1- Cutting Place
After specified number of carpets is weaved, carpets are being cut. For
example “5” means that extra simple pile less courses are weft after every 5th
carpet is weaved. The default value is 10.
3-2-3-2- Simple Cutting
Simple Cutting number refers to the number of pile less weft that are
weaved after certain number of carpets defined in “Cutting Place”. This will
help the weaver to find the correct place to cut and also help him not to harm
the carpet while cutting.
3-2-4- Design Name
Design name is shown at the middle top of the table. The first time, a
carpet group is an empty table. The table has no name assigned to it. After
the table is filled, a name should be assigned to it, in “Save Design” dialogue.
User Manual - (Picasso Versions 6xx) and (NAMAD Versions 1xx)
16
NRX1025P
Next time to load this table, in “Load Design” dialogue, you have to refer to
its name. Design name is printed at the top of the table. It’s at most 8
characters width.
User Manual - (Picasso Versions 6xx) and (NAMAD Versions 1xx)
17
NRX1025P
3-2-5- Keys and functions
Some of the available keys are listed at the bottom of the screen. The keys
and their functions are described below:
•
•
•
•
•
•
•
“F2”, brings up “Save Design” dialogue to assign a name for the design.
”F3”, brings up “Load Design” dialogue to select a formerly saved design.
“F5”, brings up Load Carpet dialogue to select a Carpet design.
“F6”, displays the current carpet in “Carpet Display” screen (Chapter 11).
“F7”, starts “Color Setting” process to set colors to carpet’s color (Chapter 10)
“F8”, deletes current line in table.
“Alt-X”, Exits the program.
List of shortcuts, to menu command that are available in this window.
•
•
“F4”, starts file transfer process.
“F10”, activates the menu bar.
User Manual - (Picasso Versions 6xx) and (NAMAD Versions 1xx)
18
NRX1025P
3-3: Station test table:
This table shows the result of the system’s station test. It has three columns
described below.
1st Column: Station or controller, order number.
2nd Column: Number of blocks assigned to each controller (Initial state).
3rd Column: Number of blocks of each controller recognized by system (Current
state). This column is either empty (witch shows an out of service state) or a value
equal to the previous column (witch shows a ready to use state). Any other value in
this column indicates an error in hardware and should be reported to a service
center. If the check out is OK, the system will continue, but if the check out is not OK
you may not weave anything but have all the other accesses to the software.
After this check out, system automatically jumps to “Weave Environment”.
Figure 6
User Manual - (Picasso Versions 6xx) and (NAMAD Versions 1xx)
19
NRX1025P
Chapter 4: Defining a Carpet Group (Design table)
Defining a carpet group is done to prepare a set of carpets ready to be
weaved. This group can be used for further uses, with or without editing the
group.
To start defining a carpet group, first you have to change the environment
from “Weaving Environment” to “Design Environment” by clicking Shift-F1.
Remember that to do so the weaving process should be stopped.
Designer password dialog box appears and designer password must be
entered to proceed. (Figure 7)
Figure 7
Every carpet design should be prepared for weaving. Preparation is consisted
of, a) selecting a carpet design, b) editing carpet colors, c) saving the results.
a) Carpet design is done by a designer, saved in standard PCX format,
and carried to system. This design is then transferred to the computer using
“transfer option” built in software (Chapter 9-3). Then some extra information
should be added to this PCX file.
b) In defining a carpet group, the PCX file is read by the software and
extra information is added to it. Extra information are, a) carpet color
assignment (Chapter 10), b) repetition number, c) simple pile less wefts, d)
simple pile less warps, e) ratio, etc.
c) Save the results (Chapter 8), a *.ds6 file is produced after these tasks.
Above tasks make a carpet ready to be weaved. Remember that before
producing and saving a *.ds6 file, no carpet can be weaved.
In this environment 7 columns must be filled, described in Chapter 3-2.
Available Features in this environment are described below.
User Manual - (Picasso Versions 6xx) and (NAMAD Versions 1xx)
20
NRX1025P
4-1: Emptying a Design Table
User can select “New Design” command from “Design” menu to prepare a
blank design table for starting a new table design. A blank table appears after
selecting this command.
4-2: Designing a new Carpet group (Design)
User can select a carpet by clicking “F5” and selecting a *.PCX file from a
file dialog (Figure 8). This dialog lists all carpet files in the selected directory.
Figure 8
Use cursor keys
to move in rows and use Enter to select it.
New Carpet (not in the list) should be transferred from floppy disk or USB to
the computer (Chapter 9-3).
By clicking F4 key or selecting “Transfer Carpet” command
from “Carpet” menu, a list of all carpet files in Floppy or USB
appears in transfer dialogue and user can select a carpet by
pressing “Enter”. The file is transferred from Floppy or USB
to Hard Disk, where Carpet files are saved. Flash Disk
(USB) is automatically recognized by the system.
User Manual - (Picasso Versions 6xx) and (NAMAD Versions 1xx)
21
NRX1025P
By selecting a carpet, carpet information is imported and placed in “Design”
table.
User can edit any field using “Tab” key for selecting a field.
In either case (Selecting from list or transferring a carpet), current course will
be filled with selected carpet information, extracted from pcx file. User can assign
the desired color to the carpet (by pressing F7 or selecting “Coloring” command
from “Carpet menu”). User can display any colored carpet to see the results by
pressing F6 or selecting “Display Carpet” command from Carpet menu (Chapter
11).
Width and height of the carpet is extracted from carpet file, but other fields are
set by default. You may change these default fields regarding your needs.
Finally user must save the defined Carpet Group by pressing “F2” or selecting
“Save Design” command from “Design” menu (Chapter 8). Some extra controls
will be calculated and required messages will be shown on screen.
User can assign a new name or use same old name in “Save” dialogue.
Design Name width must be at most 8 characters.
User Manual - (Picasso Versions 6xx) and (NAMAD Versions 1xx)
22
NRX1025P
Chapter 5: Select a Carpet Group (Design) for editing
Software starts in “Weave Environment”. In order to select a new “Carpet
Group” follow these steps:
5-1: Press “Esc” to “Stop” weaving. An alert box informs you that the
weave process is stopped.
5-2: Push “Esc” or “Enter”, to close this dialog and Weaving process stops.
5-3: Pressing Shift+F1 afterwards will bring password dialog box. Enter the
Designer password and press Enter to continue to “Design Environment”.
5-4 Pressing “F3” will bring “Design Selection” dialog box on screen.
Selecting ”Load Design” command from “Design” menu will do the same
(Figure 9).
This dialog lists all former designed files (*.ds6) in default directory
(..\Design\*.DS6). User can select a formerly defined “Design” file from the list
using cursor keys and pressing “Enter”. Then “Design” table will be filled with
information from selected design file.
To close this box without selecting any file press “Esc”.
Figure 9
User Manual - (Picasso Versions 6xx) and (NAMAD Versions 1xx)
23
NRX1025P
5-5: “Design Table” contains “Carpet Groups” (Design) information. User
can display carpet with formerly assigned colors on screen, using “Display
Carpet” command from “Design” menu, or pressing “F6”. If no color was assigned
to a carpet, an error message will inform you. To assign color to a carpet read
Chapter 11.
“Esc” closes the display screen and returns to the “Design Environment”.
If you have edited any of the permitted fields, pressing “F2” saves the Group
defined/edited. Pressing “Esc” will ignore the changes.
To edit another “Carpet Group (Design)” you have to start from step 5-4.
User Manual - (Picasso Versions 6xx) and (NAMAD Versions 1xx)
24
NRX1025P
Chapter 6: Select a Carpet Group (Design) for weaving
Software starts in “Weave Environment”. In order to select a new “Carpet
Group” follow these steps:
6-1: Press “Esc” to “Stop” weaving. An alert box informs you that the
weave process is stopped.
6-2: Push “Esc” or “Enter”, to close this dialog and Weaving process stops.
6-3 Pressing “F3” will bring “Design Selection” dialog box on screen.
Selecting ”Load Design” command from “Design” menu will do the same
(Figure 10).
This dialog lists all design files (*.ds6) in default directory
(..\Design\*.DS6). User can select a formerly defined “Design” file from the list
using cursor keys and pressing “Enter”. Then “Weave Table” will be filled with
information from selected design file.
To close this box without selecting any file you can press “Esc”.
Figure 10
6-4: “Weave Table” contains “Carpet Groups” (Design) information. User
can display carpet with formerly assigned colors on screen, using “Display
Carpet” command from “Design” menu, or pressing “F6” key. If no color was
assigned to a carpet, an error message will inform you. To assign color to a
carpet read Chapter 11.
“Esc” key closes the display screen and returns to the “Weave
Environment”.
Pressing “F2”, starts weaving the carpet group.
Pressing “Esc” will stop weaving.
User Manual - (Picasso Versions 6xx) and (NAMAD Versions 1xx)
25
NRX1025P
Chapter 7: Changing Environment from “Design” to
“Weave” and vise versa
Pressing “Shift – F1” in each environment and entering valid password, in
password dialog box (Figure 11), changes the environment.
To enter “Weave” environment, “Weaver Password” and to enter “Design”
environment, “Designer Password” is required.
Note: Have in mind that to transfer from
Weaving Environment to Design Environment,
weaving process should be stopped.
Figure11
User Manual - (Picasso Versions 6xx) and (NAMAD Versions 1xx)
26
NRX1025P
Chapter 8: Saving a Carpet Group (Design)
After changing/editing “Design” information, changes should be saved. By
pressing “F2” and entering a valid design name8 in file dialog (Figure 12), or using
the same name, changes will be saved in design file in hard disk.
A “Warning” message will be shown for duplicate name.
Figure 12
8
maximum 8 characters
User Manual - (Picasso Versions 6xx) and (NAMAD Versions 1xx)
27
NRX1025P
Chapter 9: File processing within software
Some file processing is available within system, such as:
1- Deleting a Carpet File,
2- Deleting a Carpet Group (Design) File,
3- Transferring files from Floppy or Flash Disk.
9-1: Deleting a Carpet file
In “Design Environment”, pressing “F10” key and selecting “Delete Carpet”
command from “Carpet” menu, will bring a dialog box on screen. User can
select a file from the list of carpets. Next dialog box asks for your confirmation
to delete the selected carpet. Pressing “OK” will delete the file from hard disk.
Pressing “Esc” will ignore the deletion command. (Figure 13)
Figure 13
User Manual - (Picasso Versions 6xx) and (NAMAD Versions 1xx)
28
NRX1025P
9-2: Deleting a Carpet Group (Design) file
In “Design Environment”, pressing “F10” key and selecting “Delete Design”
command from “Design” menu, will bring a dialog box on screen. User can
select a file from the list of designs. Next dialog box asks for your
confirmation to delete the selected design. Pressing “OK” will delete the file
from hard disk. Pressing “Esc” will ignore the deletion command. (Figure 14)
Figure 14
User Manual - (Picasso Versions 6xx) and (NAMAD Versions 1xx)
29
NRX1025P
9-3: Transferring files from Floppy or Flash Disk
User can transfer a new “Carpet” design (.pcx) from “Floppy” or “Flash
Disk” to the system directories where “Carpet” files are saved –
“D:\picasso.dat\carpet” (for V6.* users), or “D:\namad.dat\carpet” (for Namad.*
users) directory.
In “Design Environment”, pressing “F4” key or selecting “Transfer Carpet”
command from “Carpet” menu, will bring a dialog box on screen. User can
select a file from the list of carpets on floppy diskette or flash disk. This is
the source location where user can select the carpet file from it (Figure 15).
Figure 15
After selecting a source file, user should select the destination location,
where selected file should be transfer to. Selecting the destination location is
done by another dialog box where user can navigate and select the location
(Figure 16).
Figure 16
User Manual - (Picasso Versions 6xx) and (NAMAD Versions 1xx)
30
NRX1025P
Chapter 10: Select and assign Carpet Color
“Color” assignment is essential for weaving a carpet. Carpets can not be
“Displayed” or “Weaved”, until colors are assigned to them. For carpets that no
colors are assigned to, selecting these commands will bring up an error
message.
To assign color to a carpet file, either press “F7” or select “coloring” command
from Carpet menu (Figure 17).
Figure 17
Color setting page shows the carpet design with main colors or previously
assigned colors. The page has four parts, a) Carpet design, b) Carpet color with
coloring numbers, c) Creel colors with coloring numbers, d) Status line.
a)
A section of the carpet design is shown in upper section of the
screen. This section is a detail from upper left corner of carpet design.
b)
In lower left of the screen carpet’s colors and color’s number are
shown. User can assign any color number to the existing color and
change the carpet’s color and see the applied setting in the above
display.
c)
A row of colors in small boxes show the predefined colors or
default colors. An extra box for weaving pile less weft is placed, with
the number 0 assigned to it.
User Manual - (Picasso Versions 6xx) and (NAMAD Versions 1xx)
31
NRX1025P
In first row you see the colors of the carpet. In the lower row you can
assign numbers to the above row. The second row reads its number
from Creel colors. Thus you can change the colors of the carpet by
assigning different numbers from the same creel. This feature gives
you ultimate power to change the colors of the same design producing
different carpets according to your customer preferences.
Use cursor keys to move between boxes in second row. Typing
numbers from Zero to 5 or 6 or 7 (depending of your system) changes
the above box colors. Colors in the above section of the screen will
change according to the colors changed. This will give you a perfect
view of what will be weaved.
d)
In lower right of the screen the creel colors are shown in boxes.
The numbers above are equal to the numbers mentioned in section b).
The Creel colors have been described in section 2-3.
e)
A status line in the bottom of page displays all available keys
user can use.
•
“Esc” exits and ignores the changes, and returns to Design
Environment.
•
“Tab” moves from the left box to the right box, above status bar.
•
“F1” saves the setting, and returns to Design Environment.
•
Characters “0, 1, 2, 3, 4, 5, 6, 7, 8, 9, A, B, C, D, E, F” are the
color numbers for assigning colors.
•
“F10” shows the main colors (real colors) from *.PCX file.
User Manual - (Picasso Versions 6xx) and (NAMAD Versions 1xx)
32
NRX1025P
Chapter 11: Displaying a Carpet
You can have a view of the carpet with the colors assigned to it in both
environments (Chapter 10). Pressing “F6” shows the active carpet with the colors
assigned to it. “Carpet Display” command from “Carpet” menu will do the same
for you.
Carpet display screen (Figure 18) has three parts.
Figure 18
a)
On top of the screen, carpet colors are shown in rectangles and
below each the percentage of each color are displayed.
b)
In middle of the screen, carpet design with assigned colors is
shown. A cross line points to the current row and column of the carpet. This
cross defines the current row and column.
c)
can use.
A status line at the bottom of page displays all active keys user
User Manual - (Picasso Versions 6xx) and (NAMAD Versions 1xx)
33
NRX1025P
Active keys are described below.
•
•
•
•
•
•
•
•
•
•
•
“Esc”: Exits the page
“Ctrl-Home”: Displays the carpet from top left corner
“Ctrl-End”: Displays the carpet from bottom right corner
“Home”: Jumps to the beginning of the current course (horizontally)
“End”: Jumps to the end of the current course (horizontally)
“(+)” in Num Pad: Enlarges the picture (zoom in)
“(-)” in Num Pad: Shrinks the picture (zoom out)
“ ”: moves a column to the left
“ ”: moves a column to the right
“ ”: moves a line up
“ ”: moves a line down
•
•
•
“Ctrl+
” moves 20 pixels to either sides
“Page Up” previous page
“Page Down” next page
User Manual - (Picasso Versions 6xx) and (NAMAD Versions 1xx)
34
NRX1025P
Chapter 12: System Settings
To keep the computer and its software in optimal status there are some
capabilities built in the software.
12–1: Power Saving9
Designer can select “Power Saving” command from “Picasso” menu, while
in stop weave state, and enter “Designer Password” to enable or disable this
feature. This feature reduces the energy used (Figure 19). When enabled,
system applies some internal controls to save energy. (This feature only
works in Solenoid systems)
“Enable” or “Disable” state can be selected from “Power Saving” dialog.
“Alt–E” selects “Enable” and “Alt-D” selects “Disable” state. “Tab” key moves
through the buttons. Select “Ok” button to accept the selection and “Cancel”
button, or “Esc”, to ignore the selection.
Figure 19
9
Just applied for Solenoid systems V6.*
User Manual - (Picasso Versions 6xx) and (NAMAD Versions 1xx)
35
NRX1025P
12-2: Auto Correct
Designer can select “Auto Correct” command from the first menu, while in
stop weave state, and enter “Designer Password” to enable or disable this
feature.
“Enable” automatically checks “Heald frame” and “Ratio” and corrects the
values, if not harmonized. This feature avoids the back of the carpet weaved
“whitened” (Figure 20). If “Disabled”, system produces an error message on
inharmonic states.
Figure 20
“Enable” or “Disable” state can be selected from “Auto Correct” dialog.
“Alt-E” selects “Enable” and “Alt-D” selects “Disable” state. “Tab” key moves
through the buttons. Select “Ok” button to accept the selection and “Cancel”
button, or “Esc”, to ignore the selection.
User Manual - (Picasso Versions 6xx) and (NAMAD Versions 1xx)
36
NRX1025P
Appendix 1
Error messages and Warnings
Software errors happen! These Errors or warnings are shown via Message
Boxes on screen (Figure 21).
Figure 21
User Manual - (Picasso Versions 6xx) and (NAMAD Versions 1xx)
37
NRX1025P
List of software messages:
Row #
Messages
Meaning of the messages
1
Design Not Found!"
Error Opening the Design file: a) No such File
exists, b) Too many open files, c) Permission
denied.(reported by operating system)
What to do?
Check which reason caused the error, repair the
error and restart the action.
Error in Loading
design
What to do?
Design data is corrupted.
2
3
4
5
6
Rebuild Carpet Group again.
Overwrite the
Existing Design?"
Design file already exists and you are trying to
save over it. If you do so the design file will be
destroyed and you have to rebuild it again.
What to do?
If you want to write over an existing file, press OK
to overwrite the file, otherwise cancel and change
file name.
Error in Weave
Saving
What to do?
Data is corrupted and can not be saved.
Restart the system and try again. Report to
“Namad Parda” if error persists.
Possible error on
PX3!
Proxy3 is not synchronized with Proxy1, or
Proxy3could not be seen by software.
What to do?
Proxy3 cabling and connectors must be checked,
the distance between Proxy and the Heald frame
moving in front of it should be checked and then
should be synchronized with Proxy1, report to
“Namad Parda” if error persists.
Guide Not found!
Guide file was not found or is not in it’s place
(..\config\).
What to do?
Check (..\config) directory for guide file and if it
exists report to “Namad Parda”.
User Manual - (Picasso Versions 6xx) and (NAMAD Versions 1xx)
38
NRX1025P
7
8
9
10
11
12
13
14
Error in Guide File
Guide file is corrupted and should be changed.
What to do?
Report to “Namad Parda” and ask for new file.
Carpet has more than
maximum colors.
The number of colors in *.PCX file of the carpet is
more than number of colors, set for system.
What to do?
Select another carpet which matches the settings.
Carpet is not
colored!"
What to do?
No color is assigned to the Carpet.
Try Color Setting in Design Environment and save
the setting.
Error in Carpet File
Error Opening the carpet file: a) No such File
exists, b) Too many open files, c) Permission
denied.
What to do?
Check which reason caused the error and try to
repair the error and try again.
Not Enough
Memory!"
What to do?
Memory is not enough for starting system.
Check for extra resident files at system startup,
which does not belong to Namad Parda software.
Sometimes Viruses or other malwares occupy the
ram stopping other software. Remove them and try
again.
contact “Namad Parda”, if there was no extra files.
No Match in Heald &
Ratio
Heald and Ratio are not harmonized. System may
have stopped in bad Ratio value.
What to do?
Stop weaving and start weave again. The
harmonization will be done automatically if “Auto
Correction” is Enabled. Otherwise operator should
correct it manually.
Weave Stop
Weaving process has been stopped by pressing
“Esc” while weaving.
What to do?
Accept the dialogue. It only informs you.
Weaving successfully
finished
What to do?
Weaving process has been finished.
Accept the dialogue; It only informs you.
User Manual - (Picasso Versions 6xx) and (NAMAD Versions 1xx)
39
NRX1025P
15
16
17
18
19
20
21
22
23
TX Error in Station
Computer connection to Micros is lost. Possible
causes are: a) Problem in serial cable, b) Problem
in 5volt power supply, c) Problem in interface fuse.
What to do?
React according to the problem or report to
“Namad Parda”.
CS Error in Station
a) Noise in system, b) loose connections, c)
error in data.
What to do?
React according to the problem or report to
“Namad Parda”.
Error in Password!"
An invalid Password is entered.
What to do?
Enter a valid Password.
Checksum Error in
Dat file!"
What to do?
A serious error occurred in system.
Report to “Namad Parda”.
Guide Not found!"
Guide file could not be found, it may be corrupted
or not in it’s place (..\config directory)
What to do?
Check (..\config) directory and report to “Namad
Parda”.
Invalid VESA
Error in Graphic Board in PC.
What to do?
Report to “Namad Parda”.
Error opening file
Error Opening the file: No such File exists, Too
many open files or Permission denied.
What to do?
Check which reason caused the error and try to
repair the error and try again.
Invalid graphic File
This file is not transferred by software and is not
acceptable
What to do?
Transfer file in Design Environment to produce
valid file.
Error in Carpet
Conversion!"
An error occurred while converting the file. File
may be damaged.
What to do?
Try again.
User Manual - (Picasso Versions 6xx) and (NAMAD Versions 1xx)
40
NRX1025P
24
25
26
27
28
29
30
Sure to delete this
file?"
System asks user to ensure the delete file
command.
What to do?
Accept the dialogue if you’re sure and cancel if
not.
Sure to delete this
directory?"
System asks user to ensure the delete directory
command.
What to do?
Accept the dialogue if you’re sure and cancel if
not.
Error in Directory
Deletion!"
An Error happened while deleting the directory,
directory is not empty.
What to do?
First delete all the files inside the directory and try
again.
Error in Design Path!"
Selected Design path is invalid.
What to do?
Try correct path and retry.
Not Enough Width!"
Warns that carpet group exceeds system width
limits.
What to do?
Accept and try to change carpet group to fit system
width. Extra piles will be ignored and not weaved.
Select previous
carpet First!"
What to do?
No gaps could be left between a section’s carpets.
Fill the gap and try to save the group again.
Overwrite?"
Warns for saving on an existing file.
What to do?
If you want to write over an existing file, accept the
dialogue or cancel and try another file name.
User Manual - (Picasso Versions 6xx) and (NAMAD Versions 1xx)
41
NRX1025P
31
Error in XCopy
What to do?
32
PkUnzip Error!"
What to do?
Error in XCopy command. XCopy.exe is a DOS
command. It may be damaged, not present or not
in system Path.
a) Check XCopy.exe in Operating System,
b) Using Path command check if the DOS
directory is in the path (like C:\DOS).
c) Call “Namad Prada” if the problem persists.
Error in PkUnzip command. PkUnzip.exe is a DOS
command. It may be damaged, not present or not
in system Path.
d) Check PkUnzip.exe in Operating System,
e) Using Path command check if the DOS
directory is in the path (like C:\DOS).
f) Call “Namad Prada” if the problem persists.
User Manual - (Picasso Versions 6xx) and (NAMAD Versions 1xx)
42
NRX1025P
System Menu
“Namad Parda” software uses menu to facilitate the use of it. The description
of each menu and its commands are described below.
Menu Title 1
F1Help F10 -> Picasso V640E (for “Solenoid” systems or F10 … for “Piezo” systems)
This menu has 4 commands.
a) Station Test- This command activates station test as the system start
up.
b) Power Saving - Brings up the Power Saving Dialogue to enable or
disable power saving (Chapter 12-1) (just applied for solenoid systems).
c) Auto Correct - Brings up the Auto Correct Dialogue to enable or disable
Auto Correct (Chapter 12-2).
d) System Date - Only supervisor can see the system date.
Figure 22
User Manual - (Picasso Versions 6xx) and (NAMAD Versions 1xx)
43
NRX1025P
Menu Title 2
User
This menu has 3 commands
a) Weaver Shift+F1- Transfers from “Design Environment” to “Weave
Environment” after entering a valid weaver password. This item is
disabled in “Weave Environment”
b) Designer Shift+F1- Transfers from “Weave Environment” to “Design
Environment” after entering a valid designer password. This item is
disabled in “Design Environment”
c) Help F1- Brings up a quick help screen according to current
environment.
Figure 23
User Manual - (Picasso Versions 6xx) and (NAMAD Versions 1xx)
44
NRX1025P
Menu Title 3
Carpet
This menu contains 11 commands
1) Select F5- Brings up the carpet selection dialogue box for selecting a
*.pcx file in “Design Environment”. This command is not active in
“Weave Environment”.
2) Display F6- Displays carpet design in carpet design screen (Chapter
11).
3) Coloring F7- Brings up carpet color setting screen for the selected
carpet (Chapter 10). This command is not active in “Weave
Environment”.
4) Delete F8- Deletes current row in design table. This command is not
active in “Weave Environment”.
5) Together/Separated F9- Toggles between Together and Separated
state in “Weave Environment”. This command is not active in “Design
Environment”.
6) Transfer F4- Starts carpet file transfer process (Chapter 9-3). This
command is not active in “Weave Environment”.
Figure 23
User Manual - (Picasso Versions 6xx) and (NAMAD Versions 1xx)
45
NRX1025P
7) Unzip (Alt-F2)- Starts file unzip process. This command is not active in
“Weave Environment”.
8) Creel (Shift-F7)- Brings up Creel defining screen to define creel’s
colors.(Chapter 2-3). This command is not active in “Weave
Environment”.
9) Delete Carpet- Brings up carpet delete dialogue box to select and
delete a *.pcx file from hard disk. This command is not active in
“Weave Environment”.
10) Make Directory- Brings up Make directory dialogue box to make a
new directory under “Carpet” directory. This command is not active in
“Weave Environment”.
11) Delete Directory- Brings up Delete directory dialogue box to delete an
existing directory under “Carpet” directory. This command is not
active in “Weave Environment”.
User Manual - (Picasso Versions 6xx) and (NAMAD Versions 1xx)
46
NRX1025P
Menu Title 4
Design
This menu has 6 commands
1) New Design- Cleans the Design Table and makes it ready to define a
new carpet group. This command is not available in “Weave
Environment”.
2) Select F3- Brings up the design selection dialogue box for selecting a
*.ds6 file.
3) Save F2- Brings up the Save design dialogue box for saving a carpet
group in *.ds6 file (Chapter 8).
4) Delete Design- Brings up design delete dialogue box to select and
delete a *.ds6 file from hard disk. This command is not active in
“Weave Environment”.
5) Make Directory- Brings up Make directory dialogue box to make a new
directory under “Design” directory. This command is not active in
“Weave Environment”.
6) Delete Directory- Brings up Delete directory dialogue box to delete an
existing directory under “Design” directory. This command is not active
in “Weave Environment”
Figure 24
User Manual - (Picasso Versions 6xx) and (NAMAD Versions 1xx)
47
NRX1025P
Appendix 2- Glossary
Block
Bobbin
Common Terms
Carpet, or a Designed
Carpet
Color Setting
Common Terms
Course
Density
Design environment
Designer
Heald Frame
Height Density
Pile
Pile-less woofs
Warp
Weaver
Weft or Woof
Width Density
A block of 16*28 needles. In a single SB there may be two or
three blocks of needles.
Huge cylinder that yarn is spooled around
The common terms appeared in this document are described
below.
A carpet designed by some designing software (like Photo
Shop or FreeHand) and transferred to the system by diskette
or Flash disk and used for weaving. This file should be saved
in 16 or 256 color *.PCX format.
Assigning a color from Creel to each color of carpet.
The common terms appeared in this document are described
below.
A line of yarn in a carpet.
The number of pile threads in one meter of a carpet.
Part of the software that the Carpet Group or Design is
defined in a table.
User, responsible for defining the carpet groups and the
related operations, such as color setting.
A mechanical part of the weaving machine responsible to
move the warps up and down.
Number of weft per meter.
Color threads that makes the surface of Carpet.
A part of weaved woof without pile.
Warp is the total vertical yarn of a carpet, spooled around the
bobbin.
User, responsible for weaving operations.
Horizontal threads that the Pile is weaved into.
Number of piles per one meter
User Manual - (Picasso Versions 6xx) and (NAMAD Versions 1xx)
48