1
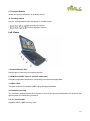
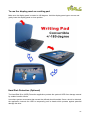
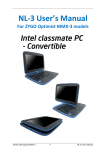
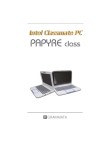
Fizzbook Spin Product Manual For the following products: Fizzbook Spin Advanced Starter 3310-9602 Fizzbook Spin Advanced Professional 3310-9603 Preface ©Copyright 2012 All Rights Reserved. The information in this document is subject to change without prior notice in order to improve reliability, design and function and does not represent a commitment on the part of the manufacturer. In no event will the manufacturer be liable for direct, indirect, special, incidental, or consequential damages arising out of the use or inability to use the product or documentation, even if advised of the possibility of such damages. This document contains proprietary information protected by copyright. All rights are reserved. No part of this manual may be reproduced by any mechanical, electronic, or other means in any form without prior written permission of the manufacturer. Limitation of Liability While reasonable efforts have been made to ensure the accuracy of this manual, the manufacturer and distributor assume no liability resulting from errors or omissions in this manual, or from the use of the information contained herein. 1 Chapter 1 Specification CPU Intel® Atom™ Processor N2600 (Cedarview-M Dual Core Processor) Memory Single-channel DDR3 800 MHz So-DIMM DRAM module Supports 1GB of system RAM Core Logic Intel® NM10 Express Chipset Audio Codec Realtek ALC269-VB6 Azalia integrated audio Analogue 2.1D3 mode support Card reader (Optional) Support 2-in-1 SDHC/ MMC Memory Card. USB 2.0 interfaces Support boot from CR LAN Controller Supports 10 and 100 Mb/sec. Full and half Duplex operation Wireless LAN Half Mini-card form factor Wi-Fi 802.11 A/B/G/N 2x2 PCI-E interface Keyboard Integrated QWERTY keyboard W/ Hot key Spill-resistance keyboard Multi-languages Supported Pointing Device PS/2 Touch Pad with Left and Right Click Button and scrolling Bar Storage SSD SATA 32G SSD MLC 2.5”HDD (with G-sensor for HDD protection) Single-HDD for 2.5" 9.5mm SATA support Support SATA 2.0 5400rpm support 250GB LCD 10.1” with 1024X600 (Anti-Glare) Touch Screen Resistive type (ETT/Catcher) 2 3.75G / WIMAX (Optional) Wireless Broadband module support USB interface, Mini-card type HSPA/ modules support Connection Manager AP support for Broadband section HSPA module w/ 2 antenna support The activation of 3G service depends on the service provider GPS Support (3G module support GPS function, GPS is an optional feature) GPS locating time is about 1 minute SIM card size: 25.00mm x 15.00mm x 0.76mm Battery Pack 6 cell Li-ion battery pack 10.8V/ 4400mAH, 3.6V/2200mAH The battery will be 70 percent charged in about 125 mins and fully charged in about 220mins AC-Adapter Automatics Voltage adjustment between 100 and 240VAC 50/60Hz, 40 Watts Manufacturer: Lite-On Technology Corp. Model: PA-1400-11 (AC 2 Pin) Manufacturer: Shenzhen Huntkey Electric Co., Ltd. Model: HKA03619021-8C (AC 2 Pin) Manufacturer: DELTA ELECTRONICS, INC. Model: ADP-40PH AB (AC 2 Pin) Model: ADP-40PH BB (AC 3 Pin) BIOS Support PnP & ACPI 2.0 Support external USB flash memory card boot up. Physical Outline Dimension: 268 x 208.5 x 47.43mm (With 6 cells) Weight: 10.1" W LCD /HDD/ CAM/ 6 cell battery pack: 1.6 Kg EMC CE, FCC, CCC RF FCC & SAR / R & TTE Safety UL/ CB Validation Energy Star Compliance 5.2 (Design ready) Vibration test: MIL-STD-810F/EN-60068 Drop test: MIL-STD-810F /GB/T4857 Acoustic test: ISO3745/ISO7779 3 Chapter 2 Attention: Teachers, Parents and Adult Supervisors This product is an educational tool designed for school children, ages 6 and up. There must be supervision by an adult on school children under 10 when using this Intel classmate PC Convertible. It is a must to have a thorough explanation to students on safe and proper handling of the Intel classmate PC - Convertible, power supply, battery pack, and power cord. Be sure to keep the power cord away from younger children. Please ensure that students understand the following: Emphasize to students that this device is an educational tool and not a toy. The computer, power supply, battery pack or power cord should not be dropped, crushed, stepped on or otherwise abused. Ensure students understand the safe and proper handling of power cord and power supply. Misuse could result in serious injury. The teacher, parent or adult supervisor should periodically inspect the computer; power supply and power cord for damage and replace it, if necessary. Students should report any damage or loose parts to their teacher, parent or adult supervisor, immediately. Do not leave the PC plugged in or “on” when enclosed in a non-vented container, such as a school backpack, as overheating may occur. It is recommended that students should take a 5 minute break every 30 minutes of use. Safety Precautions The following are lists of precautionary measure the students must understand before using this computer inside the classroom or home environment: 4 1. Do not place near the fire or other sources of heat. 2. Do not expose to magnetic fields. 3. Do not expose to direct sunlight. 4. Do not expose to rain or moisture. 5. Do not place heavy objects to add heavy pressure on the computer. 6. Do not drop the computer. The computer should be operated normally under an environmental temp of 5°C ~35°C, high humidity (70% - 90%) and dusty. The computer and power adapter shall withstand storage from -20 to +60°C, humidity up to 95%, non-condensing. Caring for your Computer To reduce the risk of electric shock when connecting external peripherals such as printer, communication network, antenna, LAN, etc. Disconnect power from the computer by unplugging cord from the AC outlet (not by unplugging cord from the computer). Disconnect power from the computer by unplugging the power cord from the AC outlet (not by unplugging the power cord from the computer). Be sure not to clean the computer when it is plugged into a wall socket. When cleaning the unit, clean only with a damp soft cloth. Do not pour liquid onto the unit. Do not clean while the computer is “on” or plugged into a wall socket. Caution students to avoid using this device under wet conditions and also to protect the unit when carrying under this condition. Be sure the touch pad does not come into contact with dirt, liquids, or grease. Power connection must be removed before installing signal cables, whenever it is functionally and legally allowed. Power cords must be reconnected only after all signal interconnections have been completed. 5 Chapter 3 Agency Regulatory Notices Federal Communications Commission Notice You are cautioned that changes or modifications not expressly approved by the party responsible for compliance could void your authority to operate the equipment. This device complies with Part 15 of the FCC Rules. Operation is subject to the following two conditions: (1) this device may not cause harmful interference and (2) this device must accept any interference received, including interference that may cause undesired operation. This equipment has been tested and found to comply with the limits for a Class B digital device, pursuant to part 15 of the FCC rules. These limits are designed to provide reasonable protection against harmful interference in a residential installation. This equipment generates uses and can radiate radio frequency energy and, if not installed and used in accordance with the instructions, may cause harmful interference to radio communications. However, there is no guarantee that interference will not occur in a particular installation. If this equipment does cause harmful interference to radio or television reception, which can be determined by turning the equipment off and on, the user is encouraged to try to correct the interference by one or more of the following measures: Reorient or relocate the receiving antenna. Increase the separation between the equipment and the receiver. Connect the equipment into an outlet on a circuit different from that to which the receiver is connected. Consult the dealer or an experienced radio or television technician for help. This transmitter must not be co-located or operating in conjunction with any other antenna or transmitter. Modifications The FCC requires the user to be notified that any changes or modifications made to this device that is not expressly approved by the Manufacture may void the user’s authority to operate the equipment. Connections to Peripheral Devices Connections to this device must be made with shielded cables with metallic RFI/EMI connector hoods to maintain compliance with FCC Rules and Regulations. 6 SAR Exposure Intel classmate PC - Convertible has been tested for and found to be in compliance with FCC RF Exposure Limit. During extended periods of use the integrated antenna located at the top left corner of the display screen should be positioned at least 20cm from users or nearby persons. Declaration of Conformity This device complies with Part 15 the FCC Rules. Operation is subject to the following two conditions: (1) this device may not cause harmful interference, and (2) this device must accept any interference received, including interference that may cause undesired operation. European Notice Products with the CE Marking comply with both the EMC Directive (2004/108/EC) and the Low Voltage Directive (2006/95/EC) and R&TTE Directive (1999/5/EC) issued by the Commission of the European Community. Compliance with these directives implies conformity to the following European Norms: EN55022: 2006, CLASS B EN61000-3-2: 2006, CLASS D EN61000-3-3: 1995+A1: 2001+A2: 2005 EN55024: 1998+A1: 2001+A2: 2003 IEC61000-4-2: 2001ED. 1.2 IEC61000-4-3:2006 ED. 3.0 IEC61000-4-5:2005 ED. 2.0 IEC61000-4-6:2006 ED. 2.2 IEC61000-4-8:2001ED.1.1 IEC61000-4-11:2004ED. 2.0 EN 300 328-2, EN 300 328-1, EN 301 489-1, EN 301 489-17 (ETSI 300 328, ETSI 301 489) Electro-magnetic Compatibility and Radio Spectrum Matter. EN60950 (IEC60950) I.T.E. Product Safety Canadian Notice This digital apparatus does not exceed the Class B limits for radio noise emissions from digital apparatus as set out in the radio interference regulations of the Canadian Department of Communications. Users should not attempt to make such connections themselves, but should contact the appropriate electric inspection authority, or an electrician, as appropriate. 7 Power Cord Requirement The power cord supplied with the AC adapter should match the plug and voltage requirements for your local area. Regulatory approval for the AC adapter has been obtained using the power cord for the local area. However, if you travel to a different area and need to connect to a different outlet or voltage, you should use one of the power cords listed below. To purchase a power cord (including one for a country not listed below) or a replacement AC adapter, contact your local dealer. U.S. and Canada The cord set must be UL/ETL-Listed and CSA-Certified or UL/C-ETL Listed. The minimum specifications for the flexible cord are (1) No. 18 AWG, (2) Type SPT-2, and (3) 2-conductor. The cord set must have a rated current capacity of at least 7A. The attachment plug must be NEMA 1-15P (7A, 125V) configuration. Other Countries The cord set fittings must bear the certification mark of the agency responsible for evaluation in a specific country. Acceptable agencies are: CCC (China) The flexible cord must be of a HAR (harmonized) type HO5VV-F 3-conductor cord with a minimum conductor size of 0.03 square inches. The minimum specification for the flexible cord for Class II product are: (1) 2X0.75 mm2conductors, (2) 2-conductor cord. The cord set must have a current capacity of at least 10 A and a nominal voltage rating of 125 / 250 VAC. This model is designed to use with the following AC Adapter model only. Manufacturer: Lite-On Technology Corp. Model: PA-1400-11 (AC 2 Pin) Manufacturer: Shenzhen Huntkey Electric Co., Ltd. Model: HKA03619021-8C (AC 2 Pin) Manufacturer: DELTA ELECTRONICS, INC. Model: ADP-40PH AB (AC 2 Pin) Model: ADP-40PH BB (AC 3 Pin) 8 Battery Pack Safety The battery pack is intended to use only with this notebook. Only qualified service technicians should replace the battery pack. Do not disassemble the pack. Do not dispose of the battery pack in fire or water. To avoid risk of fire, burns, or damage to your battery pack, does not allow a metal object to touch the battery contacts. Please handle a damaged or leaking battery with extreme care. If you come in contact with the electrolyte, wash the exposed area with soap and water. If it contacts the eye, flush the eye with water for 15 minutes and seek medical attention. Do not charge the battery pack if the ambient temperature exceeds 45℃(113℉). To obtain a replacement battery, contact your local dealer. Do not expose the battery pack to high storage temperatures (above 60℃, 140℉). Do not expose the battery pack to low storage temperatures (below0℃, 32℉). When discarding a battery pack, contact your local waste disposal provider regarding local restrictions on the disposal or recycling of batteries. Use only supplied AC Adapter for charging. Danger of explosion if the battery is incorrectly replaced. Only qualified service technicians should replace and discard the battery pack. Replace only with same or equivalent type recommended by the manufacturer. Discard used batteries according to the manufacturer’s instructions or local laws. Lithium battery warning / Bridge battery warning This computer contains a lithium battery to power the clock and calendar circuitry. 9 Chapter 4 Getting To Know the Basics Your Intel classmate PC - Convertible features the latest advances in portable computing technology. These procedures are intended for new PC users like school kids to help them get started. For a complete education solution designed for 1:1 eLearning and classrooms around the world. Please refer to the following website: www.intellearningseries.com. Touring the Computer Opening the LCD Panel Never try to use this computer with the battery removed thus exposing the battery compartment which might cause hazardous accidents to kids if it is only powered by an AC adapter. The Intel classmate PC - Convertible also features a rugged design that helps protect the computer from scratches and light falls. Please be careful when handling your computer and recommended not to let the computer fall from high places. To avoid damage to the display panel: 1. Try not to slam the display upon closing it. 2. Try not to place any object on top when it is closed or open. 3. Make sure the system is turned off or in suspend mode before you close the display panel. 10 With the LCD screen open, you will see several features important for operating your Intel classmate PC - Convertible. Front View 1. Built-in Rotating Camera Use the Built-in rotating camera for video conference, photo and video shooting. Built-in Rotating Camera The built-in rotating camera can rotate from -35 ~ +200 degrees. You can rotate the built-in rotating camera back and forth using on both sides of the display panel. The built-in rotating camera must be returned to its original position for the display panel to close properly. 11 2. LCD Display The panel is where the system content is displayed. 3. Power/Suspend Button Press momentarily to turn on the system. Press the power/suspend button again to return from the suspend mode. 4. LED Status Indicator The LED Status Indicator displays the operating status of your Intel classmate PC - Convertible. When a certain function is enabled, the LED will light up. The following section describes each indicator. 5. Built-in Microphone The microphone is used when you are having an audio/video conference with the other party. 12 6. Home Press once to bring back the desktop screen. Press this button twice to launch the quick controller display panel when the computer is turned to tablet mode. Quick Controller Brightness Control–Decrease or increase the screen brightness after you click the + / -key. Volume Control–Decrease or increase the volume when you click on the + / -key. Switch Display –This function applies when you are connecting a projector. 90 Degrees Counter Clockwise Rotation–The LCD display will rotate in a counter clockwise position. 90 Degrees Clockwise Rotation–The LCD display will rotate in a clockwise position. 180 Degrees Rotation–The screen will rotate at 180 degrees direction. Auto Rotation–When this function is selected, the screen will automatically rotate after you rotated the LCD display. This function only applies when the computer is in tablet mode. 7. Camera Button Press this button to take picture. Press this button once to enable and pop up the webcam application in full-screen mode. Under the webcam application, press this button once to take a picture. 8. TouchPad The touch pad is a built-in pointing device with functions similar to a mouse. 13 9. Touchpad Buttons Works like the two buttons on an ordinary mouse. 10. Scrolling switch Use the scrolling switch when the system is in tablet mode. : for scrolling up function ft: for scrolling down function Left Views 1. External Monitor Port Use this port to connect to an external monitor. 2. HDMI Port (USB 2.0 port is optional, either one) Compact audio/video interface for transmitting uncompressed digital data. 3. USB 2.0 Port This port conforms to the latest USB2.0 plug-and-play standards. 4. Ventilation Opening The ventilation opening allows the computer to cool off and prevent overheating. Do not block this opening when the computer is turned on. 5. 2 in 1 Card Reader Supports SDHC / MMC memory card. 14 Right View 1. Stylus Pen Slot The stylus pen for the touch screen is stored here. 2. Stereo Headphone Jack Use the headphone jack to connect an external headphone set. 3. Microphone Jack Use the microphone jack to connect an external microphone. 4. USB 2.0 Ports This port conforms to the latest USB2.0 plug-and-play standards. 5. Ethernet / LAN Port When using a LAN, please use an EMI Shielding Cable to minimize interference when transmitting. 6. Power Jack (DC-in) The DC-out jack of the AC Adapter connects here and power on the computer. 15 Rear View 1. Handle Use the handle to carry the computer. 2. Name Field Place your name tag here. 3. LCD Display Rotating Bar This bar is used to rotate the LCD display. 4. Scrolling switch Use the scroll bar when the system is in tablet mode. 5. Kensington Security Slot Attach a Kensington lock to this slot to secure your computer to a fixed location. 16 Bottom View 1. Battery Bay This compartment contains the battery pack for your system. 2. Battery Release Latch/Lock Latch Slide this latch to release or lock the battery from the battery bay. 3. Handle Use this to carry the computer. 17 Spill-Resistances Precautionary Measures on Keyboard, Power Button, Touch Screen and Touch pad Buttons The Intel classmate PC - Convertible features a spill-resistance function on keyboard, power button, touch screen and touch pad buttons to ensure greater protection against spills in the classroom or anywhere. These are the ways to avoid damage to your system: Save all important documents within 3-minutes. Power off the system in normal procedure (Click “Start”, select “Shut down”), unplug the AC adapter then remove the battery. Tilt the system to the leftmost or rightmost position and gently wipe the liquid on the keyboard (Remember not to press the keyboard). Power On the system after letting it dry up for four hours. These procedures only apply for spill-resistances keyboard, power button, touch screen and touchpad buttons. Please take note that it can cause a severe damage to the system if the user uses the abnormal procedure and forcibly shut down the system. 18 Chapter 5 Getting Started - Connecting to a Power Source Connecting the AC Adapter A universal AC adapter is provided to supply your computer with power and also charge the computer’s battery pack. The adapter’s AC input voltage can range anywhere from 100 to 240 volts, covering the standard voltages available in almost every country. To connect the computer to an external power source: Do not use inferior extension cords as this may result in damage to your Intel classmate PC - Convertible. Intel classmate PC - Convertible comes with its own AC adapter. Do not use a different adapter to power the computer and other electrical devices. Whenever possible, keep the AC adapter plugged into the Intel classmate PC - Convertible and an electrical outlet to recharge the battery. Never turn off or reset your Intel classmate PC - Convertible while the hard disk is in use; doing so can result in loss or destruction of your data. Always wait at least 5 seconds after turning off your Intel classmate PC - Convertible before turning it back on; turning the power on and off in rapid succession can damage the Intel classmate PC - Convertible electrical circuitry. Turning On Your Computer Turn on your Intel classmate PC - Convertible by pressing the power button. Hold the button down for a second or two and release. The Power-On Self-Test (POST) runs automatically. After the POST is completed, the computer reads the operating system from the hard disk drive into computer memory (this is commonly referred to as “booting” a computer). If your OS (Operating System such as Windows 7…. Etc.) is installed, it should start automatically. To turn the Intel classmate PC - Convertible off, save your work and close all open applications, click on “Start”, select “Shut down” or lightly press the power button. 19 Operating on Battery Power Your computer comes with a rechargeable battery pack that lets you operate the computer without an external power source. When the battery pack is fully charged, you can operate the computer under the following conditions: The battery pack initially has a full charge. No peripheral devices are installed. The Battery Pack To Install the Battery Pack: Align the battery packs and insert into the battery bay. Slide the battery pack gently but firmly until it locks into place. Slide the battery lock into locked position. 20 To Remove the Battery Pack: Slide the battery lock switch left into unlocked position. The battery pack will pump up from the battery bay. Slide and hold the battery release latch then slide the battery pack up. Lift up the battery pack from the battery bay. Lithium-Ion Battery Your Intel classmate PC - Convertible uses Lithium-Ion batteries pack that provides power when you don’t have access to an AC outlet. You must charge the battery pack for at least six hours before using it for the first time. In the Standby Suspend mode, a fully charged battery loses its power in roughly 1/2 day or less. When not being used, the battery’s power will deplete in one to two months. The battery pack in this system is replaceable by the end user. 21 Battery Low-Power Warning 1. Low Battery Warning Low battery condition occurs when battery power is reduced to 10 percent. 2. Very Low Battery Warning Very Low battery condition occurs at 5 percent power remaining. The red battery status LED indicator blinks and the system beeps 3x in 1.2sec (each beeping last 200ms and 200ms off interval before the next beep). When the Intel classmate PC - Convertible warns you of its low battery condition, you will have about three to five minutes to save your current work. Do not expose battery packs to temperatures below 0 degree Celsius (32 degree F) or above 60 degree C (140 degree F). This may adversely affect the battery pack. Charging the Battery and Charging Time To charge the battery, plug the AC adapter into the Intel classmate PC - Convertible and an electrical outlet. Charging time for 3 cells (2200mAh) battery; the battery will be 70 percent charged in about 62mins and fully charged in about 136mins Charging time for 6 cells (4400mAh) battery pack; the battery will be 70 percent charged in about 125 mins and fully charged in about 220mins Charging time for 6 cells (5200mAh) battery pack; the battery will be 70 percent charged in about 150 mins and fully charged in about 260mins If system runs at heavy loads or in a high temperature environment, the battery may not be fully charged. You need to continue to charge it with the AC adapter plugged in until the charging LED turns blue. System will not charge battery when temperature exceeds 45C. Checking the Battery Level You can check the remaining battery power in Operating System battery status indicator. 22 Prolonging the Battery’s Life and Usage Cycles There are ways you can prolong the use of battery. Use the AC adapter wherever AC wall outlet is available. This will ensure uninterrupted computing. Store the battery pack at room temperature. Higher temperature tends to deplete the battery’s power faster. Make good use of the power management function. Save To Disk (Hibernate) saves the most energy by storing current system contents in a hard disk space reserved for this function. The life expectancy of the battery is approximately 300 recharges. Seethe notices section in the beginning of the user manual on how to care for the battery pack. Use Function +F7 key to decrease the brightness of the screen. To achieve optimal battery performance, you may need to do a battery calibration at a 3month interval. To do this: Fully charge the battery. Then discharge the battery by entering the BIOS setup screen. (Press F2key as soon as you turn on the computer. And let it remain on the setup screen until the battery runs out. Fully charge the battery again. Using Power (Optional) Operating System Power Management provides basic power saving features. In the power configuration dialogue box, you may enter time-out values for display and hard disk drive. Operating System power manager saves power by turning off hard drive after 1 minute of inactivity, for example. Also consult Operating System user guide for more information on how to use Operating System power management functions. Actual dialogue box shown above may appear slightly different. 23 Suspend Mode Standby Suspend The system automatically enters this mode after a period of inactivity, which is set in the Power Scheme dialog box. In Standby mode, hardware devices, such as display panel and hard disk, are turned off to conserve energy. Hibernate Suspend In this mode, all system data are saved in the hard disk before powering down. When this mode is activated, all system state and contents are saved to the hard disk drive after a period of inactivity defined by the user. No power or very little power is drawn from the battery module under this mode. However, depending on how much RAM that has been installed on your computer, the amount of time the system requires to restore all its previous contents can range from five to 20 seconds. Power Power Button Action Intel classmate PC - Convertible power button can be set to turn off the system or activate the suspend mode under an operating systems environment. 24 Chapter 6 Using Intel classmate PC – Convertible Adjusting the LCD Screen Display The LCD screen display can be adjusted by the following key combinations. Fn+F6 key combination to change display mode: LCD-only, External Monitor-only, LCD/External Monitor simultaneously Fn+F7 key combination to decrease the brightness level of the screen and also disable the auto brightness (Light Sensor) adjustment. Fn + F8 key combination to increase the brightness level of the screen and also disable the auto brightness (Light Sensor) adjustment. LCD Care LCD screens are delicate devices that need careful handling. Please pay attention to the following precautions: When you are not using the computer, keep the LCD screen closed to protect it from dust. If you need to clean your LCD screen, use a soft tissue to gently wipe the LCD surface. Do not put your fingers or sharp objects directly on the surface and never spray cleaner directly onto the display. Do not press on, or store any objects on the cover when it is closed. Doing so may cause the LCD to break. 25 Intel classmate PC - Convertible Hot Key Controls Function Keys (Quick Keys) Function Keys (Quick Keys) 26 GPS activation (Optional) To activate GPS function on Windows operating system, select the “Device Manager” from “Computer Management” and click on “Ports” to identify in your area (please inquire from your local service provider) “COM port ” > Open the “Hyper terminal” and fill up the AT command > Fill up AT command field with “AT^WPDOM=0” > Fill up AT command field with “AT^WPDGP” and activate the GPS function > To close the GPS by filling up “AT^WPEND” The TouchPad The touchpad is a rectangular electronic panel located just below your keyboard. You can use the static-sensitive panel of the touchpad and slit it to move the cursor. You can use the buttons below the touchpad as left and right mouse buttons. Move the tip of your finger across the touch pad to move the cursor on the screen. Press the left button once for a left-click operation. Press the left button twice for double click operations. Press the right button once for right-click operation To drag and drop, press and hold the left button, and move your finger on the touch pad to the desired location. TouchPad Precautions The TouchPad is a pressure sensitive device. Please take note of the following precautions. Make sure the TouchPad does not come into contact with dirt, liquids or grease. Do not touch the TouchPad if your fingers are dirty. Do not rest heavy objects on the TouchPad or the TouchPad buttons. You can use the TouchPad with Microsoft Windows as well as non-Windows applications. 27 Resetting the System After installing a software application package, you may be prompted to restart the system to load the changed operating environment. To reset the system, press the [Ctrl] + [Alt] + [Delete] keys simultaneously to pop-up a full screen menu. Select “ log off” to completely turn off your settings and return Windows to original setting. If the computer has stopped responding and Windows resetting procedures are ineffective, press and hold the power button for at least 5 seconds to turn off the computer. Using the Touch Screen This model display panel also works as a touch screen. You can use the stylus pen to control system operations or as a pen for writing or illustration applications. When using the computer for the first time, power on and follow the on screen instructions to active the touch screen. Never try to tap or write on the screen with excessive force, this may damage the LCD display. 28 Rotating the Display Panel Your computer can be rotated up to 180 degrees, clockwise or counter clockwise. Fold it down with the display facing up to use it as writing pad. You can rotate the screen horizontally or vertically to suit your needs. To rotate the display panel: 29 Do not try to turn the display panel more than 180 degrees. If you start to rotate the display panel in clockwise position. To return to its original position or vice versa, turn it in counter clockwise position. 30 To use the display panel as a writing pad: Make sure the display panel is rotated to 180 degrees. Hold the display panel upper corners and gently lower the display panel to close position. Hard Disk Protection (Optional) The Hard-Disk Drive (HDD) Protection application protects the system’s HDD from damage caused by sudden harmful shocks. It monitors system movements that exceed the defined shock threshold. Once a shock is detected, the application instructs the HDD to temporarily park its heads which protects against potential damage the drive. 31 Chapter 7 BIOS Setup and Security Feature The Setup Utility is a hardware configuration program built into your computer’s BIOS (Basic Input/output System). It runs and maintains a variety of hardware functions. It is menu-driven software, which allows you to easily configure and change the settings. The BIOS contains manufacturers default settings for the computer’s standard operations. However, there are occasions when you may be required to modify the default settings in the BIOS. The BIOS allows you to set up passwords to limit access to users. This is an important feature because a great deal of vital information is carried within the computer nowadays. Unauthorized access can be prevented. Later in this chapter, you will learn how to use this security feature. Entering the BIOS Setup Screen First turn on the power. When the BIOS performs the POST (Power-On Self-Test), press DEL key quickly to activate the Setup Utility. You may need to press DEL key fairly quickly. Once the system begins to load operating system, you may have to retry by cycle-power on again Leaving the BIOS Setup Screen When you have finished modifying the BIOS settings, exit the BIOS. It takes a few seconds to record changes in the CMOS. 32 BIOS Action Keys Modifying the BIOS Settings The BIOS setup main menu is subdivided into sub-menus. Each menu item is described in this section. 33 Main Setup Under this menu, you may change time/date and view basic processor and system memory information. Due to various configurations on this model, your system may show different information. System Date: Type in the current date, in MM/DD/YY format. System Time: Type in the current time, in HH:MM:SS format. 34 Advanced Setup 35 36 Security Boot Setup 37 Exit Setup Exit Saving Changes: After you have completed the BIOS settings, select this item to save all settings, exit BIOS Setup utility, and reboot. New system settings will take effect on next power-up. F10 key can be used for this operation. Exit Discarding Changes: Discards changes done so far to any of the setup questions and exit. Load Optimal Defaults: Load Optimal Default value for all the setup questions. F9 key can be used for this operation Discard Changes: Discards changes done so far to any of the setup questions. Save Changes: Save the changes you made. 38 Chapter 8 Troubleshooting Your computer has been fully tested and complies with the system specifications before shipping. However, incorrect operations and/or mishandling may cause problems. You may also encounter simple setup or operating problems that can solve by considering the following suggestions. If the problem persists, contact your dealer for service. Check to see if the power cord is properly plugged into the wall outlet and into the computer. Check to see the power indicator of the computer is on. Check to see if your keyboard is operational by pressing and holding any key. Check for any incorrect or loose cable connections. Make sure the latches on the connectors latch securely on to the receptor end. Be sure you have not performed an incorrect setting on the hardware devices in the BIOS Setup utility. A faulty setting may cause the system to malfunction. If you are not sure of the changes you made, try to restore all the settings to factory defaults. Be sure all the device drivers are installed properly. For example, without the audio driver properly installed, the speakers and microphone will not work. Some software programs, which have not gone through rigorous coding and testing, may cause problems during your routine use. Consult the software vendor for problem solving. 39